Der overlap insulate the ceiling tips. Insulation on the ceiling in a private house: which is better. How much insulation is needed for the ceiling
Master of Architecture, graduated from the Samara State University of Architecture and Civil Engineering. 11 years of experience in design and construction.
Wooden house - the design itself is warm. That is why many city dwellers part with cramped apartments and move to a suburban home. Buildings made of wood are convenient and practical, as well as environmentally friendly. In summer, pleasant coolness reigns here, and in winter it is warm. However, even the warmest wood will not protect against severe frosts and wind: you cannot do without a ceiling insulation of a wooden room.
Often, all the heat loss from the inside is due to an improperly finished ceiling. If you do not properly insulate this part of the house, you can not wait in winter time coziness and comfort. Won't help modern windows and wall insulation, it all depends on the ceiling.
How to insulate the ceiling in a wooden house?
There are several available and simple ways insulation from the inside and outside with their own hands. All of them are divided into two options: insulation from the outside from the attic side and indoors. When insulating the surface from the inside, you need to understand that the height may decrease. If the attic floor is insulated, after all work it is necessary to do flooring.
 When insulating, it is necessary to pay attention to the following indicators: strength, safety, sound insulation, fire resistance
 Choosing desired material, you need to focus on the following indicators:
- strength and durability;
- no harm to health;
- fire resistance;
- reliable thermal insulation qualities;
- the presence of sound insulation.
What can be applied?
- mineral or glass wool;
- sawdust;
- polyurethane foam;
- Styrofoam;
- clay;
- expanded clay.
Use of sawdust
are the cheapest and accessible way insulation from the outside, while their qualities are not inferior to expensive materials. The process itself is simple and does not require much time. Everything can be done by hand. First you need to prepare the materials:
- several bags of sawdust;
- insulating material. It is necessary to calculate its required amount. To do this, you need to know the surface area exactly;
- cement.
 A mixture of sawdust and cement for ceiling insulation
 The latter is diluted in water in a ratio of 1:10. How to correctly calculate the required number of sawdust? One and a half buckets of water will be required for ten buckets of sawdust. A wet mixture should form, which will be a heater.. What should be sawdust? The first ones that come across are no good. The material must meet the following requirements:
- dryness, lack of moisture;
- age not less than a year;
- absence of mold and its smell;
- the average size. Small ones are not suitable, otherwise the thermal insulation qualities will deteriorate.
 The mixture of sawdust should be evenly distributed over the surface of the ceiling
 Sequencing:
- Clean the surface from dust and dirt.
- Treat the base with a special solution that protects the room and ceiling from fungi and insects.
- Take the pre-prepared material for waterproofing and spread it over the entire floor space.
- Prepare a mixture of cement and sawdust. It should be a rich gray color.
- Distribute the mixture throughout the space of the interceiling ceiling.
- You can walk on the layer of thermal insulation to tamp it down. This will allow the mixture to grab better and keep the heat out.
If there is access to the attic of the room, this method is the most suitable and cheapest. If you have to insulate the ceiling in wooden house only from the inside, you have to choose another method.
What are the advantages of roll materials?
Mineral wool and glass wool, as well as other roll insulation, reliably protect the room, but it is difficult to work with them: small particles crumble and get into the mouth, nose, eyes. To avoid injury, take care of yourself and prepare protective clothing and goggles.
 Scheme of ceiling insulation with rolled materials, mats and bulk materials
 The sequence of steps:
- Nails are stuffed onto the rough surface. At the same time, it is necessary to score not on the hat, but so that they stick out a little. Then threads are pulled on them using the zigzag technique.
- The heater itself is installed. It is better to do the work not alone, but with a partner: one will lay the rolls, and the other will pull the thread. So the glass wool will be able to push through better.
- An anti-condensation film is attached.
- Now you can nail the nails harder to press the layer more tightly.
- You can nail sheets of drywall or fix a false ceiling.
Attention: the work requires care and attention. It is necessary to monitor the absence of cracks: they are a source of cold and condensation.
Clay
Wide known material which is capable of retaining heat. Used only when adding other materials. Usually sawdust and glassine are added.
 Clay perfectly retains heat, therefore it is used for insulation.
 Sequence of work:
- lay glassine or any other analogue thereof;
- mix clay and sawdust (prepare a solution);
- apply the mixture in a layer of 15 cm, allow to dry. If there are cracks, they need to be rubbed with clay.
Warming from the inside
What to do if there is no access to the space above the ceiling? There is an exit. True, you should be prepared for the fact that the height will decrease somewhat. Now the insulation will be from the inside. How to carry out work?
It's simple: first comes a layer of vapor barrier, then insulation, then another layer of vapor barrier.
Why are two layers needed? They prevent the dampness of the rafters, the ceiling from the inside and the insulation. Only after that you can hem already decorative ceiling. How to do the work?

- The first layer of vapor barrier is attached. The same parchment will do. It can be smeared with glue in several places.
- A mounting rail is stuffed through the vapor barrier. It is better not to rush and do everything as carefully as possible: holes for self-tapping screws are drilled in the mounting rails, then you need to carefully tighten them with a screwdriver.
- Thermal insulation is fixed. Styrofoam is inserted between the rails.
- The second layer of the vapor barrier is attached to the rail.
- The entire structure is masked by PVC panels.
Expanded clay
Another most simple and affordable method after sawdust. Pros:
- ecologically pure;
- unlike sawdust, it does not burn;
- resistant to temperature changes;
- not afraid of rodents, fungi and insects;
- simple installation technology;
- low price;
- easy to do by hand.
 Expanded clay insulation scheme
 All work is done outside. First, the already mentioned steam and waterproofing are carried out. Even a simple PVC film will do. It is better not to use roofing material: it can release harmful toxins. Stages of work:
- The pipe outlet and wiring are insulated with non-combustible materials. Suitable sheets of iron or metal pipes.
- Waterproofing is rolled out over the entire area. Joints need to be processed. Waterproofing is securely fixed with a stapler or special adhesive tape.
- Vapor barrier is laid. Suitable overlapping technology. Then everything is fixed with a stapler.
- 5 cm of mashed soft clay should be laid on the vapor barrier layer.
- Expanded clay is already poured onto the clay. How to determine the layer thickness? It can be from 15 cm or more.
- A screed is laid on the expanded clay - a layer of cement and sand. This will protect the material.
- There is a foam ceiling tiles– it in itself protects quite well from the cold.
- Do not stop at the insulation of the ceiling. Walls and floors can also transmit heat.
- If there are difficulties in warming with your own hands, it is better to contact the masters who will do everything correctly. An unreliably insulated ceiling is practically of no use.
- Drywall filing requires the use of a galvanized iron profile. Why is this needed? If this is not done, you can soon suffer from a fallen structure.
- In a wooden house, it is better to insulate the ceiling in the summer months, so that by autumn and cold weather, excess moisture has time to evaporate.
Insulation of the ceiling in a wooden house will protect the room from the inside from heat loss. If the ceiling is not insulated, all the work should be done immediately upon settlement.
According to researchers of the thermal conductivity of materials and structures, from 25 to 40% of the heat carried by air escapes through the ceiling in the house. Naturally, this figure varies depending on the specific conditions - the type of ceiling, the location of the floors in the house, etc. But be that as it may, the ceiling is the most vulnerable place for heat loss after windows and doors, where direct heat leakage occurs. Therefore, it is impossible to underestimate the insulation of the ceiling. Saving materials in this part of the construction inevitably leads to further financial costs for heating during the operation of the building.
Do I need to insulate the ceiling with a cold roof
In order to understand whether it is worth it at all to insulate the ceiling in a house with cold roof, you need to get to know the structure of the roof as a whole.
The roof protects living quarters from all types of precipitation.
The roof (or roof) is the upper part of the building that covers the entire structure.
Its main purpose is to protect the building from rain and snow, as well as the removal of melt water.
As can be seen from the definition, the function of the roof does not include the task of maintaining heat in the house. Therefore, it is often designed based on the tasks of drainage, without any insulation.
If insulation is not laid in the roofing pie, a classic cold roof construction is obtained.
Roof shapes are very diverse. Differ in a variety and materials of which the roofing cloth is made. But be that as it may, roofers are only responsible for the waterproofing of the roof, but in no case for thermal insulation. Moreover, in order to avoid damage to materials, the occurrence of stagnant and putrefactive processes in the rafters and logs, it is customary to build an attic in such a way that it is well ventilated. In this case, moisture harmful to wood and metal does not accumulate under the coating. It is important that there is no difference in air temperature between the outdoor space and the indoor one. Then moisture does not condense on the bearing elements, and the roof will last as long as possible.
But at the same time, the problem of heat preservation inside the building arises, which is especially relevant in the northern regions. It is solved in two ways, each of which has its own characteristics.
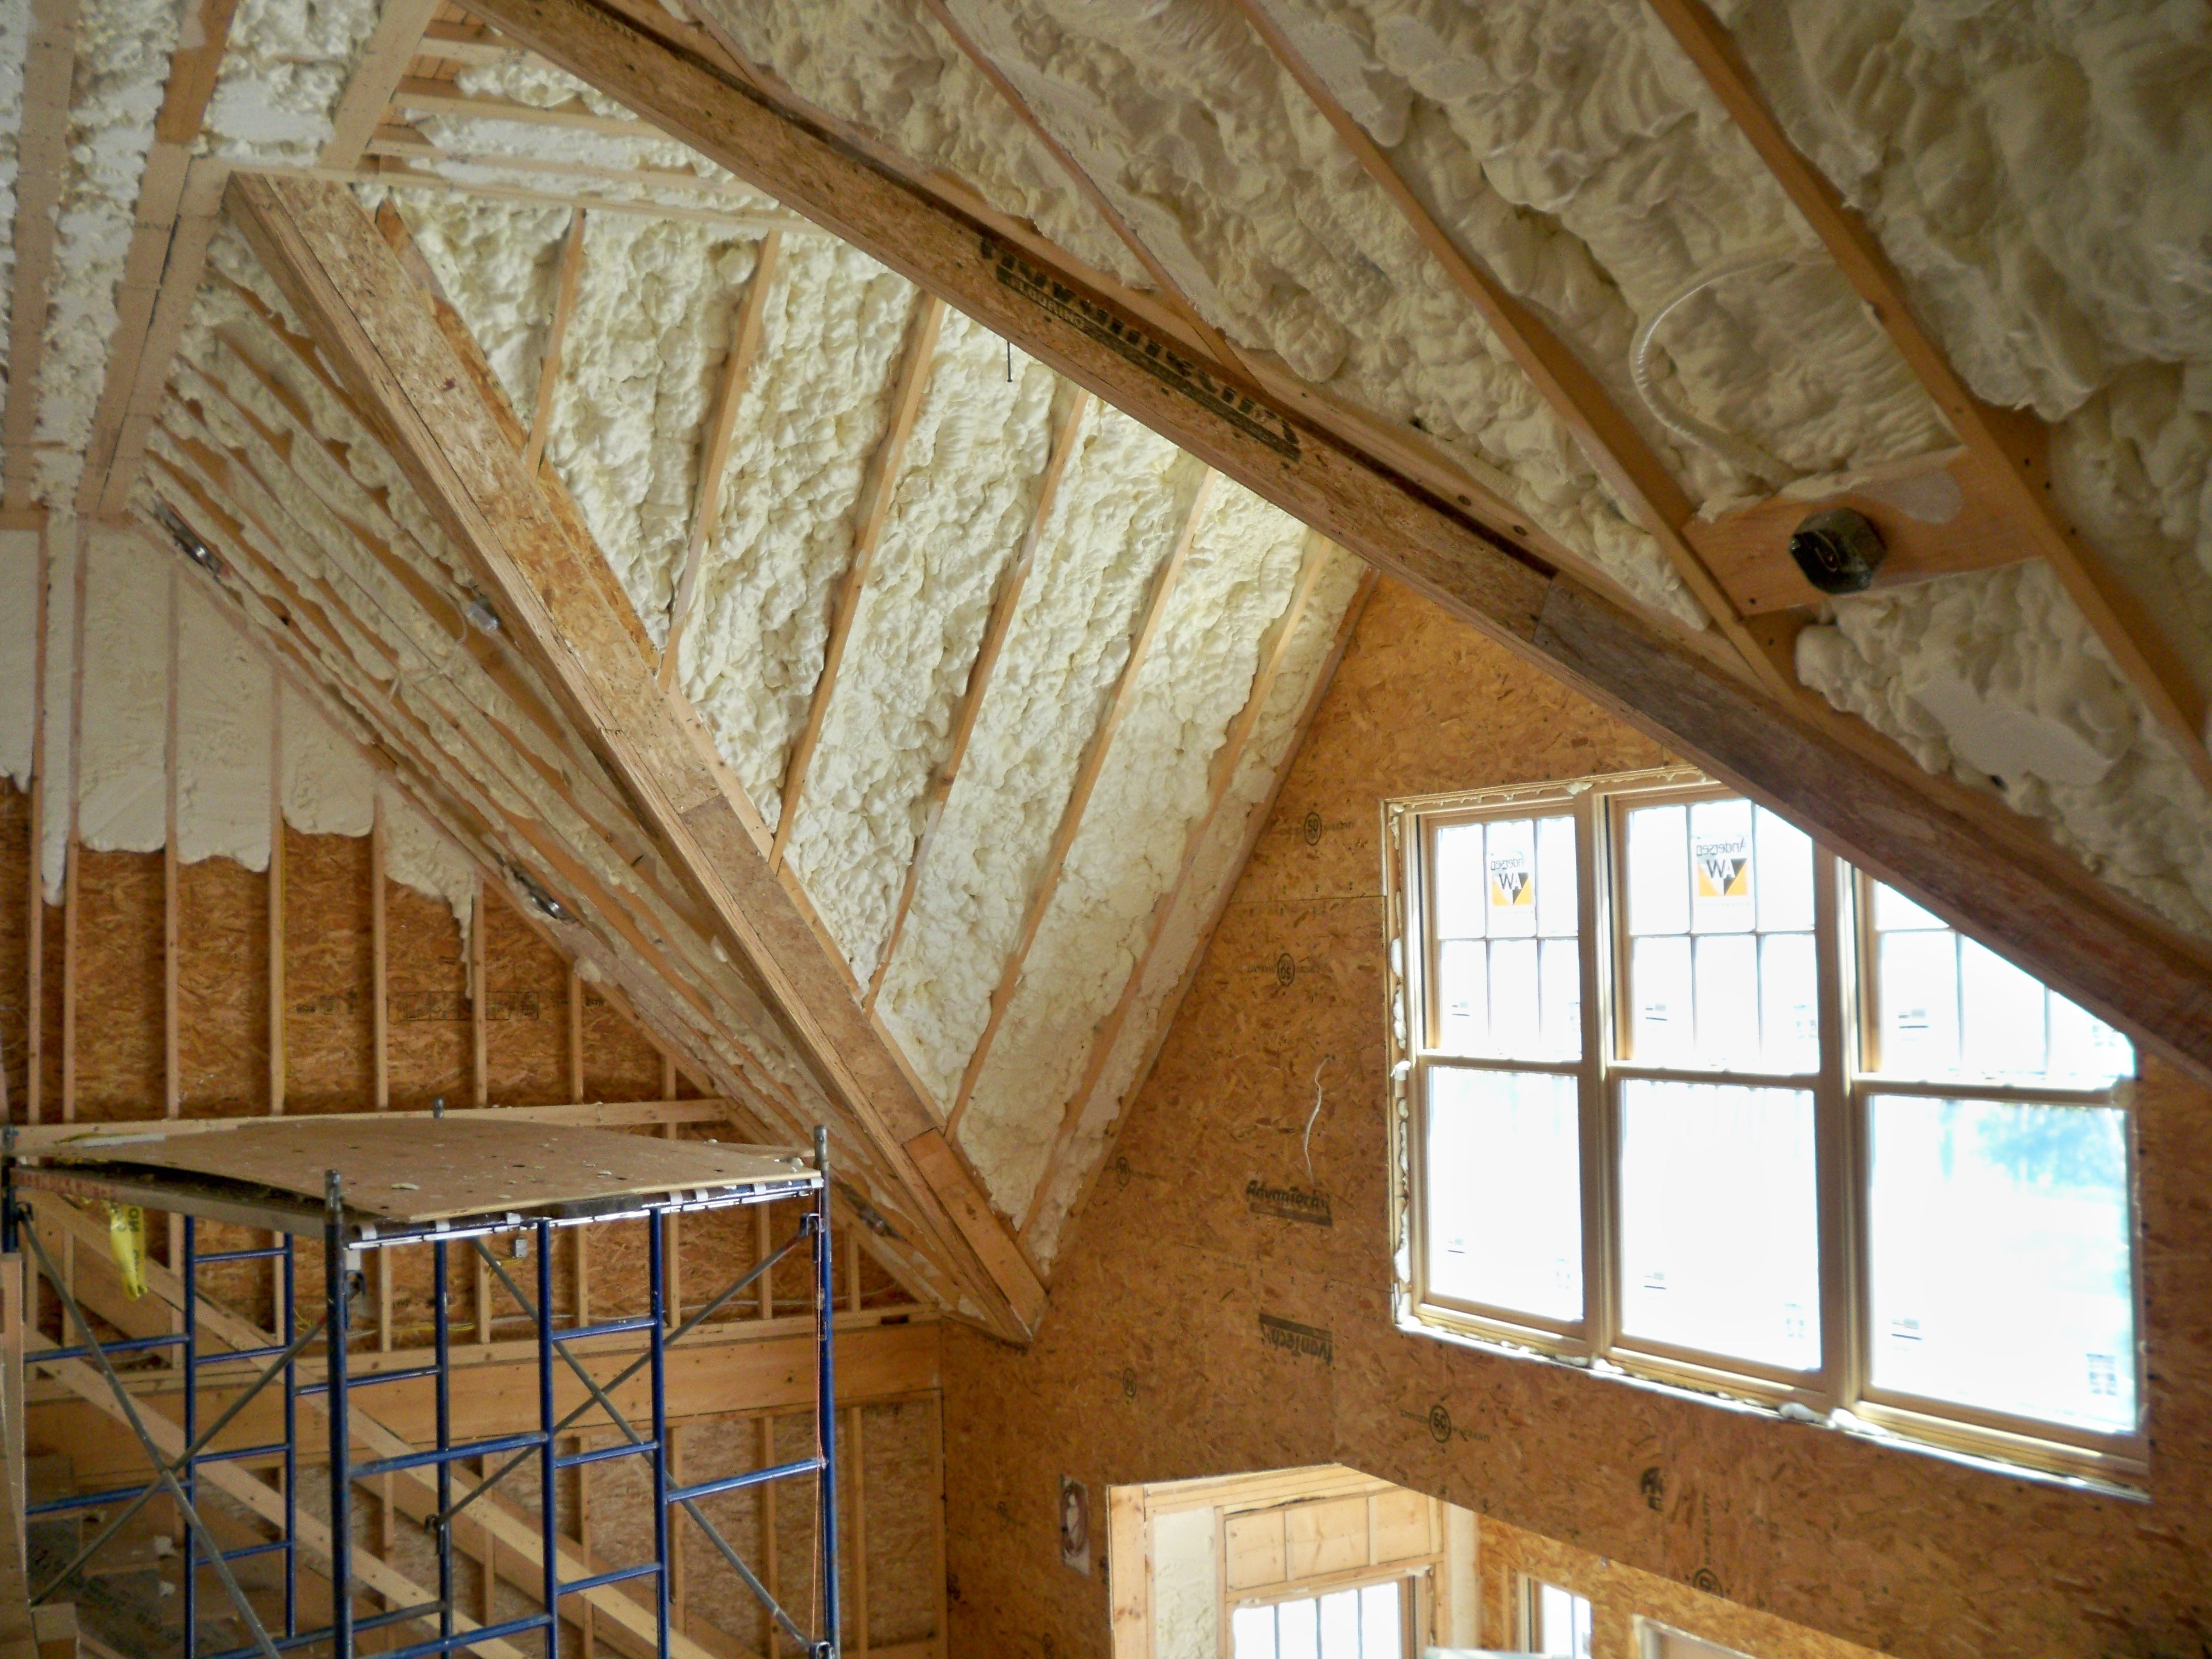
- Heated roof device. Such roofs have appeared quite recently, with the advent of insulating materials produced on a synthetic basis. The insulation layer is placed on the inside of the roof, completely isolating the attic space from external environment. Today, builders have learned how to insulate the entire roof plane with high quality and at the same time prevent the occurrence of a dew point inside the insulation. The lion's share of merit in this belongs to the chemical industry, which produces polymer (rolled and sprayed) insulation. The big disadvantage of such technologies is the high cost of installation and materials. But as a result, an additional room appears in the building, suitable for housing or other domestic needs - clubs, gyms and even saunas are located in the attics.
The classic scheme for constructing a roofing pie for an insulated roof involves laying insulation and a layer of vapor barrier
- Device cold roof with attic insulation. This method is more traditional, used for more than one generation. In this case, there is no need to insulate the roof slopes, all attention is paid directly to the overlap between the residential and attic spaces. The space under the roof remains an auxiliary place for storing things, drying fruits, mushrooms, etc. Sometimes the attic is equipped for life in the warm season, turning it into a summer attic. Compared to a warm roof, this method of thermal insulation is much cheaper. In addition, the big advantage of a cold roof is its simplicity, reliability and accessibility during repairs.
When installing a cold roof, the floors of the first floor are insulated by laying insulation plates between the ceiling beams
The choice of the type of roof in the house depends on various circumstances. Below we consider the second, more common option.
How best to insulate the ceiling
First of all, it is necessary to figure out exactly how to insulate the ceiling: from the outside or from the inside.
From the side of the attic, it is much more comfortable to insulate the ceiling. This work is, frankly, dusty. And if people live in a house or apartment during work, then all household utensils and the owners themselves will experience discomfort, albeit temporary. The external method of insulation has a number of advantages.
- You can use synthetic materials that inside the dwelling will harm human health. For example, polyurethane spraying, one of the most effective thermal insulation coatings, should not be applied to the ceiling from the inside of the house in the same way as foam, mineral or basalt wool. All these materials retain heat well, but emit harmful gases and caustic dust into the atmosphere.
- If the ceiling is made of reinforced concrete slabs, then it accumulates excess heat. When the air inside the housing cools, the stove gives off heat back. But for this it is necessary that the thermal insulation is on the outside.
- If the ceiling is wooden (logs or timber), then attic insulation is doubly beneficial. The load-bearing parts of the ceiling, which themselves are an excellent thermal insulator, together with an additional layer on top, give a very good cumulative result.
- Degree fire hazard when insulated from the attic side, it is much lower. Even if non-combustible insulation is used inside the housing, there is always a threat of collapse of suspended, glued or stretch ceilings.
The operational reports of the Main Directorate of the Ministry of Emergency Situations describe real incidents when people receive severe burns and poisoning respiratory tract during fires in houses with installed stretch ceilings. The material of such ceilings is combustible, and when heated, it is strongly deformed, stretches and falls, covering all living things with a suffocating sheet.
Ceiling insulation technologies with a cold roof
For insulation, a variety of materials are used - natural or synthetic. Depending on this, various technologies for laying insulation are used.
The main principle of attic floor insulation is the creation of the most hermetic layer that prevents heat leakage. This problem is solved by eliminating air leaks and eliminating cold bridges in the elements of the roof structure.
Natural materials for insulation of the ceiling outside
They were used even when there was no chemical industry. But many people today are returning to these means of keeping the heat in the house. Distinctive properties of such materials are low cost and environmental friendliness.
Sawdust and shavings
When erecting wooden houses a lot of waste is generated, including sawdust and shavings. But this is not enough for a full-fledged insulation of floors. Therefore, they have to be bought. Fortunately, the price of such material, as a rule, is junk. Furniture factories and sawmills accumulate a large amount of sawdust, you can always agree on delivery. When choosing this heater, you need to consider three important features.

Clay itself is an excellent thermal insulator. Its only downside is its weight. Therefore, various lightweight options are often used. Straw or wood shavings are added to the clay slurry. The proportion is selected in such a way that the coating does not lose its plasticity and easily fills any gaps. The advantage of such insulation is that clay is almost everywhere, it does not need to be further processed - only diluted in water. Usually, a construction trough is used, from which it is then convenient to transfer the resulting mixture to an insulated area. After drying, the resulting cracks are treated with a liquid solution with the addition of sand. The coating layer is adjusted according to climatic conditions. It can be from 15–20 to 30 cm. The main advantage of clay insulation is high fire safety. In addition to using clay as the main insulation, it is often used as an additional coating on top of combustible materials.
Clay diluted with fillers is poured between the lags and leveled with the rule
This type of natural insulation is rarely used today. Mainly because it burns very well. But mixed with clay or pressed straw is practically devoid of this drawback. If there is a collective farm near the building that cultivates wheat or rye (and rye is preferable), you can order straw pressed into bales of the desired shape. Installation work takes a little time and does not require any special devices. At the same time, the heat-saving effect is very high. An insulation layer of 25–30 cm is considered optimal. Treatment with flame retardants is desirable. The price is very affordable.
Straw, pressed into bales, practically does not support combustion
Reed as a heater
Reeds grow around many bodies of water. Its preparation is a rather painstaking process. To insulate the house, they use reeds tied into mats (preferably with metal wire). They are laid between the lags in several layers, while filling the seams and cracks. hallmark Reeds are considered to be resistant to rodents and have a long service life. Even if moisture gets on the mat, it does not lose its properties and does not rot. The ignition temperature of reeds is much higher than that of straw or sawdust.
Tied mats of reed stalks are laid between the bearing lags of the floor
Leaves, dried grass, moss
Today it is a rather exotic and rare way of warming. However, it is still used in countryside as well as during the construction hunting huts and forest cordons. Preference is given to the leaves of oak, hornbeam and needles (from mosses - reindeer moss). Necessary condition the use of such a material - dryness and top coating with a reliable non-combustible material, for example, the same clay or slag. Over time, the grass and leaves are compressed into a solid layer that cannot be set on fire. The initial thickness of the embankment is from 20 cm.
Moss is a universal insulation that is used not only inside, but also outside the building.
Seaweed
Since tons of algae are washed ashore by the surf every year, coastal residents have learned to use this natural material to insulate their homes. As a rule, this is damask - a type of long, branched algae with a strong structure. Dried and collected in large armfuls, they are evenly distributed over the entire plane of the attic floor. They can be laid even when not completely dry - over time, the plants fill the smallest holes and acquire a hard texture. They are not afraid of changes in air humidity, mold and rodents. For a long time, the kamka releases into the atmosphere the accumulated sea water iodine, purifying the air from bacteria.
Algae are mainly used in coastal areas where they are usually available in large quantities.
Artificial insulation for outdoor installation on the ceiling
If working with natural materials does not cause big questions for the user, then synthetic heaters require strict adherence to technological conditions. Failure to comply with the rules of operation sometimes leads to the opposite result. Before performing the insulation yourself, you should carefully familiarize yourself with the properties, conditions of use and laying technology. This group of materials includes the following heaters.
Expanded clay
A very common insulation, which is used both in private and industrial construction. Compliant fire safety does not support combustion at all. It is made from clay by foaming and firing. Has a small specific gravity, convenient to transport and operate. There are several fractions of expanded clay, depending on the size of the granules. For the insulation of private houses, expanded clay with a grain size of 4 to 10 mm is most often used. When backfilling the expanded clay mixture, a waterproofing or vapor barrier layer is necessarily preliminarily laid. This type of thermal insulation is applicable to all types of buildings. positive qualities environmental friendliness and unlimited service life are considered. Since expanded clay consists of natural clay, it does not cause any allergic reaction in people with hypersensitivity. Most often, the space between the lags is filled with insulation, which is then covered with boards. But this is not prerequisite. It is permissible to use it without additional plating. The height of the embankment is adjusted according to local weather conditions.
A layer of expanded clay is poured into the space between the lags and covered with a layer of vapor barrier
Mineral wool
Mineral wool is made from a vitreous material based on silicon. Release form - rolls and mats different size. For private construction, this insulation is recommended only on condition that it does not openly come into contact with the living space. This is due to the adverse effects of fine dust, which the material emits during installation, on the human mucosa. Can be used in enclosed structures such as plasterboard partitions, ceilings or walls. When using mineral wool, it is imperative to use a membrane film as a barrier to fine airborne particles.
Mineral wool must be laid in rows close to each other to prevent the formation of cold bridges.
Filling with cotton wool is carried out only in a respirator and gloves. Once in the lungs, fine dust can cause illness. To achieve the best result, it is necessary to carefully fill the slots, the gap between the mats should not exceed 2 mm. The cutting of the carpet covering is carried out with a sharp long knife.
Video: how to properly insulate a mineral wool ceiling in a private house
As the name implies, this material is made from solid basalt rocks. As a result - high strength, ductility and moisture resistance. Basalt wool mats and rolls are produced, covered with metal foil - this increases the thermal insulation properties of the insulation. The range of application is very wide - from blast furnaces to ordinary baths. It can be used wherever there is a need to maintain high temperatures inside a closed space. Of all types of building wool basalt insulation best suited for private construction. However, we should not forget that the common weak link of this kind of materials are phenol-formaldehyde resins, which are part of the adhesive components. Over time, the substance goes through a half-life stage and harmful gases are released into the surrounding space. Formaldehyde resins belong to a group of carcinogens that increase the risk of cancer.
When laying foil basalt wool, the metal film is directed down
Laying mats does not require special training. However, do not forget about the rules of personal safety. You need to cut the roll on a solid support, placing a board under the cut, or with large scissors. The best result is achieved if the cotton does not crumple.
It is not recommended to insulate residential buildings with slag. It is produced from the waste of metallurgical production, in particular, slag from blast furnaces. It has a low cost, but at the same time it absorbs moisture very well, after which it releases acid, which negatively affects other structural elements (especially metals).
The use of slag wool is allowed only for rough installation work outside the premises.
Ecowool
Ecowool appeared on the insulation market relatively recently; it was launched into mass production 5-7 years ago, after it was recognized as one of the the best materials in your industry. It is made from natural cellulose by recycling paper and wood waste with the addition of natural dyes and binders. Ecowool gained popularity thanks to technological features and styling options mechanized way. Application of insulation is carried out both manually and with the help of special equipment. The liquid mixture, ready for use, is supplied to the surface to be insulated by a high-capacity compressor unit. As a result, a seamless layer of a given thickness is created, which, when solidified, forms a solid crust. From the point of view of fire safety, ecowool belongs to the category of self-extinguishing materials. Hand laying is also carried out quite quickly, because the mixture is light in weight and easy to process. Experts believe that ecological wool has a great construction future.
Mechanized application of ecowool significantly increases labor productivity
There are two ways to insulate with ecowool:
- Wet. The preparation of the working mixture is carried out in a special installation for spraying. The binder is lignite, which has excellent adhesion. Insulation can be applied to both horizontal and vertical surfaces. It is rarely used for warming private houses, as it involves the use of expensive equipment.
Before applying ecowool, a metal or wooden crate is mounted on the surface to be insulated
- Dry. This method is much more affordable, because the only tools you need are an electric drill with a mixer and a large bucket. The calculation of the batch is made according to the formula m \u003d S * L * p, where m is the mass of the solution, S is the area of \u200b\u200bthe surface to be covered, L is the thickness of the insulation layer, p is the specific gravity of the insulation (ranges from 45 to 65 kg / m 3 depending on the compaction ).
Ecowool insulation is prepared in a construction bucket using a mixer
Video: ecowool ceiling insulation
Polystyrene
Polystyrene has excellent thermal insulation properties, the composition contains 90–95% air. It is produced in the form of plates and mats of various densities and purposes. However, for all its practicality and affordable price for insulation it is used in a limited range, due to the fact that when heated and burned, it emits toxic carbon monoxide. The disadvantages also include the inability to pass air, which leads to moisture condensation. The laying technology in wooden floors is simple. Polystyrene sheets are cut to the desired size and laid in the same plane between load-bearing beams. Fastening is carried out with special adhesives and additional fixation by means of mushroom-shaped plastic dowels. The seams are filled with construction foam, and a cement screed of small thickness (but not less than 5 cm) is poured on top.
If you manage to pick up polystyrene sheets strictly for the size of the span between the beams, the insulation will be much more effective.
Polyurethane insulation
Two-component polyurethane foam designed for industrial facilities in areas with low temperatures. The coating is usually two-layer and requires the use of special equipment. The application of the working composition is carried out under pressure, at least two people are required for work.
Advantages of polyurethane foam:
- high performance;
- resistance to mechanical stress and changes in humidity;
- good sealing properties. The material covers the entire area with a solid foamed layer of polymer;
- simple processing after hardening - with a knife or saw.
However, it should be said that polyurethane foam spraying is a rather expensive technology, which is used mainly for service premises: hangars, warehouses, garages.
The application of the polyurethane layer is carried out by a qualified operator in a protective suit using special equipment
Video: how to choose a heater
Ways of internal insulation of the ceiling
Sometimes, however, there are cases when insulation has to be done inside the living quarters. For example, if the attic is not available. Then apply internal heaters, which are classified as follows.
- Frame structures are a type of false ceiling that uses raster elements to secure finishing material at the right level. Suspended ceilings are used for insulation both independently and in combination with other heaters:
- stretch ceiling. They consist of a single piece of cloth, stretched over the entire plane of the room and fixed around the perimeter metal profiles. The installation of such ceilings is carried out by specialized organizations. It is impossible to make and install the canvas on your own, as this requires a cutting workshop and heat guns. But it is possible to insulate an existing ceiling with foam mats without outside help. At the same time, they use the same techniques as when laying mats in the attic: glue and plastic dowels-fungi. To level the harmful effects of polymers, the insulation is covered on both sides with membrane moisture-proof films. You can fix them with a stapler or double-sided tape. When the installation is completed, you can invite a team of stretch ceiling installers;
Installation of a stretch ceiling can be carried out immediately after the insulation of the ceiling
- rack ceilings consist of a supporting frame firmly attached to the ceiling, and metal (or plastic) rails that form one or more planes. The algorithm for preparing for installation is similar to stretch ceilings, only at the beginning the frame fasteners are mounted (usually wire hangers), and then the insulation is already attached. By itself, the rack ceiling cannot prevent heat transfer, it plays the role of a cosmetic cladding. Therefore, it is necessary to install the insulation carefully, having previously puttied all the holes and cracks in the ceiling;
The rack ceiling does not have an additional heat-insulating effect, so the insulation under it must be laid in a dense and even layer.
- plasterboard ceilings are a separate item, as they are recognized optimal solution flooring issue. Certified materials and technologies (for example, Knauf systems) guarantee the desired result. Qualified engineers work on the development of systems, all materials are tested. As leading developers conduct research within the framework of maximum consumer safety, foam insulation are not generally considered. The danger and risks for a person are too great. Ceilings are insulated only with mineral wool, such as Ursa, Rockwool and others, recognized as minimally hazardous. Rolls or mats are placed in a pre-assembled frame and covered with polyethylene film. Then the GKL plates are installed. All joints between the plates are carefully puttied twice with a plaster composition, the gaps between false ceiling and walls are treated with acrylic sealant. If there are fixtures in the ceiling, they are installed last. Moreover, it is allowed to use only factory models of lamps in which the rated voltage does not cause a risk of fire.
The insulation is installed after the installation of the raster structure
- stretch ceiling. They consist of a single piece of cloth, stretched over the entire plane of the room and fixed around the perimeter metal profiles. The installation of such ceilings is carried out by specialized organizations. It is impossible to make and install the canvas on your own, as this requires a cutting workshop and heat guns. But it is possible to insulate an existing ceiling with foam mats without outside help. At the same time, they use the same techniques as when laying mats in the attic: glue and plastic dowels-fungi. To level the harmful effects of polymers, the insulation is covered on both sides with membrane moisture-proof films. You can fix them with a stapler or double-sided tape. When the installation is completed, you can invite a team of stretch ceiling installers;
- Bonding insulation to a load-bearing ceiling. There is a group of materials designed to insulate the ceiling without subsequent cladding. It includes:
- foam panels. They differ from the usual insulation on the outside. Usually it is a decorative surface with a repeating pattern. The thickness of such plates is about 1.5–3 cm. They are light and well attached to the adhesive to a flat ceiling. Sometimes there are such products with locks on the edges. This increases the tightness of the coating as a whole. At the same time, do not forget to lubricate the edges with sealant during installation;
Installation of foam panels, in addition to insulation, well masks defects in concrete floor slabs
- cork lining. It is used in areas with high security requirements. For example, in children's rooms. It has a pleasant natural texture and does not emit toxic substances. Fixed with adhesive sealant directly to the main ceiling. The only drawback is the high price.
Cork can be used to insulate not only ceilings, but also walls inside the building
- foam panels. They differ from the usual insulation on the outside. Usually it is a decorative surface with a repeating pattern. The thickness of such plates is about 1.5–3 cm. They are light and well attached to the adhesive to a flat ceiling. Sometimes there are such products with locks on the edges. This increases the tightness of the coating as a whole. At the same time, do not forget to lubricate the edges with sealant during installation;
- Special plasters. Such insulation materials arose just a few years ago and came into free sale from innovative industries (aerospace, military and space technology). For example, heat-insulating putty of the Akterm series with a layer of 1 mm is equivalent in terms of its thermal characteristics to 5 cm of foam. Inside the composition are ceramic hollow balls a few microns in size. Working with this coating requires special skills. It is important to scrupulously maintain the ratio of all components in the preparation of the composition. Today, the mass use of such high-tech materials is limited by the price of the product and is rarely used in everyday life.
Water pipes coated with "Akterm" are not afraid of frost
Video: ceiling insulation under drywall
In conclusion, I would like to note that the insulation of the ceiling is a simple matter. However, it requires accuracy and accurate knowledge of the properties of materials. Over time, some of the heaters shrink or become saturated with moisture. If you do not respond in time, the level of protection against temperature fluctuations will decrease. Therefore, once a year you need to do an audit and check the condition of the insulation.
Most people try to insulate the walls in a private house as best as possible to avoid heat loss. In fact, 60% of the heat energy goes through the ceiling, because warm air tends to rise up and through ceilings goes outside. In addition, there is always an increased level of humidity in the area of \u200b\u200bthe ceiling, hence mold and fungus in the corners. The insulated ceiling will not only make the house more comfortable, but also protect the property from damage.
Ways to insulate the ceiling
In a private house, ceiling insulation becomes task No. 1. To insulate the ceiling and reduce heat loss, you can use the following methods:
- Insulation of the ceiling from the inside. This is the case if under the roof is not an attic, but an attic. From wooden beams a frame is constructed, which is attached to the ceiling with a puncher and dowels-nails. Inside the frame is filled various heaters, and a vapor barrier is placed between the ceiling and the insulation. Then the insulated ceiling is sheathed with drywall. The disadvantage of this method is the "hiding" of a significant part of the ceiling, as well as the complexity of the work.
- Insulation of the ceiling from the outside. This method is good if there is an attic under the roof. There are also variations depending on the type of insulation.
Foam insulation
Before starting the insulation process, you need to free the attic from excess rubbish, sweep out all the garbage, and carry out wet cleaning down to clean concrete. According to the size of the area of \u200b\u200bthe room to be insulated, it is necessary to purchase the appropriate amount of foam not less than 40 mm thick or foam styrene, but it will cost much more. Both materials have low thermal conductivity And high resistance to damage by microorganisms. The entire space of the floor is covered with foam sheets, the joints are glued together mounting foam. A reinforcing mesh is placed on top of the foam and poured screed with a layer of at least 50 mm. This procedure is necessary if the attic is to be used.
Foam Disadvantages:
- questionable refractory properties, added flame retardants are short lived
- exudes formaldehyde
- it has rodents
- there is a "greenhouse effect", the room must be often ventilated
Technology for installing foam and penoizol
The effectiveness of thermal insulation when using penoizol is much higher than when installing finished foam boards. The plates may not fit snugly against the supporting frame, forming cracks and “cold bridges”. Filling with penoizol saves transportation costs, electricity. Penoizol adheres tightly to the wall due to the resins included in its composition. It dries within 15-20 minutes. The only drawback is that it is impossible to pour penoizol on your own. Whole procedure should be carried out by experts.
To install foam boards you will need:
- Styrofoam
- drywall sheets
- metal profile or wooden slats
- hammer
- polyurethane foam
- waterproofing material
- screwdriver
- waterproofing membrane glassine, which is made of roofing paper and impregnated with bitumen. It prevents the penetration of moisture into the thermal insulation layers.
- fasteners - screws and self-tapping screws, sometimes nails
- hacksaw
There are two ways to mount foam boards: frame and adhesive. The preparatory process for both methods is the same. The length and width of the area are carefully measured. These indicators are multiplied, and the area is obtained. Based on it, the appropriate number of foam boards with a minimum thickness of 5 cm is purchased. Then surface is processed, to which the plates will be glued. Old whitewash, plaster is removed, dust and dirt are washed off. Can even be surface treated antiseptic. Apply a coat of primer to make the surface even. If possible, replace with a newer existing electrical system.
 The adhesive method has its own nuances. In order for the foam to bond well with the surface of the ceiling, it is necessary observe temperature regime
not lower than 50C and not higher than 250C .
As an adhesive, you can use ordinary tile adhesive. They can also process the surface to which the plates will be attached. After it dries, you can continue installation work. Glue is applied to the foam sheet and the wall, held for 2-3 minutes and the foam is pressed to the surface.
The adhesive method has its own nuances. In order for the foam to bond well with the surface of the ceiling, it is necessary observe temperature regime
not lower than 50C and not higher than 250C .
As an adhesive, you can use ordinary tile adhesive. They can also process the surface to which the plates will be attached. After it dries, you can continue installation work. Glue is applied to the foam sheet and the wall, held for 2-3 minutes and the foam is pressed to the surface.
You can also use dowels with large caps. In the same way, the entire area of \u200b\u200bthe insulated surface is pasted over. After the entire ceiling is insulated, all joints and cracks are carefully coated with glue or mounting foam to enhance tightness. When the glue or foam is dry, you can reinforce the ceiling. To do this, a special solution is applied to the foam sheets, into which a fiberglass mesh is immersed. Another layer of solution is applied on top. It is necessary to wait until the solution is completely dry, and only then continue the installation work.
With the frame method of mounting the foam, wooden or metal slats are attached to a previously cleaned and primed surface in such a way that cells are obtained. Cell size depends on the size of the foam boards. For example, if the plates are 1/1 m in size, then the cells must be made 50/50 cm. Accordingly, during installation, the foam sheet will need to be cut into 4 equal squares. In the case of using an aluminum profile, metal rails are attached to the ceiling using a perforator and screws.
A foam sheet is inserted into the grooves obtained, smeared on the side on all sides. liquid nails» for reliable bonding of boards to the supporting structure. A whole sheet of foam plastic is inserted into the aluminum rails and reinforced with self-tapping screws. Further also reinforcement is being carried out: a special mortar is applied, a reinforced mesh is placed and a pouring layer is applied again. Everything, the insulated ceiling is ready. If desired, drywall can be sewn over whole foam boards.
Penoizol as a heater for the ceiling
 Penoizol is expanded foam in liquid form. For the installation of penoizol, special equipment must be used. It is not very expensive in terms of cost, and it is easy to fill them. hard-to-reach places. Penoizol is fireproof, hygroscopic, has low thermal conductivity. It does not contain rodents, it is not affected by microorganisms. Penoizol can be operated at temperatures from -600C to +800C. The material has high soundproofing properties. The environmental friendliness and safety of penoizol has been confirmed by numerous experiments.
Penoizol installation technology
Is being done wooden or metal cell frame, the cells of which are filled with penoizol. It expands and fills the entire space. Gradually, it polymerizes and becomes an excellent insulation. When using it, it is not necessary to use either a steam or a waterproofing agent.
Warm ceiling with mineral wool
This material is divided into glass wool, ceramic, slag and stone wool. The types of glass wool are modern materials for insulation Rocklight, Technoblock, Technovent, Technolight, Technoruf, Technofas, etc. The raw material for the production of the material is basalt, limestone, diabase or dolomite. The highest quality mineral wool is obtained from rocks.
When using mineral wool, it is necessary to wear work clothes, goggles and a respirator, because the particles of the material irritate the skin. After laying, mineral wool becomes safe for humans. Before using it, it is necessary to clean the surface of debris and dirt. to pure concrete. A frame for the future floor is made of wooden beams. Measurements are taken, logs are mounted, a vapor barrier is laid, glassine is better. Sheets of mineral wool are placed on top of it, but this should not be done too tightly, cotton cannot be squeezed. To make the floor even warmer, you can put mineral wool in two layers, and the top layer should overlap the joints of the bottom. Next, the flooring is laid, which is attached to the wooden frame.
Flaws:
- the material must not be removed and compacted, because it may lose its thermal insulation properties
- mineral wool must be carefully protected from moisture
- even a small gap can reduce the heat capacity of the ceiling
- along with mineral wool, another moisture-proof material is also used, which increases the cost and complicates the process
- needs to be changed every 10-15 years
Mineral wool installation technology
 First you need to accurately calculate how much insulation, hydro and vapor barrier materials need to be purchased. Remember that when working with glass wool, dust is released that irritates the skin and mucous membranes of the eyes. Therefore, it is necessary purchase protective clothing and goggles, respirator, gloves. It is also necessary to turn off the ventilation system while working with mineral wool so that dust does not penetrate there. For mounting mineral wool you will need the following:
- insulation
- wooden slats (width 150 mm, thickness 30 mm) or galvanized profile
- perforator
- self-tapping screws
- big scissors
- protective equipment
- vapor barrier
- metal staples
- roulette
If the house is wooden, then as a supporting structure are selected wooden slats. A waterproofing layer with an overlap of 10 cm is placed on the wooden floor. A crate is attached on top. The distance between the rails is 50-60 cm. Mineral wool is unpacked immediately before installation. The insulation is cut into pieces in width corresponding to the distance between the slats plus 2 cm for a snug fit.
Between waterproofing and insulation is done a gap of 1-2 cm for natural air circulation. Mineral wool is placed tightly enough so that wrinkles and crevices do not form. Then, a vapor barrier with an overlap of 10 cm is attached from above, perpendicular to the rafters, and attached to the wooden slats with a stapler. All seams are carefully fastened with a mounting film. This will enhance the tightness of the structure.
It is a cellulose based material, absolutely harmless to humans. 81% ecowool consists of recycled cellulose, a product of paper processing, 12% of antiseptic, 7% of flame retardants. The fibers contain lingin, which gives the structure its stickiness. The material is resilient and elastic enough not to shrink, and at the same time has a capillary structure thanks to which the ceiling "breathes". Ecowool protects the surface from the spread of fungus, and rodents are not found in it. Upon contact with metal structures corrosion does not occur, and in case of fire, the material smoldering but not burning.
- during installation, ecowool emits a lot of dust from boric acid
- installation can only be carried out by specialists using special equipment
- ecowool should not be used near a source of fire or high temperatures(bath), otherwise ecowool starts to smolder
Ecowool installation technology
 Manual way ecowool installations complicated and tedious. The material installed by an unskilled specialist reduces its effectiveness by 20-30%. There are two ways of mechanical installation of ecowool: dry and wet. The dry method is convenient for attic insulation. The use of special membrane films such as Tyvek makes it possible to pump ecowool not only into horizontal, but also into inclined and vertical surfaces. For this on special equipment fill the ecowool cavity of the building frame under air pressure.
The wet mounting method arose due to the ability of ecowool, when wetted with water, to stick to any surface due to the special substance lignin included in its composition. Wet ecowool groans viscous and sticky, and with the help of a pneumatic installation under air pressure, the ecowool is sprayed and adheres tightly to the surface. After drying, a uniform and homogeneous layer is formed, which has soundproofing ability.
If it is not possible to do surface cladding, then apply wet adhesive method of application ecowool. With this method, ecowool is treated not with water, but with an adhesive solution, which significantly enhances the adhesive ability of the material.
Insulation with ecowool should be carried out by specialists, then the material will 100% realize all its advantages.
How to insulate the ceiling with sawdust
This method obsolete, but is still used for insulation of ceilings.
Flaws:
- shrink, they need to be sprinkled
- fire hazardous
Sawdust insulation installation technology
First you need to replace the wiring, insulate it in metal pipes, and also insulate the chimney. To use sawdust as a heater you will need:
- sawdust
- lime
- cement
- blue vitriol
 We prepare sawdust for laying. It is difficult for one person to cope, you need an assistant. In a large spacious barrel, 10 buckets of sawdust, 12 buckets of lime and 1 bucket of cement are mixed. Everything is well mixed until a homogeneous mass is obtained.
Water is poured into a 10 liter watering can, poured a few spoons blue vitriol as an antiseptic. Slowly, the contents of the watering can are poured into a barrel with sawdust mixture. If, with a clenched fist, the mixture stops emitting moisture, then it is ready for use.
Glassine is spread around the entire perimeter of the ceiling and fastened with adhesive tape or galvanized clamps. On the surface of parchment sawdust mixture is laid out evenly. You don't need to push it too hard. Level the surface and let it dry for at least 2 weeks. Everything, the heater is ready. Only walking on it is not recommended, so the room should not be used.
Clay ceiling insulation
Clay is considered environmentally friendly, fire resistant and inexpensive roof insulation. To use sawdust and clay as a heater, you will need:
- sawdust
- lime
- cement
- blue vitriol
Clay insulation installation technology
From beams, bars and boards, treated with an antiseptic, a special overlap is made (the description was made earlier), where clay will be poured. The bottom of the ceiling is lined with polyethylene or PVC film, which is attached to beams and boards with a stapler. In a concrete mixer or a large barrel, 5-6 buckets of clay (which you can dig up in your garden) diluted until completely dissolved with water. Then sawdust is added and mixed until such a state that the mixture is not too wet or very dense. The resulting mixture is laid out on the floors between the beams with a layer of 5-10 cm. It is necessary to wait for the clay to dry completely. This may take over a month. To speed up the process, it is necessary to ensure good ventilation of the attic. On a clay surface small cracks may appear but they rub off easily.
Flaws:
- under the clay, the tree can become moldy and rot
- with the wrong ratio of clay and sawdust, thermal conductivity increases and heat is lost
Expanded clay for ceiling insulation
Expanded clay is a lightweight refractory material made from fired clay of low-melting grades. Glassine is placed on the floor and reinforcing mesh is laid, expanded clay is poured over all this. It is heat and sound insulating, resistant to moisture, rodents are not found in it. Expanded clay performs the function of a thermal cushion, which is poured from above with a screed. For installation of expanded clay insulation you will need the following:
- expanded clay
- waterproofer
- vapor barrier
- adhesive tape, aluminum tape
- stapler
- staples
Installation technology of expanded clay insulation
 This technology is similar to the technology of laying other heaters such as clay or sawdust. First, the surface on which expanded clay will be poured is cleaned of dirt and old whitewash. A cellular structure is made from wooden beams over the entire surface. Then, with an overlap of 10 cm, they creep wide strips of waterproofing. Joints are glued with adhesive tape. After fixing, a reinforcing mesh is placed on top of the waterproofing agent and a layer of expanded clay is poured. Its surface is leveled. A vapor barrier sheet is laid over the expanded clay layer and attached to wooden slats stapler or metal staples. A vapor barrier is placed on top of the expanded clay layer and beams, which is also fixed to wooden structure stapler and staples.
Flaws:
- material is heavy
- air "walks" between the granules
- requires subsequent pouring or vapor barrier
- Requires special equipment for quality work
Foil insulation
The tree itself is a regulator of heat and humidity, so foil insulation is best used in a room with a concrete floor. When using it, you can exclude the use of a vapor barrier. The foil itself good conductor of heat. Foil expanded polystyrene is produced in sheets of 60/120 cm and has a thickness of 2-10 cm.
Sheets have stepped locks to eliminate "cold bridges". Foil polyethylene foam can be one-sided and two-sided. The material also has a thickness of 2-10 cm, and is available in rolls 1-1.2 m wide and 25-30 m long and looks like a carpet. Sometimes a layer of mineral wool is covered with foil polyethylene. Thus, thermal insulation is enhanced, and the release of carcinogens from mineral wool is also reduced. Foil glass wool is produced in the form of mats, supplemented with reinforced mesh. Usually, foil insulation is used to insulate the ceiling and walls of a bath or steam room.
Foil insulation installation technology
According to the method described above, a cellular structure is made from wooden beams or metal planks. According to the size of the cell, a foil insulation of the required size is cut with scissors and fixed with a construction stapler. The foil side should “look” at the room, and not at the floor. Sometimes manufacturers produce foil insulation with already applied to the surface a layer of glue.
Sheets of foil insulation are placed end to end, and the joints are glued with a special aluminum adhesive tape. Thus, a surface is obtained that perfectly reflects heat rays. If you plan to use drywall or lining on top of the foil insulation, then you need to make an air gap of 1-2.5 cm between the insulation and the final finish. Otherwise foil will heat up and warp the building material. Everything, the insulation is ready. Simply and easily!
Flaw- a tree under a foil insulation with loose laying can ban and rot.
Builders often charge a lot of money for work on roof insulation. This is motivated by the fact that these are labor-intensive works that are carried out on weight. To save money,wooden house can be done independently. Special qualifications are not needed here, special equipment is not required. And it doesn’t matter if your roof is made of ondulin, metal tile or slate, gable or broken structure. However, modern insulating materials and proven cold roof insulation technology have many nuances that you need to know.
It is not difficult to make the roof warm, and the premises of a private wooden house suitable for year-round use. The main thing is to create good conditions to keep the heat inside the attic. How to insulate the roof, what materials to use, we will consider in this article. Insulation issues can be addressed both during the construction of the house, and after, by reconstructing the upper floor.
Features of a cold roof
In accordance with the laws of physics and convection processes, warm air masses rise to the top. In the presence of a cold roof of a wooden house, all the heat will go outside. Such heat losses make it necessary to additionally heat the premises in the house, spending electricity or fuel. Therefore, high-quality insulation of ceiling slabs is the most important task for preserving heat, rational use coolants and creating a microclimate in the house.
 Warming mansard roof
 Cold refers to the construction of a gable or broken roof, which does not have a multilayer structure. In such inexpensive and simple roofs, there is no waterproofing, vapor barrier and thermal insulation.
 cold roof insulation
 The design scheme of a gable cold roof is very simple - on beams hardwood floor, as a rule, the floor is laid from boards, and the roof is made of slate or metal tiles, without any insulators. In order to properly insulate a cold roof, you need to know what requirements apply to the design of the ceiling of the upper floor and attic floors. And also you should choose the right insulation material.
 Rafter scheme gable roof
 Requirements for roofing
When starting to insulate a roof made of ondulin, slate or metal tiles, broken or hip, you should know what building codes and rules exist for the floors of a private wooden house. In order not to violate the basic parameters that must be met by the design of the attic, the thermal insulation of the ceiling andwarming mansard roof from withinshould be carried out taking into account the basic requirements. For attic floors and ceilings, this is strength and compliance with fire safety standards.
 roofing cake
 The strength of the attic floors must correspond to the nature of the under-roof space. If an attic is arranged in the attic, then the ceilings must withstand the weight of the floors, furniture and people in it. Floor beams must not sag, and the allowable load cannot exceed 100 kg per square meter.
 Stress on truss system gable roof
 The second basic requirement - fire safety is especially important for a wooden house. All structural elements must be treated with special flame retardants.

Types of heat-insulating materials
In order to qualitatively insulate the structure wooden ceiling and the entire roof of metal tiles use a variety of heat insulators.
 Types of heaters
 Main types:
- polystyrene and foam plastic;
- mineral wool;
- ecowool;
- glass wool;
- fiberboard;
- foamed polyurethane;
Each of the listed heaters has its pros and cons. The choice of insulation for the ceiling and for metal tiles depends on various factors. Therefore, you should familiarize yourself with each type of heat insulator in more detail in order to understand the better it is to insulate the ceiling floors and the entire upper floor.
 Insulation of a mansard roof made of metal tiles
Ceiling insulation in a private house - a guarantee warm rooms in winter and cool climate in summer. You need to take care of this even at the stage of building a house. But if the house got ready, you can still insulate the ceiling with minimal effort.
School knowledge of physics can still be useful in life. So, due to convection, when cold air goes down and hot air goes up, all the heat accumulated in the room will penetrate through the uninsulated ceiling into the unheated attic. Because of this, it is necessary to increase the power of the boiler and, as a result, incur additional heating costs.
For the same reason, ceiling insulation requires a more serious approach than wall insulation - due to air currents, the heat loss of a wooden ceiling can reach 3 W / m2 / K. For brick or concrete floors, the figure is even higher. At the same time, there is no need to insulate the ceilings between living quarters if the temperature in them is the same. It is enough to take care of soundproofing and save money on thermal insulation of the attic and roof.
In summer, it is also better to have an insulated ceiling - the roof heated in the sun transfers heat into the room, nullifying the work of air conditioners. Having spent once on thermal insulation, you can enjoy a comfortable microclimate in your home for many years.
What to look for when choosing a heater?
First of all, you need to decide on the place of laying the insulation - inside or outside the living rooms. The first option is highly undesirable for several reasons:
- ceiling height is reduced;
- it is impossible to use bulk insulation;
- the cooling point is shifted closer to the inner side of the floors;
- inevitable repairs due to the dismantling of the old ceiling.
Attic insulation is devoid of all these negative features. But if an attic is not provided, or an attic floor is provided for in the project, the roof must be immediately insulated.

The choice of materials for insulation with your own hands
Styrofoam or EPPS, as well as mineral wool and its analogues, are suitable for insulation from the inside and outside. Such materials are laid between beams or in a specially constructed frame and covered with drywall, OSB boards or clapboard.

But if the house has a sauna, then it is better not to insulate the ceiling above it with polystyrene foam - due to high temperatures, it can begin to release substances harmful to humans.
For internal insulation aerated concrete slabs are also excellent - due to their low weight and ease of installation. Their thickness up to 10 cm will not “eat” a lot of height, and additional plating is not required. Glue for polystyrene boards is applied to the plates with a notched trowel and pressed against the ceiling.

The insulation is puttied and painted.
Bulk heaters are quite economical - shavings, ecowool or expanded clay. True, having a high hygroscopicity, they require good waterproofing. Such insulation is poured between the beams from the side of the attic with a layer of about 15 cm, and for ease of movement in the attic they are covered with OSB boards.

True, having a high hygroscopicity, they require good waterproofing.
What kind of insulation is not chewed by mice?
Mice gnaw on any insulation. But not as food, but to expand their moves. You can hear claims that mice eat Styrofoam. This is not entirely true - they gnaw through it and build nests in it. But the same fate will befall mineral wool, although a little later.
Due to its flowability, ecowool can save a little - but rodents will simply endure it until they can settle down and move normally in a heater. Expanded clay is the most resistant to rodents - strong "pebbles", large enough so that mice and even rats cannot carry them away, and at the same time small enough to fill up their moves.
But there is a catch here - the mice will arrange “laying” there. Therefore, the only way to protect the insulation is to keep rodents out of it in principle. Everything else is just a temporary and very unreliable solution.
How to insulate the ceiling of the attic floor?
Do-it-yourself insulation from the attic side is quite simple. First, space is freed up and the floor covering is completely removed (if it was). Work is done step by step:

To insulate a concrete floor, the technology is exactly the same - it is enough to lay logs on top of the concrete. You can also use sprayed materials, but this requires special equipment and certain skills.

How to insulate the ceiling from the inside?
With the help of a suspended ceiling, you can insulate the room from the inside. For this:

Due to the lack of ventilation, it is undesirable to use spotlights in an insulated ceiling - they heat up and quickly fail. And upon contact with the foam, the insulation may begin to melt.
There are three ways to solve the problem. The first is to use only pendant chandeliers and wall lights. The second is to remove the layer of thermal insulation around the fixtures built into the ceiling. At the same time, do not forget about the vapor barrier - it should close the mineral wool without gaps. And the third is to lower the ceiling a few more centimeters, sufficient to install spotlights.
How to insulate attic floor and ceiling attic floor detailed in the video:


