Do-it-yourself mansard roof - drawings. Construction of a mansard roof: differences in truss systems, installation steps, photo Drawings of the truss system
Creating an attic - a popular type of room - with your own hands today is not difficult. Let's look at all the stages of construction, as well as the pros and cons of this design.

Peculiarities
Home is a place where we would like to surround ourselves with comfort, have the opportunity to relax with our families and work. Sometimes this becomes impossible due to lack of square meters. How to make housing spacious and comfortable? Construction technologies have stepped far ahead - resources have appeared that allow you to expand the occupied space with your own hands through extensions. But if there is not enough land, then the attic will be the most successful option!


Currently, this is a fashionable design for private houses. Back in the 17th century, the attic was conceived as a way to expand housing for the poor. And thanks to the French architect Mansard (fr. Mansard), the conversion of roofs into residential apartments has become very popular among the rich. From here, by the way, the name came - attic.
Many people ask the question: "Attic or additional floor?". It is worth clarifying right away that these are two different things. Before choosing one or another option, weigh all the pros and cons, take into account the purpose of your home (dacha or permanent place of residence), your Family status as well as the budget. It will be much more economical to build an attic than a full-fledged second floor.


In this article, we will tell you how to significantly convert the usable area when minimum investment. And with the implementation of all the necessary activities, you can handle it on your own.
Installation and arrangement of the attic, the facade of which is completely or partially formed by the surface of a sloping roof, is a vast scope for imagination and creativity. So much space shouldn't be wasted! A great studio, office or storage space for unnecessary things will come out here. But isn't it too wasteful to turn precious square meters into a warehouse?


Typically, attic spaces are provided to children who like to be placed on high levels, and besides, low beams often cause some inconvenience to adults. This floor is the last one, and the higher, the better the view, no doubt. The presence of pipes, the proximity to the roof, a remote balcony, a sloping ceiling - all this will become a stylish help for creating an architectural design.
An objective assessment of the specifics and knowledge of the constructive qualities of this type of superstructure give a chance that everything will work out as well as possible, the load-bearing walls and foundation of the house will not be harmed, and the dwelling will last a long time. Believe me, the attic is very useful thing!


The most successful solution is a frame attic. Before you begin to develop a superstructure plan, you must make sure that the lower floor can withstand the additional load. After all, every person who encounters a building knows that the main building is located on load-bearing structure, which is calculated based on the entire mass of the structure. Therefore, at the beginning of construction, it is necessary to make the necessary calculations, as well as check the foundation for cracks or any damage on it. If necessary, the base will need to be strengthened. At this stage, it is best to turn to professionals.

Based on how the roof is constructed, the appearance of the attic can be different. As a rule, the attic occupies the entire top floor, although sometimes there are options located on one side of the longitudinal axis of the building. It is not often possible to see attics that extend beyond the lower structures.
Most often, the roof is gable or broken. More complex view gable configuration is popular: the roof consists of two planes, as it were. But we will discuss each of them in more detail a little later. Windows, large or small, located on the ceiling let in many times more light than ordinary windows in the rooms on the lower floors.


When choosing a roofing, observe harmony so as not to disturb the combination of form attic floor and roofs.
You can also immediately insulate the room with SIP panels. As a result, you will get a lightweight construction, which consists of more than 50% of lightweight polystyrene foam, therefore, it does not create a load on walls and ceilings.
There are several design features that cannot be ignored.
- take seriously the thermal insulation, which should be strengthened, because it is the roof that often “suffers” from frequent and sometimes strong temperature changes;
- it is important to make waterproofing conscientiously, so that over time the insulation does not get wet;
- between the thermal insulation layer and the roof, ventilation must be done properly.
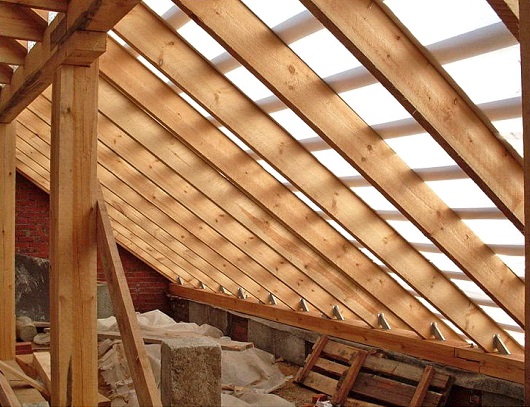
Options roof structure must be due to the further construction of thermal insulation, which is placed between the timber rafters and has a thickness of at least 20 cm. The rafters must be at least 25 by 25 cm.


The main indicators of wood that are important for the design of the system are flexural and compressive strength, the desired density and moisture content.
Wooden rafters, in turn, require treatment with antiseptics or fire and bioprotective structures and must have fire resistance limits.
Designers are advised to leave the attic space intact. Nevertheless, if it becomes necessary to separate rooms, then it is better to build partitions using drywall.


Consider also the disadvantages of this type of adjustment:
- due to the sloping roof, unlike the usual floor, the size of the attic area will be smaller;
- the height must be optimal, otherwise there will be problems with closing / opening the doors;
- psychological factor: sometimes it seems to people that there is not enough air, every time you want to bend down, a person may feel discomfort;
- regardless of the type of roofing and even correct installation soundproofing sounds from the rain will penetrate the room;
- it is important to think over the heating system correctly;
- the stairs leading to the attic may be too steep and therefore unsafe.


Design options and materials
Using the advice of experts, carefully develop a future attic project. After that, prepare the design of the attic, as this is not just a certain number of square meters, but the individuality of the facade - the pride of the building. The appearance and interior depends on the methods of coating and materials for the roof.
There are several types of roofing.
Shed
The simplest option, which is a sloping area fixed on load-bearing walls. Advantages: ease of calculation and installation work, due to its low weight, it is suitable for buildings on foundations of a simplified type. Disadvantages: not the most attractive appearance, sensitivity to loads (snow).


gable
One of the most common options. Such a structure consists of two opposite slopes, which lie on the walls of the building that serve as a support and are connected at the top with a ridge. Material investments in a gable roof are quite small, while it looks aesthetically attractive. Device gable roof includes: rafters, lathing, inclined planes, mauerlat, horizontal ribs, ridge, valleys, overhangs.


broken line
The broken roof structure is a subspecies of the gable roof, but with a more complex configuration. Because of the shape and the presence of broken lines, this name came about. Such a roof gives the house solidity and solidity.


Four-sided or hip
One of the strongest and most resistant to strong winds and leaks during rainfall roofing systems, where two triangular slopes are installed instead of gables. Complex installation is a minus of this design: it requires accuracy in calculating the truss system and installing the frame. For this reason, designing is usually trusted to professionals.


Multi-forceps
Among all the designs, the most complex, but at the same time the most interesting is considered to be multi-forceps. It is characterized by the presence of several gables (from 3 or more). A big plus is the ability to cover several rooms with one level. But in general, this type of attic works mainly on the architectural style and design.


The attic part is divided into two types. She may be:
- single-level- a fairly practical option in execution that does not require complex development and serious calculations;
- two-level- This is a building that is difficult to erect, the project of which is created immediately together with the house.


Current building technologies make it possible to do in the attic different types balconies. To select the desired design, you should consider the design features of the lower floor. And it doesn't matter if the balcony was already included in the plan, it can be done at the end of all stages of construction.
Most good option location - from the end. In this case, the balcony will resemble a loggia. It is erected together with the attic, which allows you to use part of the roof as a canopy, and the ceiling of the floor as a floor.

Another type of construction is the option when the balcony is located in the roof part. At the stage of roofing, part of the building is left uncovered so that a balcony can be equipped there.


Drawings and calculation
The main parameter when planning the attic floor is the ceiling level, the optimal height of which should be at least 2.5 m. Make a drawing before direct construction, evaluate everything and indicate accurate calculations so that everything can be built accurately. Most perfect option- this is a broken gable roof, but then as many bearing supports as possible should be installed for sufficient reliability, since this type of roof increases the pressure on the walls.
Do not forget to include the ventilation system, as well as windows and pipes in the calculations. furnace heating, if any are expected.
The height of the superstructure itself has no limit, but the lower ends must be at least 90 cm.

The plan should contain all the information about the shape features, geometric dimensions and slope angles of the slopes.
After the exact calculation of the mansard roof truss system is completed, all the necessary materials should be purchased and the roof should be prepared. Only after that, you can start building.
Do-it-yourself attic manufacturing steps
It is very important to choose the design and style of the interior at the initial stage, as well as decide on the materials for decoration. Opinion should be listened to professional designers who advise using only high-quality raw materials. We will guide you step by step through all stages of construction.

Roof
So, the first stage is the development of a project for a new future roof in an old room. It does not matter whether it is single-pitched, double-pitched or broken, without a doubt, the appearance of the result will directly depend on the structural properties of the roof, as well as the raw materials used. Make a diagram in different perspectives to better understand how to place the elements of the truss system. The most important thing is to accurately calculate the height of the roof ridge, because the size of the area under it depends on it.
We take the height of the ridge about 3.5 m - with the independent construction of the frame, which allows you to straighten up to your full height.


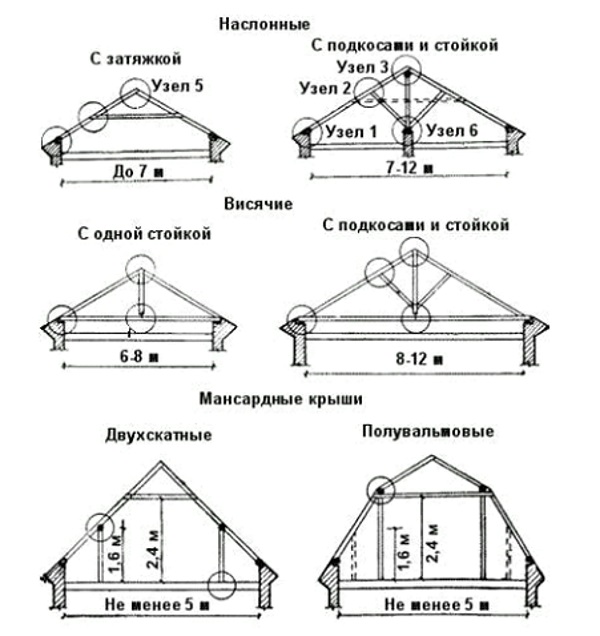
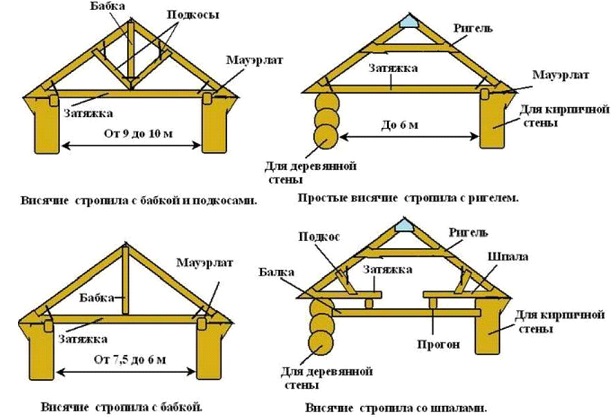
It is important to remember that in order to build a frame with your own hands, you must be aware of the existence of two types of truss systems: inclined and hanging. They differ from each other by the method of attaching nodes to the walls.
In houses where there is no load-bearing wall, a mechanism will be used hanging rafters, which will only be held on the walls of the house and connected to each other with nails or screws using corner plates. In this case, the width of a single-span building, where this particular type of rafters is assumed, cannot exceed 6 m. If the parameters of the house are larger, for example, when the span width exceeds 9 m, then more struts have to be done.
In two-span houses, where there is only an average supporting wall, layered rafters are made. In this case, the three base points (two on the outer walls of the house and one on the inside) depend on the width of the building: more than 10 m - one support, and with a width of about 15 m, two supports will be needed. The rafters are attached to each other with the help of corner plates. The crate itself is made of slats or boards.
Steam and thermal insulation are key steps in creating an attic. A membrane-type film is laid on top of the crate, which will protect against moisture penetration, and glass wool is laid on the inside for insulation.


The next stage is the installation of the roof, interior processing and design of walls and partitions, as well as the installation of windows.
As we have already mentioned above, the most successful will be the use of metal tiles or corrugated board as a material for roofing.


floors
First, take care of sound and thermal insulation from the floor below. This task can be accomplished in several ways: backfilling of expanded clay or laying slabs of mineral wool. Both methods involve protection from moisture with hydrofilms. Also pay attention to the wooden floors. Here, the insulation is performed with dressing of the seams of the insulation and beams.
Choose the flooring of your choice. It can be ceramic, parquet or laminate.


Window
Loft windows are quite a labor intensive but worthwhile process, so consider if you can do it yourself. In fact, they do not differ much from facade ones, but there is one serious difference - a special type of opening. In addition, during installation, you will have to disassemble the metal tile, while trying to maintain waterproofing. But this is not scary, because it is thanks to the windows that the room becomes much lighter and more spacious!
It is very important to know that if snow and ice are not cleared regularly, the window may be subject to temperature changes, so it is important to select models in accordance with the climate in which you live.


Heating selection
For comfortable living and the use of the premises, you also need to take care of heating the attic. It should not only maintain and retain heat inside, but also be safe and economical.
All details must be taken into account early stages design. We bring to your attention several methods of heating the attic floor.
- Fireplace. Efficient, comfortable and completely safe way.
- If your house already has a heating system on the ground floor, then you only need to install additional pipes and batteries.


- Installation of an independent heating system only for the attic - the most correct solution. It is possible to install absolutely any heating boilers, while observing the necessary safety measures. But more comfortable - turbocharged gas boilers that do not require a separate room. They are wall mounted and very easy to use.
- "Warm floor". To create a comfortable microclimate in the room, you can install underfloor heating. This can be done both with your own hands and with the help of specialists. In any case, this is a fairly economical option.


An important point is the proper arrangement of ventilation. Only in this way will attic heating work well.
Warming and ventilation
Since the attic has the largest area of contact with the street, compared to the lower floors, its insulation should be taken very carefully. Today the market offers a variety of insulating materials. However, when solving this problem regarding full-fledged thermal insulation and vapor barrier for the house, do not forget about the main conditions, and then this will not only reduce heat loss and heating costs at home, but also protect the ceiling and walls from dampness, rot and sputum, the formation of ice on the roof . The choice of materials for the "roofing pie" must be carried out in accordance with the requirements of SNiP.
When you choose a finish in a store, focus primarily on the characteristics of your home. For example, where it is hot in summer and frosty in winter, the insulation must be resistant to external circumstances. Therefore, one of the main conditions will be thickness. The colder, the denser it should be, and, conversely, if you live in the south, where the temperature practically does not drop below zero in winter, you can choose a thinner material.

The most versatile and most budgetary - based on mineral wool, polystyrene foam is used less often. Sometimes it is possible to use a heat-insulating layer consisting of modern filling agents or materials in the form of a liquid sprayed onto the walls and solidifying into a solid form. In all these cases, the roof will come out no less stable.
With the correct assembly of the “roofing pie”, the design of which consists of metal tiles or corrugated board, lathing, waterproofing membrane, truss system, properly equipped ventilation of the under-roof space is sure to extend the life of your roof. Never play the lottery "will carry it - will not carry it", but "wind it on your mustache" the advice of experts.

To create a beautiful and cozy living space, you can use wood as a finishing material from the inside, different kinds composite panels, HRL panels (or in Russian LVD - laminate high pressure). No less popular is the attic, decorated with your own hands using drywall sheets (gypsum plasterboard).
Roofing should be made of lightweight materials: corrugated board, metal tiles and similar materials that can lighten the weight of the mechanism, taking into account the load that will be transferred to an existing building.
To begin with - before altering the attic - you need to make drawings and draw up an estimate. This way you will see in advance what difficulties you will face.
It is not easy to develop a plan for a mansard roof alone: certain knowledge and skills in designing and carrying out specific calculations are important here. You can’t make mistakes: then the structure of the building will be unreliable, and besides, it can damage the overall building. Although if the idea is not too complicated, then you can do it yourself.

Everything must be included in the estimate: from the beginning of construction to the design of the premises.
Partitions
One of the most simple tasks, which you can definitely handle with your own hands, is a device interior partitions. Usually, drywall and metal profiles are used for these purposes. Everything is done quickly and at minimal cost.
The design is simple: a frame, and gypsum boards are attached to it. At the end, the lining of the partition is made. To do this, you can use lining, block house, imitation timber or even plywood with wallpaper - a matter of taste.


Finishing work
After warming the attic, you should think about finishing. Of course, it all depends on how you will use this room. The peculiar geometry provides excellent prospects for creative design solutions. Immediately, we note that the finishing process is a complex of tasks, each of which has its own function. Let's take a closer look at finishing materials.
- The most popular material plastic lining. Advantages: uniqueness, budget, environmental friendliness. The installation of the board can be different: diagonally or in a circle, horizontal or vertical. Of the minuses, it is worth noting fragility and, perhaps, weak resistance to negative factors.

- Not the most expensive material plywood sheet. Covering the walls with them is quite easy. It also has excellent sound and heat insulating properties; no pre-leveling of the surface is required before installation.
- Finishing the attic with drywall will allow you to embody the most original design solutions: with its help you can create dropped ceilings, arches and even columns. At the same time, this material easily absorbs moisture, which is its negative side. But if you choose a special type that is resistant to moisture, then this finish will last you a very long time.


So, let's sum up and summarize the above.
To design a beautiful and high-quality attic you will need:
- careful design of the future extension;
- strengthening load-bearing walls and foundations;
- roof removal;
- erection of the frame (it will be easy enough for you to assemble it with your own hands);
- roof insulation, waterproofing;
- window installation;
- interior decoration and insulation.


With excessive savings, as practice shows, the house can eventually turn out to be of poor quality and unattractive. Therefore, choose materials wisely, take into account the recommendations of experts, consult relatives and friends, as well as those who already have similar experience.
If you want to maximize the usable area of your home without spending fabulous amounts of money, you should definitely consider projects with an attic. Developers' experience suggests that this best way economy class housing plans, because one square meter housing in it is several times cheaper than in two-story buildings. There is a misconception that the attic is suitable only for seasonal use in the warm season.
However, it is erroneous, since a well-insulated broken mansard roof perfectly retains heat in winter, its temperature regime no less comfortable than in the heated rooms on the first floor.
Even without additional thermal insulation, the attic is a kind of "air cushion" that maintains the optimum temperature inside the house.


A sloping mansard roof is considered a technically complex structure, and it is advised to entrust its construction to a professional team. However, a person familiar with roofing works on the example of traditional gable roof, is quite capable of overpowering its construction with his own hands, with the help of two auxiliary workers, assistants. The main thing to understand is that this is a process that requires a serious approach, which is reckless to start without preliminary calculations.
Varieties of mansard roofs
Attic - a heated or cold space under the roof, which is used as a living space. According to building codes, in the attic it is necessary to equip windows for natural light and ceilings of sufficient height for a person.
Rooms under the roof, in which these conditions are not met, are called the attic. The following types of roofs are suitable for the attic device:


broken roof
Installation of a mansard roof suitable for habitation provides for mandatory thermal insulation, organization of natural light with the help of dormers or vertical windows and forced ventilation.
Benefits of a broken structure
Of course, the attic can even be equipped by building an ordinary one with your own hands. triangular roof. But due to the steepness of the slopes, in order for the ceiling to learn, the height of such a roof must be very large. This is not economical, and also impractical, because a roof with a variable angle of slopes allows you to more effectively manage the available space.
The flatter top makes the ceilings appear higher. According to building codes, if the distance from the floor to the ridge connection is less than 2.5-2.7 meters, the room is not considered residential, it cannot be called an attic, it is rather just an attic. The sloping roof design has the following advantages:
- Possibility to build higher ceilings.
- High level of protection against atmospheric precipitation, wind.
- Light snow removal from slopes.
- Helps to keep warm.
- Rational use of roof space.


Construction stages
Create a project
When drafting a broken mansard roof for do-it-yourself construction, it is better to draw up drawings with different projections, which will comprehensively show the location of its elements. Based on the length and width of the house, you need to determine the size of the attic room, as well as the roof. First of all, the geometry of the slopes is built:


In order for the project calculations to be correct, it is important to accurately make primary measurements, as well as maintain scale. Can make design easier computer programs, in which it is enough to enter the dimensions of the building and the desired type of roof, they perform the rest of the work automatically. If access to such software No, it is better to use ready-made projects.
Calculation of the truss system
Rafters are the main supporting elements of a broken mansard roof, a kind of its backbone. They are subjected to enormous loads, so they are subject to special requirements.
The choice of the section of the rafter legs is not random, but in accordance with the installation step, the distance between the supports, the values of wind and snow loads. If the first three indicators can be easily determined from the drawn up drawing, then the last two need special explanation.
- The territory of Russia is divided into 8 zones with different snow loads. For each specific roof, this value is adjusted by the angle of inclination of its slopes. Since the slope of the slopes is different, two indicators are calculated, respectively, the upper and lower rafters can have a different section.
- There is also zoning for wind load, which also includes 8 zones. With the help of a coefficient that takes into account the height of the building, amendments are made to the tabular value of this indicator.
- The values of these two indicators are summed to determine the total load. Numbers should be rounded up to provide a small margin of safety. Based on them, according to the reference tables, the required section of the boards is determined.


Mauerlat installation
The beginning of work on the equipment of a broken mansard roof - the installation of a mauerlat, a durable beam measuring 100x100 mm or 150x150 mm. It is fixed at the end of the side outer walls.
Its main task is to distribute the weight of the roof structure, transfer it to the foundation, as well as protect the slopes from tipping over. Mauerlat is laid on the upper part of the wall along a pre-laid waterproofing, which is used as a roofing material folded in half or several layers of a special film.

Fastening is carried out using metal studs, they must be placed in concrete screed. If we are talking about the reconstruction of the roof with our own hands, it is mounted with anchor bolts to the wall to a depth of 15-17 cm.
For timber, as well as log houses, wooden dowels are used. Please note that the installation is flush.
Assembling the truss system
Assembly truss system of a broken mansard roof happens in the following order:

The fulfillment of the above points forms one truss truss. In the same way, the rest are installed in increments of 60-120 cm.

Waterproofing and roofing
When the do-it-yourself installation work is completed, you need to organize its waterproofing. This requires a waterproofing film or membrane, which is usually produced in the form of a roll.

Fasteners are selected depending on the type of material. For tiles, galvanized self-tapping screws with rubber heads are used, which are deformed in the process of twisting in such a way that they waterproof the hole.
In order to speed up the process, you can use a screwdriver. Shinglas or ondulin is fixed with nails 100 mm long. After finishing roofing works gables and overhangs of a mansard sloping roof are made out.
Summing up, we can say that a broken mansard roof will help to expand the area of \u200b\u200bthe house with your own hands. You can build it with your own hands, however, this will require special skills and costs, which, no doubt, will pay for themselves.
Video instruction


Today we will talk about popular solutions for mansard roofs, their capabilities. After reviewing the illustrations, diagrams of the truss system, you will get a clear idea of their device. And having studied the basics of calculation, you can optimize the cost of lumber. Get information about important points space layouts. Find out in what sequence the mansard roof truss system is mounted.

mansard roof this is a complex design, and requires careful calculations
Drawings of the truss system
Any mention of an attic is associated with a voluminous "pentagonal" roof in which you can live, but there are other options.
Shed
Extremely simple, reliable shed mansard roof. Thanks to the rectilinear forms, it looks modest, but elegant. Large floor-to-ceiling panoramic windows add special respectability, because such a design not only allows, but provokes their installation.

House with pitched roof, with windows almost on the entire wall
The rafter system is very simple: the straight rafters of a single slope rest on the mauerlat of opposite walls of different heights, and, if necessary, on intermediate supports. The proportions of the walls are selected for a slope of 35-45 degrees, which guarantees stability to wind loads and normal snowfall.

The volume is used effectively - if desired, this is an additional full-fledged floor, since the usable area is equal to the area of the previous floor.
gable
Relatively simple widespread roof. It looks unpretentious, but inspires confidence, as it maintains the traditions characteristic of the Russian style. As a result, it is rarely designed specifically for the attic, more often it is adapted in finished form.

The gable roof is traditional, and most often the choice falls on it.
Structurally simple - specifications and a truss system like a conventional gable roof. Straight rafters rest on the Mauerlat, angled into a ridge. Gables are triangular in shape, straight, sheer, almost always glazed, often with access to a balcony.

Most often, a similar scheme is used for arranging an attic in small house with gable roof
It is problematic to fully use the volume, but it is possible, even necessary. The useful area is relatively small, the ceiling is usually "broken". However, the skillful arrangement of furniture, bold design solutions disadvantages can be turned into advantages.
broken line
The most popular option is a sloping roof with an attic. Which is not at all surprising - despite the complexity, it is the most convenient and practical. Overall forms and broken lines symbolize solidity and professionalism. Appearance of this roof "by default" is associated with the "mansard". This is quite natural - it is purposefully designed for living quarters.

To add space on the attic floor, preference is given to a sloping roof
The rafter system is quite complicated, but its advantages are worth the money and effort spent. Characteristic pentagonal gables, with the functionality of a gable roof - the same opportunity to insert windows, arrange an exit to the balcony.

The circuit is more complex, but gives more space
Spacious attic roof of a private house. The volume is used to the maximum - at full height, the useful area of \u200b\u200bthe room is equal to or slightly less than that of the previous floor.
Calculation basics
The purpose of the calculations is to find a compromise between aesthetics, reliability and cost.
aesthetic side. To begin with, a general sketch of the roof is being designed. The proportions are determined, compared with the size of the house.

Difference between broken roof and gable essential
After that, a constructive calculation is carried out, where factors are taken into account:
Own weight structural elements of the roof. The load from it acts on each element of the truss system.
Wind loads. They are variables and affect all elements.
. It acts unevenly, it is transmitted from areas where mansard roof with a slope of less than 30°, snow does not linger on steeper sections. In this case, the load can be unevenly distributed over the left and right slopes. Affects beams and upper rafters.Weight people, interior elements and furniture. Loads only the floor.
Factors are processed, summarized. Based on the results, conclusions are drawn about the dimensions of the structural elements. For guaranteed strength, they are rounded up. But technological assembly is hampered by the individual width and thickness of each structural element rafter system, and their custom-made production is unprofitable. Therefore, the elements are combined into groups standard sizes lumber. A standard solutions significantly reduce the cost of the project - after all, to order is always more expensive.

If the project is individual and non-standard, it is better to order accurate calculations. Taking into account the number of factors, their specific impact on the truss system, the conclusion suggests itself - an accurate calculation is the business of specialists. It makes no sense to do calculations on your own - there is a high probability of error. For standard and standard solutions, a ready-made existing project can be adapted.
In addition to the main points, a few practical recommendations will come in handy:
Rafter step corresponds to the dimensions of the heater.
Rafter width corresponds to the thickness of the insulation.
layout
The stairs are key. Its position must be linked with future floor beams. If the pitch of the rafters allows, we simply orient it between the beams. Otherwise, we design a reliable convenient entrance to the attic.
At the planning stage, it is useful to think over the interior. At this stage, decisions are made about partitions and additional natural lighting - skylights. Of course, it's too early to think about decorating, but the engineering part should become clear - what functionality will be implemented.

In the attic you can equip an office with a corner for music lessons
After all, the features of such premises: broken-inclined ceilings, their reduced height, unusual walls and non-standard lighting.
Therefore, a specific layout of the premises is necessary, and in them, the distribution is correct - space zoning:
For the main life activity, are allocated bright and well ventilated premises.
Uncomfortable areas are equipped under the storage.
"Unusual conditions" to give away at the disposal of children.
Interior design and ultimate comfort are created by the skillful use of potential finishing materials, furniture and accessories.
Assembly
In most cases, the construction of a mansard roof begins with a Mauerlat device. A strictly horizontal position, parallel, reliable fastening of its bars is important.

Mansard roof truss construction
For the installation of the rafter system, two options are practiced: the elements of the truss system on the ground are assembled into trusses, lifted and installed ready-made. Or everything is collected separately at the top - "in place", observing procedure:
Roof beams are laid. This takes into account the step of the truss system and the possibility for arranging stairs.
Straightaway laying a rough ceiling, or temporary flooring for safe work.
Racks are mounted. Temporary braces are arranged to keep them in a vertical position. Runs are laid on the racks.
Over runs stacked puffs.
Mounted lower rafters.
Temporary braces change to permanent wind connections in the longitudinal position.
Installed top rafters.
exhibited pediment frame, taking into account the design, openings are organized for: windows, balconies, other options are provided.
Further down the rafters roofing membrane is laid, and is pressed against them with a counter-lattice - bars with a section of 50x50 mm. To organize the ventilation gap. This preparations for warming. They need to be carried out at this stage. Missing is a huge omission.
On the counter-lattice crate stuffed, with a step corresponding to the roofing.
mounted roofing, its additional elements: wind boards, ridge.

The same house can look different and have different usable area.
Video description
About the features of the calculation of the mansard roof in the video:
Exactly according to the same principle, an attic floor with a gable roof is mounted. Moreover, its device is even simpler - all the rafters are solid.
The next step is to insulate the roof. Of course, it can be done from the outside, before the installation of the membrane, battens and roofing. But it is safer from the inside - there will be no threat of precipitation and work will be carried out more carefully, because successful operation depends on it.
The insulation from the inside of the room is protected by a vapor barrier film. And between it and the interior trim, a mandatory ventilation gap device - the interior trim is not mounted directly on the rafters. For her, specially, as well as outside for the crate, a counter-rail is stuffed, or a frame is arranged.
On our website you can find contacts of construction companies that offer a turnkey roof calculation and repair service. You can directly communicate with representatives by visiting the exhibition of houses "Low-Rise Country".
Conclusion
Mansard roof is perfect solution, allowing you to increase the usable area of \u200b\u200bthe house without a significant increase in the cost of its construction. There are a lot of solutions for the construction of the attic floor - they can be both standard and designed for a particular house. But in any case, the installation of the attic requires specialized knowledge and this work should be done by professionals.
Let's figure out what exactly we call the attic today. According to the building regulations in force today, we are talking about a room in the attic, part of the facade of which is formed by the roof surface.
Moreover, if we consider the line of intersection of the walls of the facade of the building and the roof surface, then its height above the floor level should not exceed one and a half meters.
There is a wide range of possible solutions for their design. It must be remembered that one of the main features of the attic is that there are two sections of the roof slope. One of them is more gentle, the other is with a stronger slope.
In addition, it is desirable that the height of the vertical part of the wall be more than one meter. This will make it possible to feel in such a room much more comfortable than in the opposite case.
Design
Consider the types of truss systems for attic rooms. Here we will talk about the main types of such premises, depending on their structure.

Here we are talking about a flat inclined surface. However, the slope in this case is usually relatively small. Designing such an attic is much easier than for other types, but there will be relatively little usable space in such a room.

There are many such solutions. Let's talk about some of them. It is also one of the most simple options. It looks like this.
As we see here, when designing an attic, the integrity of the roof is not violated in any way. This allows you to reduce the cost of arranging such a room.

But the downside of this option is that the size of the attic itself in this case is minimal in comparison with other architectural and design solutions.
Let's consider a similar option. However, we note that it allows you to increase the size of the attic. It is designed for a different type of roofing device.

Its main disadvantage is the same as in the previous case. There is very little space available here. Which, however, pays off with the simplicity of designing this kind of attic.

Here we will consider more complex geometry.
We see that the design of this type of attic presents certain difficulties. At the same time, the room has a much larger volume than in previous cases. There is a vertical outer wall, which makes it possible to make high-quality windows in the attic.

An important aspect of this solution is that there is an opportunity to push the vertical wall of the attic beyond the facade of the house. This gives a good opportunity to increase the area of \u200b\u200bthe room. Note that here we are talking about a single-level attic.

Here we are talking about a much more complex version. A two-level room with several rooms can also be one of the attic options.
However, the design of such an attic is difficult task, although it can provide additional flexibility and efficiency in the use of available space.
Roof shapes
In this section, we will look at the main types. To the most simple types can be classified as single or double-sided.
A more complex option is to use a broken type. When using this variety of it, the internal space that can be used for an attic space increases significantly. This option is a kind of gable roof.
More complex options are those that are made in the form of a dome, pyramid or cone.
There is also a four-slope, which is also called a hip. In fact, here we are talking about a gable roof, supplemented by two more slopes, which are located in front and behind.
It is also impossible not to mention multi-gable roofs. This implies a combination of two or more gables, which are located perpendicular to each other.
The following figure clearly demonstrates some of their types.
Broken mansard roof
There are not so few varieties of attics. However, some options are quite rare. One of the most common is this. What exactly do we mean when we talk about this?
In fact, we are talking about the usual gable roof. Its only difference is that in the variant under consideration, each slope is divided into two sections (this is the most common option, but there may be more than two such sections), which have a different slope. The part that is in the center is less inclined, and at the edges it is more. Let's explain this with a picture.

Now let's move on to how it works. Let's look at another picture.

This diagram shows the location of the rafters that make up the frame. Let's briefly talk about them. Floor beams. This is the part on which the entire roof structure is mounted. On the one hand, this is part of the ceiling of the upper floor of the building.
On the other hand, the remaining structural elements are mounted on these beams:
- Racks - vertically arranged elements that serve as a support.
- Runs are located along the attic.
- Sloped rafters are a sloping base for decking.
- Cross beams are used for attic floors.
The main elements of the design were listed here. Let's show another diagram.

Here are some more important elements of the truss system:
- Mauerlat. These are longitudinally located beams that serve as the main support for the layered rafters.
- Hanging rafters. They are located in the upper section of the roof.
- The tightening serves to increase the strength of the entire structure.
- The struts are an additional support for the layered rafters.
The truss system is the foundation, but that's not all. The roof itself is quite complex. After all, it should protect the house from rain, cold and heat. In addition, water condensate forms inside the house, which can not only create significant discomfort for residents, but also damage the thermal insulation layer. Therefore, it has a rather complex device.

Let's explain this diagram. Typically, an insulating layer is placed between the layered rafters. Under it directly have a vapor barrier. A waterproofing layer is placed above the insulating layer. A thin air layer is left under it, which serves for ventilation.
On top of the layered rafters, a counter-lattice is nailed (slats that are located along the rafters). And on them - a crate (slats located perpendicular to the rafters). A roofing is installed on top. This is an example of a roof device in which ventilation is provided.
Most are of this type. In areas where a warm and dry climate prevails, a roof can be installed in which this kind of ventilation is not provided.

We will tell you how mansard roofs can look in the most common cases.
Here is a design for a gable mansard roof. Here is another diagram that corresponds to a two-slope polyline.
If it is four-pitched, then this allows you to take more for the attic free space. Here circuit diagram truss system for them.

The above diagram shows the truss system that can be used in the design. Next, we will show another example of a four-pitched (hip) roof.

Do-it-yourself mansard roof construction technology
If we have plans to build an attic, then, in principle, two main ways are possible:
- Do it yourself.
- Contact the experts.

Each of the options mentioned has its own advantages and disadvantages. If you do everything necessary work do it yourself, it will cost much less. But for this you will have to work hard and you will need to do the work at a high-quality, fairly professional level.
If you turn to specialists, then the work, although it will be done efficiently, will also cost much more.
If you still decide to take on this business yourself, then you first need to prepare the necessary materials and tools.
Creation will take place in two main stages:
- frame creation,
- roof arrangement.
Various materials will be required to carry out the work:
- Wooden beam of various sections.
- Boards 3-4 cm thick and 15 cm wide.
- Roofing material (slate).
- Insulation.
- Vapor barrier.
- Waterproofing.
- Nails 80 mm.

You will also need tools for work:
- Sharp knife.
- Hammer.
- Axe.
- Construction stapler with staples.
- Plumb.
- Roulette.
- Hacksaw.
Since it is a rather complex structure, you must first draw up its diagram and calculate the parts.
Consider the situation for a gable broken mansard roof. Let's talk about what calculations and how to do it.
First of all, it is important to decide on the roofing material. It must be chosen based on the specific features of the situation. In particular, let us pay attention to two different aspects of the issue. The level of thermal insulation and waterproofing in the attic is significantly lower than in the house.
This necessitates a very careful attitude in the selection of materials for the construction of the roof. Another feature is that it is important to use lighter materials both for the roof and for interior decoration created attic.
Since each slope is divided into two sections, it is important to determine the angle of inclination of the steeper section. At the same time, it must be remembered that if it is less than 15 degrees, then this imposes special requirements on roofing material. If we are talking about a slope greater than 45 degrees, then almost any material can be used for the roof.
In order to determine the weight, you must first determine its area. To do this, its surface is divided into simpler geometric figures and their area adds up.
When determining the weight, the following are taken into account:
- weight of rafters and beams,
- insulation weight,
- waterproofing weight,
- roof weight.
First, the weight per unit area is determined, and then multiplied by its value.
When calculating the weight, do not forget about the possible weight of the applied snow and take into account its size. The additional effect of wind must also be taken into account.
The total load is found by dividing the total load by the roof area. Based on the number obtained and rather complex calculations, the necessary parameters for the rafter system are determined using special tables, and, in particular, the value of the rafter step and the recommended roof slope.
Carrying out work
Installation of the truss system
Before carrying out such work, it is necessary to prepare the wood. It must be well dried, and also treated with a special antiseptic and fire retardant composition.
At the first stage, you need to install the Mauerlat.

It is laid on a layer of waterproofing. The next step is to attach the ridge beam.

After that, layered rafters are installed. For convenience, the places of their attachment can be marked on the Mauerlat. Usually the installation step of the rafters is 70 cm. It is customary to cut the rafters in order to strengthen the connection with the Mauerlat.

The rafter system is the basis for the roof, but you need to install insulation and waterproofing.
First of all, you need to decide on the choice of material for insulation. Several options are common:
- Glass wool. This is a cheap and effective material, but when it is laid, dust is harmful to health. When used, this material is safe, durable and effective.
- MDF board. It has good thermal insulation and sound insulation. It is not usually used for residential buildings.
- Styrofoam is an effective material, it weighs a little. However, it is toxic and flammable.
- Expanded polystyrene is similar in its characteristics to polystyrene, but does not have its shortcomings.
- Mineral wool. IN last years is the most common material used for insulation. Effective in use, almost no flaws.
We lay a waterproofing film on top of the rafters, which must be carefully fixed. From below we insert blocks of mineral wool and fix them with a vapor barrier membrane, attaching it from below to the rafters.
At the same time, sheets of mineral wool must be cut a few centimeters wider than the gaps between the rafters. This is necessary in order to prevent the formation of cracks in the thermal insulation.
Features of rafter systems of mansard roofs
The frame is built to ensure that it will support the full weight of the mansard roof along with the so-called "roofing pie". On the other hand, it should be as light as possible in order to reduce the load.
Usually wood is used for such work. coniferous trees. This is due to the fact that such wood is more easily able to be processed.
Before use wooden details must undergo antiseptic and fire-fighting treatment.
Modern technologies and quality Construction Materials allow you to independently build a high-quality mansard roof. However, at the same time, it is necessary to carry out competent design and calculation of the necessary parameters.
Particular attention should be paid to the quality and reliability of the truss system being built.
It is difficult to imagine a building without a reliable roof over it. Any roof is the basis, the main guarantor of the inviolability of things in the house, the safety of property. She is the main protector from rain and snow, wind. After its construction, you can proceed to the next stage, which implies interior work. Having made this part unreliable, one cannot speak of a full-fledged dwelling. A do-it-yourself gable roof is the simplest and most functional option among other types of roofing.
There are several options for roofs, one of which is gable. The construction does not require a lot of talent, since this type of roof is the simplest. The housing element consists of the parts shown in the figure:
The design consists of the following parts:
Skate. The upper part that will connect the 2 slopes.
Rack. An installation that serves to redistribute weight from the top to the bottom of the roof. It must be done from quality materials.
Sill. Bar located horizontally. Connects the rack and bearing wall.
Struts. These boards are fixed at a slight angle. They serve to redistribute the weight from the rafters to the supporting elements below.
Rafter leg. These elements form a visible outline in the shape of a triangle. They serve to hold the roofing. The heavier it is, the more often it is necessary to lay the rafters.
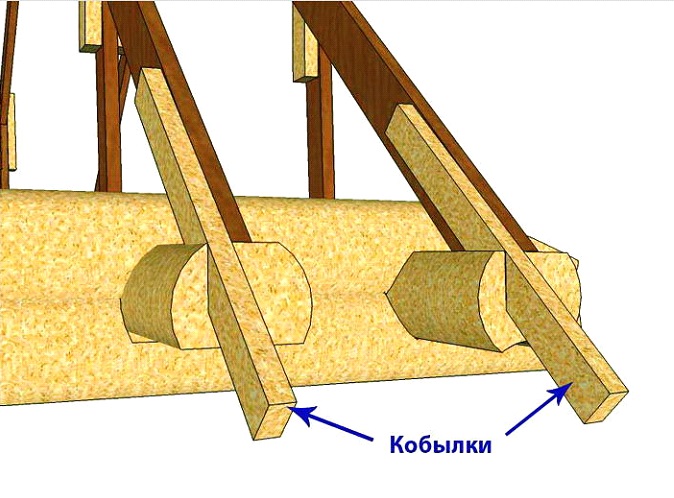
Filly. Boards that extend the rafters. Necessary to create an overhang from a gable roof, according to building codes, which should be at least 0.5 m.

Difference between rafters
a gable roof and a drawing is quite realistic to do on your own. There are several ways to construct all elements. The difference is the truss system used for construction. There are the following types of rafters:
The systems are used in many dwellings, the quality of both is sufficient for comfortable use. When building a mansard roof, they are used together. In this case, the hanging and inclined type of rafters are combined. It is worth creating drawings of rafters that will show the location of each element of the roof, erected by oneself, so that there are no incomprehensible moments. It will help you calculate the amount necessary materials.
Any element of the house must be created, understanding how all this will look like as a result. For clarity, a drawing is created, and so that everything fits perfectly, it is calculated in advance. The plan takes into account the length of the roof along the ridge, the length of the slopes, and the length of the plumb lines is shown separately. The angle of inclination of the roof is determined. The angle is determined taking into account the following points:
- At strong winds in the construction area, the angle is made around 10-12o so that the roof is not torn off.
- With significant winter precipitation, the slope is within 30-40o. snow will slide off easily. There are no difficulties in the calculations, but if the roof is made with a complex shape, this will make it difficult to calculate the required values.
Roof construction
After making the calculations and acquiring the necessary parts, the Mauerlat is installed. After that, a crate is created. The element is the basis for a do-it-yourself roof, made of pine or other coniferous wood. The material is strong and light, capable of spreading the weight of all elements over the entire plane. Placed along roof slopes, between rafter legs, top of the walls. 
In order for the element to last longer, an insulating layer is needed between the wall and it. Suitable for this ruberoid. Mauerlat can be fixed using any fasteners that are convenient.
For the construction of the roof, you must follow the plan:
- Fixing rafters. If hanging ones are used, they must be assembled in advance, using fasteners to stiffen this part. First, the extreme elements are made, after the internal ones. With a layered system, a bed is first created, where the supports will be installed. If the length of the elements is insufficient, you can add it using the installation of filly.
Lathing installation. Any materials can be used for construction, but it is important to get rid of the bark from the boards in order to increase the service life of the elements. If you plan to use soft roof, the crate is made continuous. It requires a rigid base so that there is no deformation during operation. Lattice system
Roof laying. There are many coating materials, each of them involves the use different methods coatings. Do not neglect the recommendations of the manufacturer of the material. It is important to make a small overlap between the elements. The structure must not be broken so that there are no leaks.
Don't forget that reliable roof, built with your own hands - a guarantee of the safety of property in the house. Do not neglect its construction, so that later you do not have to make complex repairs.


