What you need to repair the walls in the apartment. What you need to know for those who begin the overhaul of a private house. The initial stage of the overhaul
We do not always have the opportunity to completely empty the apartment in order to make repairs. Many people face such a situation, but not everyone can find the right solution and endure this stressful period. So how can we properly prepare for the start of repairs so that our nerve cells do not begin to be consumed along with the working materials? Follow our instructions.
1. Decide on the scope of work and their performers
At the very beginning, you need to decide what kind of work you are aiming for: will it be a “small” cosmetic repair or are you set for a major overhaul? Will you move from room to room and make repairs gradually, or are you ready to do repairs by type of work and live on the construction site all the time? Who will do the work: do you do it yourself or hire professionals? In any case, the choice will always be yours.
Of course, it's easier to invite professional designer, builder, finishing, electrical and plumbing specialists who will determine the strengths and weaknesses of the room. Note that this will directly affect the costs and deadlines, and the designer’s consultation and his assistance in developing a sketch will help save time and money on rework.
2. Write a plan
After you have made a choice on the type of repair and its performers, you need to prescribe a clear plan and schedule for the repair, which should contain a list of rooms and the work carried out in them, the cost of work and the cost of purchasing the necessary materials.
3. Start repairs at the right time
The best time for repairs is spring and summer. In the spring and summer months, heating is turned off, so it will be much easier for you to agree with the housing department on temporarily turning off the riser to replace radiators.
In the warm season, you can safely open the windows and constantly ventilate the room. In addition, putty dries faster in spring and summer.
4. Free up space
After drawing up and approving the estimate, start boldly freeing the rooms from furniture, lamps and unnecessary things.
The more you clean at the beginning, the less you will wash at the end.
Fabrics absorb all odors, so before starting repairs, it is necessary to pack all things in airtight bags and take them out of the room. It is best to store clothes in vacuum bags, they take up less space and do not allow dust to soak into the fabric.
In wall cladding, we recommend using panels made of natural wood or decorative panels based on gypsum. Extremely dangerous to use in an apartment plastic panels, as they are very flammable and in case of fire exude a suffocating odor that poisons the body.
The floor is done in two stages, moving the furniture from one part to another.
As for finishing the ceiling, here you need to choose: either you endure and breathe dust all the time, or, having abandoned puttying, sanding and painting the ceiling, you are ready to install a stretch fabric.
The cost of such a stretch ceiling is approximately equal to the cost of work and materials of a painted ceiling, and the installation time is only 2–3 hours (as opposed to 5–6 days for a painted one). However, it is important to understand that such film ceilings "do not breathe" and, together with plastic windows and linoleum create a closed "non-breathing" space. Such a room needs to be ventilated frequently, however, such a stretch ceiling can protect you from leaks from the upper neighbors. It inflates like a bubble and is able to hold up to 50 liters of water.
Means of protection
- On all doorways with Velcro (picture mount) tightly attach wet gauze. Its fiber perfectly absorbs building dust. Gauze must be rinsed several times a day and reattached to doorways.
- Masking film for surface protection. It prevents putty or a cloud of paint microparticles from getting on the surface. Such a self-adhesive film can be removed without residue, but do not forget that all protective materials must be removed after painting, and the surfaces washed and cleaned of possible minor troubles. If the second coat of paint is carried over to the next day, the protective film must be reapplied.
- masking tape. It fits snugly and does not allow paint to penetrate beyond it, thereby blocking off the surface for painting. Such adhesive tape is used to seal window frames, door trims without fail and all protruding surfaces that cannot be repaired.
- Polyethylene film and covering material (rags). During the repair, the floor is covered with a film to protect it from damage. It is necessary to cover cabinets from all sides, appliances and even flowers with covering material. True, in the evening it is advisable to open the flowers so that they “breathe”.
- Respirator, gloves And other personal protective equipment. During the period of painting surfaces, sawing tiles, grinding surfaces and all dusty work, apartment residents need to protect their health with such individual means and drink as much liquid and dairy products as possible to help the body quickly remove building dust particles that have entered the lungs during repairs.
Approximate repair plan
1. Definition of the budget.
2. Consultation with designer and builders.
3. Preparation and approval of the budget.
4. Freeing the room from furniture and things.
5. Launch of the construction team.
6. Beginning of work. Dismantling (one day is enough for one room for dismantling).
7. Electrical and plumbing installation (the most noisy, dusty and dirty work, during which the kindness and patience of neighbors are tested).
8. Painting works. These are quiet, but very dusty in the process of grinding work. Plastering and puttying works can last from 1 to 10 days, depending on the task (leveling on beacons, sealing deep strobes, visual leveling, wallpapering, decorative plaster or painting). In the same period, ceilings are made if they are prepared for painting.
9. Filling the floor can be both before (the need for serious alignment) and after the preparation of the walls (if only adjustments in parts are enough).
10. Mounting or flooring floor covering.
11. Installation of stretch fabric on the ceiling.
12. Installation and connection lighting fixtures, sockets / switches, decorative elements (baguettes, floor plinths, cashing on doors / windows, and so on).
13. Spring-cleaning.
14. Arrangement of furniture and decoration with textiles.
15. Repair completed!
Repair is associated with a million spent nerve cells, with a difficult and very long process? We will prove you otherwise! You don’t believe it yet, but repair can be a pleasure if you turn this difficult and, at first glance, rather boring task into a simple and exciting process.
And the main thing in this matter is the ORDER, when the sequence of do-it-yourself apartment repair is observed, and all the stages of repair in the apartment follow one after another according to a pre-compiled repair plan.
So, you nevertheless decided and tuned in to make repairs in an apartment, a separate room with your own hands. How to make an apartment renovation with your own hands? What is the best place to start? When and in what sequence to change doors, windows, repair floors? What is the procedure for carrying out repairs? We will try to answer the main questions in this article.
Stages of repairing an apartment with your own hands: we plan in advance the order of work

Indeed, it is important to know and follow the sequence of work carried out at all stages of apartment renovation from scratch.
If you follow the sequence of events, you can significantly save money, reduce repair time, achieve a better result when finishing work
The first stage is global preparation

Each repair begins with global preparation. First of all, it will be necessary to perform all dismantling work: removing plaster, old wallpaper, whitewashing, door blocks, flooring, and, if necessary, dismantling partitions and rearranging them.
There may be such a situation that already completing the repair, when finishing, you will find that you still forgot to dismantle something. Here we have to redo a large part of the work, and redo it slowly, carefully, in order to minimize new destruction.
Therefore, having finished dismantling everything unnecessary, old and to be replaced, very carefully examine the result of your work: have you done everything.
Stage 2 - replacement of double-glazed windows

This work is rather dirty, especially its first part, when the old window blocks must be dismantled. After installing the window and window sill, immediately cover them with a thick polyethylene film so as not to scratch or smear during subsequent work.
Stage 3 - plastering work

When performing plastering work, the following sequence of work must be observed: marking for beacon profiles, priming walls, installing a beacon profile, plastering walls, slopes. Plasterboard walls are not subject to plastering. Works on ceiling plastering, installation and installation of tension and suspended structures should be carried out only after completing the wiring on the ceiling of ventilation, electrical cables, and other communications.
Stage 4 - wiring of electrical communications, plumbing work
 The activities of the fourth stage are one of the most critical stages of repair - this is the installation of heating radiators (or replacement), laying and wiring electrical cables, low-voltage wires (this includes ground cables, Internet, telephone, TV, alarm.
Before you start laying cables, be sure to mark the output of sockets and switches on the plastered walls. Next, proceed with the work on strobe holes and grooves for cables, junction boxes, socket boxes, install a built-in electrical unit.
Be sure to draw a wiring diagram: it is needed in order to prevent accidental contact with the places where the wire is laid when you start drilling a hole, hammering nails. It is very important in the kitchen, toilet, bathroom before laying the electrical wiring to carry out the piping, including other related work.
Fifth stage - floor preparation
Underfloor heating, screed and leveling. When the screed is laid, leveled, it is necessary to wait for its absolute drying. For different materials– different drying times, carefully read the instructions in the instructions or packaging.
6 stage of repair - proceed to finishing

When the floor is prepared, you can install the doors, then proceed to the finishing work. The sequence of finishing works depends on the choice of technologies and materials used. So, whitewashing or painting the ceiling is done first, and, for example, suspended ceiling It is best to mount when the wall decoration is finished. Laying of any floor covering, whether it is linoleum, tile or parquet, is carried out when both the walls and the ceiling are ready.

Then you can install skirting boards, sockets, platbands, all sorts of decorative elements; plumbing, faucets, various accessories are installed in the bathroom, kitchen, toilet.
Important! If possible, it is better to repair the entire apartment at once and entirely. Similar stages of work, this is especially true for “dirty” ones, such as removing old whitewash, installing windows, not to mention breaking and rearranging partitions, it makes sense to do it in all rooms at the same time in order to prevent this when carpet is laid in one room, in the other had just begun to wash off the old whitewash from the ceiling.
If it is problematic to immediately repair the entire apartment, you need to start repairing from the farthest room from the front door and continue repair work, gradually approaching the exit. Repair of the corridor and hallway is done last. This is a fairly obvious rule: it is clear that carrying buckets of mortar, bags of construction waste around freshly renovated rooms is far from the best solution. But this rule is constantly violated ...
Read about - all the secrets and features of the technology for installing double-glazed windows in residential premises.
Watch the video on how to putty drywall under the wallpaper - that's it drywall sheets Before wallpapering, you need to prepare.
By the way, you should move from the room farthest from the hallway even with a complete renovation of the entire apartment. To a greater extent, this applies to the final stage of work - finishing.
This is how the apartment repair instructions look like. For those who prefer the video format to reading, we suggest watching an informative video on do-it-yourself apartment renovation:
Many people ask themselves: how to make repairs in an apartment with your own hands in order to save money. After all, inviting experienced finishers, you will have to pay a lot of money.
This article will tell you about the main stages of finishing apartments.

Repair types
First, let's figure out what types of repairs are:
Capital
During such a finish, the appearance of the apartment changes completely, that is, new doors and windows are installed, a different coating of walls and floors is applied, plumbing is reconstructed, and the location of sockets may change.
You can always use the services of INTEL DESING, the main direction is to create a unique interior design for your apartment

To reduce costs and time for overhaul you need to make a work plan.
Cosmetic
It involves carrying out work that will update the look of the apartment. This includes finishing walls and ceilings, changing flooring.

It will take less time and money than a major overhaul

Renovation
In the 90s. this concept meant expensive work according to European standards. Now it means modern renovation apartments, the use of bold design solutions, application of room zoning and much more.

The result is an exclusive room in which it will be comfortable to stay.

If you need to completely transform your home, then choose a renovation. But you need to remember that the price of such a transformation is high.

Before you start work, you need to create a housing project and come up with a design.
Main stages
First you need to draw up a phased plan for your repair. It will help calculate the costs and calculate how many materials will be needed.

The main stages of the repair will be the following
- If major repairs are required, then first of all, partitions are installed, floors are leveled, walls are plastered and ceilings are mounted.
- Then they do the flooring.
- Install plumbing.
- Install doors.

Before starting work, clean old finish. It is impossible to leave old wallpapers and glue new ones on them, as some do, as they can peel off along with the new ones. Then remove the remnants of glue, remove the cracks.

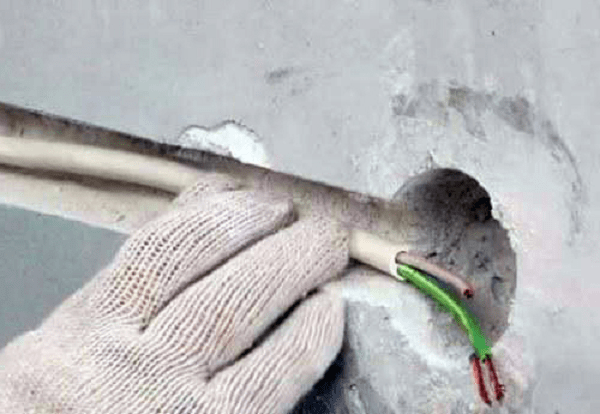
The most important process is the installation of wiring and pipes. For this, strobes are made, where pipes and cables are laid.

If construction works are performed by specialists, they should be asked to draw up a communication plan. This will help to avoid damage to pipes and cables in the future.

The next step is to install windows. When they are ready, you will have to cover them with oilcloth so that dirt does not get in.
Note!


After the windows, you can move on to the walls and ceiling. The surface is rubbed, puttied and primed. Wall primer is required to give strength. When it dries, you can start painting.

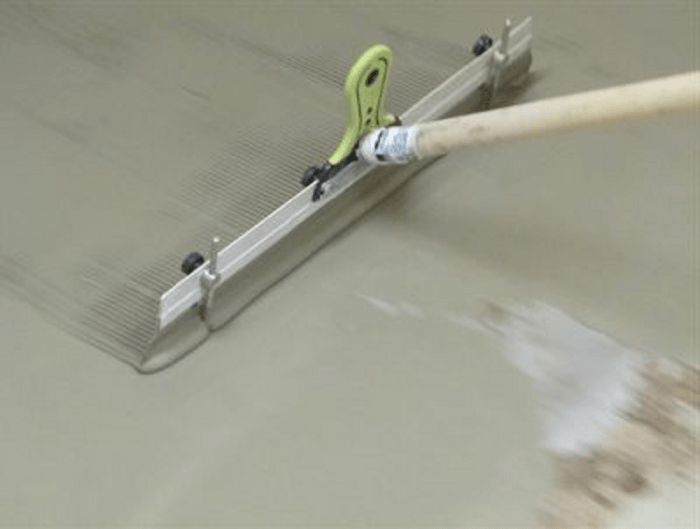
If you want to change the floor, it is better to use a self-leveling mortar. It will require less time than a screed on your own.

Now you can start wallpapering. Beautiful repairs in the apartment can be done with the help of cheap finishing materials.
The main thing is that everything looks harmonious. Be sure to combine the pattern on the wallpaper and align it so that they do not bubble.

Floor covering can be anything. If you lay tiles, then you need to do this after finishing the ceiling.

Note!

The ceiling can be whitewashed, painted or laid out ceiling tiles. Many install suspended ceilings, which also looks great.

On final stage install doors. Then you can start arranging furniture and adding decorative elements.
Numerous photos of repairs in apartments are on the Internet. If you can not decide on the design, then they will help you.

In order for the repairs to be done to bring joy, you need to adhere to certain rules and listen to the following tips:

In order not to be disturbed by the noise from the corridor, there were no drafts, it is necessary to install doors with high sound insulation.

Before starting repairs, be sure to remove furniture from the home so that it is not damaged.
Note!


Do you have small children? So, choose washable wallpaper to easily wash off their patterns.

You can not save on wiring, as cheap cables can start to melt, which will lead to a fire.

If you do not want the pipes to be on the surface, then you need to purchase polypropylene, the joints of which are soldered. Metal-plastic ones are twisted, and they will sometimes have to be tightened.

If it is impossible to level the ceiling to the end, you need to install a stretch ceiling.
To prevent the plaster from pouring from the interfloor floor slabs, you need to properly close up the seams.

As you can see, it is not so difficult to make repairs in the apartment on your own. The main thing is not to deviate from the basic rules and everything will work out.

DIY apartment renovation photo


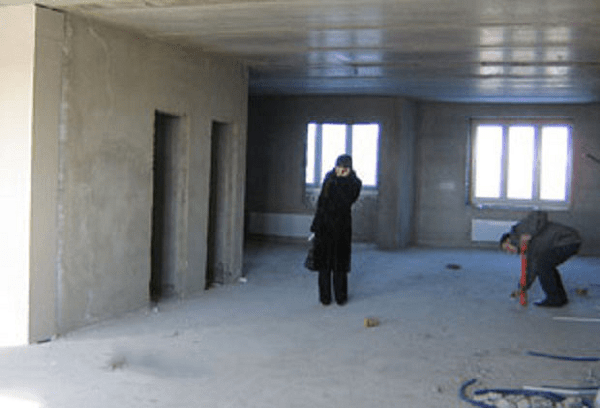
Almost always, new housing is purchased by a happy newcomer from a developer company without interior decoration and repair, but with communications brought into the apartment. Firstly, such housing in a new building will cost less, and secondly, almost always the repair and arrangement of the apartment by the developer is carried out extremely carelessly, using cheap materials. Thirdly, there is a desire to perform some stages of apartment renovation with your own hands or the hands of good craftsmen.
How to start repairing an apartment in a new building
First you need to make an audit and inspection of the apartment, identify problem areas of walls, ceilings and floors. We proceed in the following order. We determine what needs repair and finishing in the first place. If there is not enough time and money for a complete apartment renovation, it is necessary to put in order first of all:
- Entrance door and windows, apartment ventilation;
- Perform a full and highest quality electrical wiring and wiring sockets in the apartment. This stage needs to be thought out as detailed as possible, to draw up a connection diagram and a circuit for laying wires into the walls;
- Connect water and collect sewage in the bathroom and toilet, install a toilet, washbasin and shower;
- If the time of the beginning of the repair of an apartment in a new building coincided with the heating season, be sure to check the degree of heating of the aluminum registers using a remote thermometer.
Advice! Before starting the repair, a list of claims for the presence of defects or defects must be presented to the representative of the seller. You may be able to get compensation for repairs in a new building. Do not settle for rework by the company.
In the process of carrying out the above preparatory work you can calculate the sequence of repairs in a new building.
What affects the sequence of repairs in an apartment in a new building
Much in the repair of housing in a new building depends on the availability of resources of time and money. Having bought a “naked” apartment and having issued Required documents for the right to own, you automatically start paying rent and house payments, for the use adjoining territory for the removal of household waste and construction debris. After connecting electricity and water, a new apartment in a new building began to bring you a loss in the form of costs for its maintenance and decoration. The longer the repair time for an apartment in a new building, the more expensive it will cost you.
There are two main options for approaching the issue of finishing new apartment in new building:
- Planned renovation and finishing of the apartment. In this case, the hosts are detailed map and a schedule for the completion of finishing works, in which all the main types of finishing and installation of appliances are prescribed in stages. Such repairs, as a rule, are carried out from scratch to its completion by one team of craftsmen. The turnaround time for a repaired facility can take several weeks or months. The disadvantages of this approach include the ever-increasing price and cost of the work, sometimes exceeding the estimated costs by more than two times. As a result, if due to unforeseen circumstances there are not enough funds, the repair may be delayed for an indefinite period.
- Quick repair from scratch. In this case, all of the above stages of repair in a new building are carried out by hired craftsmen with direct quality control on your part. The apartment in a new building will be prepared for further finishing of the rooms within a week. In addition to communications, they finish and equip the smallest room of the apartment with laying temporary linoleum and wallpapering. There are no amenities in such a room yet, but it can be used as housing - a temporary hut and a warehouse for building materials. All other work is carried out as free funds and time become available.
The first option is well suited if the family has small children or elderly people who need to provide some comfort and convenience. The second option is considered more economical and faster, especially if after finishing the kitchen, bathroom, toilet and one room, housing is rented out, with the remaining rooms of the new building being consistently brought to condition.
We carry out apartment renovations with our own hands and head
Among the most popular horror stories for new buildings are considered to be stories about the shrinkage of the walls of the house and its foundation. In reality, a similar process for a multi-storey building should be finally completed by the time the building is put into operation. This period averages no more than 18 months. If after 1.5 years in the corners, ceiling or cracks form at the joints and in the masonry of the walls, the tiles in the bathroom fall off, the hatches are deformed with the doors skewed - this means that the new building has certain problems with the stability of the foundation. It is worth waiting with repairs until the main thing is clarified - what is happening with the new building.
How to start renovation in a new building
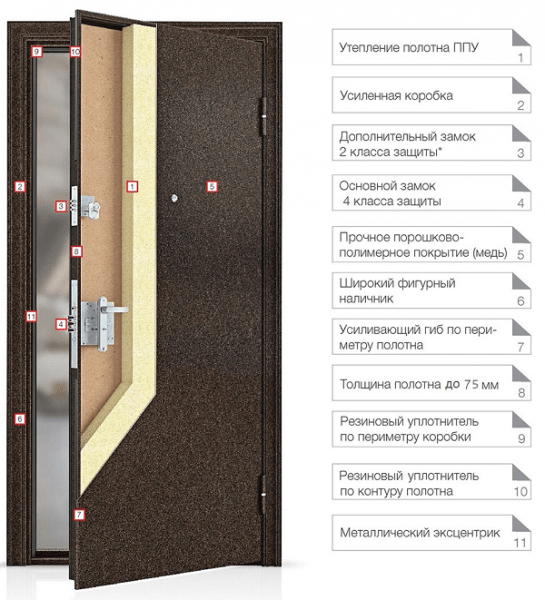
Before starting work, first of all inspect the lock on the front door. The model and standard equipment of the door can be subject to separate agreement. Specify in the addendum to the contract which model of door and lock you need to install. If there was a need to take additional measures security, first of all, change the lock supplied at the time of delivery of the new building.
At the next stage, it is necessary to resolve the issue of installing a distribution electrical panel, connecting an electric meter. This will make it possible to start using power tools when repairing an apartment. To get rid of the need to use a large number of carriers and extension cords, plan the layout of the electrical wiring in the apartment. In doing so, the following should be taken into account:
- For the kitchen and bathroom, the wiring must be laid in sealed hoses, sleeves;
- Lay a separate residential wire in the bathroom to connect the boiler or washing machine. The cross section of the cable must be designed for a current of at least 25 A;
- An additional wire must be laid to the installation site of the air conditioner;
- In the bathroom, in the kitchen, in the hall, it is necessary to conduct a wire, which will be connected and used in the future when organizing additional grounding.
Advice! When laying wiring, use only copper cable without twists and soldering.
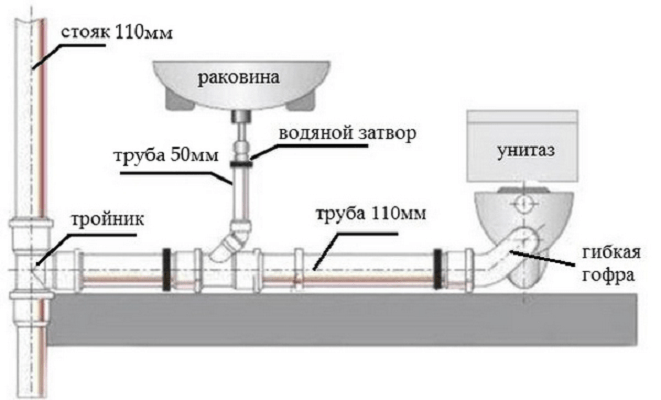
In addition to electricity, in order to create more or less normal conditions, it is necessary to connect hot and cold water meters. cold water and collect sewage in the bathroom and toilet. It is necessary to start work with the installation of a toilet bowl and a washbasin.

Considering that good plumbing is expensive, for the first time you can install inexpensive option toilet, assemble and connect plastic sewer pipes, bellows and washbasin. During the renovation of the apartment plumbing can be replaced at any time. Installing expensive plumbing increases the risk of damage to it during repairs; it must be installed at the final stage of repairing a new building.
For gasket plastic plumbing using a perforator, we will drill channels in the walls of the bathroom, toilet, kitchen with a depth of 2.5-3 cm. Next, you need to solder the water pipes and connect the leads to the drain tank and washbasin. Lastly, we will install and connect water meters to the cold and hot water to domestic plumbing.

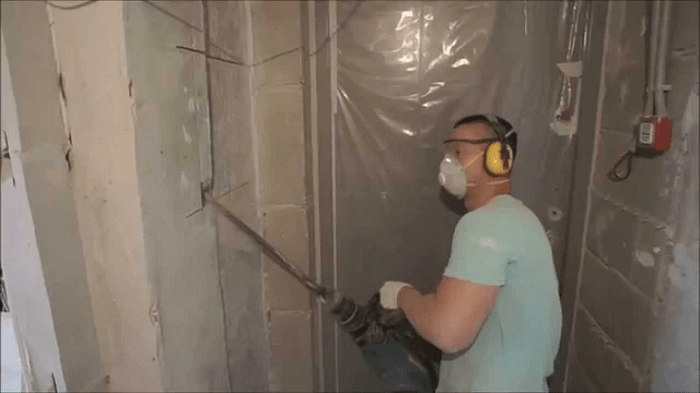
Rough operations
Before starting work, it will be necessary to perform a large amount of cleaning up the remains of concrete, mortar. The main part will be for rough cleaning of walls, floors, ceilings, their chasing, leveling and cutting seams. Such work gives a large amount of dirt and dust, so it will be necessary to organize good ventilation and wet cleaning inside the new building.

A separate item is necessary to highlight the preparation of floors in each of the rooms under fine finish. During the repair in the apartment, it will be necessary to close up all the cracks, holes in the seams between the plates, in the floor, in the interior walls of the new building. The most difficult will be leveling the floor with a screed made of cement mortar and reinforcing mesh. This procedure will need to be performed upon completion of the preparation of the walls and ceiling for fine finishing.
We will perform similar work in the kitchen, bathroom and toilet.
Carrying out finishing work
After rough cleaning, it will be necessary to prepare the walls in the kitchen and toilet for laying tiles on the walls and floor. Facing tiles you can do it yourself, but this is a troublesome business and requires a lot of time. Therefore, it is better to entrust the laying of tiles to craftsmen who specialize in this kind of finish. While the tiling work is underway, you can do the repairs yourself in one of the rooms of the apartment. Most the best option will lay decorative plaster or liquid wallpaper on the walls. If at the time of the start of the repair in the apartment of the new building, the double-glazed windows in the windows were in a satisfactory condition, then you can start applying plaster on the walls of the room immediately.

Upon completion of laying tiles on the floor and walls in the kitchen, bathroom and toilet, you need to lay inexpensive linoleum in the corridor connecting these three rooms and the room in which the repair was made using decorative plaster. This will reduce the amount of dust raised and make it easier to clean the apartment.
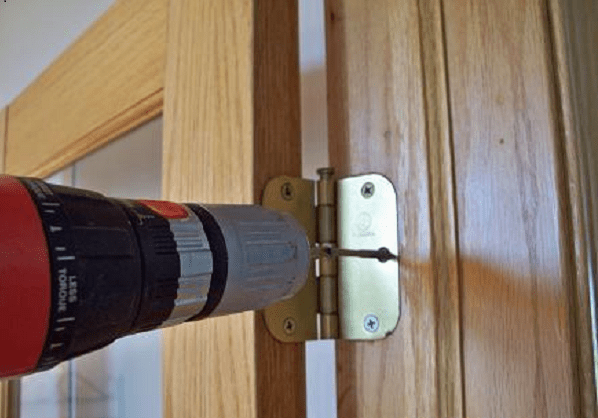
The most important stages of the renovation of a new building
Before finishing the walls in the apartment, it is necessary to align, and in case of a defect, carry out repairs interior doors. If your future plans include wallpapering, normally closing doors are simply necessary for high-quality wallpapering work. After the wall decoration is completed, we proceed to laying linoleum, laminate or carpet on the floor of the apartment. The most practical is considered to be a laminate for living rooms, for a corridor office version linoleum with increased resistance to abrasion. This type of work does not require special qualifications and is easily done by hand during the renovation of a new building apartment.
Conclusion
The final stage of the repair is the connection of lamps and the installation of furniture in the apartment. Approximately 70% of the amount of work during repairs in a new building is quite affordable for do-it-yourself work. And only when performing special types of finishes - laying parquet, installing stretch ceilings, installation of double-glazed windows or entrance doors in a new building, you will need the services of specialists.
The usual everyday business: the apartment clearly needs repair, but there is not enough money. How to do inexpensive repair do-it-yourself apartments It seems to be the simplest, obvious way: surface cosmetic repairs. That is, plywood wallpaper, whitewashing the ceiling, painting, fixing the creaky floor; Possibly window replacement.
However, if you calculate the labor costs and consumption of materials, it turns out that by increasing labor costs by half, and spending money by a quarter, you can give the apartment a completely different look, and for a long time. How much you need to invest specifically depends on the prices in the region, but the general methods by which you can make an apartment cozy and elegant inexpensively are the same.
Saving Money when repairing an apartment with his own hands, he stands, like the Earth in ancient legends, on three whales and a slowly hurrying turtle under them:
- We are not afraid of work. Nothing comes from nothing. Either money or labor.
- Wherever possible, we do not change the capital, but the old one that has lost its appearance, but renew it.
- We attribute the maximum savings to where it will not affect the quality of work and will not be visible.
- We spread the costs of labor and money over time: having conceived repairs in the summer or autumn, we spend a year on preparation, and then we pile on and quickly do everything. To lay out 200-300 thousand rubles at once is a problem, but it is quite possible to break them up in parts for a year. In addition, there will be time to measure seven times - cut once.
Where it's hard to save
The only area where you have to invite a specialist is the alteration and strengthening of electrical wiring if it is old and weak. Here, the only way to save money is to negotiate with the DEZ electrician. He will do the work in pieces, in his spare time, but the likelihood of hack work will be even less than that of “branded” specialists: after all, he will then serve all this.

It is better not to save on electrics and wiring, however, some points, such as installing sockets, can be done independently.
Tool
A good specialized tool makes the job much easier and cheaper. But it's hard to buy. Therefore, it is better to rent a tool as needed. In terms of costs, it will come out a little if you decide in advance on the design and draw up an approximate work plan for yourself.
Season
Plumbing
A sore point with independent cheap repairs is the replacement of plumbing. If it is still “alive”, only filthy, then it can be cleaned and painted. How to do this will be described below. But if there are chips and cracks, then, if you like it or not, you need to change it.
For such a case, here is some information for you: new settlers, especially in houses above the budget category, often start a major overhaul immediately upon entering, and excellent, completely new faience and cast-iron plumbing equipment ends up in a landfill. Landfill operators (simply - landfill scavengers) have long turned this circumstance into a profitable business.
They do not make direct contact by office phone with strangers, but it is quite possible to get through to them using word of mouth methods. The rate is from a third to a half of the factory price for a household item. And do not think that they will take you to the dump and show you where it lies. In the back room you will be offered a choice of clean, carefully washed products, which you can sit down on at least immediately.
Construction garbage
The next sore point is the removal of construction waste. The operation is not cheap, and requires paperwork. Exit: a basement, a barn, a summer house or a closet and a few used bags of plastic sackcloth, bought for a penny. Construction debris does not sour and does not rot, it can then be poured into a container in a garbage dump in a bucket. There is nothing illegal in this.


