Wooden grates for a gazebo: how to do it yourself? Making wooden gratings: how to properly assemble a structure with your own hands? Decorative lattice made of wood for the gazebo with its own
The desire to give a wooden gazebo an attractive look is quite justified. The installation of the grill, which you can make yourself, will help to achieve the task. The decorative grille for the gazebo serves as an excellent basis for climbing plants... How to make a practical building element in various ways with your own hands, we will tell you in detail.
Spike connection
Before proceeding directly with the process of creating a wooden lattice, you should take care of the availability of all the necessary tools and materials at hand, so as not to be distracted by trifles in the future in search of this or that object.
Preparatory stage
To work on decorating a wooden gazebo with a pretty lattice, you will need:
- bars for frame assembly;
- lathing strips;
- sanding machine;
- hacksaw for wood;
- fasteners (nails, screws, wood glue);
- materials for finishing the wooden lattice (varnish or paint intended for external work).
Comment! The beginning of the work is preceded by the drawing up of a drawing, which reflects the shape of the decorative element of the gazebo, size and design. It is convenient to check in the process of working with sketches, having a small sketch on hand.
Frame making
The basis of the wooden lattice is the frame; they are primarily engaged in assembling it. A frame is made of 20x45 mm timber. The material is sawn taking into account the dimensions of the gazebo indicated in the drawing. The diagram below offers several connection options. wooden parts... The ends of the bars are cut off with a hacksaw, after which the frame elements under the lattice are fastened together with nails. The second frame is assembled in a similar way.
Lathing
The wooden lattice for the gazebo is assembled quite simply:
- For the lathing on the frame, you will need to prepare a rebate (rectangular depression).
- Planks with a section of 10x20 mm are fixed at the edges with nails. Previously, the attachment points are marked on the long sides of the wooden frame.
- After joining, the edges of the planks are cut at an angle of 45 °.
- It remains to assemble the lattice for the gazebo. The battens on the frames should be at right angles to each other. The frames are connected together with self-tapping screws.
Naturally, both frames must be absolutely identical. This is the easiest way to decorate the gazebo with a do-it-yourself lattice. Protecting them with varnish or paint will help extend the life of wooden elements. The compositions are applied in several layers; pre-treatment can reduce material consumption wooden surface drying oil.
Advice! If you plan to completely sew up the gazebo with decorative elements, you can place a mosquito net between the two frames. This will create a reliable barrier from annoying insects. In the evening, the entrance is additionally treated with insecticides.
Examples of attractive wooden buildings and carved gazebos in the photo below:


The second way to decorate a wooden gazebo with a lattice
Not everyone is able to arrange spike connection and fold. The easiest way to make a lattice suitable for beginners:

The further algorithm of actions is similar to the spike connection process.

Option "in the pot"
The next option for creating a lattice is more laborious and requires certain skills in working with wood. This method involves drowning the slats into one another, and not overlapping the elements on top of each other, as in the previous case.
Algorithm of actions:
- The slats are marked according to the planned grid design. Will there be after crossing individual elements get a rhombus or square.
- On each wooden plank, according to the markings, grooves are cut out manually or using a milling machine, the depth of which corresponds to half the thickness of the strip. The kerf corresponds to the size of the part to be inserted.
- Gradually, one bar is inserted into another. This allows you to create a solid canvas effect with cut out geometric shapes. The gazebo grate turns out to be very refined.
Comment! If the design of the gazebo requires the installation of strong and reliable gratings, the timber and slats are selected with a large section.

Such a connection of the slats can be framed by two frames or one. In the second case, grooves are prepared on the frame for strips of the appropriate size (they are guided by the thickness wooden slats). The elements are fixed in the holes with wood glue or self-tapping screws. The advantages of the method are the grace of the lattice and the absence of the need to form a second frame. Minus - extra work to prepare grooves on a single frame.
Installation on a gazebo
When all the lattices are ready, it is required to install wooden elements on the gazebo. The installation process begins with the alignment of the decorative product relative to the bearing pillars of the gazebo. A hammer will come in handy in this matter.
The sides are knocked out until the edges of the wooden decor are aligned with the outside of the vertical supports. When the grille is fully aligned, proceed to fixing. The side bars must be fixed on the bearing supports with self-tapping screws. Aesthetics of the fastening is ensured when the fasteners are recessed into the wood. The treatment of areas with putty helps to completely mask the fastening elements.

Lattice and gazebo decoration
There are many design options for the gazebo. Traditionally around wooden building climbing plants are planted with a lattice. Girlish grapes are popular, climbing rose or actinidia. The grille can be coated with bright paint.
Gazebos look spectacular, where, in addition to classic rectangular lattices, decorative elements of a complex configuration are installed. An arched entrance is the most popular design approach.
A wooden lattice (decorative lathing made of strips or trellises) is a great way to decorate and partially protect the gazebo from the weather.
There are several options for making decorative lathing, this article is presented as simple construction, and complex. Depending on the financial capabilities, available material and desire, choose the option that suits you the most.
The easiest option is to use wooden slats, which are nailed to the frame, after which the entire structure is attached to the gazebo. The finished grill looks like this:
Frame making
First of all, it is necessary to make a frame on which the slats will be attached. For good fastening, it is recommended to use a material thicker than wooden planks, for example, 20 × 45 mm timber. If this is not possible, then the slats themselves can be a frame. The main thing is fastening, at this stage problems arise.
Frame fixings can be done in different ways:
- A 45-degree cut and anchorage to nails (the easiest but unreliable option).
- Connection in a thorn, in a flash, "dovetail" and the like (reliable, but difficult to perform).

After making the first frame, you will need to make another one. It is installed on top of the constructed lattice from the back to hide all cut corners of the battens.
Fastening the rails to the frame
Since we are considering the simplest way, we will use nails. The slats are installed at an angle to the frame with the same pitch between them (the photo shows a step of 10 cm), then they are nailed to the frame from both sides, and the remains of the tree are cut off.
 Distance measurement
 Corner mount
  Installation of rails

The second option is to install rails in the gazebo window
If in the first version the lattice was made in advance, then in this case the slats are immediately attached to the window at an angle of 45 degrees.

Before sheathe the gazebo, it is necessary to calculate the length of the material. The most difficult thing here is the calculations - it is necessary to accurately measure the dimensions so that the distances in the cells are the same and the whole "picture" looks symmetrical.
The grill is attached to the self-tapping screws at an angle of 45 degrees to the window, after which the slats themselves are also fastened together. The gaps in the joints can be hidden with a decorative skirting board.
This option is suitable if there are flat windows in the gazebo, which will allow you to attach wooden bars to yourself without additional processing.
The video above shows step-by-step instruction on the implementation of this option. This video is not as dynamic as the following (although there is a more professional method), but it very well shows the essence and understanding of the method.
The third option is a groove-to-groove lattice
This method is professional, without hand router and a circular saw to carry out it will be impossible. If you have access to a woodworking tool, then you can approach the issue professionally and execute this option.
The entire process is presented in the video below (with professional voice acting). Sergey Neiman showed his own conductor who will help you implement such a crate with your own hands.
Making slats
To make the planks, we need a fairly thick board, in which grooves are cut with the help of a hand mill.


The finished board with grooves is sawn into circular saw... As a result, identical slats are obtained, which in the future will be the grilles in the gazebo.
Fastening the strips
Unlike previous options, glue is used to attach the planks to each other. Initially, the entire structure is assembled "groove in groove" at an angle of 45 degrees, then each strip is pulled out, after which glue is applied and then glued. The work is monotonous, but the result is excellent.


After fastening the slats to each other, a frame is made, which is attached to the crate. The finished crate is varnished, after which it can be used to decorate the gazebo.
Options for decorative grilles in gazebos
Making a crate with your own hands is not the most difficult process, available to most amateur summer residents. Most often, the output is a regular pattern at an angle of 45 degrees.

If you approach this issue professionally, you can implement unique grilles that will decorate your gazebo exactly the way you want. I offer a selection of photos different optionsthat will serve as an idea for your gazebo, or just delight the eye and surprise.


Gazebo on summer cottage - a very useful and necessary thing: it decorates the landscape, you can relax in it, have dinner with your family or cook barbecue and barbecue. This backyard structure should be not only durable and comfortable, but also beautiful, for this you can use various decorative elements. Next, it will be considered how to successfully make wooden lattices for the gazebo with your own hands.

Features and Benefits
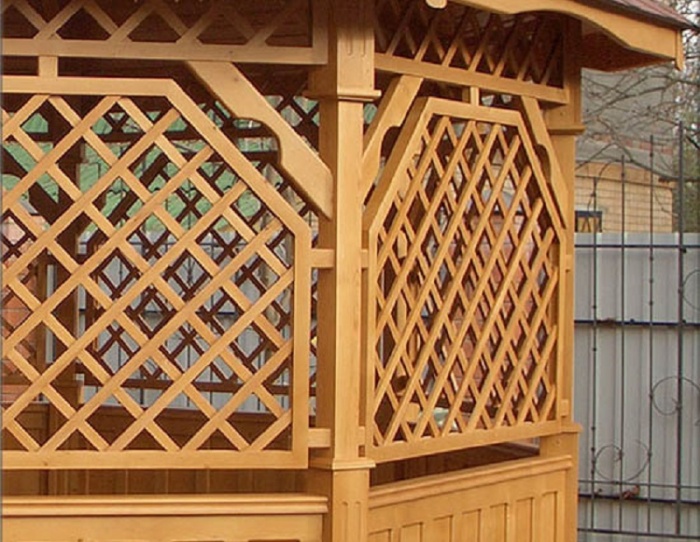
A summer cottage can be built from various materials: wood, metal, brick or decorative stone... Regardless of this, decorative wooden lattices will always look harmonious on it. Usually they are inserted into non-blind free openings on the side walls, fixing in rectangular frames, but they may not fill the entire wall, made in the form of a fence or carved inserts under the roof.
The most common examples of such grilles for street buildingsin the form of inclined slats located cross to cross to each other. They are very easy to make, requiring a minimum of tools and cheap materials. But there are also more laborious projects with carved patterns, real works of art. Created from high-quality dried wood and securely fastened, such decorative elements can serve in a summer cottage for more than a dozen years, even in adverse weather conditions.


The advantages of homemade wooden gazebos are:
- ease of manufacture, low cost of material;
- aesthetic value - appearance before country house will immediately noticeably change for the better;
- there will always be shade and coolness inside the gazebo;
- versatility for any type of arbor design;
- since the walls are not deaf, there will always be an influx of fresh air inside;
- if food is prepared in the gazebo, a stove, barbecue or barbecue is installed, then the smoke will quickly disappear.


To create really reliable and durable decorative elements for the future gazebo, you need to choose the right source material.
Material selection
There are specific requirements for the material for creating such lattices. It should be beautiful, well protected from moisture, temperature extremes and sun rays... Since in most cases thin battens are used for the battens, strength is the determining factor.
Oak is good because it bends well with the required strength.The expressive structure with pleasant shades of this tree is known to everyone. Oak wood is easy to process, excellently polished and painted, and due to the high concentration of tannins in the composition, it is little subject to decay. Bog oak with a noble black color can look simply gorgeous in a summer cottage.

Beech is also strong, relatively easy to work and bend. The wood grain has a yellowish-red hue with well-defined annual rings. Parts from this tree are widely used for the manufacture of outdoor structures, including decorative elements of arbors.

Ash slats can be yellowish brown or red with pleasant textures. This wood is dense and viscous, when it dries, it bends well and does not crack, does not warp. In addition, ash practically does not rot.
It is a good idea to choose birch parts for the manufacture of decorative lattices, due to the fact that this wood is very easy to cut, polished and drilled, and its strength indicators are excellent. In order for the material not to rot, it should definitely be treated with an antiseptic and covered with varnish or transparent paint. The most successful choice for decoration is a Karelian birch with a pleasant and expressive texture.


Aspen lathing will have a nice reddish tint. The advantage of this wood species is that it has practically no knots, this simplifies the processing process, and the sectional view will be more beautiful. This material dries quickly, is perfectly polished and painted.
You can also choose other types of wood with useful properties and beautiful texture: alder, linden, pine, cedar. When handled properly, they will all be strong and durable. Actually, it is not even so important which breed is chosen, you can take any available one, the main thing is to carefully and reliably carry out everything carpentry... Reviews say that oak and beech are the most popular in the manufacture of gazebos.


Types of partitions
The most common type decorative partitions of this type is a net of intertwined thin strips fixed on a wooden frame. There may be several options for making the main frame. It should fit exactly into the side opening; you can make it with your own hands from beams, for example, with a section of 20 by 40 mm.
In order for the rectangular structure to be rigid and durable, it is best to fasten the sides with a tenon connection "in the overlay", "in half-tree", "in the end" or "nest-thorn", you must choose depending on your capabilities and skill. Some people make the frame from old furniture or door frames, the advantage is that there is already a ready-made spike connection.


The lathing of the decorative opening inside the frame is made with thin strips of the same thickness. You can use components with a cross section of 5x10, 10x20 mm or others. They are nailed or screwed to the frame along its sides or at an inclined angle at the same distance crosswise. The easiest way is when one row of battens is superimposed on another, perpendicular to the first.
Another way to connect the elements on the crate is "in the pot", when the slats do not overlap, but, as it were, are recessed into each other. For this, grooves are made at the joints in half the depth of the rail and in its thickness. The notches can be made by hand using a hacksaw or chisel.


This method is quite painstaking and significantly increases the assembly time of the gazebo, but as a result, you can get a solid-looking neat lattice, in addition, its strength increases.
The partition may not be prefabricated from individual slats, but made of a solid sheet of plywood, chipboard, laminated board or board. To create a lattice, openwork patterns are cut out in them, as a result, a chic carved lattice can be obtained. The advantages of this method are strength, the absence of the need for assembly, the originality of the pattern, but the mass of the structure can be much greater than that of the assembled from the slats.


Self-production
If you want to make decorative elements for a gazebo out of wood with your own hands, then first you need to choose wood for the frame and slats, calculate the area of \u200b\u200bopenings and make drawings of future openwork gratings. From the figure, you can immediately calculate the number and length of the rails, as well as the required number of fasteners.
To assemble the structure, you may need the following tools and building materials:
- hacksaw;
- a hammer;
- nails;
- tape measure and pencil;
- bars for the frame;
- slats for lathing;
- varnish on wood and a brush.


First, the frame for the lattice is assembled in accordance with the dimensions of the measured opening of the gazebo. You can fasten it in a joint with nails or a thorn joint; for strength, use wood glue. Then pieces of the required length are cut out of the rails, the joints are marked on the frame, the elements are nailed in turn. When the grill is ready, you need to carefully varnish it, let it dry and mount it in the opening with nails or screws.
You can varnish the slats before covering the frame with them., so will be processed hard to reach places, and the process itself is simplified. But then the dried coating can collapse at the points of attachment to the tree with nails, so after assembly it is worth painting these areas again.


Decorative techniques: ideas
Diagonal lattices that are often found on wooden gazebos, give an original and stylish look. Most often, an angle of inclination of 45 degrees is used, the slats intersect with each other at a right angle. Only the pitch of individual elements can differ. If it is frequent and does not exceed 10 - 15 cm, then a rather dense screen is created that perfectly protects from the sun, allowing you to hide the internal situation. A wider spacing of 15 - 25 cm slats can create an atmosphere of lightness and openness, then the interior of the gazebo practically merges with the surrounding landscape.
The direct arrangement of intersecting rails will look even more original, you can combine them with inclined ones, for example, on adjacent walls. It is also very successful to use such structures to support climbing plants, then instead of walls, the gazebo will have a real hedge... You can use several slats of different widths to create a non-standard complex pattern with different steps and openings, you just need to show your imagination properly.


Bonded slats for lathing, they are also called trellises, can be connected along different schemes... The technology of connection and fastening to the frame will not differ much, but the choice of pattern is the most diverse, it is practically not organic in any way. The already mentioned lattice schemes with inclined slats are called "diamond", with straight ones - "square", trellis diverging from the bottom upwards - "mill", inclined with alternating directions - "chevron". There are other schemes, you can create your own design.
It should be borne in mind that wood gratings are appropriate not only on the walls, but also on the roof of the gazebo.If you make the top of the structure from massive beams, intersecting at right angles, and let climbing plants along them, then such a project will look fantastic. Such a "roof" will not protect from rain and the scorching sun, but it will add lightness to any architectural solution of the garden pavilion. Often such lattice roofs are made in preglays, which have become especially popular in recent years.


In order to ensure maximum openness in a personal gazebo, it is not necessary to make its lattices all over the wall. It is enough to make openwork fences with trellises, they can simultaneously serve as the backs of the internal benches, and put beautiful carved skates on the top under the roof.
Most often, these small structures are decorated with beautiful wooden trellises.
Today, if you wish, you can purchase or order a ready-made version of such a decor. However, unfortunately, it is quite expensive. Therefore, it may be more interesting for someone to make it with their own hands. Read about what wooden lattices for gazebos can be, and what is the technology for assembling them, read this article.
How to make a wood grate yourself
A well-made wooden lattice will make the gazebo aesthetic and attractive. The use of this decorative element, despite its apparent simplicity, will surely bring a touch of grace and lightness to its design.


Design features
So, let's figure out how to make a wooden lattice for a gazebo with your own hands. Structurally, it consists of the following elements:
- Two wooden frames that reinforce the structure.
- Crossed slats inserted between them.

The main elements of the wooden lattice are slats and a frame made of bars
How to make frames?
Do-it-yourself crate frames for a gazebo are most often made of bars with a section of 20x45 mm. It is easiest to connect them "in a thorn".

When assembling the frame with your own hands, the easiest way is to use the "through thorn" method (first picture)
This mount is done like this:
- Wooden blocks are marked out in thickness into three equal parts.
- In two, a thorn is chosen, in two - a groove.

At the ends of the bars, according to the markings, you need to select grooves and spikes
- Connect the grooves to the ridges with glue.
- Additionally, the thorn-groove lock is fastened with two studs. Their caps can be bitten off with wire cutters or drowned in wood, followed by filling the resulting nests with putty.
- It is advisable to screw into each connection with a self-tapping screw.
Lattice making
The manufacture of wooden gratings for gazebos continues by stuffing the mesh itself. Collect it from slats of small thickness and width. They need to be attached to each of the two frames diagonally (at an angle of 45g). The distance between the slats is usually about 5cm.

Stuffing rails and joining frames into a single structure
Advice: In the event that the decorative mesh will cover the walls from top to bottom, you can make a larger step (about 10 cm).In the next step, both frames with slats should be coated with an oil-based varnish. Apply it in at least two coats with a preliminary primer. Further, the frames are simply superimposed on each other so that the slats intersect. The result is a diamond mesh lattice. The frames are fastened with four self-tapping screws at the corners. After the decorative grill for the gazebo is completely ready, it is varnished again.

Usually the lathing of the gazebos is varnished.
On a note: If desired, you can replace the varnish with oil for outdoor use. It tolerates temperature extremes much better and is not afraid of water at all.Lattice gazebos: what design can be
There are many ways to decorate gazebos with lattices. Such fences, parapets and cornices can be of different sizes, patterns, shapes and colors.

Using the lattice, you can build a very beautiful gazebo
What a drawing can be
Above, we examined the manufacturing technology of the simplest lattice for arbors. However, there are other options for this decor. Diamonds can be, for example, double. Sometimes the slats are placed in the middle of the frames more often than along the edges (or vice versa). It also allows for original design of the grille.

Double wooden nets can look quite unusual
On a note: Sometimes such a covering for a gazebo is made of slats with teeth cut out along the edges. This option also looks quite aesthetically pleasing.Lattices are often combined with carved and figured wooden elements. However, this should be done carefully. Often such combinations look too pretentious.
What shape can be
The finished lattices are attached to the supporting posts of the gazebo frame, and therefore usually have a rectangular or square shape. However, in this case, you can show a little imagination. For example, to make the top of the parapet lattice not straight, but curved or broken. Rack cornices are often made in the form of an arch.

Photo of a gazebo with an unusual mesh
What color should be
The wooden mesh for the gazebo does not have to be varnished. If desired, you can paint it. Very stylish and modern, for example, white versions of this decor look.

White mesh design looks very modern
Of course, a lattice of a different color can also look beautiful. The main thing is to try to harmoniously combine it with the shades of other structural elements of the gazebo.
Relaxing in the bosom of nature can be comfortable. You can protect yourself from the active sun or small vagaries of nature by installing a cozy gazebo on your site. Modern market offers many options for such designs, but you can create this outdoor comfort corner yourself.
Gazebo decorated with wood paneling with lattice
After assembling the frame and installing the roof, the question of the design of the gazebo arises. The most affordable and in an interesting way is the use of a wooden lattice as enclosing or decorative elements of the future gazebo. You can make similar designs with your own hands. To do this, you just need to choose the right material and make a little effort.
Wooden lattices: types and design
The lattice structure of the partitions in the gazebo allows you to give the whole structure lightness, fill it with light and air. This is why wooden gratings often act as enclosing elements around the perimeter of the gazebo.
Different options for the combination of planks and the design of the finished weaving have led to the emergence of several main types of wooden gratings:
- with an open and closed frame;
- products with a simple crossing of the slats;
- lattices with the connection of the strips into the groove.
According to the type of crossing of the strips and the pattern created, there are two main types of products:
- with rectangular weaving;
- with diagonal braiding.
Photo - Different types of decorative gratings for the gazebo
The criss-cross of thin strips creates a wonderful decorative effect. But if desired, it can be strengthened. If equipment is available, you can apply a pattern in the form of teeth or a small wave along the edges of each lath strip. Such decoration will give the finished product an extra zest. In the absence of a tool for processing wood, the application of the pattern can be ordered at any carpentry workshop or purchased already processed strips.
Additional decor
The wooden lattice itself is a gazebo decoration. But if desired, you can achieve greater aesthetics of the entire structure. The main helpers in such decoration are climbing plants, as well as special paints and compositions for processing wood.

The wood structure is unique. To highlight the natural pattern, special varnishes or impregnations are often used to protect the tree and enhance its pattern. If you wish, you can change the color of the structure, choosing the shade you like the most, suitable for the general exterior of the site.
An interesting solution is to plant climbing plants near the gazebo, for example, wild grapes, lemongrass, decorative ivy or creeping rose hips and roses. Within two to three years, the shrubs will grow along the trellis, braiding it and filling the gazebo with the smell of flowers and fresh greenery.
Choosing wood to create the lathing
It must be remembered that making a wooden lattice on your own is not difficult, but still requires some preparation. First, you should choose the materials for making the frame and lathing. It is best to compare several types of wood and decide which one not only has high strength and reliability, but is also easy to work with.
When choosing a material, experts advise paying attention to several types of wood:
- pine is flexible and resistant to negative environmental factors;
- oak has high strength and unique wood texture;
- larch lends itself well to processing and is completely not subject to decay;
- ash is comparable in strength to oak, but differs in the light color of the fibers;
- beech has an excellent pinkish tint, as well as flexibility and resistance to mechanical stress;
- birch is one of the easiest types of wood to process, but it is very susceptible to rotting and destruction.
In addition to the characteristics of materials, it is necessary to take into account their cost. Oak, beech and larch are among the most expensive types of wood. Ash occupies an intermediate position, while birch and pine belong to inexpensive options... With a small budget, you should pay attention to pine, since birch is less resistant to temperature extremes, humidity, as well as to bacteria and fungi.
Required tools and materials
Depending on the type of lattice produced, the set of required equipment may vary significantly.

Cross-weave grating installation process
To create a simple lattice you will need:
- bars 25x40 mm. for the frame;
- strips 20x10 mm. for lathing;
- self-tapping screws;
- nails;
- hacksaw or jigsaw;
- impregnation for wood, varnish or paint;
- ruler or corner;
- screwdriver and hammer;
- waterproof wood glue;
- mosquito net.
If you have experience working with wood and want to create a more complex lattice, the following will come in handy:
- milling machine;
- a circular saw;
- joinery workbench or table;
- thicknessing tool for processing finished strips.
In addition, you will need abrasives to process the strips and remove chipping and burrs.
Making a frame for a lattice
To create the skeleton of the future structure, it is best to take a 20x45 mm bar. The use of more massive options can lead to a visual weighting of the grille, which will significantly reduce its aesthetics. Bars bigger size it is recommended to use it only when creating frames that differ in length and width. In this case, the guides must withstand an increased load, so you can use bars with a section of 30x50 mm or 50x50 mm.
When creating small decorative lattices for the manufacture of a frame, 20x10 mm strips are suitable, provided that elements of the same or smaller size are used for the lathing.

Making a wooden frame for a gazebo lattice
To fix the frame guides into a single frame, you can use several techniques:
- spike or groove connection;
- the use of special metal fasteners;
- connection by means of a plug-in rail "mustache".
The most reliable is the thorn mount, but in the absence of experience, its manufacture can cause a lot of questions and problems. In this case, you can make grooves on the edges of the bars and connect them with glue. For additional fixation, nails with a pre-bitten off head are driven into each corner to preserve the aesthetics of the product.
The second option is to wash down each bar at 45 °, followed by making grooves and inserting a special rail - "mustache", fastening two structural elements. The rail also attaches to glue and nails without caps for a more secure hold.
After assembling the frame, you can make folds on it by working out the corresponding grooves or filling the strips of the same thickness as for creating the lattice. The grooves are produced on milling machine, since with manual execution it is difficult to carry out it with the required accuracy. A simpler option is to pad the planks flush with the main frame. Their connection is carried out by cutting angles at 45 °.
This technique allows you to hide the ends of the sheathing, which adds aesthetics to the design. When installing the grille in closed openings, the production of folds is not required.
To assemble one lattice, you need to make two identical frames.
Lattice creation and product assembly
The simplest way to create a lattice for diagonal weaving is to stuff the strips to the frame and connect the two frames in a mirror overlay. In the case of rectangular weaving, the planks are packed vertically for one half and horizontally for the other.

Assembly process of wood diagonal lattice
To create a rhombic lattice, the planks are placed diagonally on the frame. As a result, an angle of 45 ° is formed between the grille and frame elements. To obtain a lattice with minimal deviations, it is best to mark the entire frame, set aside the same distance between the slats. If there are folds, the edges of the planks are cut at 45 ° so as not to leave gaps between the elements.
In the absence of folds, the work is simplified. It is only required to carefully position and fix the strips on the frame. The remnants of the planks after fixing are cut off with a hacksaw or jigsaw. The second frame is filled in the same way.
After the two frames are made, they are mirrored with folds inward. As a result, the planks crisscross, forming a rhombic weave. To protect the gazebo from insects, a mosquito net can be pulled between the frames before attaching. Frames with planks are neatly fixed with glue and self-tapping screws in each corner. For a stronger connection around the perimeter, you can hammer in several nails, after biting off the caps from them.
Single grille with groove connection
More difficult option is the manufacture of a decorative lattice with the connection of all strips into a single frame due to the elaboration of the grooves. To make such a product, you need a small carpentry workbench, a milling machine and a circular saw.

example of a grooved lattice made of wood using professional tools
For the manufacture of lattice elements, grooves are cut in each plank to half its thickness. Then the workpieces are sanded and adjusted to each other. When using thin planks, it is easiest to work out the grooves on a board of the required thickness and saw it into individual elements.
To ensure the same distance between the grooves, it is best to make a template from the cutter and saw guides. This approach will significantly reduce labor costs when processing the lattice slats. The template can be created from blocks and plywood on a joiner's table or directly on a milling machine. The guide bar or bar is located near the saw or cutter at a distance equal to the step between the grid elements.
Further, on each strip or prepared board, grooves are made in half its thickness, which are then processed with an abrasive or sandpaper to remove burrs. If necessary, the prepared board is sawn into strips of the required thickness. To obtain the most even elements, sawing must be carried out along the board, parallel to the fibers. The template for fixing the board is installed with a reserve of 1 mm to the thickness of the future plank. It is best to pass each lattice element through a thickness gauge to align.
The prepared planks are assembled groove into groove, forming a grid. Further, the workpiece is leveled in length and width and attached to the frame or directly to the bearing elements of the gazebo. To save appearance fastening is best done in a frame with slotted grooves. With such a trip, the fastening of the lattice to the frame will be hidden, which will add aesthetics and lightness to the structure.
When working with woodworking equipment, it is important to follow all safety rules, especially when cutting blank boards into separate planks.
Video - Making a grid with a groove connection
After deciding on the independent manufacture of a wooden lattice for a gazebo or veranda, it is worth correctly assessing your strengths and experience. It is best to start with simple options and gradually move on to more complex designs.
Treatment of all elements of the frame and lattice with impregnations, antiseptics and paint must be carried out before assembling the finished product. Painting can be done on the finished frame before fixing the grille, as well as each strip. Working with the finished product is complicated by a large number of overlaps of elements, so the lattice nodes may turn out to be without paint, which will lead to a deterioration in appearance and a decrease in the durability of the structure.

Do not forget to treat the wooden grate with antiseptics before starting the installation.
With any method of decoration, all elements of the frame and lattice must be treated with antiseptics. Taking into account the use of the product outdoors without such processing, the tree will quickly darken and begin to deteriorate due to rotting. Existing antiseptics allow processing without changing the color and texture of wood or with additional staining.
Video - A simple option for making a lattice from wooden slats
Conclusion
If you wish, making a wooden lattice yourself is not difficult. Even simple options such products will serve as a wonderful decoration for any gazebo or veranda. Self-production decorative elements will reduce overall costs and get positive emotions from the process.