Chandelier made of wooden slats. A simple wooden lamp with your own hands. Chandeliers differ among themselves in many ways.
Such a product will look great in a country or country house, in the hallway of the bathhouse and even in an apartment furnished in rustic style... But finding it in stores is far from easy, but by affordable price and not at all possible. You should not rush to search online stores, because you can easily do it yourself. Consider two product options that differ from each other in the severity of manufacturing.
Self-assembly of a product of simple design
For DIY wooden chandeliers of a similar plan you will need the following:
- Wooden beam square section 10x15 cm.
- Battery powered LED lamps.
- Chisel.
- A hammer.
- File.
- Drill.
- Antiseptic.
- Grinder (fine and coarse sandpaper).
- Stain.
- Hanging hooks.
- Chain.
- Linen rope.
 DIY wood chandelier
  Chandelier made of wood and bottles
The main energy-saving lamps and their features.
Do-it-yourself wooden chandelier is assembled as follows:
1. We mark on the beam the location of the future location of the lamps. We draw the contours of the appropriate sizes.
2. With a drill we make many holes inside the contour, splitting the wood as small as possible.
3. Use a chisel and a hammer to knock out excess wood. It is advisable to make the holes through.
4. Using a file, level and sand the inner sides of the squares.
5. We sand the entire surface of the bar by hand or with a grinder.
6. We treat it with an antiseptic in several layers.
7. Protect the surface with the finest grain emery paper and clean it from dust.
8. Cover the timber with a stain of the desired color.
9. On the reverse side of the product and on the ceiling, we make holes for the hanging hooks.
10. Cut off the segments of the required length from the chain, attach them to the hooks on the bar.
11. To enhance the decorative effect, we wrap a linen rope around the edges and in the middle in several rows around the bar. The ends of the segments are fixed liquid nails.
12. Insert bulbs into the holes, which will be fixed in the nests with liquid nails.
13. Instead of lED lamps you can insert sockets into which energy-saving bulbs will be screwed. The wiring will be hidden off the top of the product and in the chain.
 DIY veneer chandelier
  DIY chandelier made of branches
DIY options for step by step master class from various materials.
Do-it-yourself assembly of a wooden chandelier of a more complex design
To make a wooden chandelier with your own hands of a more complex plan, you will need the following tools and materials:
- Untreated or debarked logs.
- Shingles (wooden slats) 2.5 cm wide and 0.5 cm thick.
- Linen rope.
- Cartridges.
- Coarse and fine grain sandpaper.
- Stain.
- Chainsaw or hand saw.
- Drill and cutter.
- Screws with bolts.
- Solvent (turpentine, acetone or gasoline).


The product is manufactured as follows:
1. A third part of its thickness is sawn off along the log (a fourth part is possible). You will need three such blanks.
2. Their length is determined individually, depending on the desired dimensions of the product.
3. Bark is removed from untreated logs.
4. The surface of the workpieces is wiped with a solvent from the protruding resin.
6. Then they are folded in a triangle, so that one edge of the workpiece overlaps the edge of the other, and the second lies on top of the edge of the third.
7. Marks for drilling are made at the joint. In the center there is a large hole for the chuck, on the sides of it there are smaller holes for screws.
8. The cutter cuts out large through holes with a diameter that allows you to insert a cartridge into them. A drill is used to drill through holes of a smaller diameter for screws.
9. Closer to the vertices of the triangle, three more holes are drilled from the cuts of the logs to thread the ends of the rope on which the product will be suspended.
10. The surface is sanded with fine sandpaper.
11. The shingle is cut into small parts the same length.
12. Plafonds are assembled from chopped shingles, which were previously covered with an antiseptic and stain. Two parts are placed parallel to each other, two more elements are laid on their edges, which form a square. One plafond consists of 24 elements.
13. Fastening of parts in the plafond is carried out with liquid nails.
14. The workpieces are covered with antiseptic and stain, assembled and fixed with screws and bolts.
15. Shades are glued to the blanks with liquid nails or wood glue.
16. The assembled product is varnished.
17. The edges of the ropes are threaded through the holes, which can be suspended, for example, on a hook.
You can make a completely elementary version of the product, which is presented in the form of tightly connected branches. They can be painted or varnished, and lamp holders with lamps are hung from above on long cords. This option is suitable for a home in a minimalist or eco-style.
A kitchen with one sad but very economical light bulb in the middle of the ceiling has been waiting for its lamp for a couple of years, which we, as usual, decided to make with our own hands. In addition to this idea, there were a couple of different ideas in my head: a lamp made of ropes or bottles, a lamp made of cups or twigs, or maybe veneer or clay? In short, it didn’t work out well with the lighting of the kitchen. True, there was a vintage 60s lampshade above the desk.
Then, having seen enough of scandinavian interiors, we caught fire with branches and snags. We decided that one must necessarily hang on the ceiling in the kitchen, especially since we dream of a wooden kitchen furniture... No sooner said than done. Because finding a snag is not easy and protracted.
In search of suitable trees, we wandered along the banks of several rivers (Latoritsa, Southern Bug, Zbruch, Dnieper and Desyonka), roamed the forests and puzzled friends who love hiking. And then to the nearest park and right in the middle of the central alley they found their future wooden lamp:)
Long-awaited find
Satisfied with the long-awaited find, we returned home and ... were at a loss, because doubts fell upon us. What will it look like? "What do people say?" (ukr). But what about hanging such a lamp if there is no planned kitchen furniture?
In short, our branch first became an object of interior design and special pride, and then it was slightly shortened, because part of it went to the children for a wooden loto with animals. How so? And like this: an unknown animal began to gnaw a branch :) I had to cut off a part, and then - it was not - they made a loto from another piece of a branch. There was a snag, untouched by the beast, and just the right length.
A year has passed and here our beloved “The village” writes to us, they say, let's cooperate. We wanted it so much! But we have nothing fresh and appropriate to their theme. Well, in fact, I will not do a master class about sewing felt giraffe for “The village” :) What can we offer? Of course, the long-awaited driftwood lamp. This is mainstream and Scandinavia! We discuss this idea with the editor, she agrees and we begin work on the lamp from the branch with our own hands.
Everything could be done simply and quickly, but we are not looking for easy ways, so we go back to the forest. This time we need some thinner branches to make wooden cases for the lamp holders. Fortunately, we quickly find a fallen and dried tree, combining a pleasant find with a useful walk of the younger generation.
 While the children are sleeping ...

Suitable branch
All necessary materials for a lamp from a branch:
A large dry branch, a wire, plastic sockets E-14, energy-saving light bulbs with a similar base, a thin metal mounting cable, clips for it, dry branches with a diameter of 3.5 centimeters, small nails (about 10 pcs.), Wood screws (2 short , 1 long), square board (8 x 8 x 2 centimeters), white acrylic paint, acrylic varnish, masking tape. Saw, drill (engraver), drill, soldering iron, pliers, screwdriver.

DIY kit :)
And now the very process of creating a wooden lamp with your own hands:
1. We clean the remains of the bark on the branch with sandpaper. We leave some places untouched to give a natural look.

Sanding the branch with sandpaper
2. Mark on the branch a place for drilling holes for wires. Also, at the top of the branch, draw a line along which we will make a groove for the wire.

Marking the places for drilling holes
3. We drill holes with a drill. We make a groove with a drill (engraver).

Drilling holes

Making a groove for the wire
4. We drill holes in the square board for the cable, wire and mounting screw.

Sawing and drilling a square board
5. We saw branches with a diameter of 3.5 cm into pieces 5 cm long.

Sawing blanks
6. From these blanks, using a drill and a cutter, we drill a core for a plastic cartridge with a depth of 4.5 cm.

We fix the workpiece

We drill a hole for the chuck with a milling cutter
7. In them we make holes for the wires.

Drill a hole for the wire

Ready set of cartridge cases
8. Cut the wire of the required length, connect the cartridge to it, put the cartridge in a wooden case. Then we pass the free end of the wire through the hole on the large branch.

We collect parts
9. Insert the steel cable into the holes on the branch and fix it with screws.

We fix the steel cable
10. We lay the wire along the groove, fix it with nails bent into the letter G. We solder the joints of the wires, insulate the joints with the help of heat-shrinkable cambric.

We solder the wiring
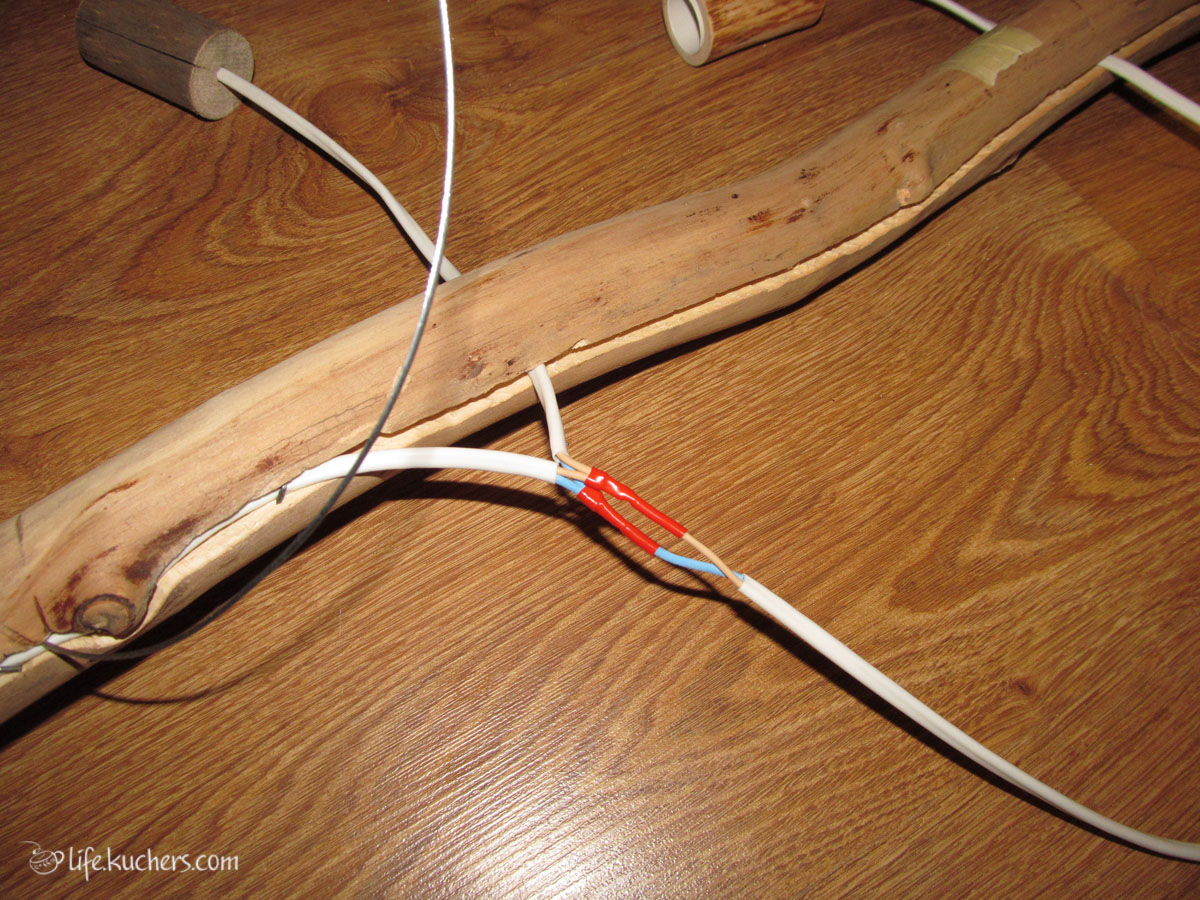
The junction of the wires in the shrink sleeve

We fix the wire with L-shaped studs
11. All wooden parts we process the lamp with sandpaper, cover it with one layer of matte acrylic varnish. We first paint the square board with white paint, and then we cover it with varnish. We did this so that the wood trim does not stand out against the white ceiling.

Skinning and painting a square board

We varnish the branch
12. In a square piece of wood we pass 2 ends of a steel cable and a power supply wire for the lamp. We set the required height of the luminaire using a cable, fix the cable with clamps.