How to make a ladybug out of a pelvis. Master class “Ladybug. From a construction helmet
Everything observed with children in nature in the summer is useful to reproduce in the craft. For example, a two and a half year old kid saw a ladybug while walking.
I liked the bright bug. We made a craft at home. Its production is not difficult. Now you can be sure that the child will not forget this insect.
How to make a ladybug?
The ladybug has a black muzzle and body. But her wings are red with black dots. With the help of them, she can just fly away, so let's have time to consider the insect in all the nuances and make ourselves a similar voluminous craft. Moreover, almost every creative kid has materials and tools.
Necessary materials:
- plastic eyes;
- red, black and green paper;
- black marker;
- ruler;
- glue;
- scissors;
- pencil.
Master Class
1. For the wings of a ladybug, cut out an 8 x 4 cm rectangle from a red sheet of paper. The insect itself with such parameters will be small. Therefore, this must be taken into account at the first stages of making the craft. Divide the rectangle into two halves using a dividing vertical line, which we draw with a black marker. We will also draw spots on both sides.  2. We roll this painted rectangle into a tube and get voluminous spotted wings for a ladybug.

3. Now we are engaged in the body of the insect. It will be black. Cut out a rectangle 7 x 3 cm.On the right side, draw the silhouette of the body and head. Draw a circle and add horns on both sides. Cut out the head and body of the ladybug along the contour. 
4. Bend the head in the upper part, and bend the body itself a little with a pencil (slightly wind it on a pencil or finger).  5. Glue two plastic eyes with rotating pupils on the muzzle. You can also draw other elements on the head at this stage. We glue volumetric red wings to the deflection of the body.
  6. Create a leaf out of green paper on which an insect with red spotted wings will sit. We draw an outline on colored paper, cut out and draw the veins with a black marker.
 7. We place conveniently and beautifully prepared ladybug on a green leaf. To fix it in this place, we use ordinary office glue. On this, a beautiful paper ladybug is ready. It has a beautiful green leaf-shaped stand. Therefore, you can not be afraid that it will fly away or go unnoticed on the coffee table.
At the dacha, every hostess or owner wants to equip her site so that it pleases both residents and passers-by. Therefore, various garden decorations are very popular among the owners of summer cottages and private houses. Ladybug is the simplest and most common craft.
People at all times have ennobled their land plots, planted beautiful bright flowers, installed openwork gazebos, beautiful garden swings, placed interesting decorations everywhere in the form of kind funny gnomes or chic large columns with flowers. To this day, summer residents are doing their best to provide comfort for themselves and their households, beautifully furnishing the site.
Modern shops offer a huge assortment of different garden decorations, but you don't have to spend money on expensive decorations. It will be much more interesting to make a funny decoration yourself. Homemade decorations will also help save the family budget, but they will bring more joy than store-bought decorations.

One of the most popular garden decorations is a funny ladybug made from an ordinary construction helmet. This cheerful bug will help to decorate the site, will delight everyone who pays attention to it. At the same time, making such a funny decoration is quite simple.
How to make a ladybug from a helmet
Even a beginner who is not used to making decorations with his own hands can make a ladybug, because such a simple decoration does not require special professional skills.
What is required for such an interesting and fun garden decoration? Nothing at all: acrylic paints and the main element of the craft - a construction helmet. Some summer residents use ordinary red and black self-adhesive tape instead of paint to make jewelry.
Which of these options is easier is up to the gardener himself, who wants to decorate his site. However, both methods result in a wonderful new inhabitant of the garden - the ladybug.

In the case of paint, you will have to purchase two cans: one red to cover the "little body" of the bug, and the second black, useful for black spots and a head. If you wish, you can take a small amount of white paint and use it as a material for a ladybug eyelet.
The entire helmet is covered in red. After that, black paint is applied to the visor, this will be the head of a ladybug, a black stripe is drawn in the middle of the helmet, and black circles are scattered. The design of the head of the bug depends on the imagination of the manufacturer. You can add white eyes, a smiling mouth. By punching two holes in the helmet and inserting a wire there, the gardener can add antennae to his ladybug.

With self-adhesive tape or film, everything is also extremely simple. In most cases, the helmet does not even need to be finished with red, especially if the item has a rich orange hue. It is enough to cut out black circles, a strip, eyes and a mouth from the self-adhesive film, if desired, and attach it to a construction helmet. The method is very easy, you do not have to wait long for the paint to dry, which in many respects saves the time of the person who took up the production of the scenery.
It's so easy to make a beautiful garden decoration with your own hands. The manufacturing process will not take a lot of time from the summer resident, but it will bring a lot of positive emotions, especially if you do not decorate yourself, but with your loved one or children. This will unite the family, and the result of joint work will warm the soul all twelve months of the year. A homemade ladybug made from a construction helmet will provide not only beauty in the garden, but also pleasant memories for the whole family.

The location of the ladybug in the garden also depends on the desire and imagination of the owner of the site. The decoration can be placed near the path in the garden, among the green bushes. However, the ideas are not limited to this, you just have to show imagination and give freedom to creativity.
How to fix a ladybug from a helmet on a tree?
There are ways to fix a ladybug or several of these bugs on the trunk of a tree, if it is present on the site. Finished decorations are fixed with a screwdriver or a regular screwdriver. You only need a few screws, and the creative garden design is ready.

If there is a mountain of decorative stones on the garden plot, why not place a ladybug made from a construction helmet on them? As if a bug crawling over the stones will add creativity to the garden and give a good mood to the whole family and visiting guests in any weather.
You can think of many more options for decorating a garden, so it is worth looking around your site and finding a suitable place for a wonderful ladybug from an ordinary construction helmet. Such a simple, at first glance, decoration may turn out to be the most beautiful garden decoration in the world, especially if a piece of soul has been invested in it during production. Options for ladybugs from a helmet are shown in the photo in our article.
Related videos
Ladybugs are amazing creatures. They are not always red, and their back is decorated with black dots. Their color is much more varied, and there may be no specks at all. Even ladybugs of the same species can be very different from each other. These insects are not only beautiful, but also very useful, as they successfully eat aphids in huge quantities, not giving that opportunity to destroy gardens and vegetable gardens. If we turn to Dahl's dictionary, then we can make the assumption that it got its name from the word "loaf". This is the name of both a head of cheese and a mushroom with a large round cap.
Ladybug: drawing on stoneIt turns out to be a very convenient material for making various gizmos. It is also suitable for making various crafts and for decorating the interior. A ladybug made of pebbles will look good. Made with love, it will be a wonderful gift. The stone ladybug can be placed on a flower pot or decorate your garden with it. According to these insects, they bring happiness, family well-being and love.
Ladybug made of stone (photo)

So, to make this composition, you need to take a pebble 10-15 cm in diameter. It will take not so much time to make several such bugs - no more than two or three hours. Before starting work, wash the pebbles and dry them. To make a ladybug out of stone, use one that dries quickly and perfectly hides all irregularities. You can find it at a hardware or art store, or you can make it yourself. To do this, you will need to mix water and in a one-to-one ratio. Depending on the material chosen, one or two coats of primer will be required. When it dries, paint a white ladybug made of stone, diluting it with a little water. The next step will be to draw the outline of the future drawing. A simple pencil is suitable for this. Now you can move on to the most interesting thing - painting.
Painting

It is best to paint with acrylics. Brushes are suitable for both natural and synthetic. To paint the wings, you need red paint. When they dry, paint over them a second time. This must be done to make the drawing look brighter. We paint over the head and the part of the body that is hidden by the wings with black paint. Then we draw points and contour lines for her between the wings. To bring the stone ladybug even closer to the original, we apply blue streaks to the white paint, which can be obtained by mixing white and blue. Then we draw a face. We choose green or blue for the eyes, white for the mouth, and don't forget about the eyelashes! Now the ladybug has become like a funny cartoon character. The work will retain its original appearance longer, and the paint will not wear off and fade if furniture or
In order to decorate your garden, to make it original, unlike others, it is not at all necessary to spend huge sums. A lot of crafts for the garden can be done very easily with your own hands from a variety of materials at hand. And one of the simplest and at the same time the cutest crafts is a ladybug. Today we will look at a master class on how you can make a ladybug out of stones, paper, concrete, plastic bottles and spoons, from plasticine and beads, as well as sew, knit or mold.

Stone crafts
How to make a ladybug out of stones and pebbles
In order to settle bright and cheerful ladybirds in your garden, you can use ordinary round stones - sea pebbles or whatever you can find is fine. Such a craft is made elementary - the stone is painted red, black paint - you draw wings, dots, eyes and antennae. Then you can settle the resulting insects in the grass, plant on stumps, glue on tree branches or decorate a flower bed. Another option is to draw ladybirds on a large stone.


Ladybug made of concrete: DIY mosaic
A similar way to make a ladybug, but this time we will use artificial stone and colorful tiles. Making a ladybug out of concrete is very simple. We need cement, which can be bought at any hardware store, an old basin or bowl - a craft mold, plastic and red and black tiles, or something from which we can make a mosaic. Here's what we get:

We put a plastic bag in a basin so that the cement does not stick to the sides, pour the cement, wait until it hardens and dries. We take out and grind with sandpaper. Next, glue the mosaic on top of the pieces of red and black tiles. The cement ladybug is ready, it remains to place it in a prominent place in your garden.


Making ladybirds out of clay
If you have not found suitable stones and it is difficult for you to make a mosaic, you can simply mold a ladybug out of clay with your own hands and paint it with paint.

Plastic crafts
Craft for the garden: ladybug from a construction helmet
If you have an old construction helmet lying around somewhere, preferably red or orange, then there is another elementary way to make a ladybug out of a helmet. The only thing you need here is black paint. As a last resort, a regular black marker. Just draw specks, eyes and wings - this is the figurine for the garden and is ready.


How to make a ladybug from plastic bottles
You will find more ideas for crafts from plastic bottles in our last article. And today we'll see how to make a ladybug out of plastic bottles with our own hands. The most popular idea is this insect-shaped flower bed. For such a flower bed, the bottles will first need to be painted black and red (not entirely, but only the bottoms + 5-10 cm). Here is a diagram for such a flower bed:

Another way is to string cut bottles on a line to create a voluminous ladybug that can be used to decorate a garden. This figure can then be trimmed with scissors. And here's what we can get:


DIY ladybug from plastic spoons
You can also use plastic spoons for garden crafts. It is very easy to make a funny ladybug out of plastic spoons with unfolded wings. You will need three spoons for each craft. We paint two in red and draw points - these will be the wings, one - in black (this will be the body). We glue all three spoons. Add a head - made of buttons, clay, or something suitable. The craft is ready:


How to make a ladybug out of cork
For garden crafts, you can use any materials at hand, and even a ladybug can be made from any round or oval object. For example, you can use beer or plastic bottle caps. They just need to be painted with red paint and black - draw dots, eyes and antennae.

Needlework: we sew, weave and knit
Beaded ladybug
The needlewoman can also use the ladybug symbol for her crafts. For example, you can weave it with beads. Of course, you won't get a large figurine, but even such miniature beaded ladybugs can be used to decorate the garden, for example, you can hang or glue them on trees.


Pillow ladybug
Sewing a pillow in the shape of a ladybug is also not difficult. All you need is a red and black fabric. If you want a fluffy pillow, just sew it out of fur. Time for details: dots can be made of beads if you are sewing a small pillow, or not round, but in the form of hearts.


Knitted ladybugs
If you like knitting, then why not knit a ladybug that can be used to decorate both the garden and at home. It can be a round knitted pillow, a figurine that can be hung on a tree or on a fence, put on a fireplace or on a shelf, a toy, a funny pot holder, or something else.


Crafts with children
How to make a ladybug out of paper
You can also make ladybugs out of paper - a great idea for crafts with children. Alternatively, you can simply fold the red paper using the origami technique and draw the eyes with dots. You can also glue a ladybug from several parts. You can simply put such crafts on the grass or make a garland and decorate it with a veranda or trees in the country.


Ladybug in quilling technique
A more difficult way to make a ladybug out of paper is to use the quilling technique. We have already written about spring quilling. There is an easier option - you get a flat ladybug or a small round one - if you wind strips of red paper in a circle with a slight shift. Or you can make such a chic volumetric quilling - ladybug:


How to make a plasticine ladybug
Also, together with your children, you can mold a ladybug from plasticine. There is nothing difficult in this, even the smallest child can handle it. Great idea for kids.


Edible figurines
Salted dough ladybugs
The idea is the same - you just need to mold a ladybug, as you already did from clay or plasticine, and then paint it in the desired colors and use it as a garden figurine.

How to make tomato ladybug sandwiches
A delicious and original idea for sandwiches is to decorate them with a ladybug made from tomatoes and olives. Tomatoes for the body can be taken either ordinary or cherry (in the second case, the figures will simply be smaller), we make the head from black olives, dots and antennae - from them. The sandwiches themselves can be anything.


Ladybug cake or salad
Another tasty idea is to make lard or ladybug cake. A cake in the shape of this funny insect is a great idea for a children's party, you can easily bake one for your child's birthday. A salad in the shape of a ladybug can be a decoration for any festive table. This is how it looks:


Sushi ladybug
And the last thing for today - sushi "ladybug". For me personally, this is an unattainable ideal, but if you have rich experience in making sushi and rolls with your own hands, you can try this interesting idea:

Of stones
To make ladybirds, we need:
- black gel pen;
- the pencils;
- several brushes;
- acrylic paint and varnish;
- some PVA glue.
After the acrylic layer has dried, you can start drawing the main contours with pencils. 
Then we paint with paints, first with two layers of red, and after black we draw up the front and back parts.
At this stage, we need to get several blanks before the more painstaking work - detailed drawing. Start with the black dots on the wings using a thin brush and continue with thin lines on the body using a black gel pen.
For the face, white paint is used: in front we draw eyes, eyelashes and a smile. We give a glossy shine with acrylic varnish and fix the painting. 
The choice of the place where to place the made masterpieces depends only on your imagination.
Did you know? Despite the cuteness of these insects, ladybugs are real predators in their world, exterminating many insects that are harmful to cultivated plants.

From plastic bottles
You can make a ladybug very simply and effectively from plastic bottles.They will not look much like real insects, but they will make a good decoration for your garden.
Take a few colored plastic bottles, the size you want and something suitable for the role of an insect head (round or a ball). All this will eventually be attached to each other with universal glue.
The lower part of the container, which we will cut with scissors, will act as the body. For believability, we'll only take a small fraction of the entire bottle. 
On the cut-off part, apply characteristic black spots using paint. On transparent bottles, the pattern will look less convincing than on colored ones. But the situation can be corrected with acrylic paint and indelible markers.
You can use something round as a head, even the cap from the bottle itself. 
 If you have old unnecessary toys in stock, then you can borrow eyes from them and make the insect even more convincing. You can also just draw them.
  You have to work hard with the antennae. These can be glued hooks or wire. If the head is made of something soft, then the antennae can be attached by simply piercing it.
From balls
To make a ladybug from balls, you need to take:
- balls;
- primer;
- acrylic paints;
- sandpaper;
- brushes.

Any oval or spherical object is suitable for making an insect. This example uses golf balls. Take sandpaper and polish the roughness on the ball, then prime it with a spray. After the primer has dried, apply red paint. Then with a brush we apply the main elements of the insect's appearance: wings, spots. We use white paint for the peephole. To protect against environmental influences, we will cover our bugs with transparent varnish.
 We place our creations on our site and surprise our loved ones.
From helmets
For making a ladybug from a helmet with our own hands we will take, in fact, the helmet itself, paints of a suitable color and brushes. Construction, miners and even children are suitable. It is not difficult to buy them, but some craftsmen still prefer children's bicycle or toy helmets.
Let's paint our plastic blank with one color. Then draw a strip with black paint in the middle. This will be the place where the insect's wings meet. Decorate the rest of the space with black spots. 
The front part is painted like a muzzle - a mouth and eyes are drawn. We let our product dry well and fasten it to a wooden surface with small screws.
From bowls
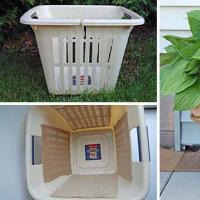
To make a ladybug out of a bowlit is necessary to perform the same manipulations as with the helmet, due to the similarity of these two items. 
From cement
We need a container (an old ball cut in two). A mixture of cement and sand in a ratio of one to three and water is poured into it. The consistency should be creamy. The bottom is pre-lined with a film or a bag. This will make it easier to remove the workpiece from the mold, which is best placed in a recess in or a basin. 
The workpiece will freeze for several days. We will not get an absolutely flat surface from polyethylene. 
Let's get rid of the remnants of the film and level the surface with a solution, to which we add additional tile adhesive. Use rubber gloves to protect your hands.  Next, let's start marking and painting. For this we will use crayons, pencils, coals.
  The decoration will be carried out with multi-colored mosaic tiles cut with a tile cutter.
  We glue the tiles with tile glue. After a while, we rub the seams and cover with a water-repellent agent.