How to change plastic pipes yourself. Replacing water pipes in an apartment: instructions for repair. We select material for hot water pressure pipelines
They say that the plan of any battle collapses at the first encounter with reality. The same can be said about the renovation of the bathroom, especially if the replacement of pipes in the bathroom is planned.
The margin for error in this case is very wide, and rework can be quite expensive. It is better to get acquainted with the most common mistakes in advance in order to minimize possible troubles.
The pipes in the bathroom are usually changed in two cases:
- if communications are out of order, clogged or leaking;
- when a significant redevelopment of the bathroom is performed.
Sometimes a breakdown becomes a good reason to make major repairs and completely transform the look of your bathroom. In any case, high-quality preparatory work should be carried out. First, you should draw up a plan for a new environment, think over the location of plumbing and furniture.
On the basis of such a plan, another plan is being developed, which reflects the distribution of new pipes.
A common mistake during bathroom renovations is the lack of free access to pipes. Small holes can be hidden behind neat doors with beautiful decor. Such openings are needed to provide free access to stopcocks, meters, connections, where leaks are most likely to occur.
In addition, you should consider the location of metering devices so that you can freely take readings from them.
Sometimes, in an effort to improve the aesthetics of the bathroom, homeowners set their meters too low or high. Another problem is related to the fact that access to metering devices is blocked by plumbing or furniture. Needless to say, you shouldn't place meters under the bathroom.
By the way, you can not install meters below the level of the toilet, in which case they may not be registered.
Access to water and sewerage pipes in the bathroom can be provided with a hinged door decorated with ceramic tiles
The bathroom, hidden behind a decorative screen, looks very attractive, but you need to provide access to the communications hidden under it. If the screen consists of decorative panels, one of them can be turned into a neat hinged door.
If ceramic tiles are used in the decoration of the bath, one of the elements can easily be converted into a hatch, which is attached above the hole with magnets.
Looks impressive, but this solution is not always practical. Sometimes such a tile falls off at the slightest touch, over time it can simply crack. If there is a possibility of such an outcome, it is still better to put the door on the hinges. It can also be decorated with tiles, but this is a rather laborious installation option.
It is easier and more convenient to use decorative plastic doors for technical hatches.
The lack of a clear plan for the implementation of repair work is a common mistake when replacing water supply and sewerage pipes. Sometimes the owners of a house or apartment connect the plumbing even before all the preliminary work is done. This can lead to accidents or negatively affect the quality of the repair.
You can negotiate with neighbors about the use of their bathroom during the renovation, purchase or rent a compact dry closet, install an outdoor shower on the site, etc. Inconveniences can be an additional incentive to reduce the repair time.

Before starting work, you should draw up a plan for the placement of plumbing and furniture, a pipe wiring diagram and think over the procedure for performing pipe replacement operations
You should also not try for the sake of economy to complete complex stages of work on your own in the absence of the necessary experience.
It is better to turn to a professional master for advice or completely entrust the implementation of some stages to specialists. Alteration will cost significantly more.
Errors when replacing drain pipes
Almost always, old metal pipes are replaced with new plastic structures. It is more convenient to work with them, they are lighter in weight, easier to install and cheaper.
The most common mistake you make is in the calculations. Experienced craftsmen recommend taking pipes with a small margin in length, so that during the repair process you do not have to throw everything and run to a plumbing store.
It is better to take pipes, fittings and other related elements not only from one material, but also from one company. Slight differences in the composition of the plastic affect the heating of parts of the structure. By connecting PVC elements with the same composition, a stronger connection can be achieved.
Sewer pipes are usually hidden from view, but this does not mean that their installation can be neglected. When installing the sewage system, you should adhere to a number of rules:
- The diameter of the existing drain and the new pipe must match.
- You should not tinker with sewage from improvised pieces of PVC pipes, especially if they are of different diameters or made of materials of different composition.
- Narrowing of sewer pipes should be avoided in any part of them to reduce the likelihood of blockages.
- The number of knees, turns, corners and other similar elements should be kept to a minimum.
- It is imperative to ensure the slope provided by the technology.
If it is planned to lower the floor level in a bathroom or a toilet, it must be taken into account that the angle of inclination of the drain pipe may change significantly in this case. In order to properly install the plumbing and comply with existing standards, the toilet bowl and bathtub are placed on a small pedestal.
Then the floor can be made a little lower, and the work of the sewer system will remain correct.

When replacing sewer pipes, it is important to observe the correct slope, otherwise you will have to face frequent blockages, and the likelihood of breakdowns will increase
When replacing the pipes of the sewer system in the bathroom, special attention is required to the procedure for stamping the socket of the tee on the house riser. Cast-iron structures rust and become significantly contaminated over time, pipes "stick" at the joints.
When dismantling old structures, in no case should the tee be damaged, therefore, remove old pipes with extreme caution. In case of damage to the tee, you will have to disassemble the entire riser and replace part of it completely.

The incision of the sewer riser tee should be done very carefully. If it is damaged, you will have to replace the riser completely or a significant part of it
Inexperienced craftsmen are advised to seek the help of professional plumbers to complete this stage of work. After dismantling the old sewer lines, the tee should be thoroughly cleaned of various types of contamination.
These can be remnants of sealing materials, pieces of old cement mortar, etc. A rubber collar is usually used as an adapter between the sewer riser and plastic pipes. If the connection is poorly cleaned, the sealing of the connection will be insufficient, and the likelihood of leaks will increase.
When replacing sewer pipes, it is logical to prefer plastic. However, it should be noted that plastic structures transmit noise much better than metal. To prevent this problem, it is recommended to plan additional noise insulation for the sewer pipes.
If the sewer riser in the house requires replacement, it makes sense to negotiate with the neighbors about the repair. It is extremely unpleasant when a sudden leak spoils the results of a fresh finish in the bathroom.
Features of replacing water pipes
An important point when installing plumbing and replacing water pipes is the height of the washbasin. It is necessary to decide which model will be used at the initial stage in order to correctly calculate the height to which the water supply and sewerage pipes will be brought out.
Usually, manufacturers calculate the installation height, focusing on the average height of an adult, which varies between 1.60-1.80 m. If the height of the majority of those living in the apartment is more or less than this level, the installation height of the wall-mounted washbasin can be adjusted accordingly.
Then, adjustments should be made to the dimensions of the pipes that will be summed up to connect the sink.

During the installation of the screen for the bath, you should take care of the presence of a door, which will provide free access to existing communications
A good idea when replacing water pipes is to install or replace filters that purify the water going to the boiler, automatic washing machine, shower, etc. It is worth thinking about installing other devices, for example, pressure sensors in the system.
These small devices are more convenient to install or replace at the stage of repair, and not at the moment when the finishing work has already been completed. Filters and sensors improve the quality of water supplied to household appliances and make it work more correctly.
As a result, forward-thinking homeowners are less likely to experience breakdowns and their appliances last longer.

Counters, filters, pressure sensors and other similar elements should be installed at the stage of pipe replacement, since it will be more difficult to do this later
When replacing water pipes, when using new plastic structures, the dimensions must be correctly calculated for each section. The thermal expansion of PVC water pipes differs from the reaction to heat of metal pipes.
If the length of a straight piece of plastic pipe exceeds two meters, its length should be slightly increased, by only five millimeters. This small distance compensates for the expansion of the pipe during heating and contraction during cooling.
A few words about mistakes when soldering PVC pipes
Soldering plastic pipes is a fairly simple process. Many novice craftsmen quickly master this technology and perform the replacement of pipes in the bathroom on their own. To solder PVC pipes, only the pipes themselves and a special soldering iron are needed. The pipe parts are heated and connected.
When the plastic cools down, it creates a strong and reliable construction. Despite the simplicity, beginners almost always make a number of mistakes during soldering, which degrade the quality of the connection. Flaws can already appear during the operation of pipes, so it is better to do everything right from the very beginning.
- Dirt and / or water at the soldering point when heated can cause significant deformation of the material. The work should be done in a clean room, and the pipes should be thoroughly wiped immediately before brazing.
- As soon as the pipes are removed from the soldering iron, they must be connected immediately, literally within a couple of seconds. Otherwise, the material will cool, which will weaken the strength of the joint.
- Allow the material to cool before removing sagging. Rough handling of a newly welded pipe can cause significant deformation.
- Excessive force when connecting the heated parts of the pipes can lead to the formation of a large sag inside the structure, which will interfere with the free movement of the fluid flow.
- Insufficient force when connecting pipes can also lead to disastrous results. In this case, the thickness of the pipe at the soldering point will be non-uniform: too thick in one place, and not thick enough in another, which reduces the structure's resistance to water hammer.

Overheating of PVC pipes during soldering is a common mistake. The warm-up time depends on the diameter of the structure and should be followed exactly
Another important point when soldering is heating time. It varies depending on the pipe diameter. If the material is not heated enough, it will not work to connect the pipes correctly. But more often there are cases when the material is overexposed on a soldering machine.
As a result, its fluidity increases, while the risk of deformation of pipes during their connection increases several times. Correct soldering of PVC pipes requires precision and accuracy. Inexperienced craftsmen should take the time to observe the work of professionals, or first practice a little.
How to properly adjust the size of PVC pipes for corner joints is described in detail in the following video:
What you need to know about replacing a heated towel rail
If a water heated towel rail is installed in the bathroom, it may need to be replaced or rearranged during the repair process.
To begin with, it should be remembered that the transfer of this element must be coordinated with the relevant authorities. The second point is the model of a water heated towel rail. Its characteristics must match those of the previous device.
It is advisable to take care of the stopcocks, if there were none before. All modern heated towel rails are also equipped with a Mayevsky tap, so that excess air can be removed from the device and to avoid the formation of air jams.
Inattentive attitude to these small moments can significantly complicate the operation of the heated towel rail in the future.
Another important element that should not be forgotten when replacing a heated towel rail is a bypass, i.e. a special jumper through which water is supplied, if the device has been removed. If there is no bypass in the old plumbing system, it must be installed.
The jumper is installed in front of the stopcocks. After that, to remove the heated towel rail for replacement, repair or cleaning, it will be enough just to close the stopcocks. Water through the bypass will continue to flow into the system and you will not have to shut off the water throughout the riser in the house.

When installing or replacing a water heated towel rail, do not forget about the installation of a bypass - a jumper that provides continuous water supply to the house during the dismantling of the device
If there is no bypass, and it can take a lot of time to replace a heated towel rail, a special jumper is installed so that the water supply can be turned on. Such a jumper is usually made from pieces of plastic pipe and fastened with threaded connections.
Of course, this is only a temporary construction; a new heated towel rail should be installed as soon as possible.
Any major overhaul in an apartment involves a complete replacement of not only finishing, but also communications. Plumbing is always one of the most difficult and dirty jobs. Replacing cast iron pipes in an apartment is usually done with metal-plastic or ordinary plastic. As a rule, if all the necessary tools are available, and the necessary materials are purchased, these works can be done independently, which will save a lot of money. Consider how the process of replacing pipes takes place in all rooms.

Replacement of sewer pipes
Sewerage is an important part of the communications in the house. If it is done correctly, then the owner will not experience any inconvenience - the water will go well, there will be no unpleasant odors coming into the apartment from the pipes either. But the process of replacing all the parts of this complex system is not as easy as it seems.

The first step is desirable draw up a detailed wiring diagram - here will be indicated not only the location of the plumbing equipment, but also the dimensions of all parts. Such a scheme will facilitate the purchase of the necessary materials and in the required quantity, as well as greatly simplify the installation process.
What do you need to work?
Without the necessary tools, this type of work will not work. These include:
- hammer;
- puncher;
- chisels;
- sturdy screwdrivers;
- grinder with a cutting disc;
- adjustable wrenches;
- gun for polyurethane foam.

You will also need to purchase a sealant, pipes of different diameters, gaskets, grease for joining individual elements. Particularly important are the rubber connectors, which will allow some of the routing elements to be securely connected.
On a note! The best way to seal pipe joints is to purchase a silicone sealant. As for the pipes, they must be produced by the same manufacturer, which will avoid a number of problems associated with fitting individual parts to each other.
Table. Required pipe sizes.

Sewer pipe prices
sewer pipes
Pipe condition assessment
The assessment of the current condition of the pipes will have to be carried out in any case, even if they are completely replaced. If you have an accurate idea of \u200b\u200bthem, you will be able to choose the most optimal dismantling option. For example, sometimes it is quite simple to cope with old connections - it is enough, by shaking the pipes at the joints, just to disconnect them. If it didn't work out just like that, then a chisel will come to the rescue, with which the joints are processed - the seal is removed from them. If the case is very difficult, then you will have to use a sledgehammer and a grinder to completely disassemble the entire system. It is also worth purchasing a gas burner for dismantling work - some elements will have to be thoroughly warmed up in order to disconnect.

On a note! If we are talking about replacing cast-iron pipes in old apartments, then there is no need to waste time sorting out the methods and immediately stop at the third option. Despite the decrepitude of the entire sewer system, the connections of such pipes are usually very strong and simply will not give in.
Dismantling and replacement of sewer pipes
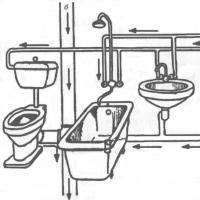
Consider in practice, like a room, toilet or washroom.
Step 1. The first step is to warn the neighbors that they will need to turn off the water supply, and they should also be prepared for the fact that they will not be able to use the toilet or bathroom. Otherwise, during the work of the master, an unexpected flow of dirty water may be expected. You also need to go down to the basement and turn off the water - both hot and cold.

Step 2. Further, all plumbing fixtures - a toilet bowl, a washing machine - are disconnected from the sewer. This requires disassembling all the connections between them and the sewer. Anything that is possible should be removed from the premises where the work is being carried out.

Step 3. After that, you need to unscrew the fixing bolts and remove the toilet itself, remove it from the room. Old and unnecessary pipes are also dismantled.

Step 4. One of the important points of this series of plumbing work is the replacement of the sewer riser. It needs to be cut off, since it goes through all floors at once, and replacement is made only in a specific apartment. The initial stage is heating the lower part of the pipe at the point of its connection with the adapter that goes into the ceiling. It should be heated with a gas burner - the procedure will destroy the old sealing material. In order for the old sealing material to collapse faster, the gap between the pipe and the adapter is machined with a screwdriver. By the way, the same method will allow you to disconnect other pipes from the riser so that they do not interfere.


Step 5. The pipe cools down after heating with cold water.

Step 6. The connecting sleeve is cut on both sides with a grinder. Then it is tapped off the pipe with a hammer and completely removed.


Step 7. Thanks to the previous steps, the bottom of the pipe can be removed. It is enough to shake it a little from side to side, and it will easily come out. The top of the riser is held by an assistant, otherwise it may fall and cause serious injury.

Step 8. A rubber sleeve is installed in the lower part of the connector located between the ceilings. Previously, its edge is coated with silicone sealant.

Step 9. A part of a new plastic pipe is installed in the formed hole.

Step 10. The riser pipe is fully assembled (along with the cross and other elements) - this will help determine the need for cutting it.


Step 12. The rest of the pipe is removed, and a rubber gasket lubricated with sealant is installed on top, as well as on the bottom. The upper part of the assembled new pipe is inserted into it.

Attention! Before installing the rubber elements, all sockets must be thoroughly cleaned of debris and old grease. And every connection (except for a number of rubber elements) must be made using a sealant.
Video - Bulkhead sewer riser
Replacing the tee
A tee is an element that provides drainage from the toilet bowl to the sewer and connects two pipes (as a rule, this is a drain from the bath / sink and a pipe leading to the sewer riser). Consider how the replacement process takes place in an old apartment.
Step 1. All the necessary tools and materials are purchased, including the sealant, the tee itself, etc. The old tee is removed simply - in the same way as in the instructions above, the remains of the sewer riser were removed. The pipe neck is cleaned of debris.

Step 2. Silicone sealant is applied to the rubber adapter. You shouldn't feel sorry for him.

Step 3. The rubber adapter fits snugly into the pipe and snuggles well against it. Additionally, it is tapped with a rubber mallet.


Step 4. The edge of the tee, which will be inserted into the rubber cuff, is lubricated with a special silicone grease, after which the tee is installed in its intended place. Other components of the sewer system are also connected to it, which will connect the entire structure of the pipes together.


Video - Switching from cast iron to plastic
Installation of sewer pipes
This part of the work begins after the installation of a new sewer riser. A so-called taper is installed in the branch, into which the first section of the sewer pipeline then enters. Fixation is carried out on the basis of a sealant, but only after the master is convinced that the pipe is suitable in size. Further, the rest of the sewerage parts are mounted in accordance with the diagram - splitters for the sink, washing machine, tees, a branch for the toilet.

Important! After assembling the system, it is important to ensure that there are no leaks. Only then can it be put into operation.
Replacing water pipes
Along with the replacement of the sewage system, it is often necessary to perform work on the replacement of other pipes - water pipes. In this case, you will also need a grinder, a perforator, a hammer, a chisel, a special soldering iron for new pipes, assembly grease, and a sealing tape (fum tape). In addition, the pipes themselves, fittings, adapters, etc. are purchased.
Step 1. The first step is to shut off the water supply on all pipes. If you plan to replace the risers, then it is important to notify the neighbors about the temporary shutdown of the water and shut off the supply directly in the basement.

Step 2. Faucets are removed in the bathroom and kitchen. For this, a gas wrench is used to unscrew the nuts on the pipes. After that, the mixer can be removed quite easily.


Step 3. If the toilet has not yet been dismantled, then its tank is disconnected from the water supply, and the sanitary ware itself is removed and removed from the room.


Step 4. Old pipes at the joints with the riser are untwisted with a wrench.

Step 5. Water meters are also removed, if installed. They can be used again, but if they are already outdated, then it is better to replace them with new ones during further work.

Step 6. Old pipes are completely dismantled. If you simply cannot remove them, then they can be cut at a distance of about 30-50 cm from the risers with a grinder. This will make it easier to remove them.

Step 7. For the installation of new pipes, work is being done on the manufacture of strobes in the walls. It is in them that the new water pipes will be laid. After installing the pipes, the grooves will be sealed.

Step 8. The water supply system is being installed - the pipes are connected using fittings. Mixers are installed, and the toilet is connected to the cold water supply system.

How are pipes connected?
Step 1. You will need a special device to solder the pipes. Pipes to be brazed must be degreased at the joints, and a mark is placed on them indicating the depth of the joint.

Step 2. Next, the pipe and fitting are put on a special device. As soon as the pipe is fused to the desired mark, it and the fitting are removed, then they are joined. They are held in the desired position for about 6 seconds. This will allow you to get a reliable and strong connection between the two elements.


Replacing pipes in the kitchen
Replacing the piping in the kitchen is done after finishing work in the bathroom and toilet. The process is similar to the previous ones, except that there will be a little less work here, since usually in this room it is enough to simply bring pipes from the riser to the mixer or bring the drain into the common sewer (provided that the risers are the same for the apartment. There are exceptions - separate risers in the kitchen).

Attention! If there are separate water supply risers in the kitchen or toilet, then it is important to worry about installing additional metering devices in the apartment.
Basic rules of work
So that the work on replacing pipes in an apartment does not become a disaster, it is important to follow a number of rules and adhere to certain requirements. Don't forget about preliminary design... If you perform work without a clearly defined plan, then there is a great risk of confusing something in the water supply or sewerage system, and also due to some errors and shortcomings, material consumption may increase. The project should immediately indicate where and how the various plumbing fixtures will stand, what kind of environment will be in the room. This will help to determine the places of output of connections, drains and think over the system to the smallest detail.

It is important to be very careful in the process of performing work - plumbing will not forgive mistakes, and incorrect replacement of pipes can turn into a real disaster - for example, flooding of neighbors. You should also use high-quality tools - the tightness and reliability of the connections will depend on the clarity of the pipe cut.
Pipes should be purchased only of high quality and from trusted manufacturers - it is not uncommon for the system to collapse before our eyes due to poor material. It is better to buy everything you need in company stores after consulting a specialist.
Plumbing must be purchased before starting work and with a small margin in case of unforeseen situations. All metal threaded connections must be sealed with fum tape or linen.

Important! If you plan to brick the pipelines into the wall, then it is important to use the soldering method. Elements simply twisted together are still not reliable enough. And before bricking it up, it is important to check the performance of the entire system at maximum pressure.
And it is worth remembering that access to pipes should be maximum, even if some of them are hidden. Otherwise, in the event of leaks, it will be extremely difficult to repair the system.
Replacing pipes in an apartment is not a disaster. And even a novice master can cope with the work. But he must be aware that if the installation rules are violated, there is a risk of leaks, which may cause flooding of neighbors, which the latter will definitely not be happy with. Therefore, it is worth weighing the pros and cons and only after that get to work.
If you need to replace the water supply pipes in the apartment, most people invite a specialist.
Can you try to do it yourself?
What to change
The modern market can offer us:
- Black and galvanized steel pipes;
- Copper;
- Reinforced plastic;
- Polypropylene.
The comparative advantages and disadvantages of these materials have already been mentioned many times, so we will only briefly go through the main points.
Steel pipes without anti-corrosion coating
pros
- Mechanical strength;
- Cheapness;
- Fittings availability.
Minuses
- Susceptibility to corrosion and overgrowth of the inner surface, especially in cold water;
- Large weight;
- Time consuming assembly with welding or on.

Galvanized pipes
This pipe is afraid of rust only where deeply cut threads have exposed steel from under the zinc layer. At the same time, the pipe has added in price, and assembling it is still not easy work.
Tip: However, where special strength or high temperature resistance is required at a low price, galvanized steel is the best choice.
In particular, it is an ideal material for entering from a heating main into a private house.

Copper
pros
- This material, in the absence of disasters (a meteorite fall on the house, the third world war or a serious family quarrel), is practically eternal. The oldest copper plumbing is over a century old and in excellent condition.
- Working temperature. It is limited from above by a value of 250 C. This means that the pipes will survive not only the peak in water temperature; they will also withstand superheated steam.
- Resistant to moisture and chemically active substances. The pipe will not rust or dissolve.
Minuses
- Price. It is the most expensive of all materials.
- Mounting on is tedious and requires a fair amount of physical strength; also needs a special tool.

Metal-plastic
pros
- Easy assembly;
- Reasonable price for pipes and fittings;
- Neat appearance.
Minuses
There is, in fact, one serious drawback, but a very significant one: leaks at the fittings. After several tens of heating-cooling cycles, the joints begin to flow. Because of this, it is better to make them available for service.

Polypropylene
pros
- Fast installation that does not require special skills;
- Extremely reliable and mechanically strong connections;
- Cheapness of material and fittings;
- Light weight is important both during transportation and when attaching the water supply system to lightweight partitions.
Minuses
- Unreinforced polypropylene lengthens greatly when heated;
- Connections with fittings are non-separable;
- Installation requires special tools
The first drawback is devoid of reinforced polypropylene - pipes in which one of the layers is aluminum foil or fiberglass. In addition, it can withstand significantly higher water pressure.

Comparison results
In terms of all the properties, reinforced polypropylene pipes are definitely the best choice. Other things being equal, it is better to stop at a fiberglass-reinforced pipe: it does not require stripping during installation and does not delaminate. But more on that later.
How to change
So, we settled on reinforced polypropylene. Do-it-yourself pipe replacement in an apartment stage by stage looks like this:
Dismantling the old water supply
- We turn off and discard the water supply risers;
- We disassemble along the threads or, which is simpler, we cut the old water supply from the valves and beyond with a turbine;
- Carefully, without much effort or distortion, we unscrew the valves.
Tip: For old screw valves it is often more convenient to first unscrew the knob and stem completely first.
In this case, you do not need to gouge out a piece of the wall to unscrew the valve.
Be prepared, if necessary, to anneal the threads with a gas cartridge with a nozzle or blowtorch; be sure to hold the valve with the second gas wrench when you unscrew the head.
Otherwise, there is a risk of breaking off the threads on the steel pipe coming from the riser.
Cleaning the old pipe
The pipe section up to the valve is almost always completely or partially clogged with slag and sand. In cold water, corrosion and salt build-up converts debris into hard build-up inside the pipe.

Judging by the absence of deposits on top - galvanized. However, as you can see, it also needs to be cleaned.
Cleaning the pipe before installing the valves is a mandatory operation. To do this, you can use a thin steel string (curtains were hung on such in the days of Joseph Kobzon's youth) or, if the riser is close, an ordinary screwdriver.
If you have to wield a string, make a handle on one side of it like the one on the well gate, and on the other - a hook the size of a match head. You will have to clean the problem areas, accompanying the feed of the string by rotating the handle.
Valves and filters
The new valve sits on the old thread with a reel of sanitary flax soaked in paint.
Tip: in order not to get your hands dirty, wind one turn of flax, brush on opposite sides of the thread with a paintbrush and then wind the rest of the winding.
Don't forget to put some plastic or folded newspaper underneath. One drop will fall to the floor.
Next, we install the filter, then the fitting-adapter from the thread to the polypropylene.
It is advisable to place the filter so that the settling barrel is directed downward. Otherwise, slag and scale will collect anywhere, but not in it.

Of the valves, it is better to stop at modern ball valves that shut off the water by turning the handle or flag by 90 degrees.
Installation of polypropylene
- We select a nozzle for a soldering iron that matches the diameter of the pipe and fittings. By the way, for domestic water supply the optimal diameter is 20 mm, which is also the cheapest.
- We remove the outer chamfer from the pipe.
- We must clean the reinforced pipe with aluminum foil: even if the aluminum layer is glued between the polypropylene layers, when aluminum comes into contact with water, the pipe may begin to delaminate after a short time. The fault is electrochemical processes in aluminum in the presence of an electrolyte and low currents.
- We insert one side of the nozzle into the fitting, put the other on the pipe.
- Let the plastic melt.
- We insert the pipe into the fitting and hold it for a few seconds.

Conclusion
And really not difficult, right? Do not forget: we turn on, opening the valves only partially, after which we carefully inspect the water supply system, all threads and connections to the mixers for leaks.
Plumbing is one of the most important components of housing, but did you know that it needs to be changed over time? It is easy to change the water supply in an apartment or a private house on your own, having at hand instructions, a set of plumbing tools and a bright mind.
Related articles:

In recent years, there has been a great demand in the country for renovation - plasterboard covering the apartment, the massive use of plastic and many other wonders of progress. But at the same time, they increasingly forget about the water supply, and in fact in old houses often Soviet pipes still lie (overgrown with rust and bloom).
Why you need to change old water pipes
In addition to pure H2O, a huge amount of impurities passes through the water supply every second, which tend to settle on the inner surface of the pipes. Over time, the lines become clogged with particles of oxidized metal, which leads to corrosion. In addition, the appearance of old Soviet metal pipes does not at all harmonize with the modern interior of the apartment. Sooner or later, but almost all owners of old apartments come up with one simple idea - the pipes need to be changed.
The cost of replacing water pipes with plastic
At the moment, the most popular pipes are made of polypropylene, metal-plastic (the so-called "reinforced pipes"), or polyethylene. The price for them differs not only depending on the material, but also depending on the region of residence.
So, the price per meter of a propylene pipe with a diameter of 100 mm will be 500-600 rubles, a reinforced pipe with the same characteristics will cost 1300-1600, and the cost of a polyethylene pipe will be in the region of 300-500 rubles.
To determine the price of a new water supply system, take a diagram, calculate the total length of the pipes, add 15% - just in case, add the cost of fittings and fasteners and ... voila - you will have in your hands the cost of all the elements and installation of the line.
Benefits of plastic plumbing
Firstly, plastic does not rust, which makes it much more durable and safer than the metal plumbing of Soviet times.
Secondly, it does not have a fragile inner coating, which again prolongs its service life and keeps the water clean even after a couple of decades of operation.
Thirdly, it is more reliable, since it is easy to solder and resistant to temperature extremes. So, if you do not know what to choose - metal or plastic - feel free to buy polymer.
Frequency of replacement of water pipes
There is no unambiguous answer to this question, but the statistical survey method yielded the result “once every 30-40 years, if it is plastic, and once every 20 years, if it is metal”. Due to the high rate of wear of the latter, the water supply system becomes unusable faster. On the other hand, if the pipes are outwardly in a normal state, and the pressure and purity of the water in them correspond to your understanding of the norm, you can postpone the replacement.
As the saying goes, "don't break what still works." But if the troubles appeared ahead of time, they need to be changed, and rather urgently, since problems with pipes can have catastrophic consequences. In addition, it is recommended to immediately change the entire system - simply because the technique of joining plastic to metal is still not as reliable as joining two identical materials, which can be securely fixed in many different ways.
We decide on the choice of material
Before plunging into work, decide on some questions. And the first of them is what kind of material to use in the apartment. Three of the most popular options have already been presented, so now let's look at their pros and cons.

Polypropylene plumbing
Until recently, polypropylene pipes were the absolute champion in the choice of material for water supply. They are almost not subject to wear, relatively easy to assemble, do not conduct electricity, heat-resistant, reliable. But there are also disadvantages - so, the connections cannot be disconnected, since the only really reliable method of connecting one pipe to another is welding, and the only way to fix poor soldering is a pipe cutter.
Reinforced plastic and reinforced pipes
An older version, originally from the 90s. It was then that the country was struck by a plastic boom and reinforced polymer was almost everywhere, including plumbing. On the other hand, since polypropylene simply did not exist then, metal-plastic was indeed the best option, especially in comparison with galvanized (or even non-galvanized) Soviet steel pipes. Metal-plastic holds physical influences well, wears out little and looks great, but it also has disadvantages - it is much more expensive than its competitors and has an extremely negative attitude to temperature changes, which is why it starts to flow after 2-3 seasons. On the other hand, it is even easier to install than polypropylene, so if you are making plumbing in the country or other place where there is no electricity for welding yet, metal-plastic will be the best choice.
HDPE pipes (polyethylene)
A relative newcomer to the market, so it will be difficult to say exactly how good they are, but in theory everything looks just fine - polyethylene pipes are not only strong, but also flexible, which allows them to be used even where a structure made of polypropylene or metal-plastic would be too cumbersome. In addition, they can freely change geometry, which provides a high level of protection against physical impact. On the other hand, thermal stability raises some doubts, but for water pipes this is still not so important, especially when you consider that the price for these pipes is lower than for analogs made of polypropylene. Alas, they share a minus with polypropylene - the only really strong connection method is welding.
Choosing a mounting method
There are two ways to normally install plastic pipes - welding and pressfitting. Welding is divided into two types - cold (using epoxy glue) and hot (with a welding machine).
Cold method
Cold welding is not only a method, but also the name of the main consumable when using it. Virtually every hardware store these days sells a fast-setting, reliable adhesive that allows you to firmly bond plastic pipes together. This method is more resource-intensive than hot welding, but it does not require an expensive welding machine. It will also take a little more time - the glue needs to harden, and money, since the material, although inexpensive, is needed a lot.
On the other hand, it prevents the appearance of sagging inside the pipes, which increases their normal service life. We recommend using this method, as durability and reliability are more important than instant gain in time and money.
Welding
The classic method of joining pipes, not only plastic, but also metal. Requires a powerful power source, as well as a set of equipment - a welding machine, a protective mask, etc. This method is faster than cold welding and is traditionally considered more reliable. But, as studies show, cold welding is not inferior to hot welding in terms of speed and reliability. On the other hand, improper use of hot welding can lead to sagging of the pipes, which is guaranteed to lead to clogging of the pipes in the next few years.

Press fittings
Another option for connecting pipes, this time is purely mechanical. This method is characterized by the use of fittings made of plastic material, which, after installing pipes in them, are pressed with force by a special press machine. This leads to their deformation and fixation of the joints. The result is a strong connection.
DIY plumbing installation in an apartment
Preparing to install a plumbing
Dismantling old pipes and installing new ones is easy, so you can do it all yourself. It is best to do the job with at least one assistant. What to do first:
- Find the inlet valve and close. Make sure to wrap it all the way up - even if the remaining trickle is as thick as a match, there can be a lot of water flowing in. Be careful not to rip off the valve.
- Disconnect all plumbing fixtures. Do not forget about the heating boiler, if any, as well as the washing machine and dishwasher.
- Dismantle old pipes. If they are steel or cast iron, wear safety glasses and a respirator. Cast iron has a tendency to crumble, making it easy to break, but small particles can get into the eyes or windpipe. Cover your ears, work with tight gloves.
- Cut the pipes according to the diagram. This is done with a pipe cutter, regardless of the type and material of the pipes. You can try with an ordinary grinder, but the cut should be perfectly flat. Consider depth when cutting - that is, add half the depth of the fitting to each end of the pipe that will go into it.
- Align the pipes with a gauge. This will remove ovality and make them round.
- Clean the pipes from any contamination, and also remove irregularities at the ends, if any, remained after the pipe cutter was in operation.
Then it all depends on the chosen fastening method. If hot welding - warm up the welding machine, if press fitting - prepare the press machine and the fittings themselves, if cold welding - preparation is not required, unless you forgot to buy glue.

How to glue pipes with cold welding
The most simple option, requiring only high accuracy of instruction execution:
- Chamfer the end of the pipe. The angle is 15 degrees. Tool - bevelling tool, bought at any hardware store. The procedure is quite complicated, as you need to avoid burrs as much as possible. In general, we advise you to practice first and start installing pipes only after you are completely confident in your abilities.
- Clean the flares of the fitting from dirt, dust and moisture by hand or using a special CPVC cleaner. Better the latter - so more reliable.
- Apply the adhesive with a brush, by hand, gently. As tight as possible on the pipe surface and on the inner surface of the socket. In this case, it is better to spend more glue than is necessary than to think about how to patch the current connection.
- Insert the pipe into the socket. Do it as quickly as possible, ideally right after applying the glue.
- Rotate the pipe 90 degrees relative to the fitting. Alternatively, rotate the fitting relative to the pipe. This is done in order to distribute the glue as evenly as possible.
- Hold the pipe and fitting together for 20-30 seconds. Absolute fixation, twisting or changing the depth of entry of the pipe into the fitting is required - not recommended.
- Check for an even layer of adhesive around the circumference. After the end of the fixing period, inspect the pipe from all sides to ensure that excess adhesive has escaped from the fitting. If there is too much of it, remove it with a soft cloth.
- Continue installing other pipes, but remember - it will take a long time before the glue completely hardens.

We connect pipes by hot welding
Hot welding can be different - polyethylene pipes can be welded with the butt method, but polypropylene will have to be processed with a socket. And there is also electrofusion, which will also have to be taken into account. So first decide on the method you will use, and then proceed with the appropriate procedures.
Yulia Petrichenko, expert
Butt method
Due to the high flexibility and ductility of polyethylene pipes, they are directly welded without the use of fittings. For this you need:
- Center the pipes.
- Make sure they fit as tightly as possible. This is important as reflow cannot correct really large defects (more than 1/5 of the pipe wall thickness).
- Disconnect them again and insert a heated heating element between them. Then press them against it again.
- Wait until the ends are melted - you will know about this by the amount of burr squeezed out under the influence of mechanical pressure. The burr height must be indicated in the welding table that came with the pipe or with the welding machine.
- When the ends are melted, release the clamping force and wait for the ends to warm up deeply. This takes the time indicated on the welding chart.
- Now remove the heating element and press the ends of the pipes tightly against each other for a while, gradually increasing the pressure. This must be done as quickly as possible. The phase is relatively short and in no case should it be exceeded, so it would be better to interrupt the "seam upsetting" procedure a little earlier than ruining the whole work from too much zeal.
- Maintain the force of compression of the pipes for some time, but just do not increase it! This will help the pipes not to "play" backwards during cooling.
Socket welding
This process requires the use of fittings. Ideal for polypropylene pipes. It is carried out with a welding machine according to the corresponding instructions, but since we work "with our own hands", we will show the installation using an ordinary blowtorch with a special nozzle consisting of a mandrel and a sleeve.
- Warm up the welding machine to the desired temperature.
- Slide the fitting onto the mandrel (this will require some effort) and insert the pipe into the coupling. This should be done as quickly as possible.
- In the process of heating, increase the force of pressing the pipes to the mandrel and coupling. This must be done until they completely enter the welding nozzle. Then stop the pressure.
- When the parts are hot enough, quickly remove them from the attachment and press against each other. After that, you get a one-piece structure from two parts.
- Weld the plug or the next pipe to the other end of the fitting.

Electrofusion welding
This type of welding is used when installing gas pipelines, since it is expensive, but at the same time reliable. If you want "only the best", you can use it when installing plumbing. It will require a special electrical fitting - a polyethylene fitting with a built-in heating element. The method is only suitable for round polypropylene pipes.
- Prepare the welding machine.
- Degrease and clean the contact surfaces of the pipe and fitting.
- Place a mark on the pipe to indicate the boundary of its entry into the fitting.
- Secure the pipe and fitting firmly. The fitting can push it out due to thermal expansion and your task is to prevent this from happening.
- Connect the welding machine to the fitting and press the "Start" button on it. It will turn off automatically.
- Leave the parts and fitting alone for at least an hour. The connection cannot be used before this time has expired!
Press fittings
A press fitting is used in cases where the pipe does not tolerate welding well and is the main method of fastening metal-plastic pipes, although polypropylene can also be fastened this way. This is the simplest method of all, but the least reliable.
- Slide the ferrule onto the pipe.
- Insert the O-ring fitting into the pipe.
- Crimp the sleeve with special pressing tongs. It is advisable to use electric tongs as they provide greater force and high reliability.
Using the selected technology, replace all water pipes with new ones. The sewerage system is mounted in about the same way (this is shown in more detail in the video below), and it is desirable - simultaneously with the water supply, so as not to stop the riser again later. It is very important to do everything according to the scheme, but even after the end of the process, do not rush to turn on the water. First, you need to test the system with a pressure pump.
Video lesson: Replacing water pipes with plastic
Crimping pipes
Pressure testing of pipes is an increase in pressure in one of the sections of the network in order to identify leaks or structural weaknesses in it. This is done using a special pressure pump.
- Seal off the pipe section hermetically from the rest of the network. This is done either by elevator valves or pneumatic plugs.
- Connect a pipe pressure pump to the site and pump cold water into the area.
- Give the pipe a pressure 10-20% higher than the nominal one. For heating, water supply and sewerage, it is 6-8 kgf / m2.
If the site passed the test, go to the next one. If not, think about how to replace it or at least strengthen it.

TOP-5 mistakes when installing plastic water pipes
In this section, we have collected the most offensive and popular mistakes when installing plastic pipes.
- Incorrectly marked boundary of the pipe entry into the electrofitting. Will force you to lose one fitting and two pipes, but in general - nothing fatal.
- Excessive butt welding force. Again, there are two pipes on the list of losses, but you lost them not through carelessness, but because of your own diligence.
- Loose chamfers for cold welding. The result will be a fragile bond that only adheres to the glue.
- Pipes not cleaned from dust and grease during welding. The result is a fragile connection that will simply crumble after a few years.
- Wrong measurement of fitting before cutting pipes. Forces to spoil all the material. There is no solution, and the process itself is characterized by large financial and time losses, for which this error gets the first place. As the saying goes: "Measure seven times - cut once."
Expertise - sewerage, water supply
Ask an expert
Do-it-yourself replacement of water pipes in an apartment with plastic ones: cost, video instruction - print version
Add to bookmarks
Replacing old steel pipes
Often in our apartments, replacement of water pipes is required, since most of the old ones are still standing from the moment the house was put into operation, which means decades of service! Usually this is a metal water supply system, which today no longer meets all norms and requirements, since it cannot provide the proper water quality, safety, and ease of use.
Increasingly, plastic pipes are being used, which are not only more durable and stronger, but also easier to install and maintain. Such a water supply system can be easily installed with your own hands in just a couple of hours.
In order to replace pipes, you do not need to have special knowledge or expensive equipment: polypropylene pipes, special fittings and other simple tools can be bought at any hardware store.
Such a replacement can be carried out not only with the help of metal-plastic ones, they have shown themselves excellently, but their cost is quite high, therefore more and more preference is given to the installation of plastic ones.
From metal to polypropylene
Today, four types of water pipes are used for installation in apartments, including:

Elements for metal-plastic water supply pipes: 1 - adapter; 2 - square; 3 - elbow joint; 4 - tee; 5 - union nut; 6 - fitting; 7 - valve; 8 - metal-plastic pipes.
- Metal with various diameters. It can be steel, cast iron, galvanized water pipes. Pros - strength, reliability, long service life. But there are also numerous disadvantages, among which it should be noted: the complexity of installation (it is necessary to cut a thread, use a welding machine to connect pipes), from the inside the walls are covered with rust and bloom. In order to crash into a plumbing, you need to have the appropriate skills. In addition, metal requires careful maintenance, constant checking for leaks, painting.
- Copper pipes are more reliable, replacing copper water pipes increases reliability and strength, in addition, copper is very aesthetic and looks great in any bathroom. But there are also disadvantages here: in order to replace copper pipes, you need to have special skills, the cost of products is very high, and stray currents may occur.
- Plastic pipelines are easy to install, they are reliable, durable, can be connected to ordinary metal ones, but at the points of attachment, due to sudden temperature changes, they can begin to leak, therefore, a connection method using special welding is often recommended.
- Polypropylene are considered the best option when installing plumbing in an apartment. Polypropylene is a very reliable material, it can withstand temperature extremes, and the connection method is simple and reliable. Polypropylene pipes are used for cold, hot water supply, heating, sewerage.The diameter can be different, so it is very easy to select them, and the cost is affordable.
The following materials and equipment will be needed:
Replacing polypropylene water pipes is easy, but you should prepare everything you need for work in advance. Today there are several ways of laying. Depending on the choice of a specific method, the set of equipment also differs:
- pipe cutter (shears for cutting);
- pipe bender (to give the water supply the required shape);
- soldering iron and nozzles (for hot, so-called diffuser, welding);
- calibration sweep (when using the press method);
- press tongs (for press method);
- glue, building level, sandpaper, nozzles for any diameter for a soldering iron, fittings, couplings, adapters, etc.

Methods for replacing old pipes
- Cold welding of plastic pipelines involves processing the inner surface of one pipe, after which a special adhesive is applied to the end of the other. Only 15-20 seconds are enough for gluing. Such a plumbing installation is considered the easiest, anyone can do it.
- Press fittings provide a more secure connection. For fastening, a pipe is put on the press fitting, the crimping sleeve is pressed with special pliers. The work is done very quickly, it is only necessary to select fittings of the required size and diameter. Additional sealing is only necessary when connected to mixers and metal pipes.
- Hot welding is carried out using a soldering iron, while the seams become monolithic, such a connection is the most reliable, but often requires the presence of a specialist.
What to look for before replacing steel pipes?
When replacing the plumbing in an apartment, pay attention to the following:
- whether it is necessary to replace water consumption meters or whether polypropylene pipes are simply laid;
- what material the pipes will be laid from (plastic, metal, copper), what installation method is chosen, what pipe diameter is required;
- which inlet taps are installed on the riser (valves for shutting off the water);
- what tools are needed to lay pipes in the apartment (depends on the material).

Often the quality of the water in our water supply systems is poor. To ensure a higher quality of water, coarse and fine filters are used. Such filters help to extend the life of steel and plastic pipes, cleaning their inner surface from rust, silt and other things.
Such filters are installed at the entrances, before installing plastic and other pipes. With such an installation, it is necessary to provide for what pipe diameter will be, what connecting elements are needed for this.
Cost of work: calculation example
Before changing the pipes in the apartment, it is necessary to correctly calculate all the costs that will go to such plumbing work. We offer a calculation for replacing pipes in a typical apartment, which includes the cost of dismantling old metal pipes, purchasing new ones, installing them:
- to replace the wiring from the input taps - 5000-5500 rubles;
- replace the riser - from 1800 rubles;
- replace existing pipes from inlet taps, install water consumption meters - from 7,500 rubles;
- to replace a riser of hot water supply and a heated towel rail - from 4500 rubles.
Carrying out plumbing work in an apartment is a rather responsible, complex matter, which, however, can be done by hand. Often this is a simple replacement of old metal pipes with new and reliable plastic ones, installation of meters, water filters. It is best to trust the professionals in this matter, but modern plastic pipes, unlike traditional steel ones, are not only of high quality, but are also easily mounted even by a person who has no experience in such repairs.