Country house step by step. How to build a garden house with your own hands. Layout of a garden house and its cost
A dacha is a really inexpensive home for living, and only from a certain time we began to consider it a luxury. In fact, if you remember the old days, then these are small houses that are half or three times smaller than the village ones, but comfortable and cozy for living at any time of the year. Therefore, it makes sense to remember how such housing is built and equipped, and to take care of the maximum comfort that is possible thanks to modern technologies and materials.
So, today we are building a small country house in which a small family can freely live. We will not touch upon the issue of financial problems and moving to a dacha, but simply study the issue from the side of the possibility of living in such a country house of our own free will, but not by circumstances.
What should be a country house
Everyone sets the basic requirements for a dacha housing independently, depending on personal requirements. But today we are talking about how to equip a house comfortably and at the same time economically.
Believe me, it's real!
So, what is a cheap and comfortable dacha for living? This is a small house that has everything for cooking and personal hygiene. It is warm in winter and cool in summer. Inside there are some household appliances, and on the street, at the very summer cottage, there is everything for a simple rest.

It would also be nice to have several acres of land nearby where you can plant vegetables and fruits for personal consumption, as well as a couple of small flower beds, say, just for the soul.
In fact, a person doesn't need so much to feel good. Therefore, we believe that it is possible to do without expensive intelligent systems and automated equipment. However, now you can see for yourself!
Choosing a project of a country house
In order to reduce the cost of construction as much as possible, but not to get away from its quality, you can choose an inexpensive project. There are enough of them on the Web and even among the house builders themselves, who simply give some typical projects to their customers. But there is always a way to get a project and not order a house from builders, it's simple.
You can also independently create a dwelling project that will be convenient for you personally by the location of the internal premises. The main thing, when determining the materials for construction, is that you have the opportunity to show the project to professionals, to approve the possibility of construction.

Building area: golden mean
To build an inexpensive country house, you do not need to chase a huge area. Start from the essentials - a couple of rooms, a kitchen, a corridor, a bathroom (if it is inside the house), a small pantry. All this can fit in about 40 square meters. It will be something like an average two-room apartment, which is quite enough for a family.
The premises themselves can be divided by area, as it is convenient, as long as the project is approved.
What to build from?
Today, such buildings can be driven out of a wide variety of materials:
- Glued laminated timber or log is a modern return to classic construction, but it is very difficult to find a good price;
- The construction of housing from brick or cinder block may be a little cheaper, but here it is worth considering the cost of subsequent finishing;
- You can build a house with a frame method, for example, from SIP panels. It will be moderately priced and not bad in terms of energy efficiency.
Any material for building a country house can be expensive and not very expensive, and if you study the market well, then you can even get away from the standard cost by 40-60%. This is so, because the cost has a regional affiliation, and is also leveled by many builders under the "name" of their company.
Inexpensive building foundation
The foundation for such a house will really cost a penny. Comparatively, of course. But here it is important not only to reduce the cost of the foundation, but be sure to choose one that suits your residential building.
It is necessary to consider the building materials, roof, cladding, because all this gives weight to the foundation. But it is also worth turning to the study of the soil, because it is not always possible to fill in the strip foundation and stop at this option. In some cases, if there are some problems with the soil, it will be necessary to use piles, and this already increases the cost of the process.

Inexpensive roof and roof for summer cottages
We studied most of the roofing options in the feature article earlier, and you can refer to it at any time to get the necessary information.
As for the cost, today it is most profitable to install slate or corrugated board on the roof.
There are other options, but it is always worth starting not only from savings, but also to calculate the possible service life in advance. In this case, depending on the type of roof, you can pay attention to bituminous tiles, ondulin and other types of roofing
How to build a summer cottage inexpensively
The answer to the question here is very simple - to build a house with your own hands! But if there is no qualification, and the house is needed in the near future, what to do then? Just look for an inexpensive bricklayer or a brigade of shabashniki who will be ready to build you a dwelling at a dacha inexpensively.
Those who have not come across such a question will certainly assume that this is impossible, but they will certainly be wrong. Just look at how many builders are looking for income today, and you can earn at least a little from the construction of your summer cottage. It remains only to determine among the total number of those who are proposing their candidacy, who can build with high quality and for the price tag you offer!

Choosing a plot for a summer residence
Today there are a lot of proposals in dacha cooperatives. There are even absolutely pennies, if only a person took the land, and with it the obligation to pay land dues and pay for water and other indicators of civilization.
It is very good if the site is selected not only for cost, but also for quality and practicality criteria. The soil, its quality, relief, remoteness from the entrance, microdistrict or city, planting in the country, the ability to build quickly and without problems - all this is very important, but the list of requirements is far from complete. The main thing here is communications: electricity, water, gas, sewage. It's good when in autonomous substations or even with centralized supply, the main thing is that there is light and water, the rest is easier.
Choosing a place for a building
The place for the construction of a country house should be on a hill so that surface or ground waters do not affect the building. It is advisable to place the house away from the road, from unnecessary neighborly views and road dust, and also so that the maximum of windows face the sunny side, because it is very good when it is light inside the dwelling.
Establishing the foundation
Since our building will be of a frame type, inexpensive, but very modern, we can not really deepen the foundation, because this will only be an extra waste of money. You can choose a simple columnar foundation or a strip foundation. Platforms and filler plates are not needed here, that's for sure.
Under the frame house, the foundation can be installed independently if you have even the slightest experience in construction. But if a construction team is working on the territory of the dacha, let it be better if it is engaged in this process, since the foundation of the house plays a very serious role.
Installing the frame
The frame of a country house is being erected quite simply, but strictly according to the project. It is advisable to initially provide for the piping of communications in order to hide them in the thickness of the floor and walls. Also, pay attention to the needs for such structures as a cellar, because it can always be under the house itself.
The installation of the frame takes place in conjunction with the installation of the rafter system on the roof. If the roof of the house will be according to your own design, other options are possible.
Inexpensive summer cottage arrangement
Now we need to make sure that the arrangement does not cost more than construction. We will not work with the interior today, as well as with accessories and decor, but we will definitely take care of ensuring comfort inside.
In terms of home improvement, all issues should be resolved with maximum practicality!
Electricity in the house
Naturally, the easiest way to provide your home with electricity is to wire from the center line. But there are always options of an auxiliary nature. Of course, they can lead the budget in the negative direction, but you still need to remember about them.
Solar panels can generate electricity. In this case, you will only need to spend money on the purchase and installation. Further, you will receive electricity practically free of charge, albeit in small quantities.
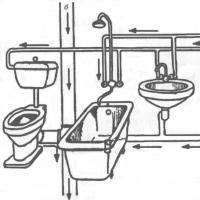
The simplest sewage system in the country
Who said that it is very expensive to provide high-quality sewage on the site? It's just that we are used to working with septic tanks and outlets to irrigation fields, which in the complex costs decently. You can always approach the issue from the other side and, for example, build a cesspool out of used bricks or just one concrete ring. Of course, you will sometimes have to call a car to service such a local treatment plant, but you can always reduce costs by purchasing special additives for septic tanks. These are bacteria that will help ensure that all effluents are decomposed and minimize the cost of cleaning the sump.
Inexpensive water supply to the cottage
The water supply at the summer cottage is good, but if it is not there, several tanks will save the situation. One can be placed outside, for summer use, and the second on the roof of the house, so that you can wash dishes, take a shower, and so on inside.
If we talk about the cost of these types of provision, then centralized water supply is always more convenient and cheaper. You pay the standard meter tariff and do not worry about the delivery of water, its purification.
How to build a summer cottage? Selection of materials (video)
Cooking and heating
It is very important that the house is warm and that there is an oven on which to cook. It can be a single structure, for example, a modern cooking stove, which will also heat the house in winter.
Just an ordinary potbelly stove, a cast-iron stove, which is installed in any room of a country house. If not, you can build a stone stove, however, the services of a stove-maker here can seriously hit your pocket.

Inexpensive life in the country: summing up
We chose an inexpensive, but decent and high-quality plot, built a simple modern house using frame technology. Here we have almost a standard, but if we count in terms of area and inexpensive construction of a house, then here we are already seriously saving.
We also immediately remove from the budget expensive septic tanks, stoves, electrical appliances for heating. This gives us the opportunity not only not to spend money right away, but also not to waste money on the maintenance of such devices and systems. Of course, there are solutions that are much more practical than a stove or water tanks, but our task was to prove that life in the country can be comfortable and inexpensive. It seems to us that we did it, especially if, after the construction and arrangement of the house, you will also put in order and make the whole summer cottage more convenient.
We will not argue, to live in the country, and even in conditions to which we are not quite accustomed, not everyone will become. But now you will have a separate private house, albeit a small one, which is valuable real estate. But in the summer, this is generally the best place to relax!
A suburban area is not only land with a vegetable garden and plantings. Many city dwellers come there for a good rest, so it is necessary to have a house on the site. Not all summer residents have the opportunity to build a comfortable house on six acres. Many people get out of this situation by choosing the option of building an economy class house.
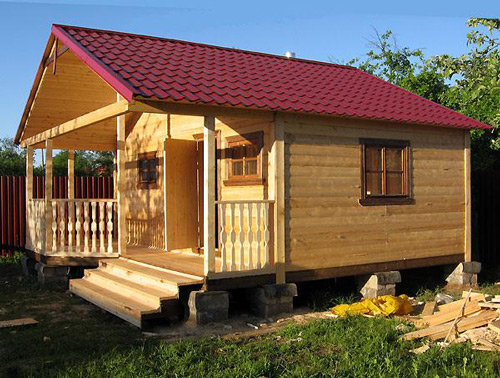
Inexperienced and novice summer residents are faced with the question of choosing cheap materials for construction. Below are examples of inexpensive and cozy country houses with illustrative photos.


Where to start construction
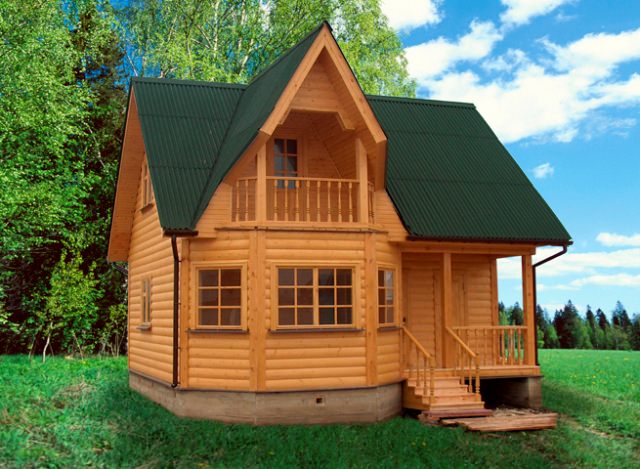
Any construction project starts with a plan on paper. A house outside the city is not intended for year-round living, but for the sake of comfort it requires familiarization with a typical project.

Among the projects of country houses, the leading one is with an attic or an attic. This option allows you to abandon construction on a farm building site. All inventory and tools are kept in the attic. In addition to such a house, you can add a veranda or terrace that serves as a dining room.


The strip foundation is more time consuming and costly. The positive side of it is that it allows you to use the room under the floor as a basement.

The next stage of preparation is the material of the "box" of the future construction. There are several types of inexpensive and reliable building materials:


Frame-panel constructions
The frame is mounted with a bar and sheathed with wooden boards of fiberboard or chipboard. Expanded polystyrene, glass wool or polystyrene is used as a heater. The result is a house with minimal costs that can be operated all year round.

A house made of timber is distinguished by its durability. Construction work will be more expensive. When using cheap timber, there is a possibility of facing the problem of building shrinkage. As a result, cracks and gaps appear. The cobbled house will also have to be insulated.

A clay house is the cheapest and easiest construction option. Building materials are right under your feet. The erection technique is similar to clay modeling.

The downside is the building process that is too time-consuming. It will take several seasons to build a clay dwelling.

The carriage is common among newcomers to summer residents. The best option for living in the summer or during the construction of a comfortable house.

Frame construction
The frame building belongs to the category of low-budget. It will not be difficult to build a country house with your own hands without the help of specialists. If all the necessary materials are ready, the work period will last for several weeks.


To build a house you will need:
- bars for the frame;
- screws and corners;
- wooden boards of chipboard or fiberboard;
- insulation;
- piles for the foundation.

Stages of construction of a frame house
At the marked places, piles are driven in the corners. Mounted concrete or brick supports under the joints of the walls. Then they cover them with a waterproofing material and tie them with a channel.

A lattice of beams is laid around the entire perimeter. Wooden logs are placed on top of it at a distance of 50-60 cm from each other. All parts are fixed with corners and screws.

Next, mount the vertical racks, firmly resting on the lattice. The finished frame is tied and attic logs are placed on top of it. Next comes the work on sheathing the frame with wooden slabs. At this stage, holes are left for windows and doors.


Now you need to decide on the choice of a roof for a country house. Most summer residents choose gable and pitched roofs. As an economy, the second option deserves more attention. When erecting a roof, do not forget about vapor barrier. The roof will be inexpensive sheets of corrugated board or ondulin.


The outside cladding is made using siding. Before that, the outer walls are insulated with special materials. Instead of plastic windows, ordinary wooden ones without double-glazed windows are installed. This approach will significantly reduce the cost of construction.

With the help of simple and simple tips, the country house will be ready for use in less than a month. Those who do not have enough time for construction can contact a construction company, where they will offer to build a house for a turnkey dacha at an affordable price.

A few words about the interior
No matter how the house looks from the outside, inside the summer cottage must meet all the requirements of our time. Gone are the days when the dwelling in the country was used for cooking and sleeping.

Rest in the country - first of all, comfort and organization inside the house. There are many budget-friendly ways to satisfy your most desirable interior design solutions.


Country - rustic style in the interior. Here you cannot do without cabinets and shelves covered with embroidered curtains. Crocheted napkins, tablecloths and rugs from old clothes will look good.

The need to build a compact house may arise for various reasons. For example, such a small structure is perfect for placement in a summer cottage that is not used for permanent residence. In a small house, you can conveniently change clothes, put your things and spend the night.
Of course, ready-made cabins are sold on the market, but the quality of their performance often leaves much to be desired, and the cost is definitely overpriced. For the same money, you can build a great little house on your own.

There is nothing difficult in self-construction of a compact structure. Follow the guide and everything will work out for sure.
Any construction should begin with planning, without which the construction will take much more time, finance and effort. There is a chance that a finished structure, built without a plan, will not meet your needs and expectations.

For a small house, it is not necessary to draw up detailed documentation with many drawings. Even a simple sketch indicating the main dimensions, communications and other design features will be enough.
Think in advance about the order of the internal organization of the future small house. Will he have only one room, or will there be enough space for arranging a small kitchen and a small bathroom? In this moment, focus on your personal preferences and capabilities.
For example, many prudent owners use a very interesting technique: they raise the ceiling and equip a sleeping place in the attic. This solution can significantly save usable space.

It is recommended to pay special attention to the experience of the Japanese. Even on a few square meters, they manage to place everything they need to create a comfortable and cozy environment, because even a mini house is still a house that is definitely more comfortable than on the street.

This guide will give instructions on how to build a fairly simple little house. Approximately 75% of the space will be occupied by living quarters, and the remaining space will be spent on placing a pantry and a dry closet.


If everything is very difficult with free space, you can make separate entrances to the mentioned premises from the street. If there are no such problems with free space, and you do not want to constantly go out, equip the entrance to the technical room from the living quarters.
Make your changes to the plan, if desired. For example, instead of a pantry, you can equip a mini-kitchen with a table, a pair of folding chairs or small stools, and a compact stove.

After approval of the plan, proceed directly to the implementation of construction activities. Start by setting up your foundation.
Foundation
For the construction of a small house, the simplest foundation of blocks is perfect. Western private developers came up with a very interesting solution. They create a foundation block with four channels. A reinforcing bar is introduced into each of these channels. The rods themselves are driven into the ground. As a result, the block is securely attached to the ground.


In the project under consideration, the foundation will consist of six such blocks. You will place four blocks in the corners of the future building, the remaining two - under the inner partition.
You can make the blocks yourself from concrete, or you can buy them ready-made.
Dig a hole 200 mm deep with sides corresponding to the dimensions of the blocks.
Fill the hole with a 20 cm layer of sand and gravel. Tamp the pillow well.
Install the blocks and insert the reinforcement according to the previous recommendations.

Cover the blocks with a layer of roofing material.
Make sure that the blocks are installed evenly and proceed with the implementation of further planned activities.
Floor laying

First step
Fit the lower trim. Make it from a bar with a section of 15x15 cm. To connect the harness beams, use a convenient mounting option. You can, for example, connect them using the thorn-groove method with additional reinforcement with glue and bolts.
Second step
Lay a platform previously assembled from a 15x5 cm board on top of the harness.
Third step
Sew up the platform with plywood.

Fourth step
Turn the resulting box over and put insulation in it.
The fifth step
Sew up the insulation with a double layer of plywood. Lay plywood with a thickness of 1.2 cm along the box, and across - with a thickness of 0.9 cm. As a result, the floor will have a thickness of 2.1 cm. Use PVA glue to fasten the plywood layers.
Sixth step
Sew up the platform with roofing felt on all sides.
On this the floor is ready. If you wish, you can additionally finish it with another material to your taste.
Linoleum is perfect for finishing the floor.

First step
Treat the timber and boards intended for the construction of walls with an antiseptic.

Second step
Assemble the frame of the planned dimensions.

Third step
Fit the top harness.
Fourth step
Cover the entire structure with plywood.

The fifth step
Attach a windscreen to the outside of the walls. At the same time, this material will act as waterproofing.
In the process of building walls, do not forget to leave openings for the installation of doors and double-glazed windows.
Roofing construction

The roof structure must be such that in the future when opening the door, the roof overhang does not touch. To comply with this rule, the slope of the roof slope must be 25 degrees.
First step
Install the rafters. To do this, use boards 10x5 cm. To fasten the boards, use corners and screws.

Second step
Mount the roof ridge. Use a 15x5 cm board to make it.
Third step
Additionally fasten the roof rafters with 10x2.5 cm ties.
Fourth step
Attach 0.9 cm plywood to the rafters.

The fifth step
Lay your preferred roofing material over the finished subfloor. Flexible shingles work well. It is a relatively light material with good performance properties. In this case, the roof of a small house will have a small area, so you will not spend a lot of money on the finishing material.

Doors and double-glazed windows
To create a healthy indoor climate, even if it is very small, you need to install windows. It is better to provide places for placing double-glazed windows at the stage of assembling the frame.
To determine the optimal total window area, divide the floor area of \u200b\u200byour small house by 5. Divide the resulting value by the number of windows you need.

If you plan to equip your small house with a bathroom and a kitchen, think over the order of furniture placement in advance so that the windows do not interfere with the normal use of the house in the future, but are a useful addition.
If possible, windows should be placed in a southeastern direction, since there is very little sunlight on the north side, and low western sun rays are bad for the eyes.
You can buy the doors ready-made or you can make them yourself. It is enough to assemble the frame, fill the voids with thermal insulation (mineral wool is perfect), sheathe the frame with plywood and upholstery with the desired material.

Wall decoration

External
Proceed with the exterior wall decoration.


Internal
Proceed with interior decoration.
- Secure a layer of thermal insulation material.
- Cover the insulation with a layer of vapor barrier.
- Cover the walls with clapboard.
This completes the wall decoration. After that, it is recommended to do the arrangement of the ceiling and make the porch to your taste. These activities are best done before the start of the roofing structure.
Make the furnishings and technical equipment of the small house to your taste.


Ceiling decoration
- Cover the ceiling with vapor barrier material.
- Fix the thermal insulation material.
- Sheathe the ceiling with clapboard insulation layers.
You can lay boards in the attic. In this moment, focus on the specifics of your specific situation, taking into account how exactly you will use your attic.
Required communications
If necessary, bring electrical wiring, sewerage and water supply into the house.

For heating a small house, both an electric heater and a gas convector are well suited. Such gas convectors use liquefied gas as fuel. To ensure the most efficient heat distribution, the system should be equipped with a galvanized steel reflector.


The gas convector must be equipped with a chimney. The chimney is carefully insulated to prevent fires. To protect the chimney from snow, rain and various debris, install a special protective visor on its street end.
On this, the small country house is ready. You did an excellent job without involving outside specialists for this, which allowed you to save a significant amount of money, and made sure that there is nothing difficult in the construction of such structures - you just need to follow the guide in everything and adhere to the advice of professional builders. You can start using your own house built.


Happy work!
Video - DIY small house
More and more residents of large metropolitan areas today strive to leave the city apartment and get away from the frantic rhythm. Some just spend the weekend in nature and organize picnics. But most dream of a place where they can constantly come - their own dacha. But people do not live by dreams alone, and they try to make some of their dreams come true. Those who have approached the issue of their country residence thoroughly, in turn, will be divided into two conditional groups. Representatives of the first of them simply collect money to buy a house. Others are building a country house with their own hands.
Start of construction
Even the simplest construction is a whole complex of works. And many developers, taking into account all the hassle of such events, are subconsciously afraid to start it. First of all, what needs to be done is to push yourself forward. As soon as the place for the foundation is determined, the first bricks are laid, or a crushed stone dump truck is simply brought in - the construction of the country house has begun, and now there is nowhere to go.
The second important step that needs to be worked out properly is the determination of the time that you will devote to construction. After all, many are well aware of situations when a construction once started is waiting for decades for completion. Experienced summer residents advise starting the construction of a small country house with a fence.

Do not assume that since there is no house on the site, then there is nothing to steal. Any construction requires building material. Imagine how annoying it is to come to the country house and find that building material is missing. Agree, not a pleasant situation. Therefore, before starting the construction of a country house, it is worth fencing your site.
Construction requirements
To build a country house yourself, you need to know a few rules. When choosing a site, one should pay attention to environmental safety, relief, configuration, accessibility of transport routes, orientation of the plot of land to the cardinal points, building on neighboring sites and provision of infrastructure.
If all of the above factors are present, then it is recommended to start drawing up a development plan, according to which it is planned to build a country house with your own hands at your discretion. In this case, you must comply with the following requirements:
- You need to retreat 3 meters from the red line of travel, 5 meters from the street, and 3 meters from neighboring sections.
- The wooden house should be located at a distance of 15 meters from the neighboring wooden house. A stone country house should be located at a distance of 6 meters from a neighboring stone building, and at a distance of 10 meters from a wooden house.
- If the country house is located on the south, east or west side of the world, then the distance from the neighboring residential or country house should be equal to the height of your building.
If you recall in short, the main methods of building a country house are as follows: construction from logs, frame-panel construction, construction from bricks or other block materials, monolithic construction.
Materials for work
So, when you decide to build a country house with your own hands, think about how it will look in the future. The appearance of any building depends largely on the material that is planned to be used in the construction of the walls. It's up to you to choose artificial or natural materials. But remember that, in addition to design, the comfort, safety and durability of the building, as well as the economy during repair work, depend on the building material.
Wood has a huge advantage over modern finishes, or rather, environmental friendliness. However, instead of the feeling of "naturalness" and a fragrant smell, this material requires a lot of attention and care from the owners. Do-it-yourself wooden country house made of logs or paving stones is called a classic of the genre.

Another common option is a stone country house, which is lined with traditional bricks. Such buildings look more solid, reliable and original, and also have good fire safety. The advantage of bricks over a wooden frame is the ability to construct walls of any configuration with niches and ledges, while the frame has a standard rectangular or square shape.
Progress does not stand still, so modern economical and practical building materials are often used in the construction of houses. These include aerated concrete, foam concrete, aerated concrete, expanded clay concrete and polystrol concrete. All of these materials are blocks and differ from each other in size, density, weight, frost resistance, vapor permeability, strength, cost of material and construction work, as well as service life.
Construction options
It is not as easy to choose the layout and method of erecting a small country house as it seems at first glance. Having decided on the number of storeys and sizes, you can think about the construction method and layout. The exact sequence of work is essential for the desired result.
First, the supports are assembled into a single structure, then they are installed in the pits and concreted. Our future country house is a structure of racks that is sheathed on both sides with boards and has a layer of thermal insulation in the middle. For a house you will need beams, thin and thick boards, timber, planks and slats. In order for the house to be suitable for summer holidays and winter living, it should be thoroughly insulated.

Due to its practicality, simplicity and accessibility, projects of country houses with verandas, including the design documentation of two-story buildings, are most popular today. Such a small extension is inexpensive, but it is quite convenient: here you can relax on a warm summer evening and drink coffee. And the veranda is useful in terms of storage, because there are things that are undesirable to store in a residential building.
Attach or not attach a veranda? This is often solved by looking at the neighbors' garden houses. In general, the veranda is a classic attribute of any country house, the owners of which love coziness, convenience and pleasant pastime.
Foundation
Even for such a small building as a country house, you need a foundation that you can make with your own hands. To build a country house with your own hands, you need a flat area measuring 4 by 4 meters, from which you need to remove all the debris, after which you should uproot the bushes. After that, you can deal with the foundation. For the foundation, it is customary to dig holes with a depth of 70 centimeters. They should be wide - more than 30 by 30 centimeters.
In this case, it is good to use concrete blocks that are installed on a sand and gravel pad, which has a height of 20 centimeters. To erect such a foundation, you need to install foundation blocks in the corners of the country house, and place additional blocks between the corner blocks - every 1-1.5 meters. Blocks need to be leveled. The depth to which it is customary to deepen into the ground should reach 10-15 centimeters.
Contrary to popular belief that the foundation of a wooden structure cannot be made of wood, you can rest assured that this is not at all the case. The only thing, before laying a wooden foundation, is to make sure that the wooden parts that are buried in the ground are well treated with an antiseptic and covered with a layer of bitumen. This will be quite enough for a wooden country house to serve for many years.
If the house is planned to be built on an uneven surface, then you will need to create a high foundation in some places. In this situation, it is recommended to use another block, having previously strengthened it with cement or cement-based glue.
Floor insulation
The floor of the country house is insulated in the following order. Plates of extruded polystyrene foam must be sawn and laid between the floor joists. On top of the slabs, the vapor barrier should be laid out, attaching it with a stapler to the beams, and gluing the joints with tape.

Then it is necessary to lay the grooved boards, connecting the ridges and grooves in series and securing them with self-tapping screws. Saw off the last board to the required width. Remove the comb from the first board.
Walling
For the walls of a country house, it is recommended to choose a bar that has a cross section of 6 by 12 centimeters. This material is able to withstand the large weight of the future roof. In addition, with a similar thickness of the timber, there is enough space for internal insulation (6 centimeters). Such a beam is able to provide reliable support for double-sided skin, which has a thickness of 12 centimeters.
The walls of the house are made up of layers such as a frame, vapor barrier foil and inner cladding. The vapor barrier film must be placed on the inside of the insulation to avoid the greenhouse effect. To speed up construction, you need to watch a video about a country house with your own hands. Wall panels with layers must be assembled in advance - they are easier to install and align ready-made.

When connecting different layers of the wall, it is necessary to do all the work with an accuracy of one millimeter, because the walls in any case should be strictly rectangular. Thanks to the right-angled sawn-off large-format slabs, the alignment can be carried out easily. The wall thickness reaches 9 centimeters. Subsequently, sheathing and sheathing will be added to it.
It is more convenient to start the installation of the country house from the rear longitudinal wall. The braces screwed to the wall and floor will hold it vertically. It is customary to insert windows into the transverse walls before the front longitudinal wall is installed, which is butt-fitted to the side walls. It is best to collect walls horizontally. This allows frames and OSB boards to be moved with an accuracy of one millimeter and to do without additional fixation and support.
Roof installation
In the photo of a country house with your own hands, a simple single-pitched roof is represented by seven rafters, which rest directly on the back and front longitudinal walls. Since the roof can subsequently be greened, the structure should be made durable.
To do without a large deflection of the rafters, it is recommended to increase their thickness to 16 centimeters, or reduce the interval between them. If you chose the second path, then it is worth installing the usual 6 by 12 centimeters rafters with an interval of 57 centimeters.
First, calculate the distance between the rafters. To do this, measure the top edge of the longitudinal walls. Then you can lay the rafters. To prevent the outer rafters from tipping over, fix them with steel corners. The sheathing will fix the middle rafters. Attach the vapor barrier from below by pulling it across the rafters and fixing it with a stapler every 15 centimeters.

Leave generous overlaps on the walls around the perimeter. After finishing the veneer, cut the film exactly around the perimeter. Saw the OSB board from the bottom to size. After that, the prepared parts need to sheathe the ceiling and walls. Place the insulation between the rafters and lay the tongue-and-groove boards, which must be screwed with two screws to each rafter.
Pay attention to the following point: in order for the country house to be used all year round, carry out roof insulation. The insulation that will fit between the rafters must be cut to size, which is equal to the distance between the rafters and another centimeter. This allowance allows you to "squeeze" the gap between the rafters of the strip of mineral wool.
Facade finishing
Although OSB boards are technically difficult to beat, they will look unattractive without finishing. In this case, you can sheathe the walls with tongue-and-groove boards. The country house will look prettier, and the presence of an air gap behind the cladding will ensure the walls are dry.
Why are grooved boards considered a good solution for external cladding? The fact is that the "groove-comb" connection is able to reliably protect the house from moisture and wind, which is beyond the power of end-to-end OSB boards. This surface will be easier to paint. In addition, the graceful structure of the grooved board will visually give the country house greater harmony.
Outside, the tongue-and-groove board must be placed strictly vertically, because vertical seams are considered less accessible for rainwater to enter and accumulate. If you prefer horizontal planking, then it is worth making sure that the grooves of the boards go down.
There is another option for decorating a country house - to paint it. For coating, it is better to purchase facade paint - its elastic structure perfectly withstands the summer heat. To avoid bleeding through the resin paint, the boards must first be primed and then finished.
Internal work
A country house is usually divided into 2 parts: 75% is occupied by a living area, and the remaining square meters is an area for a storage room and a bathroom. Do-it-yourself construction of a country house involves two windows: a small one in the pantry and a full one in the room. Therefore, it is advisable to insulate the country house. Inside, the room must be insulated with mineral wool, and a vapor barrier can be laid on top so that the insulation does not get wet.
It is not necessary to vaporize the floor of the room, you can simply cover it with linoleum. You can use drywall or clapboard for interior wall decoration. If you plan to work with plasterboard, then it is recommended to build a stronger foundation, because the construction will turn out to be heavier.

Ceiling insulation is similar to walls. It is best to lay insulation on top, because laying from below is a very complex process. Outside the house, you can lay a vapor-permeable waterproofing and fill a crate under the outer sheathing, for which it is customary to use a board of 25 x 150 millimeters, and the installation itself is overlapped.
House heating
To use a country house all year round, you need to take care of heating. In principle, for a summer cottage, where you rarely have to live, the best option is heating with electricity or solid fuel. However, developers who plan to live there permanently can also make water heating. If in winter you leave the house for a long time, you will have to pour not ordinary water into the heating system, but a coolant with antifreeze properties.

The simplest heating option is still a traditional Russian stove or fireplace: they are able to quickly heat a room and are undemanding to fuel. Not all dacha cooperatives can boast of the presence of natural gas, so the best solution would be to install a gas convector.
Change house
During construction work, you can live in a change house. Although not always, but often there is a need to spend the night somewhere! And in general, it is convenient for storing construction and garden tools and equipment. A mobile wagon shed, which can be sold after the end of construction, perfectly copes with such tasks.
Another option is to find half a railroad car or an old container. These makeshift cabins were actively used immediately after the collapse of the USSR, many models are still in use today. The garage will be an ideal solution for storing inventory and things! By the way, if necessary, you can spend the night in it.
And finally, I would like to remind you that you can build a country house with your own hands inexpensively! When building a garden house, in any case, do not rush. Although such a construction process does not require a serious project, it is still worth securing such documentation - as they say, not for a tick, but in order to build a comfortable and durable house.
Starting the construction of your own home, I want to choose the cheapest material for building a house - in order to maximize savings. But the pursuit of a low price of building materials can result in both expensive maintenance in the future, and in the rise in the cost of all construction as a whole. How do you build a cheap house?
What determines the cost of a house?
The final price tag for construction depends on several factors. Materials play an important, but not the only role here. So, the construction estimate will include:


If you make a monolithic fill, you will need a large amount of wood for the formwork. And working alone on weekends, construction is delayed indefinitely, which is also not always economically profitable.
The cheapest materials for building a house - made with your own hands?
There is an opinion that materials made with your own hands will be much cheaper than purchased from the manufacturer. Of course, there are recipes for different brands of concrete, you can independently fold the straw walls or even fill the frame with sawdust.
This is economically justified in the following cases:
- the presence of free assistants - it is difficult to interfere, fall asleep and press alone, which can lead to poorly performed work;
- no need to travel to work five days a week - otherwise construction will often have to be postponed due to weather conditions;
- the opportunity to obtain equipment and raw materials for building materials at very low prices - shipping sawdust from another region will not be cheap.
So, the cheapest construction options:
- Thatched walls with earthen plaster. They are distinguished by good thermal insulation, but require repair due to rodents that settle in the thickness of the wall.
- Abrolite or sawdust concrete. You can make it yourself or purchase ready-made blocks. In the first case, you will have to wait a long time for the sawdust concrete to dry, in the second - to erect the walls as quickly as possible and do the exterior decoration, since the wood concrete is hygroscopic.
- Clay or cordwood. Dry logs and lumps, peeled from bark are used. They are laid across the wall on a clay mortar. The ends of the wood must be impregnated with antiseptics or burned, otherwise they will strongly absorb moisture.
- Backfilling with sawdust or expanded clay. To do this, a permanent formwork is made on the frame from an edged board, into which the insulation is poured.


The exterior of the house from these materials is rather unpretentious. And if it is quite simple to beat the straw walls or peeping blocks, you will also have to make a screed over the wood concrete. Another significant disadvantage of homemade materials is that they are not strong enough. But this is a problem for all frame houses. To hang shelves or install a kitchen set, you need to provide for embedded boards at the construction stage.

Economical building materials - what are they?
If, on good judgment, it was decided to abandon independent production, it is worth taking a closer look at the prices on the market. What is the cheapest building material? Paradoxically, almost anyone:
- tree - can be purchased extremely cheaply in the forest belt, but in the steppe zone it is expensive;
- brick - being built next to a brick factory, it will be possible to buy red brick at manufacturer's prices;
- aerated concrete and foam concrete - lightweight and relatively easy to build material, has good thermal insulation;
- frame construction is the most budgetary option, suitable for any climate, but requiring the organization of forced ventilation.

Not every carpenter can assemble a log house well, so the cost of the builders' work will also have to be taken into account. The same applies to a brick house - the distortion of the masonry will result in a large-scale alignment of the walls.
So when choosing materials, you need to take into account the cost of working with them. For example, aerated concrete is laid on special glue, due to which the gaps between the blocks are minimal.

This saves on finishing, but requires care from builders. Foam concrete does not differ in the quality of geometry - blocks can be skewed and differ in size. It is unpleasant to work with such material, it is difficult to deduce walls by level.

As a result, the cost of work is higher.
How to save on construction globally?
Not only building materials alone can reduce the cost of building your own home. To save as much as possible, you must:
- Think over the plan of the future building. The simpler the layout, the cheaper it is to equip it. It is not necessary to plant bathrooms at different ends of the building - laying pipes will cost a pretty penny. Placing the kitchen next to the bathroom will also save on pipes. The smooth geometry of the walls, the absence of non-functional niches and differences in floor heights, although they look simple, do not require extra costs. Together, this will provide up to 20% savings on the total cost.
- Refuse architectural excesses. Balconies, terraces and tiered roofs can increase the value of a home by 10-15%. It is much more rational in the future to build a small gazebo or attach an open terrace.
- Use building materials produced in your region, abandoning the popular and advertised ones. This will allow not only buying them cheaper, but also not overpaying for delivery. So, houses made of shell rock in the Altai Territory are among the most budgetary ones, but Moscow cannot boast of a low price for this material.
- Lighten the rafter system as much as possible using lightweight roofing materials. Then, instead of a 10x10 cm beam, it will be possible to use a 5x10 cm board laid on the end, without reducing the step of the rafters.
- Give up the basement. Filling, waterproofing and rough finishing of the basement will add another 20% of the cost to the estimate.


Selection of building materials
If the building materials market offers several types to choose from, this is great. Indeed, in this case, you can compare all the advantages and disadvantages and purchase materials that combine low price and good quality.
General characteristics to look out for:
- durability - if the house will stand for a maximum of 10 years, the savings on materials are rather doubtful;
- simplicity and availability of installation - the need to use heavy equipment at a construction site can negate all savings;
- environmental friendliness - the maintenance of natural humidity in the house is achieved due to the "breathing" materials, otherwise you will have to attend to forced ventilation;
- heat capacity and thermal insulation are two parameters that are responsible for future efficiency, because the house should not only be cheap during construction, but also during operation.
Having considered the most popular building materials, you can choose the most suitable option for yourself.
Wooden houses
Houses from a bar are considered the most environmentally friendly and one of the best in maintaining an optimal microclimate. A wooden building has advantages:

But this structure also has disadvantages. So, the quality of literally every log is very important - an undried tree will begin to twist, longitudinal cracks may appear, the ends must be “plugged” with an ax to prevent the tree from waterlogging due to precipitation. If we deviate from the classical processing of logs in favor of using modern antiseptic and fire retardant solutions, the house ceases to be environmentally friendly.
Ready-made kits are expensive, but only professionals can assemble an inexpensive log house from round timber. After all, you will have to adjust each log! In addition, in regions with cold winters, the thickness of the walls of a wooden hut should be at least 50 cm to ensure minimal heat loss during the heating season. Finding logs of this diameter will also cost a pretty penny.

To let the house “breathe”, it cannot be insulated with foam plastic, only with vapor-permeable mineral wool. And so that the insulation does not get wet, a ventilated facade must be arranged. There are also certain restrictions for interior decoration - it is better to use modern vapor-permeable membranes if you plan to cover the house with plasterboard or clapboard.
But the frame is beautiful in its original form. To get a cozy and clean house, you need to regularly check and caulk the cracks in the walls. Particular attention is paid to the system of corner locks - a simple cut in half a tree will not provide the necessary insulation and will lead to the formation of cold spots.

Brick houses
The brick has excellent heat capacity. This means that when heating is started, the house will warm up for a long time, but then cool down just as long. For permanent residence - a great option. But for a country house visited on the weekend, this will be an irrational waste of money on heating. After all, while the house warms up, it is already necessary to go back to the city.

For one-story buildings, 1.5 brick walls will be enough. But such a thickness of the walls is completely unsuitable for winters, where the temperature drops to -20 degrees.
In order not to increase the cost of brickwork, the house will have to be insulated from the outside. What is especially pleasant when building brick buildings - you can use any insulation! So, choosing foam with a thickness of only 5 cm, you can reduce the heat loss at home from 125 kW * h per square meter to 53 kW * h during the heating season. In other words, you can cut your heating costs in half.

The disadvantages of brick houses include:
- large weight of the structure - you will need a buried strip foundation, which will significantly increase the cost of the construction;
- the duration of the construction - a team of five people can lift a box at home in three weeks, subject to continuous work, alone, the time increases significantly;
- finishing work - if you can live in a log house immediately after construction, a brick house requires an obligatory screed of walls and floors, followed by a fine finish.
Houses made of aerated concrete or foam block
These buildings have all the advantages and disadvantages of brick houses. At the same time, they have their own characteristics:

At the same time, the price per cubic meter of brick and gas block is practically the same. And given the need for insulation on the facade, the advantages of aerated concrete over ceramic bricks are quite ghostly. But due to the large size of the blocks, it is quite simple to build a house, which explains the low cost of work.
Frame houses
For those who are really on a budget, frame construction is a real salvation. A house on a wooden frame with mineral insulation is much cheaper than all the previous options. And that's why:

But, despite the clear advantages of frame construction, preference is still given to brickwork. All due to no less significant shortcomings:

On the other hand, by approaching the construction of a frame house wisely and not saving on building materials, you can get a good and reliable structure that will last for more than a decade. And in the future, the frame is just as easy to disassemble and put in its place a major brick house.
You can build a small and cozy house in a few months, and this is confirmed by the video: