The layout of the suburban area - schemes for effective and gramont zoning (99 photos). Garden layout (36 photos) in combination with the general layout of the site Plant trees for the site plan
The layout of a fruit and berry orchard is a responsible task, on the solution of which the supply of the family with tasty and varied fruits and berries will depend in the future. Therefore, when planning a site, you need to hurry slowly (as the people say).
Preparatory work
When planning a land plot, it is necessary to allocate an open sunny place with a high groundwater table. You cannot lay a garden in a lowland, where cold streams of air and water will roll down during spring floods. After an external examination of the land allocated for the garden, identify and write down a list of preparatory work in your diary.
woodcroft orchard- Clear the area of \u200b\u200bold stumps, wild bushes, stones and other debris.
- Plow the area deeply or dig up with a turnover.
- Water to provoke weed shoots. Cultivate deeply and level the area at the shoots.
- At the same time, take the soil to the nearest chemical laboratory to determine the physical state and type of soil, its chemical composition. This is necessary for the subsequent care of the garden: fertilization, watering, and other agrotechnical measures.
- Based on the results of the analysis (according to the recommendations), apply the recommended doses of fertilizers and other ameliorative components for the final autumn treatment. Without such data, it is impractical to fertilize the site. It is better to apply fertilizers and other components directly to the planting hole ( mineral fertilizers, humus or vermicompost, hydrated lime, biological products for pests and diseases).
Zoning when planning garden and berry plantings
On a separate sheet of garden diary, draw the garden layout diagram. The garden can be located in front of the house, to the side or to the back, but trees and bushes should be located from north to south for better illumination and have three zones. They can be located one after the other or divided into three separate sections located at different ends of the total cottage area.
- If the zoning is joint, then a vegetable garden is laid in the first zone, the plants of which will not shade the crops of the second zone, and in the morning they will receive their share of the sun.
- In the second zone, it is better to place the berries. Their height is up to 1.5 meters. The morning shade from the bushes will not harm the plants of the third zone.
- The third zone will actually be planted orchard... It should be at a distance of 2.5-3.0 m from neighbors, so as not to shade their area.
On the pages of your garden diary, write down the names and brief description fruit and berry crops, and in the diagram, indicate under the numbers their location on the area of \u200b\u200bthe site.
 pickleshlee
Berry layout
When breaking down the berry on the diagram, immediately take into account the nature of the plants. So, black currant grows quietly surrounded by other neighbors, but sea buckthorn and viburnum are rather quarrelsome with neighbors. Therefore, they are planted separately. Sea buckthorn can be used as green hedge, and viburnum, hawthorn - in the landscape decoration of the recreation area. In solitary plantings of mown lawns, they look great.
Some owners believe that it is generally better to place berry trees along the boundaries of the site. In this case, part of the land is freed up for other crops or zones (recreation, sports, etc.). Such planning is suitable if the site is not surrounded by a green hedge or the berry bushes themselves can serve this purpose with their own characteristics (thorny, dense, etc.).
The planting density of the berry is very important. It is a natural regulator of optimal plant development, their resistance to diseases and yield formation.
- Raspberries are planted in dense rows, 0.5 m apart and 1.0-1.5 meters between the rows. Growing up, raspberries take up the aisles, the former aisles are freed from raspberries and become temporary tracks. By pruning the overgrowth, the culture is reversed, returning after 2-4 years to its original place.
- Ioshta, black and golden currants are planted at a distance between the bushes of at least 1.5 m, and red currants every meter. Large bushes will shade each other, spines of certain gooseberry varieties will completely limit access to berries. Honeysuckle and irgu, when used with a green hedge, are planted after 1.0-1.5 meters (and even thicker), and in the berry at a distance of up to 2 meters.
 Thomas generazio
 The number of certain berry bushes is very important. Think over and plan in advance the amount of each species and variety on the diagram so that both provide the family with fresh berries and make preparations for the winter. For a family of 4-5 people there will be enough raspberries 20 bushes, 3-4 bushes of all types of currants and gooseberries, yoshta, irgi and honeysuckle. Leave some free space for exotic newbies who will come into your field of vision over time. A properly planned berry grows normally and bears fruit within 7-12 years, and then gradually rejuvenates or the bushes are transferred to another place.
Orchard breakdown
On the next free page of the garden diary, draw a diagram of the placement of fruit crops. Conditionally allocate 4 square meters for each culture. m total area under one tree. Do not thicken the planting. The trees will grow and begin to interfere, if not oppress each other. Planting holes should be in the row at a distance of 4.0-4.5 m. Leave row spacing at least 2.5-3.0 m. Pay attention to the types of crops. So, today most farms are switching to columnar forms of apple and pear - the main horticultural crops in the country house. In terms of habit, these species are much smaller, and the yield is almost equal to tall crops. Columnar forms are easier to care for, they are resistant to diseases, less damaged by frost.
For average family 1-2 trees of each type are enough. Early, middle and late varieties should be present in the garden in order to have fresh fruits throughout the warm season and also to prepare processed for the winter. From horticultural crops, it is enough to have 2 cherries (early and late). Plant 2 cherries instead of medium cherries. They form the harvest after early cherries. You need 1 quince (later you can graft on it another species or other varieties), 2-3 plums, including one marabel. Enough 1-2 apricots of frost-resistant varieties. 2-3 apple trees, which, over time, through grafting, can be turned into 6-8 varieties different terms ripening. Don't forget to leave room for exotics. Be sure to plant the nut separately. Almost nothing grows under the crown of this culture. If you like hazel, set aside the first row for it so that taller trees don't deprive it of the sun with its shadow. 11-12 fruit trees will eventually develop into 18-20 varieties of all kinds.
In order for the garden to serve for a long time and not get sick, it is imperative to use zoned varieties. They are more resistant to diseases, pests, weather changes, and bear fruit longer. You can get acquainted with the varieties and varieties for your region, up to the region, and their characteristics in catalogs and other literature. When buying seedlings, be sure to contact a specialist. Remember! A garden planted with low-quality seedlings will add work and care, but will not please with the harvest and quality of fruits.
General approaches to planting a garden
Lay the garden in the fall, that is, dig planting holes according to your scheme, prepare the fertilizer mixture near each that is necessary for the condition of the soil.
Planting pit preparation
In the fall, you will be able to prepare a planting pit of only approximate dimensions, since the final version will be determined by the size of the root system, which depends on the age of the purchased seedling. The preliminary size of the planting pit is approximately 60x60 for 2-year-old seedlings, for 3-year-old saplings it can be increased to 70x80 cm and finalized when the seedling is planted in the hole.
Preparing the potting mix
Next to each hole, mix the topsoil with humus, peat. In the spring, before planting a seedling, add to this mixture a glass of wood ash and slaked lime and 200 g of nitrophoska each. Mix well.
 mainetoday
 Purchase and preparation of seedlings
Planting seedlings is best done in spring. During the growing season, the seedlings will get stronger, the root system will strengthen. A young tree adapts to a new habitat during the warm spring-summer-autumn period.
Do not rush to buy seedlings from individual unfamiliar sellers, especially along the roads leading to the country. It is better to buy seedlings from farms that grow them or in nurseries. There is more confidence that you will get the desired zoned variety of exactly the garden or berry crop you need.
Examine the selected seedling carefully. If you find dried roots, a crooked stem, cracks in the bark, or drops of gum, refuse to buy. Remember! No seller's assurances will refund lost time.
Planting rules for seedlings
1-2 days before planting, soak the seedlings in the root or other growth stimulant. Prepare a container of clay mash with the addition of root, planriz or phytosporin. Other biofungicides suitable for tank mixes can be used.
About 2-3 weeks before planting the seedlings, pour part of the soil mixture with a cone into the hole. During this week, the cone will settle, and the planted seedling will be correctly positioned in the hole. Dip the prepared seedling into a chatterbox, insert it into the hole, straighten the root in a cone so that there are no creases upward, and fill 2/3 of the hole with soil mixture. Pour a bucket of water. After soaking back up the rest of the potting mix or soil. Drive in a stake and secure the seedling with a figure eight to the support. A loose seedling, swaying under the gusts of wind, will break off small roots that provide a connection between the plant and the soil.
Important nuances of landing
When planting, be sure to observe the correct depth of the root collar. When it deepens, the tree after 5-10 years (especially on heavy soils) may dry out for no reason. On the lungs sandy loam soils (especially in the south), it is better to slightly bury the root collar in the soil (8-10 cm), "hiding" it from the upper drying layer. In seedlings that form adventitious roots or shoots (figs, currants, plums, apple trees), deepening does not interfere with the normal development of the tree. Saplings of these crops quickly rebuild the root system, more often on insufficiently moist soils.
In own-rooted seedlings, the root collar should be at the level of the planting pit or 2-3 cm higher (no more). In grafted seedlings, the grafting site is 4-8 cm above the root collar. Novice gardeners often confuse the root collar and grafting and deepen the planting to the grafting site. In this case, the root collar is deeply buried in the soil and the tree dies early.
If you have correctly identified the root collar and planted the seedling so that it rises 4-5 cm above the soil, then the tree is planted correctly. We compact the soil around the planting. At a distance from the trunk with a radius of 30-50 cm, we make a roller 5-7 cm high and fill in another 2-3 buckets of water. Together with the absorbed water, it will be drawn into the soil and the seedling. Make sure that the root collar remains 2-3 cm above the soil. If necessary, top up the soil after watering and mulch with a small layer of fine mulch (peat or humus, sawdust). If you bought live seedlings, the planting is done correctly, in 2-3 weeks your garden will turn green with the first young leaves.
 starkbros
 How to determine the root collar
- Have young seedling wipe well with a wet rag the lower part of the trunk and the beginning of the root. The root collar is defined as a greenish transition (trunk) to light brown (root zone).
- In older seedlings (3-4 years old), wipe the lower part of the trunk with a wet rag and, after the wet zone dries, carefully scrape off the bark with a knife at the site of the inconspicuous expansion of the trunk to the root. If at the site of expansion the scraped off color of the young subcrustal layer is green, then this is a stem, and if yellowish, then the root zone. The place of transition from one color to another is the root collar.
- In some seedlings, the place of origin of the upper lateral roots from the trunk is clearly visible. This is the root collar. The place of origin of the roots should remain above the level of the planting pit.
What not to do when planting seedlings
- When planting, you cannot use semi-rotted manure, only humus mixed with soil.
- You can not often water the seedlings with small amounts of water. They only dry up the soil in the planting pit.
- You can not water the seedlings cold water (from an artesian).
- It is impossible to fertilize plants in the first year after planting, especially with nitrogen fertilizers.
- After planting, it is impossible to mulch the trunk circle with a large layer of mulch. In the event of prolonged rains, the water accumulated in the mulch will cause the young bark to decay and the plant die. A thick layer of mulch is applied in the fall, which will protect the soil from freezing and death of seedlings from low temperatures.
What needs to be done when planting seedlings
- Whitewash young seedlings with a solution of chalk and clay with the addition of biological products for diseases and pests or a solution of copper sulfate.
- Insulate the trunk with several layers of burlap, lutrasil, spandbond, paper and other materials.
- Protect the trunk from hares and other rodents with a netting or spruce branches, burying the latter into the soil by 5-10 cm.
- After every sufficiently large snowfall, trample the snow around the trunk, which will protect the latter from injury by mice.
What should be done in order to harvest a rich harvest from your site every year? Is there enough fertile land, timely fertilization and treatment of plants from pests? It would seem that here they are - the cherished hundreds, it is worth planting them and reap the result. But it’s not that simple. Conflicts exist not only among people, but also among plants.
But we are not trees, we can move away from the opponent, but plants do not have such an opportunity. Therefore, before you start planting, you should develop its plan. And in order to draw up a plan correctly, you need to have knowledge of what crops grew in the previous several years on each site, how fertile each site is, which plants can be planted together, and which are better to keep away from each other and other factors.
We plan a vegetable garden
To arrange a garden, you must choose open areaas all vegetables love sunlight. In the area near the house, fence and other structures in partial shade, onions can be planted, it is the only one capable of growing in shade. But you shouldn't count on a big harvest.
Be sure to consider the compatibility of vegetables. Families are friends of the celery family and the onion family. Cabbage will become a good neighbor for them, as well as potatoes, dill and salad.
Separately, potatoes go well with beans, corn, horseradish, onions, and cabbage.
Radish acquires an improved taste and becomes larger if adjacent to bush beans.
Tomatoes are combined with herbs, cabbage, asparagus and beans.
In principle, carrots are peaceful and can be combined with almost all crops, including peas.
In addition to carrots, peas are friends with cucumbers, potatoes, corn and radishes. And radish, in principle, has a good disposition, having a positive effect on other vegetables.
But cabbage with tomatoes and beans cannot boast of good neighborly relations.
Cucumber is not compatible with potatoes, potatoes with tomato and pumpkin, tomato with fennel.
Do not plant peas and beans next to onions and garlic, and radish next to hyssop.

Planning a garden
When landing garden trees you have to use analytical thinking as much as possible, in particular the ability to plan for several years ahead. After all, a tree is not a potato - you cannot transplant it next year. Not only do you need to choose the right planting site for each tree. It is also necessary to calculate the planting of vegetables, flowers, bushes in relation to trees.
Vegetables and shrubs should never be planted near young trees. This may seem like a good solution at first, since this arrangement is a great space saver. But in a few years the trees will grow, and garden crops and berries will be in the shade.
Of course, vegetables can be planted in a new place every year, but this is if there is one. And not all shrubs will be happy with a quick change of residence. In general, when planning a garden, you should either immediately allocate space for each culture, or understand where it can be allocated in a few years.
Those who plan to grow strawberries, berry bushes, cherries and plums in the garden should be aware that each of these plants has its own ideal fruiting times in one place, and over time they will have to be transplanted.
With berry bushes, it's a little easier. When good care they are capable of very long fruiting in one place. With regular pruning and spraying, plants can produce a good harvest for 10 to 15 years without changing their place of residence.
But strawberries in one place should not be grown for more than 3 years. Therefore, one garden bed should be freed every year for vegetables, and a vegetable bed for strawberries. In this case, it is immediately clear that it is more convenient to refer the strawberries to the garden, so that it is easier to change the ridges. In addition, it is better to plant strawberries in places where snow lingers well in winter.
When planting shrubs, their preferences must be taken into account. Gooseberries and red currants like dry, well-lit areas, while black currants prefer wetter areas. Raspberries give many root branches, while sea buckthorn has long roots. These plants interfere with the development of others, so they are planted separately.
Planted close to the boundary tall trees and shrubs can shade adjacent areas, this, of course, is unacceptable. Only by respecting the rights of neighbors can you demand the same respect for yourself. Strong trees should be planted at a distance of two meters from the border, and medium-sized trees at least a meter. The distance between the border and the trees can be occupied by currant, raspberry and gooseberry bushes.

Tall trees should be planted deeper in order to get enough light for the house. And plant flowers, vegetables, herbs, strawberries, bushes next to the house.
In order to take into account all the nuances when planting and transplanting plants, you need to know the data on which plants have grown in each of the plots over the previous 3-4 years. It will be useful to predict exactly how the plants will be transplanted not only in the current year, but also in the next few years.
In this regard, the computer makes life much easier. With the help of special programs, you can recreate the site plan to mark in what year and where certain crops grew.
For those who do not like this method, you can redraw the plan every year. simple pencil and keep all plans for the previous few years. True, this is not very convenient, you constantly have to erase the drawings and reapply.
To simplify this process, you can draw and cut out identical rectangles from a blank sheet, each of which will indicate a specific culture that the summer resident is going to plant, and try to assemble a "puzzle" for future planting on last year's site plan.
The method is convenient in that you do not have to constantly erase and redraw the missing details, but you can easily correct omissions simply by moving the rectangle to a new place.
Planning your suburban area, this is very interesting, because you can come up with a bunch of all sorts of interesting solutions.
In order to beautifully and efficiently improve the territory, you need to have some knowledge.

Our article will help you complete the basic work step by step and decorate your site.

Where to begin?
Before starting work, you need to draw up a plan. Reflect your site on it, sketch its shape, display all buildings and be sure to take into account the terrain, streams can flow in such areas.

Consider also the location of your territory, in the lowland or on the hill is your house. If the dacha is built under the mountain and streams fall on the site, then its arrangement will take a lot of time and effort.

The planning of the territory implies its division into zones, this is a residential area, a recreation area, a vegetable garden and outbuildings. For each building, you need to allocate a specific place and set the area.

The living area, that is, your house, should take about 25% of the space of the entire territory, the toilet, bathhouse and barn should fit into 15-17% of the area.

The largest place on the site, as always, is reserved for the garden and vegetable garden, which means that you can plant and grow berries, fruit trees, favorite flowers, build an artificial reservoir, build a gazebo, in general, make the territory beautiful and ennobled.

The first thing that is being built on the site is, of course, a house. Everyone builds it in a different place, someone in the center, someone likes the house to occupy the first line, right after the gate.

A gazebo or a terrace is erected not far from the house, closer to the garden, in order to enjoy the fresh air and scent of trees while relaxing. The playground is also placed closer to the gazebo, it can be at its level or behind it.
Toilet, bath and shed should take place closer to the fence. In this case, they will remain invisible on the site and will not take up space.
There is no single type of landscaping for a summer cottage, since everyone's territories are different both in size and shape. The standard lot type is a square or rectangle.

On their territory, summer residents are very fond of creating rockeries from stones, plants and a reservoir.
Site planning is a creative and interesting process, but in order to make the cottage cozy and beautiful, it will not be superfluous to look at some of the works of landscape designers.

Draw a diagram
After you have decided on the place of buildings on the territory, mark them on paper and sketch. So, you will visually facilitate your work, and you will surely imagine what to place where, namely:
- Where will the house stand, which side of the plot will be the entrance.
- A place for outbuildings.
- Where will you put the gazebo and playground.
- The direction of the tracks.
- Place for flower beds and a pond.
- Communications.

Strictly observing the sequence of buildings, the main place on the site belongs to the house, then we build a garage, sheds, a bathhouse and a toilet.

Finally, we choose a place for a gazebo, a barbecue area, a summer shower, etc. There is enough space for the garden and vegetable garden, depending on what you plan to plant there.

Site planning according to size
Depending on how many acres the suburban area occupies and the location of the buildings should be designed.

If the plot is not more than 6 acres, then with competent zoning of the territory, you can build everything you need. A house on such a plot will turn out to be no more than 20-25 sq. m., parking - about 7 sq. m., vegetable garden - no more than 100 sq. m.
If your plot is large, from 12 to 15 acres, then this is conducive to a serious project, on which you will have to work hard.

According to the standard plan, it will be possible to build everything here, and even objects of large area, for example, a house here will be simply huge, with a summer terrace and a spacious parking lot.

When developing a plan for building your site yourself, take into account all the nuances with regards to the construction and placement of summer cottages. Use a clear work plan and follow the advice of experienced craftsmen.

Photo of a successful layout of the suburban area


Happy owners of their own land plots, be it a summer residence or a private house, almost immediately face the problem of competent zoning of the territory. Now there are a lot of specialists in landscape design, but our person is closer to planning a garden with his own hands. A house, a garden and a vegetable garden are their own and here it is important to initially take into account all the nuances, because it will be problematic or even impossible to redo it.
Common types of planning
Advice: in the overwhelming majority of cases, when designing a standard garden and vegetable garden with their own hands, experts adhere to proportions according to which residential buildings account for 10% of the territory, 15% are taken by the recreation area and outbuildings, 75% are given to plants.
Despite the apparent variety, the layout of the garden site can be performed in four main ways.

- The most common is straight or parallel-perpendicular.... They choose him not because he has some special beauty, but rather because it is easier that way. Plus, this arrangement is subconsciously associated with order.
Important: parallel-perpendicular forms, in terms of landscape design, create the effect of reducing space.
Therefore, in this way, planning can be performed garden plot 10 acres or more.

- The direct opposite would be the circular arrangement.... Let's say right away that this is a rather specific method, and it requires certain knowledge in landscape design. A fruit garden and flower gardens can be entered in this way, but it will be more difficult with a vegetable garden.
- The diagonal arrangement can be called universal to some extent... Thus, it can be performed as a layout for a garden plot of 15 acres or more. So is the arrangement on a standard six hundred square meters. The diagonal orientation creates a visual volume and at the same time makes it possible to easily arrange the location of various zones on the site with your own hands.
- The fourth option can be safely called creative... There are no definite laws here, as a rule, it is a symbiosis of several types described above. Most often it is used in areas with an incorrect configuration and broken perimeter lines.

Tip: before starting to implement your project, you must definitely draw it on paper.
If you have purchased a ready-made plot on which there are already some buildings and plantings that you do not plan to remove, they should be noted first and then based on the resulting picture.
Rational distribution laws
Of course, it is much easier to plan the location of buildings, a garden and a vegetable garden on 10 acres, this is the very critical square, on which such landscape delights as an open reservoir or a separate playground will already look appropriate. But the owners of smaller plots should also not be upset, with a competent approach, a masterpiece can be made from any territory.

In any project, the house is the main object, they pay attention to it first of all, so you should start with it. The approach here can be twofold, depending on the general focus.
If the site is being developed for the purpose of growing a good harvest and in the future it should be overgrown with fruit trees and a rich vegetable garden, then it is better to locate the buildings on the outskirts. Moreover, from the north or northwest side, so as not to block the sun from the plants.
On the territory intended exclusively for recreation, with lawns and flower beds, it is more reasonable to locate housing in the center or closer to the front part. Outbuildings, in both cases, are recommended to be hidden in the depths of the territory, if this is not possible, then they should be decorated with a bush or vineyard.

It is better to place a recreation area with barbecue and appropriate furniture closer to the house; in small areas it is appropriate to make a covered terrace adjacent to the house; in large areas, you can equip a gazebo. So it will be more convenient to bring the necessary communications. But, undoubtedly, such a zone should be hidden from prying eyes.
If you would like to receive regularly good harvests and admire the beauty of their flower beds all season, then all green spaces should receive as much sunlight as possible. The layout scheme is also of great importance. orchard and a garden with their own hands, because the price of improper planting is a lack of harvest.
Arrangement of an orchard
Suppose that all the pains of creativity associated with the arrangement of various zones in your country house or in a private household are already behind and the time has come for purchasing seedlings. The most common mistake of young owners is the desire to plant everything and more.
But do not forget that the fertile land is not dimensionless and no more than 7 tall, fruit-bearing trees can fit on one hundred square meters.

A low or flat planting can accommodate up to 15 healthy trees while still leaving room for a small vineyard and shrubbery. In this case, it is much better to plant less than to invest in high-quality seedlings, the price of which can be rather high, and after a couple of seasons to uproot trees, because they do not develop well and interfere with the growth of neighboring plantings.
Revise your list.
Think about whether you really need all the plants that you plan to plant.
- Sea buckthorn is certainly useful, but after the first harvest, interest in it drops sharply. Intensive growth, thorns and problematic collection, will quickly discourage growing it, it is easier to buy 1 - 2 cans on the market.
- A cultivated undersized walnut is a rarity, in 80% of cases you will be sold a regular one. Its crown will cover a large area, and the roots are able to pull out a light strip foundation. It is appropriate for large areas or next to a capital cottage, creating a shade over the barbecue area.
- Hazelnuts will take up a quarter of a hundred and will give a lot of growth.
- Viburnum is enough one, it is better to plant it on the outskirts, near the fence. The plant is unpretentious and tolerates shade normally.
- Chokeberry or chokeberry, for a big fan. The fruit is good for pressure relief, but this plant loves the sun.

Any plant is drawn to the light, and until it reaches its goal, it will not bear fruit normally. Therefore, by planting a seedling in a deliberately shaded area, you thereby doom yourself to a lack of harvest, and the plant to an eternal struggle. In this case, even the best, grafted seedlings will not save you.

The size of the shadow is about half the height of the tree. Conditionally shaded is an area where there is no sun for half a day or more. But do not worry in these places you can place paths, design elements or flower beds.
Important: trees planted near high walls will "shy away" from them, they will need to be molded.
The only exception is the southern direction.
If the goal is a large harvest, then it is better to form trees with a height of no more than 2m, in some cases the height can reach up to 4m. A comfortable distance between the trunks should be two tree heights, in other words, there should be at least 4m between two-meter plants.

Try to arrange lines of trees, trellises of vineyards and rows of shrubs from north to south. Thus, you get an additional opportunity to plant between the rows of tall plants and low-growing crops, the sun is enough for everyone.
A few words about the garden
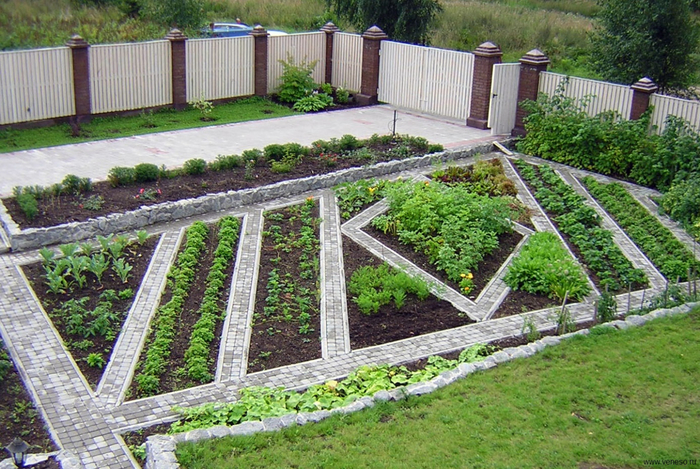
Ease of movement is important in the garden. The comfortable size of the tracks is made at least 40 cm. It should be convenient not only to walk along them, but also to import fertilizers or harvest.
Based on many years of experience, we can safely say that the parallel-perpendicular arrangement of the tracks is inconvenient in this case. You will constantly stumble over right angles, and scold sharp turns.

In vegetable beds, the law works, the shorter the path, the better. Therefore, feel free to combine diagonals, semicircles or any other configurations convenient for you.
The width of the beds may be different, but good bed should be raised to a height of about 20-30 cm and edged with a border. At the same time, the inner space is completely filled with fertile, fertilized soil.
Cabbage, root vegetables and some bush legumes love beds at least 1 meter wide. Beds for climbing beans, tall, branchy tomatoes, cucumbers or melons can be made 60 cm each.
Mutual love or dislike of cultures should also be considered.
- Rhubarb, sorrel, perennial onions and horseradish are recommended to be planted separately from the general array.
- A variety of greens such as dill, parsley, spinach, ruula and other salad greens will find their place between the main beds.
- Cabbage cannot stand being next to tomatoes, strawberries, onions or potatoes. Onions have a negative attitude towards legumes or turnips. Cucumbers do not need to be paired with tomatoes, rhubarb, or carrots.
- If we talk about a favorable combination, then legumes, corn and sorrel get along well with zucchini. Tomatoes love growing next to parsley, beans, carrots, or onions.
Important: don't forget about crop rotation.
Related plants should not be planted in one place for more than 3 years, after which redevelopment should be carried out.
Otherwise, land depletion may occur.

The video in this article reveals some of the secrets of landscape design and do-it-yourself garden planning.
Conclusion

The layout of the garden and vegetable garden on 15 acres belongs to the category of the layout of large areas. Unlike the miniature 6 acres, there is already a place for creative thought to roam. But we do not advise you to neglect the above recommendations, it can take a lot of time to fix errors.
Most of our readers have a summer house or plot that we definitely want to keep in order and beauty. Therefore, many begin to set up gardens or vegetable gardens within the boundaries of the suburban area, as far as weave allow. But in order to do everything beautifully and efficiently, you need to know the rules and features. Some have a developed imagination and love creative ideas, which means that it will not be difficult for them. What should everyone else do? We want to help you with this. In this article you will find tips on how to do the planning on your own, what are the rules, how to find suitable plants and how to plant them correctly, how many beds are needed and how to place them, taking into account your acres. And also, what decorative elements can be used and is it worth doing at all? We will post several photos in the article that you can use to create your ideas.
To begin with, you need to understand what planning is and where to start it. Layout is the optimal layout for a site that will provide the most rational use useful area for fruitful beds. But where to start? Many owners want to plant on their personal plot fruit trees and set up a garden, but the question arises, can all this be combined? You can always combine everything, you just need to know how to do it correctly. Therefore, we would suggest that you start by creating your own unique idea for the layout of the beds that you find ideal.
In order to create something of your own, look at several options for ideas on the Internet, photos on websites or in landscape design magazines. You can also find some video tutorials on the basics of design. Please note that you can create everything with your own hands, but if you think that it is difficult and painstaking, then you can use the ideas of designers or their direct services.
Step-by-step instructions for planning
We want to help you properly organize the planning work at the summer cottage so that there are no unaccounted for moments. If you decide to make a complex of vegetable and fruit plantings, then you should start with the planning.
- Sketch your initial idea to reflect general featuresthat you want to see on the site. You can make a color scheme in two versions to see at a glance what your site will be like in the spring and autumn.
- Calculate the size of the plot in advance, find out how many hundred square meters it contains (most often there are plots of 4 and 6). You should know not only the general sizes, but also some features, among which the sizes that the plants can grow, the planting should not be very tight.
- Think about where to place your garden. We want to say that many gardeners advise placing everything on the south side. If this is not possible for you, then try to make your place sunny, but with periods of shade.

Plan where is the best place to make the beds
- Write a list of plants that you would like to see on your site. It can be both vegetable beds, fruit trees, and ornamental plants and flowers. Later we will talk about the most common schemes that exist at the moment.
- Consult with experts or read for yourself whether your chosen plants are compatible with each other. To do this, you need to study the soil and fertilization requirements for each plant species. As well as the frequency of their watering, the need for solar energy and other.
- Find out what is the acidity of the soil, whether there is groundwater, what is the relief, the orientation of the area relative to the sun.
- Estimate how many beds you can create. Think in advance which processes you will carry out with your own hands, and in which you will need help.
- Plant your plants in a specific order. Seedlings cannot be in the shade, and bushes and low plants should be closer to the sun.
- It is necessary to find out the timing of fruiting of all trees and shrubs. And place all plants according to their maturity.
- Take a photo of your work.
What should be indicated on the diagram, which plants to use?
What should be indicated on the diagram
The planting scheme should be designed as correctly as possible and you can easily do it yourself, without the help of experts. In order for you to take everything into account and not forget anything, we decided to develop special recommendations for you.
- To start planting, you should always have a photo of the site. Since you can not always be in close proximity to it, and your scheme will often require it.
- Mark the location of the house on the diagram, if the site is not yet built up, then the estimated size and location.
- Indicate more than just dimensions personal plot, but also its distance from the boundaries of the site. If you decide to combine several types of plantings into one composition, then it is worth indicating what size each of them will be and at what distance they will be located.
- Pay your attention to paint everything with flowers. This is important exclusively for decorative look... Thanks to this, you will be able to see from a new perspective.
What plants can you use for your vegetable garden?
For the garden, you can use any plants that you need:
- cabbage,
- carrot,
- potato,
- cucumbers,
- tomatoes,
- greens,
- beet,
- eggplant,
- pumpkin.
What are the site planning models?
In order to outline only the main points of planting, we decided to show you three main options for planning a vegetable garden and including a garden. It should be noted that the choice should be influenced not only by the "liked" factor, but also by the relief of the site, the number of acres, the estimated number of beds.

- Decorative model. This model is designed exclusively for lovers of unpretentious site management and assumes the presence ornamental plants and plantings. Most often, this model is embodied in the form of a circle. Inside there are plantations of flowers and only ornamental plants (preferably tall to show all the beauty). Outside, a kind of "frame" is created from fruit plantations (currants, raspberries, strawberries). Very often they buy low shrubs that will not hide too much decorative flowers... If the site allows, then fruit trees are planted in a semicircle behind (their number depends on the size of the model). For example, you can see a photo of the landing on the Internet
- Rectangular model. Its peculiarity lies in the fact that here you do both a garden and a vegetable garden at the same time. Most often, a square shape is used for giving. The peculiarity is that you plant several beds of vegetables (as far as weave of the plot allow). Nearby are several beds of berry bushes (currants, raspberries), selected according to your taste. For better view fruit trees are also planted, but a little in the distance. The peculiarity is that with all the abundance of species, a square or rectangular shape remains.
- Arbitrary model. Here, the shape and size depend solely on the acres and on your capabilities. The scheme is the same: combine several vegetable and berry beds with fruit and decorative trees... As you can see in the photo, only your imagination plays a role here.
Layout is a very important thing, so we would like to give some tips for those who will do everything themselves. To begin with, it is worth noting that all natural and geographical factors of the site must be taken into account: size, lighting, temperature drops. If you have a small area for a garden, then use the method of vertical beds more, cucumbers, beans, peas, tall tomatoes, etc. feel great on nets and supports. Always pay attention to compatibility garden plants, their need for lighting. Also, that old trees should not be used for the site, seedlings are quite suitable for you. If you do not understand any process, we recommend that you look at the photo on the Internet, where you can also find instructions on the optimal number of beds and the correct calculation of acres. Planning on your own is very painstaking, but once you dive into the process, you'll love it!