How to properly build a wall from tongue-and-groove slabs. Installation of partitions made of tongue-and-groove plates. Installation of electrical and low-current wiring and pipelines
The tongue-and-groove partitions provide a stable, even surface. They are a good alternative to drywall walls, are easy to install and low cost. Thanks to the tongue-and-groove connection system, the joints of the elements become invisible. Due to this, you can omit the putty stage, prime immediately and proceed with the finishing.
Types of partitions
Partitions made of tongue-and-groove plates, depending on the material of manufacture, are divided into:
- Silicate ones are made on the basis of quicklime and water with the addition of quartz sand. The mixture is pressed and kept in an autoclave. They do not burn and have high sound insulation performance. In comparison with gypsum types, such structures are more durable and resistant to moisture.
- GWP partitions are made on the basis of gypsum with the addition of plasticizers. They are divided into moisture resistant (green) and moisture resistant. The device of such partitions can be performed in any room, including children's rooms. Gypsum is environmentally friendly, non-flammable, and has good sound insulation.

They are made hollow and monolithic. Hollow material is lightweight, but it will not be possible to hang massive shelves, lamps, etc. on it. Solid ones are capable of withstanding heavy loads.
Installation of plates for partitions is carried out after the construction of all supporting structures, but before laying the sub-floor and before the start of finishing work.
DIY installation
Installation of partitions from tongue-and-groove slabs is performed by hand or with the assistance of professional builders. The material has high thermal insulation, so it can be installed not only inside the room, but also right next to cold walls in contact with the street.
The technology for installing tongue-and-groove partitions is quite simple. The main thing is to set the structure on a level and tightly fix the elements to each other.
If it is necessary to hide communications without a groove device, use the technology of double partitions. The disadvantage is that they take up 2 times more space.
At subzero temperatures, installation is performed using frost-resistant adhesives.
Tools
All necessary tools and the materials must be prepared in advance, so that in the process of performing the work, you will not be distracted by a trip to the store for missing copies.
It is necessary to collect such devices for the installation of interior partitions from tongue-and-groove plates:
- felt seal;
- tongue-and-groove plates;
- damper tape, twine;
- cement, sand, gypsum for solution preparation;
- special glue for tongue-and-groove slabs or tile glue;
- primer;
- building level, tape measure;
- pencil, ruler;
- fasteners: screws, anchors, staples;
- rubber mallet, spatula, hacksaw;
- drill, screwdriver, construction mixer.
Consumables should be selected in accordance with the recommendations of the tongue-and-groove manufacturer.
Preparatory work
When the installation of tongue-and-groove partitions is carried out in a new house, you need to check the location of the floor and ceiling according to the horizontal level. The protruding parts of the surface are cleaned by grinding. Cracks and depressions are filled with cement-sand mortar.
The floor and ceiling must be prepared so that the tongue-and-groove plates fit snugly against them. Before the device of partitions, all surfaces that will come into contact with them are treated with a primer.
When installing partitions during current repairs, markings are made on the floor, ceiling, walls. Mark with a line the location of the partition. All finishing materials are removed from the surfaces a few millimeters wider than the markings show. The sturdy ceramic tiles do not need to be dismantled.
A string is pulled at a height of 30 cm from the floor, which will indicate the level of the partition. A damper seal is glued along the line of contact of the partition with the surfaces: a felt impregnated with bitumen or a cork backing. The width should correspond to the thickness of the board.
Erection of the first row
The location of the entire structure will depend on the correct installation of the first row. Here is information on how to make a partition from tongue-and-groove blocks.
Step-by-step installation instructions:
- For tongue-and-groove plates, which will be located in the first row, the lower ridges are cut off with a hacksaw.
- Glue is applied to the vertical and horizontal parts of the sealing material.
- A perforated bracket is brought to that part of the groove of the slab, which will adjoin the wall, so that the fasteners protrude a few centimeters.
- Fix the bracket to the wall using dowels or self-tapping screws.
- Install the slab upside down, press it tightly against the wall and floor, check that it is level, tap it with a rubber mallet.
- From the side of the installation of the next slab, a bracket is inserted into the groove, attached with dowels to the floor.
- After the adhesive has set, the next slab is installed, fixed with a bracket to the floor.
- Each subsequent block is mounted after the glue has set on the previous one.

The adhesive is applied to the side joints so that the distance between the plates does not exceed 2 mm. The protruding excess glue is immediately wiped off; after hardening, it will be problematic to remove the drips.
When erecting walls from PPG, maximum attention is paid to the installation of the first row. The quality of its installation will depend on the reliability and appearance the whole structure.
Erection of the remaining rows
The second and subsequent rows are mounted with an offset of the seams. The first slab of the second row is sawn in half. The row starts with half a block. On the cuts of the tongue-and-groove blocks adjacent to the wall, brackets are fixed.
The adhesive is diluted so that it is more liquid than that used for the first row. The adhesive is applied to the bottom and side joints of each board. Using this technology, the entire wall is assembled.
Be sure to check the horizontal and vertical levels after installing each unit.
Installing the last row
According to the technology, an expansion gap of 2 mm should remain between the ceiling and the blocks of the upper row.
In the upper grooves of the last row, staples are fixed to the glue. Install the block and screw the bracket to the ceiling using dowels. If the slab is larger than the remaining distance, it is cut to size.
After the glue has set, the seam between the ceiling and the wall is blown out polyurethane foam... When it hardens, the excess is cut off with a knife.
Installation technology of partitions with a doorway
When a doorway is provided in the design of the partition, you need to think about how to strengthen the rows that will be located above the opening.
If only one row of slabs will be located above the opening with a width of up to 800 mm, then it is permissible to mount them on top of the door frame or temporary support.
In the case when the opening is wider than 800 mm or several rows will be laid above it, you will need a reliable jumper made of thick wooden beam section 50 x 50 mm or metal channel 35.
Partitions made of PGP with the arrangement of the doorway are mounted using a technology similar to the construction of a solid wall. The difference is that when the markings are made, the location of the opening is noted, the wall is divided.
Lintels above the doorway:
- When the row reaches the upper level of the opening, cutouts are made in the blocks on both sides with a depth of about 50 mm. The width of the cut is equal to the thickness of the bar or channel.
- Lubricate the blocks with glue and insert a jumper.
- After the adhesive has hardened, the upper rows of blocks are mounted.

If you plan to install in the partition interior door, the box under it can be mounted both at the stage of wall construction and subsequently.
Strengthening corners
So that the outer corners are at 90 degrees and do not collapse under mechanical stress, they are strengthened with a 3 x 3 cm perforated corner.
Corner fixing instructions:
- With the help of a spatula, putty is applied to the surface of the corner, the steel corner is pressed against it. Press it along the entire length.
- If the length is not enough, take another bar and overlap by 3 cm.
- Apply a layer of putty on top with an angled spatula.
Serpyanka tape is laid in the inner corners. If it is without a self-adhesive base, it is fixed using the same technology as the perforated corner.
Remove the protective layer from the self-adhesive serpyanka and stick it along the entire length of the corner.
Electrical wiring in partitions
After the baffle has been installed, it may be necessary to install an outlet or switches. For the device of hidden wiring, the location of the elements of the electrical system is noted, a strobe is made for wires and holes for boxes.
Technological cavities inside hollow partitions made of gypsum tongue-and-groove plates can be used for laying electrical wiring. To make it more convenient to lay wires in horizontal channels, blind holes are made on the side.
Stretching wires, connecting sockets, switches. Close up the holes with putty.
The distance between the strobes should not be less than 10 cm.
Wall decoration from tongue-and-groove slabs
Like any material, walls made of tongue-and-groove slabs need finishing. Materials for its construction are chosen depending on functional purpose premises.
It is appropriate to lay ceramic tiles in the kitchen and bathroom. Finishing is suitable for the living room and bedroom decorative plaster, wallpaper, painting with water-based paints.
Painting
Before painting, the surface is putty with fine-grained compounds, which make it possible to obtain a perfectly smooth surface. After drying, rub the surface with a fine sanding mesh. Apply a primer in two layers.
Prepare the paint, the desired shade is obtained by adding colors.
Start staining. The paint is applied with a roller, making sure that the layer is uniform. You may need to apply several coats of paint.
Wallpapering
Cover the surface with a primer, apply a thin layer of plaster or putty.
Wallpaper decoration is carried out in the usual way. Dilute the glue, cut off a strip of wallpaper of the required length. Apply glue to the wallpaper and wall. Apply a strip, smooth it with a rubber roller, expelling air bubbles.
When decorating with wallpaper, there should be no drafts in the room.
Laying tiles
Finishing ceramic tiles does not require preliminary surface preparation.
Tile laying instructions:
- the surface of the partition is cleaned of construction debris;
- the protrusions are cleaned with sandpaper;
- depressions, cracks are filled with cement mortar;
- for better adhesion of materials, the wall is covered with two layers of primer;
- perform tile laying.
Since the gypsum surface absorbs water, the surface after installing the tiles is not touched for 3-5 days.
How to mount grooved blocks, you can watch the video:
The partition made of tongue-and-groove plates is very easy to assemble and represents robust design. Finishing such a surface can be made with any materials you like.
The appearance of this material was caused by the need to reduce the labor intensity and cost of masonry.
Judge for yourself - one tongue-and-groove gypsum board 66.7 cm long and 50 cm high replaces 14 one and a half silicate bricks or 20 pieces of single red (250x120x65mm).
In a silicate tongue-and-groove slab, these indicators are more modest (5 and 7 bricks, respectively), but also quite acceptable for speeding up and reducing the cost of work.
Partitions made of tongue-and-groove plates (PGP) are intended for installation in residential and public buildings with a ceiling height of no more than 4.2 m.
Since such slabs have a large side surface and a small width (from 8 to 10 cm), in order to increase the stability of the masonry on the side edges, they make lock connection "Groove-comb". This constructive solution simultaneously increases the evenness of the partition, since the slab sits precisely on the longitudinal seam and reliably connects to the adjacent one.
Gypsum tongue-and-groove plates
They are made of gypsum grades G-4 or G-5 using casting technology.

Plaster of paris is an environmentally friendly and breathable material. Therefore, the partitions made of it comply with strict sanitary and hygienic standards governing quality finishing materials... To improve the operational and strength characteristics, plasticizing additives are added to gypsum.
Modern gypsum tongue-and-groove plates, depending on the degree of moisture absorption, are divided into ordinary and moisture resistant. To reduce water absorption, granulated blast furnace slag and Portland cement are added to the feedstock. In order to distinguish such plates from ordinary ones, they are painted green.
Standard gypsum partition blocks can be used only in buildings with dry and normal humidity levels, and moisture-resistant (hydrophobized) ones can also be installed in wet rooms (according to SNiP II-3-79 requirements)
Tab. # 1 Basic specifications gypsum tongue-and-groove slabs
In terms of thermal insulation, a tongue-and-groove gypsum slab 80 mm thick is equivalent to concrete wall 400 mm thick. Its noise insulation coefficient is from 34 to 40 dB, which is a good indicator for partition structures.
The fire resistance of solid gypsum blocks is very high. They are able to withstand the direct impact of fire (temperature about +1100 C) for 3 hours without losing their bearing capacity.
To reduce the weight of the masonry, hollow gypsum boards of the standard size 667x500x80 mm are produced. Their mass is almost 25% less than that of corpulent ones (22-24 versus 30-32 kg).
In addition, there is a gradation of gypsum boards depending on the shape of the ridge and groove (rectangular and trapezoidal). However, this parameter does not significantly affect the quality and strength of the partitions.
Silicate tongue-and-groove plates
The technology for the manufacture of silicate boards consists in preparing a mixture of quartz sand, water and quicklime lime, which is then pressed and placed in an autoclave chamber. There under the influence high temperature and pressure, a strong lime-sand conglomerate is formed.

Silicate tongue-and-groove blocks for partitions have a higher mechanical strength than gypsum blocks and a lower level of water absorption. Therefore, they can be used without restrictions for the construction of self-supporting structures of interior walls and for the construction of partitions in wet rooms.
The weight of such a silicate block is 15.6 kg with a density of 1870 kg / m3. Gypsum boards have a lower density - 1570 kg / m3, which has a positive effect on the quality of heat and sound insulation.
Tab. No. 2 Main technical characteristics of silicate tongue-and-groove plates
Silicate boards resist fire as well as gypsum boards. They do not emit toxic gases and do not conduct electricity. In addition, the tongue-and-groove lock dampens sound well.
Gas permeability (breathability) of a silicate partition block is at a high level and provides a comfortable indoor climate. This material, even with significant fluctuations in humidity, does not deform or rot.
Manufacturers and prices
Tongue blocks produced under the Knauf and Volma brands are in high demand today. The reasons for this are the predictability of their strength characteristics and the high accuracy of the geometry. This allows you to reduce the cost and labor intensity of finishing work.
Such constructions can not be plastered, but, having primed, immediately paste over with wallpaper or paint with paint.
Today, on the building materials market, you can find offers for the sale of tongue-and-groove plates on average from 200 rubles / piece.
Installation features
The laying of partitions from tongue-and-groove blocks is carried out after the completion of the installation of load-bearing and enclosing structures of buildings, before the start of the installation of a clean floor and finishing works.

When redeveloping or reconstructing residential and civil facilities, tongue-and-groove partitions can be erected not only single, but also double. The latter option is used in cases where it is required to perform a hidden gasket engineering networks or insulate a partition, one side of which goes into a cold room.

At the facility, the installation of tongue-and-groove plates is reduced to joining along the seams, with periodic control of the verticality and horizontalness of each row. When assembling the interior partitions, the slabs are placed both with a groove down and up. The norms recommend that they be laid with the groove up, since in this case the mounting adhesive mixture is evenly distributed in the groove-and-groove space.
Standard aerated concrete glue or Fugenfüller putty can be used as an adhesive base for installation.
Installation sequence
The base for the partition is leveled with a cement-sand mortar, after which the first row of partition plates is placed on it according to the level. Before joining, the surfaces of the groove and the ridge of each plate are covered with an adhesive solution so that the thickness of the seam at the joints does not exceed 1-2 mm.
Installation is carried out with bandaging of the joint seams. To create an elastic abutment to the enclosing and load-bearing structures tongue-and-groove partitions are fastened with special brackets.

The bracket is installed in the groove of the slab and fixed with a self-tapping screw to the floor panel or with an anchor dowel to the enclosing structure.
In addition, in such joints, the standards recommend the use of cork or bitumen felt gaskets, installing them around the entire perimeter of the external joint.
If the width of the doorway does not exceed 80 cm and only one row of tongue-and-groove plates will be installed above it, then the norms allow not to use a jumper. Its role is played by door frame or a retaining structure, which is removed after curing with an adhesive solution (Fig. 1)
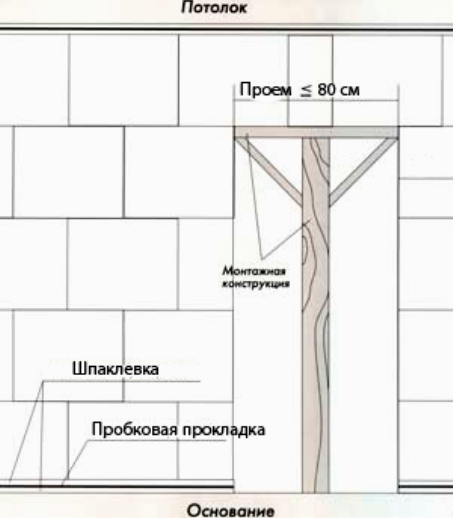
Picture 1
With a larger opening width installation of a steel or wooden lintel over it is required (see Fig. 2)

All contact zones of partitions with load-bearing walls and overlaps are sealed with gypsum mortar.
The tongue-and-groove plate is a gypsum rectangle with grooves and ridges along the perimeter. The advantages of a GWP partition in comparison with a brick partition is the speed of installation, which does not require the skill of a bricklayer. The vertical surface of the wall, thanks to the grooves / ridges, will be almost perfect, excluding subsequent plastering. There is also no need to mix a large volume of masonry mortar. For an average partition of 20 squares, one bag of Knauf plaster mix is \u200b\u200benough. So let's get started.
Layout of the first row of an interior partition made of PPG
The most time consuming thing is a breakdown of the dimensions of the future partition, marking of openings and scrupulous alignment of the first row, taking into account the horizontal and vertical.
First, we prepare all the plates for the first row. We lay out the blocks on a dry one along the entire length of the wall, check with the dimensions, draw a single common line at the base of the plates along the length with a marker, use a laser level.
The slab is placed with the ridge up, respectively, the groove in the lower part of the slab is cut down with a pickaxe to the base, then sanded with a plane for stability.

The part of the slabs marked with a dotted line is removed.
Partition masonry
If the floor surface is not even or there is no floor screed at all, it is more expedient to level the first row by placing the blocks on a cement-sand mortar, since the gypsum mixture quickly sets. Gypsum mix (glue) it is better to knead in small quantities for a maximum of 5-10 plates.
The consistency of the glue, like thick sour cream, is applied with a spatula in a thin layer (no more than 5 mm) along the vertical and horizontal edges of the board with a quick movement, wiping the glue towards you with the plane of the spatula. Seal the seams by gently tapping the plate with a rubber mallet. With the squeezed glue, we seal the seams and cover up minor chips and cracks.
If we start laying the partition with a whole slab, then the next half will go to bandage the seams.
Be sure to fasten through the row with self-tapping screws to the outer wall and connect the partition made of tongue-and-groove plates with galvanized fastening corners.

The corner is placed for rigidity along the edge of the slab, sinking into the groove using a chisel or a hacksaw. We fix the corner with the next row.
Do not forget to control the verticality and horizon of each slab with a level, if necessary adjusting the slab or upsetting, using a bar and a rubber mallet.

Gypsum boards are malleable and are sawn with an ordinary hacksaw when you need halves, quarters, pieces for doorways, corners or beacons.

Working with a hacksaw will be enough, therefore, so as not to bother yourself with endless sawing, I advise you to make a 1.5-2 cm cut on both sides. Place the slab with a cut on the edge of a stack of slabs or a goat, and, lifting, holding, release without effort. If necessary, the fracture is sanded with a plane.
As the partition is being built doorway instead of a lintel, we overlap with a bar with a thickness close to the width of the slab. We attach the block to the PPG obliquely with self-tapping screws.
Doorway device
Depending on the size of the door and the unfolding of the corners, it is not always possible to make an opening from GWP. Sometimes it is necessary to use other materials to adjust the dimensions doorway without compromising the area of \u200b\u200bthe room.

In this case, a brick was used, installed "on the priest" on cement mortar... The ends of each brick are connected by a large nail driven into the slab and fixed with the next brick. Additional rigidity of the structure will be given by the subsequent puttying of the partition with a fiberglass mesh.
Above the lintel, to facilitate the construction, drywall finishing will go.
To facilitate the process of making the opening and if the door can be positioned arbitrarily, then we build a solid wall, and then, after a day or two, we cut the opening with a saber jigsaw, focusing on the dressing seams.
We are completing the construction of a partition of tongue-and-groove plates with the last row under the ceiling. We saw the blocks of the last row lengthwise by 1-1.5 cm less than the required height for foaming with polyurethane foam.
Conclusion
On the Internet, opinions are divided on GWP partitions. In my opinion, the benefits for the customer are obvious. Subject to the accuracy of the breakdown of the first row, the presence of your own desire, patience and a partner, the partition of the tongue-and-groove plates can be erected quickly without much effort with your own hands.
This video shows the process of erecting a partition from Volm's hollow tongue-and-groove slabs.
(GWP) is one of the most optimal building materials to create walls and partitions.
PGP are a gypsum block with a groove and a ridge at their ends, thanks to which they are assembled like a Lego constructor. Using this material, you can easily build a partition up to 6m long and up to 3.6m high.
The tongue-and-groove comb can be used in both dry and damp rooms. For the installation of partitions in rooms with high humidity, special moisture-resistant tongue-and-groove plates are made.
Tools and materials for the installation of a GWP partition
To install a partition made of tongue-and-groove plates, you need the following materials and tools:
- GWP conventional or moisture resistant
- primer
- assembly adhesive
- gypsum plaster
- mounting angles (straight hangers can be used)
- dowel nails and screws
- spatulas: wide, for external and inner corners
- polyurethane foam
- level
- mallet
You can buy everything necessary for the installation of partitions made of PPG from our company.
Stages of installation of a partition made of tongue-and-groove plates
1. Preparation of the base
One of the most important conditions for creating a GWP partition is a reliable and stable base... If the base has strong irregularities, it is necessary to perform a leveling layer using a self-leveling floor.
Before starting the installation, clean the floor from dust and dirt. After that, you can proceed to the installation of the partition.
2. Installation of the partition
 To increase the adhesion of materials, it is necessary to process all surfaces that will be adjacent to the future partition primer... After the primer has dried, line up and mix - can be used any gypsum assembly mixture.
To increase sound insulation and prevent other negative consequences, it is better to fasten the partition to the base through an elastic porous material, for example, a cork. This stage is advisory in nature.
The tongue-and-groove plates are mounted in rows... GWP of the first row are mounted from the wall premises on the layer of the assembly mixture. The plate can be installed with the groove up or down. To obtain a high-quality design, it is necessary to check using the vertical and horizontal level of the future partition.
Before installing the next plate, apply a layer of adhesive to the already installed tongue and groove plate and base. After installing the second and subsequent slabs, level them with a mallet to obtain an even structure.
As a rule, it is necessary to use an incomplete GWP slab to complete the partition. This is okay, because thanks to the voids, the material is very easy to saw with a hacksaw.
When laying the second and subsequent rows, you need to observe the spacing of the vertical joints at least 10 cm, thanks to this, the structure is more durable.
Constantly control the width of horizontal and vertical seams in order to exclude additional alignment steps when finishing the partition from the PPG, it should be minimal.
Slabs necessaryfasten to walls and foundations: they are performed using fastening angles, dowel nails and self-tapping screws.
The last row must be installed with a gap not less than 1.5 cm from the floor slab, the remaining gap is filled with polyurethane foam, after cleaning the excess, it is necessary to putty the seam with gypsum putty.
3.Finishing of the GWP partition
First of all, you need to protect the outer corners of the resulting partition from mechanical damage, for this it is used corner perforated profile 31 * 31. Internal corners are reinforced with reinforcing tape.
A smoothing layer of plaster putty must be applied to all corners.
For laying electrical wires or wiring products, you can use structural cavities, which must be further expanded with a drill with a crown. With the same tool, it is necessary to prepare external holes for wiring accessories and wiring output.
Before applying a decorative coating: wallpaper or paint, it is necessary to clean the seams and treat them and all irregularities with gypsum putty and prime the surface.
The video also reflects the moments of soundproofing partitions and installation attachments: shelves, sanitary ware.
Advantages of tongue-and-groove slabs: 
- ease of assembly
- simplicity of the device of openings
- minimal finishing
- does not require plastering
- low price
- high rates of fire resistance
Partitions made of tongue-and-groove plates have been used in construction for a long time. But his new life they received relatively recently, when life became better, citizens began to carry out repairs and redevelopment of apartments and houses, using modern materials... The latter did not always turn out to be convenient to use, especially for inexperienced craftsmen who were doing repairs with their own hands. In this regard, tongue-and-groove plates are better, because their installation is a simple process.
Partitions made of tongue-and-groove panels
This wall material for the construction of partitions is present in the market of two types of building materials: gypsum and silicate. The first is pure gypsum with the addition of plasticizers. The second is lime, mixed with sand, formed into slabs and dried in an autoclave at high temperatures.
The dimensions of the gypsum tongue-and-groove plates are 500x667x80 mm. They have higher thermal insulation properties and good noise insulation properties. The standard dimensions of silicate boards are 250x500x70 mm. They are inferior in the above two parameters, but much better in strength. In addition, the silicate material withstands moisture well. Although we must pay tribute to the manufacturers of gypsum panels, which today offer moisture resistant boards painted in a greenish color. So you can't make a mistake when choosing. The dimensions of the hydrophobized blocks are 300x900x80 mm.
We add that silicate tongue-and-groove blocks are available in different thicknesses, which is convenient in terms of selecting material for the partition with respect to the strength of the structure and such an indicator as the bearing capacity of the structure. Thickness parameter: 70, 88, 115 mm.
In all other respects, the two varieties have almost the same characteristics:
- do not rot
- do not deform,
- do not burn
- do not emit substances harmful to humans,
- have a flat surface.

Tongue-and-groove plates
Installation technology
It is necessary to immediately make a reservation that the installation of tongue-and-groove plates must be started after they are completed. construction worksrelated to the alignment of load-bearing structures: walls, floors, ceilings. You will have to prepare for the work.
Materials:
- tongue-and-groove plates,
- gypsum glue,
- primer,
- staples for fastening material to walls and floor,
- screws and dowels.
Tools:
- spatulas,
- building level,
- container for diluting the adhesive,
- construction mixer,
- hacksaw,
- screwdriver.
Preparatory stage
Besides preparation necessary materials and the tool needs to prepare the floor. It is already leveled, it remains only to mark the location of the future partition on it, remove dust and prime it. This is always done regardless of the concrete or wooden floor.
With regard to the marking, it can be carried out directly on the surface of the floor base and along the walls, drawing parallel lines with a marker or pencil, which determine the thickness of the tongue-and-groove plate. Additionally, you can pull a strong thread on one side at a height of 30 cm, which will show the plane of the boundary of the installation of the board material of the first row.
Assembly process
The main requirement for the installation of tongue-and-groove plates is to correctly lay the first row, taking into account the horizontal and vertical location of each plate, which will form the basis for the location of the partition. But you will have to start by preparing the glue. It is simply poured into a bucket of water in portions, mixing with a construction mixer. The proportions are indicated on the packaging of the adhesive mixture.

Preparation of the adhesive composition exactly according to the recipe indicated on the bag
On the wall and on the floor at the place of installation of the first tongue-and-groove plate, apply the adhesive solution with small strokes using a small spatula.

Applying glue to walls and floors at the place of installation
Now you can install the slab with the ridge up, checking it for horizontal installation using a building level. The panel is pressed against the wall and floor. Smooth floor base - a guarantee of precise horizontal alignment of the panel.

Checking the tongue-and-groove plate for horizontalness using a level
The end of the plate is processed with glue. It is also applied to the floor for the installation of the second element for laying the partition.

The end of the first plate is coated with glue
Both slabs are checked with a long rule for evenness in one plane. This must be done, even if slab material strictly follows the marked lines. A slight misalignment can lead to large discrepancies at the end of the baffle. So it's better to spend a couple of minutes checking than reworking a large amount of work.

Plates are checked against each other by a long rule
This is how the laying of the first row of the partition of tongue-and-groove plates is carried out with the installation of all elements along the outlined lines. Then you can collect the next rows. Installation of the second row begins with a solid slab, which is installed so that subsequently the joints between the panels do not coincide in different rows. That is, the installation is done with an offset, preferably in half the panel.

The top plate is laid in the second row so that the joint of the two elements of the first row falls in the middle
The space between the wall and the partition is filled with a piece of tongue-and-groove plate, which is cut out of a single piece with a hacksaw. You just need to accurately measure the size for the installation.

Tongue plates are easily cut with a regular hacksaw
To strengthen the structure, it is recommended that the plates, located near the walls and resting on the floor base, be fixed to the supporting structures with metal mounting angles (brackets), self-tapping screws and dowels. To do this, you need to attach the corner, for example, to the wall, with one self-tapping screw, attach it to the plate with a screwdriver, and the other to the wall surface.

Fastening the tongue-and-groove plate to the wall using a mounting bracket and self-tapping screws
Construction of a doorway
Installation of partitions from tongue-and-groove slabs implies the construction of a doorway. To do this, at the stage of marking, it is necessary to indicate the location of the opening. It is up to him that it will be necessary to assemble the partition: on one side or on both. The main task after assembly is to identify and form the top row located above the doorway. To do this, grooves must be made in two erected walls for the embedded beam (lintel). They are simply cut out with a hacksaw.

Groove for the embedded beam
The jumper is placed on the adhesive, and the groove is completely filled with it. It is important at the stage of marking the grooves to set them so that the embedded part lies horizontally in them. Then you can proceed to the installation of the plates. Here everything is the same, the timber end of the adjacent wall is coated with glue, after which the tongue-and-groove plates are installed at their destination.

Formation of the doorway by installing tongue-and-groove plates on the embedded beam
When the doorway is finished, you can proceed to the last installation stage - sealing the gap between the partition of tongue-and-groove plates and the ceiling. Usually the gap is not very large, so the easiest option is to fill it with polyurethane foam. You can use glue, putty.

Filling the gap between the partition and the ceiling with polyurethane foam
If you want to bring the wall of tongue-and-groove slabs exactly to the ceiling, followed by fine finish, then, on the one hand, the gap is covered with plaster, on the other hand, it is filled with foam, and covered with plaster in the same place. Simple foaming is used only when the room, divided by a partition, will be formed by a tension or suspended ceiling structure.
A partition made of tongue-and-groove plates is a flat surface that does not need to be leveled with plaster. It is prepared with a small layer of putty, which gives the surface maximum smoothness.
The nuances of the installation process
Any partition is the presence of corners: external and internal. They are subjected to certain loads, and besides, there are always claims to them in terms of finishing. Therefore, it is recommended to close the outer corners with plastic corner profiles of the perforated type, which will not only create evenness outer corner, but they will also be a kind of protection against the appearance of chips with minor impacts.
An angle of 30x30 mm is used.
- A layer of putty is applied to the corner of the partition doorway.
- The corner is pressed into the solution until it stops.
- On top, another putty layer is applied until it is completely leveled.
It is recommended to use an angled spatula for this operation. If the length of one corner is not enough, the missing piece is trimmed with a length of 3-5 cm longer than the required length. Because two abutting plastic elements are overlapped.
Internal corners problem - cracks. You can deal with them in one way - with a serpentine tape.
- First, a layer of putty is applied to the corner.
- On the not dried solution, a sickle is immediately laid, which is pressed against the stop.
- Top leveling putty layer.
Self-adhesive tapes can be used to seal inside corners. When using them, the putty can be omitted.
If partitions are constructed from several walls, which make up each other broken structure at right angles, then they must be joined together not only with the help of an adhesive composition, but also with the help of the tongue-and-groove blocks themselves. They are installed in perpendicular planes on top of each other. To do this, the ridge of the lower panels is cut under the grooves of the upper ones so that the upper blocks fit snugly on the lower ones.

Rules for joining tongue-and-groove panels at the junction of two walls
If the partition of tongue-and-groove blocks is assembled on concrete floor, then fasten it to the base with metal brackets, there is no need. The adhesive composition is the guarantor of strong fastening. If the floor is wooden, then you cannot do without mounting corners. In this case, you don't even need to use glue between the blocks and the floor.
Be sure to watch the video:


