How to make a stove into a bath from a bath. A cast iron bath stove is a budget solution for everyone! Required materials and inventory
The summer cottages purchased back in Soviet times are real treasures: in the attic, in the back room or right on the street, you can find a lot of rare things or just useful things for the household. For example, an old cast-iron bathroom discarded as unnecessary often plays a boring role as a container for watering plants. She will bring much more useif, with the help of skillful hands, it turns into a heat source or a cooking unit. We offer a detailed description of how to make your own oven from a bathtub, in which you can stew meat and bake pies.
Cast iron parts are prized in manufacturing heating devices for two reasons:
- the metal heats up quickly and retains heat for a long time;
- despite the sharp changes in temperature, cast iron does not wear out and serves for decades.
Even the enamel with which the plumbing equipment is coated retains its qualities and does not burn out immediately. The fact is that the technology of applying a layer of enamel in the last century involved heating the finished product to 800 ° C. Quartz sand, which is part of the solution, under the action high temperature melted and helped to bake the enamel. She received high values \u200b\u200bof strength and at the same time was "welded" to cast iron. The only thing to be wary of is sharp, heavy impacts, which cause cracks.
An old cast iron bathtub - the main element of a garden stove
The concave shape of the product is also suitable for the device of the brazier. It resembles a dome, which can also serve as a base oven, and a compartment of the combustion chamber. So, if you want to build an original barbecue oven from an old bath with your own hands, arm yourself with tools and get down to business.
Instrument preparation
You will need tools for processing metal and erecting brickwork. To cut a cast-iron bath, grind its edges, make holes for fasteners, you will need:
- laser level, plumb line, tape measure, marker - for marking;
- grinder with a set of wheels (for cutting metal - with a diameter of 125 mm and a thickness of 1 mm, for grinding);
- coarse and fine cut files, sandpaper;
- electric drill, drills 9-11 mm;
- hammer, pliers, metal nippers.
In addition to metal parts, there will be brickwork at the base of the structure, so a stirring nozzle will be required cement mortar, container for him, trowel, spatula.

If you do not use a grinder all the time, you can rent it
List of required materials
Several items made of cast iron (if not, then stainless steel is also suitable):
- "old school" cast iron bath;
- grate;
- a stove with burners or a metal sheet (5 mm and thicker);
- door (beautiful forged or just typical).
Of the metal elements, corners are needed to fix the grate, fastening bolts with nuts, a chain-link mesh to strengthen the clay layer, a pipe for making a chimney (diameter from 100 mm to 120 mm).

The masonry is made of refractory bricks, fastening the rows with clay-sand mortar. The number of bricks depends on the size of the structure. If the external finishing of the device with ceramics is planned, then you should purchase tiles and heat-resistant glue, as well as a heat-resistant sealant. Do not forget about protective equipment - tight clothing, goggles or a mask, work gloves.
How to properly cut a cast iron bath
We warn you right away that the cutting process is a laborious task that requires effort, endurance and certain knowledge. Everyone who has previously worked with a grinder knows the technology of cutting thick metal sheets, but here is a special case: the base material is covered with a thick (about 2 mm) layer of enamel. Therefore, you need to cut carefully, slowly, in sections of 5-10 cm, pausing to cool the disc.

The ideal place for cutting is the street. If the procedure takes place indoors, it is necessary to protect the surrounding objects, as cast iron dust can ruin good things. It is better if the container will lie upside down - it is easier to make a straight cut this way.
What is the foundation for
Having cut the main part of the future stove into two identical fragments, you can start building the foundation. It is the main stabilizing element of the structure. Without a solid cement foundation, regular shrinkage will occur (do not forget about the weight of the metal) into the soil, which can render brickwork unusable.
The technology for constructing a concrete base can be different. A small stand can be built without additional supports; for the construction of a high one, you will have to put together a blind area. The main purpose of the blind area is to give the concrete base an even shape.

Device diagram concrete foundation with blind area
Detailed instructions for assembling the structure
We can say that everything preparatory work finished and you can start assembling the stove from the bath sawn in half. At this stage, you should decide on the type of facade. There are two popular solutions: an all-metal faceplate or a partially brick face. The doors are in any case made of metal. They do not have to be cut out on their own, since ready-made options are sold in specialized stores - from simple rectangular doors to decorative ones with forging elements.
Bath installation on the foundation
When the concrete of the foundation grabs, one half of the product is installed on it, bottom down, with a cut towards the future facade. This is a combustion chamber, on which the corners can be fixed in advance to support the grate. At least 4 pieces are required to secure the grille from all corners. The distance from the bottom to the corners is 15-20 cm. Brick walls are erected after the concrete has fully matured. This can take anywhere from a few days to 2-3 weeks, depending on the weather.
Installation of sheet metal
To separate the lower half (combustion chamber) from the upper (cooking-oven), it is necessary to cover the already installed part of the bath with a thick cast iron sheet. If absent, it can be replaced with a steel analogue. A hole for the chimney should be cut in the ceiling sheet. Ideally, the bore and pipe diameters should match. To cut an even circle, you should apply a markup, drill it around the entire circumference with a small drill, and then walk with a grinder. Irregularities are grinded with a file and cleaned.

It looks like a metal sheet that separates the oven chambers.
Chimney fixation
We insert the chimney into the hole, firmly fixing it. If there is a small gap between the elements, fill it with a fire-resistant sealant. There is a second way to install the chimney - from the back. If you remember, it is in the "rear" part that there is a small hole for water drainage. In this case, the configuration of the structure will change slightly, since the pipe will be led out along the back wall.
Having fixed the chimney on the sheet, we coat the contour of the container with a heat-resistant sealant and connect these two elements. The lower chamber - the firebox - is ready.
Top mount
The metal horizontal panel is the base for the second half of the bathtub, which must be installed on the finished structure, but upside down. In this half, it is also necessary to make a hole for the chimney so that after installation the pipe is strictly vertical. We twist all three connected elements along the edges using bolts (10 mm), with an interval of 15-20 cm. The “heart” of the stove is ready - the process of burning wood and cooking dishes will take place in it.

Bolting all parts
Installing the grate
The grate separates the two furnace chambers: the logs are burned on the upper grate, the lower one is blower. Over time, ash accumulates in it, so it is better to equip it with a separate door - for free access to combustion waste. We fix the grate on the corners screwed in advance. It is possible not to use the fixing elements, but then, when laying the logs, the lattice will move and tilt to one side.
Erection of brickwork
Bricks (solid, ceramic) are laid out around the perimeter of the base so as to cover the back wall and sides. You can also partially decorate the facade, leaving room for the doors. First, we display the markings of the first row according to the scheme, then we erect the walls. The upper border of the brickwork should be at the level of the cooking compartment, and the entire lower part should slightly exceed the upper one in size.

Brick bottom decoration
Forming the front wall of bricks, do not forget about the doors: we mount the blower at the very bottom, under the grate, and the main one a little higher. To close the upper chamber, we make a metal shutter with a handle protected from heat. The damper, reminiscent of an analogue of a Russian stove, must match in shape with the bend of the bath so that there is no gap on the sides.
Insulation of the cooking chamber
To protect the oven from rapid cooling, it should be “covered” with a thick layer of material that does not conduct heat well. For these purposes, a thick clay-sand mortar is usually used. A little lime is added to the mixture to prevent cracking.

Table of the ratio of components in mortars
To keep the solution well on a smooth surface, it is preliminarily covered with a fine mesh. It prevents slipping and reinforces the insulation layer. Apply the clay solution in layers, leveling with a spatula. As a result, its thickness should be about 6 cm.
Furnace decoration
A self-built stove from an old bathtub will look much more interesting and attractive if you decorate it from the outside. For finishing you can use:
- ceramic tiles (whole elements or fragments)
- artificial or natural stone;
- self-made tiles.
The upper part is usually covered with whitewash or paint. Natural brickwork also looks appropriate if there are already brick objects on the site (house, gazebo).

Finished stove in a suburban area
Alternative use of an old bathtub
The outdoor-friendly barbecue oven is not the only product that can be built from old cast iron. Using the heating function of individual fragments, fireplaces or sauna heaters are erected from them. Applying painting and others decorative species finishing, making garden furniture - sofas and armchairs. The most common application that does not require cutting or welding is for small pond construction. The bath is placed in a pit, planted with aquatic plants and decorated with stones.

Videos to help home craftsmen
Step-by-step construction of the furnace: video instruction with a detailed explanation
Cast iron bath fireplace
Suburban constructions made by handicraft method are of particular value - they are made with soul and love for their work. Today you can hardly surprise anyone with an expensive purchased unit, and a self-assembled stove is a truly amazing work of art, moreover, very necessary and useful.
Craftsmen - craftsmen, of whom there are enough in every city with an average population, have long mastered the manufacture of solid fuel boilers and stoves from steel or brick. Moreover, most of their products function quite reliably and efficiently. And only cast iron, as a material for home-made heaters, remained on the sidelines until recently. But there is already an initiative here, and in this article we are ready to present it and discuss the question of how to independently make a stove from a cast-iron bath.
Homemade cast iron garden stove
Previously, it was not for nothing that the craftsmen bypassed cast iron with their attention, although as a material for the manufacture of heating equipment, it is in high demand. The fact is that gray cast iron is difficult to machine mechanically, and manufacturers of heating equipment use the industrial casting method to give it the required shape. These technologies are not available at home, so for the manufacture of a stove, you can take some cast iron product and remake it, which was implemented by one of the home craftsmen. For this purpose fit old bath from cast iron, of which there are still plenty of them since the Soviet era.
Since this material is extremely hard and fragile, processing it requires not only a lot of patience, but also good locksmith skills. The garden stove shown above from an old cast iron bathtub - good example such skills and patience, and our task is to explain how this is done. The first step is to take an angle grinder with a working diameter of 250 or 300 mm and stock up on cutting wheels for metal, then carefully measure out half of the bathtub and draw a cutting line. The width of the cut-off wheel must be taken into account.
Procurement work
The next operation - the cast-iron bath is cut in half, strictly along the line. The work is hard and long, but quite doable. When there are 2 halves of the product available, they must be fastened together. Again, welding of cast iron parts at home is not available, so the halves are bolted together, and a steel sheet is laid between them, separating the firebox from the oven.

For this purpose, the craftsman took corrugated sheet metal with a thickness of about 8 mm, you can follow his example. If there is an ordinary smooth metal of this thickness or a little more, it will also work, although it is better not to use a sheet thicker than 10 mm, this will affect the heating time of the oven. It is better to cut a blank from a sheet in advance, but if the available metal is slightly larger than the size of the bathroom, then this can be done later, in place.
Another step towards your goal is marking and drilling the mounting holes in the cast iron bath and metal gasket. Let's make a reservation right away that you need high-quality drills and the ability to sharpen them, because cast iron will not surrender to you just like that, without a fight. To make 4 through holes, you will need to patiently re-sharpen the drills several times, while maintaining a working edge angle of at least 120º. We drill with different tools, from small to large diameter, at low drill speeds, periodically lubricating with machine oil.
And the last time-consuming operation is cutting a hole for the chimney. If it is not very difficult to make it in an 8 mm thick metal gasket, then you will have to tinker with the bathroom. It is best to cut in the place where the bathroom used to have a drain, it must be expanded to a diameter of 100 mm. When this operation is over, you can start assembling. First, the chimney must be welded to the metal sheet.
Any competent stove-maker will tell you that this place is the weakest in the entire structure of any steel heater, this joint burns out first. The cast-iron stove from the bath is no exception, so it would be more correct to pass the pipe through the sheet and scald it on both sides.
Furnace body assembly
 When the element is ready, it is installed on the lower part of the bath, and the second part is placed on top. In the place of contact, the master used a special sealant as a sealant, but asbestos or basalt cardboard can also be laid. After that, the holes are aligned, the bolts are installed and tightened. On this, the stove body can be considered ready.
In order for a home-made stove from an old bathtub to take on a finished look, it is necessary to cut and attach the front panel of metal, here a sheet thickness of 5-6 mm is enough, and then make doors and a grate. This whole structure should be installed on a pedestal made of bricks. In order not to heat the street, the metal surfaces of the combustion chamber and oven must be insulated with a layer of basalt fiber and revetted with any convenient material.
Since the bathroom can be used to make not only garden stoves, but also heaters for different premises, then in the latter case, the insulation of the case is not required so that the walls can freely give off heat to the air in the room. Then the front panel will take on a different look, and the brick base will have to be refined finishing materials... At the same time, brickwork should not be erected in front and behind the stove, so that the firebox is freely washed with air. However, another craftsman can replace a brick support with a metal one, here everything is in your hands.
About the advantages and disadvantages
The main advantage that a self-made cast iron bath stove has is its almost zero cost. The main investment is your work, and you will have to make a lot of it. The second advantage is durability, it directly depends on the service life of the welded joints of the chimney and the front panel with doors, and the tightness of the main elements. As for the bathroom, even the enamel will not burn out on it immediately.
For reference. IN soviet time for baths and kitchen utensils, silicon-based enamel (quartz sand) was used. It was applied to metal products in 2 layers (a primer and a glossy layer) and heated up to a temperature of 860 ºС to melt the quartz sand, and then cooled according to a specific technology. This kind of coating, which protects cast iron, served for decades and was destroyed only by strong blows from a heavy object.
From the point of view of heating technology, the efficiency of a home-made stove is unlikely to exceed 40% due to the direct exit of flue gases from the firebox to the outside, they transfer only part of the heat to the oven, and the rest goes into the atmosphere. For this reason, a similar design is used as a stove for a bath, where efficiency indicators are not so important, the main thing is temperature. True, only one half of the bath is taken and placed on a base made of brick, and then the side walls are erected and a heater is arranged.
Half of the bathtub serves as a reliable and durable firebox, which will not burn out very soon, and will give off heat to the stove perfectly. As a result, less red ceramic bricks will be spent on construction, which will significantly reduce the cost of the steam room as a whole. The only caveat is that in sauna stove correctly join two materials with different coefficients of thermal expansion - brick and cast iron. For this, expansion joints are provided, where asbestos or basalt cardboard is laid.

Conclusion
Similar non-standard solutions in the design of hand-made stoves, they are striking in their originality and simplicity. No one will doubt the reliability and durability of homemade cast iron stove from a Soviet bath, but it was invented and assembled by a master with a head and skillful hands at home. Such products can be made by every homeowner, subsequently they will serve him faithfully for many years.
Sooner or later, but still there comes a time when you have to change the bath for a new one, and the old cast-iron vessel, still Soviet-made, as a rule, is sent to a landfill and to a ferrous metal collection point. However, do not rush - it can be used a second time, giving “ new life". Some owners of private houses make ponds out of baths, others use them as garden benchesby dividing the bowl in half lengthwise, finishing the edges and adding legs to each of the halves.
But some craftsmen can make a stove from a cast iron bath with their own hands by sawing it across. Such an original stove can be installed in a garden area, or its cast-iron parts can be used for the furnace and cooking chamber of a conventional stove. large sizes or for arranging a fireplace.
If you have the skills to work with locksmith tools, which you cannot do without in this process, it is quite possible to save on some materials for the construction of the furnace.
Most often, an old cast iron bathtub is used to make garden barbecue ovens, which, if properly designed, become helpers in cooking for the whole warm season. Cast iron has a high heat capacity, so a chamber made of it will help not only prepare everyday meals, but also bake bread products, and also make preparations for the winter.
Materials and tools for work
To make such a furnace, you need to prepare the necessary tools and materials. Since it is not so easy to saw a cast-iron bath, especially a Soviet-made one, when the metal was really spared, and "disposable" Chinese devices may not cope with this task. This job requires a reliable German or Russian tool.
Tools:
- Small angle grinder - "Bulgarian".

"Bulgarian" must be reliable - a low-quality tool may not even cope with such a task
- Wheels for cutting for metal, 1 mm thick and 125 mm in diameter, they will need 3 ÷ 4 pieces, depending on the thickness of the cast iron.
- Grinding wheels - for processing cut sides of metal, files.
- Electric drill with metal drill Ø 9 or 11 m (depending on the selected bolts). It is necessary for drilling holes in the sides of the bathtub to connect its two parts with bolts.
- Trowel and trowel for masonry and finishing work.
- Construction gun for sealant.
- Plumb line and building level.
- A hammer.
Prices for angle grinders
Materials:
- The cast iron bath itself.
- Sheet metal, at least 5 mm thick.
- Cooking two-burner cast iron stove. Ordinary sheet metal can be stacked instead.
- Brick for the construction of walls that will cover the lower part of the bath on three or even four sides, which will be the combustion chamber.
- A grate that fits into the firebox.
- Clay and sand for masonry mortar.
- Ready-made heat-resistant adhesive mixture for exterior wall decoration with ceramic tiles.
- Heat-resistant sealant (material -).
- Bolts with nuts and washers for fastening the structure.
- A metal mesh "chain-link" for reinforcing the clay mortar laid on the top of the bath, which will act as a cooking chamber.
- Ceramic tiles (you can - broken) for decoration.
- A metal corner, which may be required for the manufacture of brackets - for installing a grate separating the firebox and the blower.
- Chimney with a diameter of about 110 ÷ 120 mm.
In order to ensure personal safety, work should be carried out in goggles, a respirator and construction gloves.
Heat resistant sealant prices
heat resistant sealant
Sawing a cast iron bath
The most difficult and responsible process in the manufacture of a stove is, perhaps, cutting a cast-iron bath, and many even believe that it is almost impossible to carry out it.

Perhaps the most crucial stage is a high-quality cut of a massive cast-iron bath
The masters who have already done this work more than once recommend doing it as follows:
- If the bath will be cut indoors, then first you need to carry out preparatory work, since cast iron dust, scattering in all directions, can spoil objects and things in it. Therefore, the room must be freed from them. If the apartment is being renovated, and the door from the bathroom is removed, then the opening must be closed with plastic wrap or an unnecessary cloth (best of all, damp), because the cast iron dust is quite oily, and it will be extremely difficult to wash it from walls and furniture. It is better to take care in advance that it does not get into the living quarters.
- Further, on the bath, the marking of the future section is carried out, since it must be divided exactly in half.
- The bath is covered with enamel, with a layer 1.5 ÷ 2.5 mm thick, and first of all it is necessary to cut it along the entire line of the future cut, otherwise chips will form at the edge of the coating.
- Then, the cast iron itself is carefully sawn, with small cuts of 100 ÷ 120 mm. Moreover, it is recommended to cut the saw at a slight angle so that the reverse movement of the disc does not flake the enamel. It is necessary to ensure that the "grinder" does not overheat - if necessary, work is interrupted and the device is given time to cool down.
- Having made a cut of half of the bath, under each of the future halves it is imperative to put supports, for example, from stacks of bricks. Otherwise, at the final stage of work, the halves of the bath along the saw line may close together, pinch or even break the disc (which is extremely dangerous) or damage the tool.
- With a quality tool, this kind of work can be done in about an hour.

- If the bathtub is taken out to the summer cottage as a whole, then it is best to cut it on the street, turning it upside down in advance. In this position, it will be much easier to carry out work.
You may be interested in information on what to be guided by when choosing
How to make a garden stove from a cast iron bath?
When the cut bath is delivered to the installation site, you can proceed to the process of erecting the stove.
| Illustration | Brief description of the performed operation |
|---|---|
 | At the chosen location garden plot a foundation is arranged for the installation of the furnace. It is necessary, since the structure will turn out to be quite heavy, and without a reliable base it will constantly shrink, which means that the entire structure can be deformed. Then the lower part of the bath is placed on a ready-made, well-dried foundation. If it is necessary for the stove to be slightly higher, then it is raised on the supports and also fixed on concrete mortar. While the concrete solution under the lower part of the bath will gain strength and mature, you can start harvesting the remaining structural elements. It should be noted here that the oven can be made in two versions, and each master chooses the one that is more acceptable for himself. In the first version, the facade of the furnace is completely decorated with metal walls, and in the other case, the firebox and the blower are closed with a brick wall, into which cast-iron or metal doors are built. After the mortar has solidified under the lower part of the furnace, it is best to immediately fix the brackets on the walls of the lower half-cylinder for installing the grate. This structural element separates the firebox and the blower, so it must be raised above the bottom of the bath, by about 150 mm. Metal corners are fixed on the marked walls of the bath, on which the grate is laid. |
 | To assemble the furnace structure, a metal sheet is cut out, which completely covers the lower furnace section. The flue pipe can be welded into the metal sheet and led through the cooking chamber, i.e. the top of the bath, to the outside. In order to cut a hole for a pipe in cast iron, first small holes are drilled along the marked contour of the circle, which are then carefully combined with a grinder, and then the resulting opening is brought to the desired configuration with a file. Alternatively, you can choose another option, less laborious - this is the installation of a chimney through the back wall of the furnace. In this case, the pipe will have to be connected to the bath hole intended for the "drain-overflow" system. |
 | At the next step, the furnace part of the furnace is coated with a fire-resistant sealant along the contour and covered with a sheet of metal with a chimney installed in it. Some craftsmen make a cutout of the required size in a metal sheet and install a cast-iron, more heat-intensive, hob on it. |
 | Next, you need to install the second part of the bathtub, which has a hole for the pipe, on top of the metal sheet. Before its installation, a sheet of metal in places of future contact with the bath rim is also coated with a sealant. It turns out that the upper part is put on the branch pipe, and then the chimney is built up to a height of 1000 ÷ 2500 mm, depending on the openness of the space on which the structure is installed. |
 | The next stage is twisting the upper and lower parts of the bath, as well as the metal sheet installed between them, using bolts with a diameter of 8 ÷ 10 mm. For this, through holes are drilled in the sides of the bath with a step of 150 ÷ \u200b\u200b200 mm, through which all the elements assembled into a single structure are fastened. |
 | In this picture, you can see how the structure should look from the side after it is fastened. |
 | Here is a view of the cast-iron body of the furnace from the facade and it is clearly visible on it how the chimney should be installed in a metal sheet and in the "ceiling" of the combustion chamber. |
 | Then, the combustion chamber and the blower chamber are separated by a grate. The grate is placed on metal corners fixed to the walls. But, in principle, in a cylindrical chamber, it can be laid without brackets - if selected suitable size, providing clearance at the lowest point of the order of 150 mm. |
 | Next, you can move on to masonry work. As mentioned above, the walls can be erected only on three sides of the structure - on the sides and back, or around the entire perimeter of the cast-iron chambers. First, the masonry line is marked along the foundation, and then the walls are displayed. |
 | If from the front side the firebox and the blower will be closed by a brick wall, then the blower door is mounted in the wall at the level of the bottom of the lower part of the bath, and the furnace at the level just above the grate. |
 | Having folded the walls to the level of the cooking chamber, it is necessary to expand them inward so that the brick adjoins the outside of the bath. Otherwise, the stove will not only look sloppy, but the heat generated in the firebox will be very quickly blown out by a draft. |
 | In this version, to close the cooking chamber, which can also serve as an oven, a shutter is made of metal sheet. This structural element must close the oven as tightly as possible, otherwise it will be problematic to bake bread or pie in it. In order for the shutter to tightly close the camera, a metal corner must be fixed in front of the latter. The distance between it and the front cut of the bath should be only 1 ÷ 2 mm greater than the thickness of the door metal sheet. The damper handle must be protected from overheating, otherwise burns cannot be avoided, therefore, most often its gripping part is made of wood. |
 | The second design option for the front part is to cover the fuel part of the furnace with a metal sheet, in which a hole is cut out for installing the furnace door. To decorate the cooking chamber, a figured element of the desired shape is cut out of the same metal sheet, which is fixed from the outside to the walls of the cast-iron container using corners. It should be noted that this method of closing the furnace chambers is more laborious and less effective than the first one; moreover, it is unlikely that it will be possible to save money by using metal instead of brick. |
 | After the lower furnace part of the stove is partially or completely dressed in brickwork, you can proceed to the insulation of the cooking chamber. Since the clay mortar has a low thermal conductivity and fits well on the surface, it is perfect for creating a "fur coat" for the upper part of the furnace. For this, a thick and plastic clay mixture is prepared with the addition of sifted sand, in approximate proportions of 1: 2 or 1: 3, depending on the fat content of the clay. Sometimes, in order for the frozen solution to crack less after drying, a little lime is added to it. While the solution is infused, the outer cast-iron surface of the cooking compartment is covered metal mesh "Chain-link" with cells of 15 ÷ 20 mm - it reinforces the insulation layer well, and will also contribute to the retention of the solution until it solidifies on a sufficiently smooth surface. The mesh is fixed to the brickwork located on the sides and back of the combustion chamber. Then, a clay solution is applied on top of the mesh. You can lay it in two layers, the first of which does not need to be smoothed to perfection, and the second is leveled with a trowel moistened with water, a wide spatula or trowel. In total, the layer thickness after drying should be approximately 50 ÷ 70 mm. |
 | When the oven is ready and insulated, it needs to be given the most aesthetic appearance, that is, to make it not only a functional device, but also a decorative decoration landscape design. Some land owners prefer to leave the brickwork in its natural form, and cover the clay "coat" with whitewash in several layers. |
 | Another option would be to finish the entire structure with ceramic tiles. Moreover, for this case, leftovers and even battle from tile materials of different colors are suitable, and this will help to significantly save on finishing. If you break the tiles into small pieces, they will make an excellent original mosaic. Sometimes the decoration is carried out with natural stone, cut into plates 10 ÷ 12 mm thick. The finishing material should be laid on a special heat-resistant compound. |
 | The result is an excellent stove in which you can cook every day in the summer, saving electricity or gas. Moreover, food cooked in the oven is always more aromatic and tasty than that which is cooked on a gas or electric stove. |
Thus, by building a stove from an old bathtub, you can get several benefits at once:
- Attach old thing with maximum benefit.
- Decorate the landscape design with an exclusive, and most importantly, a very functional accessory.
- Save on building materials, and later - on fuel (energy source) for cooking.
- Get the opportunity to cook various, not only delicious, but also healthy dishes every day.
You might be interested in information on how to do with step by step instructions
How to use an old cast iron bathtub differently?
In addition to the barbecue oven for suburban area, an old cast-iron bath can be used to make a few more useful things.
- Part of the cast-iron bathtub will make an excellent fireplace insert. The convenience of such use lies in the fact that it is not necessary to remove complex semicircular forms of the hearth from the brick. To fold a neat fireplace with a firebox with an arched vault, you will have to make a template from boards or plywood, and then do complex manipulations of its brick lining. The cut off part of the old bath already has the desired shape, moreover, capable of easily supporting the weight of the masonry. It remains only to make a chimney hole in its "ceiling" and cover the cast-iron firebox with brickwork, and then decorate it with a fireplace portal from the outside.

- You can also make a combustion chamber for a bath stove from a sawn cast iron bath. In this case, it is installed in the same way as in the manufacture of a fireplace - with the dome up. A part of the bathtub is installed on a concrete base located in a steam bath, and the edge where the bathtub section is located is built into the wall and taken out into another room, from where the furnace will be fired. Then, the cut hole is covered with a brick wall, into which the combustion and blower doors are installed.

In the steam room, along the entire perimeter of the part of the bath, at a distance of 80 ÷ 100 mm from it, a wall is also erected, the height of which should be equal to the height of the cast-iron container. Further, the entire resulting space around the bathtub and the brick wall is filled with stones, which will warm up during the heating of the stove and give the necessary heat to the steam room.
- Another area of \u200b\u200busing old cast iron baths is the manufacture garden furniturereliable and durable that will last for decades. Carefully cutting the bath lengthwise, you can get a comfortable "sofa", which is installed in the gazebo or near the barbecue oven. In this case, you get a whole set for decorating the landscape design of a garden plot. Such a "sofa" is not afraid of rain, snow, high and low temperatures. It does not require special care - it is enough to wipe it with a damp and then dry cloth. The smooth surfaces of the sofa can be easily painted, both inside and outside, and having sewn soft pillows, you can relax on it not only while sitting, but also lying, stretched out at full height.
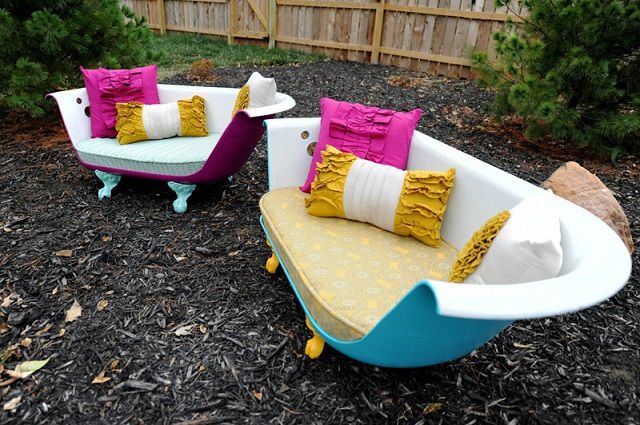
In addition to "sofas", you can make two comfortable "armchairs" from any bathtub by cutting it across. Equipping such "chairs" with beautiful legs, you can get an exclusive and almost eternal thing. The only drawback of cast-iron "furniture" is its large weight, since it will be problematic to move it from place to place.

Some craftsmen manage to make a set from a bathtub, consisting of a designer chair and an original coffee table with a built-in lamp or even a floor lamp.
- Most often, old cast-iron baths taken out to suburban areas, are used as containers for an artificial pond, which will certainly become an excellent decoration of the territory. The bowl is installed in a prepared pit, to which a drain pipe is supplied, and its above-ground part is made out to the taste of the owners of the dacha.

Another use case is artificial pond in the garden
In this case, you will not have to cut the bathtub, and the laboriousness of the work will consist only in earthworks, lowering the container into the pit and connecting it to the drain.
You might be interested in information about how the
Russian summer residents very often surprise with their ingenuity, and seemingly completely worn out old things on their plots get a "second life". Perhaps, having studied the options presented, someone will have a desire and inspiration to come up with their own model of a stove or other thing useful in summer cottages. There will be slaves if such an inventor shares his achievements on the pages of our portal.
Video: a good example of building a garden stove from an old bathtub

Evgeny Afanasievchief Editor
Author of the publication13.01.2016
![]()
It's always a bit of a pity when some old things that have served with faith and truth for many years come into disrepair. But natural domestic ingenuity often allows breathing a second life into seemingly serving "veterans". For example, very often a sauna stove is made from an old cast-iron bath. The popularity of such a solution is added by the undoubted advantages that such a non-trivial material as cast iron possesses.
- practically unlimited service life. Even the enamel that was used to cover the bathtubs is practically very difficult to destroy. This can be explained quite simply. In Soviet times, the enamel coating was made in two layers using quartz sand, which, when baked, formed a super-strong composition;
- a significant indicator of heat capacity, as well as the accumulation and release of heat;
- high resistance to corrosion.
Required materials and tools
- in fact, an old bathtub, preferably cast iron, although you can use a steel one with a slightly lesser effect;
- steel sheet with a thickness of at least 6 mm;
- steel pipe;
- several bricks;
- metal fasteners;
- angle grinder, she is a Bulgarian;
- welding machine.
Option number 1, universal
Step # 1
Cut the tub in half using a sander. Cast iron is a brittle material (and this is perhaps one of its few disadvantages), therefore, when cutting, care must be taken to avoid chipping the material. It is necessary to ensure that the grinder does not heat up too much, for which technological breaks are arranged.


Step # 2
Cut off a 6 mm thick metal sheet. or more by the size of the part of the bath prepared by the first step, which in the final design will be located at the bottom. Having previously outlined, cut a hole on the sheet according to the size of the existing pipe. Then weld it in place. Thus, a chimney is gradually formed.

Step # 3
Make a hole in the upper part of the tub, then place both halves on top of each other with a sheet of metal. The pipe must be secured either by welding or using a heat resistant oven sealant. With the same sealant, it is necessary to treat the places where the metal sheet adjoins the halves of the bath, which will avoid possible smoke. The edges of the bath must be securely connected with fasteners.

Step # 4
The base of the future oven is almost ready. Now it must be installed on brickwork to give the structure stability and ease of use. The ends of the future stove, primarily for decorative purposes, are recommended to be sheathed either with ordinary iron sheet or corrugated, which will look even more attractive.

Step # 5
Make metal doors for the firebox and stone chamber. In order to improve the air supply and, as a result, better combustion of firewood, it is necessary to make a certain number of holes in the firebox.

Step 6
The resulting universal oven can be used for a variety of purposes. In order to install it in the bath, it is necessary to make the smallest additions, namely, to place stones in the upper part; connect to the existing chimney or lead the existing pipe outside the steam room.
Option number 2, specialized for a bath
When using a stove only for a bath, a simpler design solution is possible, including virtually eliminating the use of the second part of the bath. In fact, the first half of the bath is used, which is lined with ceramic oven bricks.
Inside the bath, either a gas cylinder or a metal drum with a diameter of about 40 cm is used as a firebox. A chimney is connected to it, welding it.

IN free space the halves of the bath, left over from the furnace, are filled up with stones (7-15 cm in diameter). As a rule, rose quartzite or granite is used for this.
Video review :
The masonry is carried out at the height of the bath using clay mortar. The main feature is the joining of two materials with very different thermal expansion - brick and cast iron. For this, it is imperative to provide expansion joints, in which, as a rule, basalt cardboard or asbestos is used.
After completing the masonry work for decorative purposes, the surface can be tiled.
Ecology of consumption. Manor: What folk craftsmen can not think of to build with their own hands from improvised means. If you have an old cast-iron bathtub, which is usually adapted for watering the garden, and the construction of a bathhouse is brewing, then you can save a lot by making a stove into the steam room from this bathtub.
A cast iron bath stove will be almost eternal. Even the enamel will burn out slowly. In Soviet times, enamel was applied in two layers. The enamel contained quartz sand. After covering with enamel, the product was baked in an oven at a temperature of more than 800 degrees. The sand melted, and such a coating served for decades. The enamel could only be damaged by a strong blow from a heavy object.
In addition, cast iron has a high heat capacity, well accumulates and gives off heat. Not afraid of corrosion. The industry produces cast iron furnaces and grates, as it does not burn out for a long time, unlike steel. But cast iron is a rather brittle metal.
Bath cut
It is best to saw the bathtub on the street, having previously turned it upside down. Cast iron is a brittle metal, so the procedure requires accuracy. The cut is done with a grinder. Purchase multiple cutting blades at once. We make the markings, and then slightly cut the enamel along the line so that no chips form with a full cut. We saw through the cast iron at a slight angle and make sure that the tool does not heat up. Taking breaks. So that at the final stage of sawing the halves of the sawn tub do not clamp the disc, place wood or brick supports along the edges of the cut.
The bathroom is cut with a grinder
Furnace foundation
The type of foundation depends on the total weight of the oven:
- for a light oven, a brick base is suitable. The bricks are placed on the edge and bonded with mortar. Cement grade for the binding solution, not less than M300;
- for a heavy furnace weighing more than 700 kg, a self-leveling foundation with a depth of at least 50 cm is required.Formwork is made and poured liquid concrete with or without filler. The filler will be fine broken brick or crushed stone.
The top of the base is arranged flush with the floor or 15 cm below the floor level. To protect the base from moisture, the bottom and walls of the formwork are covered with roofing material and all joints are coated with bitumen.
Council. The base should protrude 50 cm beyond the boundaries of the furnace. In front of the combustion chamber, 1.2 m of space should remain free.
Furnace No. 1
This version of the stove is capable of heating a bath of 7 sq. m up to 80 degrees in just a couple of hours. To build the furnace, you will need scrap metal: a cast-iron bath, a gas cylinder and a metal drum from a belt conveyor with a diameter of 40 cm.The drum can be replaced gas cylinder or a pipe - this will be a combustion chamber. The sequence of work is as follows:
Council. If you weld a flat to the cylinder metal platform, you get a stove for heating a kettle.
Furnace No. 2
From a cast iron bath sawn into two parts, you can make a combustion chamber for a bath stove. You will need one half, the other can be used for a fireplace.

The remaining half can be used to build a fireplace. Cast iron will easily withstand brickwork if you veneer the fireplace with an arched vault. And for this you do not need to make a complex template from plywood. The front part is formed by a portal. The chimney is removed. You can make the fireplace closed by installing a transparent door on the firebox and admire the flame.
Council. Cast iron and red ceramic bricks have different thermal expansion coefficients. Therefore, when erecting brick walls provide for expansion joints, which are filled with asbestos or refractory basalt cardboard.
Furnace No. 3
The third version of the oven is often used as a garden barbecue and for cooking in the summer. If the upper chamber is filled with stones, then this design will replace the traditional oven in small bath, therefore, we will not bypass this model.
- The foundation for the oven is poured out.
- The bathtub is cut into two identical pieces.
- Supports are placed on the foundation if you want the stove to be higher.
- The first half of the bath is installed. A sheet of metal with a thickness of at least 5 mm is laid on top, which completely covers the upper and lower compartments and serves as a hob.
Construction of a barbecue stove from a cast-iron bath
- We cut the chimney into the sheet and weld it along the contour.
- We install the second half from above with the bottom up, having previously cut a hole for the chimney.
- We glue the metal sheet and the halves of the cast-iron device with a high-temperature sealant. This will prevent smoke from entering the upper chamber.
- We clamp both parts with clamps and drill holes along the contour for 10 mm bolts. We fasten both parts of the bath and the metal sheet.
- We lay out a brick pedestal under the stove from three walls.
- The grate is installed 15 cm from the bottom of the combustion chamber. If the size of the lattice is small, then two corners are welded to install it.
- The front part is covered with a sheet of metal or brickwork with a door installed opposite the combustion and blower chambers.
 Finished product made of cast iron bath and sheet metal
- A metal shutter is made to fit the upper chamber. In this form, the chamber can be used as an oven.
- Now it remains to give the product a noble look: to revet the brick with tiles or plaster.
Such non-standard designs are easy to manufacture and require minimal financial costs. The used thing will get a second life, and you will get a convenient and practical stove that will serve you faithfully for many years. published
Universal stove for a bath: video