How to insulate the bath from the outside with your own hands. How to insulate a wooden bath from the outside
In order for the temperature to be maintained in the bath for as long as possible, and the costs of maintaining it as low as possible, baths need external insulation. In addition to solving this problem, external insulation also protects the building from direct contact with cold air and precipitation, which prolongs the life of the building.
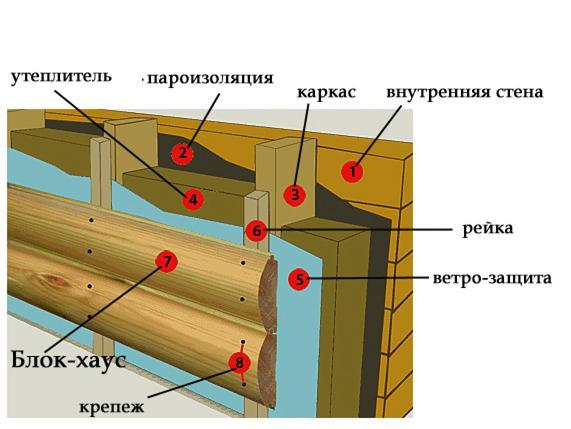
The order and sequence of work on external insulation depends on the type of material used for the construction. For baths made of logs - rounded or simply sanded - this is usually a thorough sealing of all cracks and cracks: wood of sufficient thickness holds heat well on its own. Sometimes they insulate the steam room and the washing room from the inside.
If timber is used during construction, it is most likely necessary to insulate, but how it depends on its thickness and region (you need to know how severe the winters are). Be sure to insulate baths built of bricks and building blocks - they have high thermal conductivity and to provide the necessary temperature regime the thickness of the wall must be at least 80 cm, which is very disadvantageous from an economic point of view. Therefore, such baths are always insulated.
How to insulate a bath from a log from the outside
Almost all the insulation of a log bath comes down to careful sealing of cracks. Even during construction, a special jute insulation was laid between the crowns, but the wood dries out over time, cracks, and new cracks form, which need to be regularly caulked.
 Warming of a bath from a log
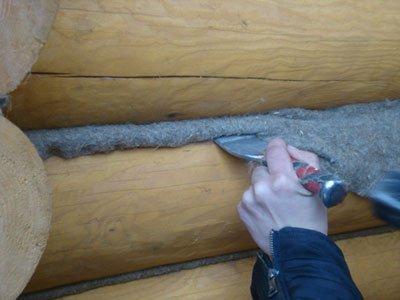
After the erection of a log house and caulking of cracks, the building must stand under the roof for at least six months. All this time it is advisable not to use the bath. The log house will shrink, the wood will dry out, new cracks and gaps will appear. That's what they need to caulk. To do this, use a special insulation based on jute and flax. Jute itself does not conduct heat well and does not burn, but its disadvantage is low elasticity (it breaks easily). To solve this problem, flax fibers are added to the log house insulation. Thin strips of material are hammered into the slots with a hammer and a special metal spatula-caulker. This must be done carefully to prevent distortion of the structure.
There is also a special sealant for sealing cracks in wooden buildings. It is easier to work with it: all available voids are filled from a special syringe.
 Warming a bath from a log with a sealant
Log cabin shrinks for two years. At this time, it is not recommended to sheathe it with finishing materials. So you will have access to newly appearing cracks that need to be periodically sealed from the inside and outside. To protect the insulation from the effects of precipitation, the building can be tightened from the outside with a film, fixing it with planks.
Two years after the construction, you can start finishing. For many, this will sound ridiculous, but log structures can be sheathed with a block house, clapboard, imitation timber, and dies. To begin with, a crate is mounted on the wall (if it is made of wood, it must be treated with antibacterial impregnations and increase resistance to fire), which is checked for verticality and horizontality using a building level.
 Crate for insulation and finishing
Attached to the frame finishing material, which is then varnished or other protective compounds. If metal guides are chosen, they are mounted on special suspensions.
Insulation on the outside of a log bath is almost never used, and inside it is additionally insulated only sometimes a steam room and a washing room. If you decide to play it safe and insulate the building, if the insulation is afraid of moisture, a vapor or hydro barrier is laid on top of it. It is fixed with the help of planks, on which the finish is subsequently attached.
Insulation of a bath from a bar outside
Warming a bath from a bar from the outside is absolutely no different from warming a bath from a log. The building must also settle down, cracks also appear in it, which are sealed in the same way.
 Warming of a bath from a bar
The need for insulation from the outside depends on the thickness of the timber. If its thickness is insufficient for your climatic zone, insulation will be carried out according to the following scheme:
- a crate made of timber or metal guides (be sure to set them both in a horizontal and vertical plane);
- heat insulator (thickness depends on the climatic zone, wall thickness, and type of thermal insulation);
- moisture and wind protection;
- counter crate (not necessary, but there should be a gap between the protective film and finishing materials);
- Decoration Materials.
 Insulate baths outside
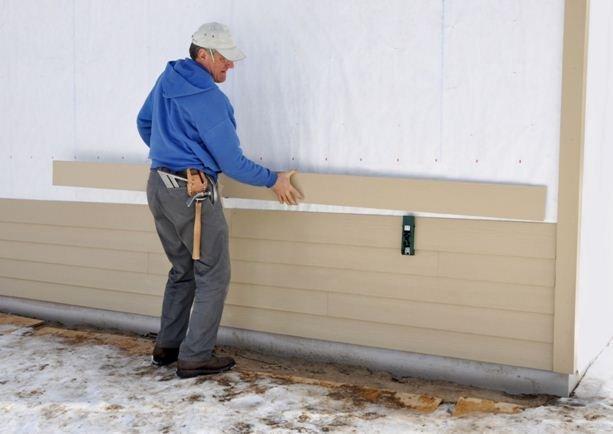
They usually sheathe a bath from a bar outside: clapboard of any type, edged board, siding, metal profile, block house, etc. After completion of the work, the wooden finishes are coated with varnishes for outdoor use, sometimes they are pre-treated with coloring pigments, but many modern compositions also have a tinting effect, which, of course, is convenient.
If as finishing siding is used, then the presence of a ventilation gap between the insulation and the finish is mandatory. In this case, it is advisable to use special guides as a crate, which can be bought at the same place as siding. The guides are mounted on special suspensions.
 Metal guides for siding are mounted on special suspensions
 Insulation of a brick bath from the outside
It is imperative to insulate a brick bath from the outside - this material has a high thermal conductivity, so it will be extremely difficult to warm up the room to the required conditions without external insulation. The sequence of insulation is the same: frame, insulation, moisture and wind insulation, ventilation gap, sheathing.
 Scheme of insulation of a brick bath
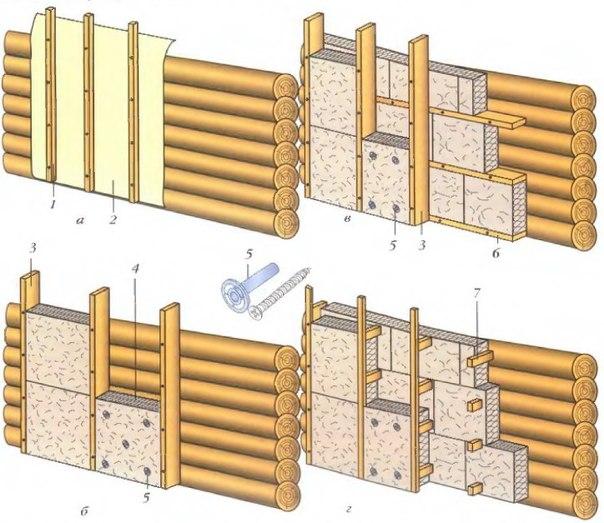
For external insulation, it is usually advised to use mineral wool. For internal insulation baths, according to recent studies, are not suitable - they emit formaldehyde, and for external insulation - one of the best options. You can also insulate a brick bath from the outside polystyrene boards, polystyrene foam (it is cheaper, but polystyrene is more durable), foamed glass (its disadvantage is its high price). For high-quality performance of work, it is advised to put two layers side by side (with an offset of half the length) to reduce heat loss due to overlapping seams. But this method takes more time, and materials for insulation take twice as much. Therefore, most often the insulation is done in one layer, tightly laying one mat to another, and the joints are glued with reinforced tape.
 Fabric-reinforced PVC tape
For sheathing a brick bath outside, you can use wooden finishing materials or siding. There is another option exterior finish: you can finish the bath outside with plaster. This is possible if polystyrene plates, foam glass or foam plastic were used as a heater. Then a reinforcing mesh is placed on top of this material, a primer is applied, and then the walls are plastered.
 Scheme of insulation of a brick bath and finishing with plaster
Can be insulated brick bath as a ventilated facade. In this case, special L-shaped brackets are attached to the wall (the installation step is 1 cm less than the width of the insulation), between which mats or insulation boards are tightly installed.
 The scheme of insulation of a brick bath according to the principle of a ventilated facade
For reliability, they can be strengthened with special dowels, but this is not necessary - the material itself must hold firmly enough (therefore, the mounting step of the guides is 1 cm less than the width of the insulation - it is held due to the force of elasticity). The joints of the plates are glued with reinforced tape, or treated with special glue, laid on top of the waterproofing film, and fixed with planks. Now guides are installed on the brackets, which support the insulation and at the same time serve as the basis for mounting the exterior finish. According to this scheme, it is also possible to insulate baths from foam blocks, cinder blocks or aerated concrete.
Finishing the outside of the block bath
To baths from blocks, you can apply any of the insulation schemes described above. In addition, there is another option: to impose such a bath decorative brick, but such an option for finishing and warming is possible if a positive temperature is maintained in the bath all the time.
 External decoration of the bath with decorative bricks
If you decide to overlay a bath of blocks with bricks, you can lay out the second wall not close, but stepping back 5-10 centimeters. In this case, the thermal insulation characteristics of the building will improve significantly. The gap can be left empty, or it can be filled with heat-insulating material: expanded clay, sawdust that has undergone special processing, etc.
 Aerated concrete bath insulation scheme
In order to prevent moisture from accumulating in the inter-wall space, in outer wall leave small ventilation gaps, and for reliable fixation finishing wall, small pieces of fastening reinforcement are driven into the carrier.
Recently, such a finishing material as a block house, which emits a log wall, has become more and more popular. Block house to be made from different materials: PVC (vinyl), metal or wood.
A block-house sheathed bath looks like it was made of wood.
 Block bath lined with a block house
 conclusions
A log bath, built in Russian traditions, as a rule, does not need additional wall insulation, either outside or inside.
When choosing an external insulation for a brick or block bath, the choice is very wide. Without prejudice to health, you can use mineral wool made using phenol-formaldehyde resins, which is not recommended for warming the bath inside. Styrofoam and polystyrene foam are also suitable.
If you have financial opportunities, the bath can be sheathed with a metal block house, which will last for many years.
External finishing of the bath is necessary to increase the service life of the building, give it an aesthetic appearance and improve performance. Among the abundance of options offered, it is important to choose the most suitable one.
The content of the article:
It is necessary to carry out the external cladding of the bath room not only to improve the aesthetic appearance. It is also needed to increase the performance of heat and waterproofing, because a bath is a place with high humidity. In addition, if it is located in close proximity to other residential buildings, it is worth choosing a finishing material that is ideal for the general style of the area where the bath is located.
Materials for exterior decoration of the bath

Depending on the material from which the hygienic building is made, your preferences and finances, the following materials are used to finish the bath from the outside:
- Vinyl or metal siding . Differs in environmental friendliness, ease, durability and availability. It is easy to mount, resistant to atmospheric, mechanical and temperature influences. Presented in wide color palette. They are faced, as a rule, with frame and brick buildings.
- Wooden or plastic lining. Both modifications of the material are characterized by relative cheapness. Easy to install. Suitable for finishing brick baths.
- Block house. It has the appearance of a round log. With such a finish, the bath will look like a log house.
- timber imitation. Durable and durable lumber. It is a type of lining.
- Edged and unedged board. Cheap option. Of the shortcomings - unaesthetic appearance.
- Fake diamond. Has a long service life atmospheric influence and mechanical influences. Used to implement interesting design ideas.
- Decorative plaster and cement-sand mortar. An economical option, which is called a "fur coat". Differs in unpretentiousness in leaving and frost resistance. Suitable only for baths with a solid foundation due to the heavy weight. popular in last years uses "warm plaster".
- OSB panels. Durable, elastic, water-repellent and fire-resistant material. Its installation does not require additional wall insulation.
- Facade tiles. Durable and resistant to external influences. It is applied to finishing of any baths.
Please note: baths made of timber and logs can be tiled no earlier than a year and a half later. The structure must be "settled". But brick buildings can begin to be faced immediately after construction is completed.
Features of the exterior decoration of the bath from a log house with your own hands

Log cabins usually do not need external finishing. However, to improve the heat-saving characteristics and service life, the tree must be further processed.
Work is carried out in the following way:
- We make a caulk. To do this, we hammer tow with a hammer and a spatula in the gap between the crowns. It is used as a heater.
- We sand the walls. For fast grinding we use an electric grinder.
- We carefully treat the walls with antiseptic impregnation.
- Then prime the surface and paint.
- After drying, we perform retouching (tint the missing areas).
- We apply a second coat of paint.
Finishing the bath outside with siding

This method is best suited for brick buildings. Installation on wooden baths is undesirable, since the material will interfere with the natural ventilation of the wood. For cladding, we need: siding panels (from 150 rubles apiece), docking parts, boards or slats 5 * 8 cm for lathing, brackets, vapor barrier film (optional), insulation (optional), waterproofing (preferably isospan).
We perform siding work in the following order:
- We attach a vapor barrier layer to the wall to protect the heat insulator from condensation.
- We build a crate. To do this, we nail the slats 5/8 cm to the wall at a distance of up to 30 cm.
- We lay a layer of heat insulator between the profiles and leave a distance of 1-3 cm to the siding.
- We cover the insulation with a waterproofing agent. Isospan is considered the optimal material.
- We fix the starting bar with self-tapping screws or galvanized nails and mount the corner parts.
- We install siding sheets in the corner and starting bar.
- We assemble the panel from the bottom up, docking each part according to the comb into the groove scheme.
- Last we fix the finish bar. We insert the finishing element into it from below.
Siding does not require special care, easy to clean. And if desired, it can be easily repainted.
Finishing the bath from the outside with a block house

Several types of this material are used for cladding buildings:
- Natural. From a tree of deciduous and coniferous species.
- Metal. For its manufacture, galvanized steel is used.
- Acrylic. Based on polymer resin.
- Vinyl. It is melted from PVC powder.
Before proceeding with the cladding process, you need to treat all the wood with an antiseptic and fire retardant.
Next, we perform the work in stages:
- We attach a vapor barrier film horizontally with an overlap of 10-15 cm. We fix it with staples and a construction stapler.
- We also install the crate in a horizontal position. Fastening to a wooden base is carried out using self-tapping screws or nails. On brick wall fix with frame dowels in pre-drilled recesses.
- We put insulation between the bars.
- We attach a waterproofing agent with a construction stapler with staples.
- We build a second crate on the main frame clearly vertically.
- We sheathe its surface with block-house elements from the bottom up in a horizontal position.
- We fix the panels with clamps.
- After finishing, hide the heads of the screws. To do this, we use wood paste from sawdust and PVA, ready-made plugs or the remains of a block house.
- We trim the corners with skirting boards, and window and door openings with cashing elements.
Finishing the bath outside with warm plaster

This method is used for buildings with a solid foundation. Most often, brick baths are finished with a cement-sand mortar. For wooden structures, it can only be used after caulking all the cracks. For effective insulation and aesthetic cladding, we need the following materials: a 3 * 5 cm crate timber, “umbrella” dowels, polystyrene foam, building glue for polystyrene foam, plastic reinforcing mesh, the basis for “warm plaster”.
We carry out cladding works in the following sequence:
- We fill the crate. To do this, we use bars with a thickness of 3-5 cm.
- With special dowels - "umbrellas" we attach the insulation panels in a horizontal position. The seams should not be in one line.
- We lay vertically the second layer of heat insulator. We fix it with glue for foamed polystyrene.
- We cover the structure with a reinforcing plastic mesh.
- We apply a layer of "warm plaster".
This finish is not whimsical in care and has a long service life.
External lining of the bath clapboard

Such material is considered less reliable, since it is damaged due to atmospheric influences. To cover the room with wooden or plastic clapboard, you need to stock up on brackets, mineral wool mats, dowels, building glue, guides, waterproofing film, clapboard.
Finishing is carried out in the following sequence:
- We install the brackets in a horizontal direction at a distance of up to 50 cm from each other.
- We finish the walls with mineral wool mats. For their fastening we use building glue or dowels.
- We fix the guides on the brackets and check them with a spirit level.
- We lay a layer of waterproofing.
- We attach the lining with screws.
Remember that the lining should have a humidity within 15%. Otherwise, the wet lining, drying out, will form gaps.
And finally, we advise you to watch a video about the external decoration of the bath:
Instructions for finishing the bath outside in different ways and photos will help you independently implement any stylistic decision on the facade of the building. Carved details on the openings of windows and doors will help to decorate the walls of a primordially Russian bathhouse. You can also decorate the building with openwork cornices and platbands.
When building a bath (it doesn’t matter - brick, wooden, expanded clay concrete blocks or any other material), you need to worry not only about building a solid and robust design. Not less than important issue thermal insulation is the protection of the building from heat loss. performed quite simply but according to certain rules.
This is a crucial nuance for any building, however, for a bath, due to the need to hold high temperature, it is the most relevant.
It doesn’t matter what kind of building you have - a small “box” of blocks covered with corrugated board, or a whole house with lounges - you need to work on both sides: both inside and outside the building.
1 On the importance and necessity of thermal insulation
The atmosphere prevailing in the steam room can be described in two words: hot and humid. To be precise, the temperature in the bath (we will consider the traditional Russian as an example) reaches about +80 degrees (or even higher - up to +90), and the humidity is about 70%..
It goes without saying that such conditions are not easy to maintain, and this depends not only on the power of the stove. You can install even the most expensive unit, but if the bath is not properly insulated, it will not be of much use.
The necessary conditions simply cannot be created, and if it does, it will be very difficult to maintain them: the heated air will easily go outside. To summarize the above, we can form the following list of disadvantages of the lack of insulation:
- an increase in heating costs (it doesn’t matter what the stove is running on - much more fuel will be required, which means you will have to pay more);
- acceleration of equipment wear (due to the fact that the furnace will have to be loaded more);
- slow heating of the steam room.
In addition, we should not forget about the negative effects of moisture and cold on the building itself. Regardless of what it is - brick or expanded clay concrete blocks - in any case, the building will deteriorate.
This happens due to the fact that in winter (or in general - at sub-zero temperatures), moisture that gets into micropores, as well as into cracks, joints and holes, freezes, while increasing in volume. At the same time, it cannot be ignored.
And since there can be more than one hundred (!) of such freeze-thaw cycles per season, in just a few years the surface of the walls will be covered with a network of cracks, and over the years the process will accelerate.

Add here also the sharp temperature drop that occurs during the heating of the steam room: let's say it's -30 outside, and the temperature of the walls quickly, literally in an hour (depending on what your bath is made of and how powerful the stove is), will rise to +70 and above. It goes without saying that a drop of about a hundred degrees will also not be useful for construction.
1.1 Why insulate the outside?
When insulating a bath with their own hands, many often believe that the first step is to isolate the steam room from the inside. This is true - after all, it is in this room that it is required to maintain the desired temperature. can serve as an excellent material.
However, the use of only internal insulation shifts the dew point - it is just between the insulation and the surface of the walls. As a result, moisture begins to accumulate, and the building itself, again, remains unprotected.
So besides internal works do not forget that the insulation of the bath from the outside is an equally important and relevant issue. In addition, additional thermal insulation will not be superfluous - the use of another layer of insulation outside the walls will further improve the microclimate inside the steam room. By the way, it is quite simple
2 How to insulate?
To isolate the bath from the inside, you can not use any insulation - materials that are afraid of moisture are not recommended. And if applied, then with a serious and properly used waterproofing.
Outside, things are better - there is no exposure to such an amount of moisture, which means that the choice of materials that can be used is also increasing. For walls (it doesn’t matter what kind of bath your bath is - brick, or made of expanded clay concrete blocks), it is most relevant to use any insulation from the list below:
- Minvatoy.
- Styrofoam / Styrofoam.
The first two materials can also be used with your own hands: such insulators do not require special knowledge and experience. The third heater will already require the services of specialists. Let's take a closer look at each of the mentioned insulators and figure out exactly how to use them with your own hands to insulate walls.
2.1 The use of mineral wool (video)
2.2 Insulation with mineral wool insulation
Mineral wool insulation has been used for several decades, and judging by the fact that the number of products on this basis continues to grow, there is still a demand for it. An alternative to minvata is.
Despite the fact that now there are many other insulators that are of better quality, more reliable and easier to use, such materials are still relevant.
Mineral wool is usually sold in rolls or in slabs. For walls, of course, the second option is more convenient - rolls are best used for horizontal surfaces. Moreover, it can be applied to
The thermal conductivity of the product is not the best: this figure is in the region of 0.04 W / mK (depending on the type and brand). However, since the insulation will be attached from the outside - this is not a significant drawback - it can simply be used in a thick layer. But some properties of mineral wool make it not the most successful material:
- poor resistance to moisture - under the influence of moisture, the material crumples, cakes;
- increased complexity of work (compared to foam);
- the need to use protective equipment for the skin and face.
Of the tangible advantages (except for relative cheapness), one can single out the fact that mineral wool can be mounted even on an uneven wall surface that has protrusions and height differences.
The process itself, if you do it yourself, looks something like this (the list of stages is the same for both a brick bath and for building from expanded clay concrete blocks):
- The surface of the walls is checked - they should not have cracks, chips, holes. If there are any, they should be sealed with plaster.
- Wooden framing is being installed.
- A vapor barrier film is glued to the wall (this item can be skipped).
- A heater is placed between the crate.
- A waterproofing film is stretched over the crate (when insulating with mineral wool, this is a mandatory nuance).
- The cladding material is being installed.
2.3 Application of foam (video)
2.4 Insulation with Styrofoam or Styrofoam
Insulators from the category of gas-filled plastics have also been known for a long time. The brightest and most popular representative is ordinary foam. This insulation is extremely easy to use - we can easily install the blocks with our own hands, even if before that you didn’t know how exactly this was done.
It is not surprising that this particular material is widely and universally used to isolate various parts of buildings, including how.
Its better and more efficient "brother" is extruded polystyrene foam. This insulation is distinguished by better thermal conductivity (approximately 0.03-0.035 versus 0.04 for polystyrene) and complete resistance to moisture. By the way, it can be produced with his participation.
The materials themselves are similar in appearance, have a small weight (which, again, makes it easier to do it yourself) and are absolutely identical in terms of application. By the way, with regard to the work itself - such a heater does not require any precautions (like mineral wool).
However, for laying blocks, it is required to have a perfectly flat surface, which somewhat complicates the process. The very sequence of actions with your own hands is as follows (the same for a brick building, and for a structure made of expanded clay concrete blocks):
- The surface of the walls is checked - they should not have cracks, chips, holes. If there are any, they should be sealed with plaster, then applied.
- The surface of the walls is primed at least 1 time.
- Starting from the bottom corner (any) and moving sideways, the foam / EPS is glued to the surface with a special adhesive solution (sold in the same place as the insulation itself).
- Each of the blocks is additionally fixed with self-tapping screws (approximately 5 pieces per 1 sheet).
- The joints between the sheets are glued with adhesive tape, or foamed. Alternatively, you can simply cover them with plaster.
- A waterproofing film is stretched over the insulation on the crate.
- The installation of the facing layer and further finishing is in progress.
2.5 Application of PPU (video)
2.6 Insulation with spray foam
Relatively new technology insulation is sprayed polyurethane foam. This insulator is liquid - it is obtained by mixing two components. Preparation is carried out directly at the place of work, in a special installation.
The capacity of such units is equipped with a stirrer - to maintain the desired consistency of the solution. Better and more expensive models are also equipped with heating (necessary for the same purposes).
You can stop on this material. The insulation itself can be safely called ideal: it is lightweight, not afraid of moisture or any other negative factors (rodents, mold), and has a minimum thermal conductivity (around 0.025 W / mK).
In addition, the surface of expanded clay concrete (or any other) walls does not require leveling, and the resulting insulation layer is monolithic and has no seams or joints.
Its most basic disadvantage is the impossibility of doing it yourself: the aforementioned special installation is expensive. And the spraying service itself is also expensive.
For reference, here is a sequence of actions when using this technology:
- The surface is checked for cracks, chips. If available, they are covered with plaster.
- PPU is being prepared.
- The crate is mounted on the wall.
- PPU is sprayed onto the surface.
- On top of the insulation, along the crate, the installation of the cladding and further finishing is carried out.
It is necessary to insulate the bath not only inside, but also outside. Reliable thermal insulation with vapor barrier reduces heat loss, protects walls from the harmful effects of dampness. For each type of wall material, a suitable insulation is selected.
How to insulate the bath from the outside
To warm the bath from the outside, two technologies are used: wet facade” and “ventilated facade”. In the first case, foam, polystyrene foam or basalt wool slabs act as thermal insulation. First, they are glued to the wall with foam, additionally fixed with plastic dowels with umbrellas, and decorative plaster is applied on top. In the second case, a crate is attached to the wall of the bath. The cells are filled with mineral wool or basalt slabs, covered with a windproof film, a counter-lattice is stuffed, on which they are attached facing material. A gap remains between the film and the cladding, forming a ventilated space.
Ventilated facade method
If the bath is built according to frame technology or the walls are made of timber, logs, the outside can only be insulated by arranging a ventilated facade. For thermal insulation it is better to use basalt slabs. Rolled mineral wool eventually sags, slides, does not hold well between the elements of the crate.
Warming outside begins with the preparation of the walls. First, cracks are caulked, gaps between the crowns. Wood is processed protective impregnation. Rotten areas must be replaced. A vapor barrier is attached to the prepared wooden wall of the bath.
Advice! It is better to use a special membrane as a vapor barrier for the wooden walls of the bath.
According to the vapor barrier material, a marking is drawn for the location of the elements of the crate. Brackets in the form of U-shaped perforated plates are attached to the walls along the marked lines. Pieces of roofing material are placed under each element. The crate is assembled from a galvanized profile or wooden bars. Elements are fixed with self-tapping screws to perforated brackets.
When the crate is ready, they begin to insulate the walls of the bath. Basalt wool is laid between the vertical elements. Plates should fit snugly without gaps. From above, the insulation is closed with a windshield. The film is fixed with a stapler to the elements of the crate.
In order to form a ventilated space under the cladding, battens are nailed to the vertical elements of the crate over the wind protection, forming a counter-lattice. The cladding is fixed from any vending panels. For insulation outside the bath, most often they choose the Block House, which imitates a log house.
Advice! The “ventilated facade” technology, if desired, can be used for a bath from bricks, blocks and other materials.
Insulation of different types of walls
The owners sometimes insulate the bath from the outside at their discretion. The procedure is not cheap. If the cost of heat loss exceeds the cost of cladding materials, the work will have to be done.
How to insulate a wooden bath from the outside
Walls made of timber or logs are thick. It makes no sense to insulate them from the outside. Wood itself is a heater, plus the internal thermal insulation of the bath. Walls made of timber or logs are insulated by sealing cracks. Flax caulk the gaps between the crowns, eliminate the gaps near the frames of windows and doors.
If a wooden bath is made of boards or the walls are made of thin timber, logs, a ventilated facade is equipped outside. Styrofoam and expanded polystyrene cannot be used even in this technology. Plates do not pass moisture. For this reason, they do not combine well with wood. From the vapors accumulated under the insulation, the wooden walls will begin to rot. It is better to lay basalt wool in a ventilated facade.
Advice! If the log house is warm, but ugly, the outside of the bath can be lined with a ventilated facade without thermal insulation. Under the panels, only steam, waterproofing and crate are attached.
Warming of the frame bath
feature frame buildings is the presence of insulation inside the walls. Additional costs for insulation outside are not needed. For beauty, you can mount a ventilation facade without thermal insulation. Only if the insulation inside the frame has become unusable, then a full-fledged ventilated facade with basalt slabs is attached outside.
Insulation of a brick bath
For a bath made of brick, cinder block, foam block and other similar materials, it is desirable to make insulation from the outside. Wet facade technology is preferred here. Such insulation is cheaper. Budget thermal insulation is foam. Styrofoam or basalt slabs will cost a little more. Thermal insulation from above is covered with decorative plaster, painted with facade paint.
When the budget allows, the walls are insulated from the outside using the "ventilated facade" technology. If for wooden bath you can use only basalt wool, then here between the crate you can lay slabs of foam or expanded polystyrene. Only important mounting foam close all joints and cracks to avoid the formation of cold bridges.
How to insulate the ceiling of the bath from the outside

Inside the bath, the ceiling is insulated similarly to the walls, and a ventilated space is equipped. Outside, from the attic side, another technology is applicable. When the rough ceiling of the boards is lined, it is covered with two layers of fiberglass. It is undesirable to use roofing material, as it will appear inside the steam room from heating bad smell bitumen.
Even rolled mineral wool can serve as thermal insulation, but in order to save money, natural materials are used for insulation. The space between the beams is covered with expanded clay. Suitable kneading clay with the addition of fine straw, shavings, sawdust.
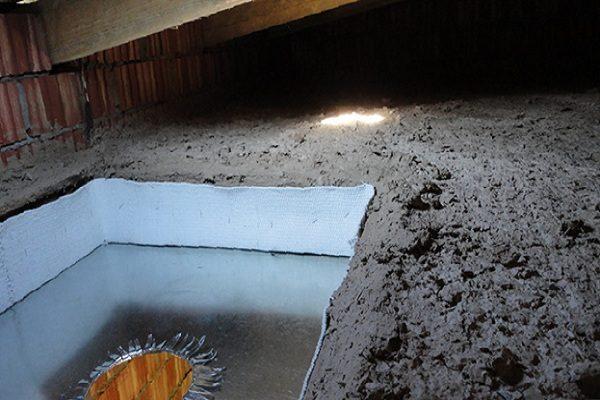
When the clay fill hardens and dries, foam or expanded polystyrene plates are laid on top. The thermal insulation is covered with waterproofing, a thin concrete screed is poured. You can even walk on this floor. If the attic of the bath is reserved for a rest room, after warming the final layer is laid with a finishing floor.
Do I need to insulate the foundation of the bath from the outside

To make sure the importance of external insulation of the foundation, it is worth considering 5 reasons:
- On a cold foundation in winter, a temperature difference forms in a heated bath. The resulting condensate destroys the concrete base.
- The problem with condensation occurs even in summer. An uninsulated foundation is warmed by the sun from the outside, and from the inside it draws cold and moisture from the earth. The temperature difference is similar.
- A foundation not insulated from the outside cools the steam room faster. The bath has to be heated more often.
- Outside, thermal insulation in winter softens the impact on the foundation of heaving soil.
- A thick layer of thermal insulation on the outside protects the foundation from destruction, accidental mechanical impacts.
The listed 5 reasons convince that the insulation of the foundation of the bath from the outside is necessary. It can be carried out simultaneously with thermal insulation from the inside. It is impossible to do only internal insulation of the base of the bath. From the temperature difference, the concrete will begin to collapse from the side of the street.
How to insulate the foundation of the bath from the outside with your own hands
Exist different ways insulation of the base from the outside. All of them depend on the type of soil where the bath is built, as well as on the very design of the foundation.
The strip foundation is dug around with a trench 50 cm wide from the outside. The depth is maintained at least 80 cm. A 20 cm layer of sand is poured into the trench. The concrete tape is cleaned of dirt, treated with hot bitumen. After the waterproofing has hardened, the base is covered with polystyrene foam or expanded polystyrene. Plates 15 cm thick are glued with foam, additionally fixed with dowels with umbrellas. When using expanded polystyrene, the gap between the trench wall and the insulation is covered with sand. Styrofoam overlay brick wall. From above, the entire pie around the base is poured with a concrete blind area at an angle of 15 o.
A monolithic foundation is usually laid under a bathhouse in a swampy area. Insulate the base even at the stage of construction. Between layers concrete screed embed polystyrene foam. On the walls outside the foundation of the bath, do-it-yourself insulation occurs according to the principle of a strip base.

The columnar foundation forms a gap between the ground and the lower crown of the bath. For insulation, it must be laid with a brick. First, a trench is dug around the perimeter of the bath. The parameters are the same as for the insulation of a concrete tape. The bottom of the trench is covered with a 25 cm layer of sand, poured with water. When the pillow is compacted, they begin to lay out the wall. Concrete can be poured to the ground level, and rows of bricks can be laid above. A gap is left between the last row and the crown of the bath, filled with mounting foam. The built basement is insulated from the outside using the strip foundation method.
Do-it-yourself warming of the bath from the outside

Work on insulation from the outside can be divided into three stages: preparation, rough work, final cladding.
surface requirements

Regardless of the chosen method of insulation, the walls of the bath from the outside are subject to careful preparation. The surface is carefully inspected. Slots on wooden walls are caulked with jute or linen.
The gaps between the crowns of the log house can be repaired modern materials. The site is first primed. The gaps are pushed with a polyethylene foam cord, a sealant is applied on top.

The method of sealing depends on the packaging of the paste. Sealant from buckets is applied with a spatula, squeezed out of tubes with a gun. Using special tape, the protective film is removed from its adhesive layer. The area is sealed with a strip. From above the tape is rolled with a roller. restored wooden surface treated with protective impregnation.

The preparation of brick, block walls of the bath is based on the sealing of all cracks, potholes. Small gaps are filled with sealant. When using putty or cement, the groove is widened so that the mortar penetrates deeper into the crack.
Tools

The set of tools depends on the selected material for the work. If a ventilated facade is chosen for installation, you will need a saw, drill, jigsaw, hammer, screwdriver. For the installation of a wet facade, spatulas, buckets, and a construction mixer are needed.
Installation
Insulation from the outside using the “ventilated facade” method consists of the following steps:
- a crate is attached to the wall of the bath ( wooden structure first sheathed with vapor barrier);
- the cells are filled with insulation;
- the windproof film is shot with stapler shackles to the crate;
- a counter-lattice is attached from the rails.
The whole cake is covered with facing material.
Insulation from the outside according to the “wet facade” method consists of the following steps:
- slabs of polystyrene foam, polystyrene foam or basalt wool are glued to the wall with an adhesive composition;
- square plates of thermal insulation at 5 points are fixed with dowels with umbrellas;
- the insulation is covered with a base layer of plaster, the fiberglass mesh is fixed.
The final finish is decorative plaster. The method of application depends on the selected composition.
Conclusion
Insulating a bath is not so difficult, if you clearly follow the instructions, follow the procedure. The initial costs are high, but they will pay off by saving the energy used to kindle the furnace.
In contrast to the equipment of residential premises in spa areas, internal and external energy-saving claddings play a completely different role. The relevance of the external thermal insulation of the walls of the bath depends, first of all, on the mode of its operation. In most cases, the procedure is not mandatory and requires a feasibility study. This review discusses the insulation of the bath from the outside with your own hands from an organizational and technological point of view.
If the owner assumes occasional use of the object for its intended purpose (no more than once a week), he expects the steam room to cool completely between sessions. That is, the internal insulation is equipped on the basis of rapid heating with a rise in temperature from the street to 60 ° C - 90 ° C. In this case, the installation of thermal insulation from the side of the street does not make sense: in winter period this measure will not save the building from freezing for 3 to 4 days. The cooling of the room will slow down, but in the end, it will be necessary to spend almost the same amount of energy on each heating as in the absence of external insulation.
When using the steam room every 2 - 3 days, the question "how to sheathe the bath outside?" is no longer idle for materials with high heat capacity (brick, concrete). Daily operation (for example, for commercial purposes) makes it advisable to cover the bath with insulating materials on both sides, regardless of the type of load-bearing walls.
Another option for using a bath that justifies double-sided insulation, regardless of the heat capacity and vapor permeability of the draft walls, is to conduct several paired sessions in one day. At the same time, the bathing day itself may not be repeated often.
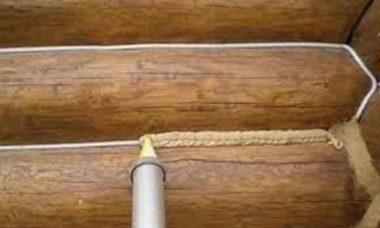
Sealing the joints of the bath-log house
You should immediately make a reservation: the insulation of a wooden bath from the side of the street is, as a rule, not in the installation of additional layers, but in sealing the interventional joints. This operation does not refer to external insulation, but to the provision of basic thermal insulation, the role of which is played by the structural material. Nevertheless, if the owner of the log cabin has enough time, he may well caulk it qualitatively on his own.

Outside insulation with jute rope
The seals laid at the joints of the logs work as a hydrophobic element and a wind barrier. They eliminate heat transfer by convection and, at the same time, are decorative elements that emphasize the aesthetics of a log structure. Specialists involved in the arrangement of log cabins recommend using a jute cord for external sealing.
In some cases, it is permissible to caulk wooden bath outside with latex or rubber based sealants. However, this is permissible only in those baths in which there is no interior decoration. The condition is associated with the prevention of moisture condensation between the wall beams, which can be provoked by the combined use of internal insulation and external vapor-tight sealing.
Continuous external thermal insulation depending on the material of the load-bearing walls
How to insulate the bath from the outside, if it is not intended to seal the joints, but to install a thermally insulating lining? Consider the types of load-bearing walls:

Before warming the bath, a competent calculation of the thickness of the insulation layer is necessary
- Brickwork or concrete structure. The types are combined into one category, since they belong to inertial buildings that have a high heat capacity and a high allowable moisture accumulation.
- Foam concrete and gas blocks. They occupy an intermediate position between log cabins and brick baths.
- Srub. Requires strict consideration of the relative vapor permeability of each layer of the insulating sandwich.
Brick or concrete walls
Of the two ways to select a heater relative to the structural material, it makes sense to use the dew point shift technique. What does this mean? A thermal insulator with a vapor permeability close to zero is taken (for example, polystyrene foam) and glued to the draft wall. The inner insulation also contains a vapor-tight layer - a foil infrared screen. It turns out that the moisture condensing in the thickness of concrete or brick has nowhere to evaporate.
To prevent waterlogging, it is necessary to ensure that the dew point is located outside the draft wall - in polystyrene foam. To do this, it is necessary to increase the thickness of the outer insulation to approximately the value of the thermal resistance of the wall 4.0 - 5.0.
IN middle lane In Russia, this corresponds to a thickness of XPS boards of 200 mm.

The material will cost a decent amount, but the budget for the work will be less than when implementing the technology of a ventilated facade (with mineral wool, air gap and molded finishing cladding). In addition, self-pasting walls with XPS boards is much more affordable for a non-professional than any other methods of external thermal insulation. During everyday operation of such a steam room during inner lining only a reflective screen and clapboard lining should be left. For the mode of paired sessions 2-3 times a week, it makes sense to divide the estimated thickness of the insulation into 2 layers: 150 mm for the outer surface and 50 mm for the inner lining.
The choice of finishing from the side of the street should be correlated only with the budget, the possibility of independent implementation and personal aesthetic preferences. From the point of view of the operation of an insulating sandwich, the physical properties of this layer are absolutely not important. If there is no desire to mess with plaster, you can finish the bath with any relatively light slabs or panels that are moisture resistant. The main thing is not to use chemicals that can destroy polystyrene foam.
Foam concrete and gas blocks

Insulation of the bath from the outside with polystyrene foam
How to sheathe a bath built from cellular materials? For independent work, you should stop at the same polystyrene foam.
The only difference with the previous version of the bath will be that the thermal calculation will require a smaller thickness of the XPS layer (120 - 150 mm), all other things being equal - the climate, the thickness of the masonry and the given value of the heat transfer resistance of the wall sandwich.
log cabin
This idea may seem strange, but sometimes a log house needs a “fur coat”. Especially when it comes to re-equipping a bath with a change in the purpose of the object (for example, from personal to commercial). The only insulation whose vapor permeability is higher than that of wood is mineral wool. However, the downside of this venture is associated with the high complexity of the work. You will need:

- Stuff horizontal slats to form a crate.
- Lay rolled or slab mineral wool.
- Hang the windproof membrane, grabbing it with a stapler to the crate.
- Mount the vertical slats of the counter-lattice, which form the ventilation gap and serve for installation finish coat(for example, wooden or plastic lining).
- Lay a high-diffusion membrane (hydrobarrier) along the vertical rails.
- Install decorative cover.
Myths about the goals and results of external insulation
Often in informational texts and on forums you can find the following statements:
- “It is imperative to insulate a brick bath from the outside. Otherwise, it will be problematic to warm it up to the required temperature.” Note: the speed of heating the steam room in much more depends on the proper arrangement of internal insulation.
- “For expanded polystyrene, it is best to use the “wet facade” finishing system so that the wall “breathes”. Note: XPS boards have practically zero vapor permeability, which cannot be increased by any coatings.
- “It is relatively cheap to buy foam glass granulate and use it as a filler for heat-saving cladding blocks.” Note: such a granulate, both in the form of fillings and as the basis for the formation of cellular concrete, is an order of magnitude inferior to the heat-shielding properties of block foam glass. In fact, it is no better than expanded clay.
Video: the main mistakes in the external insulation of the walls of a wooden bath
conclusions
If it is initially planned to insulate the outer surface of the walls, it is necessary to carry out a series of thermal calculations and coordinate the parameters of all layers - from the infrared screen of the steam room to decorative finishes facade. At the same time, the amounts saved on energy saving should be commensurate with the difference in capital expenditures, taking as the goal the achievement of a certain payback period.
There are no bad or good heaters. The temperature and humidity regime of multilayer walls is provided by the entire system, and not by one insulator. Therefore, an approximate schedule for the operation of a steam room should determine the choice of not only facings, but also the structural material of the walls. The denser the schedule, the more in demand is the inertia (high heat capacity) and high permissible moisture saturation:
- for daily sessions - brick or concrete walls;
- 2 - 3 days a week - walls made of foam concrete, foam glass, gas blocks;
- once a week - log cabins and frame baths.
Internal insulation can be chosen based on convenience self-assembly. With the outside, the situation is much stricter. Several characteristics of the insulator should be coordinated with the properties of the structural material of the walls at once.


