Plasterboard ceiling installation in the kitchen. Plasterboard ceilings in the kitchen (60 photos). Preparing for installation
Functional and available ceilings from drywall (photos for the kitchen will inspire new ideas) - a good solution for finishing. The material is resistant to moisture, practical, can be used in almost any design project. A nice bonus is the use of a plasterboard ceiling for zoning surfaces with the ability to create both simple and complex multi-level structures.
Advantages and disadvantages of systems
Plasterboard ceilings have many positive characteristics.
These include:
- the ability to mask communications and surface defects;
- the possibility of zoning the kitchen area;
- versatility - products will complement any interior;
- high heat and sound insulation properties;
- open opportunities for implementing ideas with a lighting system;
- long service life;
- simple care.
The designs also have some drawbacks that photographs for the most part are not able to convey:
- ceilings "steal" the height (from 7 cm and more);
- installation of complex multi-level structures is laborious, requiring experience and skills;
- prolonged use can lead to cracks in the joints.
Against the background of advantages, several disadvantages are insignificant. The main thing is to install a plasterboard ceiling in a kitchen with high ceilings, without trying to do the installation yourself without experience in such work and relevant skills.
With regard to service life, from time to time a small cosmetic repair will be enough in order to maintain the original appearance products unchanged.
Options and decorative component
Plasterboard systems (often called euro ceilings) allow you to implement different design ideas using additional decor elements and building materials. The main condition for the implementation of projects is a sufficient level of ceiling height in the kitchen.
How less space and the lower the ceilings, the more limited the possibilities will be. The correct layout of the structure using several levels and the installation of lighting equipment will make the kitchen stylish and functional.
For additional effect, you can paint the plasterboard ceiling (use no more than two colors). In rooms with low ceilings, light colors will be appropriate, visually expanding the space.
As auxiliary elements fit:
- mirrors;
- glass;
- rhinestones;
- stained glass;
- tree elements, etc.
The thoughtful design of plasterboard suspended ceilings will help to maintain the style of the room design with the necessary allocation and zoning of areas.
Suspended and hemmed structures - what are the features?
False ceiling is not so often included in the design of the kitchen, but in vain. A plasterboard construction of such a plan is ideal for masking surface flaws, looks modern and fashionable. Communications and ventilation are hidden behind the canvas. The system allows you to arrange profitable and functional lighting for zoning using it in the kitchen in the most profitable way.
The hemmed one differs from the suspended one by a pronounced solidity of the structure. It is able to withstand an order of magnitude more significant loads, practical, opens up more opportunities for implementing decor ideas.
Single-level - a simple and cost-effective solution
When planning a drywall ceiling in a small kitchen, it is worth exploring the features of simple single-level products. This option for finishing the rough base is considered the most affordable and economical, partly due to the low consumption of materials, and partly because of the possibility of installation without the participation of a master in the process.
A simple algorithm of actions and right choice colors will allow you to create real masterpieces with minimal cost. Additional surface painting will simplify the maintenance of the structure. Lighting equipment in single-level ceilings is mounted either in the central part or around the perimeter.
Two-level systems - possible options
If the area of the room allows, you can arrange beautiful ceilings from drywall on the basis of several tiers. The first is the ceiling base, the second is a geometric figure in the central part, or the perimeter.
An interesting solution is combined figures, and a new fashion trend is an abstraction on the ceiling, visually changing the perception of the kitchen.
Multi-level ceilings - on the verge of fantasy
Among all the varieties of plasterboard structures for the kitchen, multi-level ceilings are one of the most unusual and promising in terms of the implementation of bold ideas. Compared to trendy stretch fabrics, they unconditionally lead due to the absence of any restrictions regarding location, color palette, lighting installation.
Just like two-level ceilings, multi-level structures are practical and durable, and in addition they allow:
- use high-tech fixtures for zoning the room;
- mirror finish to visually expand the space;
- combine levels with harmonizing shades to create an individual atmosphere;
- use additional materials for finishing in tone with furniture and kitchen textiles.
Layered structures - really profitable solution for kitchen decor. This is easy to verify by looking at the pictures of the ceilings of completed projects with an analysis of the reviews of real owners.
Combined ceiling - what is the difference?
Combined plasterboard ceilings- the choice of outstanding personalities, prone to experimentation. Designs can combine both several styles and several options for finishing materials. So, for example, drywall can be successfully combined with stretch PVC or fabric, adding tiers, thinking through the unusual placement of lighting equipment.
With the help of combined ceilings, you can not only zone the room, but also highlight individual zones. Such designs are practical, durable, do not need special care.
About figured ceilings in the kitchen - what you need to know?
A non-standard solution is figured plasterboard ceilings in the kitchen, which are considered a variation on the theme of suspended structures. The systems have both pluses and minuses, however, they are actively used by designers to design stylish interiors.
Figured kitchen ceilings have the following advantages:
- mask the defects of the ceiling base;
- repairable without complete replacement;
- hide communications;
- zone the room;
- affordable;
- do not need special care;
- visually expand the room.
The disadvantages include a rather complicated installation. In addition, the design of plasterboard ceilings for a kitchen of this kind can only be realized in spacious rooms where the centimeters “eaten” by the structure are not so noticeable.
As for the figures that can be combined with the base, the options may be limited solely by the scarcity of imagination. You can experiment with the most simple elements, as well as complex ones. Most often, designers combine the base:
- with squares;
- with circles;
- with ovals;
- with rhombuses;
- with ellipses.
Looking through the sketches of the ceilings, you can see how easy it is to get graceful ornaments in the form of waves and weaves from simple combinations of figures. The author's drawing by hand will look especially bright. It is advisable to entrust such work to the artist.
Design lighting options
“Playing” with backlighting, you can make something exclusive and bright out of a simple even single-tier ceiling. The main thing is to think over the lighting system at the design stage of the structure, taking into account the layout and dimensions of the room.
The most functional in the kitchen is considered spot lighting. Providing a sufficient level of light, the lamps do not hurt the eyes, creating the illusion of a flowing light flux.
In a spacious kitchen, it is permissible to arrange a light cornice to illuminate a certain area, with its arrangement with spotlights placed randomly or according to certain contours.
A photo gallery of finished kitchens with plasterboard ceilings will help you decide on the choice of lighting option. It is enough to choose a photo of the room with the actual parameters and purpose.
Painting the surface of the ceiling - how, with what and for what?
To make the ceiling perfect and fashionable, drywall sheets (originally milky in color) are covered with a layer of water-based paint. To do this, use ordinary paint brushes or a roller.
IN water-based paint add concentrated dyes to obtain the desired tone. Paint only a clean, dry surface of the sheets, applying at least two layers.
You can install a two-level plasterboard ceiling or a multi-level structure only where the size of the room allows. Such a system will make a small kitchen even smaller, limiting functionality.
The really important stage is lighting design. It is necessary to think over the options for lamps, their location. It is believed that work areas should be most brightly lit, it is advisable to install soft and cozy light in recreation areas and the dining room.
Both the color and the design of the ceilings should be considered based on the stylistic direction used in the room. Surfaces must be in harmony with each other so that the overall picture is perfect. Plasterboard geometric shapes will help to place the right accents. They also visually adjust the shape and size of the kitchen.
By creating classic design for the kitchen, it is worth taking a closer look at the ideas with frosted ceilings from drywall. Futuristic designs modern kitchens it is difficult to imagine without bold combinations and glossy surfaces in bright colors.
In modern realities, a plasterboard ceiling in the kitchen, regardless of the size and proportions of the room, remains the best option for solving the problem of finishing the ceiling space. First of all, because of the perfectly even and flat surface of the drywall sheet. Any, even the most fantastic design of the ceiling in the kitchen, thanks to the high stability of drywall, will retain its original shape, design and quality after 20 years.
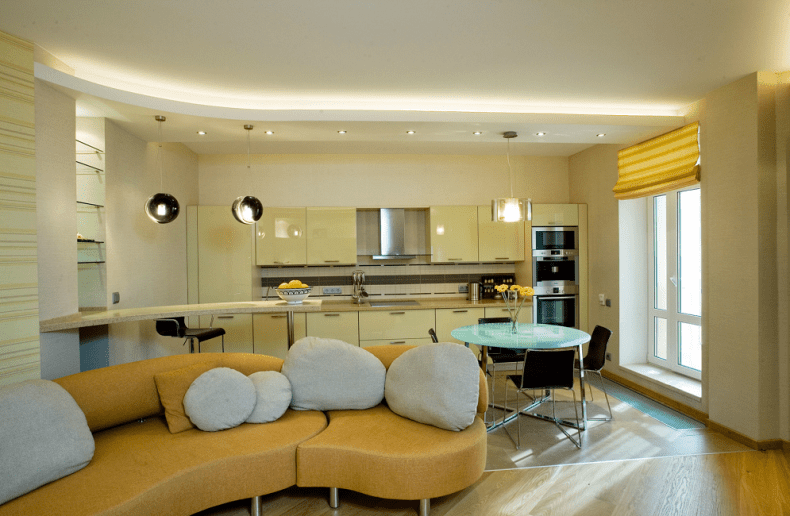
Two-level plasterboard ceiling in the kitchen
The main advantage of drywall, which provided the material with unusually high popularity, was and remains the ideal geometry of the sheets. To get a completely flat and flat ceiling surface, you only need to fulfill two conditions:
- Properly plan and fix the suspension mounting system on the ceiling;
- Mount plasterboard ceilings in the kitchen and seal the joints between the plates as carefully and carefully as possible.
To achieve a similar quality with plaster, even on a gypsum basis and with mesh reinforcement, is an order of magnitude more difficult, and in addition, considerable experience and skills in working with ceiling plastering will be required. Then how to collect suspended ceiling from drywall in the kitchen, even a novice finisher who is familiar with the basics of assembling drywall structures can.

Pros of drywall on the ceiling of the kitchen
In addition, the construction of a suspended plasterboard ceiling allows you to solve a number of secondary problems:
- Improve sound and thermal insulation;
- Remove and hide kitchen communication lines behind the plaster screen, primarily ventilation, electrical wiring and pipes.

Advice! It is possible to build a suspended plasterboard ceiling only for kitchen rooms in houses aged three years and older.
In new buildings, before proceeding with the full-fledged finishing of the ceiling and walls, one has to wait for the complete completion of shrinkage processes. Otherwise, there is a serious risk of breakage and destruction suspension system.
If it were only about decorating communications in the kitchen, then it would be possible to get by with a suspended ceiling with tiles or plastic panels. This solution is simpler and cheaper to implement in practice. They resort to finishing the ceiling space with suspended structures if it is required to build a ceiling of a special design in the kitchen from drywall.

Varieties of plasterboard ceiling structures
Almost always, the design of the plasterboard ceiling in the kitchen, photo, is developed at the stage of planning the interior of the kitchen, determining the layout of the furniture set, arranging lighting and places to relax.
Designing a kitchen ceiling design is considered a rather difficult task, since it is necessary to tie into one whole, at least decorative trim walls, style kitchen furniture and lighting system.
Formally, all false ceilings for the kitchen, assembled on the basis sheet drywall are divided into two large groups:


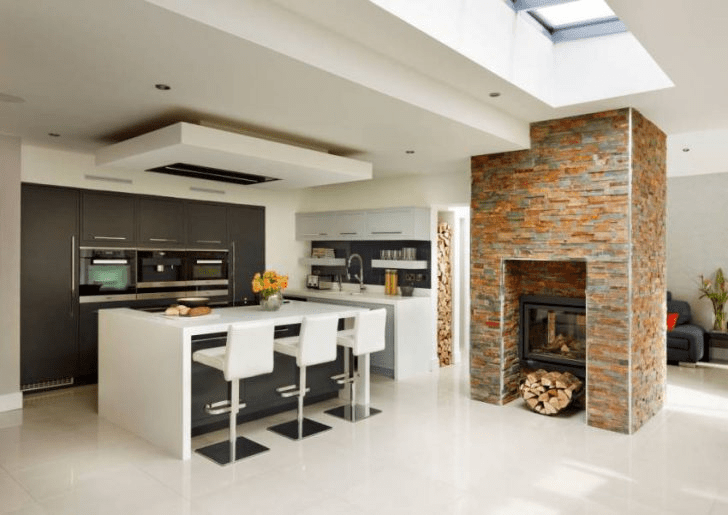
Box structures are widely used for masking ventilation pipes, laying tunnels for kitchen umbrella hoods located in non-standard place, and redistribution of lighting. As a rule, the lower level of the ceiling is located above the countertop, wall cabinets, in the area ceiling plinth. The upper level is usually located in the center and in the recreation area of the kitchen, which provides maximum comfort and a good supply of fresh air.
Figured plasterboard ceilings in two levels are used mainly as a decorative element. The kitchen space is usually planned as utilitarian, with the maximum level of functionality, so the number of decorative elements is not as large as in the case of a hall or a bedroom. Figured plasterboard ceilings in the kitchen make it possible to make the interior of the room more spectacular and relaxed.

Plasterboard ceiling design in the kitchen
Planning and designing a plasterboard ceiling in the kitchen, photo, requires considerable effort, since you almost always have to find a compromise between the shape and size of the tiers of the suspension system and the maximum thickness of the entire structure. Unlike stretch ceilings, plasterboard structures have one serious drawback - each level “steals” 15-20 cm in height from the kitchen space.
Therefore, for small kitchens limited to the simplest options for two-level ceilings. But even in such conditions, a two-level plasterboard cladding, in terms of interior design, allows you to “expand and elevate” the space of the room.

Simple and functional plasterboard box ceilings
The main advantages of drywall box structures include the two most obvious ones. Firstly, the box is ideal for almost any interior space. A small second level, which runs along the perimeter of the ceiling, is equally appropriate both in a large spacious kitchen with a corner suite and light tones of decoration, and in a small room.

Secondly, box-shaped decorative drywall trim is relatively easy to make with your own hands. At the same time, the simplicity of the design does not mean the primitiveness of the design.
For example, a simple plasterboard ledge with spotlights and internal lighting allows you to achieve the effect of high ceilings in the central part of the room.

At the same time, most of ceiling surface remains under the upper tier, that is, the kitchen space practically does not lose in volume, as one would expect due to the use of a suspended decor structure.
The simplicity of box construction does not mean that its design is limited to primitive drywall frame constructions. For example, the skillful use of boxes with a podium in the center of the ceiling provides a screen effect when all the main colors of the kitchen interior are collected and concentrated on the ceiling.

How to enhance the design of box ceilings
Another technique widely used in the planning of gypsum plasterboard suspended box ceilings is associated with the simultaneous use of a stretch polymer ceiling and a standard gypsum board box.

The mirror surface of the polymer membrane, illuminated by the plasterboard frame fixtures, perfectly reflects the light, due to which the ceiling height visually almost doubles.

A similar effect of visually increasing the height and volume of the kitchen space can be achieved using multi-level ceilings laid in steps, as in the photo. Due to the use of three levels, the peripheral part of the ceiling space loses in height, but in this case, such a loss does not play a special role, since the lower level occupies the corner zone.
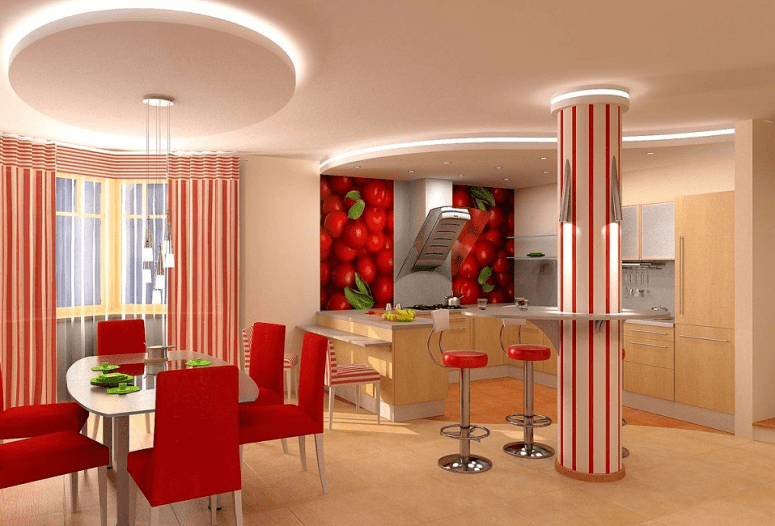
Figured plasterboard ceilings
Really complex and original design ceiling surface can be obtained only with the help of complex curly constructions from drywall sheets. Compared to box-shaped structures, a figured ceiling is a real aerobatics in kitchen design, therefore, serious experience with profile and drywall is required to develop and install such structures.
Figured ceilings can be simply stunningly beautiful and look organic in almost any kitchen interior.

Concept figured ceiling allows you to implement the two most popular ideas of modern design:
- Zoning of the kitchen;
- Color saturation and addition to the interior of the kitchen.
Thanks to the use of curvilinear inserts of complex geometric shapes with the help of ceiling decor you can divide the kitchen into several important zones.
The cooking area remains dark and less bright, the dining table area is illuminated more intensely and brightly. The resting place is equipped with the most comfortable type of lamp.

A few curvilinear and circular sections on the kitchen ceiling are able to soften the contrasting bright red color used in kitchen furniture.
The monochrome division into black and white plasterboard ceiling zones can not only enhance color scheme interior, but also helps to skillfully hide the details of the ventilation system, hidden behind the hanging decor.

A rather interesting and new solution is the use of inserts with stained-glass windows and photo wallpapers on the upper tier of the suspended ceiling.

Plasterboard ceiling with backlight in the kitchen
To a large extent, the expressiveness of the interior of the kitchen depends on correct location fixtures, their type and number of lighting points. Traditionally, three types of lighting are used for plasterboard suspended ceilings.

The most common lighting option is the distribution of spotlights on the suspensions of the lower tier. This type of fixture creates a uniform background lighting throughout the kitchen.
More modern version backlighting is based on two and three-color LED strips. The tapes laid in the upper tier of the plasterboard false ceiling provide soft diffused light, if necessary, you can change the color and saturation of the backlight, thereby enhancing the color background of the kitchen interior.

The third type of illumination is used for local illumination. It could be Entrance door in the kitchen, dining table or additional cutting table at the countertop.

Do-it-yourself plasterboard ceiling in the kitchen
Regardless of the characteristics of the room, only moisture-resistant green gypsum boards and UD and CD galvanized metal profiles are used to assemble a suspended plasterboard ceiling. No wooden crate or conventional GVL. All elements of the ceiling structure must be moisture resistant, as the kitchen has always been and remains the largest producer of water vapor and condensate.
Marking the future suspended structure
It is necessary to start work by applying marking lines for installing a carrier on the walls and ceiling surface. metal profile. It is best to rent a two-beam laser level for these purposes.
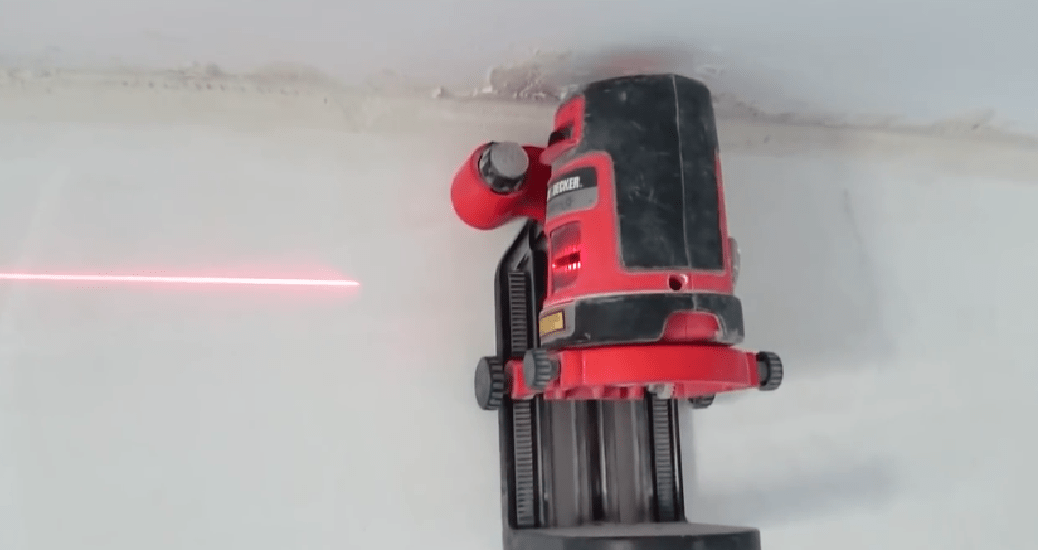
We fix the device on the wall, turn it on and adjust it, use a ruler or tape measure to measure the distance from the horizontal laser beam to the ceiling.

At the lowest point of the ceiling surface, the distance from the laser beam to the ceiling should be at least 4 cm, so we adjust and lower the marking line issued by the laser to fit at least 5-6 cm. After the final adjustment along the laser line, you need to pull the masking cord or duplicate the horizontal markings with a simple pencil.

For your information! In any room of a kitchen or other living space, ceilings always lie crooked, with a slope and a height difference on the walls of up to 5-6 cm.
After applying horizontal markings on the walls, it is necessary to draw the ceiling lines for installing the CD suspension carrier profile, in increments of 60-70 cm.
Installing a profile on the kitchen ceiling
First of all, it is necessary to install and fix the UD profile guides on the walls of the kitchen according to the horizontal markings. To do this, we drill holes in the wall and profile with a step of 30 cm, hammer in the plugs and wrap the mounting screws.

To install the galvanized CD profile, we mark the installation points of the U-shaped bar on the opposite walls of the kitchen. Each section of the CD profile is brought in and placed on the shelf of the UD frame. Until the crabs are installed, the CD strips remain "hanging" in the air, relying only on UD rails sewn to the walls of the kitchen.

This design obviously will not withstand the weight of drywall, especially if the kitchen ceiling is two-level, with numerous inserts and inserts. Therefore, the next step in assembling the structure from sheet drywall will be the installation of "crabs".
Each "crab" is a short perforated tape, which is wound behind a supporting profile and sewn to the kitchen ceiling. Further, the edges of the tape are bent and wound onto the “cheeks” of the CD profile.

Before fastening the edges of the ribbons under the profile, a marking cord is pulled between the opposite walls of the kitchen, along which the height of the installation and fastening of the CD profile is adjusted.
Strengthening the suspension system and installing drywall
Two-level ceilings in the kitchen with additional boxes and decorative elements always require reinforcement of the suspension system in places where additional loads are attached. Despite the apparent lightness, drywall, consisting of 98% of gypsum, has a significant weight, therefore, at the installation site of the boxes, it is always necessary to attach additional spacers and mountings that increase the rigidity of the supporting frame.

Be sure to put jumpers and spacers at the installation sites of lamps or ventilation elements.

If the kitchen ceiling design provides for additional hanging podiums or built-in niches, for each element you will need to cut out your own frame from a galvanized profile, which will subsequently be sheathed with pieces of drywall.
For fastening curved figures, the suspension profile is retrofitted with a mounting rail with split edges. Every 4-5 cm, a horizontal profile shelf is cut, which allows the carrier profile to be bent exactly along the curved contour of the drywall sheet.

The lines of joints of drywall sheets are also strengthened. So that the seams between the details of the kitchen ceiling lining do not crack, both edges of the mating sheets must be attached to the backing CD profile.
The main part of the drywall is attached to the kitchen ceiling with self-tapping screws. In places of transition from the upper level to the lower material can be glued acrylic adhesive, for example, "Moment" or "Liquid Nails".

Finishing operations for assembling the ceiling in the kitchen
After laying drywall, in order to relieve tension in the ceiling lining, first of all, the seams are cut at the transition points. After that, all joints are cleaned, primed and sealed with gypsum putty.
Then, in a similar way, the lower level of the ceiling is assembled, all the transition points to the upper level are glued with a mesh and sealed with putty. At the end of the work, the hanging decor is primed and painted with acrylic enamel.
Conclusion
The plasterboard ceiling in the kitchen is de facto becoming a benchmark or a typical solution to problems with curves. ceilings. The low cost of work and good decorative data make it possible to compete with the most expensive tension systems. In addition, the drywall construction is easy to maintain and repair, which cannot be said about more modern types finishing of kitchen ceilings.
The right design of the ceiling in the kitchen can completely transform the entire room. The kitchen has certain features that require a special approach. Need to take care of nice view curtains in the kitchen, as well as somewhere to hide an unsightly vent. Now everyone uses hoods, so you have to hide ventilation pipe that goes from the hood to the hole in the wall. These problems will help solve the plasterboard ceiling in the kitchen.
It is not necessary to use moisture-resistant drywall, although it is desirable. Humidity in the kitchen is not so high, and all the steam from the stove should be removed thanks to the kitchen hood. So in the kitchen it is quite possible to use the usual GKL.
Preparatory work
Regardless of the design chosen and the type of plasterboard ceiling in the kitchen, it will be necessary to carry out certain preparatory work. So you need sheets of ceiling plasterboard. It differs from the usual GKL in its weight and thickness. The thickness of the ceiling plasterboard is 9.5 mm, and not 12.5 mm, like that of the wall. On average, one sheet of plasterboard for the ceiling weighs 3 kg less than a sheet for the wall.
The number of sheets is easy to calculate for a single-level ceiling. You need to calculate the area of \u200b\u200bthe ceiling and divide it by the area of one sheet ( standard size 1.25x2.5 meters). It is better to round the sheet area to 3 sq.m. So for a rectangular kitchen of 3x4 meters, 4 plasterboards are required. But this is an idealistic option in which there will be no waste.
 The scheme of placement and fastening of drywall
 However, the plasterboard ceiling in the kitchen can be unpredictable in the sense that more sheets can go due to improper cutting. Therefore, you need to figure out in advance where the whole sheets will lie, and where the trimmings will go, and how to cut them correctly so that there is a minimum of waste.
If we are not talking about a simple design, then you will have to create a sketch to calculate the number required material. You can make a simple sketch or a detailed drawing. The more complex the work, the more difficult the sketch will be. Below you can see what are the sketches of plasterboard ceilings for the kitchen.
To work, you will need special tools (level, screwdriver, clerical knife, drill, etc.) and fasteners (various profiles, dowels, self-tapping screws, etc.). You also need to mark the working surface, but this stage is highly dependent on the type of ceiling chosen.
Single-level ceiling in the kitchen: step by step instructions
Creating this type of ceiling is no different from similar work in other rooms.
- We find the lowest point of the ceiling in the room and make a mark on it. With the help of a level and a chopping cord, we create straight lines along the perimeter of the walls, indicating the place where the profile is attached.
- We mark stripes on the ceiling in increments of 40-60 cm from the wall. On the marked strips with a step of 50 cm, we drill holes and fasten the hangers to the dowels.
- We fasten the UD profile to the wall along the marked perimeter. We start the CD profile into the UD profile opposite the previously outlined lines.
- We fasten the profile with self-tapping screws, and also fix the hangers with the CD profile with them. The frame is ready.
- Drywall sheets are fastened with self-tapping screws in increments of 20 centimeters.
- Everything is puttied and finishing is done.
 Stages of creating a simple suspended ceiling from plasterboard
 Of course, the profiles must be cut to the required length. Jumpers can also be used, which are inserted between the CD profiles and serve as additional stiffeners. Such additional measures required only for large areas. If the room is small and the step of the CD profile is 40 cm, then jumpers can be abandoned. Moreover, it is not heavy moisture-resistant GKL that is used, but lighter ceiling plasterboard.
Now you have an idea how to make a plasterboard ceiling in the kitchen. But this is the simplest case available to every beginner.
Create a box and cornice
It is the need to hide the ventilation pipe and the curtain rod that leads to the creation of two-level plasterboard ceilings in the kitchen. In the case of a niche, everything is simple, suspended structure it just doesn't finish. The extreme profile is not attached to the wall, but to the suspensions that will hold it. In both cases (ventilation box and curtain rod) the same design is used only with different sizes. Therefore, consider the creation of a box that hides the exhaust pipe. There are several options for creating a box, but we will focus on only one of them.
A guide profile is screwed along the entire wall where the box will go. This will be the lower level of the box, so you need to make such a height that the pipe fits there. After that, the same guide profile is attached in parallel to the ceiling. It will indicate the width of the box.
 Box with an additional ventilation window for repair work
 Now a ventilation pipe is being drawn, which is raised to the level of the ventilation hole. It is fixed with special clamps to the ceiling. A box in the kitchen made of plasterboard on the ceiling is needed to hide the ventilation pipe. But that doesn't mean it has to be in a box. Moreover, a simple design is made that is not designed for additional weight.
A guide profile is attached to the back of the screwed drywall sheets. It must be at the same level as the wall profile. When it is attached, the excess GKL is cut off (the same 5 cm). If a beginner makes a plasterboard ceiling in the kitchen, then he often misses the dimensions and uses the level incorrectly. Therefore, a margin of 5 cm was needed.
It remains to fix the lower strips of the GKL and the box will be ready. Do not forget about the hole for the pipe, because it must go somewhere.
Distinctive features of a two-level ceiling
It is this drywall design that is most in demand in the kitchen. Using two tiers for the ceiling, you can create beautiful patterns on it, but this requires great skills. Also, such a design in the kitchen is simply necessary to hide the ventilation pipe in the box. With its help, a niche or cornice for curtains is created so that the rod on which they ride is not visible. This has been covered in detail earlier.
If the ceiling is two-level, then the spotlights on it look especially beautiful. The ceiling in the kitchen of plasterboard with lighting allows you to evenly distribute light throughout the room, if you use spotlights.
 The hood box can have beautiful curved shapes.
 When all the boxes are created, then you can simply make a suspended ceiling, as if it is one-level, and the box acts as part of the wall. However, in this case, it will be necessary to fasten the hangers close to the boxes so that the main load from the profiles goes to the hangers. Also, the inner ceiling should be of a lower height than those parts that were created by the boxes.
If you make wide boxes, then the space between them (the central part of the room) can be left for a stretch ceiling. This combination is only welcome, especially if you make the center oval or round. But this job requires special skills. The ideal option there will be a thought through of all the details at the level of creating a frame.
Finishing
Regardless of which plasterboard ceiling in the kitchen was made, it needs finishing. First, the caps of the self-tapping screws are puttied, like all joints. Sickles are applied to the puttied joints between the GKL and pressed in. Otherwise, cracks may appear on the surface. If necessary, paint corners are installed. When everything dries, the ceiling is completely puttied.
Next, the dried putty is sanded with sandpaper, primed and puttyed again. The surface is now ready for top coat. Wallpaper or paint is always poured out with such a coating. How to paint a plasterboard ceiling in the kitchen? The answer to these questions can be given to yourself after analyzing the differences between the main types of paints.
| Comparison of paints for plasterboard ceiling in the kitchen | |||
| High price | moisture resistant | Needs to be updated every few years | |
| water emulsion | No | No | Yes |
| Water dispersion | No | Yes | No |
| acrylic or latex | Yes | Yes | No |
| silicate | Yes | Yes | No |
| Silicone | Yes | Yes | No |
The ideal wife is always the unconditional mistress in the kitchen, if you create suitable conditions for her and fill the space with comfort. Finishing the ceiling surface is one of the main touches on the way to this. The choice of materials is truly great, but numerous photos convince us that the ceiling in the drywall kitchen looks no worse than the popular stretch fabrics, and in some ways even surpasses them. More about it with numerous photo examples the best options design below.
The finishing of the ceiling surface of the HL received a rapid spread along with the introduction of numerous options for additional lighting in the room. Specialists have successfully mastered this magical in some cases zoning tool and generously shared fresh ideas with numerous clients. The requirements set by the kitchen for the material placed on the ceiling perfectly matched the characteristics of drywall - and beautiful, full of interesting compositions and ideas, design projects began to be actively implemented.


The main advantages of using drywall in the kitchen
- moisture resistance- in conditions of constant temperature fluctuations and high humidity, an extremely important indicator, unless, of course, you are going to change the finish on the ceiling every couple of years;
- elementary disguise of communications- the type of wiring and pipes is unlikely to add points to your kitchen on a scale of expressiveness;
- visual zoning tool- easily divides the kitchen space into working and dining areas;
- concealment of defects in the concrete ceiling surface- it's not scary if those who built your house have crooked hands, the main thing is the ability of your designer to correct all mistakes in the most accessible way;
- wide design possibilities- a whole bunch of photos of plasterboard ceilings in the kitchen are walking on the Web, and choosing the right design is not difficult even for a person who is far from interior design.


Are there any disadvantages?
Alas, but they always exist - this is how the Universe is arranged, the ideal happens only in naive minds and children's books. True, in the case of drywall, the existing disadvantages of the material do not at all cover its many advantages:
- installation complexity- you cannot do without the help of a partner, numerous tools and materials, as well as relevant knowledge;
- minus 7-10 cm of room height- depressing figures for rooms with very low ceilings;
- the hypothetical possibility of cracks in the joints between the plates- in fact, a rather dubious minus, since over time any material becomes unusable.

Otherwise, such a ceiling in the kitchen is perhaps the most suitable option to organize a truly original and memorable interior. If you live in apartment building, you can always soundproof and protect both yourself from the noise attacks of people from above, and them from your too loud actions.


What plasterboard ceilings are most often used in the kitchen?
single level

The simplest option, which has every chance to fit into low rooms with classic interior. Combines great with lighting fixtures different types. Due to the competent placement of recessed lamps, you can achieve a harmonious accent on the dining area. Take a look at the photos below single-level ceilings in a drywall kitchen - and once again see how sometimes simplicity and naturalness completely overshadow the most inventive and complex projects in terms of expressiveness.


Two-level

Compared to the above simple options is more complex technical solution. This design is perfect for large rooms in which it is required to close especially large communication elements. However, the practical usefulness of such structures is noticeably inferior to their powerful design potential. As a rule, two-level ceilings in a plasterboard kitchen are full of various geometric shapes and abstract compositional solutions. To harmoniously fit them into the interior is the main task of the designer working on the project.


Not uncommon and combined options- joint use of drywall construction with stretch fabrics. Most often, the protruding part, which hides the wiring and pipes, is made of hl, and the central zone is reserved for stretch ceiling. Judging by the following photos of the ceiling surfaces in the plasterboard kitchen, the owners very often do not limit themselves to such a separation and use additional decorative processing of the ceiling surface - using the same photo printing.


Multilevel

In modern reality, they are not so common, as they require what most apartments cannot provide - a solid margin for the height of the room. However, if you live in those very famous "Stalinka", famous for their inaccessible ceilings, then we recommend that you consider this option. Or in the case of finishing the ceiling surface in a private house - perfect solution, which will give your kitchen monumentality, scale without any loss for a unique home comfort.


Some options for using a ceiling in a plasterboard kitchen with lighting


The lighting organization of the kitchen, where hl was used to finish the ceiling surface, if it has any boundaries, it is only due to purely your taste preferences. Think carefully about the options for placing spots on the ceiling: which areas in your room require additional lighting, is it appropriate to focus on the central part by stretching LED lighting around the perimeter, which is best used as the main lighting. The end result directly depends on how you want to see your kitchen - bright and expressive or warm and atmospheric, with slight notes of intimacy. You can read about how to make a plasterboard ceiling with lighting with your own hands in given article.


The role of the lighting script as a tool to correct some of the objective shortcomings of your space should not be ignored. So, cornice ceiling lighting with the help of the already mentioned above led strip allows you to elegantly solve the problem of lack of space.


Using spotlights with directional light has the potential to transform your interior with an interesting interplay of shadow and light.


Even more interesting design options for plasterboard ceilings in the kitchen


We draw a conclusion
Judging by the photos used, the plasterboard ceiling in the kitchen is one of the most common and surest ways to give your room an original and spectacular look. At the same time, the format of the kitchen with special temperature conditions causes special claims to the finishing of the ceiling surface - and no matter how wide the design possibilities that this or that material provides, the expediency of use will be reduced to zero if there are no certain moisture resistance standards.

In this regard, drywall definitely has no problems: it brilliantly copes with permanent high humidity, hides all possible flaws in the base surface and gives owners full carte blanche to create an individual comfortable interior.


