Plasterboard ceilings with LED lighting. Backlit plasterboard ceiling is the best choice. Combined illumination boxes
Multi-tiered ceilings with spot and hidden lighting provide designers with so many options that they will definitely not go out of fashion soon. Today we will tell you about how to make a two-level plasterboard ceiling with lighting with your own hands.
Forming and fixing the profile frame
In ordinary cases, a two-tiered ceiling only imitates a cascade. The highest tier is usually not formed by a plasterboard structure, instead a rough ceiling surface is used. This plane can be tightened with a stretch ceiling.

This design implies that all prefabricated elements are attached directly to the ceiling independently of each other. Adjacent profiles of adjacent tiers can, however, be fastened together, but not for the purpose of strengthening - rather, for faster and more convenient assembly and alignment of the structure. Such a frame is recruited really quickly, but it does not behave very well with a high weight of the suspended structure. Due to the lack of a common base, the frame is subject to shear and deformation.
There is another concept as well. For ceilings with three or more tiers, as well as for structures lower than 30 cm from the draft ceiling, the frame has a real cascade device. In other words, each tier is independent in the horizontal plane and serves as the basis for the underlying one, and the structure itself resembles an inverted pyramid. This approach is very beneficial both from the point of view of saving profiles, and from the point of view of reliability and overall solidity.

However, today we will focus on two simpler structures that demonstrate a visual construction of tiers one after another according to any of the systems described above. In the general case, the lower tiers of the ceiling can be represented by an external figure adjacent to one or more walls, or an internal figure located at some distance from the ceiling corners.
In the first version, the frame is like a ceiling edging and has two track profile lines for fixing to walls and ceilings. The profile is nailed to the wall along a horizontal line that intersects the room with a common plane in the horizon. The second profile is attached to the ceiling along the line marking the contour of the future figure. In both cases, allowances must be made for the thickness of the sheet and finishes.

The main plane of the tier is assembled like any other: rack-mountable CD-60s, which do not protrude in length beyond the figure's projection line. The rack elements of the frame are recruited perpendicular to each of the walls to which the tier adjoins, in increments of 45-60 cm. When working with external figures, one assumption can be made: do not continue the profile after the first intersection. It looks so that the profiles of one wall, resting on the transversely directed profiles of the neighboring one, are limited to a T-shaped joining, for which it is allowed to cut the crosspiece (crab) in two diagonally.

For internal figures, the lathing of the plane should be carried out with a frame mesh with a cell of 60 cm. But how to install the rack profiles if there are no guides under them? The fact is that the assembly of the outer corners is a topic for a separate conversation, there are several versions.
Tier set methods
We stopped at the fact that along the contour of the figure, a profile with the function of a guide was nailed to the ceiling with metal anchor wedges or dowels. If the edge of the tier is straight, the profile is nailed behind the central flange. Sections of rack-mount CD-60 are inserted into it, the length corresponding to the height of the tier. The lower edge of the segments is cut under the "tongue", to which the third guide profile is attached on two self-tapping screws, edging the rack profiles of the horizontal part of the frame.

If the face of the shape has a bend, a flexible segmented profile is attached to the ceiling in this section. And this is the only way to attach the radius edge to the ceiling. A self-cut "herringbone" cannot serve as a suspension, its shelves will bend under the weight of the structure. Accordingly, after stripping the sheets, the edge of the figure will sag unevenly by several millimeters. This is not so important for thin cornices and vignettes, but we are considering larger figures.
The handicraft "herringbone" from the profile nevertheless finds its application in radius ceilings: it is used to surround the ends of the rack-mount profiles of the horizontal plane. This edging is connected to the ceiling profile using sections of the rack profile, and if the bends are too steep, the CD-60 is replaced with a narrower guide.

If the side edge of the figure forms a niche with illumination, the lintels from the ceiling profile are made with a rack mount CD-60 and are attached in such a way as to maintain the horizontal edge, that is, exactly above it. In this case, the frame of the plane is slightly carried out beyond the contour of the figure and is framed by a "herringbone", to which a thin strip of drywall is then attached, forming a side. Inside, along the vertical posts, another strip is sewn, wider, which serves as a reflective partition.

After assembling the frame and approving its final configuration, it is necessary to strengthen the lathing of the horizontal planes. This is done with direct suspensions, and with a very low ceiling - with knitting needles.
 To assemble a soundproof ceiling, use special damping profile mounts
 There are specialized fasteners for any type of profile connection
Electrical network laying
Before finally closing access to the internal cavities of the ceiling, communications are laid in them. These can be both lighting cables and transit wiring, communication lines and speaker wires built into the ceiling. Regardless of the type, these cables must be clad in a corrugation. Not only for reasons fire safetybut to protect against cutting when pulled. Another rule applies to fasteners: power cables, including local lighting, should not be fastened to the frame profiles, only to the ceiling. Unlike television and other low voltage conductors, these can be tied with nylon clamps.


This explains why it would be a mistake to first hem the horizontal planes of the tiers, and then scatter the hidden electrical network. This is done under the pretext that it is much easier to wire through the holes for spotlights, however, it is assumed that the wires are attached to the frame, which, we repeat, is not allowed by the rules for the safe operation of electrical installations (PBEEP 15.2.2). In this light, the transition to a low-voltage lighting network, for example, with LED strips, seems to be even more profitable, especially when the backlit tiers are far away from the rough ceiling.

In any case, the marking of the connection points is carried out along the ceiling, sometimes with strips of electrical tape on the profile. At this point, the cable should be folded into a loop with a margin sufficient for conveniently connecting the lamp by weight, standing on a ladder under the ceiling. In these places, the wires must first be stripped and provided with terminal blocks, while it is advisable not to break the core. Individual lighting lines are connected to a common highway by means of small boxes fixed to the ceiling. Those, in turn, are connected with a 4 or 5-core wire to the junction box of the common network, where decoupling to switches is performed.
 1. Control unit. 2. LED strip. 3. Remote control. 4. Power supply
If electronic ballasts or voltage transformers are included in the lighting network, they should be installed at a minimum distance from the powered light sources. Most of such equipment is produced in a protected case, so they can be mounted directly to the ceiling on a non-combustible substrate. Moreover, enclosing the device in a box can cause rapid wear and tear due to insufficient cooling.
Ceiling sheathing
When sheathing the gypsum ceiling, you should start from flat horizontal planes, which contributes to more rational use scraps for fragmentary sewing of side faces. First, all sheets are hemmed to the frame lathing, and then to the edge. The distance between the attachment points is about 25-30 cm in the center of the sheet and 10-15 cm at the edges.

The hemming of the bottom edges performed first of all makes it easier to work with radius parts. The trimmed herringbone on the outer edges is attached to every second or third petal, due to which the middle shelf acquires sufficient rigidity for attaching the sheets to the side edge. After that, you can cut holes for the lamps with a crown and bring out the hidden lighting wires: it is more convenient to do this while the side edges of the ceiling are still open.
The ends of the tiers are sewn up just as easily. Small pieces are screwed to the ceiling and edge profiles, as well as to the uprights connecting them with a standard fixing pitch. In the places where the fragments join, trims of the rack-mount profile are placed under the seam, which do not have direct attachment to the frame.

For sewing bent surfaces, drywall is prepared in several ways. This can be transverse notches with a knife, or rolling with a needle roller, impregnating the sheet with water to obtain flexibility. The second option is preferable due to the high speed of execution and minimal efforts for subsequent alignment. However, a wet sheet must first be fixed, only having previously given it the desired shape, moreover, only on the main bends. The rest of the screws are screwed in after drying, when the sheet becomes dense enough again.
 A strip of drywall moistened with water bends easily, and a curved surface is the result of a regular shape and smooth

Ceiling decoration
Do not forget that the decoration of multi-tiered ceilings is associated with the widespread use of corner and flat tapes to strengthen the seams. In the first case, these should be metallized paper strips or perforated corner profiles. Flat seams are covered with a special perforated tape.
 Be sure to chamfer all ends of the drywall sheet, especially when forming outer corners, so that after a rough finish with a starting putty to get a strong and reliable edge that will not crack over time


When reinforcing the joints, it is recommended to use starting plaster, and with it, initially stretch all surfaces of the ceiling with the laying of fiberglass. This will create a uniform substrate, which means that the joints and screws will not be visible through the thin smoothing layer of the finish.
Multilevel ceilings are very beautiful in themselves, but if they are equipped with lighting, they become a real highlight of the interior. How to make a backlit plasterboard ceiling, we will tell and show in this article.
Ceiling installation

In one of the previous articles, we have already described how to make a single-level one. In the event that you want to make a plasterboard ceiling with backlighting with your own hands, this information will be very useful to you when installing the main, upper level.
We will not completely repeat the information presented earlier, but we will draw your attention to some differences in the installation of the frame for a conventional ceiling and ceiling, to which the box with illumination will be attached.
Features of the structure of the upper level frame
Drywall itself is not strong enough. In any case, he is not able to withstand the weight of the second tier, in which the backlight will be mounted.

Therefore, the fastening of the frame of this very second tier should be made through drywall to the guides of the upper level. And for this, they must be located exactly in the place where the guide will pass, forming a box with backlight.
With two parallel guides running across the longitudinal profiles of the main ceiling, there will be no problems: they will be screwed to them with a pitch of 400 or 600 mm (this is the distance we kept between the axes). But with the fastening of the other two guides it will be more difficult if there is no longitudinal profile above them.
The conclusion suggests itself: either this profile must be laid specifically at the stage of installation of the main frame, or the second level must be designed based on an already existing structure.
Basically, it's okay if you forget about the mortgage. Longitudinal profiles are located close enough to each other, which allows you to choose any of them as the base.
Installation of the frame of the box with a niche for lighting
Sew up the main ceiling with drywall sheets, after which you can proceed to further actions. To do this, you first need to do the markup.

- First, make marks on the walls, stepping back from the main ceiling to the height of the future box, and connect them with a horizontal line.
- Then mark the perimeter of the box on the ceiling, stepping back from the walls to the desired distance. The resulting shape should be a regular rectangle.
Attention! It is possible to give marks on the ceiling at the same distance from the walls only when you are sure that they are perfectly even and the room has right angles. Otherwise, the marking is done using a square.

Benefits of LED backlighting

In the photo - plasterboard ceiling lighting
So:
- Mounting led strip is not difficult.
Note. The reverse side is equipped with double-sided tape.
- Power consumption is minimal compared to other light sources, and the brightness is sufficient for backlighting.
- LED lighting of a plasterboard ceiling will be inexpensive, and the service life is quite long.
- Some tapes are covered with silicone insulation, 12 V power supply, which allows them to be used in rooms with high humidity.

- LED strips are produced with a different number of LEDs per meter (30, 60 or 120), with gradation in colors and shades, which makes it possible to solve any problems.
- In addition to monochrome (monochrome), there are RGB - ribbons that can change the color of the glow.

- The lighting of plasterboard ceilings using LED strips can be easily controlled using special controllers. It is also possible to use a remote control and various programmable automation devices.

Backlight mounting

Now, as promised, let's talk more about installing hidden light sources. What do we need for this?
- First of all, LED strip, which can have different wattage, be one-color or change color.
- Secondly - a power supply unit that converts the voltage in a 220 V outlet necessary for the operation of 12 V LEDs. Thirdly, basic skills in working with electrical wiring and the network.

Attention! Before making connections, make sure that the wires are de-energized, otherwise you risk getting hit electric shock, the probability of which is much higher, due to the fact that the current conducts metal carcass... Also, in this way you will warn yourself against a possible short circuit.
Determination of the total power of the LED strip
After you have chosen the type of LED strip, you need to determine how much power it needs in order to choose a power supply. To do this, measure the perimeter of the niche prepared for installing the backlight, and multiply it by the power of one running meter ribbons.
Now you know what the power of the power supply should be, through which the LED strip is connected to the 220 V. But here you need to take into account the following points:

- It is not recommended to connect LED strips to the power supply unit in series for more than 5 meters, since due to the increase in resistance in the circuit, the LEDs at the end of the strip will shine dimmer.
- The higher the power of the power supply, the larger its dimensions. Consider this when you make a side to mask the backlight. Or purchase a separate power supply for each tape.
- A powerful power supply unit, and the tape itself, needs an efficient removal of the generated heat. For the power supply, it is recommended to build ventilation grill, and the tape is glued to the profile, which plays the role of an effective heat sink.
Installation and connection of LED strip

Glowing tapes are sold in 5 meter reels. An adhesive backing is applied to the back of each tape, which allows it to be mounted on both horizontal and vertical surfaces.
Therefore, making plasterboard ceilings with your own hands with lighting, you can use both a shelf in a niche and the inner wall of the side to mount the LEDs. But we will repeat again - it is better to glue it on metal, which will significantly increase the LED life.
Before securing the tapes, connect them to the power supply as follows:

The diagram shows the connection of a multi-color RGB tape through the corresponding controller, so you can see 4 wires from the power supply. If you use a monochrome light source, then the controller is removed from the circuit, and there will be only two wires: plus and minus.

Attention! All exposed seams and other connections must be well insulated.
Place the power supply in a drywall niche where the wires come out and plug it in. Then do a test run. If everything works, then the assembly of the box can be continued.
Position the power supply so that you can remove it after assembling the ceiling. This is very important for the repair and maintenance of the lighting system.
Sometimes, in the process of repairing an apartment, very interesting ideas on how to decorate the ceiling. Some of them are related to lighting. Often, designers or even the owners of residential premises themselves decide that the ceiling, illuminated around the perimeter, would look very attractive. And to realize this idea, you need an LED strip.
Why do you need backlight
Ceiling lighting with LEDs is now one of the most frequently used design solutions. If you decide to transform the rooms in your home thoroughly, then she will help you do it with the greatest effect.
On a note! The first experiments with LED lighting began in the not so distant 70s of the twentieth century - it was then that the LEDs themselves appeared on the market. But at that time they were not yet of such a quality that would allow them to be used in residential premises for the purpose of organizing lighting, as they irritated the eyes.

Previously, only sconces were used as additional lighting or illumination in the rooms, later spotlights appeared. However, it is the LEDs that have established themselves as the most good option installation of hidden lighting - after all, you don't always want the light sources to be in plain sight. In addition, LEDs enable extremely interesting options lighting, and not only additional, but also the main one.

What is good about LED ceiling lighting?
- It allows you to realize the idea of \u200b\u200bhidden backlighting - a light source, that is, an LED strip, is laid so that it is not visible to a person, but at the same time it gives a lot of light and creates a luminous aura in the room.
- It is easy to assemble such lighting yourself.
- In certain cases, LED backlighting can act as the main light source.
- This is an opportunity to bring to life the wildest fantasies and design decisions regarding the play of light and color.
- Backlighting can be not only white or yellow - LED strips are available in various color variations.
- In addition to LEDs, you can also use fiber optic - an excellent "conductor" of light, which significantly expands the possibilities of organizing the backlight.
- LEDs consume little power during operation, which means they are economical.
- Due to the illumination, you can clearly delineate the zones in the room, if necessary.
- Finally, the backlight can fulfill its usual decorative role.

Ceiling light prices
ceiling lights

LED ceiling lighting has its drawbacks. There are not many of them, but they are worth knowing about if you plan to install it in your apartment.
- The use of colored backlighting is not always a plus. Sometimes this kind of lighting can irritate the eyes. Therefore, it will be great if during installation you provide for the possibility of changing the backlight colors.
- LEDs are not cheap, but they are cheaper to maintain due to their low power consumption.

The service life of the LED is quite long. Some manufacturers claim that this small light bulb can last for about 100,000 hours. But you shouldn't trust this figure strongly. The fact is that over time, the LED strip begins to shine less brightly. The service life of this lighting element is the period from the beginning of its commissioning and until the moment when its luminous flux decreases by 30%.

Prices for LED strip
lED Strip Light

On a note! If you use LED lighting for no more than 6 hours a day, then the tape will work properly for about 10,000 hours. That is, the human eye will notice a decrease in the brightness of the glow not earlier than after 4 years of such a mode of operation of the LED strip.
Backlight types
There are several types of lighting that can be equipped indoors.
Table. Types of lighting for the ceiling.
| View | Description |
|---|---|
| Gives a delicate, beautiful diffused light. The ceiling is, as it were, highlighted from below along the perimeter, contour. In this case, the LED strip is located on a special shelf (on the lower level in the prepared recess), and the light from it falls on the ceiling surface. A continuous luminous strip is formed. |
| In this case, the LEDs will be installed on the slope, which is located between the two ceiling levels, shining as if along ceiling surface. |
| This is a ceiling covering with a "starry sky" effect. LED bulbs installed in finishing material... One of the most difficult types of ceiling lighting organization, as it will take a lot of time. |
| The LEDs are installed in small shades that will be installed in the finished ceiling. Light bulbs are installed in several pieces, one, for example, shines downward, several others create "rays" on the ceiling surface. |


Also, the backlight is divided into:
- target;
- general purpose;
- design.

The first type is the installation of lighting in order to delimit certain areas in the room. Simply put, in this case, the backlight is used to zone the room. For example, the kitchen can be more lit work zone - additional light will not hurt here.

General purpose lighting is general lighting. True, most often it is realized not through LEDs, but with the help of spotlights. Although there is an option when the LED strip can also turn into a full-fledged lamp - this is.
The luminous ceiling can be installed in any room. For manufacturing, an LED strip, a stretch translucent fabric is required. The tape is attached to the rough ceiling and hidden under tension material... As a result, when you turn on the light, we get a completely luminous ceiling above our head.
Attention! The installation of this ceiling is not as easy as it seems. In order for the light to flow evenly, it is very important to correctly calculate the distance from the tape to the canvas. If you make a mistake with this parameter, the ceiling will "strip".

Usually, a luminous stretch ceiling is combined with plasterboard edging. A small cornice is made of this material around the perimeter of the room, and a backlight with a canvas is placed between its sides.
And finally, a design option for lighting the ceiling. Such lighting will not give a lot of light, but it will make the room cozy and complete. Such lighting can be attributed to the illumination around the perimeter of the room, and the creation of glowing patterns on the ceiling.
The patterns are created in the same way as the luminous ceiling. Only the LED strip is placed in the shape of the desired pattern, and not across the entire draft ceiling. When the switch is pressed, the light will penetrate through the translucent stretch fabric and create the same shape on the ceiling surface as made of LEDs.

By the way, the ceiling lighting does not have to be white. It can be either one-color decorative or multi-colored RGB, that is, shimmer with red, green, blue and other shades. Colored lighting, if it matches the color of the bulbs to the style of the interior and general view the room will look very good around the perimeter of the room both with the main light on and in the dark.
Choosing materials
So, you firmly decided to make a ceiling light in one of the rooms at home. It doesn't matter what color, white, or even decided on a luminous ceiling. But in any case, you need to visit a hardware store where you buy the necessary materials.
The most important element is the glowing ribbon. It can be LED and duralight. Duralight is a cord, inside which there is a mass of small bulbs, diode or incandescent. It is not afraid of water, very durable and flexible. Duralight can be installed on any surface. Its main drawback is a weak glow.


On a note! Duralight is a very durable light element. The fact is that the cavities inside the cord between the bulbs are filled with polyvinyl chloride, which gives it additional density.
An LED strip is a thin and flexible board where the LEDs are spaced equidistant from each other.
Its main advantages:
- the ability to install on any surface;
- low level of electricity consumption;
- high brightness;
- ease of installation.
On a note! Sometimes other types of lamps are used to mount the ceiling lighting, for example, neon lamps. But they are too large in size and will not allow you to create beautiful decorative designs.

Prices for LED lamps
lED lamp

It is the LED strip, due to its advantages, that is usually used for the installation of such decorative lighting.

And it is important to know how to choose the right part of the future lighting.
- First, decide what color your backlight will be. This is an important aspect, not only because the shade of light should be suitable for the interior, but also because certain colors, whatever one may say, affect the human psyche.
Table. The effect of colors on the human condition.
| Colour | Impact |
|---|---|
| Red | An annoying, but at the same time exciting color. Not advised to use for people with increased irritability. |
| Blue | Alarms, tunes in a working mood, makes a person collected. |
| Yellow-blue | Capable of causing tantrums. |
| Blue, sea, turquoise | Tune in to reflection, pacifies. |
| Green, yellow-green | Soothes. |
| Orange, yellow | Neutral, does not evoke any special feelings. |

It's best to choose a ribbon that has multiple color variations and a controller. Thus, you can choose exactly the shade that you like at the moment to suit your mood. And in your normal state, you can turn on the white light.

- Look at the density of the light bulbs. It can be 30, 60, 120 pieces per meter. Experts advise to take a tape with 60 or 120 diodes for contour illumination, but for directional lighting, a tape for 30 is best.
- Decide on the power of the tape - according to this indicator, they are also different. For directional illumination, buy a 5 W / m model, and for contour illumination, it is better to take more - 8 W / m. To save on controllers (buy cheaper ones), 5 and 7 W tapes are placed on the slopes, and 7 and 14 W tapes on the shelf. Determining the power of the tape will help its marking, which has an alphabetic and numeric code, for example, SMD 3028. The first two digits are just the power value.
- It is also important to estimate the total power of the tape, which is calculated along the entire length. Having calculated how many meters of tape you need, multiply this number by the power of 1 meter. Based on the obtained parameter, choose the power of the controller for the tape.


By the way, take a close look at how the tape is flashing. This type of backlight can also have a psychedelic effect due to this parameter. Do not use tapes that flicker at 0.5 Hz, 2 Hz and 7 Hz. They can cause epilepsy to develop.

Attention! If you want flickering backlighting, choose a controller to achieve this effect, which will make the diodes flicker and fade smoothly.
So, to mount the ceiling lighting you will need:
- lED strip in the required quantity;
- PVC corner (you will glue the tape on it);
- power Supply;
- cornice, drywall (if your ceiling does not yet have slopes and shelves to accommodate lighting);
- network cable;
- controller;
- connectors for connecting tape segments.

This is a basic list of required materials. Depending on how you plan to mount the ceiling lighting, you may need other items as well.
On a note! During installation, LED strip usually does not need additional adhesive material - as a rule, it is already equipped with an adhesive layer. But cheap tapes usually don't stick well on it. It is better to choose a more expensive but high quality material.
Perimeter lighting installation
Step-by-step instructions for creating a simple LED ceiling light.


Step 1. In the niche where the LED backlight will be located, fix it on small screws around the perimeter plastic corner... The fact is that the sticky layer of the tape is in good contact with PVC, but it can peel off from the drywall. So do not neglect this stage of setting the backlight.

Step 2. Use a tape measure to measure the required lengths of the LED strip and cut it into pieces equal to the sides of the perimeter rectangle that you will be highlighting. Cut the tape only at the cut points marked on it, otherwise it will not burn.

Step 3. You can connect the segments using connectors, but it is better to solder - this will be more reliable. Solder contacts according to the principle - plus with a plus, minus with a minus. By the way, remember that it is impossible to connect too many tapes into one whole - they are usually produced in reels of 3-5 meters. So, more than three bobbins are not assembled into one structure. If the tape turned out to be larger, then its segments are connected to the power supply in parallel.


Chandelier prices

Attention! The LED strip can be bent, but only if the angle is less than 90 degrees.
Step 4. Remove the wires from the system that will be needed to connect the controller and the power supply. Connect the system first to the controller, and it to the power supply. Check the system is working.


Step 5. Peel off the sticky layer from the tape and attach it to the previously mounted PVC corner. The backlight is ready.


Another option is to install the LED strip in the ceiling cornice
A few words about soldering: LED strip doesn't like high temperatures, therefore, the soldering time should not be more than 10 seconds, and the melting temperature should not be more than 160 degrees.
Video - Installation of LED lighting
Starry sky
Ceiling "starry sky" is a real hit, which is becoming more popular and is increasingly being used for the design of the ceiling surface. It can be made of fiber and LEDs. Let's consider the second option. The main difference from installing the previous backlight is that this time you will need individual LEDs, and not a tape.

Step 1. This step is performed even before plastering the ceiling frame with plasterboard. Make a lot of small holes in the sheets of this material in a chaotic manner.

Step 2. Connect (solder) all diodes into one circuit using wires. Check it for performance.

Step 3. Install in each of the holes in the drywall over the LED. It is best to choose light bulbs of different power - then it will turn out to create a more realistic starry sky.
On a note! Many stars cannot be created in this way - as a rule, for the appearance of real galaxies in the sky, fiber is needed.
Step 4. Attach the drywall to the ceiling frame as you would normally.

Step 5. Connect the system to the controller and power supply. The lighting in the form of a starry sky is ready.

This system also has a drawback - the LEDs glow very brightly, so scattered starlight cannot be obtained. Alternatively, you can try experimenting with light diffusers.
Ceiling lighting is undoubtedly one of the the best options decorate the room. And almost anyone can handle the installation of an LED strip. The main thing is a little desire and patience, and you will succeed.
Many people know the expression: "The repair never ends!" This expression is especially relevant for those who have lived in their home all their lives. But residents of apartments have to do this thankless job at least once in their lives. You can't get away from this - no one wants to "live in a hut" or be known as a retrograde. And in construction and decoration, new materials, designs and solutions appear every day. It makes sense to consider in detail how to make yourself a two-level plasterboard ceiling with backlight and betray original design apartment.
Plasterboard ceilings are profitable
There are many modern ways to turn a ceiling into a work of art. These are suspension systems and stretch ceiling, and special plastic panelsand ceiling tiles from expanded polystyrene , and metal constructions... And yet, the plasterboard ceiling is still in demand. Why?
The first and main reason is the relative cheapness of this method. Many people have to count every penny during construction and repair. And a ceiling made of gypsum sheets will save you a little.
Another positive point: suspended structure will allow you to hide all the flaws of the old ceiling, as well as wires, ventilation covers, pipes, etc. objects that spoil the design of the room.
The third plus is the uniformity of the texture of the walls and ceiling. If the walls are finished with plasterboard, it is logical to sheathe the ceiling with them. You just need to buy a little more material. In addition, the ceiling can be made both simple and unique. The flight of imagination in this method is not held back by anything, except for the contents of your wallet.
It is also important that any man who knows how to use a building level and a screwdriver is able to mount a two-level suspended ceiling made of plasterboard with lighting on his own. Of course, you will have to seriously dig into the Internet in search of information, ask your friends for help and find a few days free from your main job. But the result is worth it.
First you need to draw or find a photo of the ceiling you like on the Internet. Measure the ceiling and draw some drawings. A two-level plasterboard ceiling with backlighting is a rather complicated structure and it will not be possible to make it "by eye". Separately draw the layout of the main and spotlights, determine the type of lighting between the levels. Most common, but other light sources can be used.
Photos of beautiful two-level ceilings
Classic niche

Wave

Winding lines
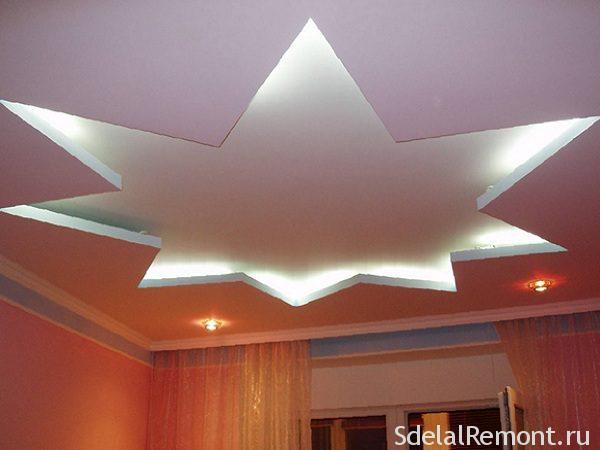
Star shaped

Curved design

Duplex ceiling made of gypsum plasterboard

Neon lighting

Painted with a niche

Winding lines

Oval

Classic ceiling

Straight-line niche option
We make an exquisite ceiling with our own hands
If you have experience in construction industry, tools and free time, you can try yourself in the role of a professional finisher. It is difficult to make a two-level plasterboard ceiling with backlighting with your own hands, but it is quite within the power of every master who is not afraid of dirty work. In the sense - dusty, because gypsum leaves behind a lot of dust.
It is better to take "just barely enough": in any settlement of materials for such ceilings above the roof and you can buy them in addition, if not enough, at any time. But where to put the leftovers after repairs in a small apartment is a big question! And it's a pity to throw it away - money does not lie on the road, and there is nowhere to put. However, everyone must decide this issue on their own.
There are several leaders in the production of products and materials from plaster:
- Knauf. The company occupies a leading position in our market, and throughout the world. Drywall and everything for finishing with this material. Time-tested quality. Among the assortment - arched gypsum board 6.5 mm thick. An excellent choice for creating curved lines of a two-level ceiling.
- A Scandinavian firm obsessed with sustainability. Their products are in great demand all over the world. Many products are more expensive than those of its German competitor.
- Lafarge Group. The Polish firm has scattered its factories all over the world. European quality of products at quite affordable prices. Not as well known in our market as Knauf. She was the first to establish the production of gypsum boards with a semicircular bevel on all four sides of the sheet.
- JSC "Gips". The only Russian company, the quality of products of which corresponds to the European level, and the range of goods is wide and varied. Based in Volgograd. Products with the Volma logo can be seen at all construction sites in our country.
As for the components. The most famous and expensive ones on our market are from Knauf and Gyproc. Most of the other manufacturers are small private Russian factories. So there will be no problems with the acquisition. The same wide range of accessories - from expensive to luxurious - for lighting installation.
Materials and tools that come in handy during installation
A two-level ceiling made of gypsum plasterboard with your own hands with backlight will require a lot of materials and tools. If there are dimensional drawings, it is easy to calculate the approximate amount of this or that material. You will need sheets of ceiling plasterboard 9.5 mm, a sheet of arched drywall 6.5 mm for finishing the winding lines of transition of levels. If the 2nd level is direct, it makes no sense to buy arched drywall.
In addition, you need a primer and plaster putty, a self-adhesive tape (serpyanka) for sealing joints, a damper tape to improve sound insulation. The metal frame is assembled from ceiling guiding profiles (PNP), ceiling profiles (PP), arched profiles, straight suspensions, single-level suspensions (crab). For fasteners, anchor-wedges are used, for metal 3.5 by 9.5 black ("seeds" in the jargon of masters) or white PSh, as well as black self-tapping screws for drywall.
All this cannot be mounted with a hammer and a screwdriver. Therefore, you need to prepare or buy the necessary tools. In addition to the above, you will need a laser and bubble levels, metal scissors, a hacksaw with fine teeth, a coloring cord (beating), a tape measure, a stationery knife for cutting drywall, a planer, an emery cloth or a painting net, a screwdriver, a perforator, spatulas of different widths of the ceiling for putty ...
Don't forget about lighting. Two-level plasterboard ceilings with backlighting, in addition to the central chandelier, must be equipped with duralight or neon lamps. In addition, you can add 220 volt spotlights on both the first and second ceiling levels. Their choice is huge and a simple listing will not give anything. Everything is decided by a specific choice of style and design of the ceiling structure.
Installation of a double-level ceiling frame is not an easy task for a beginner
There are two ways to install a two-level plasterboard ceiling with lighting . The first way is easier and more understandable for a non-professional. The second is more time consuming and more labor intensive. But everyone has freedom of choice. Let's consider the first method in more detail ...
With this method devices of a two-level ceiling made of gypsum fiber boardfirst, the frame of the first level is mounted. It is a horizontal crate made of metal profiles, on which drywall will be attached.
 This is how the first level ceiling lathing should look like
 A drawing of the frame is made, dimensions are affixed. A standard GKL sheet has a width of 1200 mm. To create a structure with good rigidity, 3 ceiling profiles per sheet are sufficient, i.e. the distance between the centers of the longitudinal PP is 60 cm.
First, guide profiles (PNP) are mounted. On the walls, using a laser level, marks are placed at a distance of 6-7 cm from the ceiling. These marks are connected with a line using a long rule or a paint line (skipping). Do not forget to stick a damper tape on the back of the profile; it will serve as additional soundproofing for the room. A profile is attached to the line from above, holes for its fastening are marked. The holes are drilled in the wall with a perforator, then the profile is attached to the dowel-nails. The easiest part of the installation phase is now complete.
Then, lines of longitudinal ceiling profiles (PP) are applied to the ceiling. Try to clearly maintain a distance of 60 cm. The width of rooms is rarely a multiple of 60, so the distance from opposite walls is calculated approximately the same; it is different for each room. On the marked lines, every 60 cm we make marks perpendicularly. These are the attachment points for direct suspensions. The hangers are fixed to the ceiling using nail dowels or wedge anchors. The choice depends on the design of the old ceiling. The ends of the suspensions are pulled down.
The longitudinal profile is inserted into the guide at one end. The other end is secured with a nearby straight suspension. The correctness of the fasteners is monitored laser level or a long rule. To fix the parts, PSh self-tapping screws are used, as well as "seeds" - black screws for metal. After that, the profile is fixed along its entire length in straight hangers and a guide profile.
This operation is repeated for all longitudinal profiles. If the length of the PP is not enough, it is lengthened with longitudinal connector anda piece of PP of the required length.
Longitudinal PP on the ceiling
It remains to mount the transverse strips. Their length is 1 cm less than the distance between the longitudinal profiles. They are attached using single-level connectors (crab) at intervals of 50 cm. This is done so that the edge of the drywall sheet - and its length is a multiple of 50 - falls in the middle of the transverse profile for convenience and reliability of fastening. All connections are fixed with self-tapping screws. As a result, you should get a structure as in the photo above. Then the electrical wiring is mounted. Be sure to place the wires in a corrugated, non-combustible pipe. We make loops at the places where spotlights or chandeliers are placed.
In order to avoid penetration of screws, it is forbidden to lay inside metal profiles.
The resulting crate is sheathed with plasterboard. For fastening, black self-tapping screws with a fine thread pitch 4-5 cm long are used. The distance between the self-tapping screws is taken equal to 20 cm, the distance to the sheet edge is 2 cm. This will protect the sheet from destruction. The caps of the screws are slightly recessed into the surface, later they are masked with plaster. 
If the sheet has to be cut into pieces, an edge is made on the cut part with a plane or a sharp knife. Then the cut must be cleaned with sandpaper.
The seams of the first level are passed with a rough layer of plaster with application. At this, the first stage of installation of a two-level ceiling with plasterboard lighting is completed.
The beginning of the second stage is identical to the beginning of the first. We retreat down the wall 12-15 cm. Why so many? Once the ceiling is made with illumination, then this is just right: the height of the side that obscures the light source + the ability to stick your hand into the niche to replace the burnt-out element.
Diagram of the device of the second level of the ceiling with a niche for lighting
So, below the ceiling on the walls we make marks, connect with lines and mount the guide profiles. If the second level is planned along the entire perimeter of the room, the guides go along all the walls. If this is a diagonal, then the profile is attached only in those places where the second level is adjacent to the wall.
The second level of the ceiling is usually curved. For smooth curves, it is best to use an arched profile. But most "craftsmen" prefer to save money. They cut the triangles on the sidewalls of the ceiling or track profile as often as possible and bend it according to the pattern. The drawing is best applied to the ceiling of the first level. This line is repeated, stepping back from the future edge of the second level in depth by 10-15 cm. This distance can be less if you use LED strip or duralight in lighting. Here the attachment of this level to the first one will take place.

We cut pieces of the ceiling profile 12-15 cm long (level height). These pieces will replace straight hangers. Along the inner winding line, we bend and mount an arched profile or a cut guide profile on the ceiling. We attach suspension pieces to it. We connect their lower edge with the PNP, fixed on the wall, using PP segments. The length of these segments should be equal to the distance from the wall to the outermost winding line of the future level. If the length of such segments is more than 60 cm, it is recommended to make transverse inserts from single-level connectors and PP segments. 

Try to keep the structure as rigid as possible. The final touch will be the edging of the protruding PPs with a guide profile with cut sidewalls. It is bent so that, when viewed from below, the line of this profile repeats the bends of the pattern on the ceiling. The resulting edging is fixed with self-tapping screws. The frame is ready.
 Corrugated wiring on the ceiling
 Wiring is installed in the same way as for the first level. The location of the spotlights is roughly marked on the ceiling.
Plastering the resulting frame with plasterboard will be the next step. An even surface is sheathed as described above for the first level. The edges are sawn along the bend line. The problem will be to sheathe the end of the second level. There are two proven ways to do this:
- A strip of drywall from the inside is pricked with a needle roller or the tip of a knife. Then the surface is moistened with water using a sponge or rag. Moisture permeates the gypsum and the strip is applied to the profile. Bend it slowly and carefully, fixing it in stages to the profile with self-tapping screws.
- The inside of the strip is cut in a V-shape down to the outside board at small intervals. In this case, the strip will repeat the bend of the profile. But this method is only good for short sections.
Next, the drywall is primed, a rough and final layer of putty is applied using spatulas. Holes are cut for spotlights, an LED strip is attached in a niche, and others. Contacts are well insulated and hidden. The surface is painted in the selected colors. A two-level plasterboard ceiling with DIY lighting is ready.
Drawings of the frame of a two-level ceiling with a niche
Consider in detail the various schemes of the device of plasterboard streams with a backlight device in one and two levels.


What you need to remember while working
Installation of a two-level plasterboard ceiling with lightingit won't be an overwhelming task if you adhere to a few rules.
- You need to believe in yourself :).
- Carefully develop sketches and drawings of the future ceiling, starting from the layout of the frame of each level and ending with the location of each lamp. Make sure that the luminaires do not coincide with the crate.
- Choose quality-tested materials that will serve you for decades.
- Do not rush. Start the next stage of work only after completing the previous one.
- If problems arise, carefully study the entire available materialto choose the simplest and most effective way to eliminate it.
- Do not hesitate to use the help of friends. It is almost impossible to cope with such work alone without having experience.
- It is advisable to entrust the work with electrical wiring to a professional.
If all of the above did not frighten you, then good luck! In addition, watch the video on the installation of ceilings.
Currently, one of the most common types in the field of ceiling decoration is the backlit plasterboard ceiling. In this article, you can find all the instructions for finishing such ceilings, which will help anyone independently, with their own hands, get a beautiful design solution for the ceiling, since the first glance of visitors to your home is initially directed at the ceiling and this is what will make the first impression on your guests.
In appearance, these plasterboard ceilings seem to be complex structures, but if you look closely, you can say with confidence that there will be no difficulties in their designs and even a beginner can assemble a plasterboard ceiling.
If you follow all the instructions and follow them carefully, you will have an effective backlit.

In general, taking into account the design and location of the luminaires, there are two main groups of plasterboard ceilings:

The first option for plasterboard ceilings is a very simple design... You can make a special hole in the plasterboard ceiling and build the luminaire into it, or simply hang these luminaires from it. Both options are very simple and effective.
The only thing to consider if you choose this option is that the weight of your fixtures should not exceed 10 kg. This is due to the not very high bearing capacity of the frame and plasterboard ceiling sheathing.
But this is not the case if you decide to choose a plasterboard ceiling design with hidden lighting. This method involves placing lamps between two layers of plasterboard ceiling, in specially provided niches.
In this case, the light of the lamps is directed not downwards, but towards the ceiling. On the ceiling, light is reflected and illuminated throughout the room, giving your room an irresistible effect.

In order to arrange a backlit plasterboard ceiling, it is first of all recommended to think about the optimal lamps for backlights. In such designs, mainly LED or fluorescent lamps are used. This article will talk about the LED option, as this is the most common today.
The main advantages of LED ceiling lights are their reasonable price, practicality, and the factor that they provide a high level of illumination. Compared to other lighting sources, LEDs are more than 50% energy efficient. Mounting lED lamps very simple.
These luminaires are fixed to drywall with self-adhesive tapes. Besides, modern market equipped with such backlights, which have special control units, with which you can remotely control the illumination of the room.
The modern market provides an opportunity to choose lighting fixturebased on several self-adhesive LED strips. They can be distinguished by the following parameters:

From a design point of view, the color of the LED lighting on the strip also plays a very important role. Basically, single-color ribbons are very common, but apart from them you can also find RGB ribbons that are able to change color. If you decide to install an RGB tape, then it should be borne in mind that along with it you will need to purchase a special controller that will adjust the brightness of the glow.

In order to get started, you will need to start by marking the ceiling and assembling the frame. In this case, use metallic profile for the frame, as in any suspended plasterboard ceilings.
We mark about 100 mm from the ceiling and draw a center line around the entire perimeter of the room. This line will further determine the level of the ceiling. It will be necessary to take into account that this line must be strictly horizontal. For this you need to use the building level.
After that, along these lines, we attach the initial profile to the wall. Next, we attach the suspensions to the ceiling, and fix the frame to these suspensions. This frame for a plasterboard ceiling will then need to be securely fixed with connectors-<<крабов>\u003e, as well as self-tapping screws. Upon completion, you will need to sheathe with drywall sheets. This is the milestone of a basic false ceiling.

Further, in order to arrange a special place for fixing the backlight, it will be necessary to arrange the second stage of our ceiling construction. The first thing to do is to define the border of the second line on the already built ceiling.
We mark approximately 40-60 mm from the marking line, which is the width of the cornice and after that we fix the UD-profile to our already finished first ceiling. Every 50 cm we make segments on the main profile. This length will be equal to the height of the second sheet of our ceiling.
We take these hangers and fix them with self-tapping screws. UD-profile is fixed with self-tapping screws also from the bottom side. It turns out the frame of the second ceiling, where the main gypsum plasterboard profiles are inserted, which connect these two levels of the ceilings into a single whole.
After that, we get special holes on the sides, where it will be possible to equip the backlight connections. Upon completion, we fix the second frame with plasterboard.

If the size of the cornice (the protrusion of the drywall outside the frame) is small, then you can mask it using an LED strip, attaching it around the perimeter of the protrusion.
In order to remove all dents and damage during work, you can make a putty, which can also hide the joints between plasterboard sheets... The putty can be done both before installing the backlight, and after that. In any case, the installation of backlights is not a complex design and does not require any violations of the integrity of the ceiling.
The final stage of this whole structure is the installation of lighting on the plasterboard ceiling. To do this, you should pay attention to some points, such as the correct cutting of the tape. LED-tape, for example, is produced in 5 meters in special spools.
Cutting on this tape will need to be done only at the special marked places on the tape. If you took a one-color tape, then its sections are connected by contacts<<+>\u003e and<<->\u003e. But if you have an RGB tape, then its V + pins of the same name are connected to<

It should be noted that if you connect more than three coils, which is about 15 meters, it is not very safe, since in this case the power will be high and the conductive paths may not withstand.
But if in any way you need to take more than 15 meters, then in this case you should arrange the connections in a parallel manner. It should be noted that all tape connections must be made observing the polarity of the tape. To connect, we connect the cord to the L and N contacts on the power supply.

And if you have an RGB tape, then you should arrange the connections observing the polarity. You will need to check the voltage of the tape with the power supply and controller. You need to check it in test mode and if everything is in order, then you can already glue it in its place.
In contact with