Do-it-yourself putty on the ceiling and walls, how to glue the ceiling plinth on a putty surface: photo and video. How to install and how to putty a ceiling plinth: the basics of home repair How to putty a ceiling plinth
Fastening the ceiling plinth to the ceiling is a responsible process, since if the conditions for its installation are not followed, the structure will not be securely fixed, which can adversely affect the appearance of the room. Next, we will talk about how to glue ceiling plinth on the putty, how to correctly perform its joining of its elements and fix them. It should also be mentioned about its further finishing.
Design features of skirting boards for the ceiling
Before figuring out how to putty a ceiling plinth, you need to study what characteristics its most popular designs have.
Technical characteristics of polystyrene skirting boards
- the standard materials for skirting boards are usually foam and polyurethane. By weight, the foam cornice is lighter, therefore, you can use putty or glue to fix it (read also: "");
- a foam plinth is a good solution if you only need to fix it on one side. Most often, these are the places in which the backlight is hidden or a baguette designed to hold the curtains. Also, such fixation is used in areas where the communications of the heating system are connected;
- by its structure, the plinth can be, firstly, coarse-grained, like the foam itself. This option is quite affordable (read also: "");
- the second option is a solid and homogeneous structure. Such a cornice is more durable, but it will be more difficult to install it in the area of \u200b\u200ba smooth bend;
- the quality of the foam plinth depends, first of all, on the manufacturer, therefore, in the process of choosing one or another sample, you should definitely be guided by its cost.
Advantages of a polyurethane ceiling plinth
The skirting board made of this material has a wide range of positive properties... It has a high plasticity index, so that it can be used even with a construction such as an arch in the room.
Characteristics of polyurethane skirting boards:

Even before deciding what to putty the ceiling plinth, you should carefully consider the choice of the plinth itself.
When choosing, you need to be guided by the following set of rules:

Measures to prepare for the installation of the skirting board on the ceiling
Before installing the plinth on the ceiling, you should prepare all surfaces involved in the work process.
It would be more correct to mount the plinth even before the final decoration of the room is completed. In this case, the wall must be plastered and primed.
In the event that fungi or mold may appear on the wall, then the surfaces must be treated with a special antiseptic or with ordinary whiteness. But, although chlorine is able to eliminate the emerging mold, it cannot provide any protection against its further appearance.
The ceiling surface should be approximately 90-100% prepared. Last but not least, you can only whitewash. If the ceiling design is stretch, or if the ceiling is plastered, then the plinth can be safely attached directly to it. Otherwise, it will be necessary to perform an event such as plastering the ceiling plinth.

To do this, using a spatula, you need to remove the old coating from the ceiling, if any, and also remove the old plaster.
At the end of the cleaning of the ceiling surface, the ceiling should be washed from dirt and dust and left to dry completely.
After that, you need to start priming the ceiling. This is done so that the plinth for the ceiling plinth improves its adhesive properties. Simply put, the ceiling covering does not absorb moisture from the mixture applied to it. This will not only promote faster drying of the surface, but will also prevent the formation of cracks and other small defects.
It is best to apply a coat of primer using a standard roller equipped with a long handle, as this does not require regular use of a ladder.
As a rule, putty is applied in two layers: starting and finishing. It is important to remember that a different filler is used for both layers. The starting layer is rougher in texture and is intended for leveling the ceiling surface. The finishing layer, in turn, is softer, since it is based on smaller particles. Such a putty is used to create an absolutely even and uniform surface, prepared in whitewash.
It is important that the layer of putty is no more than 5 millimeters thick, otherwise cracks may form on the surface.

For those surfaces that have large differences, it is better to use gypsum rather than putty. Do not forget that gypsum is a quick-drying material, so working with it requires a certain skill. You can increase the drying time of the gypsum solution by adding PVA glue or standard washing powder to it.
A layer of primer should be applied after each of the putty layers. The same goes for the process of whitewashing the ceiling.
After completing all the above procedures, you can achieve the arrangement of a beautiful, externally and reliable ceiling, distinguished by originality and harmony with the interior of the room, and if you want to somehow give it some freshness, you can re-whitewash.
When the renovation in the apartment comes to its finish, you need to glue, and then putty and paint the baguette, in other words - the ceiling plinth. The operation seems to be simple, but if the work is not done well, you can spoil the whole impression of the repair. How to properly putty and paint the ceiling plinth? You will find the answer to this question in this article.
Plastering the ceiling plinth is a necessary work, because if you stick it and leave it that way, the view will be spoiled by the gaps formed due to the unevenness of the wall, the joints will stand out well.
Subtleties of putty ceiling plinth
There are certain requirements for the putty itself, and which ones we will consider:
- putty should fill all the cracks, joints, so we choose a small one;
- in the case of a very uneven wall, the gaps are very large, to close them, we take a gypsum-based putty, and then use the finishing mixture.
Putty process
Before puttingty the ceiling plinth, we will examine it and start working with the largest slots, that is, the width of which we exceed 0.3 cm, and for this:
- we clean the ceiling plinth from dust;
- we prepare a plaster solution using a putty based on gypsum;
- take an ordinary spatula and cover up the cracks. Carefully remove the rest of the putty with a wet rag or spatula;
- let the starting putty dry, carefully clean the surface of the ceiling plinth with sandpaper;
- we dilute the finishing dry putty so that it is convenient to apply it with a folded brush and finish the work;
- if the baguette is patterned, then the spatula cannot be used, everything is done with a brush, and at the joints the excess is removed with a sponge.
Useful: when filling the seams between the fillets, make vertical movements with a spatula, repeating the relief of the ceiling molding, then it will look like one continuous canvas.
Which plaster mix is \u200b\u200bbest?
If you choose gypsum-based plaster, then opt for the universal dry plaster mixture Rotband (Rotband), which is produced in Germany by Knauf (Knauf). Its advantage:
- contains additives that provide excellent adhesion, therefore it will not flake off from the ceiling plinth;
- small specific gravity;
- spent sparingly.
For filling small gaps, you can use Eskaro Fine Filler fine-grained finishing putty, supplied from Estonia. It is distinguished by:
- high adhesive properties;
- ease of application;
- the presence of packages of different weights.
- good technical data;
- environmental safety;
- the fact that it includes high-quality components of firms from Germany "Bayer" and "Wacker", the French company "Rhodia".
For puttying, you can also use the glue-putty for the ceiling plinth, with which it was attached to the wall. If there is no ready-made mixture left, then prepare it yourself in this way:
- dilute the finishing putty according to the instructions;
- add PVA glue to the solution at the rate of: 1 kg of putty - 0.15 kg of PVA.
Do I need to paint the ceiling plinth
Painting the baguettes is not a mandatory procedure, so the question is: "Do I need to paint the ceiling plinth?" everyone decides on their own, but if we want there to be nothing to complain about in the interior of the room after the renovation, it is still better to perform this procedure. And in favor of making a positive decision, the following factors speak:
- by painting the ceiling plinth, you can make it so that it will completely harmonize with the overall design of the room;
- ceiling plinth, thanks to the well-chosen colors, will play the role of a contrasting line separating the walls and the ceiling or smooth out the contrast between them;
- painting the ceiling plinth will strengthen it, since the material from which it is made is soft and not very durable;
- with the help of paint, the texture and stucco molding on the baguette stand out well;
- since the baguette is made of polystyrene, polystyrene and polyurethane, and these are porous materials, without painting they will simply be dust collectors and will very quickly lose their presentability. The painted ceiling plinth can be wiped off;
- after filling the cracks with putty, no matter how carefully we do it, the material will not be homogeneous anyway. There is only one way out: painting. It will hide all the flaws and such a decorative element as a ceiling plinth will look monolithic.
Painting the ceiling plinth
Before you paint the ceiling skirting boards, you need to decide on the choice of paint and stock up on the necessary tools.
Ceiling plinth paint
When deciding what paint to paint your ceiling plinth, pay attention to the following:
- ceiling skirting boards made of polyurethane and polystyrene are melted with paints containing aggressive components. Therefore, choose latex, acrylic, water-dispersion paints;
- the tone of the paint should be in harmony with the color of the walls and ceiling. The desired color, in the case of using water-based paints, is independently obtained by applying a color scheme.
Selection of tools for painting the ceiling plinth
We will work:
- brush. When picking it up, we pay attention to the width - it should not be wider than the baguette itself, but very narrow does not fit;
- during the painting process, you will have to quickly wipe off the splashes, so a rag or sponge is needed at hand;
- so that only the baguette is painted, and not the sections of the walls and ceiling adjacent to it, buy a protective masking tape or tape;
- since the work will be done at a height, a stepladder is required.
Two color options
Ceiling skirting boards are painted in two different ways:
- after the baguette is glued;
- before gluing.
The best option is when the ceiling plinth is installed in front of wallpapering, then it is plastered and painted easily, and it is more convenient to paint according to the second option, but installation will be complicated here. Having painted the fillets on the floor and then installed, the joints will have to be putty and then painted again.

Rules to be followed when painting
Having chosen the first method of painting the ceiling plinth, we adhere to the following rules:
- the putty or glue must dry completely;
- if there is dust and dirt, we remove;
- if the wallpaper is not yet glued, we start painting immediately;
- if the wallpaper is already on the wall, we protect it using masking tape. You can protect the wall with a wide spatula, applying it close to the baguette and moving it as it is stained;
- working with a brush, apply paint to the outer surface of the baguettes;
- the joints should not stand out after applying a layer of paint, and if they do stand out, then the procedure must be repeated.
Take note: if there is decorative stucco on the surface of the plinth, then when painting it, make movements with a brush that imitate blotting, otherwise an excess of paint will form, which will begin to drain.

Water-based paint, trade mark TRIORA (Triora), fits well on the surface of the ceiling plinth. Its advantages include:
- water resistance - the surface painted with this paint can be washed;
- vapor permeability;
- lack of unpleasant odor;
- pronounced shine;
- wide range of colors.
Used for painting ceiling polyurethane plinths with stucco molding and such a toning material as glaze, related to glaze paints. With its help, an ordinary baguette can be aged, give it the effect of metal, stone, wood and even gold. It goes without saying that a wide skirting board is suitable for glaze painting.
Applying glaze

In order to apply glaze to the stuccoed ceiling plinth, you will need:
- a can of glaze or a spray bottle;
- brush;
- sponge or rag.
The order of its application is as follows:
- spray glaze over the surface;
- take a brush, sponge or rag and rub for a tinted effect.
Patinating the ceiling plinth
To make a simple ceiling molding look like an antique, it needs to be patinated with glaze. This is not difficult to do:
- we buy glaze in the colors of Tare and UMBER;
- apply a glaze of Tare color in an even layer on the upper and lower parts of the ceiling plinth, leaving the middle unpainted;
- now it is necessary to shade with a sponge at the junction of the painted area with the unpainted one. At the same time, we remove the outer layer of paint. In this case, the convex relief will become lighter and brighter, and the grooves will contrast with the color of the reliefs;
- to accentuate the relief we use UMBER glaze.
Here is a good example of creating an antique effect on a skirting board: 
How to create a stone effect
If our skirting board has a large eye-catching pattern, then it can be given the effect of a natural stone, slightly dirty, surface:
- apply TAIRE glaze in a thick and even layer on the surface of the skirting board;
- shade the surface with a brush to form light strokes;
- using Humbert glazer, cover the surface with dark spots;
- shade;
- apply small strokes of a dark color, remove the excess;
- let the surface dry;
- we apply strokes on the reliefs using bronze glaze;
- leave to dry.
In a room designed in the Baroque style, a ceiling plinth with gilding would be appropriate.
Gold plated skirting board

For work you will need:
- glaze gold or silver;
- thin brush;
- rag.
Technology:
- dip the brush into the glaze;
- take a rag and remove the paint from the brush;
- apply the brush to the protruding part of the pattern and slowly move it horizontally. In this case, the paint will remain only on the bumps.
You can familiarize yourself with the preparation process for painting and the painting itself using these videos:
Ceiling is one of the most time consuming areas to renovate, especially when it is necessary to decorate and decorate the joints of the walls and ceiling. One of the most original and effective decoration solutions is to glue a baguette (ceiling plinth). For the installation of a baguette, it is advisable to use the services of finishers, but if this is not possible, then you can do it yourself. First you need to find out what a baguette is and how to glue baguettes to the ceiling.
What is a ceiling plinth
A baguette is a decorative element, a ceiling plinth, which gives the renovation a finished look and a certain style. Baguettes can be easily painted with water-based paint, so in the end they can be different color... The ceiling plinth can be configured in various configurations. You can easily find the desired look ceiling decor depending on the design and style of the room. The main thing is to find good glue for ceiling plinths and have the skills to work with baguettes.
As an adhesive for mounting the ceiling plinth, use:
- gypsum mixture;
- plaster putty;
- plaster mix without adding sand.

The use of building mixtures for gluing a baguette is explained by the fact that these materials can easily putty the gaps that arise between the baguette and the walls or the ceiling and the baguette.
Since modern baguettes are made of polystyrene foam, liquid nails (glue) are also used for their installation. Using a special construction gun, liquid nails are applied to the surface and joints of the baguette.
Types of flow decor

Knowing the characteristics of the material from which the baguette is made, you can choose the required type of ceiling decor:
- Plastic baguettes. Economy option. Durable, durable and reliable. Do not be afraid of moisture or sun rays... Versatile, suitable for any style and design of the room, due to the fact that they can be different shapes and can be easily painted in any color.
- Aluminum baguettes. Strong, durable, but not cheap. Suitable for decorating apartments in modern style, as well as for finishing office premises.
- Wooden baguettes. Used when decorating rooms with classic design... Expensive and noble. In order for wooden baguettes to serve for a long time, they are processed special formulations, as the tree is afraid of fire, moisture, dust and moisture.
Since it is quite difficult to glue the baguettes without experience and certain knowledge, it is necessary to learn how to properly cut the baguette, as well as to cut it qualitatively in the corners. To trim corners and straight sections, a miter box is used - a tool designed to trim both ceiling and floor skirting boards made of different materials.

You can use the miter box only in those rooms where the angle between the walls and the ceiling is straight. As a rule, angles in apartments are not always 90 degrees, so the corners often have to be adjusted manually.
Work order

- Preparation. This stage is important. It includes cleaning the surface from dust and a primer. A primer is used to level the surface.
- The next step is marking, which will facilitate the process of gluing the ceiling plinth. To do this, the plinth is applied to the corner and the part that needs to be cut is marked with a pencil. Marking is not required only if the angle between the ceiling and the wall is 90 degrees.
- After the joints of the baguette have been adjusted, you can start gluing the skirting board. If the room is large, it is advisable to start gluing the baguette from the corners. Glue must be applied to the entire surface of the ceiling plinth with an excess, which, after gluing, must be removed with a sponge or damp cloth.
- If the work uses acrylic adhesive, then before gluing the baguettes to the ceiling, you must consult with the seller of a hardware store or carefully study the instructions;
- It is important to remember that after using silicone sealants, apply water-based paint on the skirting board.

- The baguette should be glued along the marked line. Spread excess glue over the entire length of the skirting board. Then gently wipe off the excess glue with a sponge or damp cloth.
- Use a pencil to mark the desired length of the ceiling plinth, remove the excess, grease the rest with glue. Do not forget to coat the joints of the baguette. Putty the small gaps of the joints with further processing of the joints with sandpaper;
- To extend the service life of the ceiling plinth, paint is applied to its surface in several layers.

The paint can only be applied after the glue and putty are completely dry.
The use of a ceiling plinth (baguette) in the decor immediately transforms appearance any room.
Video
Installation instructions for ceiling plinth:
- When using corners, you need to fix them first of all, and then fix the rest of the plinth elements between them (read: "How to saw down a ceiling plinth - methods").
- First of all, glue should be applied to those areas on which the whole piece is mounted, and in other areas, the plinth will need to be cut with a hacksaw for metal or a clerical knife.
- To keep the cutting line straight, it is best to use a miter box. With this inexpensive tool, you can trim the curtain rod at either 45 or 90 degrees.
- It would be most correct to measure the plinth at the right place, but if this does not work, then you need to use a tape measure. The skirting board should rest against a pre-installed corner at one end, and then it must be pressed firmly to the place of fixation.
- Using a knife or pencil, you need to make a mark on the plinth, and then the material is cut, and any irregularities that appear are removed. By the same principle, it is required to equip the entire perimeter of the room.
- The skirting board without corners is mounted in the same way. To do this work correctly, you need to form an angle using a miter box. It is better to start the process from those corners where you can mount solid parts of the baseboard.
- When adjusting the ceiling plinth where it meets the corner, it is important to remember that the length of the plinth must be longer than the length of the intended installation area. First you need to cut the corner, and then set it in place and mark it.
- When marking, the cut thickness that the saw blade produces must be taken into account, therefore, it is worth leaving about 1 - 2 millimeters in stock.
- In the event that there are any volumetric images on the plinth, then it is better to start fixing the material from the least noticeable angle, since problems with joining usually arise at the starting angle.
- It is required to fix the plinth only in one direction, otherwise, in the areas of the joints, the pattern of the plinths may differ.
pod-potol.com
Methods for fixing the plinth
On practice two methods of installation of the ceiling plinth are used:
- Fastening with wall putty.
- Installation using quick dry adhesives.
Both methods have their fans and opponents, so we will try to be objective and consider the process of performing work in both cases.
The plinth is selected according to several criteria, and if its texture mainly depends on the taste of the owner of the apartment, then other qualities are evaluated more based on technical issues. The choice of the size (width) of the plinth is determined by the dimensions of the room, it is advisable to follow the following guidelines:
- With a ceiling height of up to 2.5 meters, it is worth stopping on a plinth with a width of up to 4 cm.
- If the height is from 2.5 to 3 meters, you can use a baguette up to 7 cm.
- Well, in higher rooms, the width of the decor is practically not limited.
It is these sizes of decor that will look the most organic in any interior.
The ceiling plinth can be made of several types of material:
- Foam elements belong to the budget class of decor and can be used in any premises. The disadvantages include the low strength of the material, it can easily crumble.
- Extruded polystyrene foam (expanded polystyrene) is more durable, highly resistant to moisture, can be installed both in bathrooms and in living quarters. These types of materials do not tolerate temperature extremes, so in the kitchen, such skirting boards can quickly lose their attractiveness.
- Polyurethane foam is considered the most expensive, but at the same time, the most reliable raw material for the manufacture of ceiling plinths. Differs in moisture resistance, withstands elevated temperatures, can be mounted in any premises, in addition, it is used for outdoor decor.
Preparing the skirting board for installation
Correct trimming of corners is considered the main problem of installation. Given that rooms can sometimes have the wrong geometry, without proper practice it can be very difficult to adjust the angle. Ideally, the skirting board should be cut at an angle of 45 degrees, but this is not the only difficulty, the type of angle (internal or external) should be taken into account, it is at this stage that most mistakes are made. Therefore, if you have to glue the ceiling plinth for the first time, you should take it with a certain margin, at least one more strip.
There are several ways to cut a plinth:
- A hacksaw for metal or wood, but with a fine tooth (intended for finishing). The skirting board is inserted into the miter box (wood or plastic fixture, which has template cuts at different angles), is pressed tightly and sawn off at the required angle. Ceiling skirting boards made from the materials described are easy to cut.
- More technological is the use of electric miter boxes or miter saws... This tool is a saber (miter box) or disk (miter) electric saw, which can be rotated on the bed to the required angle. With such a tool, work moves much faster.
Immediately it is necessary to prepare two elements connected in the corner. After trimming, it is necessary to check their fit at the installation site, if necessary, correct the cutting angle. Ideally, there should be no gaps between two converging skirting boards. Only after adjusting the decor can it be mounted.

How to glue a ceiling plinth on a putty
In this case, the usual finishing putty is used as an adhesive material, the one with which the walls were processed. D in this way, you can glue the skirting board on plastered or plasterboard wall surfaces... It should be borne in mind that it is possible to glue the plinth to the putty only before the final finishing of the room. That is, the ceiling plinth is first mounted, and after that wallpapering, painting of walls and ceiling is performed.
If you carry out the installation on the finished finish, white marks will certainly remain on the wallpaper, and it is almost impossible to remove them. In addition, this method is ideal for use on not too even walls, all the resulting gaps are filled with putty and the skirting board looks organic.
- The putty is prepared in accordance with the instructions, only the amount of water should be reduced by 5-10% so that the composition is not as viscous as for treating walls.
- Installation of skirting boards begins from any corner of the room. A layer of putty is applied to the inner edges of the prepared elements, after which the plinths are installed in their place and briefly (at least 1-1.5 minutes) are fixed by hand.
- After that, the excess putty, protruding from under the plinth, is removed. If the corner joint is not perfect, then it can be corrected with the same putty mixture, after it hardens, the defect will practically not be noticeable.
- When installing the skirting board, try to avoid the use of overly short pieces of skirting board in straight sections, extra joints will not add beauty. Linear joints are also puttyed.

How to glue the ceiling plinth
For this purpose, several types of glue are used, while the technology is somewhat different.
- Application of transparent liquid polymer glue such as "Dragon" or "Titan". On the inner shelves of the prepared plinth, drops of glue are applied with a step of 3-5 cm (in a checkerboard pattern - the upper lower shelf). After that, the plinth is pressed against the installation site and removed, this allows some of the glue to be transferred to the ceiling and walls. The formed strands of glue are removed, and the plinth is left for a few minutes so that the composition is somewhat weathered. After 2-3 minutes, the plinth is pressed back into place and fixed for at least a minute. On uneven walls, you should not press the plinth excessively, it is better to putty the cracks with acrylic sealant white, it is also used for sealing joints.
- Application of glue type "liquid nails". This glue is also applied in a checkerboard pattern. You can glue the plinth immediately after applying the composition; many professionals prefer this type of glue. It is believed that in this case it is not necessary to fix the plinth for a long time and hold it, the setting occurs quickly enough. If a white compound was used, then it can be used to seal up the resulting cracks, if transparent glue was used, then it is better to use the same acrylic putty for this purpose.
After gluing and eliminating defects (joints, irregularities), it is advisable to paint the skirting board. In this case, you can use the same paint as for the ceiling, or you can highlight it in a different color, this is a matter of taste.
The skirting boards should be mounted according to a linear scheme, that is, sequentially one after the other, this will avoid incorrect joining of elements, which often happens with beginners. If mounted at the same time from different angles, the plinth can be slightly displaced (more on the ceiling or wall), which leads to distortions. It is better to start installation from a wall with a window, so the falling shadow will less shade the joints.
In principle, it is not difficult to glue the ceiling plinth, the main thing is to observe the utmost care when trimming, installing and puttingty.
mymansion.ru
Types and features of baguettes
Ceiling plinth (frieze, fillets, baguette) is used for interior decoration houses and apartments. However, it goes well with different types wallpaper, ceiling tiles and regular painting.
Tip: When decorating a room in a high-tech style, a frieze should not be used.
When purchasing a baguette, you must take into account the height of the ceiling and the size of the room. The larger they are, the larger the baseboard should be.
By installing a baguette, you can:
- Hide defects arising from puttying or wallpapering between the ceiling and the wall;
- Hide uneven wallpaper trim;
- Decorate the room;
- Underline its outline;
- Give the finishing touch.
A fairly diverse assortment of these products, when the owner decides to use them in the decor, allows you to choose the best way for the interior. Fillets differ in size, shape and material of manufacture.
Baguettes can be made from different material, but we will only touch on the most popular options:
- Foam, decorative... Such plinths for ceilings are used most often, which is explained by:
- low cost;
- beautiful appearance;
- low weight;
- ease of installation of elements;
- they do not absorb moisture;
- do not rot;
- easy to cut with an ordinary sharp knife;
The disadvantages include:
- low fire resistance;
- great fragility;
- sloppy joints due to graininess of the material.
- Gypsum... Such fillets can only be used with flat walls and ceilings, since the material is not flexible. They allow you to turn a modest room into a real palace. The products are fireproof, but, like all gypsum products, they are quite hygroscopic.
Disadvantages of the material:
- heavy weight;
- the complexity of installation.
- Extruded polystyrene foam... It has all the advantages of foam and more accurate joints, which is associated with the increased density of the material. But the price is slightly higher.
- Of natural wood ... These products are used for premises made in classic style... Due to the rich appearance, which can be seen in the photo below, and the high cost, they belong to elite baguettes. They are made from expensive hardwood wood:
- oak;
- ash;
- mahogany.
Lack of material - it absorbs moisture, which may cause deformation and even mold over time.
The most popular are baguettes made of polystyrene and modern expanded polystyrene.
The procedure for the repair of the premises
So, which glue first, skirting board or wallpaper? The quality of do-it-yourself work depends on this.
However, in any case, the instruction for carrying out preparatory work is as follows:
- All dismantling works are carried out in the premises;
- Garbage is taken out;
- Replacement of windows, radiators, all joinery;
- If necessary, change the electrical wiring;
- Slopes are made;
- The walls are aligned.
And only then the finishing begins. Let's say right away that you can glue the ceiling plinth on the wallpaper. Moreover, many people do this in order to save time on wallpaper trimming, which must be done exactly on the baseboard when gluing. However, this solution has several disadvantages:
- It's no secret that the walls in our apartments are often far from even. Adhesive plinth on such a wall without wallpaper, it is always possible to seal all the cracks that form with gypsum putty or sealant. The result is neat connections and the skirting board holds up much better. When gluing to wallpaper, this trick cannot be turned.
- Further. If you glued the plinth to the wallpaper, then when finishing it, you run the risk of staining the walls - you can smear with glue with an awkward movement or drip paint when whitewashing.
- Well, and the last nuance - if you want to replace the wallpaper with new ones, you will have to cut through the old ones with a knife so as not to tear off the baguettes.
How the ceiling plinth is glued
Now let's take a closer look at the work itself.
To complete the work you will need:
- Carpentry miter box and hacksaw with fine teeth;
- Stationery knife;
- Roulette and pencil;
- For wood and other rigid skirting boards (except plaster), it is better to purchase a miter saw.
Tip: Before gluing the ceiling plinth to the wallpaper, you should accurately calculate its quantity and purchase one extra piece in case of a cut when cutting.
How to attach a baguette over wallpaper
The order of operations is as follows:
- Marking is made on the ceiling and walls. In this case, a chopping thread or a long rule is used to flatten the baguette.
- To trim the plinth, when joining the material in the corners, a miter box is used.
- The baguette is glued: first in the corners, then along the entire perimeter, but if there is a markup, the sequence of work does not matter. Liquid nails are used as glue. This glue is applied in a thin strip to the edge of the fillet from the back side, after which it is pressed against the wall. Squeezed out excess glue quickly, before it has time to dry, is wiped off with a damp sponge or cloth.
- The gaps formed between the wall and the skirting board, joints, especially at the corners, are very carefully covered with silicone. It is necessary to ensure that the surplus does not fall on the wallpaper and floor.
Advice! There is a way how to do it as cleanly as possible, with practically no risk of staining the wallpaper. Before gluing the skirting board along the marked line from below, masking tape is glued, which will need to be removed after all work is completed.
- The frieze is painted with two brushes - one larger for the main part, the other small for neatly whitening the edges.
The sequence of work on gluing the frieze before gluing the wallpaper is practically no different, except that the baguettes can be processed much more carefully, with grinding the joints and other delights.
There are other benefits too:
- As an adhesive, you can use a finishing putty - this solution is more justified, since the plinth becomes almost monolithic with the wall.
- The walls do not need to be covered with masking tape before painting.
The density and properties of the materials from which the ceiling skirting boards are made affect the sequence of gluing them and the wallpaper. Therefore, we can conclude: flexible and lightweight friezes are glued to the wallpaper, heavy and hard ones are attached only to the wall.
What comes first, wallpaper or skirting board? This question, we think, has been answered. The video attached to the article will cover the topic in more detail.
sdelaipotolok.com
Material selection
The modern ceiling plinth is a decorative strip designed for finishing at its joints with walls, as well as multi-level connections. Hides irregularities and defects in the finish hard-to-reach places, rounds the corners, giving the room a more aesthetic appearance.
Used as an alternative to plaster molding:
- Materials for the manufacture of such skirting boards are polystyrene (foam) or polyurethane. Polystyrene options are much lighter, so glue or putty can be used for fastening.
- Styrofoam skirting board is ideal if it needs to be fixed on one side. These are usually places where electric lights or ceiling moldings are hidden for attaching curtains.
- Also, a similar method of fastening is sometimes used at the junction of the pipes of the heating system.
- The structure of such material is of two types. The first, the simplest, is large grains, like ordinary foam.
- This is the most inexpensive option... Average price for running meter, approximately, 15 -25 rubles.
- The second is a solid homogeneous structure. This skirting board is more durable, but it will be more difficult to use in places with gentle curves.
The quality of the expanded polystyrene itself also varies. It all depends on the manufacturer. Therefore, when choosing a product, focus primarily on the price.
Polyurethane
Polyurethane skirting board has excellent properties. It is very flexible, which makes it possible to use it even for finishing arches.
You can verify this by looking at the photo below:
- Polyurethane is resistant to moisture, mold and insects. It is much stronger than foam and resistant to mechanical damage, which makes it possible to use skirting boards made of this material for the floor.
- Also, the advantages include environmental safety and ease of maintenance. The surface of such a plinth is easy to clean with water.
- It is permissible to use household chemicals, including abrasive cleaning agents.
- The variety of colors of polyurethane skirting boards is also wide. Drawings and textures vary.
- You can purchase both painted and prepared for painting options.
Note: When installing the ceiling plinth, use a special high-strength adhesive that can easily support its weight. Installation on filler is not recommended.
Small nuances of choice
Arriving at the store, you will see a great variety of options presented. To determine which one is right for your room, just remember a few simple rules.
- Narrow skirting boards (up to 7 cm edge to edge) They will harmoniously fit into the space if they are used: in the kitchen, bathroom and toilet rooms, as well as in rooms with low ceilings.
- Wide options (over 7 cm) - look great in spacious rooms full of light, such as a hall or living room. Usually they have an original texture, which will help to create an interesting appearance not only of the ceiling, but of the entire room.
- Choosing a plinth for finishing a multi-level ceiling, you need to focus on the distance between the levels. And it is best to entrust this matter to the master who will perform the installation.
- Colored skirting board most often used while observing a certain style, in addition to other room accessories. Otherwise, it's best to buy a classic white version... If necessary, it can be colored in desired color further.
- Skirting board quantity, should not be equal to the perimeter of the room. Take a couple of meters in reserve, since during the installation process there will certainly appear scraps that you cannot use.
- And if the outer side of the skirting board contains a textured patternthen rest assured that there will be even more waste.
- To simplify installation, special glued (and even cast) corners are soldwhich can save you the hassle of docking. This is especially important if you are not a professional.
Attention! Often in our homes, walls and ceilings are not even even, even after finishing. This can make the corners ineffective and even more difficult. Plus, remember that the corner is two additional seams that will have to be repaired. Also, do not buy corners if your skirting board contains drawings, as there will be problems with fitting.
Preparatory work
From all that has been said above, we can conclude that before proceeding with the installation, it is necessary that both the walls and the ceiling are well prepared. Although, the skirting board can be glued either directly to the wall or to a completely finished surface.
- But remember, if you have simplified your task and glued the skirting board, for example, over the wallpaper, then with the subsequent dismantling they will become a serious problem. And, most likely, the skirting boards will have to be re-glued.
- It is best to install the frame before finishing the decorative finish. The wall must be plastered and primed.
- If there is mold on the walls, then it is necessary to treat them with a special antifungal impregnation or at least the usual whiteness. Chlorine perfectly kills mold spores, but does not guarantee protection against their further appearance.
Note: The ceiling must be 90 - 100% ready. Finally, you can leave the whitewash. If your ceiling is stretched or already plastered, then there is nothing to worry about. The skirting board is glued directly to it.
Otherwise, the ceiling is first prepared for plastering. It is as follows.
Process step by step
- Using a spatula, remove the old whitewash from the ceiling, if any.
- Cracked plaster must also be removed. It is removed until you feel that you have to make an effort to remove it. This means that the plaster in this area is suitable for further use.
- After stripping old coatings, remove all dirt and dust from the ceiling and let it dry well.
- The next step will be the application of the primer. This is necessary to improve the adhesive properties of the putty, i.e. concrete or old plaster they will not draw moisture from the applied mixture, which contributes to its better drying and prevents the appearance of cracks.
- The most convenient way to apply the primer is with a conventional long-handled roller. With it, you do not have to constantly go up and down the ladder to move on to the next section.
- High-quality soil is absorbed almost instantly, so you do not need to go through the dry place several times. Next, we look at the instructions and give the primer time to dry completely. Then you can proceed directly to the puttying.
- The putty is applied in several layers. Usually there are two of them: the starting layer and the finishing layer. Each of them uses its own type of putty.
- Starter mixes are coarser in consistency. Designed for preliminary surface leveling.
- Finishing - softer, consist of small particles. They are used to create a perfectly flat surface, which is later whitened.
Tip 1. The layer of putty should not exceed 5 mm, otherwise the surface may crack.
Use gypsum instead of filler to level surfaces with large differences. Remember that working with it is much more difficult due to the fact that it dries very quickly.
Advice 2. To prevent the plaster mixture from hardening longer, add PVA glue or ordinary washing powder to it. Some add milk, but this is not worth doing, as it creates an ideal environment for the growth of fungi.
Tip 3. Do not forget to apply a layer of primer after each layer of putty. It must also be done before whitewashing. Preparation for plasterboard ceiling plasterboard is slightly different. It is also primed, but the composition must be suitable for working with drywall.
A starting layer is not needed here, but instead of it you will need to putty the joints at the joints of the sheets. To find out how to do it correctly, you can watch video clips, of which there are a great many on the Internet.
Installation of skirting boards
After completing the surface preparation stage, you can start installing the skirting board. All work can be done by hand, without the help of specialists.
First of all, we will choose the installation method:
- It is best to use glue if our skirting board is mounted: on stretch ceiling; to surfaces made of plastic, MDF or wood.
- We attach to the plaster with finishing putty... In this case, this method is ideal, as it allows you not to notice the unevenness of the wall, filling voids and cracks with putty.
- On the reverse side along the edges, each skirting board has a corrugated section. These are the junction points to the ceiling and wall. This is where we put putty or glue.
- The putty is easiest to apply in a thin layer using a small spatula. Glue "liquid nails" - using a special gun.
- The putty is applied in a continuous continuous layer. Whereas glue can be applied pointwise, this should be done only in conditions of austerity.
- After installing the plinth in place, it is necessary to remove the excess glue that has come out. For this we use a dry cloth or spatula. We do this right away, as the glue can dry out.
Attention! Before applying the adhesive, be sure to complete all the manipulations to fit the skirting board (cutting corners, plank length).
Fitting a ceiling plinth is not a tricky business, but still, there are some subtleties. Below we will tell you more about them:
- If you use corners in your work, then they are the first to be glued. After that, it is necessary to fill in the space between them by gluing the skirting board. First of all, we glue the places where the solid bar lays down.
- For the remaining spaces, the skirting board will have to be cut. This is done using a hacksaw for metal or a clerical knife. To create an even cut, it is best to use a miter box.
- This is a tool that is worth a penny. It allows you to cut skirting boards at 90 or 45 degrees. There are more advanced options, but you can work with the one below.
- It is best to measure the plinth in place, if this is not possible, then use a tape measure. With one end we rest the plinth against the already glued corner and apply it to the place of future fastening.
- We put a mark on the plinth with a pencil or clerical knife. Then we make a cut and remove the resulting irregularities. Our section is ready for finishing installation. Thus, we go through the entire perimeter of the room.
- The plinth is installed in the same way, without using corners. Previously, using a miter box, we form an angle.
- We start the sticker from the corners where it is possible to lay solid strips. Then we move in the same way as in the first method. Adjusting the length of the plank in the places where it adjoins the corner is done as follows.
- The skirting board should be longer than the place where it will lie. The first step is to cut the corner. Next, set the corner in place and carry out the markup. When placing the mark, take into account the thickness of the saw blade, so it is better to leave an additional 1 - 2 mm.
If your baguette contains textured patterns, then start glueing from the most inconspicuous corner, since it is the starting angle that may not fit well. We glue the strips in order, strictly in one direction. Otherwise, the skirting boards at the joints may not match the pattern.
Cutting corners with a clerical knife
If you didn’t have time to get the miter box, then you can cut the corners with an ordinary clerical knife.
This is done as follows:
- We put the plinth in the intended place of installation, and mark the upper edge on the ceiling with a pencil. We perform the same operation on the adjacent wall.
- The point where the lines intersect is the point where the skirting boards meet each other. Reapply the plinth and put a mark on it, at the level of the obtained point.
- The cut is made from the bottom edge of the plinth to the mark. We put the knife to the cut point and turn it 45 degrees in the plane (tilt it), towards the part of it that will be used in the future.
- If this is not done, then a good gap will turn out at the junction, which will be difficult to hide. Cutting accuracy is achieved in a practical way.
- No need to cut the surface of the plank. One downward movement with a light pressure, quietly cuts 2/3 of the baseboard thickness.
- Next, just break the cut and align the corner.
As a result, we get an almost perfectly flat angle. This method also has the advantage that it allows you to more accurately adjust the joints in uneven places.
Finish ceiling plinth
After the installation is completed, it is time to putty the skirting board. Joints and corners are subject to sealing. You will need a small rubber spatula to work. In the absence of such, your own finger will do.
We fill the gaps with putty. The deeper the better. We collect the surplus with a spatula, after which we pass along the plinth with a damp sponge. After drying, the joint will be barely noticeable.
Well, the last part is whitewashing or painting. Like other surfaces, you need to whitewash in two layers.
Ultimately, we get beautiful ceilingthat will serve you for a very long time. The freshness of the whiteness can be restored by repeated whitening.
We told you how to choose a plinth, how to putty, and even offered excellent options for decorating the ceiling. If everything is done correctly, then the result will surely please. Try it, train and you will definitely succeed. And we wish you success and good luck - we will be very glad if we could help you with our advice!
23 November, 2016Specialization: master in the construction of plasterboard structures, finishing worksoh and styling floor coverings... Installation of door and window blocks, decoration of facades, installation of electrical, plumbing and heating - I can give detailed advice on all types of work.
Today you will learn how to glue the ceiling plinth correctly. Many people mistakenly believe that it is very easy to glue the skirting board to the ceiling. And the result of such a delusion is crooked, poorly docked and in places falling off elements. All these troubles can be avoided by performing several simple recommendations, which will be discussed below.


Description of 2 workflow options
Let's figure out how to glue a polystyrene and polyurethane skirting board, since these options are used in 90% of modern houses and apartments. The technology is based on your own experience, so you just need to repeat all the steps, especially since gluing is a simple process, construction skills are not needed, accuracy and precision are much more important.

Option 1 - fastening to a putty compound
This option is suitable if you have not yet glued the wallpaper, I consider it the most preferable, since the result is high-quality and reliable. Thus, both foam and polyurethane and gypsum elements can be fixed.
First, let's figure out what materials are needed.

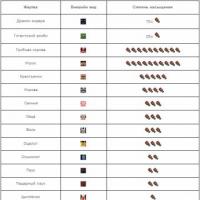
| Material | Selection recommendations |
| Skirting board | You choose the specific option yourself, it is important to remember a simple rule: for low ceilings and small rooms it is better to take narrow strips, and wide elements are more suitable for tall rooms. Foam products are most often used, they are distinguished by a low price, a wide range of possible options and a minimum weight |
| Putty | Many do not know what to glue the elements on and buy special glue, while the rest of the putty disappears at hand. There are no special requirements, the main thing is that the mixture is suitable for work and with a normal shelf life (you should not use fossils from bags that have been in the basement for several years) |
| Primer | To fix the elements to the base as firmly as possible, you need to prepare the surface. An acrylic-based primer is best suited for this. |
You can also use a gypsum adhesive, but I do not recommend it for the simple reason that the mixture sets very quickly, and there is not very much time to expose all the elements perfectly.

Now let's figure out which tool is used to glue and prepare the plinth:
- Cutting is best done with a fine-toothed hacksaw; metal tools are best. Use construction knife I recommend only for elements with a width of up to 20 mm, since it is impossible to cut wide strips with high quality and evenly in this way;

- For perfect cornering you will need special device, it is called a miter box;

- Putty is applied with a spatula up to 100 mm wide;
- A brush is required to apply primer;
- If roughness remains on the surface, it is easiest to remove them with fine sandpaper.
Now let's figure out how to properly glue the ceiling plinth:
- First of all, it is necessary to check the junction of the ceiling and wall, if there are irregularities on the surface, then they must be eliminated;
- The place where the frame will be attached must be treated with a primer, just go around with a brush to strengthen the surface. Before use, the soil must be mixed (if you have a ready-made composition) or diluted (if you have a concentrate);
- It is best to pre-mark the line for placing the plinth, you can simply take the element and draw its position. This will allow you to see clear landmarks during work, you will control the process and will not fix the product crookedly;

- Measuring the exact length of the elements is a very important process, if you are mistaken by even a couple of millimeters, then gaps will appear at the joints that will have to be repaired. Therefore, do everything with maximum accuracy and measure the dimensions down to a millimeter in order to dock all the components as tightly as possible;

- After the dimensions are determined, it is necessary to mark the lines on the baseboard and cut. Here it is important to install the plinth in the miter box as it should be, if you confuse something that spoil the product. The diagram below shows how to align the planks correctly when cutting the joints of the inner and outer corners, use the picture as a guide when working;


- When the preparation of the elements is completed, you can prepare the glue for the ceiling plinth. To do this, we just need to dilute the putty with water in the same way as for finishing work, the mixture should be moderately thick and well stirred so that there are no lumps in it;
- Now you need to apply the composition to those sides of the skirting board that will be pressed against the base. The layer should be even, but not very thick, otherwise after pressing from all sides a lot of excess will come out, which you will have to remove. It is not necessary to apply the mixture on surfaces that are not in contact with the wall and ceiling, there is no sense in this;

- How to properly glue the ceiling plinth? It's simple: work starts from the corner in the most visible place, the element is attached to the surface and tightly pressed against it. Most likely, excess composition will crawl out from under the element, they should be carefully removed while the composition is fresh, and this is easy to do;

- When the excess is removed, at the same time, the gaps at the joints are closed, if any. That is, you carefully align the joint, giving it the perfect look, this putty is better than glue. Even if there are irregularities on the wall, you immediately cover them up and thereby achieve an ideal result;

- The next element is attached in the same way. But, before gluing the abutted skirting board, you need to apply putty to the end joint, so you can immediately close up the connection and fasten the strips in this place. The most important thing is to clearly combine the products so that the overall geometry is ideal, any displacement will be very striking;


- If after drying there are irregularities at the joints, then they should be carefully removed with sandpaper... After that, the surface is painted in the desired color, everything is simple here. The only thing worth mentioning is that if you need to protect the walls or ceiling from paint, then masking tape is pre-glued so that the work goes quickly and efficiently.

When pressing the foam plinth, you should not press on it with your fingers, as the material is soft and traces may remain on the surface that will have to be either putty or left as it is. It is easiest to press the elements with the back of your hand.
Option 2 - using an adhesive
This type of work can be used both on bare walls and on surfaces that are already covered with wallpaper. The only thing I want to draw your attention to is that the wallpaper must be glued securely, if they begin to fall off later, the plinth will also come off.
First of all, let's figure out which glue is better to glue the baseboard:
- Universal assembly staff are a transparent mass that solidifies slowly and is used for different types materials. The most popular version of them is "Titanium", it is also often called polystyrene glue, although it is for this material, not from it. I rarely use this composition, since working with it is inconvenient: the surface is smeared, left for a while, then pressed and held;

- An excellent solution is liquid nails, they are available both in special cylinders for a gun and in tubes. There are special options for expanded polystyrene products, they are best used;

- How to quickly glue the skirting board if there is no glue at hand? Acrylic sealant is perfect, it has the right viscosity and fixes the elements very reliably. Personally, I most often use this option, since it has another important advantage, which I will talk about when describing the work below.

Review the list the necessary tool it makes no sense, since it is similar to the section described above with the only difference that in this case a spatula is not needed and there is no need to prepare the composition. Therefore, I will immediately begin to explain how to properly stick the elements.
Diy work scheme consists of the following points:

- First of all, the surface must be checked for irregularities, if any, then it is advisable to eliminate them so that the strips are pressed as tightly as possible;
- Then the length of the required elements is measured, you can also mark the wall to see the location of the plinth, these operations have already been described above;
- Cutting is done with a miter box;
If it turns out that this device is not there, then you can make it on a sheet of paper or cardboard, the main thing is to set the corners correctly. It is more difficult to work with such a device, but as a way out of the situation it will work perfectly.

- What kind of glue to glue the elements, we figured out above, and if you have an option in a balloon, then do not forget to purchase a gun to simplify the application process. The composition is distributed in a line on those surfaces that will be glued. Sometimes the elements are attached only to the wall, in this case the glue is applied only to one side;

- The elements are neatly positioned at the gluing point and attached as indicated in the instructions for use of the composition. Some options need to be held, some pressed, then removed for a while to set the glue, but it is easier to use those that set quickly: pressed, held for a few seconds - and that's it (the sealant is just right for this);

- The plinth is left until the glue dries (the time is indicated on the packages with the composition), after which you need to close up the cracks that may occur at the joints or in the places of irregularities on the walls. Acrylic sealant is used for work (that's why I wrote above that it is most convenient to use it), it is applied in the necessary places, after which its excess is removed rubber spatula or even with your finger so that the joint is neat and even;


- If necessary, the plinth is painted, but before that it is advisable to prime it. If you do everything carefully, the framing will look great anyway, because both the strips and the sealant are white, and if there are no irregularities on the surface, then the joints will be almost invisible against the general background.
I am often asked if there is a self-adhesive skirting board for ceilings? But so far I have not seen such options, there are flexible elements for the floor and bathroom, so the ceiling structures will have to be fixed with traditional options.
Conclusion
From the article you learned what is better to glue the skirting boards. All the options I have considered are reliable and durable, just some technologies are simpler, and some are more complicated. The video in this article will tell additional information and will clearly show some important points of the workflow. If you have questions and clarifications on the topic - write them in the comments under this review, we will analyze them in the most detailed way.