How to quickly make a fence in the country. Cheap dacha fence. What is cheaper to make a fence? Wooden fence from the stakenik - the most fiscal option
It is worth protecting its territory if not from the encroachment of intruders, then at least from the run of their own livelist in the village. And to minimize costs, you can build a fence with your own hands.
The cheapness of the girlfriend is very conditional. For example, a tire owner does not know where to give tires, and its own sawdress is a permanent provider of sawdust and sawn timber. But for an ordinary resident, the search and collecting a large number of similar waste will be a problem. If the difficulties are not afraid, and the neighbors will gladly throw off a pair of hundreds of bottles, it will take advantage of practically Darmov.

Firewood
Several cubic meters of firewood are not only heating for the entire winter, but also an excellent material for the fence! It is suitable for almost any tree, except for birch, which trumpets in a couple of years. For example, the oak from the exposure of moisture becomes stronger, and the coniferous rocks practically do not rot.
To build a wall of chorbacles, no special skills need:


The only drawback of such buildings is the briefness, since the tree is still exposed to moisture and starts rotting over time.
Bottles
Plastic and glass bottles are an excellent way to not only save on the construction of the fence, but also utilize household waste. The device of this barrier is extremely simple:

In addition, plastic when heated can evaporate harmful substances, so it is not desirable to expose it to direct sunlight. But due to the materials used, the fencing from the glasstar will flash not one ten years, having time to borrow with several generations of tenants.

Tires
Tires are used everywhere - as flower beds, playgrounds and even foundations. So why would not make them even a fence? For this, practically nothing will need:


The only drawback of the tire fence is when heated it will be quite unpleasant to smell rubber. Therefore, it is recommended to have it away from the residential premises and resting places.
Reliable and simple fences
Of course, the usual fences are much easier to implement. After all, we carry the tires - a hard lesson, the hand will get tired very quickly. But to stretch the grid between the columns or to put the wooden fence - what can be easier?
From the grid
The most common type of fence is a chalk grid. It makes vegetables, large areas and even yards. If appearance Does not cause aesthetic delight, you can use a more modern option - a welded grid. Its installation is also simple, but allows you to make a fence more accurate.

For the construction of a fence from the grid, you will need:

With work, you can cope alone, but it is better to get an assistant:
- Placed the territory for the future fence. For this purpose, the armature is driven in the corners, between which BECHEVA is tensioned.
- The lower part of the pillars (150-160 cm) is launched with two layers of enamel from rust.
- First install angular pillars. A well will be clogged in a depth of about 1 m and it is immediately clogged with a sledge hammer pipe for another 30 cm. After that, the pillar immediately falls asleep with sand with rubble, shed water and thoroughly tram.
- Pitch pillars - up to 3 m.
- Since the mesh fence is lightweight and does not have high sailboat, posts, plugged above the level of the fruit of the soil, it is better not to concrete. Otherwise, the concrete will "squeeze" together with the pillar and the fence will begin to wander after the first winter.
- If you need to make reliable supports, the wells are stuck with a depth of 1.5 m, a sandy-gravel pillow is embanked to the bottom, a formwork from the frontieroid is made, the pipe is clogged and poured with concrete.
- After all the pillars are installed, the deformed tops are cut and the grid is stretched. It can be attached to the pillars using welded hooks, wire or mounting screed.
- If the grid is installed with the stretch of the reinforcement, then after it is fixed on the posts through the cells, the steel rod is used, which is welded to the pipes. This will increase the strength of the fence and will not allow the grid to be saved.
- Poles and corners are processed by enamel from rust and bloom. To simplify the work, it is better to use a paint sprayer - a tassel will turn out longer and less economical.


And so that the fence looks interesting and unusual, it can be decorate with weaving from the wire. After all, it is so nice to go into the courtyard, fenced by the real work of art!

From professional flooring
Professional flooring - durable and relatively inexpensive material. You can choose a colored coating of virtually any color, and even the starting builder will cope with the installation:
- For the professional flooring, the soil and concreted pillars will be required below. On the pummination soil to prevent the column sediment, it is better to make an extension of the support of the TISE foundation.
- As with the construction of the fence from the grid, the pipes of the pipe must be treated with rust primer.
- When the foundation is completely frozen, transverse lags are welded to the columns - profiled pipes 4x2 cm. They should be 4 cm from the top and bottom edges of the sheet of corrugated. For fences with a height of up to 170 cm, there are enough two crosslinor, if the fencing is higher - you need to do the third in the middle.
- All metal parts are processed by primer - after mounting the professional flooring it is problematic.
- Proflists are attached to the lags with self-draws on the metal with the allen in the wave.


If you put the rack with bricks, the fence will look more presentable. For this purpose, 4 bricks stacked in a circle in dispersion. Each row of bricks is checked by the level in two planes, so that the poles do not get oblique. Inside the pipe poured a sand-cement mixture.

At the same time, metal racks are placed brick together with welded lags. It is much more reliable than trying to fix the league on facing brick after completing the masonry.
Customize the fence from the inside can be highly alive plants. In the time being we grow, you can pull the photosette.

Its life is 3-4 years old, after which it will begin to fade. But during that time, planted bushes and trees will be strengthened.
From wood
Wooden fences are traditional for countryside. After all, it is possible to find building material at an extremely attractive value, if you look good on the saws - illiquid with pickup will cost a practically for nothing.
For the construction of a wooden fence will need:
- manual circular saw;
- screwdriver and self-tapping screws or hammer and nails;
- grinding machine or grinding wheel and bulgaria;
- kraspopult;
- benzobur or shovel.
Installation of a wooden fence attracts with its simplicity:


For such a fence, the selection of boards is important - they should be without flaws and cracks. A planed board looks much more carefully, but any thickness of 2 cm is suitable.
The only drawback of the tree is a short service life. On the other hand, repairing certain sections of such a fence is much simpler!
Original fences
The novice builder is better to try its strength on simple objects. But for those who have already ate the dog on the construction of fences, there are several non-standard optionsthat will surprise the neighbors and please our loved ones!
Stone
Stone masonry, despite the external simplicity, much more difficult to perform than the brick. This challenge bricklayers will be dry laying of stones. To do this, at the edges of the future wall, two trapezoids are installed, between which the Bacchev stretches - this is a reference point during masonry.

The trapezoidal form of the fence is needed so that the stones do not start to pour, because they are held only their own weight. The main complexity in such construction is to properly select stones so that the ranks do not deviate from the horizontal.

Gabion fences are becoming increasingly popular. For their device, a ready-made design, installed on a compacted soil with slain supports, is decent fencing weight. And so that in the process of filling the cell by stones, the design did not cut the design, after each row, the grid is fastened with special hooks.

Alive

And if it does not scare the fact that for the growth of the meter samshet, it will take more than one year, you can begin to implement this idea.
First of all, you need to decide on the height of the desired hedge:
- high - Tuya, Maple, Juniper, IRGA;
- average - rowan, bearing, barberry;
- low - it is possible to plant the self-sushit, a palm, tees.
For high living hedges, deciduous fast-growing shrubs are often chosen. After all, it is necessary to protect against other people's eyes as soon as possible, and not after a dozen years. But in the future it will be necessary to close this wall very often, otherwise it is possible to be hidden behind a five-meter fence. Plus, the deciduous hedges - the leaves flowing in the fall allow us to get a maximum of light from the scarce winter sun.
You should not believe the photo on which the half-one-meter summer hedges are represented - for their formation it took more than two decades. You can buy already grown bushes, but the cost of such a fence will be far from democratic.
Wicker
The woven is a traditional fence, today undeservedly forgotten. Constructions are increasingly artificial rattanStanding a lot of money.

But it is very easy to build it:


The house fenced by such a shoulder will be a cozy family nest.
Forged
Forged fences attract attention with their opening and air industry. This is an excellent option for a small area that allows you to visually expand the space.

Of course, without good Koval, do not do here. But the finished spans are very simple:
- foundation with pillars is poured, the distance between which is equal to finished spans;
- when concrete froze, wrought elements are welded to the columns;
- retained loops for the wicket and gate;
- the fence is processed by primer and paint.
Very simple I. inexpensive option Fence of the site fence in detail and available is shown in the video:
In this article: what criteria depends on the choice of the type of fencing; characteristics of materials used in the construction of fences; how to independently make a woven; how to build a fence from the naked; The fence from the chain grid is independent construction.
Creating a fence around the perimeter of the country area is the task of paramount importance. Moreover, it is necessary to protect the site before the construction stage of the cottage building, otherwise the material values \u200b\u200bplaced on its territory will be regularly plundered. The fence can be lattice (not solid) and deaf (solid), formed by shrub, wooden, plastic, metal and stone materials or combinations thereof. The role of the fence in ensuring the safety of the country landscape is difficult to overestimate - consider in this article ways to build country fences from different materials, while taking into account the regulations and requirements in the territory of the Russian Federation.
Type of fence - selection criteria
The territories of neighboring country sites are usually adjacent to each other and the fence between them serves not only as a fence, but also to determine the boundaries between the plots. According to the requirements of SNiP 30-02-97, fences separating the cottages adjacent to each other cannot be solid (deaf) and have a height of more than 1500 mm. Thus, dacha fences can be solid only in the part of the site that goes outside. However, the requirement of this SNIPA regarding the height and the light permeability of the intake of the fence between the adjacent territories of the cottage can be circumvented on a legitimate basis, although not without some losses - about it at the end of the article.

Structurally, any fence consists of carrying structures and trim. The supporting struck structures are vertical pillars of supports, fixed in the ground and horizontal runs (spans), which are attached to the objects of the sheath, wicket and gate. Materials used to cover the fence can be the most different - stone, wood, metal or plastic. The choice of the type of fence and structural materials for its construction depends on the following "local" factors:
- The characteristics of the soil.From how much these soils are dusty or bubbling, their ability to hold the fence supports, power and blocking of the foundation. The more open terrain has a terrain, the stronger the seasonal winds, the greater wind load will be experiencing a fever. In equible areas with strong winds, it is necessary to either install the supports of the fencing on a powerful foundation, or to samples are rapidly resolved, leaving the slot between the objects elements. In both cases, the distance between the supports should be less than the usual (less than 2500 mm).
- Style design of the country area. External decoration of the fence should not be dissensing with the cottage style - if the owner gives security issues great importance And he intends to put a metal or stone fence, then it is worth falling off at least from its inside the curly plants.
Before building high fences with a deaf trim, it should be borne in mind that tracking events for them will be visually impossible - only a video surveillance system can solve this problem.
Characteristics of materials used in the construction of fences
For the territory fences, the tree is traditionally used - it is cheap and available for summer residents. Positive characteristics of a wooden fence:
- simple installation, there is no need to attract special equipment;
- the deafting of the wooden fence reliably protects against noise from the adjacent territories and dust, prevents observation from the outside;
- wood has high environmental safety features;
- the rarefied fever will reduce the wind speed, deaf - completely protects from it;
- it has high aesthetic characteristics, which allows you to combine a tree with any other materials without prejudice to the overall style.

Negative characteristics of wooden fence:
- fire hazardous material;
- alternations of temperatures of cold and warm seasons have a destructive effect on it;
- needs to protect against moisture impact, requires periodic painting;
- the maximum service life will not exceed 10 years.
The most popular metal fences are from the chain grid, professional flooring. Characteristics and procedure for building fences from corrugated floor are described in detail in one of our articles, and now we will analyze the characteristics of fences from the chain grid.
Positive characteristics:
- service life of about 20 years;
- simple installation, which allows for a short time to upset significant areas;
- permeable for sunlight (does not give shadows) and at the same time serves an irresistible barrier for animals;
- non-combustible material.

Negative characteristics:
- does not protect against sounds, dust and wind;
- is not an obstacle to visual observation by outsiders;
- low ability to prevent the penetration of intruders;
- not galvanized and not covered by PVC grid-slave is subject to corrosion;
- according to environmental data, the zinc layer with a galvanized grid rain rains causes soil infection with rains;
- in case of poor quality chemical composition Facing from polyvinyl chloride, it will not withstand several alternating cold and warm seasons - it will radiate.
In addition to the above-described fencing from the metal, metal sectional and forged fences are made, the compounds of the elements of which are made welding.
Positive characteristics of sectional fencing of metal:
- service life of 15 years;
- strength to impact, elasticity;
- light permeability at high protective properties from penetration of outsiders;
- nonseasing;
- diversity design solutions.

Negative characteristics:
- they are not able to confront wind, noise and dust;
- are not an obstacle for a third-party observer;
- anticorrosive processing of welded joints is necessary;
- independent installation, due to the need for welding work, it is difficult - the involvement of professionals is required.
Among metal fences, forged fences go a mansion - this is a kind of welfare of the owner of the cottage.
Positive characteristics of forged fences:
- with timely, color will serve about 50 years;
- their elements and connections between them are durable, will create a reliable barrier for intruders;
- light traffic, almost complete lack of shadow;
- allow execution of complex designer solutions;
- do not burn.

Their negative features:
- do not create obstacles for wind, dust and noise;
- have a high cost;
- permeable for foreign surveillance;
- creation and installation require the involvement of professionals;
- susceptible to corrosion.
Stone fences can be created from natural (natural) stone and artificial, such as bricks or concrete blocks.
Advantages of slaughter from stone:
- service life of at least 50 years;
- high strength;
- excellent decorative characteristics;
- resistance to temperature differences and moisture effects;
- reliable protection of fenced area from external noise, winds and dust. Create a difficult obstinate barrier for intruders, both when conducting observation of the inhabitants of the cottages and when trying to penetrate its territory.

Disadvantages of stone fences:
- require a laying of a heavy foundation;
- long-term installation work, you need to attract specialists;
- considerable labor complexity;
- the high cost of structural material and significant costs for its delivery to the territory of the cottage.
Woven in the country do it yourself
Compared with any other types of fences, the material for creating a whites practically does not require expenses - cheaper only to do without fence. However, it will last no more than 3-4 years and will provide owners more decorative fence than really able to confront anyone.

The design of the Weaves is no different from the device of any fence - wooden or metal supports and flexible rods for the trim are necessary. Wooden stands supports are made of pine with a diameter of 50 mm, the branches of willows and nuts are most suitable for the trim, in the absence of which the branches of alder, birch or aspen can be used.

The billet of the rods for the sheath is performed late in the fall or at the beginning of the spring - the straight and even rods are selected with a closer (scene space from the tree trunk) at least 30 mm, from 1500 mm long. Before the bunch of rods, it is necessary to check the branches of the tree or the bush on the break, cutting off one rod and examined the location of the cut.

If the core of the branch is very big and have a reddish brown shade, then for the sheathing of a rod from this tree is not suitable - in the process of laying between the supports they will break. Therefore, we turn to the next tree and we estimate the core cut from it the rods - only those branches are suitable, the core of which will be quite small, barely noticeable. Finding suitable material To create a shoulder, cut off the branches of smooth, suitable diameter and length that have no damage, any growths and bitch.
Sliced \u200b\u200bbars need to be dried for several hours, then remove the bark from them - if they were cut in the spring, then they will be easier to make them, but in the fall, then it will be necessary to soak in water. To patch, you need to tie a rope to the bunch and immerse in the flow water (stream, river), putting the cargo from above. It is possible to soak in non-peccable water using a sufficient capacity for this, but it will be necessary to change the water in it daily. Duration: 7-14 days.

The rods are performed using special tool - Title. To create it, you must drive two thick nails or metal rods into the wooden base on 1/3 of the length. Then the robbed nails need to be wired to a height of 50-70 mm, ranging from the point of their pairing with a wooden base and moving up, the turns at the same time should fit as close as possible to each other. Wire-free parts of nails need to be divorced like a slingshot and a chemistry.
For the ham, each rod is placed by the comlek side into the slingscake of the underage, pressed against her left hand, and the right stretching towards himself - a well-tempered bark will be removed from the rod like the peel from the banana. Sorting the rod after removing the cortex in thickness and length, proceed to the construction of the shoulder.
First of all, we are armed with a tape measure, spicy and beggar - mark the position of the future of the shoulder and the points where the supports will be installed (pegs are rushing). The usual distance between the supports is 350 mm, not more.

If metal racks are used in this capacity, then you can safely score them in the placed places to a depth of 300 mm, after preparing the holes in the ground using scrap and sledgehammer. If the supports are wooden, then they will need to prepare the stakes themselves and their placement. The lower part of the stakes intended for the props of the shoulder is sharpened and labeled the heated resin or several layers of the Kuzbass varnish on the segment, slightly exceeding the depth to which they will be driven into the ground. However, this measure will increase the service life of a wicker fence not much, more effective measures are needed - a trench of a 500-600 mm depth of 500-600 mm is taken off and falls asleep with subsequent rambling. Sand will provide drainage and gets moisture from wooden supports, thereby extending their service life. It must be borne in mind that the sandy belling will be badly held by the racks of the shoulder and therefore they will have to score to a depth of at least half-meter - wooden stakes must be sufficient length so that it is enough for immersion in the sandy back and on the construction of the whites. The optimal length of the stakes: 2000-2300 mm, that is, above the ground it will be possible to put a woven with a height of 1500-1800 mm.

To drive off wooden stakes and the subsequent placement between them, the plating rods need wooden or rubber cosyan - the metal hammer breaks the wood. Supports placed on the edges of the Weight must be put up at a small distance from the stands located nearby - they will serve as a castle for the ends of the rod.
Before weaving the sheathing, the rods should be shoved in the water for a day, two, which will make them more flexible. To attach the rods, prepare an annealed copper wire - annealing will completely remove the flap with it and make copper more flexible.
The weaving is performed from the bottom-up - the comer of the first rod is pressed with the right hand to the extreme pillar of the support, the left hand of the rod will be burned along the second rack and is displayed for the third. The next (second) rod starts at the first support of the tip (a thinner end), is held with the right hand, with the help of the left hand, we supply the second rack and deposit on the third. The alternation of commelle and the tops will reduce the number of cracks between the rods, avoid the slope of the intertwined rods to one side of the shoulder.

In order for the rods with a more tightly to each other - confuse them with the Cyonya. The ends of the rod are attached to the racks with the help of an indoiled wire. If there is such an opportunity - exit when weaving the ends of the rods 100-150 mm for extreme supports, which will allow them to be equally fired by the saw at the end of the weaving.

To protect the ends of the supports from wetting during the rains, it is necessary to equip their conical caps from galvanizing or put on them glass bottles - classically perfect solution In dressing on the stands of clay rats, but where they will take them now. When used under the racks of metal tubes, in their upper ends should be scored wooden corks.

Casting fence
At its essence, the hill is a waste on any panel, like chips with chip. Hence the low cost of the cubic meter - about 700 rubles. Meanwhile, this externally non-zero material retains all the attractiveness of wood, which allows you to create a pretty and cheap fence for the cottage at the same time.

Work on the creation of the fence is to start from the hamper ham - if you leave the bark, the fence will be amazed by the bug-cored and quickly collapse. Removing the bark - the occupation is not empty, requires a special tool, namely flat spades with an acutely sharpened blade (to the end of its cutting it is necessary to nourish the horizontal handle with a length of 120-150 mm - it will be easier to work), a small carpentry and bra blah. Removing the bark from the porridge, it is necessary to open its surface and cover the two-three layers of the antiseptic.
The support poles for the fence from the porridge can be metallic or wooden. Under the metal racks of the fence, it will take a pipe with a diameter of 76 mm and a wall thickness of 3.5 mm, with welded plates for fastening horizontally arranged wooden runs - in their quality the easiest way to use the same hollow, painted along.

Wooden fence posts are performed from oak, larch or if better options There is no, pine - the diameter of the barrel of 200 mm, length 2300 mm. The side of the poles, which they will be placed in the ground, are covered with hot resin or Kuzbass varnish in several layers.
If the runs are performed from the porridge, the distance between the fence supports depends on its length, it is usually 2000-2500 mm. On thin soils wooden and metal poles are simply clogged into the ground without additional Mer To strengthen, in the places of their installation, you only need to drill holes using a boraxy (it is more convenient to use a garden boring, but intended for winter fishing, it is more efficient) and score poles with a sledgehammer, pre-put on the end some flat board.

Sand and black earth soils will require great effort - it is necessary to dug under each pillar a hole with a depth of 600 mm, twice as long as the diameter of the pillar. Then, pour a 100 mm layer of gravel to the bottom of the pole, to put in its center, fall asleep gravel around the perimeter, take the vertical position of the post with a plumb and a building level, after setting the post tightly rammed gravel.
The sheathing of the fence with a hill is performed horizontally or vertically. In the first case, you will need to attach a 50x30 mm timber to the supporting columns on both sides and mounted a nails with a nails or a self-tapping screw to it - to fit the hill jack will not succeed, excessive waste of time.

For the vertical sheaving of the fence, the porch must be cut along, first to fix it with a cut-down peeled with a convex side inside, leaving 40-50 mm gap between it, then close them with a hill, placed by the convex side. For a larger service, a ready-made fence from the porch should be covered with varnish or paint, the ends of the posts close with plastic or metal cones - as a fence of cottages he will last about 10 years.

Fence from the chain grid do it yourself
In its popularity, as a shearing of fences of the country's territories, a chain grid is out of competition, since it meets the requirements for light permeability, reliability of fence and deadlines. Today, the market offers not galvanized, galvanized and plastic plastic grid-Rabita - the first option disappears immediately, since its service life is minimal due to the lack of protection against corrosion. The chain grid, lined PVC, is intended primarily to build fencing in warm climatic zones and on the sea coast - plastic provides protection against atmospheric moisture and high decorative properties of the fencing itself, but it is not capable of withstanding seasonal drops of high and low temperatures. Still optimal decision The galvanized chain grid remains.

Creating a fence from the chain grid begins with the markup of the position of the poles, there will be two types - intermediate and stretch. The first is usually installed in a step of 3,000 mm, the second - every 9,000 mm. It is better to use metal profiled racks as a pillars, pipes with a diameter of 60 mm and angle with a shelf from 50 mm. The length of the intermediate posts for the mesh with a height of 1.8 m should be 2.3 m, tension pillars are longer - 2.5 m.

Under the intermediate pillars in the ground using a drill, a pits of a depth of 400 mm are dried, a pit is required for stretch poles. On loams and clays, pillars concreting will be meaningless, since the punching soil will push the concrete base along with the post in the cold season - it is better to either be concreted, or tear the hole below the drainage depth. If the soil is sandstone either light loam, then the base of the pillars is concreted.
After installing the tension pillars in the corners of the future, the fences are connected to the adjacent pillars downward diagonal backups from 25 or 32 metal angles - the compound is made by welding or bolts. In principle, for fastening the grid, the racial posts will be enough on a 3-meter distance, it will not be involved between them, but this fence is unreliable - the lower part of its skin will easily raise and penetrate the fenced territory. Therefore, we need a rolling with a diameter of 3 mm, which will be skipped through the chain grid cells on three horizontal levels and keep its web from sagging and shift. In order to pull the rod between the columns, in each of them you need to drill three through holes with a diameter of 10-12 mm (the positions of the holes for the chain grid with a height of 1.8 m are considered) - the first 30 mm from the ground level, the second of 900 mm above The first, the last hole is 850 mm above the second.

We proceed to securing the chain grid on the pillars - we put her roll vertically near the support pillar, make sure that the coarse ends of the lines are in the upper side of the roll, if it is not so - we turn it over. Then we draw the upper line of the chain grid to the top of the pillar and, gradually unwinding the roll, we move to the next post. Having placed the mesh cloth between two adjacent pillars, we skip the rod rod through its cells on three levels - at the top point of the grid-Rabita, the kink is stretched through each second cell on top. By skipping the rod through the entire length of the chain grid between adjacent pillars, its ends are set in the prepared holes, stretch the wire and secure on the pillars using tension bolts.

Since the length of the roller grid is most often insufficient for the complete overlap of the perimeter of the fence, it will be necessary to spray the edges of the canvas from one roll with a web from the other. To do this, unscrew the extreme vertical wire from one web chain mesh, align the brine of the edge of the castible canvas from both rolls and screw the wire extracted earlier between the cells, stitching two canvas among themselves.
As promised at the beginning of the article, they will answer the question - how to put a deaf high fence between neighboring summer cottages on legal grounds? According to the rules of the joint venture 11-106-97, paragraph 6.12 on the country (garden), the apiary device is allowed, provided that the neighboring areas are separated by a deaf fencing with a height of at least 2000 mm, the perimeter of which retreats from the separation boundaries between the sections of at least two meters. That is, to build a deaf and high fence, if you wish, at least one hive with bees, it is possible, but you will have to sacrifice 2 meters of its country area with each of the parties, where your country area is bordered with the neighboring - the option is also not particularly favorable It is easier to put a one-year memeting fence from the chain grid and put some curly plants along it - wild grapes, ivy, hops, honeysuckle or buddha.
Country fences - with their own hands created, quite common and successful practice, the main thing is the desire and creative approach. After all, you will have to decide how to decorate the fence in the country with your own hands, well, and we will tell you about everything and give recommendations.
Inexpensive fence for giving - with your own hands to build this design, it is a rational solution.
Types and destination
Purpose

Banal, it would seem that the question, however, besides the design of the natural borders of the site, the fence can perform a number of certain functions from which it depends on the appointment in the full sense of the word.
The most convenient moment to determine what you want from your future creation is the choice of the type and type of design itself and its implementation technology.
Therefore, decide right away what you want:
- tightly closing from outsided curious eyes;
- or a little clearer designate the boundaries of the site, while without interrupting communication with the surrounding world completely.

Often use various wicker imitation and fences, which, among other things, are a sign of confidence between neighbors. But transparency or close is a subtle topic, which depends on the many factors and situations, and therefore it is necessary to consider full-fledged solo options.

Of course, the first and basic purpose of the fence is to create a barrier on the border of the site, in order to sign the surrounding that this place is employed, and also make it difficult to the unauthorized intersection of this border.
But if others deserved trust and demonstrated sufficient education, it is possible to limit the designation of the borders, but not performing the function of an indevertinary barrier. Here to solve you.
Therefore, they build fences for giving with their own hands different, then we will look at their views.
Views

Fences and their systems can be divided into groups and subspecies, but we will try to convey the thought in a simple table:
- Fencing from wood, that is, completely wooden designs without foreign inclusions - bricks, concrete, steel and other things;
- Wooden fences with steel, concrete, brick or asbestos columnsdesigned to the ground;
- Systems made of steel and corrugated. The columns are easily concreted, and the remaining parts are fitted and assembled like the designer, only using a screwdriver, welding and other things;
- Brick fences. The most serious, impregnable and solid fence, what is the price of its price. In addition, it will take the foundation, and this is also not easy and notable;
- Mesh structures. The same as the professional flooring, only instead of the profile hang modules from the grid. The wind pressure on the design is supplied, so it is facilitated and, accordingly, is cheaper;
- Concrete "Eurozab". Maybe not the most beautiful, but quite durable and reliable, which will have a hundred years. There are also problems: I need special equipment and it is better not to risk it yourself.

Important!
As you can see, there are a lot of options, and choose from what.
It remains to carefully examine the details.
Wooden fence

Typically, the first thing will be taken country houses From the container block to be located in the coming days. It may also be necessary to rent a diesel generator for giving, as the central electrification is not everywhere.
The tree is chosen due to the excellent qualities of this material:
- it is easily processed by a simple tool;
- not much weighs;
- it looks beautiful;
- harmless and even useful;
- but, most importantly - it is inexpensive.
Important!
Start with the fact that the site is placed and determine the places of installation of carrier pillars.
It can be a timber or full, other types of forest.
But it is better to make the columns from another material - steel or bricks, then the fence will live much longer, and it will be stronger.
To be clearer, we have compiled instructions:
- We place the boundaries of the site, we determine where the gate will be, wickets and so on. Then from any of the corners begin to bury in the ground by Motoburn. The depth is 70 cm, the width is 50 cm. The distance between the pits is 1.7 meters, it is necessary that they fall on the corners, pairing with other designs and the intersection points.

- We prepare the required number of columns - it will be segments of a steel square pipe 50x50 mm. They should be tied in, cover with wear-resistant soil in two layers and paint with any good paint for the outdoor work, for example, acrylic.
- The columns are installed in the pits using the level strictly vertically, align in height and concrete cement mixture, rubble and sand in a ratio of 1: 4: 5, M500 grade cement, gravel gravel crushed the middle fraction;

- Next, we are waiting for the drying of concrete for at least a week and continue: take the board and tend it along the length of the pattern. We process all the edges and surfaces with a planer, the board is proliferating or soaked with another anti-naughty agent. It is also necessary to impregnate the material with antifungal and fire-fighting compositions.

- On the columns in the installation places of the board, and it will go siding, drill holes for the bolts and cut the threads in them. Next, inspire the board, starting with the bottom, according to the principle of siding or blinds, when the edge of one board covers the end of the previous one;
- Install. Complex and massive gates better entrust to specialists.

- Pray the fence into the favorite color of the acrylic paint, we open it with a varnish or soak oil - there is already a choice for you.

Important!
As a rule, the color of the fence coincides with the color of the roof on the house, the color of the tracks or the structure itself, so that when you choose the paint seven times.
Output
Wooden fence for giving with your own hands is a fully implemented solution, and the video in this article will help you believe it, and some - and build your own fence.


For most privacy is an important factor. It allows you to feel safe and be the owner of your possessions. It is normal when we are intolerant of unexpected interference in our personal life. In the country area and country house It is easily prevented by installing a fence from girlfriend. Ordering ready-made structures is quite troublesome, since it takes a special approach to delivery and installation. In some cases, it is difficult to choose exactly what would like the most. This article will describe which components can be used, and ready-made options will be presented in the photo.
Important factors
The construction of your own fence in the country or in a country house should not begin with mounting work, and with the compilation of a small questionnaire, which will determine the objectives and purpose. It is worth thinking about what:
- what a height will be a fence;
- what is the main purpose of the hedge;
- whether he will only be a fence for flower;
- what material is most available for hedge;
- what can be combined;
- is it important to serious protection against invasion.
These moments will allow to analyze where the fence will be located. It can serve as an element of scenery, which will additionally decorate the territory of the site. Maybe the purpose of such a fence will be a fence of flower beds with flowers or vegetable cropsSo that the animals do not harm them. It would be good to decide on the material and, if necessary, to assemble the required amount for the hedge.
Metal fence
Perhaps hearing about the fence from the metal, in the imagination there are paintings of powerful and large ingredients, which over time are covered with rust and require constant painting. But if you easily approach the issue of creatively, it may be a very interesting dacha fence, which will ride the views of passersby.
Cycling Rama
If you are engaged in repairing bicycles or have a friend at the acceptance of scrap metal, then you can build an interesting fence from cycling frames. It is better to select those that are made of aluminum. They do not require special care and perfectly oppose the corrosion exposure to moisture. First of all, it will be necessary to sort designs by folding them in size. This will allow during the assembly of the fence in the country to perform alternation. All iron frames are cleaned of the old paint and are cleaned with sandpaper to metallic color. Leave after that they are not recommended in the open space, since they will quickly cover rust.

Next, it will be necessary to measure the internal diameter of the tube, which anterior fork was installed. On the specified size is selected metal pipe. The process of grinding will be very simple. A segment of the tube of the desired length is taken and is inserted into one of the frames, it will serve as an initial support. After that, the partner holds one part, and the second person hangs the frames, alternating them by the parties and sizes. When they are risen, it will be necessary to secure the fence. For this, the corners of the hedge are installed metal columns from the same pipe that are taken to the ground.
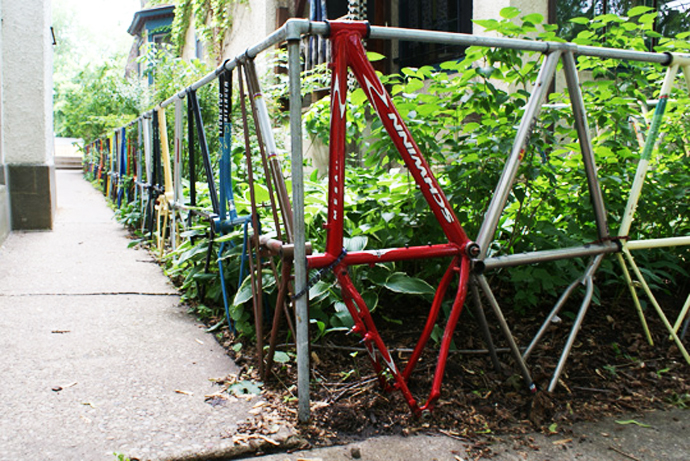
In order not to use the welding machine during the installation of the fence, it is enough to cut the thread on the ends of the pipe and using the corner tee, to assemble the intake adjoining node. Someone prefers to provide an additional stiffness of the hedge structures, the bay of a slight base of concrete and immersing the lower part of the frame in it. When the hedge will be collected, the frames can be painted in one or more colors.
Tip! If there is a large number of old bikes that are not subject to recovery assembly, then there is no need to disassemble them on the frame for the fence. Mount them as a hedge, you can entirely. An example of such a fence is in the photo.
Embroidery on the grid
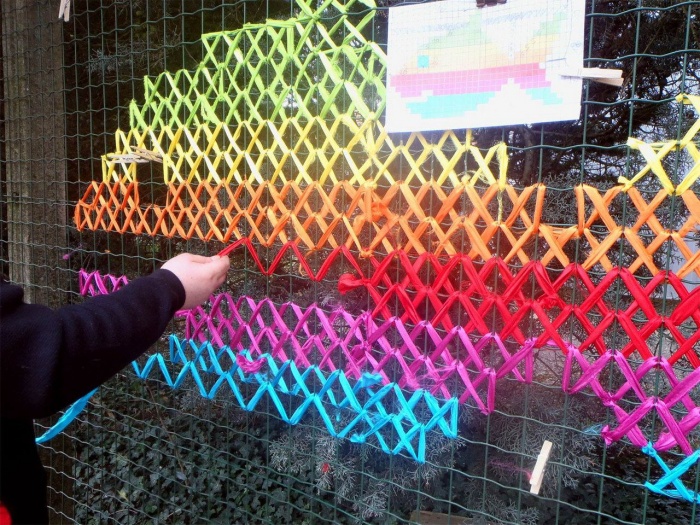
Many in the country have a fence from the chain grid, which separates the site from the neighbors or serves as the main fence. Such a hedge can be made unique to the entire village. To do this, you can put an embroidery on the hedge. It is done according to the principle of the usual embroidery cross. As a material, you can use unnecessary threads for knitting. Replace them easily with polyethylene or cellophane bags. They can accurately find breathing in abundance. It is enough to cut them into small stripes and everything is ready. On the fence can be placed any drawing. To do this, the photo file must be downloaded to the service (for example, this https://xfloss.ru/), which breaks it on colors and squares. After that, you can proceed to the implementation of the masterpiece. One option can be seen in the photo below.
Wooden fence
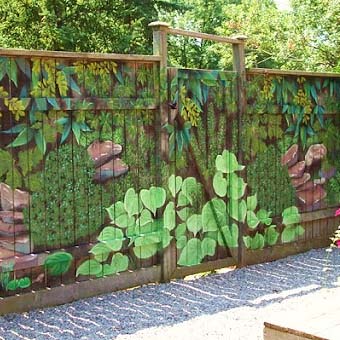
Wooden fence is one of the classic hedge solutions for the country area. Boards give various formsnot to be similar to neighbors. Such a fence requires constant care. The fact is that wood is very sensitive to moisture and pests, so the hedge must be periodically painted and processed by antiseptic compositions. Here are some non-standard and beautiful bleeding options that are suitable to do.
Breeds in the form of pencils
If you have cleared your site from old trees or made wood blank, some logs can be used to fence. Unnecessary boards are also suitable for hectares. They will not need to be processed in a special way. All that will be required for such a fence is to remove the bort and sharpen one of the ends of the log or board. No need to align their dimensions. If in the fence they will be a mistake, then it will be more interesting to look. Special effect will paint them into different colors. To fix the fence on the plot, it will be enough to wear a few major logs that will be bigger size. They must be placed evenly so that they hold the whole fence. After that, two transverse staps from the inside of the hedge are nailed.

Fence from pney
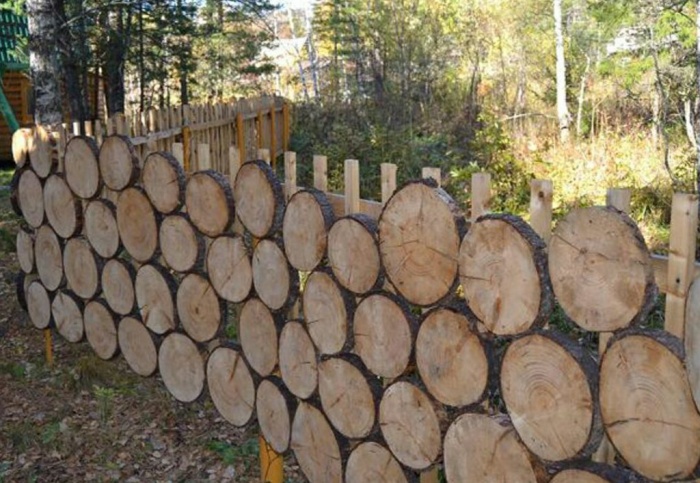
This fence will be an excellent decorative barrier for the site. It practically does not require any investments. It will be enough for such a hedge to cut round the same length. For example, they can be put on the cement solution, as shown below in the photo. The solution itself for such purposes is made only from cement and sand. The ratio should observe 3 parts to 1 for such a fence. Additionally, a good reason will be required for hedge. It is performed according to a small-breeding belt basement. There is a trench under the fence at a depth of 50 cm. The bottom of the coarse sand is stacked at 15 cm. It is well trambed. The following is placed by the reservoir of the crushed stone of the shallow fraction of the same height. After that, the formwork is set and poured concrete solution. Two weeks later, it is possible to mount the elevation. The hedge logs are stacked in a checker, fastened by a solution.

Note! In the photo below, you can see another embodiment of such a hedge. It is not going out of the whole logs, but from small cuts round. The basis for such a hedge can serve as an old wooden fence or several covered logs.
Plastic goes
The invention of polymeric compounds and their derivatives made it possible to largely simplify life and introduce new types of materials. But in some cases, the plastic only aggravated the situation by supplying the landfill with tons of waste, which will be recycled by bacteria hundreds of years. If you decide to rationally use what others consider garbage, then from plastic products you can implement a great version of the hedge. You can put the bottles and old pipes into the move.
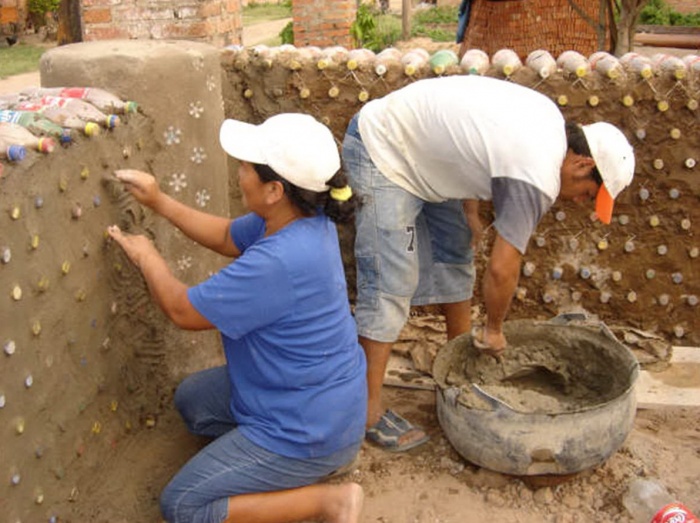
Water bottles
Such a good can be found both at home and the neighbors. From PET bottles easy to make various household items. There are several options for fences that are quite quickly assembled from this material. The main operations that will have to do is to soak the bottles that will be used for the hedge in water to remove the label from them. It is also desirable to wash them from the inside so that there are no spots and other inclusions on the walls. Covers should not be thrown out. The hedge can gain rainwater and lose their kind. Air inside the containers will give them good stiffness.
One of the embodiments of such a hedge can be seen in the photo below. It will be necessary to sort the bottles of color and form. Around the perimeter, where the fence will be, several columns are set. They can be wooden or metal. The latter are not just getting into the ground, and fixed with the solution according to the example of how it was described for a wooden fence. Bottles are trimmed by the bottom, except those who will be in the hedge closer to the ground. The bottom is required to trim the same height, since it is still useful. If the lids are no longer needed for any projects, then they can be left on the hedge, if necessary, then they remain only on the top row of bottles.
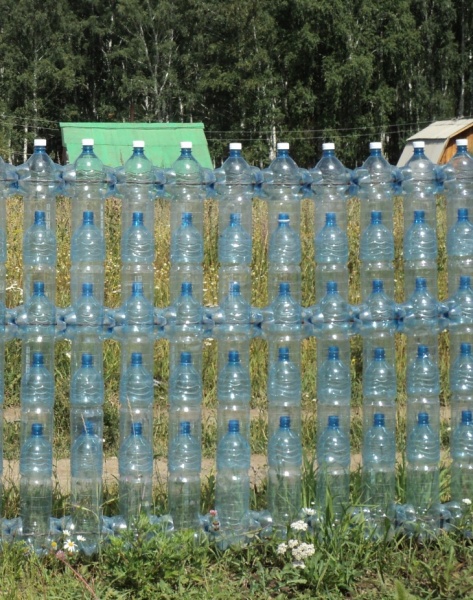
Depending on which the height is the fence, the number of bottles is calculated. It is possible to repel from the fact that the height of the bottle is 25-30 cm. For a fence of 1.8 meters height between the columns, it is necessary to pull the minimum of four rows of wire. A bottle is rolled on the wire. After it, two bottom is mounted. They are sliced \u200b\u200bpart to the bottle. Their destination is to provide the same distance between adjacent bottles so that the design look more harmonious. Between the bottles that are riveted on the wire of the fence is set even one without the bottom. Subsequently, a hedge is formed with partitions from bottles.
Note! Fasten the bottle for the fence can be a bit simpler. For this, they are not vertically, but horizontally. They simply ride a wire like beads. Visually such a fence can be contemplate in the photo below.
If you wish to build a more reliable fence from plastic bottles, you have to tinker a little. Each separate container will be required to fill with sand or clay. It is important to tackle the material inside. To fasten bottles, each other will need to prepare a solution from sand, cement and clay. The ratio of sand and cement, as was given above for a wooden fence, and clays need six parts. Bottles in the fence are additionally tied to the necks with wire. The elements in a checker order are laid out. Additionally, the surface can be plastered to get a monolithic hedge.
Tip! From plastic bottles you can build a beautiful fence for flower beds. Special efforts do not have to apply. It is enough to trim the bottle of the neck with a lid and simply drown it into the ground so that the bottom was towering on 5 cm.
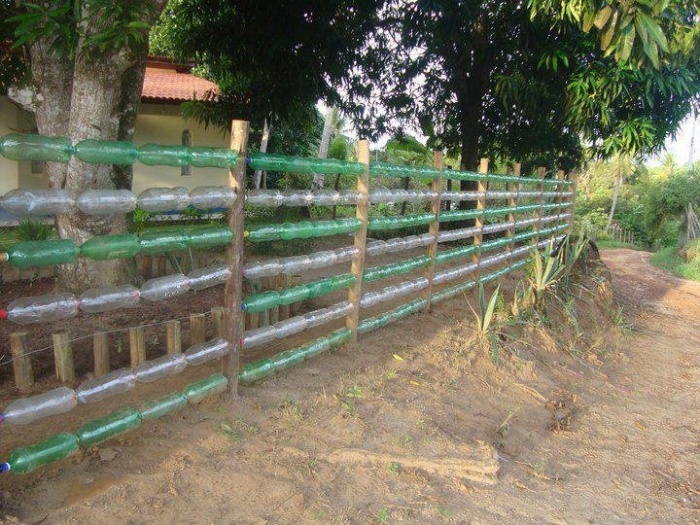
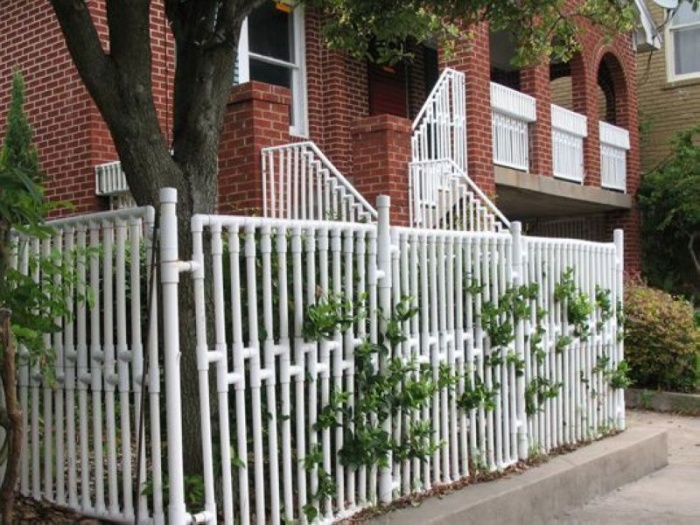
Plastic pipes
Polypropylene pipes are increasingly used for mounting heating and water supply systems. But someone prefers to replace them with stitched polyethylene pipes. Throw out what will remain should not be, because of them you can build a great fence for a plot or flower beds. All that will be needed for this is the ability to work with a soldering iron for plastic. Options for implementations and shapes can be the most different. Creating fantasy and various fittings, you can build a fence according to the example of the picture in the photo.
Glass fence
Making your own glass fence from the glass package would be great and expensive. But there is a free material that is perfect for these purposes - a glass bottle. Before starting the installation of hedge, it will be necessary to carry out the same training as in the case of a plastic bottle. They are easy to soak in the old bathroom on the street. It is not necessary to rub inside the ground or sand, since the bottle must save its transparency. There are two main ways to implement such a type of fence:
- monolithic wall;
- shirma bottles.
For the manufacture of fence in the form of a screen will additionally need metal rods or wires, as well as a corner and pipes for columns. The first thing is mounted by columns that will perform support. The distance between them will depend on the specific project. They can be simply inserted into the ground or fix on a concrete solution. In the latter case, you will need to prepare a mixture of sand, cement and rubble in proportions 3 to 1 to 2. A pits of a depth of 50 cm is made, a column for the fence is inserted, it is set to the level and falling asleep with the cooked solution.
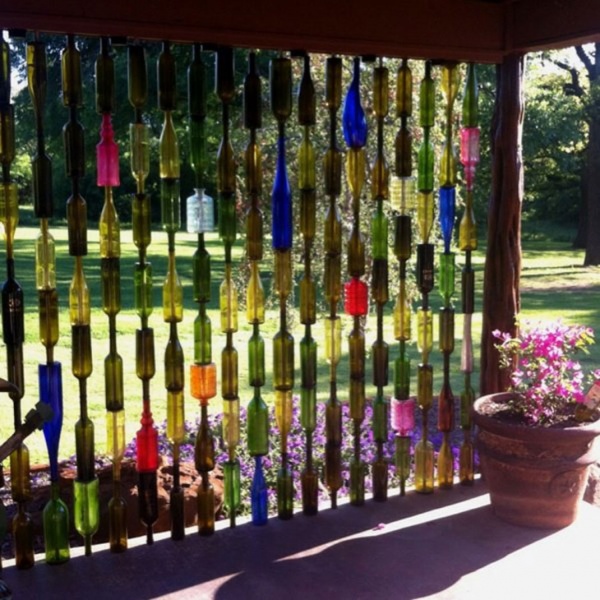
Next step using welding machine Metal frames for fence in the form of rectangles or squares are manufactured. They are fixed to the mounted columns. In the bottom of the bottle, the hole is drilled under the rod or wire. Bottles are simply stripped. Wire or metal rod fixed to a metal basis. Position the neighboring "beads" is needed back to achieve the effect of the wall. On a sunny day, such a fence will play with different colors when the rays passing.

Tip! The lifting of the screen can be made not on the metal, but on wooden base. For this, frames with additional transverse boards are manufactured. The distance between the boards should be equal to the height of the bottle. In the boards, holes with a diameter under the neck and inserted bottles are inserted into them.
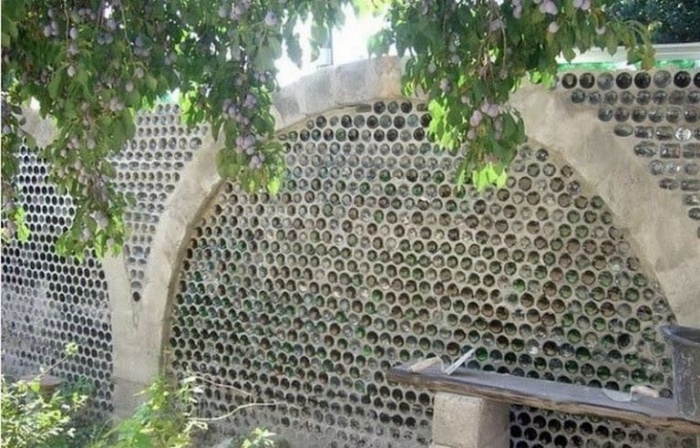
The monolithic option of the fence will require great strength and time spending, but the result will pleasantly surprise you not only, but also all passersby. First of all, you need to draw a small drawing of how the bottles will be located. In the fence, they can be laid just rows with interlacing. Looks rather interesting. Donals need to be laid out, but to leave the neck inside the fence, so that the light passed. You can make a fence with the pattern, as you can see in the photo below. To do this, it will take to sketch a small sketch of the hedge with the indication of specific colors of bottles and their quantity, to make it easier to pick up.
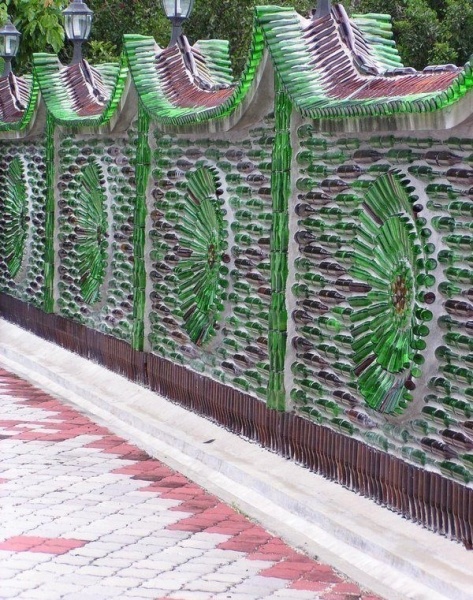
The first stage of the structure of such a hedge will be the preparation of the foundation. It is made according to the same principle as for a fence from lane. Next is preparing a solution for hedges and laying bottles begins on it. Laying stands with uniform rows so that the solution gradually gained power and could hold the entire wall of the hedge.
Tip! The fence for flower beds can also be made of glass bottles. To do this, they make up the upwards in the homemade border or simply to be taken into the ground.
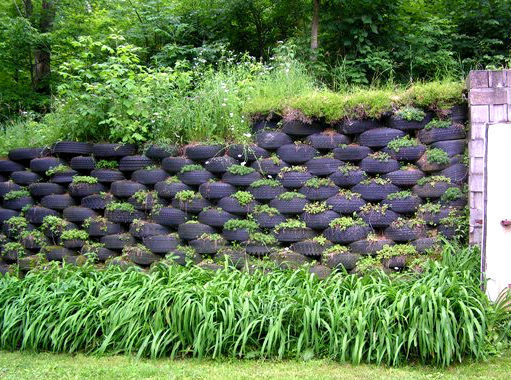
Rubber fence
Rubber is not because it is stretched, but because it is made of old tires. In general, flower beds are excellent, flower beds are excellent. But if a full fence is required, it is also easy to arrange. We will have to stock sufficient tires. Well, if they are one size, as well as have a similar protector. You can buy them on car landfills at a low price. The basis for such a fence does not have to construct. It will be enough to align the platform under the fence.
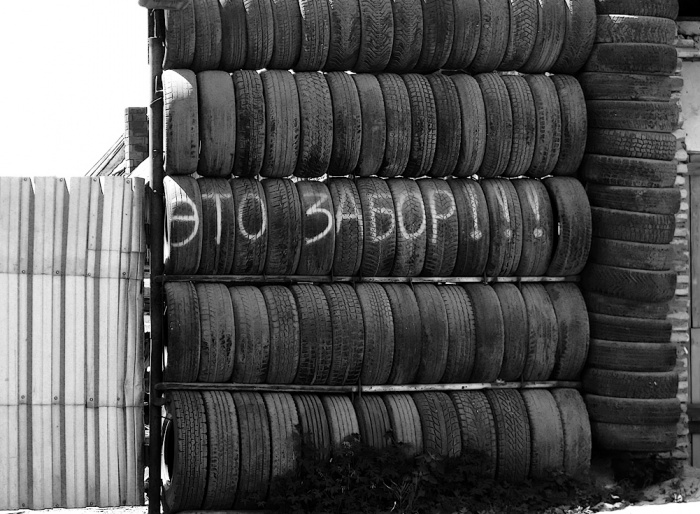
The first row of tires are stacked so that the tires are back to each other. They must be copped with each other so that they do not disperse. Inside the soil or sand falls asleep, which will give the additional stability of the hedge. The next row is stacked so that it turned out a chess order. That is, the tires must lie on each other, but on the seams. In voids also fall asleep ground. In order for the hedge to be alive, various flowers or letters can be planted into the ground. Such a fence has a disadvantage that manifests itself in restriction in height depending on the diameter of the tires. If a large height is required, and the tires are small, then you need to mount the holding columns that will be inside the tires. An example of such a fence from the primary means, which was made with their own hands can be observed in the photo.
Conclusion
As you can see, any remedies that are in sufficient quantities can be used to fence in the country or in a country house. There is also an option of a wicker fence, as well as a living hedge. Describe each option in one article is quite problematic. In general, you should not limit your flight of fantasy. There is always the opportunity to combine various construction and not construction Materials When erecting the fence.
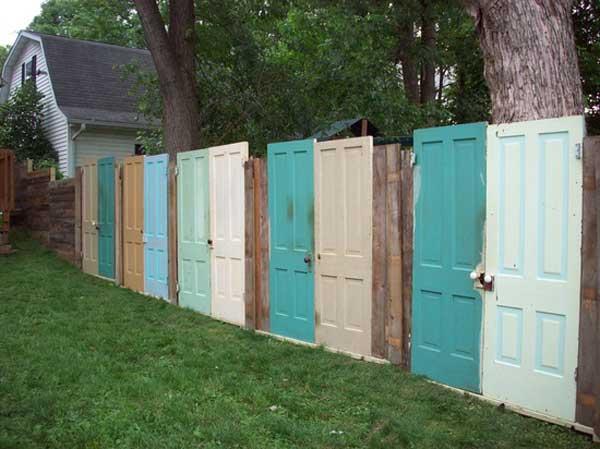
Even the most modest cottage plot needs reliable fence. In order to save a family budget and at the same time not to lose in quality, many craftsmen choose the fence facing with their own hands. Go to go cheap Materialscapable of listening to the owner of several decades.
Today on the site for successful you will meet the most diverse fences for cottages, photos I. brief descriptions Will help you quickly decide on the choice. Thanks practical advice You can independently install on your site the selected design model.

Wooden Fence - Classic Genre
Tree is a favorite material of summer houses for building a fence. Especially attracts its environmental friendliness and durability. In addition, a wooden fence does not violate the harmony of the natural landscape, does not create a sensation of a closed space and allows dacnis to fully enjoy solitude with nature.
 Tree - excellent material for country fence
 It is very easy to work with a tree, so even an amateur can cope with the construction of a fence in the country. The material is also interesting because it does not require complex processing or application of intricate designer ideas. Even the simplest models of wooden hedges look aesthetic on the countryside, harmoniously, glad of the eyes of the owners and passersby.
 On the photo a wooden deaf fence, created with your own hands
 The easiest wooden fence, painted in white, green or any other color, looks quite attractive surrounded by the greenery of nature. You can estimate the successfulness of such a combination by looking at the photo provided here or find other illustrations on the Internet.
 Wooden fence from the stake
 You can use any raw material with you: logs, boards (even untreated), planks. Other materials available in your barbell or garage will be supplemented. Missing details purchase in the store.
 Wooden fence with your own hands
 The fence, the stakenik is perfect for a small summer cottage. Protect the building from the log cabin better with brenen.. For the solidity of such a fence with an additional element take natural stones.
 In the photo, fence from logs
 Popular fences are also popular from the board. This is one of the newly emerging options. Boards can be positioned in various ways. Most often there are such: "Chess", "Fir-tree", "Pletenka". You can familiarize yourself with them with the help of photos provided on the Internet. Receive necessary information In order to create your own hands the chosen model of a wooden hedge for giving, you will be helped by folk masters video footage.
 In the photo fence from the boards
 If you intend to create a living fence for giving, select a low model of a wooden fence that will skip a lot of light. Seeping sunlight should be enough in order to the curly plants planted along the fence can fully develop, the fellible hedge.
 Make a fence with your own hands - a great way to save
 Metal and plastic fences at an affordable price with photo
Cheap can be called country fences from the grid "Rabitsa". They copes well with the responsibility entrusted to them to protect the site from the invasion of uninvited guests. If there is a goal to protect yourself from putting views, use masking types of grids that are perfectly skipped sun rays And do not prevent air penetration. The camouflage mesh is not used in itself, but superimposed on top of the metal.
 Fence from the grid "Rabita"
 Many dackets chose another option to create a cheap fence for the country area with their own hands - the use of professional flooring. The design can be done any height. The material is perfectly combined with stone, wood and metal details.
 Fencing from corrugated in the country
 Profiled sheets as material for fence have many advantages: they are not heavy, durable and simple in circulation. To create a good fence, do not need too much time and strength. However, there is a significant lack of such an option - the fence is deaf. This leads not only to visual decrease in space, but also to impaired air circulation and the creation of a deep shadow on the pick-up areas.
Opening your choice on the fence from the professional flooring, you have a certain opportunity to choose a design. For example, you can install a metal frame and secure the solid web profile sheet on it. The second option is to install individual sections in the frame. Often, parts of the fence from profile sheets are located between the brick columns. It is also practicing the use of carved and forged inserts in such enclosing products. The main thing is that all this successfully combined with country house And other buildings on the plot, and also harmoniously fit into the exterior.
 Cheap fence from corrugated
 IN last years Popularity acquired fences for giving from a metal stakenist. This is economical I. practical way To upset your site. Breakable fences from Evrosshorter - a modern approach to creating a fence on country possessions. The material is characterized by high aesthetics and ease of work. This fence can be installed with their own hands even an inexperienced master.
 Metal Stakenik Dachi Fence
 Many dacha owners tend to create plastic fences. It is a very durable material that does not require a complex installation or care. A wide range allows you to choose options for any design and in any color scheme. Plastic fences - good option Not only for installation around the perimeter of land possessions, but also for zoning the territory and fence of the flower.
 Plastic fence in the country
 Ready fences for cottages at affordable prices, with photos
For those who have no opportunity or desire to build a fence around the perimeter of the country area with their own hands, there is a simpler way - to purchase blocks ready for installation. If necessary, you can order installation of the fence.
A particularly wide selection of fences from different price categories can be found in online stores. On their pages you can familiarize yourself with the photos of finished options and prices for each of them.

Even when buying a ready-made fence, you can do a rather modest amount by choosing a cheapest material. Having spent a little more, you can get an exclusive fence that you perfectly fit and emphasize your personality. It is very important to find a firm, ready to provide quality services and guarantee the long-term service of the product.
 Fencing from EvroShnika
 Those who have not come across the purchase of a fence and a slightly in this topic, to navigate in prices will help the table posted below. It contains the approximate cost of a two-meter fence from different materials. Standard is also considered the height of 1.5; 1.7 and 1.8 m. The difference in value when ordering the fence of different height depends on the material and design. For details, it is better to read the sites of manufacturers.
Material | The minimum price for 1 p. M. At a height of 2 m, rub. | |
| Standard stakenik | ||
Deaf stakenik | 1215 | |
Stakenat "Chess" | ||
Profiled sheet | With 2 horizontal guides | |
With 3 horizontal guides | 1055 | |
| With 2 horizontal guides and colored coating | ||
With 3 horizontal guides and colored coating | 1117 | |
| EurStashnik | With 2 horizontal guides and color applying | |
With 3 horizontal guides and color applying | 1375 | |
| Rabitz" | Solid fence | |
| Sectional fence |
Photos and Description of the fences from undergraduates
If you want to truly save when erecting the enclosing design with your own hands, do not limit yourself to using the cheapest materials. Your wallet will save the use of free raw materials in the garage or shed. There will probably have many details that can come in handy. Connect the fantasy and skill, and you will succeed original fence For a penny. We provide you with photos of finished options to push the idea.
Plastic bottle fence
One of the most affordable materials for the collection of fence in the country are plastic bottles. You can use both the containers themselves, fixing them with a solution and multi-colored covers, riding them on a wire. Such a picturesque hedge will become a highlight of your cottage, without requiring any wretched. Before connecting with a solution, plastic bottles must be filled with sand on the most core.

From plastic bottles, you can also create a practical fence for the beds. Bottles are connected by thick wire in two places: near the neck and around the bottom. This homemade fence is located in the necks down between the pins installed in the corners. Thus, it turns out high Groke in the garden.
 In the photo Fencing for beds from plastic bottles
 A small fence for a bed or flower beds can also be made in another way. Drop around the perimeter trench and bury the bottles in a row of slaughtering down. Tara must be fill in advance to the top sand. If using bottles different colors Or just repaint them, it will turn out a fun fence that improves the mood to the owners and passersby.

The fence from plastic covers with a neat and pre-thought-out work is very beautiful. However, it is necessary to spend a lot of time and effort. First, you should collect several thousand covers. Secondly, each of them needs to make several holes. Thirdly, all covers should neatly connect with a wire, adhering to a specific pattern. Everything needs to be done very carefully, and then the fence for giving from plastic covers will be as attractive as in the photo below.
 In the photo fence for giving from plastic covers
 Plastic bottles - affordable Material To build a country fence with your own hands. It is easy to work with them, they are not afraid of moisture, resistant to the development of fungus. Plastic does not light up, but only melts under the influence of very high temperatures.
The disadvantage of the material is its reaction to temperature changes. In hot weather, plastic bottles are deformed, compressed. In severe frosts, the bottle can crack. Plastic fences do not recognize the fans of the organic way of cultivation of the Earth. Low quality plastic highlights poisonous substances, especially under the influence of high temperature.

Glass bottle fence
The fencing from the glass containers is distinguished by high aesthetics and serve the owners for many years. Consider several ways to create such a fence.
1 way
Stay bottles across the wall of the fence in the yard and connect with the solution. So you get fat and durable fence. It looks like this option is quite beautiful. Pay attention to the photo example.

2 way
Place the bottles across the wall, as in the previous version, only alternating bottom and neck from the outside. Thus, you can get a specific drawing on the fence. To do this, you need to think in advance the location of the glass container.

3 way
By hanging glass bottles on a metal rod, you can get a highly elective fence for giving. To do this, drill a hole in the bottom of each bottle. Finding out different color and form of container, you can create a cheerful fence for giving with your own hands. The photo shows how such an unusually looks like.

Cerencing fence
Not new, but a fairly popular idea is the use of old tires to create a country hedge. They can be decomposed around the perimeter of the cottage in a chess order or put it vertically and bury the lower half. With the first version inside each tire, bright flowering flower beds are often suitable. The fence created by the second technique will become more attractive if using paint change its color to a brighter.
 In the photo the original fence for the cottage from the tires
 Fence of pallets
This option implies the use of fantasy. The first thing to be done is to establish and concrete columns around the perimeter. Next, you need to attach pallets to them in the desired order. Another option is to disassemble the pallets on separate homes and make a fence of the stakenik or another embodiment of the fence.
 Pallet fence in the country
 Fence of branches and vines
On the creation of a wicker fence for the cottage takes a lot of time. But a lot of one is ready to sacrifice them for the sake of obtaining original and cheap hedges. Support dry branches or vine stems. An interesting design of the fence will be an excellent addition to the country in the country style. Support for such a fence can be made from bars or rods of reinforcement.

High-quality fence for cottages does not always require large financial costs. As can be seen from the photos, if you purchase inexpensive materials and make installation with your own hands, you can get a decent fence without extra costs. Using sweater materials, the fence is performed almost free. Do not forget about the aesthetic face of the question, because fences in the country (the photos demonstrate) will stand more than one year, and well, if he all the time will delight the eye.
Video: Cheap fence from corrugated
What are weaving plants for the dock and garden decor