Internal arrangement of a bath, how to create comfort inside. Bath interior design: arrangement options How to equip a room for a bath
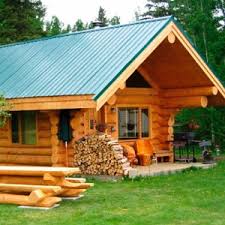
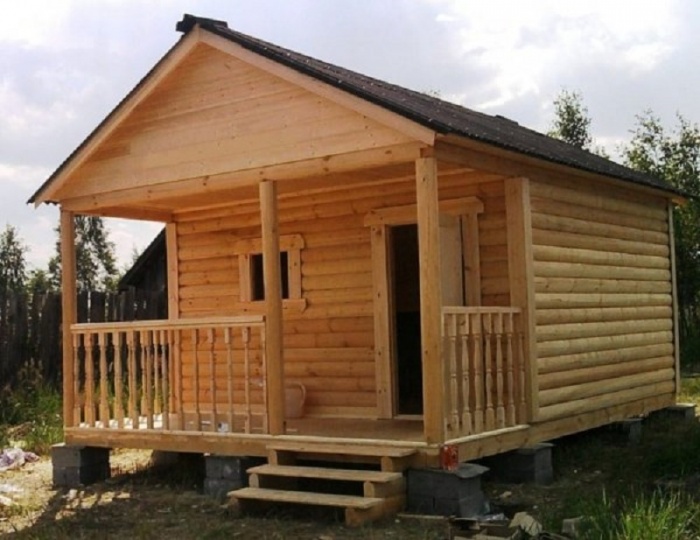
Everyone perceives the dacha differently, for some it is a way to relax after a working day in the garden, for others it is a reason to get together with friends, for others it is just a Saturday tradition. But in any case, a bathhouse in the country is a real miracle that every summer resident dreams of. Therefore, this article is devoted to how to make this dream come true, i.e. build a bath yourself.
Bath design
The first step towards realizing this dream is to create a bath project. It depends on him what the bathhouse will be, therefore it is necessary to approach this stage very responsibly.
The project must contain the following information:
- Building dimensions;
- Layout;
- Location of doors and windows;
- Structural features of the structure;
- What materials will the structure be built from?
If you can build a bath with your own hands, then it is better to entrust the implementation of the project to professionals. True, you can use a ready-made project that best suits your wishes.

You can find some of these projects on our construction portal. However, before giving preference to any of them, you should think in advance what kind of bath you want to see on your site. It can be a small building with a washing room, a changing room and a steam room for one or two people, or, on the contrary, a whole bath complex in the country, which may include, etc.
Nuances of design
In order to avoid mistakes during the design of the bath, the following points must be taken into account:
- To make a steam room comfortable and comfortable, you need to plan it correctly. According to experts, the area of \u200b\u200ba steam room for 2-3 people should be about 10 square meters.
- The height of the steam room should be - 2-2.2 m. A lower ceiling is inconvenient, and a higher one leads to irrational energy consumption and a longer heating of the room.
- It is desirable to make windows and doors small. In addition, a high threshold should be set, although this will create some inconvenience, it will seriously reduce heat loss.
- Resin wood must not be used for interior decoration of the steam room.

Advice!
If you have acquired a plot for a summer residence without buildings, this does not mean that it will not come soon to the construction of a bath.
Country houses made of block containers are a great way to equip a site.
After installing such a house, which happens very quickly, you can slowly take up and.
Place for a bath
Also at the design stage, before making a bath in the country, you should think carefully about its location on the site. The best option there will be its construction near the reservoir, which will allow you to plunge into cool water after the steam room.
In addition, it is advisable that the bath is not visible from neighboring areas or from the street. If you cannot withstand such a condition, then you can artificially make a green fence of shrubs and trees.
Materials
Any building materials are suitable for the construction of a bath, however, a bath built of timber or logs is considered traditional. I must say that the choice largely depends on the project budget, since the price different materials may differ significantly.
Since the process of building a wooden building is fundamentally different from building from a brick, we will further consider both options.

Construction of a bath from a bar
Foundation
As with any other construction, the construction of a bath from a bar begins with a foundation. Since the structure will be relatively light, the foundation can be made columnar, provided that the soil is solid.
The foundation is performed as follows:
- The first step is to prepare the construction site for further work. To do this, you need to remove the debris and remove the topsoil.
- Then markings are applied to the soil surface in accordance with the project. All dimensions of the future structure must be rechecked several times in order to avoid a mistake.

In the photo - columnar foundation
- Further at the corners of the building and at the junctions interior walls to the outside, dig holes to a depth of about 30 cm. The diameter should correspond to the size of the concrete blocks or flat stones that will be used as pillars.
- After that, the same pits for the posts are made, on which the lags will rest.
- Then the bottom of the pits should be covered with a layer of sand about 10 cm thick and carefully tamped.
- Next, blocks or stones are laid, which should rise 25-30 cm above the soil surface. It is important to ensure correct location pillars - the surface of the foundation should be located in the same horizontal plane.
- At the end of the work, the surface of the blocks is covered with a waterproofing material. Most often, roofing material is used for these purposes.

Erection of the box
After the foundation is ready, you can start building the walls.
Instructions for performing this work are as follows:
- The erection of the walls begins with the laying of the first crown made of 20x20 cm timber... Before laying it, the timber must be treated with an antiseptic and resin, which will ensure its safety for a long time. Before fastening the timber, you should make sure that it is horizontal.
- To fasten the timber, you need to make a thorn-groove connection, which can be done with a conventional saw, as shown in the diagram... In addition, metal corners and self-tapping screws can be used to strengthen the structure.
- After laying the first crown, the floor log is installed... The traditional option is considered to be their insertion into the timber of the first crown, however, this significantly complicates their replacement, which sooner or later will definitely be needed. Therefore, it is more expedient to attach the logs to the first crown using metal corners and self-tapping screws.
- The timber of the inner walls can be cut into the outer walls using a tongue-and-groove connection.

- Next, a heat-insulating material (tow) is laid on the first crown and the second row is mounted from a bar of 150x150 mm, also treated with an antiseptic... The connection of the crowns to each other is performed using thorns (pins). To do this, a hole is drilled through the upper rim to the middle of the lower rim and a spike is inserted. The installation of the dowels is carried out in a staggered manner at a distance of 1-1.5 meters from each other.
- After the construction of the walls, window and door openings are cut out with the help of a chainsaw.
- After that, the floor beams are laid, and the rafter system is installed in accordance with the building design.
- The final stage is installation roofing material and laying the floor... After that, the arrangement of the bathhouse in the country is carried out, which we will talk about below.
This completes the main stage of the work.

Building a bath from bricks or blocks
Foundation
The construction of a bathhouse in a brick country house also begins with the construction of the foundation. Since the building will be heavy, the foundation must be solid.
It can be done as follows:
- As in the first case, first you need to prepare and mark the site.
- Further along the perimeter of the outer walls, trenches are dug to a depth below the level of soil freezing. The width of the trenches depends on the thickness of the walls.
- Next, a 15 cm thick sand pillow is placed on the bottom.
- After that, the formwork is installed and reinforcement with steel rods is performed. As a rule, the reinforcement is a metal frame made of reinforcement, fastened together with a wire.

- After that, the formwork is poured with concrete. At this stage, it is necessary to ensure the horizontal level of the foundation.
An important point in the construction of the foundation is the preparation of concrete, since the strength of the structure depends on it. To make quality concrete, you need the following ingredients:
All components must be thoroughly mixed until a homogeneous mass is obtained.

Erection of the box
After 28 days, when the concrete gains strength, you can continue to build a bath in the country.
The work is done in the following order:
- As in the first case, before the walls are erected, the foundation is waterproofed with roofing material.
- Next, bricks or blocks are laid on a cement-sand mortar. When laying each row, it is necessary to check the horizontal position of its location using a building level.
- In accordance with the project, at the stage of wall construction, it is necessary to provide for window and door openings. A lintel must be laid over each opening. As a rule, concrete beams are used for this.
- After the walls have been erected, the floor beams are laid and the roof rafter system is performed.
This completes the construction of the box.

Bath arrangement
So, the building is ready, now it remains to figure out how to equip a bathhouse in the country. Of course, doors and windows should be installed first. Then you need to pay attention to the steam room.
The arrangement is carried out as follows:
- First of all, logs are laid and a wooden floor is laid out of resin-free wood.
- Further, insulation is carried out, especially if the building is built of bricks or blocks. For this, slats are nailed to the walls, between which mineral mats are fixed, after which a foil insulation is mounted. Then the walls are sewn up with linden clapboard.

- The next step is to make linden or abasha shelves. The shelves are packed from hotel strips, between which there should be a distance of several millimeters.
- The final stage of work is lighting. For the steam room, you must use special sealed lighting... In this case, the switches must be located outside of it.
Advice!
If there is no electricity at the dacha, then renting a diesel generator for the dacha will help to solve the problem of power supply.
After the steam room is ready, you should purchase equipment for the bath in the country. The most important element is the stove. Of course, it can be made of bricks, but this is a rather difficult job, so it is easier and safer to buy a finished product.

As for the arrangement of the rest of the premises, the interior of the bathhouse in the country depends on individual preferences. Most often, the bath is decorated in the Russian style, however, more modern options can be used.
Output
A bathhouse in the country is available to almost every summer resident, so it is quite possible to build it yourself. The most important thing in this case is to strictly adhere to the technology at each stage of construction in order to avoid mistakes. The result of this work will be a comfortable and safe steam room that will delight its owners for many years.


Bath is an amazing place to relax and rejuvenate. Therefore, it should be not only hot, but also comfortable. Each owner strives to give his bathhouse an attractive look both outside and inside. In this article, we bring to your attention a few tips on how to settle down, interior decoration which is no less important stage than the construction itself.
So, if you plan to do the interior decoration of the bath yourself, then this article will come in handy. Here you will find professional instructions for different types of finishes, and step-by-step photos of important finishing works, and detailed videos that will help you solve your tasks at the highest level. Our advice will help you stick to the principles of building technology when performing cladding, cladding, etc.
Finishing inside the bath is the most important stage of construction. Its quality and level of performance determine not only the aesthetic characteristics of the bath, but also the atmosphere of coziness and comfort, the degree of convenience. In addition, the materials used in finishing directly affect the creation of a special microclimate in the bath and on its medicinal properties... The main task of finishing is to make your stay in the bathhouse as pleasant, comfortable and useful as possible.
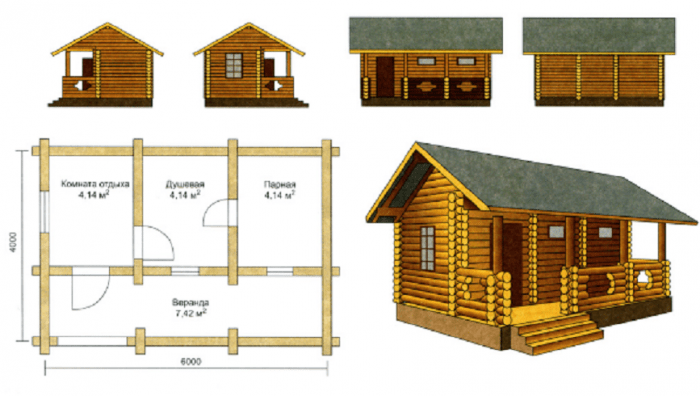
A modern Russian bath assumes the presence of several rooms:
- vestibule;
- steam room;
- washing.
If you have built a large bath, then it is quite possible to equip an additional recreation room, billiard room, kitchen area, playground, pool and much more in it. Theoretically, it is possible to plan and build any bath, equipped with everything that you think is necessary and useful. However, this does not in any way affect the basic defining requirements for the bath:
- all premises should be attractive and practical;
- there should be hot and pleasant steam in the steam room;
- it should be convenient and safe in the washroom.
Finishing has a big impact on the functionality of the bath. Even if you used high-quality building material that does not need mandatory interior decoration, it still needs to be done in the bath. Competently selected materials will allow you to create optimal conditions for a comfortable stay, as well as significantly extend the life of the walls, floor and ceiling. Materials are selected in accordance with the purpose and characteristics of a particular room. How best to finish the steam room, washing room, vestibule, read below.
When planning the decoration of the steam room, take into account the following features of this room:
- Constant presence of heated steam entering in a concentrated and dense stream;
- Temperature drops, heating to high temperatures;
- High humidity level.
The conditions in the steam room are, one might say, extreme. Many materials are simply not designed to be used in this setting. However, the widest range of modern finishing materials allows you to choose the option that will best suit even such harsh conditions. We recommend paying attention to the cladding board. Its characteristics must meet the following requirements:
- Low heat capacity, the ability to quickly warm up and not accumulate heat;
- Moisture resistance;
- High aesthetic characteristics;
- Pleasant smell, no tar when heated;
- Resistant to mold and mildew;
- Air purification.
Today, there are several classes of lining:
- C-class. Differs in low cost. But for finishing a bath, its characteristics are not high enough.
- B-class. Such material can have contrasting spots, cracks, minor damage, resin pockets. This class includes material on which, for every 1.5 m of length, there are no more than four knots;
- A-class. Shallow cracks are possible. There should be no cores in the cut. No more than one knot per 1.5 m length is allowed on each panel.
- Premium class. Highest quality and value for money. The color is uniform, cores and knots are absent.
The most common profiles are eurolining, thorn-groove, "Softline", "Calm".
Linden lining shows excellent results as interior decoration for a bath. Its density is quite low, so it doesn't get very hot in a steam room. However, it does not emit resins. Linden panels provide excellent sound insulation.
And also lining from other types of wood is suitable for solving this problem. For example, cedar and aspen have proven themselves well.
When choosing one or another material for cladding, carefully examine the panels. The wood must be dry, well-processed, free of chipping, knots and other obvious defects. High quality material must meet these requirements, and only he will provide an aesthetic, reliable, durable finish.
The material for covering the steam room does not require additional processing with special equipment. You should not use antifungal, antiseptic compounds or paints and varnishes. All these products are harmful to humans, and when heated, they will begin to actively release their wood, making bath procedures more dangerous than useful.
Before you start clapboarding, the steam room must be insulated. An affordable and time-tested material that is suitable for this purpose is rock wool. She is the most demanded in this area. Another option, no less effective, is basalt wool. It copes better with exposure to high temperatures, so it will last a little longer than mineral wool. But if we talk about the ideal heater for a steam room, then one cannot but recall the cork agglomerate. Among its advantages are hypoallergenicity, resistance to fungi and rot, fire resistance.
The floor in the steam room should be pleasant to the touch, non-slip, not cold or too hot.
The washroom isn't just for showering and washing yourself at a comfortable temperature. There should be a place to relax in the washroom so that you can leave the steam room for a while, pamper yourself with massages, face and body masks and other relaxing and enjoyable treatments. It is necessary to think over all these possibilities before starting finishing work, or even better - at the construction stage.
In any case, the choice of finishing materials should be carried out taking into account all these functions of the washing room. The best option is wood or ceramic tiles. If for a steam room you can choose among hardwoods, then only conifers are suitable for a washing room - pine, spruce, larch. This choice is very easy to explain. Coniferous wood is resinous and highly water-repellent. Therefore, in a washing room, it will show itself better than hardwoods, and will last for many years, while maintaining a pleasant appearance.
It is especially worth considering the selection of materials for finishing floors in the sink. The main qualities of the finished floor in this room are a comfortable temperature and anti-slip properties. To achieve this result, the base for the floor is prepared from concrete, and ceramic tiles are laid on top of it. In order to prevent heavy sliding, wooden pallets or removable logs are placed on the ceramic floor. After each visit to the bath, they are taken out into the air to dry. However, the floor in the sink can be completely wooden, but ceramic tiles as the main finish are a more practical and durable option. She copes well with an abundance of water, various cosmetics, shampoo, etc.
A high level of humidity remains in all areas of the bath. This is the most important aspect that must be considered when choosing finishing materials. Any type of wood can be used for the vestibule and other rooms. But don't limit yourself to using wood. Other materials are also suitable for high-quality and stylish decoration of the vestibule, recreation room and other bath rooms:
- Porcelain stoneware;
- Plaster;
- Natural stone;
- Fiberglass wallpaper;
- Majolica.
Ample opportunities for aesthetic and practical finish bath rooms open up various combinations of these materials. For example, the combination looks very solid and beautiful. natural stone and wood. Do-it-yourself sauna will allow you to make non-standard creative ideas come true. The interior decoration, the photo of which is presented on this page, will help you choose the best materials and their combinations.
The ceiling of the bath must be able to withstand high temperature loads, as well as cope well with streams of hot wet steam. Do not forget about the need to protect the floors from heat and steam using heat and vapor barrier materials. Construction membranes or aluminum foil can be purchased for this purpose. If you put them tightly, then their effectiveness will be equally high. It is not recommended to carry out vapor barrier with a foil with a layer of cotton wool, because this material is thinner, so it is much more difficult to work with it during the cladding process. The same applies to foil with a polypropylene foam layer. This material, when exposed to high temperatures, emits substances that are toxic to humans, therefore it is not suitable for use in bath rooms.
Each joint of vapor barrier and thermal insulation is glued with aluminum tape to ensure complete tightness. Sometimes, when performing work, the material is pierced, torn, etc. If this happens, then the hole formed in the material must be immediately sealed with aluminum tape, because later you may simply not remember about it or find the damaged place. As a result, the vapor barrier will be leaky and of poor quality.
The steam room requires a pipe hole. It is equipped with a box with a stainless steel frame filled with expanded clay.
The cutting of the ceiling for the chimney hole must be carried out taking into account the maintenance of a sufficient distance from the wooden floor to the outer contour of the pipe, as well as taking into account the characteristics of the chimney used.
To make a pipe hole you will need:
- 2mm stainless steel sheet;
- Galvanized box;
- Clamping clamp.
The partition of the ceiling is carried out mainly in order to ensure the fire safety of the ceiling slabs. In addition, in this way, the elements of the chimney receive additional support and are securely fixed in place. Cutting allows you to shape the outlet of the pipe.
The 400x400 mm box is installed from the attic side. A sheet of stainless steel 500x500 mm is attached to it from below, from the side of the steam room. The pipe is wrapped around the steel plate with a clamp, preventing the pipe from coming into contact with the furnace. This significantly extends the life of the furnace, since the entire load from the pipe falls on the upper steel circuit.
After the box and the steel sheet have found their places, the inside of the box is insulated and covered with expanded clay. This will prevent heat loss through the duct circuit.
Steel sheet on the ceiling provides additional protection against high temperatures.
We bring to your attention instructions that will help you to perform the clapboarding in the bathhouse quickly, economically and efficiently:
- The ceiling is lathing with 2x4 cm slats. They are attached with a distance of 40-45 cm. In those places where the frame is attached, it is necessary to leave ventilation gaps of 10 mm.
- Horizontal slats are placed on the walls perpendicular to the lining;
- Fastening of panels starts from one of the walls. The first plank is positioned with the groove outward. A thorn of another panel is hammered into it. The order of connecting the tenon and the groove can be changed, it is not fundamental.
When sheathing, use rubber pads and a mallet to handle the material gently and gently without damaging it.
- Fasten the strips with special clamps. Cleamers are attached to the rail with a screw or nails. You can also use a construction stapler, it will be even more convenient. With the help of a stapler, the fastening is reliable, and the work time is significantly reduced.
- There should be gaps of up to 2.5 cm between the cladding and the wall. They are necessary for additional ventilation and to prevent deformation of the finish. To mask the gaps, it is enough to nail ceiling plinth... The first panel and the last one are attached with nails with an inconspicuous head. It is necessary to hammer in such nails at an angle, and drive the cap tightly into the wood.
Do not forget that the cladding should be carried out along strictly vertical lines. A level check is required after each installed panel. If there is no level at hand, then you can simply measure the distance between the wall and the edge of the sheathing. It should be equal along the entire length of the bar.
If the values \u200b\u200bobtained as a result of measurements diverge, then the lining must be knocked out so that the measurements converge. Otherwise, the cladding will turn out to be uneven and sloppy. Tamping is carried out with a piece of the panel, which is driven into the groove using a mallet or hammer to adjust the size.
Another method can be used to achieve perfect evenness. The wooden plate is fixed and sharp chips are hammered under it.
The only material suitable for wall cladding in a steam room is wood. It is also suitable for other bath rooms, but other materials can also be used in them - stone, tiles, etc. In the vestibule and the rest room, you can create original ensembles by combining various materials.
Wall cladding
According to the main parameters, clapboard wall cladding is performed in the same way as ceiling decoration.
- The first step is to fill a thick bar along the perimeter in a horizontal direction. Step - 80-100 cm.
- Insulation must be placed in the grooves between the bars. For example, mineral wool. It is cut into appropriate pieces with a sharp knife. It is not necessary to tamp the insulation.
Note! All work with mineral wool must be performed with gloves, a respirator and goggles.
- Then a vapor barrier is laid, each joint is glued together with aluminum tape.
Pay particular attention to the insulation in the corner joints.
- Remember to leave ventilation clearances. To do this, you can fill in the distance rail. The lathing is created at right angles to the lining. Therefore, if you want to sheathe the walls, placing the lining vertically, then the lathing must be nailed horizontally.
First of all, slats for the frame are installed in the corners of the walls in a vertical position. Care must be taken to ensure that their position remains strictly vertical. In order to facilitate the alignment of the horizontal battens, a string can be pulled between the vertical battens at the ceiling and floor.
- Separate bars need to separate the door area and the window;
- Now you can go directly to the paneling.
It is recommended to fasten the lining for baths from one corner in the vertical direction. Due to this, it will be easier for water to drain from the walls, without lingering in the grooves of the panels. If you like a horizontal pattern, then the panel spike should be directed upwards so that moisture does not collect and linger in the grooves. In this case, you need to start work by fixing the boards to the ceiling. The lathing in this situation is performed in the vertical direction.
Directly fastening the lining is carried out with clamps, nails, self-tapping screws or a construction stapler. If you are using screws or nails, then insert them at an angle, driving the caps deep into the wood. There should be approximately 2 cm ventilation gaps between the ceiling and the cladding, the floor and the cladding.
A common problem that people face when doing self-cladding of bath walls with clapboard is the need to cut the material. This is not difficult to do. You can saw the lining with a fine-toothed saw or jigsaw.
The last panel on the wall is trimmed to the desired size and fixed to the lathing. The next wall starts with a panel from which the ridge is trimmed. It should fit snugly against the last rail of the previous wall. In the corners, the elements must be adjusted especially precisely. Determine the exact angle values \u200b\u200bbefore cutting the strip or panel. Draw a line with a pencil on the material to avoid mistakes. There should be no joints in the corners of the panels.
The most important moment when performing finishing work inside the bath is the insulation of the stove. The following materials are suitable for solving this issue:
- Correspondingly dimensioned stainless steel sheets;
- Minerite is a special material with high heat-resistant characteristics. It is a mixture of cement, fiber reinforcement and mineral fillers. When the stove is located close to the wall, the minerite must be put in two layers. If at least 40 cm remains between the oven and the wall, then one layer will be enough.
- Ceramic heat-resistant tiles;
- Solid red brick. They need to line the walls from the floor to the base of the pipe or higher;
- Profile iron is the cheapest option.
Ceramic tile - the best option for finishing all rooms of the bath, except for the steam room. Considering the modern variety of models and collections, it will not be difficult to make the design of a rest room or a washing room not only practical, comfortable and durable, but also aesthetic. The most important argument in favor of tiling is its excellent moisture resistance.
Tiles are laid step by step. The first step is preparation. The second is the direct execution of work.
Preparatory stage
Preparation of concrete or cinder block walls consists of removing dust, dirt, plastering and leveling. Preparation of wooden walls consists in performing waterproofing. Roofing material is nailed onto wooden panels with a construction stapler. A mesh-netting is sewn on top of the waterproofing, on which concrete mortar is densely placed.
Then, in fact, and in another case, it is necessary to nail an even beam. It will become the basis for the final finish. Instead of a bar, it will do metallic profile... Do not forget to check the horizontal and vertical rows during the laying process. For horizontal, use a building level. For vertical, you can use a plumb line.
Instructions for laying tiles in a bath
You can prepare the mortar for fixing tiles yourself. To do this, you need to mix cement and sand in a 1: 5 ratio. But you can also purchase a ready-made mixture. It is recommended to give preference to a special glue developed for laying tiles in rooms with high humidity and temperature changes. Before installation, the tiles must be placed in water to remove air. Thanks to this, the tile will adhere much better to the solution.
Start of work - from the attached level. The first row must be laid out especially diligently, because it is he who determines the evenness of all subsequent rows and the accuracy of the entire lining.
The glue is placed on the back of the tile. Use a notched trowel for this. The adhesive can also be applied to the wall. Then the tile is carefully applied to the wall and pressed down so that the adhesive slightly protrudes beyond its edges. The position of the tiles can be corrected with a rubber mallet.
It is important to maintain an equal distance between the tiles. Therefore, after you put adjacent rows, fix special plastic crosses in the corners of the tiles. This will maintain the same clearance in both length and height.
It will take a couple of days for the tiles to dry. After that, you can remove the level and wipe the seams. The color of the grout should be in harmony with the color of the tile.
The finishing step is to remove grout residues, clean the tiles and give them their final aesthetic appearance.
With the help of ceramic tiles, you can realize the most daring creative fantasies. It can be laid evenly, diagonally, with an offset, patterned. The easiest and fastest way is to lay the tiles in even rows.
If you decide to tile a complex pattern or design, it is best to transfer it to the floor or wall so that you can immediately see where which tile should be located. This will allow you to accurately decorate and give your bath a truly original and unique look.
Unusual and very stylish solution for a bath - it is finishing with terracotta slabs. They are ideal for this type of room as they are resistant to both temperature and moisture. At the same time, they allow you to create an original and interesting design, eco-friendly, practical and stylish. The laying of this material has its own characteristics, due primarily to its significant weight. This tile needs a special adhesive. Mastic will do as well.
The laying process consists of the following steps:
- The mastic is thickly spread on the stove. This material will require much more glue than conventional ceramic tiles;
- We apply the slab to the wall, press down and align;
- We continue to work in the same order with the rest of the plates;
- To align the joints between the tiles, pieces of drywall can be inserted into the joints;
- Do not forget to regularly control the parallelism and evenness of the rows with a level;
- 10 hours after finishing the installation, you can start processing the seams. It is carried out with a heat-resistant grout for wide joints. The composition is diluted with water until sour cream is thick.
- Then pieces of drywall are removed from the seams;
- The grout is applied with a construction gun. The spout should be cut at an angle of 60º so that the width of the hole is 8-10 mm;
- Seams are neatly filled with grout. It must not come into contact with the boards themselves or other surfaces.
Handling a pistol requires experience. So be very careful with it. If grout does get on the tiles, do not try to remove it right away. You will only spread the composition over a larger area. It is better to wait a little while the grout dries. This way, you can gently scrape it off.
- The direction of grouting can be any;
- Two hours later, you can move on to the jointing, which will provide the finished look of this finish.
- Joining is done with a 7-8 mm screwdriver or wire ring;
- After that, you need to walk along the seams with your finger in a clean glove.
The wooden floor in the bath does not need additional finishing. Concrete flooring involves the installation of non-slip ceramic tiles.
Laying starts from one of the corners. In this case, perfect evenness of the rows is not required, because the floor in the bath is made with a slope towards the drain. But the approximate location of the tiles is still worth noting on the floor by level before you start laying them.
The work is carried out in the following order:
- The mortar is spread on the floor with a spatula according to the tile size;
- A pattern is imprinted on the mortar with the spatula teeth, which ensures its reliable connection with the tile;
- Tiles are laid out. During operation, its position is corrected with a rubber hammer. Don't forget about slope formation! The tiles for the first row must be dry. And all other elements should be pre-soaked in water.
- Corner pieces are cut to the required size using a tile cutter;
With a free area on the land, you can build a strong and very functional bath. Moreover, the last factor is due to the competent design of the premises, their decoration and furnishings. Regardless of the size of the building, premises such as a steam room and an entrance hall with a wardrobe should be equipped inside.

But such an economy option can hardly be called comfortable enough, therefore, among the rooms recommended for design, decoration and equipment with all the necessary rooms, the following can be distinguished:
- shower, washing or washing. Here basic hygiene procedures will be carried out in the form of a shower. The room can be equipped with a small font and a bucket-waterfall for pouring;

- separate bathroom. It is unnecessary to talk about the purpose of this room. It is especially important to allocate a room for a toilet in two-story bath houses with a kitchen and a sleeping place;

- recreation area with dining room. This room is intended for relaxation after the procedure of vaping, drinking tea. The zone can be supplemented with a fireplace, a seating area and other furniture and decorations;
- kitchen area. Relevant for large baths, which are often used by large companies. The kitchen area can be small and consist of an electric hob, kettle and microwave. Sometimes the kitchen is supplemented with a phytobar, equipping a rack with high chairs and a cabinet for storing packages with elite varieties of tea and medicinal herbs;

- pantry. A small room with shelves and cabinets should be allocated for storing bath sheets, towels, hats, shoes, etc. It is also worth storing here household chemicals for cleaning, so as not to litter the shower room;
- sleeping area. For example, the second floor can be allocated for a separate bedroom. It will be pleasant for arriving guests to settle here if there is not enough space in the house;
- boiler room for boiler equipment;

- billiard room;
- solarium;
- pool;

- laundry. It is recommended to design next to the shower room for ease of installation of water supply and sewerage wiring. The laundry room can be equipped with a washing machine, drying cabinet or conventional floor / wall dryer, ironing board for bath linen;
- veranda or terrace;

- a small vestibule (important for baths, which are used all year round).

Depending on the available budget, you can equip only some of the proposed premises, for example, a bathroom, a shower and a recreation area. If the plans include the construction of a truly luxurious health-improving complex, and it is not difficult to pay a "tidy sum" for comfort, then you should think about including all the aforementioned premises in the estimate.

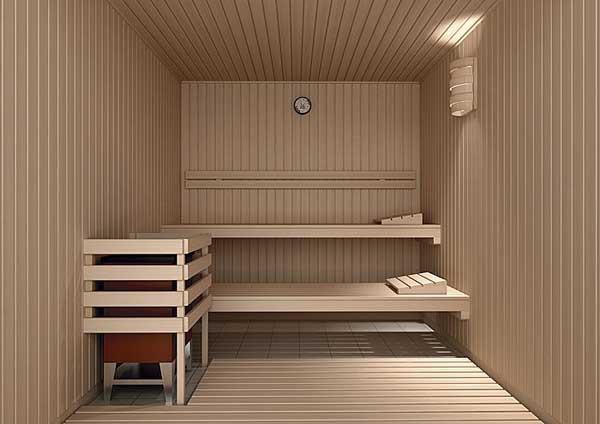
Steam room arrangement. 1 - foil. 2-insulation. 3-membrane. 4-plinth made of wood. 5-plinth floor wooden. 6-vent valve. 7-ceiling from wooden lining... 8-light. 9-floor made of wood. 10 shelves. 11-thermometer and hygrometer. 12-back shelf. 13-chimney. 14-water tank. 15-heater. 16-oven bath. 17-protective shield. 18-non-combustible base under the oven. 19-door to the steam room. 20-bath accessories. 21-light therapy or LED illumination.
It is customary to equip the steam room on the first floor of the building. The entrance to the steam room can be from the shower or dressing room. The door to the steam room is installed from tempered glass or wood, strictly without metal ornaments, inserts and fittings (except for hinges), because metal can heat up and burn the visitor. For one steamer, it is customary to allot 1-2 meters square area premises. The stove will take about a meter more. Accordingly, the comfortable dimensions of the steam room are 3-5 sq.m. Too large a steam room with high ceilings is not worth doing - it will take a lot of time and fuel to warm up the room, and the air will dry out from a hot stove.


Video - The optimal size of the bath and steam room
The height of the ceilings is arranged from 2.2 to 2.6 m, depending on the height of the owners of the bath and the height of the shelves, which in turn can be 1-3 tiered. The shelves themselves are made so that it is comfortable to sit on them, lie down, and a bather with a broom could stand nearby and perform bath procedures. The upper shelf is made the widest, and the recommended height of each tier is 35 cm. It is better to sew up the space under the shelves in order to reduce fuel consumption for heating the unused area of \u200b\u200bthe room.
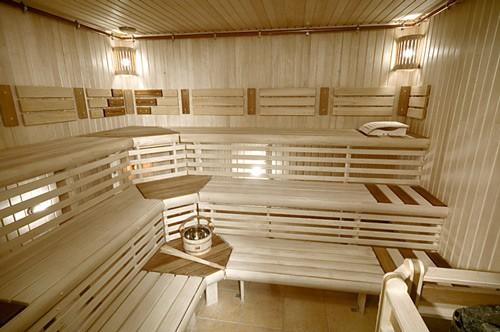
It is advisable to make the shelves from hardwood, the use of cedar / larch is permissible. Wood can be combined, but it must be of good quality - dry, free of knots, resin pockets, traces of rot and mold, carefully sanded. For convenience, it is worth buying or making do-it-yourself headrests made of aspen or linden, as well as a tub and a bucket with a long handle. It is imperative to hang a bath thermometer with a hygrometer in the steam room to regulate the degree of heating and air humidity.
 In the photo - a pointer thermohygrometer and an hourglass

Bath thermometer prices
bath thermometer
The lighting in the bathhouse is rarely made bright. Basically, ceiling and wall lamps are covered with wooden shades / lampshades so that a soft twilight reigns in the steam room. Additionally, a diode tape can be used for color therapy, as well as an optical fiber to create the effect of a starry sky.


The stove is usually located closer to the door. Moreover, the heater can be made of bricks or made of steel (wood-burning, electric).
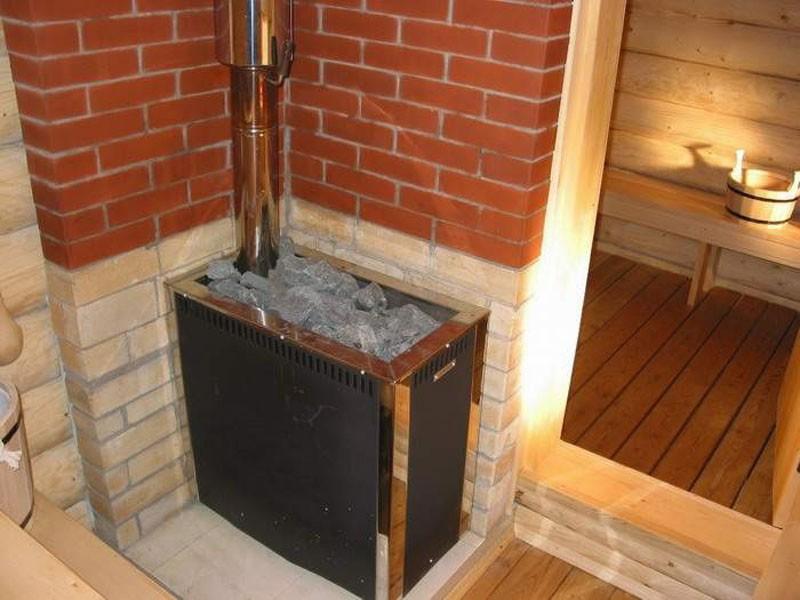 Sauna stove at the entrance to the steam room
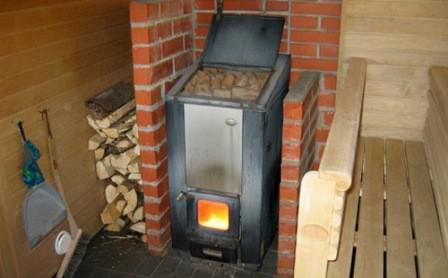
 Sauna heater installed on ceramic tiles
It is extremely important when installing the stove to properly insulate the wall, floor, as well as overlap in the place of its contact with the outgoing chimney. The stove is placed at a distance of at least 10-15 cm from the wall, if the firebox door goes into the steam room, if sauna stove simultaneously in two adjacent rooms and the output of the fire door to the dressing room, in interior partition a recess is cut through, in its dimensions exceeding the dimensions of the furnace by 10-15 cm on each side of the heating surfaces. Insulation is done by means of asbestos cardboard, bricks, ceramic tiles, stainless steel sheets.

Separately, it is worth considering the options for finishing the walls, ceiling and floor. In addition to the standard clapboard and wood floor, there are some interesting ideas.
Table. Steam room wall decoration
| Material | Benefits | Features: | Installation method |
|---|---|---|---|
| Salt crystals or halotherapy blocks in your own steam bath / sauna | They have a pronounced therapeutic effect on the body as a whole, the respiratory system and the skin in particular. | Salt crystals are used in dry steam saunas. The maximum evaporation of trace elements occurs at 60 degrees, but already at 75 degrees the blocks turn into a salt solution. Do not allow salt bricks to come into contact with water, because the salt dissolves in it. | Salt crystals are used to make spectacular rectangular wall inserts; it is also possible to finish one or more walls from floor to ceiling. Facing with salt blocks is combined with diode or other illumination; to fix the masonry, a two-component quick-setting glue is used (curing time from 10 minutes). |
| Wild stone or decorative brick | The uniqueness of the interior, the unusual combination of stone with wooden surfaces. Improved fire safety. When using medicinal rocks, for example, soapstone or jadeite, additionally - a healing effect. | The stone can be used to cover both a part of the wall behind the stove and the entire wall behind the heating device. Sometimes stones are attached instead of plinths to the floor and ceiling. It is worth remembering that the stones in the bath are very hot, so they should not even be allowed to accidentally come into contact with the skin of the visitors of the steam room. | If it is faced with a stone wooden wall, you will need to fix construction waterproofing paper on it (overlaps on all sides 4-8 cm). On top of the waterproofing layer with galvanized staples or nails, a paint net should be fixed (the spacing of the fasteners vertically up to 15 cm, horizontally up to 40 cm, at the corners the mesh is laid in two layers). The mesh is plastered, and after drying 1-1.5 plaster layer, facing stones are laid out on a cement-sand mortar. It is recommended that the stones be laid out on the floor first and numbered for convenience. It is better not to use stones that are too heavy for facing. |
| Ceramic tiles, porcelain stoneware, polished natural stone tiles | Fire safety, aesthetics, steam room interior decoration, durability. | All of these tiles are laid on the wall behind the oven (all or only part of the wall). Tiles with a thickness of more than 10 mm are installed using metal fasteners and pouring cement-sand mortar / glue / mastic into the joints. | The tiles are fastened to the plastered surface of the walls. For fixing the tiles, highly specialized adhesives are used, for marble - on a latex or polyurethane base (anhydrous). Laying is carried out from the bottom up, the seams are laid with crosses or wedges to maintain the same thickness. |
| Cork moisture resistant coating | Suitable for both additional wall insulation and their finishing. | Plates are used with a thickness of 20-40 mm. | Installation of panels on the wall is carried out using a specialized adhesive for cork coverings. It is permissible to use a cork skirting board for arranging a steam room. |
Table. Materials for arranging flooring in a steam room
| Material | Benefits | Features: |
|---|---|---|
| Beautiful, durable, noble looks. | Cold enough, it is desirable to install underfloor heating systems under the porcelain stoneware coating. Must be non-slip. Seams are treated with a moisture resistant grout to prevent the spread of mold and mildew. | |
| Shock absorbing, warm to the touch, blends perfectly with wood surfaces. Not slippery. | Suitable for use in a steam room because the floor temperature rarely exceeds 30-40 degrees. | |
| Wooden boards and wood rugs | Such coatings can be laid on concrete or porcelain stoneware. | Treatment with moisture-proof impregnations and periodic air drying is required. |
Note! It is unacceptable to use any plastic, rubber coatings, linoleum, PVC tiles and panels for arranging a steam room. Decoration Materials and furniture when heated should not emit a chemical smell, resin.
The ceiling in the Russian bath has long been made of timber, lining, boards. It is wooden surfaces that tolerate high temperatures well, fill the bath with a pleasant aroma and do not contribute to the accumulation of condensation - wood tends to "breathe".
There is no point in painting the ceiling, covering it with plywood, chipboard, or plastering - high humidity and temperature will quickly ruin such a finish. In Turkish baths, mosaics are often used to decorate the ceiling, but it is worth remembering that the humidity and temperature in hammams is much lower than in Finnish and Russian steam rooms. It is possible to use a cork coating Termokork 100 mm thick, specially designed for bath ceilings (cost 3900-4000 rubles per 1 sq. M).

It is advisable to equip the steam room with one window. A particularly eccentric option is a full-wall panoramic blind window. Such a window allows you to admire nature from your own steam room, while the mirror coating on the outside will not allow the curious to look inside. But remember that the larger the window, the more heat loss.
The most common option is a single opening window 60x60 cm or 40x60 cm. The window is not placed on the wall behind the stove or sun loungers. The height from the floor to the bottom sash cannot be less than 170 cm - this is the height that implies effective ventilation of the room (natural air circulation). The frame can be made of wood or high-quality plastic that can withstand temperatures up to 120 degrees.


Sometimes glass blocks are inserted instead of a window. They allow you to save on lighting the steam room during the day.
Prices for different types of lining
Arrangement of shower or washroom
The shower room can be arranged as separate room or adjacent to a steam room, for example, separated only by a glass damper or a partition made of glass blocks. A cabin can be installed here or a shower tray with a drain for water drainage can be organized. If a large number of visitors are planned, then it is recommended to install two or three showers.
Directly in the shower, in addition to the shower itself, there should be a bench, a mirror, as well as hooks and non-traumatic shelves for toiletries.
Often, the washroom is completed with a douche bucket and a bathtub made of acrylic or cast iron. Also, fonts are installed in the washing room, especially if there is not enough space for arranging a full-fledged pool.
The temperature in the shower room should be higher than in the dressing room, but significantly lower than in the steam room.
Hot water supply is organized by connecting to a central water supply, installing a boiler or installing a heat exchanger and a remote water tank (from 80 to 120 liters).
The diversion of water is organized into a central sewerage system, a septic tank or a drainage well. A drainage ladder is installed in the shower room (the floor is poured or laid with a slope towards the drain funnel), from which waste liquid is drained through a pipe with a diameter of 110 mm. One person needs about 50 liters of water to take a shower, respectively, using this figure, you can calculate the volume of a septic tank or a storage cesspool for a bath. By the way, treatment and storage facilities should not be located near the walls of the bathhouse or underground - an unpleasant smell will penetrate the room. It is recommended to mount a local installation 5-10 m from the walls of the bath.
For wall, floor and ceiling coverings, see the following table.
Table. Arrangement of a shower in a bath
| Material | Features: | Finishing example, photo |
|---|---|---|
| Wood | The showers adjacent to the steam room are often trimmed with wood so as not to violate the general style of the premises. Wood does not tolerate constant humidity - fungus develops, rot appears. It is worth considering the possibility of installation shower tray or booths to minimize the effect of moisture on the wall and floor material, as well as regularly dry the boards, carry out treatment with antiseptics. | |
| Wood Ceramic tile, porcelain stoneware, mosaic | These materials are most appropriate in the shower, but it is important to choose products with a non-slip surface, and trowel the seams with compounds that prevent the formation of mold. It is recommended to install wooden or rubber mats on the tile floor. | |
| PVC panels | This material can only be used for walls and ceilings in showers not adjacent to the steam room. Plastic does not tolerate exposure to high temperatures, but high humidity is not afraid of it. The panels are easy enough to install, wash, but the strength of the material leaves much to be desired. | |
| Natural stone | This decision is not to everyone's liking due to the extraordinary interior and the coldness of the coating. However, the stone tolerates high humidity and is quite suitable for wall cladding in shower rooms. |
Video - An example of finishing shower ceramic tiles
Don't forget about ventilation in the shower room. A hood with an electric fan should be located under the ceiling. For natural ventilation, it is worth placing a small opening window closer to the ceiling, this is especially true for wooden baths and showers with timber trim, clapboard.
Advice! So that less heat escapes from the shower, it is recommended to equip a threshold at the entrance to the room, as well as install a door of a small height (from the standard 2.37 m, 2.07 m, 2 m and 1.87 m, the smallest is chosen, and this value should be reduced further 10 cm). The justified width of the doorway is 75-80 cm.
Bathroom
The bathroom can be a separate room or be combined with a shower. In the first case, in addition to a toilet or dry closet, it is recommended to install a washbasin with a mirror, a cabinet, a shelf, a paper holder in the room. The decoration of a separate bathroom can be absolutely any, from classic cladding with tiles and plastic panels to cork, linoleum, a combination of various materials.


Toilet ventilation is very important. According to the rules, up to 50 cubic meters of fresh air should be supplied to a toilet room with 1 toilet bowl every hour.
Often a heating radiator is installed in the toilet so that it is comfortable in the cold season. It is also worth placing a boiler here so as not to spoil the interior of the washing room.
In the case when it is planned to install a toilet in the shower, it is worth equipping two forced draft hoods. One will not allow moisture to accumulate under the ceiling, the second will ventilate the space above the toilet.

The decoration of the shower room with the toilet is made in the same style; for convenience, the toilet is installed in the far corner of the washing room and is fenced off with a partition, curtain, screen. It is unacceptable to use materials like linoleum in the shower room. Are applied standard options finishing with tiles, clapboard, mosaic, stone, plastic, etc.
The drainage of water from the toilet can only be carried out into a local treatment plant or a central sewage system. If floors of a leaky type are arranged in the bath, a sewerage network must be provided separately for the toilet (or an independent mobile dry closet is installed, for example, of a composting or liquid type).

Of course, every private developer designs a bathhouse based on their own capabilities and preferences, but it is worth familiarizing yourself with federal regulations prescribing the rules for arranging baths in general and latrines in particular:
- SanPiN 983-72, 2.1.2.2645-10 and 42-128-4690-88;
- SNiP 30-02-97;
- SNiP 31-05-2003;
- and for the organization of a shower and toilet for a disabled person, it is worth paying attention to the second edition of the manual on the integrated design of the environment for persons with disabilities (from 1997, prepared by the Moscow Committee for Architecture).
Files to download:
Plumbing dimensions
Prices for dry closets
dry closet
Dressing room and wardrobe
The dressing room is the last room that must be on the first floor. This room can be large and airy or very tiny. In any case, there must be an entrance to the shower room from the dressing room. Dressing rooms are most often made of wood to emphasize the style of the bath. It is advisable to arrange wooden furniture.
The recommended air temperature in the dressing room is 26-28 degrees. Ventilation can be natural, for which they install opening windows, which in turn are a source of additional light during the daytime. Artificial lighting it should be made quite saturated (chandelier and wall sconces), but not sharp.
The dressing room can be combined with the dressing room, if the whole bath small size... In this case, you should be guided by the following recommendations:
- the height of the ceiling should be greater than the height of the person, taking into account the raised hands. Optimally - 2.4-2.6 m;
- the number of seating areas, hooks and shelves for clothes should correspond to the expected number of visitors to the bath;
- the floor in the dressing room and dressing room should be warm and non-slip so that it is comfortable to walk barefoot. For example, you can install a "warm floor" or lay a carpet;
- it is worth providing one or more electrical outlets;
- it is recommended to equip the dressing room with a mirror.
By the way, the dressing room can be combined with the kitchen area by installing a corner kitchen set from household appliances... If you plan not only brewing tea in the kitchen, but also full-fledged cooking, you need to install a separate hood, as well as plan the laying of water and sewer pipes to connect the sink.
Advice! Do not install kitchen cabinets under the stairs to prevent dust from falling from the steps onto the dishes.
Video - Dressing room design
Second floor
In the photo - a cozy bedroom in the attic of the bath
Everyone decides on their own how to equip the second floor. Whether upstairs there will be a bedroom, a billiard room, a solarium or a simple storage room depends on the size of the bath and the budget of its owner. However, we strongly recommend installing a safe staircase with wide steps between the floors, and supplementing the residential floor with a small balcony.
Equip the bath so that you feel cozy and comfortable in it.
Video - Sauna project with billiards
Video - Building a bath with a font


The arrangement of a bath requires a careful selection of materials for construction. The interior decoration of the premises is especially important, because the comfort of operation depends on it. This task can be accomplished using a variety of materials and finishes, each of which has its own characteristics.
Bath interior decoration: purpose and features
The classic Russian bath includes three main rooms: a steam room, a washing room and a vestibule. Additionally, there may be a recreation room, billiard room and other premises. In any case, interior decoration is needed, which not only creates coziness, but is also needed to create an optimal atmosphere and keep warm.
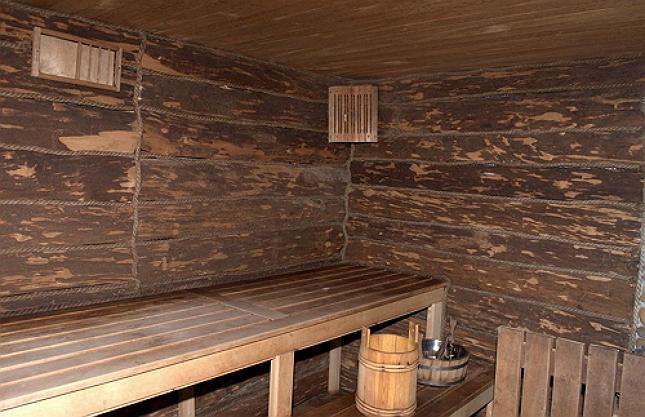
The bath building can be built from a bar or another type of wood. This material is available, in demand and effective. Log structures for summer use do not need complex finishing. A bathhouse on a log house should have well-drilled lower rims; from the inside, the walls do not require additional materials. This is due to the fact that wood is able to "breathe", removing moisture and steam outside. The use of synthetic insulation will disrupt this process. However, for a winter bath, thermal insulation is needed, clapboard finishing is appropriate. Log walls look aesthetically pleasing without additional finishing.
The construction of foam blocks is reliable, it is used at any time of the year, but it needs interior decoration. Indoors, steam rooms almost always use lining, under which layers of hydro and thermal insulation are placed. In the recreation room and dressing room, the use of ceramic tiles, PVC panels, lining is appropriate. Walls made of foam blocks are pre-treated with antiseptic compounds. The floor is often tiled with anti-slip ceramic tiles to provide comfort.
Brick for the construction of baths is rarely used, but such structures are reliable, very durable, and environmentally friendly. Brick structures do not need exterior decoration, but inside you can use porcelain stoneware for the floor, ceramic tiles, lining. In the locker room, the walls are often trimmed with PVC panels, but they are not suitable for the steam room due to the high temperature in the room.
Wooden larch paneling is a universal solution for interior decoration of a bath. This material is affordable, practical and durable. If a more reliable wall or floor covering is required, then use porcelain stoneware or ceramic tiles. Bath from any building material requires interior decoration that will provide comfort, aesthetics and protect the main walls from moisture.
Interior finishing options
All bath rooms are exposed to high humidity, which requires careful selection of materials for interior decoration. There are several basic options, each of which has certain properties. The advantages, disadvantages, purpose and features of operation must be taken into account when choosing an option for interior decoration of a bath from any material.
Table: advantages and disadvantages of materials
| Material | Benefits | disadvantages | Optimal use |
| Lining made of wood | Environmentally friendly, pleasant texture, the possibility of combining with other materials, variety of wood species | Complex installation and maintenance when operation, fragility, fire hazard | For walls in any room of the bath, built from any material |
| Ceramic tile, porcelain stoneware | Durability and reliability, resistance to mechanical and chemical influences, wide selection, durability, environmental friendliness, fire safety | It's important to follow the rules installation, high cost, uncomfortable texture | Baths in any room for finishing the floor, walls, firebox |
| PVC panels | Affordable price, variety of colors, easy installation, easy maintenance during operation | Fragility, low resistance to high temperatures, fragility | For changing rooms, lounges, shower rooms |
Photo gallery: clapboard finishing options
Log walls make the bath cozy and do not require additional finishing  The combination of lining and ceramic tiles is a practical solution
  All surfaces inside the steam room can be finished with clapboard
  The lining is easy to mount both on the ceiling and on the walls
  Clapboard trim is convenient for a small steam room
  The lining is easily combined with stone and tiles
  The break room is easy to arrange luxuriously
Choosing the type of finish
The interior decoration of the bath fulfills not only an aesthetic function, but also provides comfort, an optimal atmosphere in the premises. Therefore, materials for arranging a steam room, shower, rest room or other space must meet the following requirements:
- environmental friendliness, non-toxicity, safety for human health when heating the material;
- resistance to mechanical and temperature loads;
- easy care during operation;
- simple installation technology.
Popular materials such as wood and ceramic tiles meet these requirements. They are easily combined with each other, allowing you to create a comfortable and safe environment inside any room of the bath.
When choosing a material, its purpose is taken into account. The tile is appropriate for the floor and walls, and the ceiling is decorated with planed boards and clapboard. This combination is optimal for a shower room, and in a steam room, all surfaces are often made of wood. This allows you to create the comfort and spectacular atmosphere of a Russian bath. For a drier room, stretch ceilings are suitable, but you should not make plasterboard structures. This is due to high humidity in all rooms of the bath, and drywall is unstable to moisture.
Wood and lining made of different types of wood are in demand materials for interior decoration of a bath. This is due to the fact that wood is affordable, environmentally friendly, and the installation of elements does not require special preparation. For a bath, such types of wood as larch, aspen, abasha, alder are optimal. They are durable, resistant to humidity and temperature extremes.
Preparation: calculating the working area
Before starting work, you should calculate the area of \u200b\u200bsurfaces that need finishing. Lining is used for walls and ceilings, and the floor is made of boards. For a quality finish, high quality wood is needed with the lowest resin content. Therefore, pine is rarely a material for arrangement, as it releases resin.
The decoration of each room consists of several stages. Installation is carried out first flooring, which is a flooring of boards with a thickness of 50 mm. The elements are laid on logs with a height of 300 mm, which are installed on a sand cushion, equipped on the ground. After that, the area of \u200b\u200bthe walls and ceiling is calculated, which they plan to trim with clapboard. To do this, you need to calculate the areas of each wall, ceiling and add up the data obtained.
Selection and calculation of material
Larch lining is the optimal solution for decorating a steam room or washing room. Under the influence of time and humidity, its wood becomes harder, which makes a durable interior decoration. When choosing a lining, you should pay attention to the following features:
- lining for finishing the steam room, washing room must be marked "Extra class" or "A class". Such material is devoid of large knots, has a homogeneous structure, a flat surface;
- wooden elements should not show signs of decay, cracks, deformation. Smooth and dense lining is easy to assemble and looks aesthetically pleasing;
- for finishing you need not only lining, but also steam and heat insulation materials. Finishing is carried out only after the installation of these layers;
- the thickness of the board must be at least 12.5 mm, a spike of 8 mm corresponds to the depth of the groove. Material moisture - no more than 12%;
- quality material has a flat, smooth surface.
It is also important to correctly calculate the amount of material. Lining is often calculated in square meters... In this case, its quantity is equal to the area of \u200b\u200bthe working surfaces. This indicator needs to be increased by 5%, since material damage is possible during operation, therefore, the lining is purchased with a margin.
Bars or thin slats are required for work. If the thermal insulation of the bath was carried out outside, then only the installation of vapor barrier and decoration is carried out inside. Therefore, you need to purchase a vapor barrier film that will ensure indoor comfort. Otherwise, the insulation is carried out from the inside and you will need insulation, a waterproofing film and bars for the lathing.
Video: how to choose a lining
Tools and supplies
The construction and arrangement of any facility requires the use of reliable tools. The quality of fastening materials is of particular importance in the construction of a bath, because the durability of the finish depends on it.
List of tools and consumables:
- construction stapler with staples;
- roulette;
- pencil;
- building level;
- nails;
- self-tapping screws with anti-corrosion coating;
- screwdriver;
- hammer;
- hacksaw.
The tools must be prepared in advance, and the fasteners must be purchased with a margin. This makes it possible to securely fix all materials and elements.
Step-by-step instructions for interior decoration of the bath
Wall decoration is carried out after the installation of heat and vapor insulation. To do this, you need to attach vertical or horizontal bars to the wall, the distance between which is equal to the width of the insulation used. On top of the racks, a waterproofing film is fixed with brackets, and then the insulation is also fixed on the brackets or glue. After that, a vapor barrier layer is attached, which protects the supporting structures from condensation.
The cladding of the walls of the bath from the inside involves the following actions:
- On top of the vapor barrier film, slats are attached, the distance between which should be 50 cm. A gap of 3 cm should be left between the vertical slats of the frame and the ceiling and the same distance should be left from the floor. This is necessary for the shrinkage of the structure.
- To a wooden surface without internal insulation the slats are fixed with self-tapping screws, and to the brick base - with dowels. In this case, it is important to control the verticality of the rails using a plumb line, and check the plane with cords stretched between the extreme bars. Clamps are installed on the back side of the lining board, after which the panel is attached to the crate with the help of nails.
- Next, a sheet is assembled from the lining, inserting one element into the groove of the other. On the back wall of each panel, a clamp is attached, with the help of which the lining is fixed to the crate. You can also fix the parts simply on nails, deepening their heads into the wood. The spacing between the fasteners is about 60 cm. It is important to connect the parts tightly, but leave a gap of about 2 mm, as the wood swells with moisture.
Lathing for wall cladding is necessary for walls made of any materials. The bars allow you to create a ventilation gap, and the vapor barrier film ensures moisture removal. This preserves the quality of the supporting structures and the appearance of the finish. The ceiling is sheathed with clapboard using the same technology, after fixing a vapor barrier film.
Video: preparing the ceiling for clapboard sheathing
Decorating a bath with clapboard is a popular method of arrangement. At the same time, wood is successfully combined with ceramic tiles, stone. Therefore, the interior decoration of the bath can be varied, but it is important to choose the installation technology of a suitable material.
Having set out to build a bathhouse with your own hands, you should study in detail each stage of construction. A qualified approach when choosing a site, a competent project and adherence to recommendations at all stages of arranging a bath will ensure a worthy result of the work invested.
Rules for determining a place for construction
A skilfully chosen construction site guarantees convenient operating conditions in the future. Experts recommend considering the following recommendations:
- Despite the benefits in terms of the consumption of building materials, the addition of a bath to the main dwelling creates an increased threat of fire.
- Avoid the close location of the reservoir - this can provoke flooding of the building.
- The back of the courtyard is the optimal place for the sauna.
- The construction of a bath is necessarily accompanied by the arrangement of communications, including a drainage system, and effective ventilation.
- Avoid areas near roads.
- Its construction on the southern side of the site will help to ensure maximum heating of the bath by the sun's rays. Protection against gusts of wind is an additional bonus of a winning solution when setting up.
- Building away from the contact line of the plots will help to eliminate disagreements with neighbors.
- In order not to provoke pollution of drinking water sources, a site for the construction of a bath is selected at a distance of about 20 m from a well or a well.
Any construction activity is not complete without preliminary planning. The bath drawings below will help you choose a suitable project.


The minimum size of the building is determined based on the projected number of guests at the same time in the pair establishment. The acceptable area for one visitor is 5m 2 of the total bath space, a company of four will need 20 m 2. A standard bath includes the construction of a steam room, a dressing room and a washing room. If desired, the arrangement of other premises is also carried out. In order for the bathhouse to bring only positive emotions with your own hands, consider the following nuances when designing and building:
- The rational height of the rooms is from 2.0 to 2.2 m. Lower ceilings will create inconvenience for vacationers, a high room will require additional costs of heat carriers and increase the heating time.
- Arrangement of the exit of window openings to the west contributes to the extension of natural light. They usually take a steam bath at the end of the day, watch the sunset in between visits to the steam room - the best way relaxation.
- The doors are better planned on the south side, this will reduce the worries of clearing the entrance from snow.
Advice! Bath windows and doorways are small. The optimal dimensions of the doors are 70x180 cm, subject to the arrangement of a high threshold. Some of the inconveniences at entry are offset by the significant reduction in heat loss.
- The criteria for choosing materials for construction are their light weight along with high energy-saving ability.
- The purchase of high-quality equipment and well-executed installation of communications contributes to the safe operating conditions of the bath.
- Avoid using resinous wood for furnishing decorative finishing baths inside.
After determining the optimal dimensions and other nuances of construction, proceed to the preparation of the following drawings:
- general bath project;
- plan of each room;
- option for arranging the foundation;
- roof erection scheme;
- way of fixing the timber;
- floor and ceiling mounting option;
- the design of the stove for the bath and the features of its installation.
Comment! When choosing ready-made construction projects, take into account the type of soil and climatic conditions of the region in which the construction of the bath is planned.
With design skills, you can draw up your own bath plan. Ordering drawings from a specialized company is another option for preparing for future construction.


Indicative list of materials
The construction of a bath will require materials, the volume of which depends on the chosen project. Here is an indicative list required for arranging a bath:
- Beam with a section of 15/15 cm.
- Floor mounting board. Optimally for these purposes, an edged board with a length of 4 m and dimensions of 15/5 cm is suitable.
- The ceiling surface is sheathed with clapboard 2 cm thick, the width of which is 10 cm.
- Arrangement of decorative trim inside the bath is recommended to be carried out with a similar material.
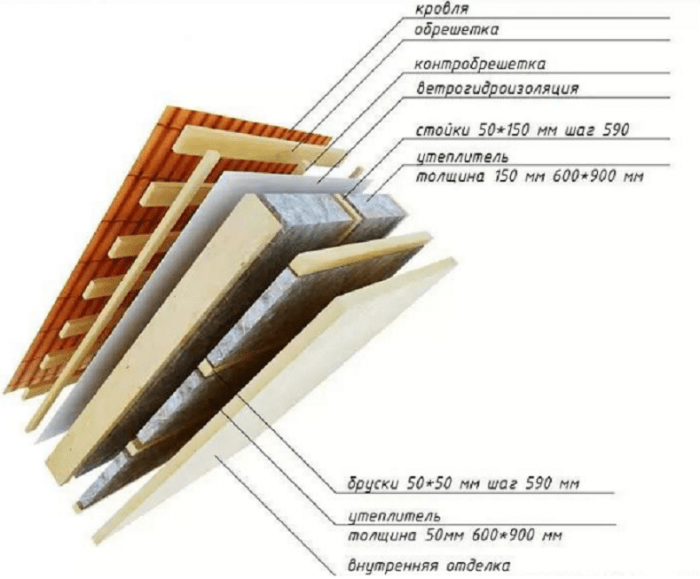
- Competent construction provides for the formation of steam, hydro and thermal insulation. For these purposes, a vapor barrier film, penofol or polyethylene film is purchased as a waterproofing, for insulation ceiling surface mineral wool is perfect.
- The surface of the bath will be protected from high temperatures by sheet asbestos. Installation is carried out on the walls and ceiling near the stove, as well as in the chimney area.
- Depending on the chosen method of building the foundation, you will need components for concrete mortar and materials for forming the columnar structure.
- The finishing coating of the bathhouse roof is more often focused on the finishing of the main building or related buildings in order to create the overall harmony of the site.
- Insulation for mezhventsovy seams. When building a bath, jute, tow, moss or flax felt are suitable for these purposes.
Advice! Start building a bath better in spring, this will allow the wood to settle in the next half-year break. The purchase of cement is carried out immediately before the start of the construction process so that it does not lose its qualities.

The main stages of arrangement
The laborious construction process is unlikely to be complete without the involvement of diverse specialists. The work begins with the arrangement of the selected site for a bath, freeing the soil from debris, roots and other elements that impede construction.
Laying the foundation
There are three main options for building a foundation for a bath:
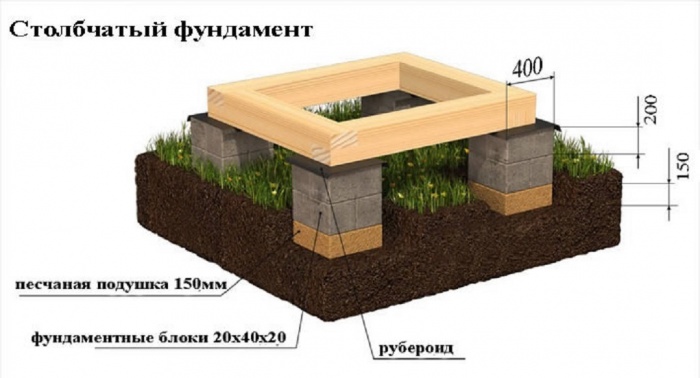
- Columnar. The most popular option when building a bath from a bar. Let's dwell on the rules of its arrangement in more detail.
- Pile-screw. Refers to a type of columnar foundation. The characteristic features of its construction are the speed of the process and insignificant material costs.
- Tape. It is used for the construction of a bath in rare cases due to its high cost and labor intensity. The significant weight of the building or problem soil are the main reasons for choosing a strip foundation.

If we are building a bathhouse on swampy soil, it will save the structure from premature destruction, but be prepared for serious expenditures of funds and efforts.
The process of building a columnar base support for a bath includes the following steps:
- Recesses for the supports are prepared. The spacing between the posts is determined based on the total load on the columnar structure, taking into account the characteristics of the soil. The corners of the bath and the intersection of the walls are the obligatory points for installing the pillars.
- The approximate depth of the holes is 1.0-1.5 m. The value varies based on the level of soil freezing.
- At the bottom of each recess, a cushion of sand and gravel is being arranged with a layer of 10-15 cm.
- The next stage in the construction of the foundation for the bath is the installation of asbestos pipes with strict adherence to the vertical level.
- Metal rods are placed inside the supports for the purpose of reinforcement, which are poured with a concrete mixture in three stages.
- The space around the pipes is also filled with concrete mortar.
- After several days, construction continues with the formation of a half-brick wall between the bath supports.
Erection of walls and roof
After the arrangement of waterproofing on the foundation in the form of 2-3 layers of roofing material, they proceed to the construction of the walls of the bath. For construction, a beam with a cross section of 15/15 cm is traditionally chosen. The first crown made must be checked for all parameters.
Advice! Optimally, when the first crown is at least 30 cm from the ground.

Arrangement of walls is most often carried out by the "in the paw" method. If the quality of the timber is in doubt, the rows of bath walls are connected with dowels. This construction method will prevent displacement and twisting of the wood material. Installation of wedges is carried out according to the brickwork method: piercing through 2-3 rows, skipping one. It is optimal when the gap between adjacent pins does not exceed half a meter. The arrangement of the bath walls is accompanied by the laying of insulation between the beams. During the construction process, do not forget to leave window and door openings.


After completing the arrangement of the walls of the bath, the rafters are fixed taking into account the features of the selected roof configuration:
- Construction shed roof involves fixing the rafters with two external supports. The second option of arrangement is to fix the roof of the bath with external and internal support.
- When installing a gable roof system, the lower edges of the rafters rest firmly on the walls of the bath, the upper edges of the elements form a roof ridge.

Installation of rafters to the last crown of the bath walls is carried out with staples. After arranging the rafters, they proceed to fixing the lathing. Do-it-yourself construction of a bathhouse at all stages is accompanied by the laying of insulating layers that prevent heat loss, steam and moisture penetration, which provokes premature deterioration of the base material. This rule also applies to the arrangement of the roof. After fixing the insulation, steam and waterproofing, proceed to the installation of the decorative roof covering.

At the next stage of construction, they are installing window frames and doors.
Installation of communications
Then they move on to the arrangement of communications. The formation of the wastewater system begins at the stage of foundation construction. For this purpose, outside the building, a drainage well or a pit is being arranged, which are connected to the bath with a pipe. Remember to provide a slope in the drain system to prevent stagnant sewage waste. How to make a competent drainage system is shown in the following diagram:

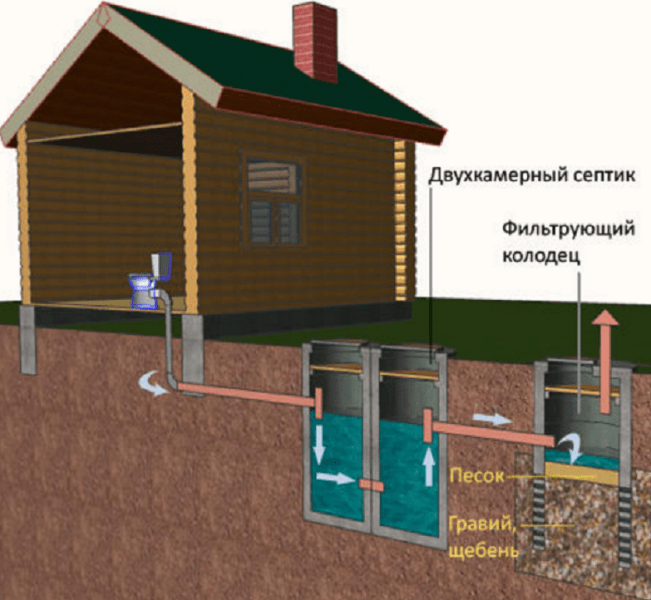
After the formation of the sewage system, they proceed to the arrangement of the floor. During the construction of a bath, two options for mounting the floor surface are common: using concrete or wood. The first option is more durable, but labor and material costs for construction increase significantly. In addition, the arrangement of a concrete floor in the bath significantly increases the weight of the entire structure. In this case, the surface facing is carried out with tiles.
When arranging a wooden floor, it is made leaking. Construction technology is as follows:
- The lag is being installed.
- Boards are fixed on the logs with a small gap.
- For drainage, a compact hatch can be made, which is closed with a grill.
- The flooring is designed with a slope, allowing moisture to accumulate in the hatch.
The construction of a wooden floor in the bath is shown below in the photo:
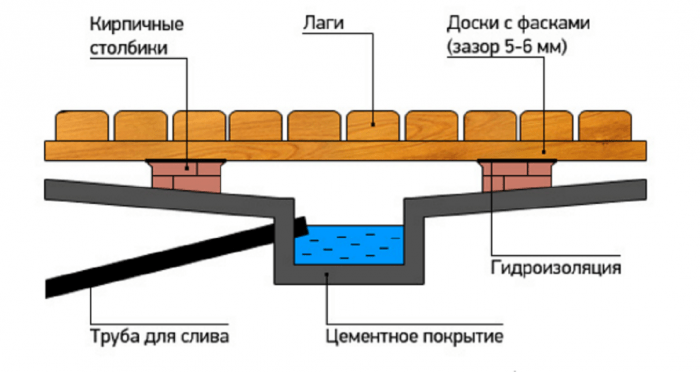

Comment! Extend the life of wooden floors by thoroughly ventilating the room after each visit.
The next steps in arranging a bath
- installation of insulating materials on wall surfaces;
- construction of a water supply system;
- electricity supply.
Steam room equipment
One of the most important stages of construction is equipping the steam room with a stove. The place of its installation is planned in advance. The light construction of a timber bath is unlikely to withstand a heavy brick stove with a massive chimney. In this case, an additional foundation is required. Usually they resort to the option of mounting a metal model. Protection of adjacent surfaces with screens reflecting radiation of high temperatures - required condition construction. An approximate scheme for arranging a stove in a steam room is presented below:

The construction of comfortable shelves does not present any particular difficulties: initially, the support frame is being installed, then boards are nailed to the installed support. The caps of the fasteners are carefully recessed to avoid scalding.

Conclusion
The final touch of the arrangement is filling the bath with all kinds of accessories. Brooms, tubs, buckets, grates - all the wooden surroundings contribute to the formation of the traditional atmosphere of the Russian steam room.
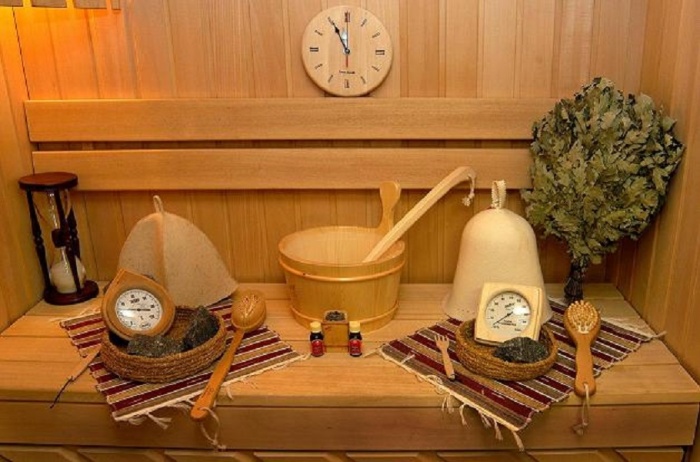
Despite the laborious construction process, the result will be the pride of the owner and the delight of all invited visitors.


