How to make stained glass windows with your own hands? Do-it-yourself stained-glass window at home
The art of making stained glass has been known since ancient times. Such pleasure is very expensive. Those stained-glass windows, photos of which can be found on the Internet, are made experienced craftsmen using unique technologies and materials. But, do-it-yourself stained-glass windows or their imitation can be made at home.
A stained glass window on a window or door creates an image flavor of the authentic design of the room. To create a stained glass picture, choose the sketch that suits your taste and the available technology. Stained glass pattern can be anything: geometric pattern, flowers, ornament, birds or animals.
Types and choice of stained glass technology

- Filled stained-glass windows are made by applying paints to glass. For contour lines, special paint is used in tubes with a tip adapted for drawing lines. It can be purchased at any art store. After the contour lines have dried, the free gaps are filled with multi-colored dyes for glass, a more liquid consistency.
- Film stained glass is the simplest and most inexpensive way of stained glass on glass. A translucent self-adhesive multi-colored film is cut out according to patterns and glued to the glass. It turns out a kind of application. To imitate a full-fledged stained-glass window, the seams are decorated with self-adhesive lead or bronze flexible tape.
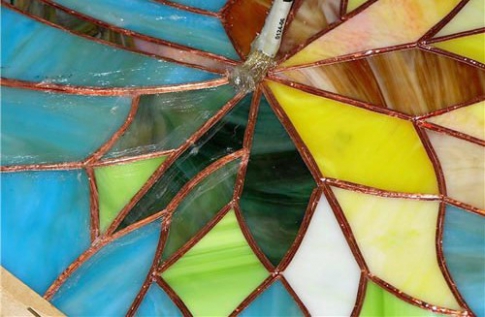
- The stained glass window, according to the Tiffany method, is closest to the real stained glass window. It is made from pieces of colored and transparent glass. You need some skills in working with a glass cutter and the ability to solder.
Stained glass window manufacturing

- The sketch of the drawing is made with a pencil and is drawn with a marker on a sheet of paper corresponding to the format of the processed glass. Choose colors for filled sectors and designate them. Degrease the treated glass and dry it. Put the sketch on the table, and glass on top of it.
- Contour lines are easiest to apply with embossed thick paint. Tubes of special paint are equipped with nozzles for lines different thickness. They are produced in different colors, including imitating metals. Let the paint dry.
- You can make wire aluminum stained glass windows. To do this, take an aluminum wire with a diameter of 1.6 mm, bend it along the contour lines and grease with PVA emulsion. Lay on the glass and press down with a weight. Drying time is an hour and a half.
- Prepare the aniline color. Dilute it with distilled water and filter through cheesecloth. The consistency of the paints should be like thick sour cream. Paint should be applied progressively with a clean brush. If the saturation of the area is weak, let it dry and paint over again.
- After the paints have dried, turn the glass over to the other side and decorate the places where the aluminum wire is glued with a self-adhesive metallized tape. Open the front side for reliability and aesthetic appearance with a transparent varnish.
Technique for making film stained glass

- You will need a lot of scraps of translucent colored or multi-colored self-adhesive film. A sketch of a stained-glass window can be made on paper and then transferred to glass. Putting the sketch under the glass, transfer the contour lines to it with a marker or watercolors.
- Carefully paste the details of the picture cut out according to the templates onto a fat-free plane. Smooth air bubbles gently to the edges with your fingers or a roller. Poke small bubbles that cannot be removed with a thin needle and carefully squeeze with your fingers until the swelling is completely eliminated.
- To create a relief contour, a self-adhesive lead tape is used. Joints and joints are processed with a soldering iron.
Tiffany stained glass technology

- For such stained-glass windows, you will need a set of multi-colored glasses, preferably of the same thickness. The ability to cut glass in a curved pattern and solder tin will also come in handy. When sketching a pattern for a Tiffany stained glass window, keep in mind that the abundance of "T" - shaped intersections of the seams of the contour, contributes to the strength of the stained glass structure.
- On thick paper, draw a sketch of the stained glass window. Cut it into individual template fragments with scissors. The table is covered with a soft cloth, a template is placed on it, and colored glass is placed on top. Glass cutter, it is better to use bulk. Smoothly, with light pressure, make a line along the contour and beat with a glass cutter until a crack appears on the glass. Use pliers to remove excess pieces of glass. Internal arcs can be done in stages. Deviation from the contour line, permissible within 4 mm. The edge should be processed with a grinder and a fine-grained file - chamfer along the edges.
- Each fragment of a stained glass panel is wrapped with foil. Folia is a thin copper foil. A foil is applied from the end part with a small but uniform launch onto the plane on both sides. The details of the stained-glass window begin to be laid out on a plywood sheet from the top corner to the sides and down. Parts of the stained-glass panel are fixed with small carnations.
- The space between the seams is treated with flux, degreased and prepared for soldering. The flux removes oxides from the copper foil and aids in the ductile application of the tin solder. You can treat the surface with soldering fat or mix it with soldering acid. For the manufacture of Tiffany stained glass, tin solder POS - 61 is suitable.
- The tip of the tin wire is applied to the groove between the glass parts and filled with molten tin solder using a heated soldering iron. Adjust the height of the seam yourself, but try not to overheat or stain the glass. Soldering is done on both sides.
- Areas close to the perimeter do not need to be soldered, leave room for the frame. Select a U - shaped tin profile corresponding to the thickness of the glass, cut frame rails from it with angles at the edges at 45 °. Taking the stained glass panel into the frame, the connection at the corners, carefully solder with a thin seam.
The stained-glass window is cleaned of visible defects, the seams are corrected with fine sandpaper, and washed with soapy water. After drying, it can be installed on a door or window.
Stained-glass window is a great way to decorate the interior, give windows and interior door inserts nobility and sophistication. And if earlier it was a very time-consuming and expensive process, accessible only to individual craftsmen, today it is really possible to do it yourself. stained glass do different ways, but it makes no sense to master the most laborious methods that were used several centuries ago to decorate cathedrals and palaces. A similar effect is easy to achieve through the use of stickers or the technique of painting on glass with special paints.
The use of stained glass in the interior
Many centuries have passed since the invention of glass for stained glass, and humanity still admires narrow and long windows temples and cathedrals, palaces and houses of the rich nobility of the Late Middle Ages. In those days, any glass was an expensive luxury, especially stained glass. They were made on the basis of a cellular metal pattern, into which segments of smalt and colored Murano glass exactly corresponding to the pattern were inserted.

The word "stained glass" is of Latin origin, where vitrum is translated as "glass", but now it is used to refer to colored drawings on glass. Until now, numerous pilgrims and sightseers of historical monuments are impressed by the images of saints on glass, which transmits light through colored cells. Breaking stained glass with biblical scenes in an Orthodox church or Catholic cathedral was considered blasphemy, especially since they had been created for decades.
Stained glass painting has long gone beyond religious buildings. Today, stained glass on glass is back in fashion, and the most varied subjects are used. Stained glass artists offer more and more new techniques that reduce the cost of creating glass inserts shining with colors.
This special highly artistic decor is able to give the interior of the apartment a more expensive and respectable look. And today stained-glass windows are widely used wherever they are appropriate:
- window panes;
- large plafonds of ceiling lamps;
- false windows with illumination;
- interior doors;
- glass partitions for zoning large areas;
- graceful countertops of small tables in the living room;
- frameless interior glazing;
- translucent screens between 2 adjacent rooms;
- multi-level and suspended ceilings;
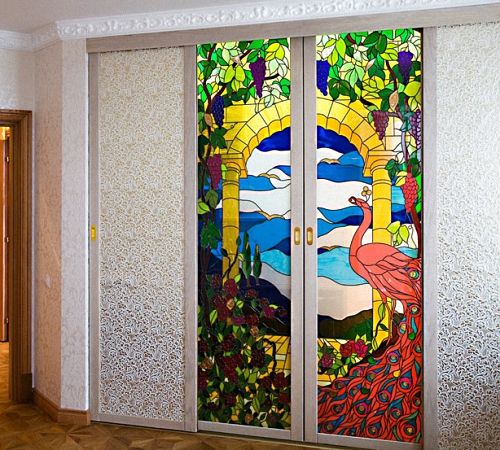
- sliding cabinet doors;
- fireplace screens;
- table, floor and wall lamps;
- * translucent inserts in the ceilings;
- inserts on wall niches;
- art objects and souvenirs.
You can choose transparent or opaque stained glass, depending on the overall task. If it is important that the light partially penetrates the room, but what is happening behind the partition is not visible in detail, choose opaque glass for stained glass:
- stained glass screen in the bathroom (in the shower room);
- glass partition between kitchen and bathroom;
- impenetrable interior doors with an insert in the bedroom;
- partition between toilet and bathroom.
Attention: It should be borne in mind that a colored impenetrable stained-glass window only partially transmits light, so it is inappropriate in an apartment where there is already insufficient lighting. But on the south side, a do-it-yourself stained-glass window will become an appropriate light filter, for example, stained-glass windows on glass, photo:
Advantages and disadvantages of stained glass inserts
Mastering the art of stained glass painting is within the power of anyone who wants to make stained glass windows on glass with their own hands. It is useful to master the glass painting technology for decorating personal space, and then you can use it as additional income. And although a beautiful stained glass is a real art, it is not necessary to be an artist, many masters use ready-made sketches for intricate drawings with clear boundaries on the glass.
Making a stained glass window on your own is a fascinating process, reminiscent of children's "coloring books", where within the finished contours, each cell of the picture is filled with a certain color. And it also resembles a children's kaleidoscope with colored glass between the mirrors, where it is so exciting to observe delightful patterns.
An important advantage is that each stained-glass window is unique, even if a ready-made sketch was used. Any image is obtained as a result of the choice of a particular technique, the method of applying and selecting dyes and cell boundaries.
Obtaining the selected picture of stained-glass windows on glass is an interesting activity that even a schoolboy can master. It is interesting to make it for the whole family, being careful when working with glass, the edge of which can be temporarily pasted over with masking tape. If you work with acrylic paints, then you do not need any special devices. The traditional technique of making stained glass and metal requires a separate workshop. And some methods of glass etching involve the use of chemicals.
Drawing on glass, with proper organization of work and with a ready sketch, can be completed quite quickly. And if you have artistic skills and a delicate taste, then making stencils and stained-glass windows on glass with your own hands is a great hobby or a way of creative self-realization. In this case, you can try which stained-glass windows will be most interesting:
- drawn;
- cut;
- glued;
- soldered.

The simplest methods of applying a drawing have their drawbacks - the drawing may be unstable. The simplest loose image has to be done between 2 glasses in a frame, keeping it as a souvenir so that it does not wash off. But this is more about children's creativity. And if you decide to decorate the apartment with real works of art, using special paints on glass, the stained-glass window should be elegant and attractive. It is unlikely that “something” special will come out the first time, you will have to practice several times in order to practice to master the technique.
Attention: Remember that any glass can break, including stained glass. Therefore, it is advisable to first consider whether there is a possibility that the insert will be broken. In some cases, it is better to use ready-made foldable film, which will not allow fragments to scatter, for example, if you do not carefully slam a glass door.
Varieties of techniques for stained glass painting
Stained glass on glass used to be done by the most time-consuming method, when a metal pattern was made, consisting of cells. Then a piece of glass of a certain color, cut exactly to the shape of each cell, was inserted into each free gap. The most difficult thing was to make symmetrical images - the metal patterned grid could not match in shape, and each fragment was cut separately. The glass had to be fixed, and even so that there were no gaps that let air and water through.
The classic soldering method is still used today, but less expensive, labor-intensive and inexpensive stained glass painting techniques are applicable in domestic conditions. The most popular techniques today include:
- frosted stained glass;
- "Tiffany";
- in the technique of "casting";
- in the technique of "fusing";
- in the Plastic Lead technique;
- stained glass windows;
- film stained-glass windows SGO;
- facet technique;
- "etching" technique;
- technique of "molding";
- laser engraving;
- painting with acrylic paints;
- combined stained glass windows.

How to make a stained-glass window on glass with your own hands with the most accessible methods is worth understanding in more detail.
1. We put together pieces of cut colored glass, which form a mosaic canvas. Each fragment of the composition is inserted into a metal frame-stencil made of tin or sheet copper. The metal parts will have to be soldered, but this has to be done without glass, so it is important to think about how to fix the glass in these cells. The finished drawing will resemble real expensive stained glass.
2. Segments of a colored translucent film are laid out on the glass, like an appliqué, with a pattern thought out in advance - along the contours drawn with a special disappearing marker. Further along the borders, a special paint is applied in the form of a dark border with a tube, or any resinous solution that sets quickly. The finished image is covered with another glass of exactly the same format and carefully glued along the edges. Double glass with internal pattern is quite practical, it is inserted into a frame or wooden window frame.
A similar method - inserts of thin colored glass (transparent, frosted or sandblasted) are also inserted between two glasses. Such double or triple colored glasses for stained-glass windows are the heaviest, therefore they are not recommended for furniture doors.
3. On sale you can find ready-made colored smalt, which, in the form of fragments cut and polished along the edges, are simply glued onto glass. Plastic crystals or artificial “pebbles” for embroidery with a flat back are also suitable, as well as small gems or flat beads. They can be planted on glass liquid nails”, for example, in the form of a vine. In this way, it is easy to decorate vases, glassware and souvenirs. The method is suitable for those inserts that do not need to be cleaned partly - pebbles and smalt can be accidentally scraped off. However, this hand-made stained glass window, sparkling with crystals, looks luxurious, especially with backlighting.

4. Drawing on smooth or sandblasted glass is applied with special paints that require heat treatment. After firing in the oven, a durable stained glass pattern is obtained, which is not afraid of cleaning.
A similar method is an imitation of stained glass painting, where acrylic paints are used without oven treatment. The drawing will turn out resistant, but you should not wash such glasses. Such stained-glass windows are successfully used in windows with double frames with an inward pattern, where the glass is not washed often, as it is outside.
Where can I get stained glass stencils?
The beauty of the initial sketch determines the final result. And if you try to draw “something there” on your own, it is unlikely that such a stained-glass window will be highly artistic. Even if you take more advantageous plots - roses, peacocks or fish, it is important to respect the proportions of the picture, color balance and overall composition.

The choice of plot should be justified by the functionality of the room. Fantasy flowers, angels, beautiful half-naked maidens, Amazons, leopards are suitable for the bedroom. An elegant abstraction, symmetrical ornaments that are in harmony with common theme premises. If they are looking for stained glass windows suitable for the bathroom, stencils are selected with aquarium fish, something on a marine theme.
Any abstract image or neutral theme, for example, a firebird, is suitable for a partition of a walk-through corridor. An image for a certain interior style is selected in accordance with the characteristic theme for such a design:
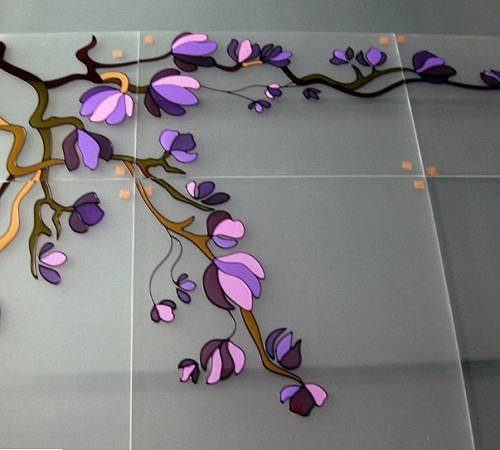
- sakura branch - for Japanese style;
- curls "rocalia" - for rococo;
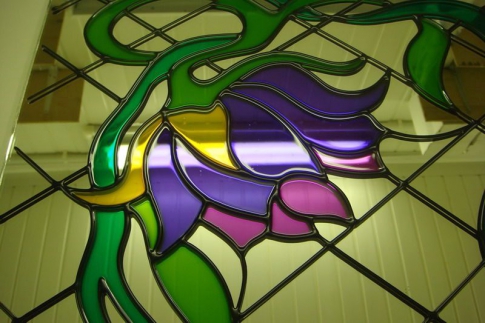
- whip stroke - typical of Art Nouveau;
- intricate abstraction - Art Deco, etc.

It is best to use ready-made stencils that can be purchased:
- in shops for artistic creativity;
- from artists who own this technique;
- print popular "pictures" from the Internet (the uniqueness of your stained-glass windows will suffer).
For those who know how to draw, it is best to take the illustrations you like as a basis, choose a suitable plot and develop your own sketch.
Attention: It is important to take into account the scaling of images, because when transferring a small sketch to a large glass, the proportions will be distorted and there will be a lot of empty space. Therefore, a small sketch is preliminarily drawn into squares - for a better increase in the picture.
Sometimes at the stage of completion you have to draw elements to fill in the voids. Ready-made stencils for stained-glass windows in full size do not require refinement. Traditionally, stained glass drawings look beautiful, where a thin graphic frame and floral ornament are combined.
Tip: Do not rush to fill the stencil drawing with paints. If you have a choice, experiment with color on drafts. Sometimes the replacement of the background or central elements not only changes the overall impression of the picture, but also forms an aura in a room with stained glass windows. For example, cold blue or purple flowers should be changed to shades of warm colors for the living room or cold colors for the bathroom.

What paints to use for stained glass windows?
1. Solution based on nitrolac NTs-2141 (or similar, other marking). Artistic oil paints and solvent. In a separate container, nitrolac is diluted with the addition of a solvent (less than half). A pea-sized artistic paint or a drop of pigment is added to the finished emulsion for construction works. We check the intensity of the paint on the glass, if it is not enough, we add more. Glass must first be degreased by wiping with a solvent such as acetone. A high-quality lacquer for a turn should be transparent, well-spreading, not curled up on the glass with bald spots.
2. Solution based on BF-2 glue. The emulsion is diluted on the basis of a solvent and any dye soluble in alcohol. For example, they use ballpoint pen ink - blue, purple, green and red. Glue and solvent are mixed in a glass jar, where the dye is added drop by drop to the required saturation. We try with a brush on the control glass.
3. On a gelatin basis and dyes for fabrics. Gelatin (5-6 gr.) in the form of a paste is brewed hot water, where the diluted liquid paint is gradually introduced. You can first apply an image, then outline the boundaries, but it is better to first make a “coloring” grid. Such a pattern requires fixing - after the bend dries, the glass is coated with a colorless nitro-lacquer.

Stained glass painting with silicate paints is used by artists for heat treatment. Special chemical components create a mirror or matte surface on stained-glass windows. Some techniques are not available for home painting, for example, an engraved stained glass window, which is created on special equipment.
The simplest method is to use ready-made stained glass or mirror stickers.
Many people think that decorating a room with their own hands, stained glass paints is difficult. In fact, the lesson can become an exciting game for both adults and children. The main thing is not to be afraid to fantasize and not give up, making the first mistakes. If you are used to doing everything with your own hands, then stained glass will not cause you much trouble.
Types of stained glass
Before we start creating stained glass windows with our own hands, let's look at the main types of stained glass art and technology.
fusing
One of the most difficult techniques for creating stained glass windows is fusing. The stained-glass window is made of solid glass with colored elements applied to it. There is no fastening metal thread between the fragments, and the finished canvas is calcined in a red-hot oven for several hours.
The details of these stained-glass windows can have clear boundaries, can merge and overlap each other, or can take on textured outlines. It all depends on the idea of the master and on the temperature of the melting furnace. Stained-glass windows are created in production; it is difficult to repeat the technique at home.

Fish. Glass. Fusing. Master Elena Yaroshenko
Of course, it will be difficult to repeat the fusing technique with a small child, but with an older child, you can sign up for a stained glass master class. Impressions from a non-standard lesson will remain for many years.

Master Lilia Gorbach
Tiffany
In stained-glass windows created using the Tiffany technology, working with glass involves bonding individual parts with a metal strip and soldering. Bizarre shapes, intricate plots and bright colors are the main component of any product in the tiffany technique. From the lamp, and the lampshade at table lamp, to a house for dolls - all this can be decorated with stained glass technique "Tiffany".
Creating stained glass windows using the Tiffany technique with your own hands can cause the following difficulties:
- glass must be cut small parts and sand the edges
- a metal thread does not always lend itself to soldering the first time;
- It is strongly not recommended to master this technique with a child.

Vera Yurieva, St. Petersburg

“Fairy”, Stained glass in Tiffany technique. Master Olga Lisitsyna, Voronezh region.


Lamp made of colored glass and glass drops in the Tiffany technique.
Master Nadya Bezrukova, Samara
Film stained glass windows
Stained-glass windows made in the English technique, which involves assembling a picture on glass from parts of a self-adhesive film, are gaining particular popularity. For this stained glass window with your own hands you will need:
- self-adhesive stained glass film of different colors;
- self-adhesive lead tape;
- rubber roller;
- paint knife;
- glass.
This technique can be mastered with older children, having previously instructed how to work with materials.

The essence of the English method is to transfer the outline of the picture onto the glass. The blank can be printed from templates posted on the Internet, or you can create it yourself. First, we apply a contour to the glass with a black marker, then we glue it along the contour with a lead self-adhesive and turn the glass over. We paste a colored stained glass film and apply the second contour of the lead tape. It remains to fix the lead contour with a rubber roller.

Film stained glass on the cabinet door. Workshop “Miracle of Glass”
Stained glass films are monophonic and multi-color, smooth and with embossed effects, interspersed with particles various forms and shades.

Painting on glass with stained glass paints
Most affordable way creating stained glass windows with your own hands - stained glass paints. This version of the stained glass will appeal to both adults and children. It is based on: drawing the outline and drawing of the future stained-glass window with special paints.
A picture created with stained glass paints must dry completely after being made, therefore, after applying a contour or picture, the product will have to be left alone for at least 24 hours.
But you can draw with stained glass paints with your child different ages. The younger ones can copy the contours through the film - the basis, the older ones transfer the drawing directly onto the glass.

Interior plate with stained glass painting in African style.
3dogsdesign workshop, St. Petersburg

Flashlight with stained glass painting.
Decorator Maria Nett, Chelyabinsk

Painting with stained glass paints.
Maria Kirillova, Nizhny Novgorod
Technique for creating stained-glass windows according to your own sketch
If you are seriously thinking about creating a stained glass window with your own hands, using stained glass paints, do not rush to master windows and glazed doors. First, you should try to draw a stained-glass window on a small area. For example, decorate a night light or a vase, glass plate or mug.
stained glass paints
To create stained-glass windows with your own hands, you need to decide which paints you prefer to use. All paints for stained glass can be divided into fired and non-fired. Fired allow you to calcinate the finished product in the furnace, that is, to extend the life of the finished stained glass window.
But, despite the obvious plus of the fired materials, such stained glass paints have drawbacks. Firstly, after firing the product, the paint becomes matte, losing its former brightness. Secondly, some shades after annealing may change their color. Turbidity may appear.
Unfired paints do not have such features. The finished product has bright, rich colors, smooth, glossy structure. The only “but” is that you will have to wash this product manually using mild detergents.

Paints and contours for glass without firing Idea
Contours for stained glass paints are sold in special tubes. Very often, beginners buy a black outline. It is not right. Working with a black outline is more difficult than it seems at first glance. Lines can be unreasonably wide, and contours can be conspicuous. Overshadowing the whole picture.
A beginner in stained glass decoration and decor is better to use the contours of silver or white colors. Do not be afraid, at first the line will be larger than you planned, but with experience you will understand how to extrude the contour paint of the desired width.
So that the tip of the nozzle does not dry out and does not become overgrown with paint residues, always place a damp sponge next to the product, on which you will wipe off all excess.
Stages of work
Before working with glass, it must be rid of dirt and excess grease. To do this, rinse the base under running water with detergent.
Now for the sketch. If you do not want to repeat replicated pictures and dream of creating something unusual, then the drawing can be done using special programs or in simple Paint, which is on every computer.
Having created and printed a sketch, we proceed to transfer it to a glass product. If this is a night light for decor, then we carefully set the sheet with the pattern inside the glass lampshade, fix it with adhesive tape.

Now we take a black marker for working on glass (its outline is erased very easily), and we draw the outlines of the picture on our lampshade. The next step: apply the stained glass contour and leave the product to dry.

In creating stained glass windows with your own hands, it is important to work correctly with stained glass paints. Before use, each tube must be shaken, but not shaken, so as not to raise a bunch of bubbles.

Stained glass paints are applied in a thick layer on every detail of the picture. Allow each side to dry completely. The finished product can be opened with acrylic varnish to fix the parts, or it can be calcined in an oven. In the second case, pay attention to the heat resistance of the base glass.

Stained glass paints as fun for a kid
In order not to go broke on expensive stained glass paints, you can invent fun for the baby yourself. To do this, take a tube of PVA glue and several bags of food coloring. Mix the dye with glue until you get a homogeneous, thick mass.
Under the containers, you can use empty gouache tubes, or jars from under baby food. Such material is ideal for work even for a small child.

The next step is to apply the pattern to the film. Do-it-yourself stained glass paints are applied to a file sheet containing the desired picture. A child over three years of age will cope with tracing the contour and applying a pattern according to the template under the film. The kid needs to be given space for creativity.
After complete drying, the film with the painting is separated from the template and glued onto the glass.

My daughter loves to draw the sun and flowers, houses and little men. If earlier her art forced me to wash off the paint from the windows for hours, now the acrylic pictures are easily attached to the glass. They are also easy to remove, which is great!

This is how interesting, friendly and creative we create stained-glass windows with our own hands with stained-glass paints, which is what we wish you too!
The oldest example of stained glass art that has survived to this day dates back to the 7th century BC. As strange as it may sound, the process of making stained glass is so simple that even children can learn how to make stained glass with their own hands.
Stained Glass Styles
For a long time the existence of this type of creativity, the technology for creating glass drawings with your own hands has improved significantly. New types and technological features have appeared.
Having studied all the techniques, you will be able to choose the right one, each time planning new interesting stained-glass windows.
Classic way
The classic technology for creating stained-glass windows with their own hands has been preserved to this day. The master draws sketches on the main glass, cuts them out, and, according to these blanks, prepares the details of the future composition from colored glass. The particles are inserted into a pre-prepared forged frame.
After the installation of colored glass is completed, the iron partition is sealed for greater strength. The finished product is beautiful picture of large geometric elements with a clearly defined metal contour.
In ancient times, wide openings of buildings were decorated in this way. Stained-glass windows were especially often used to decorate windows in Christian and Muslim churches - the ideas for drawings were taken from biblical and Koranic motifs.
The beauty of the classic method is that it allows you to connect large parts with your own hands. Unfortunately, the design turns out to be quite voluminous and heavy, so it is not recommended to use it to decorate the ceiling. In addition, rough metal does not make it possible to draw a pattern from small curved parts.
Tiffany stained glass
The improved technology was developed by the founder of the Tiffany jewelry company, Louis Tiffany, at the turn of the 19th and 20th centuries.
He came up with a rather simple solution, thanks to which the stained-glass windows began to look different. Instead of lead rods, Louis began wrapping glass parts with thin copper strips with his own hands. As a rule, the strip protrudes slightly above the plane of the part.

After drawing up the drawing, the parts are treated with flux to prevent rust and soldered to each other. The protruding edge of the copper tape is leveled above the glass surface, creating additional protection against falling parts from the frame.
Thanks to the Tiffany technique, stained glass windows have turned into real works of art! Fine filigree patterns, consisting of small particles, allow for a smoother color transition and naturalness of the image.
Tiffany stained glass can be used to create almost any product due to their lightness and beauty.
fusing glass
The amazing fusing technique allows you to create a variety of products - from glass inserts in doors and furniture to painted dishes. But this method is too laborious to make stained-glass windows of large sizes with your own hands.

The peculiarity of the technique is that colored elements are laid out on top of the main transparent glass. The billet is sent to the furnace, where under the action high temperature parts melt into each other. This way you get colored glass without an iron partition.
Another disadvantage of fusing is that it is difficult to find a kiln in which large items can be placed.
Pseudo-stained glass
Modern technologies have given people the opportunity to create stained glass windows with their own hands without learning the laborious process of forging, metal processing and glass cutting.
All you need is a piece of transparent glass of a certain size and a special film with colored patterns that allows light to pass through. There are several types of film:
- self-adhesive - a sticky layer is applied on one of the sides of the material;
- a film that needs to be attached to the glass using a special colorless glue.
Film stained-glass windows help save on interior decoration, while maintaining an interesting appearance glasses.

In addition to the film method, the use of special stained glass paints is also widely used. Transparent gel-like mixtures are applied to the workpiece in the form of a specific pattern. After they harden, the glass takes on the appearance of a transparent stained glass product.
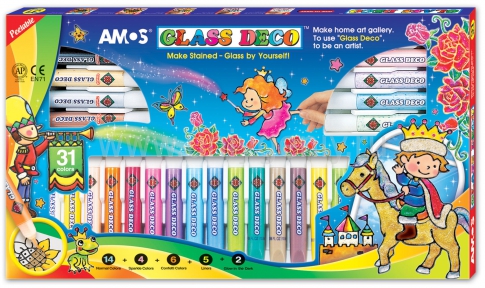
This technology is so simple that children's kits for creativity have recently begun to appear, allowing you to create painted stained-glass windows with your own hands.
Tiffany stained glass: master class
Tiffany stained glass is very easy to create even at home. Prepare colored glass shards, glass cutter, thin copper foil - foil, soldering iron, grinder, flux, soldering tin.
- Create a blank sketch - the more T-shaped connecting lines in the drawing, the stronger the details of the stained-glass window will hold.

- Print out 2 life size copies of the sketch. Number the pieces on each sketch and cut one of them along the seam lines.
- The second whole sketch is pasted over with adhesive tape and inserted into a wooden working frame.

After working on the sketch, you can proceed to the preparation of parts.
- Attach the cut out parts of the first sketch to the fragments of a certain color.
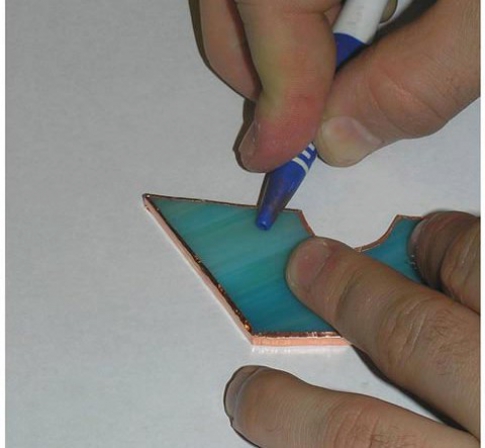
- Take the glass cutter and start cutting out the colored element, holding the tool at a 45 degree angle to the surface. Try to cut the part with one continuous line, observing permanent force pressure, otherwise you may get chips and cracks.

- After the glass cutter, microcracks formed in the glass. Barely tapping on it, you can separate your part.
- Use a sander to smooth the edges of the glass and give them a rough texture before the next steps.

- Now wrap the piece with copper wire. Use foil - a special thin long copper material with one adhesive side.

- Bend and smooth out the protruding edges of the foil on the product.
- Install the finished element on the general drawing with the help of nails driven around.

- When all the parts are in place, remove the nails and flux the gaps between them.
The preparatory stage is completed - you can start soldering!
- Put the tip of the tin wire to the joint and heat it on top with a soldering iron. Thus, gradually process all the seams with your own hands. Do not keep the soldering iron in one place for a long time - you can overheat the foil and glass, and also melt too much tin.

- After completing the soldering of the pattern, remove the wooden frame and bring the iron blanks to the sides of the picture.
- Using tin, solder them with the image at the points of contact with the seams.
Leave the product to cool in a dry, ventilated area for an hour or two. When it reaches room temperature, wash the painting well with a sponge, water and degreasing detergents.

Now your creation can be hung on the wall or placed on a shelf.
Filled stained glass: master class
Try to make flooded stained-glass windows with your child - the kid will surely enjoy the process of non-standard drawing. The main thing is to follow the safety rules: after all, your main material - glass - can lead to injuries and cuts.
Prepare stained glass paints - these are easy to find in large office supply stores - and a small square piece of glass. Pre-insert it into the frame with rounded corners to protect the child from sharp edges.
With dark color paint, draw thin sketch lines on the glass with your own hands. The most commonly used color is black. You have defined hollow areas. Near the black color, but not on it, drip several times with a color tint - it should spread over the cell on its own.

You can create beautiful stained-glass windows with your own hands for decorating a candlestick by watching the following video.
With this technique, you can decorate a glass frame for a photo, a locker door or a window in a nursery.
Today we will talk about the creation of stained glass: how to choose a pattern for a stained glass window, how to transfer a pattern to stained glass, materials and tools for making stained glass yourself, two ways to create a painted stained glass window, independent production stained glass paint, how to get a matte glass surface.
Among the many different ways of decorating rooms, stained-glass windows stand out for their special brightness and non-standard look. A game sun rays or special lighting will give a special charm to the room where stained glass products are installed. By the way, if a classic stained-glass window is an ornament made of colored glass through which natural light is passed, then the modern concept of stained-glass windows is much broader. Artistic stained glass windows can be placed in any room - even in one where natural light is completely absent.
Traditionally, stained glass compositions were created from fragments of colored glass, fastened with lead gaskets (lead is quite soft). When creating stained-glass windows from colorless glass, painting on it was carried out with silicate-based paints.

Modern stained glass windows are connected with lead and brass profiles (brass with steel insert), they can be installed both in window openings, and as plafonds for internal lamps in the building, for the installation of suspended ceilings, the formation of internal partitions, the creation of showcase compositions and panels. Decorative items, such as Tiffany stained glass, are independent decorative elements.
Artistic stained glass windows - technology of creation
- is created according to the classical stained glass technique, with the only difference being that the edges of some (or all) stained glass elements are cut (the bevel is removed). Thanks to this operation, a great play of sunlight in the created faces is achieved, which increases the beauty of the stained glass composition.

- created by fusing multi-colored glasses in high-temperature furnaces. At the same time, the colored elements of the stained-glass window are carefully cut out and polished, after which they are placed on a sheet of glass (substrate), forming a complete composition. Next - processing in an oven, after which the substrate and colored elements are soldered into one. One more hallmark fusing stained-glass windows is their wavy surface.

There is another technology for creating fusing stained-glass windows - gluing the elements of a stained-glass pattern onto a tempered glass substrate using transparent adhesives, after subjecting the colored glass to high-temperature processing. The fact is that using a tempered glass substrate is necessary when creating all-glass doors and glazing window openings a large area, it is impossible to create a fusing stained-glass window - during the heat treatment it will become brittle. Gluing the elements will allow you to get a strong, highly artistic stained glass composition, and it can even be installed on the ceiling - if for some reason such a stained glass window breaks, it will not cut anyone, because there will be no fragments.
- a pattern is applied to the glass with silicate paints, then the glass is subjected to heat treatment in an oven. The drawn composition is done with a brush or airbrush.

– a stained glass composition is performed according to one of the above technologies, then a thin layer of titanium nitride is applied to its back side. In this case, the degree of reflection can be increased, reduced, or a one-sided transparent mirror can be obtained.

Engraved stained glass– the drawing is created only by hand, using engraving equipment or hand tool. Colored glass - the basis for such stained-glass windows - is created by mixing glasses different color, which are heated to a liquid state, then several liquid glasses of different colors are poured onto the table and rolled out. The glass obtained in this way has a unique color and pattern - it is impossible to obtain two sheets of such stained glass with an identical pattern and color.
- a technique that is especially popular today. To obtain a matte stained glass window, sandblasting technology is used: high pressure a jet of sand scratches the surface of transparent glass, knocking out microparticles and turning one side of the glass into a frosted one. To create a drawing using this technology, you need a stencil - it is fixed on glass and placed in a sandblasting chamber. After processing, the places covered with a stencil remain transparent, everything else becomes matte.

Of particular interest is the technique of creating stained-glass windows using the method of deep working - obtaining three-dimensional drawings on glass. For this, a sandblasting machine and a more complex, multilayer stencil are used. The creation technology is as follows: all layers of the stencil are laid on sheet glass and subjected to sandblasting (a glass layer of about 1 mm is removed), then one stencil layer is removed and a new sandblasting is carried out (a layer of 1.5 mm is removed), etc., until the desired composition is obtained. It is possible to create stained-glass windows in this way only on glass with a thickness of 6 mm, and the process itself is quite painstaking and time-consuming.
- outwardly similar to the classic, although more in a simple way. Elements of a picture for a batch stained-glass window are cut out on a machine controlled by computer program. The lead gaskets that fastened the fragments of the classical stained-glass window have been replaced here modern materials, externally similar to lead. After the formation of the finished stained glass composition, it is glued onto a sheet of glass using a special transparent glue - the finished stained glass window made using this technology is lighter and stronger than the classic one. Often such a stained glass window is sandwiched between two sheets of transparent glass.

- most cheap way creating a stained glass composition. On the market, a large assortment of films of different colors is presented, elements of a stained glass pattern are cut out of it manually or using a plotter and glued onto sheet glass. The stained-glass window obtained in this way will be short-lived, but it is easy to replace.

Drawings for stained glass
An important point in choosing the theme of the sketch for the stained glass composition will be the purpose of the room. If some abstraction is supposed, then it is better to execute it in a single color scheme with a room. You should attach importance to the meaning contained in the stained glass composition - this way it will look better in the overall design.
It is important to consider that stained glass drawings should not leave too much empty space on the glass, as well as overloading it too much. In the first case, you can make a stained-glass window from a small central pattern (pattern), complementing the picture with decorative elements at the corners of the glass, covering the rest free space varnish.

Please note that correcting voids in a finished stained glass composition is much easier than correcting an overfilled stained glass pattern after it is completed (this desire often arises with a large number of small elements).
Think carefully about the stained-glass window sketch, experiment with the dimensions individual elements compositions. It is best to introduce new details of the drawing gradually. No less important color palette stained glass pattern - try several color options.
How to make a stained glass window with your own hands
At home, the creation of stained-glass windows using industrial methods is impossible. For example, fusing stained glass requires a special glass furnace and a temperature of 900 °C.
What types of stained glass windows can be made at home? This is a Tiffany stained-glass window, a painted stained-glass window (firing is replaced by varnishing) and a film stained-glass window. Let's consider each of them separately.
Making your own Tiffany stained glass
You will need a separate room for work (rather painstaking).
From materials: colored glass, special copper foil (sold in rolls, its width is 4.7 mm), transparent glue (not silicate), soldering acid, solder for soldering stained glass elements (tin/lead content 50/50 or 60/40), any means for washing dishes, patina.

From tools: diamond glass cutter (preferably diamond), pliers, small wire cutters, a small machine for turning glass edges or a whetstone, a thin soldering iron.

We create a sketch of the future stained-glass window - first on plain paper (preferably in a cage), then we transfer the final version to a thicker paper (cardboard or whatman paper). You need to cut the sketch into elements, put them on colored glasses of a suitable color and circle around the contour with a marker.

Using a glass cutter, we cut out elements of the future Tiffany stained glass from glass. We carefully break off the glass along the cut line, the resulting irregularities must be broken off with small wire cutters: for this we take a cardboard box right size, hold the glass element (not strongly clamping!) With pliers, take small wire cutters in the other hand and break off (without a box, pieces of glass will scatter throughout the room).

The next step is edging. If there is a special machine, we work on it, but if not, we need to draw water into a bowl (preferably metal), put a whetstone there (it must be drowned in water) and grind sharp protrusions on the glass against it. We check the quality on a general sketch, if all the glass elements are ideally suited to each other, then we can proceed to the next step - wrapping the edge with copper foil.

We use a special copper foil in the form of a tape with one adhesive side. We wrap the edge with it: placing the middle of the copper tape in the center of the edge, we bend it on both sides. It is important that the edges of the fold are the same on both sides of the Tiffany stained glass element. Carefully smooth the foil to the glass using a wooden spatula (not metal - it will scratch). When all the glass fragments of the stained glass window are wrapped in foil, fold them into a composition - check the fit again.

Next, you need to process the edge covered with copper foil with soldering acid - it will act as a flux when soldering. To apply soldering acid, use a cotton swab attached to a stick. Soldering queue: we warm up the soldering iron, collect drops of tin on it and solder the elements of the tiffany stained glass along the edges, connecting them together. The tin seam should be continuous and resemble a small roller - this will be beautiful and neat. Tin should completely cover the entire visible part of the copper foil - both between the stained glass elements and along their outer edges. You are unlikely to succeed right away, so practice. If the Tiffany stained glass you are making is going to be suspended, then solder a wire loop to it.

At the end of the soldering, it is the turn for washing the soldered stained-glass window - if this operation is skipped, then the remnants of the soldering acid will cause moss-like formations to appear on the tin seam. For washing Tiffany stained glass, the usual detergent for dishes and a sponge.
Let the stained glass dry, then cover the pewter joints with a patina (black or copper color- to your taste). The patina should be applied with a cotton swab: put a little patina on the swab, then rub it hard into the surface of the pewter seam. After completing this operation, you need to wash the stained glass window again. That's it, work is done!

Painted stained glass is one of the oldest techniques. We offer you two ways to create a painted stained-glass window: in the first of them, the drawing is formed by applying it with a brush and paints, in the second, the paint is poured onto the drawing.
First of all, you need to choose a drawing for a stained-glass window, prepare its sketch, proportionally enlarging the image (if necessary).
After preparing the stained glass for drawing the picture, carefully wipe it with a cotton swab or a clean cloth, soaked in alcohol. This simple operation will big influence on the durability of the future stained glass painting.
The queue for transferring the contours of the picture on the glass. By the way, you need to draw on glass when it is in a horizontal position - the paint will not spread. The easiest way to transfer a sketch of a drawing is to stick it with adhesive tape on the back of the glass and redraw its outline with thin lines - first with a marker, then with a special stained glass paint applied to a thin brush (see below how to make it).

Start painting the picture, first you need to paint the fragments that are separated from each other (i.e., not adjacent), in this case it will be possible to correct the paint going beyond the contour and it will not mix with the paint of a different color from the neighboring fragment of the picture.
There is another way to stain stained glass fragments. For its execution, you will need to cut out on a paper sketch only the fragment that you intend to paint this time. Align it along the contour with a similar area on the glass and paint over with a brush or spray. After the paint has dried, prepare a new fragment - and so on, until the stained glass pattern is completely painted.
It will take three days for the painted fragments to dry completely. After that, apply paint to the remaining areas and let it dry. Then apply a contour over the painted areas of the picture, using a thin squirrel brush and stained glass paint - this way you can give the image clarity, hide small gaps and streaks. Be careful and slow!

After three days, you need to perform the final operation - apply a layer of varnish on the stained-glass window using a wide brush or paint sprayer. Varnish the entire stained glass window, including those areas of glass that do not have a pattern. This time the drying time is a week. For the entire drying time, place the glass with a stained glass pattern in a clean, dry and well-ventilated area, do not touch it, exclude the possibility of access to it by children and pets. After seven days, the stained-glass window is ready, it can be inserted into a frame or, for example, into an interior door.
Drawn stained glass by pouring paint
The beginning of work on creating such a stained-glass window is in choosing a stained-glass pattern and transferring its outline to glass. Next, you need to make the contour convex (volumetric) to create boundaries that prevent the paint from spilling outside the area assigned to it.
Here you will need to make a special contour paint, for this you need:
- 50 ml of PVA glue, suitable for gluing porcelain and glass;
- black ink - 20-30 ml;
- silver (aluminum powder) - about 30-40 g.

The contour paint is created like this - we take a small glass jar, pour PVA glue into it, add black ink, mix and pour silver in the process of stirring. The consistency of the paint thus obtained should resemble lead-colored liquid sour cream.
We note right away - if in the process of applying a volumetric contour to the glass, the paint in the jar thickens, then by adding a certain amount of warm water and a little black ink (for the desired color) to it, it will return to the state you need.
The contour formed like this homemade paint, will hold firmly on the glass, outwardly it will look like lead gaskets connecting the elements of a classic stained glass window. Moreover, you can improvise with the width of the outline when applying it - this will give your stained glass originality. So, we arm ourselves with a squirrel or kolinsky brush and start drawing the contour - it should turn out to be sufficiently voluminous (convex), so do not save much on paint, but you need to apply it carefully and accurately. In the process of creating a volumetric contour, it is required to periodically stir the paint, since lighter silver particles will begin to accumulate on its surface. Do not delay with contour work - the longer the paint you have prepared will stand, the more its color will change, which means that the monotony of the contour lines will be lost.

After drawing the outline of the stained glass pattern, we wait 3 hours for the paint to dry completely.
How to make stained glass paints
The continuation of the material on creating a stained glass pattern using the paint pouring method will be below, but for now it's time to give here several ways to create stained glass paint at home.
First way. You will need NTs-218 nitrolac (you can use 222 or 2141), the 647th solvent and oil paints for artwork. Pour about a third of the nitro-varnish into a jar, add a solvent (up to about 40% of the amount of nitro-lacquer), mix until a composition similar to water is obtained. Then we introduce a drop (the size of a pea) of artistic paint, mix, add more paint if the color is not bright enough (up to 10% of the amount of nitro varnish will be needed). As a result, we get a well-flowing colored varnish, which is perfect for filling a stained-glass window pattern.
The second way. You will need light BF-2 glue, acetone, alcohol-soluble paint (you can use paste from ballpoint pens). Pour glue into a glass jar, dilute it with acetone in a ratio of 1: 1, mix and add paint until the color of the desired saturation is obtained.

The third way. You will need gelatin, warm water, dry dyes for cotton, woolen or silk fabrics. About 6 g of gelatin should be diluted in 200 g of warm water, mixed. Separately, dilute dry paints in warm water. Pour a little solution of water with gelatin into a new glass jar, add required amount paint solution, mix. After applying this paint to the stained-glass window and drying it, you will need to cover the drawing with a colorless nitro-lacquer on top.
Important: all the stained glass paint recipes below must be mixed exclusively in glassware (glass baby food jars are ideal).
We continue to create a stained glass window by pouring paint
So - the contour paint on the stained-glass window has dried, and the paint for pouring is ready. Before you start painting a stained glass window, make sure that the sheet of glass is in a strictly horizontal position - any, even a slight distortion, will cause the paint layer to run off and thicken at the lowest point of the fragment being painted.
We arm ourselves with a large round brush (squirrel or kolinsky), pick up a large amount of paint on it and apply it to the specified fragments of the stained glass window. In this case, the main thing is not to cross the border of the contour and completely fill each of the fragments with paint of a certain color. If you get paint on the contour itself - it's okay, on the contrary - it's even good, because it will completely exclude any unpainted areas near the contour. Fight the appearance of air bubbles - watch for them and quickly remove them with a brush stroke. Having completed the coloring, we maintain a pause of 3-4 hours - let the paint dry completely.

The next step is to re-draw the outline. Try to repeat the previous contour lines, apply paint as abundantly as you did when you first drew the contour. Now you can be sure of the complete elimination of any irregularities and flaws. The next stage of work is 2-3 hours after the applied contour has dried.
At the end of work on the stained-glass window, you need to apply 3-4 layers of transparent nitro-lacquer on it, covering the entire surface of the glass with a thin layer. This measure will protect the drawing from scratches and moisture, and extend its service life. It is best to apply nitro-lacquer not with a brush, but with a sprayer, keeping at least 10 minutes before each new layer to dry the previous layer.

The work on creating the stained-glass window is completed - you just need to insert it into the frame. Such a painted stained-glass window will serve you for at least 10 years.
Additional stained glass work
We consider it unnecessary here to give a detailed method for creating a film stained-glass window - the work here is the simplest, you need to prepare a sketch, apply it to the glass and to the tint film, cut out the necessary fragments and attach it to the glass. The film will stick to the glass itself.

In some cases, it is required that the stained glass in the doors be opaque, especially if these doors lead to a bathroom or bedroom. To solve this issue, it is necessary to give the side of the glass, the opposite of the stained glass pattern, a matte finish or stick a tint film on it. There are two ways to create a matte surface: using compositions based on liquid glass or using compositions based on hydrofluoric acid.
Compounds based on liquid glass:
- It is necessary to slightly dilute the liquid glass with distilled water, then add a small amount of tooth powder to it and mix thoroughly.
- Mix 10 parts of liquid glass with 15 parts of distilled water, add 8 parts of barium sulfate and 1 part of silicic acid to this solution. The last ingredient can be obtained by mixing liquid glass with a significant amount of sulfuric or hydrochloric acid - silicic acid will precipitate out, it must be isolated, dried and ground into powder.

Before applying any of these compounds, the glass must be thoroughly washed with soapy water and dried. For application, use an even roller - it is dipped into the composition, rolled and carefully covered with a solution of the entire surface of the glass. After drying, the glass should be rinsed under water.
It should be borne in mind that when working with solutions based on liquid glass, it is necessary to apply the coating as carefully as possible - the matte surface created by this composition will show all the defects.
Formulations based on hydrofluoric acid:
- 12 parts of hydrofluoric acid, 10 parts of barium sulphate and 10 parts of ammonium fluoride are mixed together, then poured into a thin layer on the surface of the glass. After drying, the treated surface must be washed with a solution of soda (5%), then with water.
- 50% hydrofluoric acid is applied in a thin layer on pre-prepared glass. The preparation is as follows - the glass is placed in a wooden frame, on the reverse side covered with two layers of PVC film, along the edge of the glass (along wooden frame) a side is made of plasticine. The layer of hydrofluoric acid is maintained on the glass surface for 10 s, the temperature of the acid solution should be 30-40 °C. At the end of the exposure period, rinse the treated surface with a solution baking soda 5%, after - with water.

Unlike compositions on liquid glass, the use of hydrofluoric acid gives a more even matte surface, regardless of the mistakes made during application.


