A simple homemade paint stirrer. Do-it-yourself drill from a mixer Mixer manufacturing process
From time to time, even the strongest and most independent woman who does not like to cook wants to feel like a real culinary specialist.
Inspiration for culinary exploits can overtake a woman at any time, the absence of a mixer should not prevent her from accomplishing them.
As a rule, such a desire is not limited to simple scrambled eggs, you definitely want something like that. For example, to make a mind-blowing bizet, but, unfortunately, there was no mixer at hand, without which it is simply impossible to beat the protein properly. A sudden creative impulse should not be suppressed by the mere absence of a mixer. Homemade can be mixers for the kitchen, children's or construction.
If there is a whisk, then an ordinary drill can save the situation
Homemade kitchen mixer
Quite by ourselves. For this you will need:
- First of all, you need to get a motor. It should be powerful enough to handle egg white, but we won’t talk about products with a firmer consistency for now. A suitable motor can be obtained from an old cassette player for example.
- Tin. Everything is simpler here, you can cut off a piece from a can of any drink.
- Plastic lid from a jar.
- A couple of plastic cups.
- You will also need a switch.
- The power supply is selected depending on the power of the motor.
- And of course, all this will be done with a regular screwdriver.

One of the motor options
Capacity and Drive
It's time to take action. We start with a glass in which we need to make a small hole. To do this, we heat the metal end of the screwdriver with matches or a lighter, then with a heated tip we make a hole right in the center of the bottom of the cup.
Next, we place a motor in the center of the glass and circle its edges with a marker, thus marking where it will be located. While the engine is retracted to the side and manipulations with the glass continue. That is, it is clear that the mixer body is assembled first of all.
Now you need to cut a hole along the lines marked with a marker with a clerical knife at the bottom of the glass, into which the motor will be placed. The motor should fit snugly into the hole, not fall out of it, so the hole size should be slightly smaller than the motor.

This motor will be more than enough
Nutrition and communications
Now you need to prepare a place for the switch and wiring. If the power supply has two wires, then one is attached to the switch and the other to the motor. Then the switch and the gearbox are interconnected using a piece of copper wire.
Thus, a kind of mixer body is obtained. In order not to worry that the structure will fall apart, you can fix the motor and switch with superglue.
Screw
Let's move on to the second step. A tin can is needed to make a screw. To do this, we put a thin piece cut off from the can into a ring, with the second piece of the same piece you need to wrap the resulting ring in the middle, so that you end up with a figure resembling a butterfly. We got the screw, now we put a silicone nozzle on it with glue, which will be put on the pin.
While the tin is set aside until the glue dries. We return again to the body with the motor. Place the glass cut side down. Here you will need a second glass, in which a hole has already been made with a screwdriver. It must be installed on top of the motor. The result is a design in the form of a glass on a stand. In the center of the cup is placed a pin pre-glued to the motor, about a centimeter long.
During this time, the glue on the screw should have dried completely. We attach it to the pin. Done, now you can try. We put the necessary ingredients in a glass with a screw, cover with a plastic lid for mixing without splashing, and turn on the mixer.
Homemade doll mixer
Each child enters the age when he wants to be like an adult, necessary, responsible, to do the same as adults, girls in this period more often copy the behavior of their mothers, and boys of their fathers. The child shows interest in household chores, including trying to help parents in the kitchen. However, not all household appliances can be allowed to children. For example, a mixer is not a safe toy at all and improper operation can lead to tragic consequences.
You can get out of this situation so that the child is satisfied, and the parents are calm. Namely, to assemble your own mixer for him. For this you will need:
- Plastic tube.
- Electric motor.
- Any two wires.
- Batteries or portable power supply.
- USB cable
- Small switch.
It will not be difficult to make such a simple device, and the child will be satisfied not only with the result, but also with the assembly process itself. Yes, and an adult will enjoy creating something with his own hands from improvised means, you can feel like the host of the Crazy Hands program.
So, we start with the fact that the switch is glued with a silicone gun or superglue to the motor. Next, we take the USB cable, cut off one side of it to free the wiring, peel off the rubberized base from the wiring by about two centimeters. There should be two wires. We connect one to the motor, the other to the switch. After that, the switch and the motor are interconnected by a copper wire. It is better to fix the wiring with a soldering iron, but if it is not at hand, then you can just twist them properly.

Children love it when something is done especially for them, he will appreciate it more than the most expensive toy.
Now it's the turn of the drinking tube, cut it into two pieces 6 centimeters long. We glue them together well along. A motor is attached to the bottom of the connected tubes. While the glue dries, we take on the stirring element. This will require simple wand from chupa chups. A quarter of the stick must be bent in such a way that the letter “G” is obtained from the stick. With an even tip, we attach the stick to the pin at the base of the mixer. Ready. We connect the USB cable to a portable battery or any other source of energy and press the switch. Such a miniature mixer will perfectly cope with mixing tea or eggs, and there will be no limit to the delight of the child.
DIY construction mixer
The repair process is very time-consuming and, sometimes, you can’t keep track of everything. For example, you need to mix concrete mortar, now everything is bought and ready, when it suddenly turns out that the construction mixer is out of order or it was not there at all. How to be in such a situation? Run to the store? But extra expenses cannot always be foreseen, and there may simply not be funds for such a purchase. You can get out of the situation by making a concrete mixer yourself. For such a mixer you will need:
- Drill.
- Hairpin 8, 40 cm long.
- Four metal plates.
- Nuts and washers.
So, work begins with a hairpin. It must be turned in such a way that it is convenient to wind the nut. On the other hand, you need to grind off the hairpin under the triangle. This is necessary in order to properly attach it to the drill.
Next, we take on the plates. With an 8 mm drill, it is necessary to make one more hole from the edge on each. Now you can proceed to the assembly of the mixer. A nut, a washer, then a platinum are installed on the length of the stud. The distance must be at least three centimeters. The upper and lower plates must be bent according to the principle of blades.

It should look like this
The second end of the hairpin is attached to the drill, that's it, the construction mixer is ready. However, this type of home-made construction mixers will handle only a small amount of mortar.

Such a mixer will not master large volumes of work

For mixing more liquid substances, for example, paint, this option is also suitable.
For a large amount of mortar, you will need a concrete mixer, which you can also make yourself, but this will take much more time and materials, so it will be easier to borrow from friends or use rental services. Moreover, such a device brings more benefit when completely independent than requiring constant supervision. In this case, it is better to choose the gravitational method of mixing the solution.

An example of a concrete mixer made by yourself
The main thing to remember is that when assembling any mixer, you must follow safety precautions, and if you are not confident in your abilities, then it is better not to take on such painstaking work, but go to the store and buy a decent product.
A drill mixer is a great helper for any builder. Such devices have a fairly powerful engine and two ergonomic handles, which are necessary in order to hold the tool while mixing mortars and mixtures. This convenient mechanism, which combines several important functions at once.
purpose
The construction sector of the industry does not stand still - every year new compositions appear that are used for the construction of structures, small and overhaul. Both glue and plaster and many other materials go on sale in the form of a powder, which must be diluted with water in order to make a full-fledged composition out of it.
In order for the components of the mixture to mix as efficiently as possible and make up a homogeneous working mass, it is necessary to choose the right tool. For example, if you can mix wallpaper paste with an ordinary stick, then for cement mortars and putty which method will be ineffective, especially if you need a solution in large volumes.
Mixing building mixtures with improvised means, as a rule, does not the right quality working composition: a lot of lumps form in it and a large percentage of dry matter remains, which could not get wet properly.


Many users in such situations resort to a puncher, which has the necessary rotation capability; however, experts do not recommend using this method, since the hammer is initially oriented to loads in a different plane without any influence of radial forces. Of course, you can knead a small volume of the solution with it, but in large quantities you risk simply damaging your tool, which, by the way, is quite expensive.
Great solution in this situation, it may be the purchase of a drill-mixer, which is optimal for mixing compositions in a volume of up to 15 liters in one go.
Such devices are optimal both in everyday life and when carrying out professional repairs. Unlike a hammer drill and a conventional drill, they have a stronger bearing, in addition, the mechanism is equipped with a powerful gearbox, which is protected by a particularly durable metal case. Thanks to this set the device can work even at the lowest speed.
An important advantage is also the fact that such the construction mixer can simultaneously perform the function of drilling the surface, that is, in fact, it is a 2 in 1 device.


Types of structures and their characteristics
A drill mixer is used to carry out repair work in large volumes; the user, when mixing the solution, usually holds it in his hands, because the device has ergonomic handles that make the operation of the tool less laborious. If the engine of the device has a power of more than 1 kW, then a special gearbox is built into it: it is suitable for use not only at the very first speed, but also when switching from first to second.
The first is used to make thick dense mixtures, for example, mastic, and the second - for gypsum and cement. At the second speed it is also possible to stir paints and other liquid substances with a minimum torque.
In order to make work more comfortable, it is better to use tools that are supplemented with a speed stabilizer or inrush current limiters.


Such drills, as a rule, have a different configuration. Usually, they come with several types of nozzles, which can have several shapes.
- Right hand spiral mixing attachment- used for such solutions that have a very viscous structure. These include cement, concrete, as well as various kinds of plasters and glue. Such a nozzle kneads the solution, as if pushing it from the bottom up, the composition is mixed at the top, and then falls back.
- Left-handed spiral nozzle ideal for mixing paints and varnishes. Here reverse principle work: the mixture is pushed from top to bottom, where it is stirred and rises back.
- Screw nozzles allow you to mix light compositions.
- cross- a more specialized nozzle, it is used in cases where it is very important to prevent air from entering the container with the mixture.

Advantages and disadvantages
The main advantage of the drill-mixer is the possibility of its multifunctional use. On the one hand, the tool is referred to as a drill, therefore, in addition to mixing mortars, it can be used to form holes in surfaces different type, even the most hard and dense. On the other hand, a drill of this type belongs to the category of low-speed ones, therefore it cannot replace the drill by 100%, but at the same time, it is low speeds that make it possible to knead even the densest compositions.
Obviously, such a design cannot be used in industrial volumes, its power and design features not enough to cope with intensive use. But with the solution of small everyday tasks for minor repairs and decoration of an apartment or a private house, she will cope in full.
Such a drill weighs much more than a conventional one: its mass is more than 3 kg, so frequent drilling with such a unit is associated with significant physical effort.

Principle of operation and features of use
Depending on the principle of operation, there are three types of tools:
- drill mixer;
- drill mixer with one whisk;
- device with two beaters.
A conventional electric drill-mixer is a low-speed, non-impact type. The power of this tool ranges from 500 to 2000 W, there are 2 comfortable handles, a rather large cartridge with a diameter of up to 16 mm.
Two-handed models are divided into options with a single whisk or two, the difference follows already from the name: mechanisms with two whisks mix even the most viscous mixture, they are equipped with a fairly powerful gearbox and easily cope with solutions of a wide variety of consistency - from light to concrete.


Model Rating
The following brands are the most popular among consumers.
- Fiolent- this is a product Russian production, which is optimal for stirring the most dense and viscous formulations. The power of the device is 1100 W, and the speed is 600 rpm.
- Rebir- under this brand the most popular low-speed drills are issued. Individual models from this manufacturer have exceptional performance: power up to 2000 W and rotation speed up to 500 rpm.


- Interskol– offers a wide range of mixer drills with power up to 1050 watts. Such a tool is optimal for mixing any building mixtures, even concrete, and also for drilling: for example, if you place a special drill for wood in it, you can get a hole up to 1 m long in a matter of seconds.
- BISON- This is one of the most popular brands in the domestic market. The models presented in the assortment of this manufacturer have exceptional power parameters - up to 1200 W - and rotation speeds (up to 850 rpm).
- Makita is a well-known Japanese brand, which is in demand all over the world due to its quality and reliability. It is noteworthy that all models of this brand, in addition to excellent specifications, are also distinguished by practicality, because they consume much less energy than competitors.


How to choose?
- product weight - in the range of 2.7-4.5 kg;
- power - 620-110 W;
- rotation speed - up to 1050 rpm;
- torque - 70 N / m.
In addition, when choosing suitable model pay attention to additional features that may be useful to you: soft start, auto-on mode, additional insulation of the case, overheating protection and others.


How to do it yourself?
If you wish, you can make a construction mixer with your own hands. For this, you need to use the most ordinary drill as a drive, and any product with a shank made in the form of a hexagon is suitable as a nozzle. Such a device is quite easily fixed in the drill chuck, the main thing is that the dimensions of this hexagon correspond to the minimum size of the chamber that can be placed in the chuck.
However, keep in mind that the motors and gearbox of a standard agitator are designed exclusively for a longitudinal surface, so only very small portions of the building mixture can be mixed with such a homemade tool.


In the next video, you will find the main features of mixer drills.
Every woman sometimes wakes up with a desire to cook something, but the necessary electrical appliances may not always be in the kitchen. For example, it is almost impossible to cook a bizet or beat a protein without a whisk or mixer. Do not give up the idea due to the lack of any devices, make a mini-mixer with your own hands and turn your culinary ideas into reality.
Store-bought yogurt is not always healthy. Its long shelf life (up to 6 months) is questionable. You can make exactly the same yogurt at home.
Let's watch the video of the mixer:
For this you will need:
For yogurt
-strawberry;
- sour cream;
- sugar;
For mixer
- a motor, preferably more powerful, since it will be difficult for him to grind. Can be removed from an old cassette recorder.
- a small piece of a tin can be cut off from a tin with a drink;
- regular plastic cover for a bank;
- two plastic cups;
- switch;
- power supply (depending on how many volts you have a motor). In our case, the motor is 8.5 volts.
- screwdriver.

We take a plastic cup and a screwdriver. We heat the edge of the screwdriver with a lighter so that it can calmly melt the cent of the plastic cup.
When we have a small hole in the center of the cup, we need to insert a motor into it and circle its edges with a marker. So we mark where it will be. We take out the motor and continue to work with a plastic cup.

Along the edge, which we circled with a marker, we draw with a sharp or clerical knife. As a result, we should get a large hole in the bottom of the glass. Our motor should easily pass through this hole. Make a hole with a diameter slightly smaller than the motor, it should not fall out, the edges of the cup should hold it.

Then we measure the height of the motor (let it be 3 cm). We will have to leave exactly the same height at the cup in which we made a hole for the motor at the bottom. We leave our 3 cm - we cut off everything else.

In the workpiece, we cut out a place for the switch and a hole for the wire.


There are always 2 or more wires in the power supply. We need a power supply with 2 wires. We solder 1 wire to the switch, and the second to the motor. Take another small copper wire and connect the switch and the motor together.
As a result, you should end up with a workpiece slightly larger than our motor, in which a hole for the switch, a hole for the wire and a hole for the motor will be made. To prevent the switch and the motor from falling out, they can be fixed with super glue.

Next, we take a thin piece of tin and make a small ring out of it. To the second small pieces of the tin, we wrap this ring in the middle to make a butterfly. We should get an impromptu screw.

We glue the silicone nozzle to the improvised screw with glue, which will then be put on the pin.

While the glue dries and fixes on the tin, we return to our workpiece with a motor.
We turn the cut side to face the table, a round plastic surface with a non-protruding motor in the central part should look at us.
We take the second glass, where in the central part at the bottom, a hole has already been made in advance and install it on the motor. You should get a glass on a stand. There should be a centimeter pin in the center of the cup.
Once the glue is dry, install the screw.
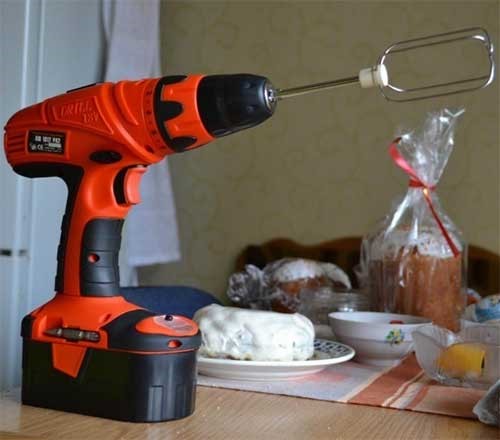
Both the mixer and the electric drill are far from essential items. Not everyone can afford to keep both at home. But even if you can boast of having an electric drill at home, most often it is the most powerful kilowatt machine, which is convenient for drilling walls. But drilling radio boards with it or repairing shoes will be hard, isn't it? Therefore, I had the idea to make a special nozzle for the mixer, with which you can now not only cook an omelette, but also a hole in hard to reach place drill.
The adapter for the drill is inserted into the socket of the “quick knife” nozzle. If you have a rubber joint between the mixer and the attachment, you will have to redo it too. For the effort that he is able to transmit is not enough even for the operation of a coffee grinder. A square is best for connecting, but a hexagon is also suitable.
The drawing shows the dimensions of the details of the attachment for the MP-2E mixer manufactured by the Minsk Electrical Equipment Plant, but due to the similarity of all mixer models, the correction will be quite insignificant. I took the cartridge from a hand drill. You should not count on drills with a diameter of more than 5 mm even when drilling wood (after all, the power of the mixer motor does not exceed 100 W), so if you have a choice, the cartridge should be chosen as small as possible.

The scheme for making a drill from a mixer with your own hands
Parts 3 and 4 require fabrication on lathe; in the absence of a head of the required size for part 3, the hexagon groove will have to be milled. In the case of the complete production of part 3, a slight improvement can be made, which is as follows. To exclude an additional friction surface between 3 and 4, make a selection for the hexagon with a slope of 5-6 degrees relative to the horizontal axis. This is necessary so that the head, sitting on the hexagon, engages with it when moving and is wedged by friction forces. In this case, there will be a small gap between the head and the sleeve, which will prevent additional heating of the assembly and the associated power loss.
Item 4 can be made from any structural steel, but if you can find a piece of polyethylene suitable sizes, the design will only win. If structural steel is used, a through hole should be provided in the sleeve for shaft lubrication; the polyethylene sleeve should be lubricated with grease. Usually the chuck shaft is surface hardened and the MB thread should cut easily. The nozzle is assembled as follows. A sleeve is put on the chuck shaft, then the head is screwed on. The nozzle assembly is screwed to the mixer along the M3O thread.
The use of the attachment is also supported by the fact that the mixer, unlike most electric drills, has a smooth speed control, which creates additional convenience during work. By the way, maybe you have an old enlarger lying around? In the conditions of the Kodak victorious offensive, you will hardly need it already, and its tripod can be adapted for a drilling machine. A tripod with a gear rack from the Upa enlarger is especially convenient. The adjustment handwheel feeds the drill as smoothly as on drilling machine. If you have a low-power drill "Master", you can place it on a tripod as well.
Video instruction - how to make a drill from a mixer


