A beautiful path to the house. DIY garden paths (45 photos): material, shape, features. Tracks from plastic bottle caps
Provides for the creation of tracks. Moreover, the requirements for them are quite serious: they must be reliable, comfortable, functional, beautiful and, very desirable, inexpensive. We will talk about how to make garden paths with your own hands at low cost in this article.
What to make tracks from
Track coverage can be hard or loose. The following materials are used to create a hard coating:
- Concrete... Concrete walkways are more than just plain gray tape. In addition to the fact that there are dyes and, if desired, you can decorate it. There are also molds for pouring in place. It turns out homemade paving slabs. Another option is to pour small concrete slabs of the required size on your own, then put them on a bedding. For examples of design, see the photo.
And everyone on the farm has molds for such a path - cut water bottles into cylinders, place them as needed and fill them with a solution: nice and cheap
 And this is a concrete track with expansion joints. If you look closely, you can see that stripes are applied across. This is to keep the wet surface non-slip
 - Flagstone. This is a natural stone that has been cut into plates. It is laid on a prepared base (more on this later), the gaps are filled with backfill. It turns out beautifully, reliably, non-slip. It is not for nothing that it is stone paths made of limestone that landscape designers love so much.
 Backfill is one of the important elements that shape the appearance
 - Brick. Ordinary ceramic bricks - beautiful materialbut not for tracks. It absorbs moisture, if it then freezes wet, it breaks apart. If you are going to make a path from broken brick, then you can walk along it more or less normally for only a couple of years. Then you have to redo it. The resulting cracks will need to be covered with coarse sand or fine gravel. Clinker bricks will serve much longer on the path, but this option cannot be called low-cost: the cost of one piece is from several tens of rubles.
These are two types of bricks - ceramic and chipped from granite Clinker brick walkway - beautiful, you won’t say anything ... but maybe too beautiful for a garden?
- Wood... Such a seemingly unsuitable material, but with proper processing, it can serve for a long time. Moreover, many do-it-yourself wood paths can be classified as low-cost. For example, they came up with the idea of \u200b\u200busing hemp and tree cuts as curbs or coverings. They also make the flooring from well-processed boards - better terraced, but if not, it will work from the old floor.
The combination with pebbles is comfortable to walk And this is how to make a path from boards
- Plastic.There are tiles for garden paths made of plastic - polyethylene or polypropylene. It has a square shape and a system of locks, which is attached to one another. It can be laid directly on top of the lawn or on previously trodden paths in the country or on a section of paths. This option is fast and cheap. It can definitely be called "Low Cost". It is better, of course, to make a dump of crushed stone and sand according to the rules, and put plastic elements on top. It's already a little longer and more expensive. There is also an immodest one, but very beautiful option plastic tiles for paths. There is also "garden parquet". These are slabs or boards made of wood-polymer composite - WPC (they are in the photo, they look exactly like parquet). This material appeared relatively recently. It looks and feels like wood, but in fact is a mixture of wood flour and polymer. These are very beautiful coatings, but their cost is not modest. Although not fabulous.
This is garden parquet. Gorgeous, but immodest
- Pebbles. These are rounded natural stones that can be found on the banks of rivers or lakes. Flatter stones are more suitable for making paths. There are different shades of gray, black, white, sometimes you can find burgundy. From these stones, laid close to one another, mosaic paths of amazing beauty are obtained. But this is an occupation for the diligent and persistent. Those who lack patience can find large flat boulders or large pebbles and place them in the sand. It is not that luxurious, but no less reliable. You can do the same with granite or other similar stones. It is important that at least one face is relatively flat. Put this flat part up, bury the rest. The work is not easy, but it will be possible not only to walk, but also to ride along the path.
- Materials at hand. Country paths are made from old tires and bottles.
There are also paths with a poured surface: gravel or crushed stone. Their peculiarity is that with a small layer of 2-3 cm and with sufficient compaction, it is convenient to walk on them. If the layer is slightly larger, bumps are formed when walking, and such walking is tiring. Therefore, as you have seen in many photographs, gravel and crushed stone are used as backfill in which rigid elements from other materials are laid. If done correctly, it is convenient: gravel conducts water well and puddles do not form. To those who do not like grey colour, you can advise to paint it: many designers do this when organizing rockeries.

How to make garden paths with your own hands
It is not enough to know what you can make garden paths with your own hands. You also need to know how to make them right so that it will serve more than one season or two. Styling different materials may differ slightly, but there are several rules and actions that are repeated in any technology.
First rule: when laying or shaping the pavement, the track is made with a slight slope. If the material allows, a slope of several centimeters is made on both sides of the center. If, for example, a concrete path is poured, then the slope is formed in one direction - from the house, if it is nearby. The slope is made towards the lower part of the site if the track is located on a slope.

Second rule: any coating requires preparation of the base. If you put stones (for example) directly into clay or loam, it will certainly be useful - it will definitely be more convenient to walk, but the stones will “silt” after a while. They will simply be trampled into the clay. With a bedding device, this will take much longer. And if you also make a drainage pillow and a side, water drainage will be even more efficient, and everything will look even more beautiful.

Third rule: The pavement level should be a couple of centimeters higher than the adjacent area. Then the water will quickly drain, it will be more convenient to clean, and cleaning will be required less often: the washed out earth will not flow either during rains or during watering, which is often done along the paths.
Step-by-step instruction
When making garden paths with your own hands, start with the markings. In theory, the dimensions and shape should be plotted on the site plan, and the marking should take place according to the project. But most often everything is done in place. To make the future track more clearly visible, its contours can first be covered with white sand or something similar. If the shape suits you, you can drive in the pegs and pull the twine between them, but you can also work on dumping.

A flower garden or flower bed can be placed along a beautiful path. Read how to do them.
Do-it-yourself beautiful pebble path
If with flagstone, paving stone, brick, everything is more or less clear - everyone has already seen and more than once how this is done, then it is not clear how to lay pebbles with patterns.

Below is a photo report on the process of making a pebble track. The main techniques are visible on it: lines are applied to the leveled sand, along which pebbles will be laid out. If these are arcs, they are made with a thread and two sticks / nails.

Picking up stones, they are laid out on the edge close to each other, slightly sinking them into the sand.

A board is laid on the folded pattern, a rubber mallet is taken and knocked on the board, hammering pebbles into the sand. So the whole drawing is deepened, making sure that the edges of the pebbles are at the same height.

Stones "sink" into the sand
Take a mixture of sand and cement (sand 2 parts, cement 1 part) and fill in the gaps, leveling the layer with a brush.

A fragment of a pebble path is carefully watered so that the backfill does not blur. Wait several hours for the cement to set a little, then remove the excess with a soft brush.

It is important not to miss the moment: the solution should not get dirty, but also become a stone. If you pick it up with your finger, it should crumble. It's time to clean off the excess.
A path of wooden hemp and gravel: video
Old logs or trees can be turned into a beautiful path. From sawn into blocks of the required length, the face cut is polished, all the wood is first treated with a bio-protection composition (you can soak it with used oil). After drying, it is dipped in Kuzbass lacquer and dried again. Then covered with paint desired color the front parts of the hemp - which will protrude outward. They dry it again and only then put it in the sand.
The process is described in detail in the video. It explains step by step how to make garden paths from hemp or logs with your own hands.
We make a concrete path ourselves
The process is generally similar to the one described at the beginning. There are some differences, which we will talk about.
After the trench has been dug and the bottom is leveled, formwork is installed along it on both sides. These are boards from 25 mm thick (thicker is possible, thinner is undesirable, you can use plywood with a thickness of 16-18 mm). Their height is the height of the track. If you are molding a slope, the boards should be aligned with it - one side a little higher, the other a little lower.

The formwork is set to a level - concrete will be leveled along it
To make the formwork, pegs are driven into the ground with a step of no more than 60 cm. Boards are nailed to them. It is better to smear the inner surface of the formwork with waste or other oil: so that it can be removed easily. Further, crushed stone is poured onto the bottom and rammed. But it is necessary to tamp thoroughly: if you walk along the bottom, there should be no traces.
Further, in order to prevent the path from cracking, a metal reinforcing mesh is laid on the crushed stone. Bar thickness - 4-6 mm, step 5-10 cm. It is sold in pieces, they must be tied together with steel wire.

Then, to compensate for the expansion in winter period you need to put wooden planks 1.5-2 cm thick. They are placed across the path, set so that the height of the planks is flush with the formwork boards. Compensation strips are set at least every 2 meters. More often it is possible, less often it is not. Why do it more often? For beauty. Squares look better than long rectangles.
The finished frame is poured concrete mortar brands not lower than M-250 (). For him, take 1 part of cement, 3 parts of sand, 4 - crushed stone. Everything is mixed into a solution of medium fluidity (thick sour cream) and poured into the formwork. When pouring, make sure that no air bubbles remain. To remove them, the solution is pierced with a pin, shaking it slightly - bayonet. It is ideal if there is a surface vibrator for concrete - it quickly compacts the mortar, creating a perfectly flat surface. If it is not there, you will have to level it with the rule, using the edges of the formwork as beacons.

After a few hours, after the concrete has set, the surface can be processed. It can be left as it is, you can brush it over it with a stiff brush, making transverse strips, you can finally put pebbles, stones, flagstone, etc. in a not completely hardened solution. It is not very economical, but reliable. After a couple of days, the formwork can be removed, and you can already walk along the path.
Budget tire track
What is not done from car tires:, swings, and ... tracks. It's simple: you need to cut off the sidewalls of an old tire, leaving only the tread. How can you cut it off? Grinder. Someone contrives with a knife, but this is only if the cord is not metal.

The projector is cut across to form a path. Then cuts are made on the sides of 15 centimeters - depending on the diameter of the tire. They will make it possible to unfold the rubber.

Make cuts on the folded edges - the surface is still non-linear
In this form, it can already be laid on the beds. Will serve for many years. This one is like a low-cost garden path.

Such a coating will withstand many years of active use.
As you understand, there are a lot of options for how to make garden paths with your own hands. It is impossible to tell and describe about all of them, but we try ...
When it comes to garden paths, our possibilities are endless. We hope the beautiful garden paths in these photos will inspire you to create your own special design in the country.
 Add a simple yet interesting element to the track, such as a piece of pebble mosaic. So the path of boring gray slabs not only does not lose its practical value, but also gains an aesthetic appearance.
A great way to create a beautiful garden path is to use natural stone: pebbles or gravel. After sorting the stones by shade, you can put them together into your delightful puzzle.
 You can use other materials to pave garden paths in this style, skillfully combining pebbles with bricks and tiles.
  By changing the proportions of the mosaic and ordinary paving on the path, you can create an effect of different beauty and complexity from the use of mosaics.
 Garden paths in a modern free style, they offer us to install paving slabs on a gravel path.  Visually, such a path becomes more harmonious - practical concrete slabs in combination with gravel fit well into the overall romantic design of the garden.
  Classic brick garden paths look beautiful in any garden. But simply paving a path on a sand and gravel pad is not enough. The use of bricks of a different shade, beautiful curved lines of the path, a logical visual center of the whole garden composition on a small garden patio - all of which work together to enhance the impressive effect of this simple garden path.
Delightful tinted gravel garden paths are an example of how to solve complex problems in landscaping. After all, the passage between the house and the fence is rather narrow, long and darkened. Any straight path would only reinforce these imperfections and turn this section of the garden into a dull long corridor. But the use of colored gravel, plus the bold play of curved lines along the path, creates a whole adventure in this extraordinary corner of the garden.  The overall impression of a garden path is made up not only of the material of the path cover itself, but also of the space between it. And if, in the previous photo, tinted gravel was used for a path that is rarely used, then the combination of the same gravel and sidewalk slabs made it possible to create equally beautiful garden paths in the intensive pedestrian zones of the garden.
  Garden paths are not only a practical element landscape designbut also an effective delicate tool for creating a special mood in the garden. The success of solving this problem depends not only on the materials at your disposal for paving paths, but also on your personal imagination.
Experiment with combinations various materials, colors and textures, find what you personally like, and then garden paths will become an integral and effective part of the personality of your garden.
Walking barefoot on asphalt is less pleasant than walking on seashells, polished cobblestone or sun-warmed logs. Road surface, without which the metropolis is unthinkable, is inappropriate in a country estate. Almost every day, the owners walk around its territory without shoes, and the kids generally crawl on all fours.
When doing gardening, it is important to pay attention not only to high-quality care of fruit plantations, but also to remember the general arrangement and appearance garden. Hand-made garden paths not only create the convenience of moving around the household, but are also a special part of the overall design. In this article we will talk about arranging the tracks with our own hands.
Garden paths - how to combine beauty and convenience
Country house, private house, the cottage requires not only the arrangement of the interior, exterior, but also embellishment of the area around. Often the owners want to combine practicality and aesthetics in one project. The idea can be realized by laying garden paths.
What you need to know and take into account during construction
Any design begins with an idea, a thorough study of the area and a plan. The first step is to determine the directions, length, width of future tracks, to present their shape, decoration. Next, you need to analyze the bearing capacity of the soil in order to choose the right type of building material and only then plan.

It is necessary to draw up a drawing on paper, it will be possible to correct, alter, supplement. There are several important factors to pay attention to:
- Component parts must be resistant to the aggressiveness of the environment - high humidity, fungi, corrosion.
- It is good to tolerate temperature fluctuations in different seasons.
- Provide for possible increased loads (car, loaded wheelbarrow).
- The optimal angle of inclination of the web to avoid the accumulation of water from precipitation.
Advice from landscape designer - in compact areas, it is better to lay not straight garden paths, but with wave-like bends, turns. This visually expands the space, deepens the niches for plants.
From what to build a track, each owner decides independently, based on financial capabilities, needs and fantasies. Every cover needs a base. The ideal option would be a tamped earth mound or crushed stone pillow.

The most popular materials for do-it-yourself garden paths:
- A natural stone. It looks noble, aesthetically pleasing even with non-smoothed corners.
- Artificial substitute. The grace of nature, faceted by man.
- Clinker bricks will add bright colors to the garden.
- Gravel or coarse polished pebbles will provide originality.
- Wood is an affordable, simple, but short-lived look. Looks impressive separately and in the composition.
- Decking - plastic garden parquet. New material, resistant to ultraviolet light, water, mold, rot.
The decorativeness of the structure in to a greater extent depends on how the blanks are laid. The canvas can be solid, even, or consist of separately located elements of different geometric shapes. Having laid out a path of large "leaves", "butterflies", "flowers", it is easy to get pleasure from comfort and pleasant walk.

Varieties of garden paths
Everyone who has a summer cottage and even a small but own personal plot will think more than once about ways to decorate and transform it. There is not always enough finance to implement ideas and fantasies. Many will ask: "What then to do?" The answer is quite simple: if you want to ennoble the garden paths, but there are no funds for a landscape designer and expensive components, then you should pay attention to the available and more affordable materials.
Do it yourself for arranging garden paths of various kinds stones, boards, wood cuts, river pebbles and even caps from plastic bottles... Now a little about each of the options.
Tracks from natural stone
They fit into any site design. They look natural, and when correct styling can last forever.
These tracks look very impressive. If there are stones left after the nearest construction, you can use them. Or those that remain after laying the alpine slide will do. They have irregular shapes, which makes them ideal option for a scenic path.
 Natural stone path
 Initially, you need to calculate the number of stones. One of the methods is a rough layout of stones. This way you can estimate if the amount of material you have is enough.

Sprinkle the place for the path with sand and tamp it well. It turned out to be a kind of "pillow" for pebbles. They need to be processed, adjusted in shape, made more uniform. For good docking and grinding, you can use a grinder or other not too powerful types of tools. Having prepared the stones, they are laid in a mosaic composition.
Since all stones are different in size, they are adjusted to each other using a rubber mallet. At least one side of the stone must be flat for the path to turn out right.

When the mosaic is ready, you need to start sealing the joints between the stones. Otherwise, they will start to overgrow. Although some may prefer another option, the most natural one: a cement-sand mortar is used for grouting.

Concrete paths
They are very similar to stone ones. First, make a bed, the depth of which is approximately 10 cm. Then pour sand on the bottom and tamp. Pour on top with a mixture of concrete and sand, install formwork around the edges. While the solution has not frozen, pour pebbles into it. Lay out the intended pattern from it. A drainage system must be installed next to such a path.
Sometimes a concrete path is made by means of already finished form... It is not difficult to buy it at a hardware store. And then just pour the concrete mixture into the mold in the place you need, level it with a trowel, remove the excess and remove the mold. This is a very easy and quick way, in addition, you can lay out such a shape in at least several rows.
 How to make concrete paths with your own hands using ready-made forms
Wooden walkways
Wood paths will last long enough, but at the beginning they require maintenance. You can lay them out from sawn boards or timber, using what is left from the construction of the house.
 Wooden walkways
 Prepare boards and blocks, the latter can be replaced with steel corners or pipes. Process them protective impregnations or bituminous mastic. After absorbing, nail the boards to the blocks. Mount the track from above using different caliber hemp. Paint them one or more colors.
But in domestic climatic conditions, the most modern impregnations will not protect the boards from deformation, rotting and corrosion, therefore, imitation of wood is often used as a material for paths - tiles with a corresponding pattern.
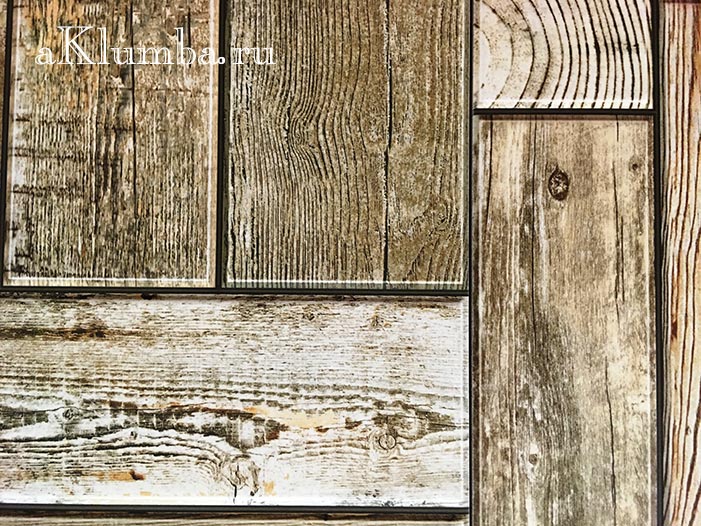
It will be possible to pick up such perfect samples that no one will detect the difference at a distance. It is felt only after tactile contact. The tiles reliably depict the natural texture of pine, beech, oak and other species in section - as a result, the ersatz turns out to be indistinguishable from the original.
DIY gravel garden paths
Gravel is a simple material that has good flowability, moisture permeability, and is relatively cheap. From it you can fill paths of any width and length, it is possible even to give them different shape... This path looks neat, harmoniously fits into any landscape. Doing it yourself will not be difficult.
 DIY gravel garden paths
 The order of execution of a gravel path
- First you need to mark the track along the site. The marking is carried out with pre-prepared wooden pegs. You can pull a string between the pegs if you find it difficult to determine the direction "by eye".
- Further, the bed is prepared according to the markings. To do this, dig a trench in the ground. The depth of the trench can be about 14 - 17 cm.
- Gravel is prepared. It is advisable, if possible, to view it and remove unwanted impurities (broken glass, sharp large stones, etc.). Busting the gravel should be done with tight gloves.
- Gravel is backfilled to the depth of the trench. You can level it with a rake or with your hands (also use gloves).
- Next, the laid gravel is rammed.
- At the end, a curbstone can be placed along the edge of the walkway. This will give an even more effective and finished look. The stone is fixed with a cement foundation. It can be laid both flush with the canvas, and slightly above it.
This algorithm is also suitable for the construction of a garden path made of sand. Accordingly, gravel is replaced by sand, and then all work is carried out according to the same scheme.
DIY brick garden paths
It is a very fragile material. Before laying, check for strength. First, mark the path with string and pegs.
Remove the soil (25 cm), put a drain underneath. In this case, it will be simple, but the main thing is that the water does not penetrate. Crushed stone must be poured onto the drainage system from above. Boards are laid sideways along the edges. Then the brick is laid. You can come up with many different brick designs.
 Clinker brick path
 The garden path, lined with brick chips, looks great. It is permissible to pour it onto a concrete track. A beautiful mosaic is laid out of broken bricks. If the bricks are of different colors, beautiful patterns are laid out from them. You can leave space between them to fill it with small pebbles, pebbles or soil, so that later there was a green island.
 Homemade brick and stone path
 Sandstone path
They are made dry or using cement grout. This method is similar to laying a stone path, and the first is more natural and original.

Dig a trench by removing some of the soil. Pour sand there and tamp. The middle section should be higher than the edges. It is necessary to walk a little to the slope. This is such a dehumidification system. This is followed by the processing of pebbles.
Sandstone can be of very different sizes and shapes. Try on each stone before finishing.
Level the stones by making the gaps as small as possible. The processed stones are laid out as you like. For a classic track, you need a bucket of sand and the same amount of mixture with cement. Under each pebble, you must first put the first, then the second. Moreover, the cement should protrude slightly. You need to press the stone tightly. The made path must be washed so as not to spoil the aesthetics with the remains of cement. Seams are filled with soil or sand.
Saw cut path
Such a path will look very beautiful and attractive.
 Saw cut path
 Cuts should be taken of different sizes, laying them so that there is no free space... Before laying, round timber must be treated with an antiseptic composition.
 Garden path saw cuts
Another option is to use round timber in the form of curbs, and fill a layer of gravel between them.
While staying at the dacha, you want to move away from the city life, because all around, if not a forest, then a garden, some lucky people even have a lake or a river. In a word, whatever the surrounding landscape may be, it encourages closer proximity to nature.
An interesting idea is a forest trail. It represents fragments of common tree stumps. Round plates different sizes laid along the edge of the pond and concreted.

The side of an artificial reservoir is also made of them. It is pleasant to sit on such stumps in order to sunbathe, the contact of the feet with them also gives rise to positive sensations.

Plastic garden paths
Such country paths are sold as ready-made modules. Their installation does not require preparation and surface treatment. They are very simple and quick to attach, very economical, are characterized by strength and long service life. They can be laid out on any site, in the form of any composition. They are environmentally friendly and aesthetic.
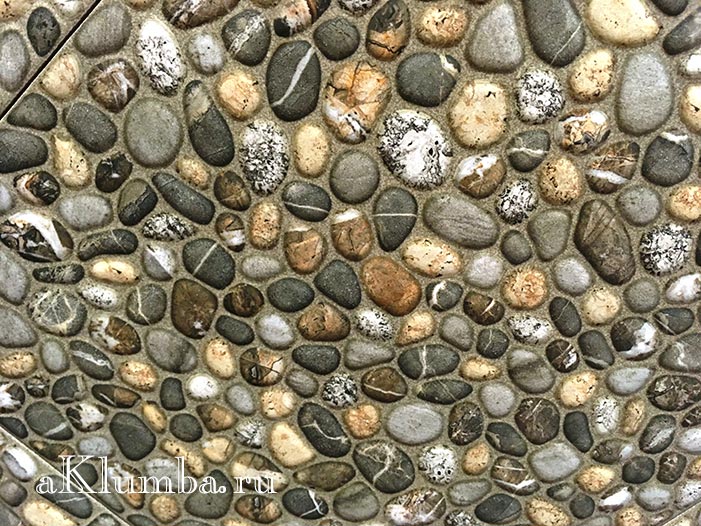
River pebble paths
Working with these stones will be difficult, time consuming and will not end quickly. They are laid in a pre-limited space in wet sand and compacted to the desired depth. The process takes several days.
 River pebble paths
 It happens that the design of suburban buildings is based on imitating the styles of bygone times - the antique era, British classicism, etc. Then you should choose slabs decorated in accordance with the general concept of the site and the residential building. They may have impressions of Mediterranean pebbles, ancient bricks, etc.
Tracks from plastic bottle caps
The most original and interesting way - lay out the path or part of it with plastic bottle caps. Due to the fact that the covers have a variety of colors, it is possible to make patterns and mosaics, even coming up with whole pictures.
The only drawback of this improvised material is its collection, because a lot of covers will be needed.
Reinforced concrete tile garden path
Stages of work:

 DIY ready-made garden path made of reinforced concrete tiles
  From lined ceramic tiles mosaic type
  Paving stones, stone path
  Slabs laid on a layer of sand, sown in between lawn grass... Mowing is done with a conventional electric lawnmower. Photo taken 3 years after installation.
 These are just the basic materials from which you can make suburban paths with your own hands. Man's fantasy is limitless, so to the next summer seasonwill probably come up with something else. Paths for summer cottages are made by hand from any, sometimes unexpected material. For example, from glass bottles. You can create combinations of different types of material in one composition.
Creating a cozy and unique design of a personal plot, the owners, through logical thinking or assessing practical needs, will come to the conclusion that it is necessary to plan and construct garden paths. Next question which will arise on this occasion - a variant of their paving.
Construction and decoration of garden paths
Professionals with extensive experience in the production of paving paths and the so-called enthusiasts who improve their sites using a variety of methods, give a positive characteristic to the simple, interesting and amazing result of the paving process. The first advantages that people who have tried the paving method note are the increased comfort of the created conditions, an aesthetically attractive look. For example, paths made of stone after the last rain will quickly shake and dry out, in the cold season they will not create problems when clearing ice and snow.
Going a little deeper into the process, it becomes clear that the paved paths prevent subsidence of the upper layers of the earth and their erosion, as well as the spread of mud formed during precipitation over the area. The designers also refer to the pluses and focus on the fact that the paved path on the site will not only become a bright fragment of the decor, but also unite its different zones.
DIY garden paths
Experts advise - when paving a path, do not forget about the need to decorate it with a border. It will serve as a rigid fixer for the boundaries of the path, as well as protect its edge from deformation, especially under the action of various climatic conditions... The border is not a prerequisite, but it is he who can favorably emphasize and keep unusual for a longer period, original way paving. Basically, the curb is not used only when the path is planned from natural stone of various configurations or concrete slabs.

Such a fence as a curb can protrude 5-15 cm above the ground. It can be made from different building materials: from special concrete blocks for curbs, from wood or concrete, natural stone or brick. The most commonly used curb material is red brick. Mount it with its end in the ground. This edging option does not require large financial investments and special skills. If the shape of the red brick border is planned with bends, you should prepare cement mortar, which will be needed for filling seams and joining.

A curb made of a product kit will look interesting. Podtokolnik - chocks with a curved cut, about half a meter long, about 10 cm in diameter. A crookedly cut end is better than a straight one, because it allows the unhindered outflow of precipitation, preventing, in turn, rotting of the upper part of the wooden fragment. In order to maximize the service life of such a curb, you need to apply an antiseptic on the chocks and wrap their lower part with tar paper.
Making a border from natural, large, flat stone is as follows:
- the source material is placed at a certain depth and covered with earth;
- when the stones are not large enough, the curb is drawn up using a solution.
In cases where a garden path is planned from slag, sand, gravel, pebbles - a border is required without fail. The most durable and strongest will be a concrete curb stacked on a concrete base.
Making the path to the house

A successful combination of motley building materials (brick, tile, wood, gravel), will add personal plot splendor and originality. All paths on the site should be elegant and practical at the same time. And those that are located directly near the residential building should also guarantee a hassle-free and comfortable approach, and perhaps even an entrance, to it in any weather conditions.
How can you decorate a garden path
To make the track beautiful, you should first think over the option of decorating it. When choosing, you should take into account the material from which the track is made and its color. For example, plants with flowers of a similar shade (calendula or marigolds), or vice versa, contrasting ones, which would emphasize the orange shade of the material, are suitable for a brick path.

If the path is cement and has an inexpressive color, then the plants along it should attract all the attention to themselves, i.e. they should be distinguished by brightness of color and grace of form.
When decorating garden paths, you can use both perennial, and annual, and perennial, but when choosing the latter, the decor of the path will have to be thoroughly corrected and restored.

In the event that the paving of the path was done beautifully and from expensive natural materials, then it is not better to organize lawn strips on the sides of it - it will emphasize the attractive appearance and color of the material. At some distance you can plant flowering plants - hosts, irises. At the points where the paths intersect, designers recommend equipping flower beds from creeping and rapidly growing plants, very a good option there will be a ground cover rose planting.
What plants to plant along the paths

Of course, it is impossible to give an unequivocal answer to the question of which colors are best for decorating paths in the garden. The choice will depend on the style of the landscape, its color scheme, from the personal preferences of the garden owners. But general recommendations on this occasion, you can still take into account.
For example, paths framed by daylilies planted along them will look very attractive. The originality of the plant composition will be given by planting a daylily in a certain order with in different shades colors: burgundy, yellow, orange, lilac, the second attractive moment - different periods flowering, if you choose the correct varieties of daylily, then the path will always be surrounded by flowers - until the flowering of one variety ends, the flowering of another will begin.

If a herbaceous border was built during the design of the droshky, then along it you can plant bushes of sedges or cereals, other plants with variegated leaves or decorative inflorescences. The periwinkle framing it will give the track brightness throughout the summer. Irises, hyacinths, daffodils or tulips are also suitable for planting, but remember that they bloom once a season, in early spring. For example, delicate daisies will bloom throughout the summer.

The framing of the paths will look more interesting if you pick up the plants and plant them in such a way that you get tiers. In the first of them, of course, there will be creeping or undersized:
- tenacious or stonecrop,
- periwinkle or saxifrage,
- thyme or lungwort,
- monotonous loosestrife, primrose.
The second tier can be formed from medium-sized crops, it can be annuals or perennial creeping conifers, badan, tall primroses.

From tall, to create the third tier, you can plant lilies and phlox paniculata, astilba, falaris. Columnar conifers can also be planted. Plants used in one composition should be combined in shape and color of leaves and flowers, the height of the tiers should be such that the plants are clearly visible, do not shade each other.
Planting creeping or undersized plants on uneven areas will help to visually brighten steps and bumps on the ground surface.
When there is a difference in the height of the soil, the path must be equipped with steps. You can also decorate the steps with flowers, moreover, competently selected types of them will help to make a flat flight of stairs or an uninteresting flat section of the path bizarrely curved. To do this, you will need to plant large, branched plants at several points, which will block the view of the continuation of the path.

You can also plant plants such as small-petals, which, while growing, will roll over the edges of the path, thereby concealing all the errors made during its construction.
Decoration of paths in the garden with flower beds
flower borders

Often, certain types of flower beds are used as finishing paths. The simplest, but quite attractive, dense strip of plants, called a flower border, can have different widths. It can be used for carpet plants, of several types, growing very compactly. You can also use taller plants planted in several rows. Smaller ones are planted closer to the path, the subsequent, higher rows, with proper planning, should close with them. Most often used for this purpose: marigolds, vervain, sedum, ageratum.
discounts

Broader and more colorful flower beds located along the paths are called ridges. The recommended width is from 0.5 m to 1.5 m. If the track is long, then the rabat should be made intermittent. Such flower beds can be double-sided or one-sided. The latter are usually located near fences or walls of buildings, while tall plants should be planted closer to the walls or fence.

If the path lies in an open space, then equip a double-sided bed. Several of the plant species used in it are planted in the form of an ornament or parallel stripes. It is also assumed that a certain colors: white-pink, pink-burgundy, violet-yellow, yellow-blue.

In a double-sided bed, tall plants are placed in the middle line.
mixborders

Mixborders look more natural and relaxed; they are usually used to ennoble the territory near buildings or hedges, to border paths. the width of such a mixed-type flower garden can be from one and a half to four meters, the length - up to tens of meters. For a mixborder, you can pick up about two to three dozen different types of plants, but always in such a way that the period of their flowering follows each other. When planning a mixborder with a width of more than one and a half meters, it is advisable to provide for the presence of a path in the middle of it, or at least a passage - this will make it more convenient to care for flowers and water.

Plants in a mixborder are placed in three groups - the tallest of them should bloom at the end of summer, medium ones - in June-July, low-growing perennials - with a spring flowering period, it is desirable that they have bright, decorative leaves... Early flowering bulbous plants placed closer to the middle, their leaves wilted after flowering will hide bright plants located in the foreground.
When planting perennial crops, one should not forget that they will grow over time. The space left between them in the first year can be filled with annual plants.
Well-groomed, elegance and nobility. In addition to purely practical functions, they also carry significant aesthetic value. On the one hand, uniting all the buildings, the paths form a common ensemble. On the other hand, they allow you to zone the site, highlighting the functional zones: a vegetable garden, a flower garden, farm buildings, a recreation area. With proper organization, garden paths can correct some of the shortcomings and inaccuracies of landscape design.
When planning to build garden paths with your own hands, you should definitely take into account several factors:
- the material must withstand seasonal temperature fluctuations
- the track must be resistant to decay, corrosion, mildew and mildew
- ease of care
- the planned load - it is important to consider in those cases if the car will cross (run over) the track
- the path should be sloped to avoid the accumulation of rainwater on the canvas
Advice! On a small section of the track should not be straight - turns and bends optically add a section of depth and space

Garden paths: we select the material
A variety of materials can be used to create a garden path:
- a natural stone - the material is noble, status and very expensive. But the track will turn out to be "eternal" due to the strength of the material
- fake diamond - perfectly conveys the beauty, texture and aesthetics of natural stone, but much cheaper and easier to install
- brick - special clinker (road), ordinary red or silicate (white) will not work, it will quickly disintegrate in the ground
- paving slabs - durable, frost-resistant, durable. This is a popular option with a variety of textures, colors and shapes, allowing you to show your imagination. It can be laid like a mosaic, getting patterns and even drawings on the track
- fill path - gravel, pebbles, crushed stone, sand and even wood chips are suitable for this. This will require a large volume consumable, because it gives significant shrinkage over time. This option is unlikely to be suitable for the central alley, the "soft" embankment path will fit into the wild, between flower bed and beds, by the reservoir
- garden paths made of wood - an affordable and simple option, but very short-lived. It is optimal for these purposes to use larch - from moisture, it becomes stronger over time, it retains the integrity of the structure longer than other trees. The canvas of the track can be made of boards or logs, but the track made of wooden cuts (rounds) looks especially picturesque and cozy - their patterned texture looks especially impressive. A practical alternative to wood cuts can be their concrete imitation.
- concrete walkway - you can pour concrete with your own hands, or lay ready-made concrete slabs

- garden parquet - decking, plastic track, wooden plates are fixed on the surface of the substrate, so outwardly it looks like a wooden one. The plastic track keeps its original shape perfectly, does not curl, does not swell, accumulating water, is resistant to the external environment, does not grow moldy and does not rot. It is easy to care for it - you just need to water it with a hose.
For very rough terrain and also for places where people do not walk too often, a path made of separate (single) stones is suitable. In addition, this option is suitable for cases where the track is very long - to pave it with a continuous canvas, significant costs will be required. Such a path is invisible, but at the same time very decorative, in good harmony with