Learning to work with wood. Woodworking machines for the home workshop: drawings, instructions and photo examples. The sawing technique consists of several stages
The hero of the film “I am a robot” at the beginning of the film expressed a very scandalous idea for advertising the near future: “We see how a carpenter makes a wonderful chair. And then a robot comes along and makes the chair twice as fast and twice as beautiful.” So the character of Will Smith is fundamentally wrong. More precisely, he is right, but this truth is one-sided. Isn't that why we invented robots to give ourselves time for creativity? Not a single machine in the next hundred years will be able to surpass man in creation - this process is so subjective, so incomprehensible that no algorithms can understand its principle.
It is not very difficult to create a table or a wooden statue. But to create them of high quality and unusual, unique and beautiful is the prerogative of a true master. Yes, after some time the machine will be able to do the same, but only because it already knows how to do it. The superiority of a specialist is that he is able to create new things, break stereotypes and bypass the generally accepted framework. This philosophy closely affects the sphere of carpentry - this art requires not only skill, but also creativity.
We are all destined for a standard fate: to raise a son, plant a tree and build a house. In general, it is not necessary to follow it, but the profit in the form of the ability to handle wooden beams, undoubtedly useful and valuable, even if needed once in a lifetime. This art is already several thousand years old: wooden chairs and statues, as well as images of carpenters, were found at excavations in Ancient Egypt and Mesopotamia. In modern times, this profession is no less important: a good carpenter knows how to pick desired material and its decoration, and modern houses still can not do without furniture, doors and windows. So if you were looking for the perks of acquiring woodworking skills, this was it.
Starting to learn something new from scratch is always difficult, so we found for you the Kedr carpentry school, where training courses where craftsmen learn how to handle hand-held power tools, a manual milling cutter, classic carpentry, and so on. The choice of programs is rather big: from basic skills to restoration. And absolutely everyone is welcome here, regardless of age and gender (by the way, for some reason there are more girls there - take a chance!).
Also, this school has a very convenient schedule: there are intensive courses on weekends and those where the student himself chooses the time of attendance - teachers are always on site and are always ready to look after you in a coworking format if you want to work on your project yourself. There are two sites in the Russian capital, and one more in St. Petersburg, so if you do not plan to move from Saratov, wait for the opening of a branch.
There are also requirements, where without them. First of all, this, of course, is the presence of creative and aesthetic thinking. Without these abilities, you can still do such a popular business, but you should not count on something more than standard stools or cabinets. There is no place here for those who do not have the necessary patience - only a balanced person who is ready to try and put his soul into the process can spend from several hours to a week on one thing. And of course, a certain amount of money will be required to purchase the material - if you do not want your kitchen table looked poor, you have to choose a prettier tree. But in any case, it will be cheaper than a typical ZHUMARVISHUBOZ from IKEA.
However, as with any job, carpentry has its downsides. Here they are especially worth considering: for example, strong odors of processing solutions such as varnish, glue, wax and other substances. Such a cacophony of aromas can lead to dizziness and constant headaches. So you will have to go out into the fresh air more often and wear plugs in your nose. Also, wood dust will constantly hover in the workshop, shavings will continually aim at your eyes, and a circular saw will constantly remind you of the danger of a severe cut, not to mention ordinary splinters. Luckily for you, there are means of protection against all this: masks, goggles, gloves, specialized clothing. Without it, in any way, forgive me, but it's safe. And if you can’t stand the high noise level, then you will also have to purchase soundproof headphones.
Another woodworking expert is the Bosch DIY Academy carpentry co-working space, a modern space for craftsmen and novices who are ready to learn the basics. carpentry and create exclusive objects from wood. Basic classes for beginners are four days, and immediately after that you will drag home your first chair to the delight of the household.
In total, such a course (with a convenient and flexible schedule) lasts two weeks: marking, sawing, milling, grinding, assembly, finishing - you can learn about all this from the best specialists Russia and test your knowledge on modern Bosch Green equipment. And after completing the course, you will become an honorary resident of the project and will be able to return there with your own creative ideas. The workshop is also located in Moscow, in the north-west of the city - it is very modern equipment, qualified personnel and affordable prices. Remarkably, you can even book an off-site coworking space or a master class - for example, for a children's birthday or corporate party, where everyone will receive basic skills in carpentry.
By the way, skills are one thing, but only with bare hands(even if wearing gloves) the wood cannot be sawn and processed. In short, you will definitely need a circular or miter saw, jointer, thickness gauge, drill, milling cutter, as well as sets of hand tools, that is, chisels, mallets and hacksaws. We advise you not to save on these tools, otherwise one day a sharp piece of iron will bounce into your face, leaving a Tyrion Lannister-style scar. In addition to the inventory, it would be nice to remember school drawing lessons - without a properly organized scheme with all the calculations and footage, there is a big risk of getting crooked legs or even inconsistent parts as a result. Wood is not Lego blocks: when creating any thing from such material, you need to keep in mind that there should be no mistakes.
There is an ancient Taoist parable on this subject. One day, the ruler of Lu ordered a frame for a bell to the carpenter Qi. When the work was completed, the emperor came to the master and saw a real masterpiece, exclaiming: “Qi, this frame seemed to be created by the gods! How did you do that?" To which Qi replied that he was an ordinary artisan and did not know divine skill. “First, I fasted for three days, forgetting about future rewards and people's opinions. By the end of the seventh, I no longer felt anything except the knowledge that I needed to make a frame for the bell. And then I went into the forest and saw a tree that was well suited for this. This is how my creation came about.” This story teaches that any art exists primarily for self-knowledge and peace in one's own life. Carpentry will always live, bringing peace to its craftsmen. And you too, if you learn.
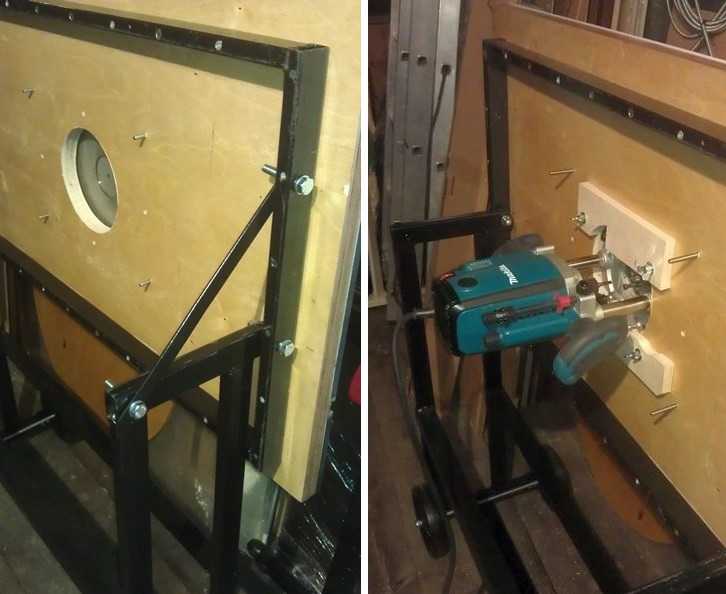
In the presence of milling machine work on inserting loops, forming complex holes, recesses, wood carvings, etc. is really simplified. But this does not mean at all that it is necessary to have professional and expensive equipment: it is enough to have a simple manual device.
The only thing you need is to be able to handle wood and use power tools. In addition, you need to have a desire, otherwise there will never be a result without it. Those who have no desire to work simply buy furniture or hire craftsmen to, for example, install new door and cut locks. Any work, especially with a power tool, requires certain knowledge, and especially safety precautions.

The milling device is intended for processing both wood and metal. With its help, it is possible to form recesses or holes of any configuration. This greatly simplifies tasks such as tapping hinges and tapping locks. To do this with a chisel and an electric drill is not so easy, and it takes a lot of time.
There are stationary milling devices and portable (manual). Manual electric cutters are considered universal devices, with the help of which, in the presence of nozzles, it is possible to perform operations for various purposes, it is enough just to change the position of the part relative to the device or vice versa.
Stationary devices are used in factories or factories where mass production of wood or metal products is established. Under such conditions, the cutting nozzle is stationary, and the workpiece moves along the desired path. Using hand tool on the contrary, the part is fixed motionless and only then it is processed, although there are parts that require fixing a hand tool. This is provided for in the design, therefore, it is considered more universal. This is especially true when you need to process a large number of parts, and use stationary machine does not seem possible.
 Homemade milling machine - a horizontal platform with a hole in the center, from below to which a manual fixture is attached.
 There are many types of milling machines, but for use at home or for starting a business, universal models are more suitable. As a rule, they are equipped with a set of cutters and various devices for performing various kinds of operations. The only thing is that with a manual router, simple operations can take much more time than with a stationary machine.
With the manual milling device it is possible to:
- Make grooves or recesses of arbitrary shape (curly, rectangular, combined).
- Drill through and non-through holes.
- Process ends and edges of any configuration.
- Cut out complex shapes.
- Carry out drawings or patterns on the surface of parts.
- Make a copy of the details, if necessary.
 Copying parts is one of the functions of any electric milling machine.
 The presence of such functions makes it possible to simplify the production of the same type of furniture or the production of identical parts that are not related to the production of furniture. This is one of the main advantages of this tool. As a rule, for the production of the same type of parts, it is necessary to install copy machines that are designed to perform only one operation, which is not always profitable, especially in small enterprises.
Getting Started and Caring for the Tool
To understand how this device works, you should familiarize yourself with its main parts and their purpose.
Composition and purpose of the main nodes
The manual milling fixture consists of a metal case and a motor, which is located in the same case. A shaft protrudes from the body, on which various collets are put on, serving as adapters. They allow you to install cutters of various sizes. A cutter is inserted directly into the collet, which is fixed with a special bolt or button, which is provided on some models.
 The main elements of a manual milling device and their purpose.
 The design of the milling fixture provides a metal platform, which has a rigid connection with the body. It is attached to the body with two rods. From outside the plate has the smooth covering providing smoothness of the movement in the course of work.
The manual milling fixture has some characteristics that can be adjusted:
- Due to the handle and scale setting the depth of milling. Adjustment is carried out in increments of 1/10 mm.
- By adjusting the speed of rotation of the cutter.
On early stages when mastering the tool, it is better to try to work at low or medium speeds. Although you should always remember that the higher the speed, the better the work. Especially when it comes to responsible, visible areas that cannot be masked.
In addition to these levers, there is also a button for turning the product on and off, as well as a lock button. These elements are considered the main ones that ensure the quality and safety of work. There is also a parallel stop, which contributes to ease of use. It can be rigidly fixed or with the ability to adjust the shift of the working area, in the direction from the center.
Caring for your handheld router

Usually, a factory product falls into the hands of a person tested and lubricated, so no additional measures should be taken. Only in the process of its operation it is necessary to monitor its cleanliness and serviceability. At the same time, it should be regularly cleaned of dust and change the lubricant, if the passport says so. Especially lubrication is necessary for moving parts. Alternatively, you can use aerosol lubricants, but you can get by with the usual ones, such as Litol. The use of thick lubricants is not recommended, as chips and dust stick to them. If aerosol lubricants are used, then this factor can be eliminated.
Lubrication also requires a sole - a smooth part of the body. Regular lubrication will ensure the desired smoothness of movement.
Despite this, the purchased item should definitely be checked for build quality and the presence of lubrication.
Unfortunately, not all manufacturers, and especially domestic ones, care about build quality. There are cases when, after the first hours of operation, screws or screws are unscrewed from the product, as they were not tightened properly.
Rotation speed adjustment
The operation of any tool is associated with certain conditions related, first of all, to the nature of the material being processed. It can be plywood, composite material or regular wood. Depending on this, the rotation speed on the electrical appliance is set. As a rule, the technical data sheet always indicates the operating parameters of the device, depending on the technical characteristics and characteristics of the surfaces to be processed, as well as the cutters used.
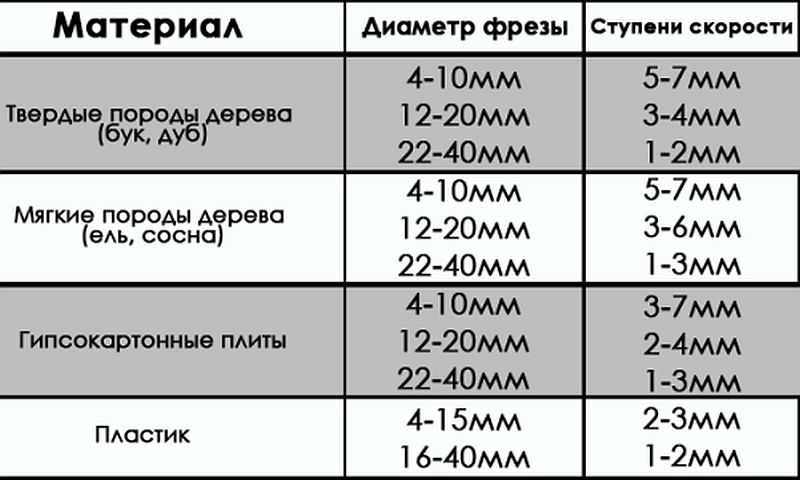 Processing speed indicators when using various cutters.
 Cutter fixation
The first thing the work begins with is the installation and fixing of the cutter. At the same time, one should adhere to the basic rule - all work is carried out with the cord removed from the outlet.
The cutter is set according to certain marks, and if they are absent, then to a depth not less than ¾ of the length of the cutter itself. How to install the cutter on a specific model, you can learn from the instructions, which must be present in the technical documents for the device. The fact is that each model can have its own design features and it is not possible to talk about this in the article.
 Installing the cutter on the device before starting work.
 There are models both simple and more "advanced", as they say. Some models have a shaft rotation lock button, which makes it easier to install the cutter. Some, especially expensive models, are equipped with ratchets. So it’s impossible to describe specifically the process of installing the cutter, and it doesn’t make sense, since everyone who is familiar with the operation of such devices will figure it out at the moment.
Milling depth adjustment
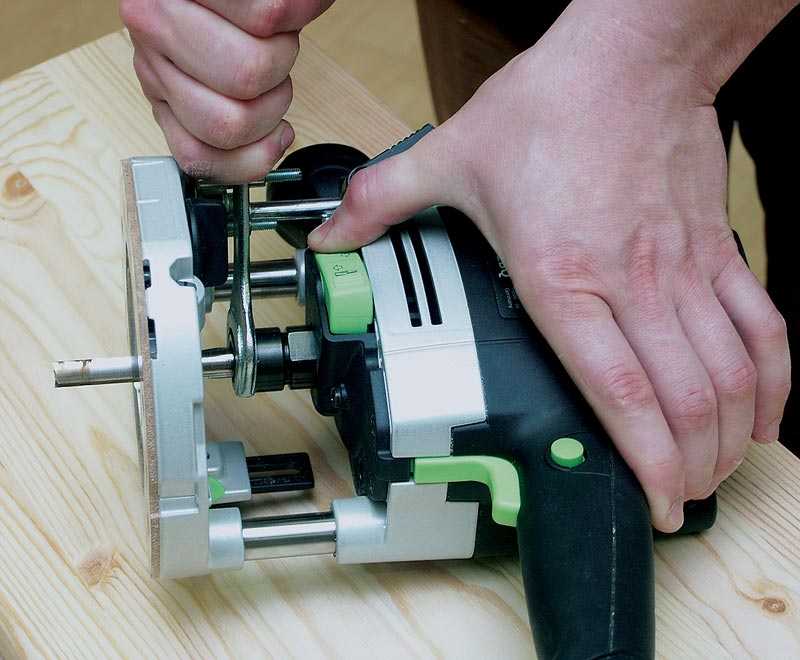
Each model has its own maximum cutting depth. At the same time, it is not always the maximum depth that is required, but a certain depth, which is set before work. Even if the maximum depth is required, then, in order not to overload the device, the milling process is divided into several stages, changing the milling depth in steps. For adjustment, special stops are provided - limiters. Structurally, they are made in the form of a disk located under the bar, on which stops of various lengths are fixed. The number of such legs can be from three to seven, and this does not mean that the more of them, the better. It is better if it is possible to adjust each of the legs, even if their number is minimal. To fix this stop in the optimal position, you should use the lock, in the form of a flag.
The milling depth adjustment process is as follows:

 Thus, the workpiece is milled to a predetermined depth.
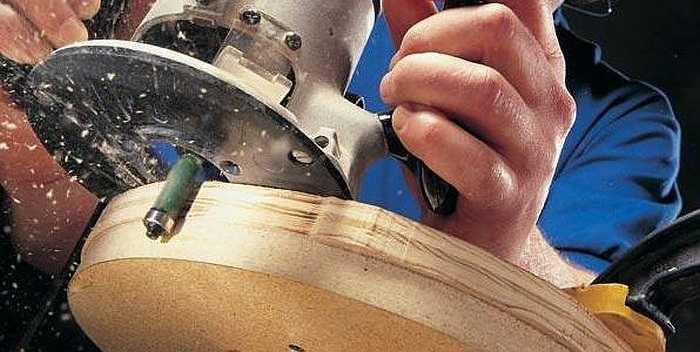
 On high-quality expensive models, there is a wheel for fine-tuning the depth of milling.
 With this wheel, you can more accurately set the depth without violating the previous setting.
 This wheel (green in the photo above) allows you to adjust the depth in a small way.
Cutters for manual milling tools

A milling cutter is a cutting tool that can have an intricately shaped cutting edge. As a rule, all cutters are designed for rotational movements, therefore they have a cylindrical shape. The shank of the cutter, which is clamped in the collet, has the same shape. Some cutters are equipped with a thrust roller, so that the distance between the cutting surface and the workpiece remains constant.
Milling cutters are made only from high-quality metals and their alloys. If you need to process soft woods, then HSS cutters will fit, and if you need to process hard wood, then it is better to use HM cutters from harder grades.
Each cutter has its own specifications, which provide it with high-quality and long work. The main indicator is maximum speed its rotation, which should never be overestimated, otherwise its breakdown is inevitable. If the cutter is dull, then you should not try to sharpen it yourself. Sharpening of cutters is carried out on special, expensive equipment. After all, it is necessary not only to sharpen the cutter, but also to maintain its shape, which is no less important. Therefore, if the cutter, for some reason, has become dull, then it will be cheaper to buy a new one.
The most popular cutters
There are cutters that are used in the work more often than others. For example:

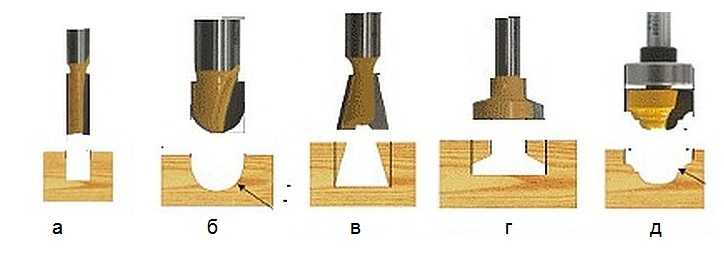 Groove molds are designed to create recesses in an arbitrary place on the workpiece.
 There are simple cutters, monolithic, made from a single piece of metal, and there are type-setting. Type-setting cutters consist of a shank, which serves as the basis for a set of cutting elements. Selecting cutting planes and installing them on the shank using washers different thickness, you can form an arbitrary relief on the surface of the workpiece.
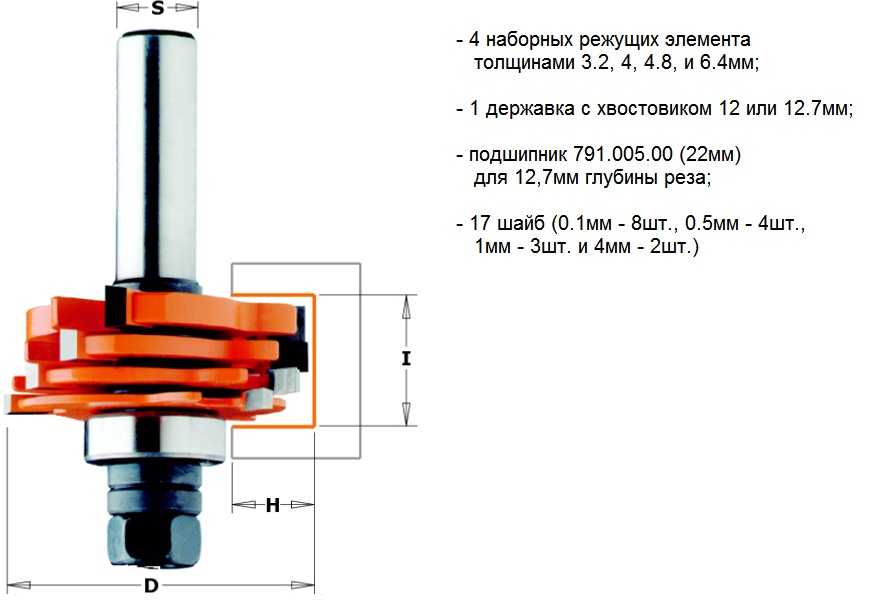 A type-setting cutter is a set of cutting surfaces and washers, which allows you to assemble the cutter of the desired shape.
 In fact, there are a lot of cutters and this is only a small fraction of what is produced. All cutters differ in shank diameter, cutting surface diameter, cutting height, knife position, etc. As for manual milling equipment, it is enough to have a set of five most popular milling cutters. If necessary, they can be purchased at any time.
Rules for working with manual milling tools
Working with power tools requires special rules, especially when there are rapidly rotating elements. In addition, as a result of the work, chips are formed, which scatter in all directions. Despite the fact that most models are equipped with a protective shield, this does not fully protect against the flow of chips. Therefore, it is better to work with such a tool in protective glasses.
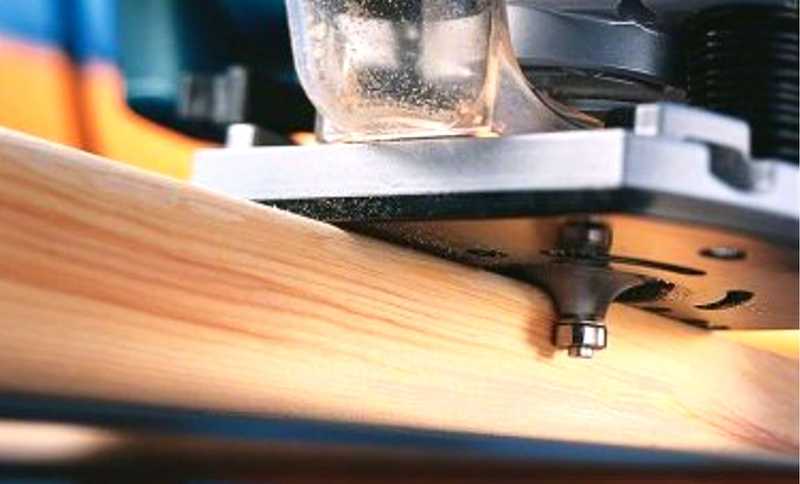
 The photo shows a model where a vacuum cleaner is connected to remove chips.
 General requirements
If you fulfill the basic requirements for safe work with an electric hand router, then the end result will please you with the quality of work and a safe outcome. Here are the conditions:

The requirements are not very difficult and quite feasible, and ignoring them means putting yourself in danger. And one more thing, no less important, is the ability to hold a milling tool in your hands and feel how it works. If serious vibrations are felt, then you need to stop and analyze the reasons. It is possible that the cutter is dull or a knot is caught. Sometimes it is required to correctly set the speed of rotation of the cutter. Here you can experiment: either add speed or reduce it.
Edge Processing: Using Templates
Processing the edge of a wooden board is best done on a thickness gauge. If this is not possible, then you can use a manual router, although this will take some time. These works are carried out both without a template and with a template. If there are no skills or there are very few of them, then it is better to use a template. For processing edges, straight edge cutters are used, both with one bearing at the end of the cutting part, and with a bearing at the beginning (see photo).
 Edge cutters.
 For the template, you can take an already processed board or another, even object. Moreover, the length of the template must be greater than the length of the workpiece, both at the beginning and at the end of the workpiece being processed. This will avoid unevenness at the beginning of the edge and at its end. The most important thing here is that the template or object acting as a template has a smooth and even surface. In addition, its thickness should not be greater than the gap between the bearing and the cutting part.
The width of the part is less than the length of the cutting part
At the same time, the longer the cutting part, the more difficult it is to work with the tool, since more effort is required. In this regard, it is better to start work with cutters that have an average length of the cutting part. The working principle for edge processing is as follows:
- The template is attached so that it is at the desired height and has a flat horizontal surface.
- The template is firmly mounted to a table or other surface.
- The cutter with a roller is installed so that the roller moves along the template, and the cutter (cutting part) along the workpiece. To do this, perform all the necessary manipulations with the template, workpiece and tool.
- The cutter is set in working position and clamped.
- After that, the tool turns on and moves along the template. In this case, it is necessary to determine the speed of movement, which is determined by the depth of processing.
- The milling unit can be both pushed and pulled: as it is convenient for anyone.
After the first pass, you should stop and evaluate the quality of work. If necessary, another pass can be made by adjusting the position of the tool. If the quality is satisfactory, then the clamps are removed, freeing the workpiece.
With this approach, it is possible to remove a quarter along the edge or in some of its parts. This is done by setting the cutting edge so that it goes to the required depth into the part.
 A quarter taken on a furniture facade.
 If you replace the cutter with a figured one and shift the guide, as well as use the stop, you can actually apply a longitudinal pattern to the part (in the photo below).
 Drawing a longitudinal figured pattern on the workpiece.
 If you use a similar milling technique (with a template), then you can easily master the technique of working with wood in general. After some time, you can abandon the templates, as their installation takes a lot of useful time.
 How to make a smooth edge without a template: experience is indispensable here.
 The width of the part is greater than the length of the cutting part
Quite often, the thickness of the workpiece is greater than the length of the cutting part of the cutter. In this case, proceed as follows:
- After the first pass, the template is removed and another pass is made. In this case, the already processed part will serve as a template. To do this, the bearing is guided over the machined surface. If the cutting part was again not enough, then you will have to make another pass.
- For final processing, you should take a cutter with a bearing at the end, and the workpiece must be turned upside down, after which it is fixed with clamps. As a result, the bearing will move over the machined surface. This approach allows processing thick parts.
 The bearing is guided over the machined surface while the cutting edge machine the rest of the workpiece.
 In order to master the work of a manual milling tool, you will need a lot of rough workpieces, which you do not mind throwing away later. Nobody got it right the first time. For something to work out, you need to train hard.
Obtaining various curly edges
If a curly edge is required, which is most likely to be necessary, then first pay attention to the condition of this edge. If it is uneven, then it will have to be leveled and only then proceed to the formation of a curly edge, choosing the appropriate cutter.
 Rounded edge.
 It is necessary to prepare the surface so that the cutter does not copy the curvature along which the roller will move. In this case, a sequence of actions is needed, otherwise a positive result will not work.
Wood is a unique material for various works. Firstly, it is a pure material of plant origin and wood products do not have any bad effect on a person, but only positive emotions. Secondly, it is soft and easy to handle, with the exception of some varieties that are comparable to iron. Thirdly, different shades of wood and its structure make it possible to make very beautiful things, not only by home lovers, but also by professionals.
Depending on the purpose, there are many types of wood processing, both manual and mechanized. In accordance with this, there is a wide variety of tools for working with wood, some of which were invented many centuries before our era. Even then, humanity appreciated this material.
 Types of woodwork
 The first type of processing can be considered wood cutting, you can start from it. The tree must be cut, then cut into boards or beams. In this case, three types of cutting are distinguished: cutting to the end, in which cutting occurs across the fibers, cutting along the fibers and cutting across the fibers, for example, for the manufacture of veneer. Each operation has its own types of tools.
Further, according to the technology, there is a marking of wood, in which they try to make the most of the workpiece with the least amount of waste, take into account the thickness of the cut, so as not to spoil the workpiece. For this operation, there are a very large number of tools that allow you to make markings accurate and noticeable on wood.
Wood planing is mainly used for individual processing of the workpiece before further processing, for example, hewing a log or the edges of boards from the bark. The only tool for this work is an axe. True, for different jobs he has a different blade.
Next, the board is planed in order to remove the roughness after dusting. There are also tools for this - for planing along the fibers and across, for profile planing, for stripping scuffing, for selecting grooves, grooves and similar work.
In order to sample various grooves, nests and make spikes, an operation such as chiselling is performed.
If holes are needed in the workpiece, both blind and drilled through, a drilling operation is performed using a drill.
Turning is used to give the product round shape outside and inside.
Tools that are used for various types of wood processing
If you are into woodworking, you should have a woodworking tool kit. If you do not have such a set, but you decide to go into carpentry or other woodworking, you will have to buy such a woodworking tool in a set or, in experience, one tool according to your need.
Of course, if possible, you need to give preference to tools with an electric motor, it is clear that cutting with a manual jigsaw can discourage all interest in the work.
When choosing a tool, what you need to pay attention to first of all is the quality of the tool. The tool must inspire confidence and this applies to both manual and mechanized. It is advisable to choose the tool yourself, especially the one that you will use constantly. You need to hold it in your hand, appreciate the convenience. As for which tool to choose, manual or with an electric motor, it's up to you. If you use it often, definitely take an electric one, you can take a manual one if the work is episodic.
 Wood carpentry tool
 The very first tool that can be said about is an ax. Although it is not in the picture, but as mentioned above, this is a tool for primary processing. Both the carpenter and the carpenter should always have it available.
Next, choose a saw for cutting wood. If you will be doing the work manually, select hand saw or a hacksaw. You won't need a two-handed saw. When choosing, you need to pay attention to its teeth. The smaller the tooth, the better the quality of the cut, but the slower the speed. Here you choose, but it is desirable to have a set of several hacksaws, universal, with teeth for cross cutting and for longitudinal cutting.
For planing or cleaning the surface, as well as for bringing the workpiece to the final size, we cannot do without planers, which should also be several: for trimming and jointer with a single or double blade. They are made from metal or wood. The tree for the body can be birch, beech, pear, maple, hornbeam. The hornbeam is a very hard wood, it is used more for soles.
There are so many varieties of hand planers that they can hardly be used at home, although true amateurs may well collect them. So: a planer with a single blade, a planer with a double blade, a sherhebel for roughing, a jointer for final processing, a semi-joiner, a grinder, a scraper for scraping parquet, a humpback (for planing concave and convex surfaces), a zenzubel for sampling quarters, a falzgebel for processing samples , tongue and groove for grooving, grooving for their stripping, tsinubel for stripping under the cladding. You can get by with an electric planer with interchangeable nozzles, which, if desired, you can make yourself.
For gouging holes, recesses, especially in the manufacture of furniture, a chisel is used. For more precise processing, chisels or cutters are used, it is advisable to buy them in a set. They can also do wood carving.
 Nice set of wood chisels
 A set of good chisels is the pride of every master, they are carefully selected for work, they make sure that they do not lie in bulk, that the blades do not become dull.
 Using chisels at work
 It is hardly rational to buy tools such as woodcutters in an online store, only if you have already used the same set and want to expand it.
The miter box is used to cut the workpiece at an angle. It's just such a device with slots at different angles.
For work, you also need to have a workbench to clamp the workpiece and give it the correct position in space. It can be either purchased or self-made.
Well, a set of metalwork tools, such as pliers, round-nose pliers, clamps, scribers, carpenter's pencils.
Use of electric tools
If you use a sub-tree power tool, such as a miter saw, most models have a swivel function to cut at an angle. Then such a tool as a miter box will not be needed. The same can be said about the electric drill. Special fixture allows you to drill at the angle that is needed by design.
As already mentioned, the jigsaw makes the job much easier, especially if you need to cut a curved perimeter.
A circular saw for wood, depending on the power and, accordingly, on the diameter of the disc, can cut a fairly large thickness of workpieces.
We also choose an electric planer by power, size and additional parameters, depending on what kind of work you plan to perform.
Sanders work well for finishing, but the truth is, hand tools are better for furniture.
But a milling cutter for the manufacture of various products of complex shapes is simply necessary.
 Work with a manual router
 However, like a small lathe. It is very common to find a small lathe in the home workshop, such as the Jet JML-1014i lathe. There are other models, but this one is more or less good feedback and the country - holder of the trademark - Switzerland.
 Turning desktop machine Wood Jet JML-1014i
 If you are working on the manufacture of products of various rounded shapes, you will have to lathe buy a tool for wood turning. These are turning tools with different shape. Like cutters for hand cutting, each master selects turning cutters for himself, he will sharpen the cutter blade at his discretion, he can redo something. Usually cutters are divided into two types: Reyer for roughing and Meisel for finishing.
The remaining types of cutters are called shaped and their shape depends on what surface and how difficult they will process.
 Turning cutters for woodworking
 The tool for turning woodwork structurally consists of two parts: the working part, it is made of metal, and the handle, which is made of wood. The working part consists of a shank, a body (main part), a cutting part or a blade.
Woodworking tools cost a lot, so an online store to buy them, at least most of them, will be a good way out. Although some non-standard tools are better to buy in person.
And finally, I would like to show a photo of woodworking tools.

A set of forged chisels for gouging holes and grooves

Wood cutter set

Falzgebel planer for processing samples

Planer - cynubel

Rules for successful tree work
1. Take your time
Don't waste your time and nerves trying to salvage damaged parts if they are smaller than required, or if your equipment does not allow us to repeat our actions. You can avoid problems by carefully studying the list of materials for which blanks are cut with an allowance. If you want to use other fittings in the project, be prepared to make changes to the design of the product. In any case, if you plan to use the recommended fittings or replace them to your liking, purchase them before starting work on the project.
2. Prepare materials
If you need straight and flat parts (for example, for a frame or a shield), cut all the boards on one side, and then pass them through a thicknesser. The planer aligns and flattens one face of the board, and after processing on the planer, the opposite face becomes parallel to the first and also aligns. Before parts are made and assembled, calibrate all workpieces for thickness without changing the thicknesser settings.

3. Pick a texture pattern
Beginners usually don't care about the texture pattern and consider all boards to be of equal value, but the expert can better bring out the properties of each board. Choose boards with an interesting pattern for an attractive box lid or door panel. Set aside separate straight-layer boards for panel blanks and frame parts. Before gluing the shield, spend some time choosing the best combination of plots, in which the pattern of neighboring parts matches, and the joints become less noticeable.

4. Leave a small allowance in width
When sawing boards lengthwise into individual parts, leave an allowance of about 1 mm in width. To bring the width to the final, make one or two light passes on planer to remove sawing marks.

Before cutting seams or grooves for inserting plywood panels or other sheet materials, double check the thickness of the final sanded parts and make trial cuts on the offcuts. Do not trust factory labels and stamps too much - the actual thickness of the material may differ from the declared one.

6. Start with stops
In most projects, two or more parts of the same length or multiple parts of the same length need to be made. To be sure to achieve an exact match, use the simplest stops. In many cases, it is enough to clamp a piece of a bar or board with a clamp on a parallel or angular stop of a saw machine, miter saw or milling table as shown in the photo.

Do not postpone grinding and tinting of individual parts until the end of the assembly of the product. For example, it is better to sand the inner edges of the frame and the profile part of the panel in advance before proceeding with the assembly of the door. If you are going to tint the product, apply stain to the panel before assembly to prevent the appearance of unpainted stripes if the panel subsequently dries.

8. Check dry assembly
Avoid the daunting disappointment when, in the middle of a complex assembly process, two pieces don't fit together. Check each connection immediately after it is made. Then assemble the whole product, fixing the parts only with clamps. If this is inconvenient, then dry assemble and then glue the individual assemblies together and fit them to match for the final assembly.

If you and all joints are stained with squeezed out glue, then you are applying too much glue. Lubricate with a thin layer of glue only one of the parts of each connection. When applying the optimal amount of glue, it is only slightly squeezed out of the joint in the form of small droplets or a thin roller after compression with clamps. After about half an hour, when the glue begins to dry out, becoming rubbery, remove the excess with a paint scraper. Clean the scraper frequently with a paper towel to avoid smearing adhesive on the surface of the product.

10. Be patient
At a temperature of +20 °C, a joint glued with carpentry glue requires an hour of holding in a clamped state and another day to achieve maximum bonding strength. But if you are working in a cold garage, you should double the holding time in the clamps for every 10° below +20°C. Although modern glue can work at temperatures around +5 ° C, the temperature of the wood is more important than the air temperature. If the boards have been lying in the cold all night, do not expect them to quickly warm up to the optimum temperature using a heater.

Good afternoon. Today we start uploading articles on the topic of wood crafts with their own hands. In this first article, I want to show you some simple wood crafts for both kids and adults. Many ideas fit for school work- for boys. Some ideas will work for school competition crafts made from natural materials. Some wooden crafts can become decoration of your cottage or yard. Here you will find a storehouse of inspiration and joy from the anticipation of such an interesting and simple work. In this article I will prove - what to make beautiful wood crafts can anyone. Because here you will find simple and feasible tasks. Even a fragile woman with a manicure can do half of the crafts from this article. So - let's fall in love with wooden art.
Let's start with simple magic.
tree + sun
Crafts that glow with love.
Here are the simplest and cutest country crafts from wood. For crafts, you need a saw cut of a log (ask when you are sawing firewood with a grinder to make a few thin cuts). Or you can do it without sawing - just take a board of any size.
In a tree, we drill holes of such a thickness that a glass pebble bought in a store enters it. Such sets of multi-colored decorative glass stones are sold - in the gifts department, and in the department where candles, vases and everything for holiday decor.

You can drill such holes with glass just in the board - and hang it on the apple tree. You can drill such holes in the fence - if the sun at least once a day shines into it at a low angle.
That's very beautiful. Magically. Like in the land of fairies. Your kids will love this wood craft.

simple wooden crafts
from saw cut logs.
If you are sawing logs for firewood in your yard, you are in luck. You can get priceless craft material for free. Ask the men to cut flat cuts for you, both from small logs and large ones. Lovingly stack them away from the woodpile and start inventing future wood crafts. For example, let it be wooden owls. It's easy to make and looks beautiful. Saw cuts can be nailed to each other with nails. You can plant them on liquid nails (like glue).

The surface of the saw cuts can be rough, unskinned (as in the photo with the bunny craft). And you can sand it with sandpaper and even varnish such an ornamental material. Or paint in the color you want.

From large saw cuts, you can make large country crafts from wood. And small log cabins (from thinner branches and logs) are suitable for miniature crafts - for example, these birds. You can cut branches of this thickness yourself with a hacksaw - manually, without a chainsaw.

Log saw cuts can become a canvas for art installations. Such wooden crafts-pictures can be made from any natural material. Go to the river and find smooth flat pebbles. They will become a source of interesting crafts. The stones are easily painted with felt-tip pens, office bold markers or just gouache (after work, fix the gouache with hairspray or nail polish).

And here is another way to make beautiful AIR crafts from wooden cuts. Openwork through sawing with an electric jigsaw (photo with a maple leaf craft) looks simply magical.

Here is a small master class, from which you can see how the process of cutting openwork patterns on a thick saw cut of a tree takes place.
First, trace the stencil with a pencil. Then we drill holes in the key nodes of the picture with a drill. And then with a jigsaw we go from one holey node to another.

You can create your own device which will help you cut wood products using a conventional drill. Make an electric jigsaw with your own hands. Holding hands on comfortable handles, you simply move the device - following the lines of your drawing. The thinner the drill, the more small parts you can cut out a picture for them. Well thought out.

Or maybe buy a jigsaw It costs an average of $100. You can find it for 50, but we don’t work on an industrial scale, so it’s not necessary to buy a very powerful expensive tool.
Mosaic Crafts
From saw cuts of thick branches.
If you have a boring barn wall looking right at you in your country yard. That needs to be made boring. Let's make a shed positive with the help of wooden crafts. Let's do mosaic applique from small saw cuts. Such cuts are obtained by sawing thick branches or thin logs with a hacksaw (or chainsaw).
basis for such a wood craft, we cut it out of a sheet of plywood. First, draw on it the silhouette of the future crafts. We cut the plywood base with a manual jigsaw or a special power tool. And we stick wooden roundels on it - on liquid nails, on wood glue or on hot glue from a gun.


And even at home you can make saw cuts decorative wooden mirror frame(master class in the photo below).
- Also buy a round mirror. Put it on a sheet of plywood - circle it with a pencil.
- Around the resulting circle, retreat a few centimeters (to the width you want for the frame). And with this indent draw a second circle.
- Cut out a large circle from plywood. And paste over outer ring saw cuts from wood. It will turn out a beautiful wooden craft frame - it remains to glue a mirror into the middle on liquid nails.

PUFF CRAFTS
from wood.
This is probably my favorite kind of wood crafts. Here, the swollen shields lie on top of each other, creating a LAYER VOLUME of crafts.
Here is a cow craft made from three layers of wooden shield. The first layer is the body, the second is the head, the third is the bangs and nose.

You can paint all the layers of your craft the same color (as craft polar bear wood) or different colors(as a craft mouse on the moon- photo below).

Or you can leave the textured wood pattern (as in the crafts from the photo below).
wood fox It has a two-layer construction - the back layer, and the head and tail are laid on it.
craft duck has 5 layers - the central layer with the head, and two layers on both sides (tummy + wing).

The more layers you will impose on each other, the more voluminous and convex your craft will be. Here is an example with the craft "Lions made of wood" you can see how the muzzle of the beast moves forward, thanks to four layers of thick wooden board.

If you color your crafts. Draw facial expressions, add small details - folds, spots, and more. You can get very realistic and expensive wood crafts. Your little hobby can become your business. Such works can be safely put up for sale.

You can invent your own characters. Draw their layers on a sheet of paper. Enlarge the craft first in a paper template - transfer the contours to wooden shield and cut out. Or find pictures in a children's coloring book- and redraw them in an enlarged size.

Wooden craft
For school
At the lesson of labor.
Such Puff wood crafts can be cut NOT FROM THICK SHIELD, but made of thin plywood. And then such work can be carried out in labor classes as part of the school curriculum. On the topic "cutting with a jigsaw on plywood."
Here's an idea for you - how from 3 plywood boards make a two-color puppy craft. The first posterior layer of WHITE PLYWOOD peeks out only with the tips of the ears, tail and one hind leg. We will cover the second layer with a stain (so that it darkens). Eyes, nose and lines can be drawn with a marker, or burned out with a special wood burning device.

In the same technique of shields with different shades of color, you can make a lot of voluminous wood crafts at labor lessons at school or in a circle of wooden creativity.

wood crafts
as an APPLICATION.
In a very similar technique, you can make an appliqué out of wood. Here, too, wooden solid wood board(that is, not a glued shield, but a solid board). Because we will grind it, and the glued sanding shield can exfoliate and the glue seams will be visible.

- On paper the whole future craft is drawn. Divided by lines into details. Each detail is numbered. And it is photographed (so that later on the photo to check the location of each element).
- Next, the drawing is cut along the lines into elements. We trace each element on the board with a pencil. We cut out an element from a flat board. All elements are flat on top, rough on the edges of the cut and with sharp sawing edges.
- Now our task smooth all edges of each part, round. We grind the sharp edges of the cuts with a chisel. And we grind it on a grinding machine (if you have one) or do it by hand with sandpaper of varying degrees of hardness-roughness.
- After sanding all the details painted in tinted stain(sold in hardware stores). Depending on how many times you wipe the part with a stain, you will get a lighter or darker tone. Very light details can be wiped off simply vegetable oil. You can check in advance shades of color on the scraps of wood left after sawing the crafts.

You can also paint the details of wood crafts in watercolor or gouache(using not a brush, but a foam rubber sponge). After painting, so that the part does not get your hands dirty, you can sprinkle it with hairspray or impregnate the craft with another wood finish (only check what color it will be on the scraps beforehand).

It only seems that the cow (pictured in the woodwork above) is behind the moon. In fact, all the details are in the same plane. On a piece of paper. But thanks to the streamlined edges of the details, everything looks voluminous, soft and, as it were, PUSHED into each other. In fact, nothing is pressed in - everything just lies next to each other.
Ideas for such flat wood crafts can be taken inside children's coloring books. There are just pictures with large details. Children's coloring picture can be found in Google - enlarge and print. Or redraw directly from the monitor screen by placing a sheet of paper on the glowing screen.

Methods for grinding parts
for wood crafts
(instructions to help).
To make it easier to sand smooth edges of parts without rubbing calluses on my hands, I want to give some useful tips.
You can clamp the sanding belt in a special vise, also made of wood. Here's how it's done in the left photo below. Or come up with your own version of the device.

Here on the left photo - sandpaper wraps around a thick plank with a semicircular edge. And the edges of the sandpaper are wrapped in a groove, and clamped with a bolt twisted through a round cylindrical piece of wood-clamp.

There are also grinding nozzles for a drill. And then you can do the shlivovka parts using the rotational power of the drill and the magical power of electricity.
Below we see grinding attachments for drill- cymbal and drum shape.

There are drill grinders where you can change sandpaper - remove the old worn sandpaper and refill with a new one.

By the way, on Aliexpress you can immediately buy in bulk grinding drums for a drill for $ 3-4 for a batch of 100 pieces. If you look you can find it cheaper.

And so that the drill does not spin in your hand during operation, you can create a special FASTENING STRUCTURE, which will fix your homemade grinding machine in one place, and all you have to do is bring the parts to the grinding drum.

The design of the mounting tray can be different - with a wooden clamp (photo above), or with a lock in the form of a metal bracket (as in the photo below).

With such an assistant, making wood crafts with your own hands is a pleasure. Quickly pleasant and immediately beautiful results. Such work can be put on stream - and a whole production of beautiful wooden (smooth and safe) toys for children, gift wooden paintings can be set up.
You can become a successful master. Completely unexpected. It's as simple as looking at this article and falling in love with the idea.

The fantasy of wooden crafts is limitless. Remember the formula for success - everything can be made from wood. The main thing is to start ... then continue ... and finish.
For example, knocker toys. Beautiful fun for children and for decorating the cottage. Such a hammer or woodpecker can knock on your door, reporting guests on the porch. Like in a fairy tale - pull the rope, and the door will be opened for you.

You can make decorations for the children's room with your own hands. In fact, reincarnate and become a designer of interesting interior wood crafts. Any boy will be happy if his children's room sparkles with motives from the Jungle.

You know ... I'll probably continue the theme of wooden crafts for design children's room in one of the following articles. I would like to see what ideas are hidden here. And falling in love with someone is a good thing.
And perhaps it is also necessary to create an article with handmade wooden toys for children. You also need to write. And then it will work here link.
And while we continue...
Crafts FROM WOOD
and WASTE material.
Where do future crafts live? …. Old decayed boards. For example, from the grandmother's fence. Which usually go for firewood or are taken out of the yard as excess garbage. Stop. Let's not throw them away. Let's dig through this pile and create something wonderful - with our own hands from wood.
A wooden mop-brush, if cut in half, turns into the mouth of an evil dog. A little imagination and work. And now the service dog bristles and grins at you.
Gorgeous piece of art. tree and waste material.

Any junk material (pieces of iron, plastic) and old pieces of wood can populate your house with fairy-tale characters. They are alive. They have a soul and their own history.


wood crafts
Imperishable beauty.
Peeled veneer , from old furniture panels, quietly damp in your shed - can also become a source for handicrafts, applications made of wood.
Of this thin wood material you can cut out the details of the future crafts directly with scissors and stick them on hot glue from a gun (or on wood glue).


And instead of veneer, you can use thin birch bark. And also make interesting flat wood crafts.

wood crafts
(logs, firewood and bark)
Ordinary firewood from your woodpile can be a source of inspiration for wooden crafts for the country.
If a round log is cut obliquely, then you get a figure with a face turned towards you. It remains only to draw this face, add elements of eyes, ears, nose to it.

You can fold the body of an animal from logs and round blocks. The logs will be the legs and the logs will be the back. The head can be made from a round cut of a small log. Or chop off with an ax muzzle to the desired shape from the same log as the body of your four-legged wood craft.

Show your imagination, do not stop before a difficult task. A squirrel made of wood or a snail made of logs - there is nothing complicated. We turn on the head and sense of humor - it will tell you the most ridiculous, but effective ways convey the gentle image of the animal using rough wood and other natural material.

YOU can work with a chainsaw or an ax - sawing or cutting off the face of your wood craft. You can make such cute pigs with your own hands as fun craft from a tree to the country.

And in the bushes you can put a beautiful proud deer - also a simple and quick craft made of wood and branches.

wooden crafts
from chips from a log.
It happens that when you chop wood, curly large chips break off from the log. This chip often has a bizarre shape - already similar to something (a bird, a panther, a face profile). It is necessary to carefully put such a gift of fate aside, in order to return to it later and complete the craft begun by nature. Cut something with a knife, highlight something with paint, glue something as an additional detail. And you get a craft made of wood with your own hands - beautiful and original.


These are the ideas I managed to find for the masters of wooden art.
Now you can also make beautiful wood crafts with your own hands. Moreover, this article is only the first of a cycle on the topic of wooden crafts which are clear and easy to make at home. You have probably already fallen in love with some ideas and are determined to implement them - I keep my fingers crossed for you - let everything work out in the best way. And your whole family bunch will love your wood craft.


