How to raise a hinged garage door. How to repair garage doors and insulate them with your own hands. Insulation of garage doors
The safety of your property depends on reliability and durability garage doors... Besides the protective function they perform, they can also serve as an attractive addition to your home.
What if for some reason you cannot open the gate? For normal operation, it is enough to raise them. The question arises, how to raise the garage door? The answer is very simple: just follow some guidelines and you will succeed.
The design can be easily done by hand. In terms of quality, it will not differ from the one installed by experts. In this case, it is imperative to perform step by step recommendations installation of the gate and be extremely careful. Plus, installing a garage door won't take long.
Consider the positive aspects, without which the gate will be simply unnecessary.
A good gate is the safety of your property
- The car must easily enter the premises.
The dimensions of the gate must ensure a normal ride. It all depends on your car model. The width of the opening should be such that when the car stops, a gap of about 30 cm remains in it. The height for a passenger car should be from 1.70 to 2 meters, for a truck - 2.5 meters.
- The gate must be strong and burglar resistant.
The gate should protect your property. The protective functions depend on the material from which the structure will be made. Metal - the most reliable and durable. Galvanized steel sheet 2.5 mm wide will perfectly cope with this task. With the help of overhead locks for the outer pads and armored pads for the inner lock, you can additionally strengthen the structure. Wooden doors not very reliable, so they can only be installed in guarded parking lots.
- The gate must be resistant to external factors.
The tighter the web is against the frame, the more reliable the protection. Use vertical latches to lock the door in position. Vertical locks prevent the structure from skewing and also hold the door securely. You can use a seal to further adhere the structure to the frame.
Types of garage doors
There are these types of gates.
Consists of two doors that can be unlocked inward or outward. Mainly preference for the latter. For the normal functioning of the structure, the presence of space in front of it is very important. This is the cheapest type of mechanism.
They open along the fence, from the inside. The main advantage is that there is no need for additional territory in front of the device.
They include separate sections that are refracted when opened, and thanks to a special system of springs and profiles, the canvas goes up, under the ceiling. This type of gate also saves space.
The canvas contains polymer coated aluminum plates. When opened, it folds into a special box above the garage entrance.

In this type of device there is a vertical rise of the canvas to the ceiling.
Steps for installing a garage door
First of all, take your measurements to understand the size of the future gate. As a rule, they make swing metal garage doors with their own hands. This type is simpler and cheaper. Sliding gates will be more difficult and expensive to make, but it is also possible. You need to take a drawing, buy a ready-made system kit for assembly. The kit includes installation instructions, with which the installation of the structure is done. As a rule, they are installed in dachas, in private households, warehouses.
You can also reduce costs by installing the automation yourself. Take a drawing, buy the necessary components and follow the instructions.
You can make swing gates without buying expensive components. The materials used are a profile, sheet metal 1-3 mm, steel corner.
You can install a garage door in a few steps:
Step # 1. Frame making
The frame includes an external and an internal frame made of a steel corner, the dimensions of which are 65x65 mm. You will need the following tools:
- Bulgarian;
- Construction level;
- Square;
- Welding machine;
- Roulette.
We focus on the height and width of the gate when making the frame. Measure and cut the blanks for the frame from an iron corner with a cross section of 16-20 cm. Form the future frame strictly according to the level, using shims. Then set the corners with a square. Check that the diagonals of the structure are the same, and then weld it.
In order for the canvas to fit snugly to the surface of the frame, its outer side must be flat. Sand the welds. Make a lever from the remnants of the corner, which then weld to the corners of the frame, which will further strengthen them.
Step # 2 Making the frame
It is necessary to make a frame for two swing leaves. Attached to each of them iron sheet... Use a 60x20 mm profile to make the frame.
Insert the guides into the frame, align each side. Make a gap of 20 mm between them so that the flaps move freely. Check the right angles of the frame, then weld the profiles. Your wireframe is ready.
Step # 3 Sheathing
For welding the doors, use a galvanized metal sheet with a thickness of 2-3 mm. It is necessary to cut out the required size, while it is imperative to superimpose the sashes on each other by 10-20 mm. Thus, the right canvas will overlap with the left.
We weld from below and attach it to the frame.
Strengthening the gate is possible by strengthening: weld on a horizontal iron belt at a height of one meter.
Step # 4 Installation
Install power hinges on the garage door. The lower part must be welded to the garage frame, and the upper to the outside. To do this, attach a curved metal line 0.5-0.7 cm thick to the top of the hinge and the sash. For a stronger connection, you can use a reinforcement insert.
A bolt is required to securely fix the position of the mechanism. For this, a vertical pin design can be used. Drill holes in the ceiling and floor. Weld the guide loops to the frame. Use a pipe with a diameter of 20-25 mm for the pin.
You can also use the clamping method of the bolt structure.
Step # 5 Painting
Be sure to paint the canvas: this will protect it from adverse effects such as precipitation, moisture, damage. Prime before painting, apply several coats of metal paint to the surface.
Step # 6 Installation
First of all, install the frame. It should facilitate the free movement of the flaps.
Installing the gate is easy. First, attach the outer and inner parts of the frame to the slopes of the opening using iron pins 15-18 cm long. Weld their protruding ends, then grind them with a grinder and paint over.

Firmly fasten these parts together with metal bridges 20-40 mm thick every 60 cm. This is done so that there is no need to repair the structure in the near future. Next, hang the flaps on the hinges and check how easily they move.
There are times when during operation it is necessary to correct the operation of the gate, since for some reason they do not function well.
Cases in which it is necessary to raise the garage door and how to do it
Raising the gate while maintaining the level
The most common case is when, due to the too low location of the gate, it is very difficult to open them, and sometimes it is not at all possible. If such a problem arises in the summer, what can we say about winter, when snow and ice interfere with their normal operation. Alternatively, you can cut the gates, and concrete the entrance to the garage. This will create a slope and the water will flow down. But if you work by this method, then the size of the opening decreases.
In order to raise the garage door, you need the following materials: channel, brick, water and gates. You can get to work.
Stages of work:
- Remove the doors;
- Free the frame;
- Remove several rows of bricks in front of the opening;
- Raise the gate;
- At the bottom, lift the dump;
- Put the gate back in its original place.
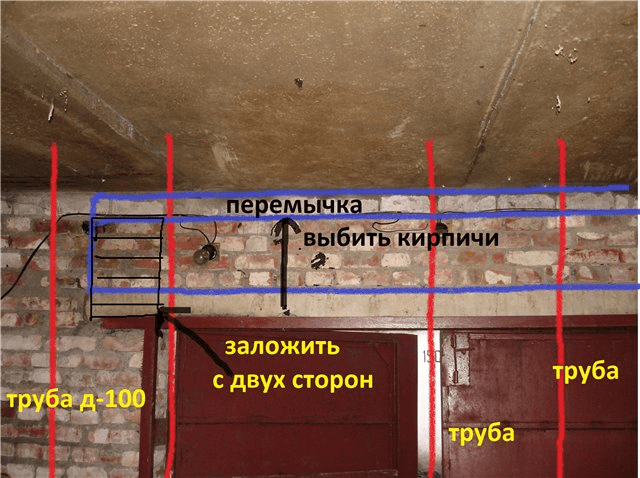
Before starting to dismantle the gate to a level higher than 3-4 brick rows, wash the solution between the bricks with water. Place a corner or channel in its place. This is done before opening the garage door to prevent the building from collapsing. Otherwise, the roof of the garage will move down. Secure the channel or corner with anchor bolts.
Garage height problem
Sometimes the height of the gate can be a problem with the normal functioning of the gate. Its solution will require experience and knowledge of the construction business. If your garage is brick, you need to remove 1 or 2 rows of masonry, then strengthen the resulting slope and raise the frame to the desired height.
There are many ways to solve the problem of poor gate performance. You can choose the best option solutions to the problem. At the same time, the most common and easy way to increase the space between the gate and the ground is to cut the bottom of the door leaves with a grinder.
DIY garage doors. From quality materials and from exact step by step installation will depend on how long the garage door will function.
Due to the design features of the sash, under a hundred pounds of weight, in the open state from their own gravity and gusts of wind, they sag and bend so that it is almost impossible to close the garage door on a hooked and deformed frame, without straightening with our own hands. We have to raise the gate, remove and align the hinges.
Major problem with garage doors
Old structures of garage doors made of five-millimeter sheet metal are capable of withstanding a huge load, while the heavy structure was hung on a frame made of a T-beam up to 20 cm wide.It had to be lifted or repaired no more than once every 20 years, and mainly due to wear of the hinges.
It is almost impossible to lift the garage door or even simply remove it from the hinges yourself, without the help of neighbors, therefore such work was always carried out by a team of at least three to four people. Modern garage doors have to be lifted and removed almost every couple of years, mainly due to thin metal or illiterate garage design:
- The foundation of the garage under the threshold beam sagged along with the wall, respectively, it became impossible to open the doors, the lower edge simply clings to the blind area;
- The gate hinges are deformed or worn out, the sash tilts appear;
- The dimensions of the garage doorway do not allow parking cars with high ground clearance or a high cab, for example, a Gazelle or VWT4, at worst, a UAZ Patriot.
Important! In most cases, in order to level or correct a defect, you have to raise the garage door and remove it from its hinges.
In-line gate repair
In repair, two operations should be distinguished, completely different in terms of labor intensity and complexity of execution:
- Raise one or both leaves, without dismantling the frame, racks or body on which the garage door is fixed;
- Overhaul or replacement of the frame, in this case it is necessary to disassemble the masonry and raise or remove the welded frame structure on which the sashes are hung.
Advice! If you do not have the skill of welding, it is better to entrust any replacement of the frame or sashes to specialists.
How to raise a garage door
The simplest and most affordable procedure, if you have the skill, you can try to lift even a very heavy sash alone. For example, if the wear of the friction surface of the hinges has reached its limit, and the garage doors begin to cling to the upper edge of the blind area, it is necessary to insert repair washers. At the same time, note that it will be correct to install two thin steel washers made of hardened polished steel. The total thickness of the washers should be such as to increase the height of the garage door leaf above the threshold beam. Each washer has a cutout for the width of the pivot axis of the hinge and is lubricated on one side only.

In this case, there is no need to even lift and remove the garage door, it is enough just to raise them to a height of several millimeters in order to insert a pair of steel washers into the resulting gap in the hinges. To raise the gate leaves, it is necessary to turn them out at an angle of more than 90 °, then install a wooden or steel wedge under the lower edge of the gate, as close as possible to the axis of rotation. A few blows to the wedge will help to raise the gate by 2-3 mm. Then you can insert a rolling jack, raise the sash to any height and even remove it if necessary. If the loops are completely out of order, you have to lift and digest.
In the same way, repairs are carried out if, due to deformation of the hinges or the frame of the garage doors, sagging of the doors occurs. In this case, a jack is placed under the edge of the sash, as far as possible from the axis of rotation, and a jack is slowly raised, upsetting the place of deformation of the loop or frame with a sledgehammer. If the sash has a wicket door, it must be fixed with bolts or a tie, but not removed. Most often, in 5-6 transitions it is possible to align the gate, if not, you need to raise it to the maximum height, install the jack in a horizontal position with an emphasis on the opposite frame post and "squeeze out the geometry" of the frame until the beams and hinges are completely aligned.
Raising the garage door frame
The most difficult and time-consuming garage door repair operation is lifting the frame. The heavy steel structure is concreted into the brick sidewalls, therefore, before lifting the structure, you must make room for lifting and remove the gate leaves.
If the frame, along with the doors, is planned to be raised above the ground level due to the subsidence of the garage foundation, before raising the gate, you will need to knock out the upper part of the masonry into a brick or two, depending on the lift height. With a perforator or a construction hammer and chisel, they knock out the cement from under the side racks of the frame and the threshold beam.
With an ordinary crowbar, they pry the lower part of the frame and raise it to a small height, first in the center, and after installing the first wedge, they similarly try to lift it from the left and right edges. If the frame is lifted, the side wedges are hammered in. They are usually placed on the opposite side of the threshold beam. After increasing the gap to 5-6 cm, it is necessary to install a rolling jack up to 5 tons, and then raise the structure using a hydraulic mechanism.
Raise the upper frame beam in the same way. Most often, it is necessary to raise it in case it is necessary to increase the height of the garage door without dismantling it. After knocking out the upper rows of bricks with a grinder, a piece of vertical racks is cut off from both sides along with the upper horizontal part of the frame. The cut is made above the welding points of the loops.

The weight of the cut-off part of the frame is no more than 70 kg, so it is easy to lift it with a conventional jack installed on the threshold. A log or bar is inserted between the top bar and the jack and carefully raised to the desired height. After that, cut pieces from a similar material are welded into the gap formed in the frame.
Conclusion
Lifting a heavy frame must comply with safety regulations. Often, when trying to raise the frame, a heavy structure heeled and overturned on workers, so experts recommend installing spacers and blocking cable ties.
It is worth noting that the need to raise a garage door can have several reasons. For example, the need to raise the garage door may be required in a situation where the garage door structure is not easy to open not only in winter but even in summer. What can we say about winter periodwhen a layer of snow and ice prevents the gate from opening? If necessary, you can trim the structure itself. In this case, the entrance is concreted. This ensures a natural slope. But at the same time, the above method of raising the entrance gate reduces the dimensions of the structure.
Below we will consider the situation when it is required to maintain the existing level of the garage and slightly raise the gate. In this case, everything is done in stages. To begin with, experts advise dismantling the gate and freeing the frame. Then you need to remove several rows of bricks above the garage opening. At the same time, the filling in the lower area can also be lifted. Further, the structure of the garage door must be returned to its original position.
Before removing the garage door from the hinges, experts recommend washing the mortar between the bricks of the very row to which the gate will rise. A channel should be installed in place of this ryazh. An alternative option is to install a reliable and high-strength corner. This operation is carried out directly until the moment of raising the garage door. In addition, this approach will save the structure from possible destruction. The installation of a channel or angle must be carried out using reliable anchor bolts.
At the same time, do not forget that raising the garage door even by a couple of bricks can significantly increase the available clearance between the doors, as well as the garage floor. In this case, you can use one of several methods to fix this problem. Concreting is the most optimal. In addition, if necessary, you can carry out the installation of a special nut. Whichever option you choose, it is worth making sure that the slope is directed from the garage to the street, and not vice versa. Otherwise, do not be surprised that water flows into the garage during rain, causing dampness. And dampness, as any motorist well knows, causes corrosion of the car body. And the dampness itself is also very harmful to the garage. Considering all of the above, we can conclude that it is not so difficult to lift the garage door on your own as it seems at first glance. All stages can be done independently, that is, with your own hands.
There is a proverb "I passed the material, I passed everything." And yet, some garage "experts" like to assure that they made a "hard gate".
Competent engineers are aware of the simple truth - "there are no rigid metal structures", and a shipbuilding engineer, hearing about the strength of materials, will grin and say that “The strength of materials is special case Structural mechanics in which movement is not taken into account. This is us to the question of why it is sometimes necessary to raise the garage door. Now a little more detail on how to do this.
The main reasons for changing the geometry of the gate, or opening
General metal fatigue, subsidence of hinges, natural deformations after installation, subsidence of the opening (the frame in which the gate is mounted) for various reasons, some other factors (for example, in hot, cloudless weather a couple of years ago there were problems of thermal deformations of metal structures).
External reasons that do not depend on the material part. We bought a higher car - it doesn't fit, we made a mistake in the lower gap - in winter the gate is extremely difficult to open, one of the garage walls sagged more, which caused a skewed opening, and others, which are sometimes difficult to foresee.
In each of these cases, the decision is made individually, but we will consider several simple methods that are available if you have a simple tool with an assistant.
Ways to raise (correct geometry) the gate
- Sagging of the hinges, (the gate is deformed, or something else). A spacer washer can be used to lift (eg one leaf). We remove the sash from the hinges, put on a washer of the required thickness on the axis of the lower hinge, return the sash to its place. Sometimes it is difficult to pick up the washer, then we put a ball of a suitable diameter in the loop, where the hole is.
This method allows you to correct slight distortions of the doors, slightly raise the gate, and facilitate movement on the hinge. Very important! The washer and ball must be made of a harder alloy than the hinge itself!
- The need to change the distance from ground level to the bottom of the flaps.
The easiest way is to cut off the bottom with a grinder, and then fasten the rubber strip to eliminate the gap. Applicable if the sheathing sheet extends beyond the lower frame beams. If the gate is mounted so that the lower beam is at ground level, you will first need to cut the beam, then the metal, weld the beam into place.
By the way, in our practice there are constructions where the lower part (about 10 cm) is mounted on hinges, and when the gate is opened, it can be folded back.
- Skewed sashes due to deformation of the opening.
If you do not touch the opening, then the easiest way to determine the skew zone (as a rule, the sashes do not close at the top or bottom), on the sash that does not give the bow we cut the horizontal beam, cut a few mm. With effort (you may need a jack), we press the vertical beam of the frame - we weld. Deformations of the sheet metal will be invisible up to gaps of 7-12 mm.
We must weld the place of welding with an additional metal strip, since residual deformations will occur here! If this place is not strengthened, the weld will simply rupture over time.
- The need to increase the opening height. The most difficult case, which will require time, the ability to lay bricks, additional equipment. How to do this can be found on construction sites. We'll look at a situation where the problem was solved more easily.
An example of a simple solution in a difficult situation
So, new car did not fit within the dimensions of the upper part of the garage opening. 6-7 cm in width of the car itself, 14 cm on the right - on the left, in the places where roof rails are installed (by the way, one of the most common reasons when you need to raise the gate in height!).
Some garage craftsmen immediately advised disassembling the upper part of the opening, (reducing the number of rows of bricks is a generally accepted approach), re-welding the frame, thus increasing the opening height. In fact, it is very difficult to raise the entire upper part by 14 cm (2.5 rows of bricks), but this was not required. How the problem was resolved.
- In the garage floor (concrete, as well as a drive with a slope of about 2 meters long), grooves were hollowed out with a width of 2 - 2.5 tires each, with a depth of 10 cm. ... The bottom of the track was covered with corrugated metal fixed to the floor.
- Taking another car as an example (garage cooperatives are good because there is always almost the same car - in this case, without roof rails). Take into account the difference in tire height. We determined the gap between the roof of the car and the upper frame in the maximum unloaded state - 7 cm.
- On the left and on the right, at the top of the opening, a 60 cm channel was cut out (the middle part was supported with beams, just in case). They knocked out several bricks, and scalded the resulting U-shaped slots with a channel, which was fixed into the brick.
- We checked the calm check-in and check-out on the right car, making sure that everything was done correctly.
- After that, it was necessary to slightly raise the necessary sheets, since the gates ceased to close these holes, which was done on site, after the sash had already been put in place.
The work was completed on this. They took three days, they needed the help of a neighbor in the garages, they did not have to struggle with the task of how to raise the entire upper part of the frame (at the same time increasing the gate).
We hope that when you are faced with a similar problem, this article will help you be smart, use simple solutions, and not try to solve the problem head-on, as experts from the Internet advise.
Source: http://VorotaGate.ru/garazhnye-vorota/kak-podnyat
DIY garage doors: how to make from a profile and how to raise a structure in a brick garage
Today there are a huge number of garage door designs. They differ in structural elements, as well as in the quality of filling. Someone prefers primitive models, and someone equips their storage for a car with more powerful systems.
Making a garage door with your own hands is a great option for those who want to equip such a structure with a durable gate that is most suitable in size and filling.
What types of garage doors are there and is it possible to design them on your own without resorting to the help of professionals and not having experience in this matter?
Types of garage doors
There are several types of garage doors, most of which appeared not so long ago.
And before figuring out how to make a garage door with your own hands, consider the types of similar products:
Swing gates
Swinging garage doors.
The most ancient and at the same time reliable version of the gate. Such structures are installed everywhere: they can be used not only for equipping garages, they have earned the trust of many years of trouble-free practice, even in conditions of tough operation.
The design of these samples consists of 2 leaves, hinged in the frame. The sashes, if everything is assembled correctly, close tightly, without forming gaps between the frame. The mechanism of operation of swing gates is simple, but, as practice shows, it is very reliable.
Recoil type
The gate was first used at the beginning of the 20th century. By design, it is one sash that moves to the side parallel to the front wall. There are designs consisting of two leaves. In this case, the flaps will move apart on different sides.
May also be sliding gatesfolding into several sections. A feature of the device of such models is the mandatory presence free space to move the flaps. Therefore, such structures are most often used to equip hangars and industrial premises.
Lifting and turning mechanisms
Overhead gate design.
Their development and production in our country began to be engaged not so long ago. By design, it is one canvas that rises upward. The option is suitable for equipping a garage and arranging an entrance to a private plot.
Overhead sectional doors
Like the previous version, the models have appeared on our market relatively recently. They represent a panel, assembled from sections, which are refracted and moved up along the guides when the command to open the gate is given by the remote control or by the button.
The mechanism works due to the spring available in it and guides with a chain drive. One of the biggest benefits is space savings.
Roller shutter doors
Garage rooms are rarely equipped with such structures, due to their low reliability. Externally - aluminum plates, folding into a special box under the ceiling. Objects with security and access system are most often equipped with similar structures.
When choosing a garage door, it is important to take into account not only them appearance, functionality and feedback from advertisers, but also other, more important indicators: strength, durability and the ability to work in specific climatic conditions.
As mentioned earlier, swing-type gates will become the most reliable and durable option: they work even in any frost and are able to protect the room not only from frost, but also from burglary, if equipped with a solid locking system.
Do-it-yourself gate: features of the work
Based on the fact that swing gates are most often used to equip garages, we will consider, by way of example, how to make a simple, but very robust design do it yourself.
Features of welding garage doors.
Having bought everything necessary consumables and having prepared some tools, you can make a swing garage door on your own from start to finish.
For their device, the following materials will be required:
- steel corners;
- profiles;
- metal sheets.
The dimensions of the gates and their features can be designed in advance, which makes it possible to make a structure that is most suitable for the parameters of the building and the aesthetic preferences of its owner.
You can try to make a lift-and-turn type gates on your own, but the work requires considerable engineering experience and knowledge. In this case, it is important to understand how the counterweight system is organized and the mechanism itself is installed so that the system works flawlessly.
Most often, structures of this type are purchased ready-made, and their installation is carried out in accordance with the instructions attached to the product.
Therefore, if you want to equip your garage with just such a system, then it is advisable to purchase a finished product.
Now let's take a closer look at the specifics of manufacturing swing garage doors.
Garage door design
Drawing of a gate with a door for the garage.
As with the organization of any construction business that requires high precision, before proceeding with the manufacture of garage doors, it is necessary to make a draft of the future structure.
It is not difficult to make a drawing of a garage door on your own, it is enough to sketch a sketch on a regular sheet of paper, measure all the important elements and indicate the location of the hinge joints, the entrance, if it is supposed to be a project, and the lock system.
First, you should choose the right height and width of the structure. The minimum width of the flaps is considered, at which the distance from the car body on both sides to the frame remained at least 30 cm. Of course, the larger this gap, the easier and more convenient it is to drive a car into the garage.
In practice, the maximum frame width is 5 meters. Most often, the gate is made 2.5-3 meters wide.
The height of the products is selected depending on the dimensions of the vehicle. Most often it is 2-2.2 meters. If a minibus is stored in the garage, then it is better to expand this parameter to 2.5 meters.
In our case, the structure will consist of a frame and a pair of sashes fixed to it by means of hinges. Guided by the project and the dimensions indicated on it, we calculate and purchase the required number of consumables.
Gate frame manufacturing
It is best to start making the frame at the stage of building the walls of the garage structure. This will allow the gate to be fixed in the body of the building, which will make the whole structure more reliable and durable.
In the process of laying the front wall, when up to 0.5 m of masonry is ready, construction works are suspended and retrained for the installation of the door frame, after which you can continue to erect the walls.
To make a frame, you will need steel corners of 65 mm, strips 2-3 cm wide, 3-4 mm thick and a reinforcing bar, with which the frame will be fixed in the opening of the structure. As for the tools, the work requires a grinder, a square, a building level, a tape measure and a welding machine.
The garage frame in our case consists of an outer and an inner part.
The manufacturing algorithm for this structural element is as follows:
- We cut the corner with a grinder into 4 segments with a length equal to the width of the gate opening.
You will also need 4 more segments with a length equal to the height of the doorway. - We place the cut parts of the corner on a flat surface, having checked it in advance with a building level for skewing, which is unacceptable at this stage of the construction process.
We measure all the angles - they should be equal to 90 ° and using a welding machine we weld them together. As a result, you should get an even frame. The corners are welded either overlapping, or by cutting off their edges and butt-to-butt welding. The first option, in comparison with the second, is more durable. - From the outside of the frame, carefully remove all welding flaws using a grinder.
Otherwise, the protruding seams will prevent the flaps from fitting snugly against the frame.
Sash frame manufacturing
Then we move on to making the frame of the gate leaves. It should be slightly smaller in terms of the dimensions of the garage door frame itself, which will ensure its easier entry into the opening. Compliance with this condition contributes to a tighter fit of the sashes to the outer side of the frame.
The algorithm for manufacturing the frame part of the shutters consists in performing the following actions:
- First of all, it is necessary to cut off 4 pieces from the corner or profile along the length, less than the height of the frame by 1-1.5 cm.
Thanks to this gap, the sashes will easily enter the opening. Since this design assumes the presence of two sashes, then 4 more horizontal segments are required, with a length equal to the width of the main frame, divided in half and minus 3-3.5 cm. - We place the cut parts of the corner on a flat surface, check them for skew, measure the corners and weld.
It is better if this process is carried out together with the already welded frame - so all the flaws and inaccuracies will be visible. - In order to strengthen the structure, we weld on a horizontal bar, which acts as a spacer and reduces the risk of slip and distortion of the future structure.
Manufacturing of gate leaves
Sashes are usually made from sheet material... The most practical and reliable is a sheet with a thickness of at least 2 mm.
Stiffening ribs for garage doors.
The process of creating gate leaves is as follows:
- First of all, it is necessary to cut 2 canvases from sheet metal: one is 30-40 mm higher in height than the height of the garage opening and is less than 10-20 mm in width of the frame width, the other is the same in height, and 20 mm in width more than the frame.
- The next step is to weld the panels to the frame in such a way that the panels protrude 10-20 mm from the top and bottom of the frame.
One of the flaps, which will open in the second turn, in width should not fit tightly onto the edge of the frame, leaving 10 mm free edge. Thanks to this, a tighter fit of the second section will be provided. On the contrary, we weld the sheet of the second sash in such a way that it protrudes beyond the frame part by 20-40 mm. - Then we proceed to welding the reinforced hinges.
The lower half is welded to the main frame, and the upper half is welded to the sashes. In order to strengthen the fastening, the hinges can be supplemented with a welded metal insert. We take a strip 5-7 mm thick, bend it and weld it to the upper half of the hinges and to the sash. The reinforcement insert is welded from the inside.
Advice! During the welding of sheet material, it can be driven. In order to avoid skewing of the sashes, first of all, the corners and the middle of the canvases are seized by welding, after which the entire sheet is seized with point movements with a step of 10-15 cm.
If all structural elements are on a flat surface, the flaps are located on top of the frame, it is possible to consider whether everything is welded correctly and where there are any flaws. This makes it possible to take timely measures to eliminate inaccuracies.
If the structure is made with high quality, then after these works we proceed to the installation of the gate in the garage opening.
Gate installation
First of all, the door frames should be installed: internal and external. Recall that the frame part is installed at the stage of erecting the front wall of the garage itself. Do not forget to check the evenness of the position of the frame using a square and a building level.
After that, you can continue laying out the frontal wall of the structure, wiring the rods into the masonry.
Having reached the top of the structure, a floor beam should be installed on the frame. It can be metal or concrete - at the discretion of the developer. It remains only to hang the leaves on the hinges and check the operability of the entire gate mechanism: how the leaves open / close, whether nothing interferes with their movement.
Insulation and installation of constipations, locks
Similar designs can be insulated different material, ranging from foam and ending with mineral wool.
But recently, extruded polystyrene foam has been increasingly used for such purposes. It is fixed by laying lining or other facing material: it is enough to spread the insulation inside the sashes and stuff on top, for example, sheets of plywood.
It remains only to choose a locking system. Garage structures are most often equipped with a locking and locking system: one sash is locked from the inside with a lock, the other - from the outside with a lock, hinged or internal. If it is a padlock, then it is necessary to equip the sash from the outside with rings.
Outcome
If you adhere to the tips described above, carefully check the correctness of the dimensions, then it is quite possible to get a strong, reliable garage door that will serve you faithfully for a long time. The design makes it possible to insulate the gate by laying foam plastic from the inside and making a sheathing.
Making garage doors with your own hands takes about 2 days. In this case, the product will have a unique size and design, if there is a desire to make something special. Good luck!
Source: https://vseprogarazh.ru/etapy/vorota/garazhnye-vorota-svoimi-rukami/
How to increase the height of the garage door: a step-by-step master class - Mastremont.ru
Often, the height of the gate of an already finished garage does not suit the owner. Perhaps the person decided to buy a new car, say, an SUV, which is higher than usual. passenger cars, or it became necessary to use the garage for other purposes, when you need to drive a small truck inside, for example, a Gazelle.
But the gates for a private garage were previously created using a certain amount of metal in order to save money - the calculation of the amount of materials used was made taking into account the size of a standard steel sheet with a thickness of 2-3 mm (photo 1).
Photo 1. Standard garage doors
Today, the height of the garage doors of other owners has ceased to suit, and many have begun to increase this size (photo 2).
Photo 2. The height of the front wall allows the gate to be extended
Purchase of materials and choice of tools
Of course, you can invite specialists who will do it quickly and efficiently. However, not everyone has sufficient funds to pay the wage earners and buy the materials they use. Craftsmen often demand the purchase of new metal, which is much more expensive than the used one.
In turn, the owner of the garage can find the necessary metal rolling in an organization that collects scrap metal. The material selected from scrap can cost 2-3 times less than you have to pay for new rolled metal. At the same time, the strength of metal structures made of old metal is quite enough to ensure the strength of the finished product.
But it is not recommended to save on tools and equipment. Need to prepare workplacehaving established the required height strong scaffolding - when performing work, a person must be in a stable position, which will exclude him from falling with a working tool and getting injured.
A hammer drill and an angle grinder must be powerful, and equipment such as drills and cut-off wheels must be of good quality, which will determine the speed of work and the safety of the worker.
For example, for a cut brick wall it is recommended to use special diamond cut-off wheels. For welding, it is enough to use a small inverter welding machine, working from a regular 220V network and welding metal with electrodes with a diameter of 3-4 mm.
I would like to add that such a job should be undertaken by a person who has at least a little understanding of how to use specialized equipment and has little practical skills in using such tools.
Tools and equipment
- Construction scaffolding;
- Powerful angle grinder;
- Hammer drill or powerful drill;
- Plumb line;
- Construction level;
- Inverter welding machine;
- Welding mask (it is recommended to choose a “Chameleon” type mask);
- Welding gloves and preferably a welding suit;
- Two cutting wheels for metal;
- Cut-off wheels for concrete, one of which has a maximum diameter (photos 3 and 4);
- Drill for metal d \u003d 8.5 mm;
- Concrete drill d \u003d 8 mm;
- MP3 electrodes with a diameter of 3 mm, although you can work with 4 mm electrodes;
- Hammer;
- Bit;
- Open-end / ring spanner 13 for anchor bolts;
- Plastic film to protect the garage from dust;
- Respiratory protection respirator;
- Special goggles that protect the eyes from dust and small stones formed when making channels under the new gate frame;
- Clothing that maximally protects areas of the body from dust.
Photo 3. A set of cutting wheels for concrete
Photo 4. Cutting wheel for concrete of maximum diameter
Materials
- Corner with a shelf width of 40-75 mm for extending the door frame (focus on the corner from which the frame is already made);
- Corner with shelf width 30-35 mm for the door frame;
- Trimming sheet with a thickness of 2-2.5 mm
The number of rolled metal and sheet dimensions are calculated based on the area by which the gate will increase.
Procedure for building a gate
Scaffolding is being installed firmly and stably.
The outline of the new garage door frame is outlined.
Inside the garage, a plastic film is fixed in such a way as to exclude the dust generated during operation from entering the room.
A corner is cut, prepared for building up the door frame, with a mark of each segment about its location in the structure.
Cut in progress brickwork garage walls along the contour of the new door frame, first outside the garage. It is better to make a horizontal cut of the wall along the seam located between the bricks (photo 5), which will facilitate the smooth laying of the channel and the further removal of excess masonry.
Photo 5. Sawing through the masonry seam
The vertical cut is made along the outlined contour (photo 6) with the maximum deepening into the existing part of the frame for ease of installation of the new structure (photo 7).
Photo 6. Drank along the outlined contour
Photo 7. Recess in the frame
The sufficiency of the groove depth is checked by the segment remaining when cutting a corner with a shelf width of 40-75 mm (photo 8).
Photo 8. Checking the depth of the groove
After the cut is completed from the outside (photo 9), the corner pieces for the frame are installed (photo 10) with careful welding of the seams at the joints of the segments (photo 11). When installing the corner pieces, it is advisable to check their location using a plumb line and a building level.
After checking, the structural elements are fixed in some way, after which the seams are welded.
In the case of the extension, which is shown in the photographs, the gate was installed incorrectly during the construction of the garage, which had to be compensated for by adjusting the newly created frame and sash structure, which will be especially noticeable in the photographs with the already enlarged gate. When performing welding work, it is recommended to have a fire extinguishing device near.
Photo 9. The cut is ready
Photo 10. Installation of segments for frame corner
Photo 11. It is necessary to carefully weld the seams at the joints of the segments
For better attachment to the existing masonry of the created structure, it is advisable to use anchor spacer bolts (photo 12).
Photo 12. Under these conditions, it is best to use anchor spacer bolts
The diameter of the bolts used is 8 mm with a length of 60 mm (photo 13). It is enough to fix the horizontal piece of the corner in four places. First, a hole is drilled in the corner to the brickwork with an 8.5 mm drill for metal, and then the hole for the anchor bolt is deepened with a drill on concrete 8 mm to the desired depth. After that, the anchor bolts are inserted and the structure is fixed to the wall.
Photo 13. Anchor spacer bolts 60 mm long and 8 mm in diameter
After assembling and fixing the new structure from the outside, the necessary cuts of the wall are made from the inside, after which the elements of the door frame are assembled in the same order and fastened from the inside.
The next stage is the preparation of parts for building up the sashes. To do this, the existing sheets are cut and the corner with a shelf width of 30-35 mm is cut into pieces of the required length.
Next, the fabric of the stacked section of each of the gate leaves is assembled. The assembled sections of the canvases are butt welded from above to the gate leaves, and for fixation they are stuck to the new section of the frame by spot welding in several places (photo 14).
Photo 14. Assembling the blade and fixing it to the frame by spot welding
After that, the excess brick is removed from the inside of the garage, gently chipping off a chisel and a hammer using tools. Before removing the excess wall sections, it is also necessary to secure the inner part of the expandable structure of the door frame with anchor bolts (photo 15).
Photo 15. The inner part of the canvas must also be secured with anchor bolts
When unnecessary pieces of the wall are removed, additional strengthening of the frame structure and reinforcement of the incremental part of the gate leaves with the frame are performed (photo 16). All new structural elements that increase the size of the gate are carefully welded, because the strength of the finished product depends on this.
Photo 16. The whole structure is carefully welded
The bottom gate locks are adjusted in place when new elements are added to the existing frame (photo 17). Then the floor is poured to required level, or the door frame is fully extended from below.
Photo 17. Fitting the lower locks
The upper gate locks are built up and adjusted along the upper edge of the enlarged frame (photo 18).
Photo 18. Extension and adjustment of the upper constipation
On the outside of the gate, the upper hinges are cut and welded higher due to the increasing size of the canvases (photo 19 and 20).
Photo 19. Changing the place of attachment of the hinges from the outside (right side)
Photo 20. Changing the place of attaching the hinges outside (left side)
The final stage is painting the gate with a special paint (photo 21). It is recommended to use a coloring composition that performs three functions - the paint replaces the primer, converts rust if necessary and creates a paint and varnish protective layer on the metal.
Photo 21. New painted gate
If a person has little skills in working with a special tool for concrete and has an idea of \u200b\u200bwelding, then he will be able to build the gate on his own, thus saving significant funds from the family budget.
Rarely does a purchased major garage completely suit the new owner. In addition to cosmetic repairs and insulation, many motorists undertake a complex and time-consuming procedure for replacing the gate, while simultaneously trying to increase the opening of the garage door. Cutting and removing old garage doors is not a problem; it is more difficult to replace them so as not to cause subsidence or collapse of beams or floor slabs.
How to increase the size of the gate without dismantling the roof
The complexity of the procedure for increasing the opening directly depends on the structure of the roof and ceiling slab garage. Before trying to enlarge the garage opening, you should understand the roof structure and find out how much the garage door width should be. Most often, three basic schemes for arranging the supporting roof frame are used:
- On brick or cinder block walls, cross-beams are laid, steel or wood. Lathing, insulation and waterproofing are laid on the beams. In this case, it is possible to increase the doorway without major alterations to the front wall of the garage;
- The case when instead of beams in the transverse direction, hollow lightweight reinforced concrete floor slabs are laid on the side walls. In this case, the weight load supporting structure the roofs are placed on the side walls, so a relatively small part of the load falls on the brickwork;
- Most difficult option - the case when concrete slabs are located in the longitudinal direction. In this case, the floor slabs largely rest on the front wall of the garage, which does not allow the simultaneous removal or destruction of several rows of bricks between the door frame and the floor slab.
For your information! The presence of a concrete lintel above the garage door can simplify the situation. In this way, competent builders transferred part of the load from the floor slabs to the side segments of the wall in the construction of the garage.

If there is no serious load on the front wall and garage doors, expanding the size for replacing the frame can be a very simple operation. To do this, with a cutting wheel on a stone, it is necessary to make an incision along the measured vertical border of the new opening and chip off part of the brick wall with perforators. Today, instead of the old garage doors of 250 cm, an entrance structure with a width of 270 cm is increasingly used.

Expansion of the garage door opening
It is much more difficult to enlarge the opening if the upper rows of bricks above the frame and the trap itself bear a certain load from the weight of the floor slabs. In this case, it is possible to change the height or increase the width of the opening only by installing additional unloading beams:
- Option one - to increase the size of the garage entrance using a steel I-beam as a temporary fastening;
- Option two - cut a niche in the brickwork above the frame for the installation of a reinforced concrete lintel and use it as a transverse beam holding the bulk of the slabs;
- Use steel corners for assembling a horizontal crossbar that holds the weight of slabs and brickwork during the "redrawing" of the garage door opening.
For your information! All three methods are of the same type and imply the possibility of increasing the size of the entrance only after unloading the door frame.
How to widen and enlarge the opening with a steel angle
The given method to increase the size of the garage opening can be called the least traumatic and cheapest, due to the fact that a relatively small amount of auxiliary materials is used in the reconstruction than in the method with reinforced concrete or I-beams.

To increase the size of the opening, first of all, you will need to install an additional horizontal split beam from two corners with a shelf width of 75 mm. On initial stage you will need to mark the front wall above the entrance. We mark the horizontal and vertical lines of the new gate's dimensions.

Using a punch, cut a groove in the wall with a width of 8 mm and a depth of the width of the corner shelf. First, a groove is cut from the inside of the wall. Three pieces of the corner are cut along the dimension line, which are recessed into the cut groove and welded with the letter P.
In a similar way, the groove is cut, then the corners are installed from the outside of the front wall. It turns out a construction of two corners, welded and fixed on the wall in the form of two letters P, edging the contour of the future gate. To prevent the assembled frame from falling apart, it will be necessary to increase the strength and rigidity by welding the transverse jumpers.
Disassembling masonry as a way to increase the opening of a garage door
Before welding the lintels, it is necessary to remove some of the bricks above the horizontal beam of the old gate. To do this, install a support from a thick log or bar in the central part. Only after that, you can cut out a part of the masonry bricks with a perforator, and a gap is formed sufficient to connect the corners of the new frame with jumpers.
Then you can increase the size of the garage door opening. To do this, you will need to cut out the remaining brick from the masonry, stretch two channels through the knocked out holes above the old beam, under which additional supports from a wooden bar are installed. The horizontal rail of an old garage door can be cut and thrown away.

We got a new frame for a garage door. It remains only to strengthen the paired corners with overhead elements, if necessary, replace the channel on the threshold. Since for the most part new gates are sold complete with a frame and recessed elements, the easiest way is to insert the finished structure into the prepared frame from the corner, align vertically and horizontally, and then weld it to the base with electric welding.

Conclusion
A similar method to increase the size of the opening can be used if there are no more than 4-5 rows of bricks above the old gate, that is, the ceiling height is no more than 240 cm.For higher gables, the strength of two corners will not be enough, and the use of an external I-beam will be a safer way to increase the opening as an intermediate support for ceiling slabs.


