Interesting homemade products for a summer residence and a garden with your own hands. Homemade products for a summer residence and a garden: useful tips for creating original decorations (120 photos) Country homemade wood products
A summer cottage is the area where you can give yourself freedom to carry out numerous experiments and dream up to your heart's content. This is manifested not only in interior design, but mainly in the design of the garden or vegetable garden. Inquisitive and resourceful owners have not been guided by expensive and standard methods for arranging their sites for a long time, since there are many alternative solutions for virtually all areas of activity.

There are several varieties of vertical beds to optimize use free space... Custom designs are a great opportunity to create interesting design garden, vegetable garden, suburban area.

This type of beds in most cases is used for growing ornamental plants or spicy herbs.
Materials for making:

The length of the drainpipes is adjustable in accordance with the wishes of the owner of the site. However, you should not make bulky beds, as they can complicate movement around the territory.
Creating a garden

Stage 1. Create a container. To do this, we take a drainpipe, cut it in half lengthwise and put on special plugs on both sides.
Stage 2. We take the prepared metal holders, put them on the resulting frames for the beds.
Stage 3. We make holes in the pipe. They are made in those places where metal fasteners will be located.
Stage 4. We pass a cable or a strong rope through the holes made.
Step 5. We fix the cable / rope with fasteners.
Stage 6. We fill the resulting beds with expanded clay and soil.
Stage 7. We plant the plants in the beds.
Stage 8. We hang the pipes to the chosen place. Sometimes a special wooden crossbar is placed for this, or rather a construction in the shape of the letter "P"
Step 9. Alternatively, you can make a special design for the pipes.

Important! A bed of drainpipes is not resistant to strong gusty winds, so you should choose a place for it that is not blown from four sides by winds. Otherwise, the frame will quickly collapse, nullifying all your efforts.


A bed made of a plastic bag is another modification of vertical beds. It is extremely compact, functional and externally interesting. You can make such a bed in a couple of hours.

Materials for making:
- durable plastic wrap;
- sewing machine;
- priming;
- seedling.
In order for the bed to be solid, it is recommended to pay special attention to the thickness of the plastic film, which in this case will act as a "frame" of the structure. The minimum film thickness is 0.2 millimeters.
The process of creating a polyethylene bed

Step 1 . We cut out 2 rectangular pieces of film, the size of which corresponds to the size of the created bed. An allowance of one and a half to two centimeters should be left on each side. The recommended bed diameter is twenty centimeters.
Step 2. Sew the rectangles together, leaving only the upper part of the bag unconnected.
Step 3. Sew a handle to the future garden bed, the strength of which will allow to withstand the weight of the bag filled with soil. It should also be taken into account that when watering, the weight will increase.
Step 4. Fill the bag with fertilized soil.
Step 5. We make horizontal cuts on the bag in twenty centimeters increments. They are necessary in order to plant seedlings in the garden.
Step 6. We plant seedlings.
Step 7. Water the soil regularly and add the necessary fertilizers.
With these simple steps, you can get a cheap and useful garden bed.


The compost heap is an integral part of every summer cottage. This is the place where all kinds of biochemical reactions take place that ensure the creation of fertilizers.
To create fertilizers that will satisfy all the requirements for them, you should carefully consider several key stages: creating a container and directly correct manufacturing the compost itself. Let's talk about each of them in more detail.

Stage 1. Take eight support posts of the same length.
Stage 2. We treat the lower part of the wooden posts with engine oil or tar.
Stage 3. We dig the posts into the ground so that they are reliable and stable. If the compost bin will be located next to the fence, then 4 posts (i.e. one side) can be attached to the fence. This will avoid having to dig 4 holes.

Stage 4. Between each two adjacent posts we nail the crossbeams in such a way that we end up with three independent sections. Be sure to leave slots that will function as ventilation holes.

Stage 5. In two sections, we nail boards horizontally to half the height of the posts. In these places it is planned to create two small doors.

Step 6. The remaining section will have a large door, so only one plank should be nailed. It should be located at the very bottom in a horizontal position, that is, like a regular crossbar.
Stage 7. Installing the covers. You can use one large solid board for this.
Stage 8. Install the pre-prepared doors.
Stage 9. We provide doors with handles and latches.
Stage 10. We process wood using special impregnations.
Stage 11. We paint the box in any color that suits preferences.

Many gardeners mistakenly believe that any component can be dumped into a compost heap. In fact, to create the right biofertilizer, you need to carefully select the "ingredients".
Among the essential components of a compost heap are the following:
- peat;
- ash;
- needles;
- tree branches;
- leaves;
- hay or grass;
- wood ash;
- plant roots;
- raw vegetables and fruits, etc.
All elements are randomly mixed on the heap. To speed up chemical reactions, it is recommended to cover the pile with a tarpaulin (this is especially true in the absence of a box).

Trips to the country house with the family involve the presence of entertainment elements on the site that will delight children. The most common way to keep young summer residents busy is with a swing.
To build a swing yourself is not an easy task, but quite doable. Of course, you can always take a stick, tie it with a rope and hang the structure on a tree, but this can hardly be called a full swing. True craftsmen prefer to build comfortable structures with a comfortable seating position.

Constructive components:
- two logs;
- strong rope.
Indicators:
- diameter of logs - 85 mm;
- log length - 700 mm;
- distance between ropes - 500 mm.
Making a swing
Stage 1. We stretch the ropes between the logs.
Stage 2. We wrap each log with ropes.
Stage 3. We release the ropes outside.
Stage 4. We tighten the ropes by 3 knots.
Stage 5. We fix the swing on the tree.
Important: such a swing is designed for only one person.
Garden path from scrap materials
There are several types of garden paths that you can easily do with your own hands.

Step 1. Remove the sidewall from the tire using a knife or saw.

Step 2. Cut the tires.
Step 3. We line the space with grooved stripes.
Step 4. We paint the path with paint.
Step 5. Sprinkle with stone chips.
This is an economical option for those who do not want to rack their brains and spend time on a full garden path... The tire track is usually used for vegetable gardens, as it easily fits into the ground.

Stage 1. We paint the corks in different colors.
Stage 2. Digging a small trench.
Stage 3. We drive in supports to strengthen the future track.
Stage 4. We build the formwork using boards.
Step 5. Install spacers along the edges of the trench.
Stage 6. We place gravel deep into the trench and carefully tamp it.
Stage 7. We make a mortar from sand, cement, glue and water.
Stage 8. Pour the solution into the trench.
Stage 9. Press the plugs in random order. Even multi-colored stripes look interesting.

These are the easiest and fastest ways to make a garden path without purchasing expensive materials.
DIY tools
The expression "everything will come in handy on the farm" is most relevant when it comes to canisters. From this plastic container, you can make a large number of irreplaceable tools that are actively used in the process of summer cottage work.


To make this tool, we only need a sharp knife and the container itself.
Stage 1. Cut off the bottom of the canister.
Stage 2. We mark on the container the cutting line for the scoop so that the handle from the canister is the handle of the future tool.
Stage 3. Cut off excess material.
As a result of these simple steps, we get an excellent scoop with a comfortable handle.

Materials:

Manufacturing
Stage 1. Carefully wash the canister so that there is no smell left in it.
Stage 2. We cut the canister vertically into two parts.
Stage 3. Make a groove on the plank using a woodworking machine.
Step 4. Apply glue to the plywood and insert into the bottom of the canister.
Stage 5. We paint the resulting shelf with a spray can.
Of course, such a structure will not withstand a lot of weight, but it is quite suitable for storing small parts.

Materials:
- 40 cans;
- scissors;
- rope;
- paper;
- marker.
Stage 1. We pierce the upper part of the cans with a knife.
Stage 2. We make a stencil out of paper.
Stage 3. We apply it to the canister, outline it with a marker.
Step 4. Cut out large holes with scissors.
Stage 5. We put the prepared cans in several rows, tying each row by prying the rope under the handles of the containers.
Stage 6. We tie all the rows around the perimeter for greater strength.
Stage 7. If the cabinet is planned to lean against the wall, then we drill it to the surface.
Stage 8. We put heavy objects in the bottom row - stones or bricks.
The result is a fairly spacious and functional rack that will help get rid of the issue of storing many small parts.

Be resourceful and courageous in implementing your ideas. Good luck!
Video - DIY homemade products for giving
Video - We do it ourselves for giving
Homemade products for a summer residence are a special source of pride for a zealous owner. Not everyone can show ingenuity, practicality. But to take note, to translate into life someone's useful experience, into a masterpiece, many can do.
Original flower bed from car tires
Used car tires are a popular material for transforming landscapes and practical structures.
Tire beds
Such homemade products for summer cottages and gardens are most popular. At the same time, the classic single flower beds receded into the background. Currently, you can see the following options:
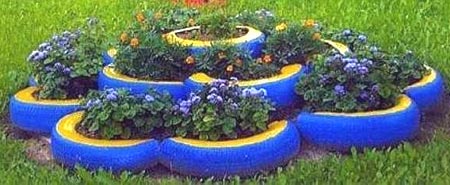
Such homemade products for home and summer cottages with their own hands will take their rightful place in any landscape.
Playgrounds made of car tires
Grandchildren and children are frequent guests at the dacha. Therefore, they will appreciate the efforts of adults who have decided on which they will post:
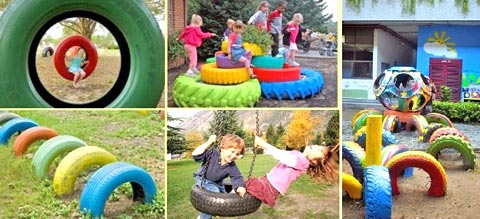 Tire playground options
 - and cartoon characters from tires. Bright little animals made of tires will be a special source of pride for friends and neighbors.
- Swing. Can be found from ordinary pendant models to rocking chairs made of a semicircle with installed board instead of a seat.
- Cars, motorcycles. Different wheel diameters allow you to assemble original racing cars and bikes. Any boy will feel like a real racer and will appreciate the efforts of adults.
- Furniture. Chairs and tables for playgrounds and impromptu banquets are every little lady's dream.
Read also
Installing a wicket in the country
DIY homemade products for the playground will provide an active, interesting summer for the child.
Useful Tire Crafts
Tires are often used for the following designs:
Rubber crafts, homemade products for giving are popular due to the availability of scrap materials and a wide range of applications.
Useful homemade plastic bottles
Another popular material for design and practical research. Useful homemade products of plastic bottles widely used for suburban life:

Practical homemade products for giving with your own hands from plastic bottles are widespread due to the high availability of material and ease of processing.
For many, the private sector is associated with hard, constant work. Plant a vegetable garden, follow the growth of plants, harvest. All this, of course, must be done. But if you organize the whole process correctly, then the work will be a joy. And there will be a lot of free time for rest. And homemade products for a garden and a summer residence, made with their own hands, will help in this. Someone will object that everything can be bought ready-made in the store. This is true. But, firstly, buying all the money is not enough. And secondly, the very process of making something useful from scrap materials can bring a lot of positive emotions.
Russian people have always been distinguished by their resourcefulness and ingenuity. And a huge number of self-made homemade products for a summer residence and a vegetable garden, photos of which can be found in our article, are confirmation of this. We will offer for consideration only a few options that will come in handy on any site.
Flowerbed-box
Many gardeners have recently preferred flower beds located in boxes. They are raised above ground level and are fenced on all sides. Thanks to this, the care process is facilitated, and the garden looks more attractive and interesting. It is possible (or even recommended) to use such constructions on scarce nutrients soils.
Homemade products for the garden involve the use of scrap materials. Therefore, for the construction of the box, you can use the boards left over, for example, from building a house. If these are not available, you will have to purchase them at the store. A box of arbitrary sizes is constructed from them. The dimensions will depend on the size of the plot, its style and the plant that is planned to be planted there. The height of the side is made approximately to the knee so that the layer of fertile soil is thicker.
Attached to the manufactured box on the bottom metal grid with a small cell. It will protect you from rodents and moles. If there are none on the site, then you can do without a grid. You can easily make a small greenhouse from a box-bed. Its height is chosen taking into account the plants planted there.
Drip irrigation
Homemade products for the garden will simplify such a difficult process as watering plants. You can make a drip irrigation system. This will require a large barrel (metal or plastic), a hose, capillaries (you can make holes in the hose at a certain interval) and various connections (tees, clamps, and so on).

The barrel is raised about 1.5-2 m from the ground. For this, a special stand can be welded from the metal corners. This will ensure a stable pressure in the system. There is a main hose from the barrel. A filter must be installed on it so that debris does not clog the system. The capillaries are fed from the main hose.
Sprinkler do it yourself
Homemade products for a summer residence and a vegetable garden will allow you to create something necessary and useful on the site from improvised means and materials. For example, from old plastic bottles that are always thrown away, you can make a sprinkler for a garden and a vegetable garden. It will allow you to process and water plants of various heights. A spray gun is attached to the watering hose. To a long stick (the longer the better), the same atomizer is screwed with the nozzle up. The lever is secured with a thread in the pressed state.
In a bottle of 1.5 liters, a hole is made in the neck with a hot nail. A bolt is inserted into the hole and secured with a nut from the outside. The bolt must be drilled through with a drill. A hose is put on it and secured with a clamp. After applying pressure to the system, the nozzle spins up and water is sprayed.
Tire compost pit
Old tires from passenger cars are one of the most popular and available materials for making homemade products for the garden. You can even make compost pit... Only 4 of them are required.

One of the tires, which will serve as the base, is cut. One sidewall is cut off from it. From the rest, two sidewalls are cut off to make rings. Next, you just need to install the tires on top of each other in the designated place.
Bench
After all the work in the garden, you can relax. And on this account you can also pick up suitable option homemade homemade products for a summer residence and a vegetable garden. With a small set of tools and materials, an attractive streamlined bench can be made. It will become a place where you can relax and unwind.

From materials you will need:
- A sheet of plywood (preferably pine) measuring 90 x 90 cm and 1.6 cm thick.
- Slats from the same tree in the amount of 7 pieces (2 cm thick, 9.4 cm wide and 140 cm long).
- Boards 2 x 6.9 cm and 100 cm long in the amount of 3 pcs.
- Planks 2 x 6.9 cm and 140 cm long, 9 pcs.
The parts will be fastened with self-tapping screws 0.5 x 5 cm. In addition, glue for connecting wooden elements, varnish on wood, turpentine will be useful.
The plywood sheet is cut into three pieces. A template is drawn on them for cutting out the sidewalls and the central crossbar. The shape is cut with a jigsaw. At the back, 3 grooves are made for the slats, which will hold the structure.

Homemade products for the garden will help make your summer cottage life more pleasant and easier.
As they say, there is never a lot of space in the garage. Men who spend a lot of time in the garage will agree that in some cases every minute and every square inch of free space counts. That is why the garage master needs a competent organization of the workspace. Here various people help out and help in every way devices for storing building materials, work equipment, machine parts and other things necessary for work. To keep your electronic, garden and garage gadgets always in place, use the following tools:
- stands;
- shelves;
- sliding panels;
- racks;
- organizers for tools.
Also, for clarity, we offer homemade products for the garage and home master do it yourself - YouTube video will reveal all the nuances of organizing a workspace and suggest fresh ideas.
DIY homemade products at home
Man began to engage in homemade homemade products since prehistoric times. Actually, all industrial processes are improved once handicraft or home developments of folk craftsmen. Sometimes we don't even think that we are paying for the things that we can do with our own hands. Homemade homemade schemes are easy to find online, and materials can be bought at a hardware store or found at home.
For example, from a cardboard box and a piece of cloth you can make a handy portable organizer for towels and other textiles.
The topic of storing all sorts of little things is inexhaustible, fortunately, as is the number of ideas. Successful decor ideas you can also draw from ordinary things - let them be buttons or empty cans.  Cool shelves are obtained from regular boxes... How do you like this idea?
How did you manage to understand, if there is detailed instructions it's not so difficult to make homemade products with your own hands at home. The video will help you comprehend all the nuances of this pleasant activity. Helpful hints, interesting ideas - everyone must watch.
Homemade products for a summer residence and a garden with their own hands
At the dacha, there is usually a little free time for creativity and arrangement of the surrounding space. therefore have a few fresh ideas on handto implement them on your own summer cottage... Do-it-yourself country homemade homemade products can be ingeniously simple. From the materials at hand, you can make unexpected and extremely useful things in your household. 
Ordinary stones turn into fabulous animals.From an old teapot it turns out to be a wonderful flower pot.
Used tires - it has already become a classic in the world garden figures. Stylish lamps for the country interior - do it yourself from a regular can and candles (don't forget about safety precautions).
– gorgeous idea for a small cottage.  DIY homemade products for a summer residence and a garden are often obtained by themselves, without unnecessary time and financial costs. Perhaps you did not know how useful for household will be plastic bottles.Retired plastic bottles can serve as the basis for an incredible decorative flower bed.
  Cool "blooming" pillars will significantly decorate your summer cottage space.
DIY garden furniture successful homemade products: photos and drawings
In the previous sections, we told you about homemade products that will become indispensable for the household and household. However, do not forget about the rest, before which, nevertheless, you will have to work a little. Cozy armchairs, various tables and benches, swings and hammocks - all this dacha and garden bliss can settle on your site. We suggest that you familiarize yourself with the photo instructions and drawings for manufacturing garden furniture... We have selected the best options for you.


