Original ideas on how to make a sconce yourself from scrap materials. How to make a pendant lamp with your own hands DIY metal lamp
In this article we will figure out how to make a complete and safe DIY lamp. In the initial publication of the cycle - - general requirements for quality, methods of forming a luminous flux, as well as how to choose a light source and - safety first of all - the rules for connecting a stationary lamp to the mains were considered. From the previous article, we learned how to make the main lighting parts of the lamp -. Now is the time to take on a solid, reliable and beautiful constructive foundation for all this.
About LEDs
LEDs as light sources are becoming more and more popular: they are very economical, durable, almost do not heat up, which gives ample opportunities for independent construction and design. In addition, the low voltage power supply makes the LED light sources safe. Therefore, in this article a significant portion of the material is devoted to how to independently make lED lamp.
However, the quality of light from LEDs has not yet reached ideal: his spectrum is quite tough. It can be softened by various lighting techniques, which was discussed in previous articles. But thanks to the low-voltage power supply, an outdoor or garden LED lamp can be made independently without special precautions, as well as be autonomous; then voluminous excavation and cable laying on site. In this section, we are more concerned with LED lamps.

Some examples of what you can achieve by taking up lighting equipment with your own hands are shown in the photo. Anyone who knows how to use the Internet will compose a similar selection "for ideas" or "for inspiration". And here we will deal with things that are not so aesthetic: how to embody all this in the material. Cheap, reliable and practical. Desirable - at home, "on your knees."
Materials, tools, equipment, technologies
You don't need expensive and / or hard-to-find materials to make a good lamp. Previous technologies are focused on incandescent lamps, which are very hot and consume a lot of current. Today's homemade products have economy and LED lamps that emit little heat, which simplifies the design.
For the manufacture of a lamp, neither in appearance nor in quality inferior to industrial designs, we need cuts of metal pipes, steel wire with a diameter of 1.5-2.5 mm, galvanized sheet steel with a thickness of 0.4-1 mm and pieces of plastic or inexpensive plastic products, see below. And in many cases, to achieve the desired result, it is possible to do with unnecessary rubbish. Wood processing for a complex lamp is a special case, and we will not bypass it either.
Note: good old glass is also not to be discounted. See, for example, a master class: diy.ru/post/3916/... This is what you can achieve by working at home with such difficult material. Only one small "but" - what the author of the product (a man, no doubt, very skillful and sharp-witted) calls a cut, in fact, a border. However, how to call is a matter of literary experts, and it is enough for a master to make a good thing.
Simple yet tasteful
Examples of excellent lamps made from scrap materials, namely, scraps of wood and paper - well-known Chinese lanterns, see fig. When using modern light sources, their fire hazard is negligible, much less than that of an electric kettle. The base is most often a rack frame, pasted over with paper, pos. 1. For the frame of what is in pos. 2, thin bamboo sticks are better (you can split an old rod into strips), or the ends of modern fiberglass rods; sold in fishing shops. The joints are wrapped with thread and glued. After pasting, paper (preferably rice) is lightly sprayed with water from a spray bottle. When dry, it will stretch. After that, for strength, the paper is varnished.

A Chinese lantern can also be made entirely of wood: chopsticks or skewers (wooden twigs on which barbecue and kebab are served to the table). Both are made of light wood that reflects light well enough. And its slightly rough surface effectively diffuses light, which softens it.
From the chopsticks, placing their broadened heads alternately to the left and to the right, pick up the side light-transmitting panels, pos. 3. And from the skewers it turns out quite good ceiling lamp for the kitchen or hallway, pos. 4. The ends of the sticks (they are made of soft wood) are simply pierced with a sewing needle with a fishing line threaded into it.
Plastics
But back to the materials, they are not finished yet. Excellent parts for chandeliers, table lamps and floor lamps (cups, caps, see below) are obtained from reusable plastic dishes - bowls, glasses, saucers: the side on the bottom is carefully cut down or grinded. Then this place is passed 2-3 times with increasingly fine sandpaper; the last pass - "velvet" - and polished with felt with GOI paste. The decorative, lighting and technological (ease of processing) qualities of such parts are very good.
The second type of plastic that allows you to make a very original lamp (see fig.) Is polymer clay or just plastic. In terms of lighting properties, it is not inferior to light wood, and in a thin, 2-3 mm, layer, it is translucent, like milk glass, i.e. softens light very well.

Polymer clay is available in different colors immediately-plastic in plastic bags and bars, like plasticine. The latter are at first quite hard, but soften when kneaded. To speed up and facilitate softening, 3-4 drops should be put on the bar vegetable oil, and begin to crease when it is absorbed.
Lampshades are molded from soft plastic on a mandrel greased with petroleum jelly. Immediately, if necessary, fill the texture with a brush, at the bottom right in Fig. To obtain an openwork shade, the tip of the package is cut off and the mass is squeezed out with a sausage. After about a day, the product will dry out, then you can, while not removing from the mandrel, cut out figures, scallops, frills. The product dries completely in 3-7 days.

Bar plastics are used to make lamp stands. Having formed the workpiece, it is baked in the oven at 120-130 degrees. When a brownish crust forms on the product, the gas is covered to a minimum and “baked” for another 1-3 hours, depending on the size of the part. It should cool completely in the oven, which is undesirable to open. The baked workpiece can be cut, sawed, drilled, polished, painted. In this way, lamp bodies are sometimes obtained not only original, but also quite piquant (see fig.), And even frivolous on the verge of decency, or even behind it.
Ceramics
Since we are talking about stands, let's try to make a lamp from a bottle. Ceramic beverage containers crafted by signature designers deserve better applicationthan a trash heap, moonshine or recyclable materials for a pittance.
There are 2 problems here: stability and openings for cable entry and a switch. The first solution is solved with sand poured into the bottle by 2/3 or 3/4. To solve the second one, it seems, you need a tubular diamond drill, which is expensive, quickly wearing out, and requires a high-speed drilling machine. And we can do without all this:
- Let's select a copper tube of a suitable diameter.
- We will securely fix the vessel, which we will drill, so that the drill enters along the normal (perpendicular) to its surface in this place.
- Around the place of the future hole, we will mold a roller 4-6 mm high from plasticine.
- Rub a couple of pieces of fine skin together over a pallet to get about a teaspoon of corundum powder.
- Pour it into the hole and drop 3-5 drops of machine oil - you can drill.
For drilling, it is better to put a drill with a copper tube clamped in a chuck in a bed, which turns it into a tabletop drilling machine... These stands are sold at tool stores; the prices are divine, the benefit to the artisan is invaluable. Moreover, you can buy a turntable with a degree scale for the bed.
They drill ceramics with copper and corundum with jerks: slightly pressed - raised - pressed again - raised. The abrasive particles are first eaten into the copper and drilled, but then break off and crumble. Pulse drilling continually renews the corundum "sputtering" on the copper, and the oil prevents the powder from scattering and speeds up the work. The main thing is that the tube, with each feed, falls exactly into the already selected groove.

Electrical fittings
For a novice lighting technician, perhaps, it is best to use sockets for lamps for a regular E27 base with fastening with union shaped nuts (threaded flanges); its designation begins with E27H, and the drawing is shown in Fig. It will not work to fasten such a cartridge, or a regular one with a skirt, with a threaded fitting in the lid: if there is a M10x1 or M12x1 die, then at home, with a hand crank, it is very difficult to cut a thread on a thin-walled tube without cutting it or twisting it, even with lubricant. For mounting with flanges, you will have to make a fastening ring, as described in the article on lampshades, it is much easier.
Note: if a wall lamp is made, in which the lamp is located along the base, then cartridges with a side bar are usually used, see Fig., but they are more expensive. In this case, you can also do with a flange chuck: an Ω-shaped clamp is bent from the wire and fastened to the base with self-tapping screws.

The second thing you need is a screw terminal connector, or a terminal block, or just a terminal block, to connect the luminaire to the wiring. For a chandelier, it is obligatory not only for the sake of ease of installation, but also according to the safety requirements: suddenly the chandelier will break, its thinner wires will break out of the terminal block, and the ceiling wiring will not suffer, which will prevent an accident and ceiling-slotting repair work.
It is better to take the terminal block of the "comb" type, see fig .:

Such are compact, reliable, exclude an accidental short circuit, and by biting the jumpers between the sections, it is elementary to get a connector for the required number of wires. It is allowed to enter into each terminal no more than 2 stranded wires with a copper cross-section of up to 1.4 sq. mm in aggregate and not more than 1 single-core, regardless of the cross-sectional area of \u200b\u200bits conductive core.
About wooden lamps
Wood, on the one hand, is easy to process and looks solidly finished. On the other hand, in order to make an elegant wooden lamp, you will have to use some special technological methods. Which we will consider.
Cable channels

The first problem that arises in the manufacture wooden lamp: how to make cable ducts in long parts. To do this, without special equipment, "on the knee", you can use a wood drill with a tapered 6-sided shank, see fig. A metal tube is tightly put on it, squeezed, and the opposite end is bent in a T-shape to make a manual crank; for easier and more accurate work, it is better to take a two-tape drill.
Through axial holes in long wooden parts are drilled in advance, before bending:
- Blind holes are drilled at both ends of the workpiece required diameter, with a depth of 30-40 mm, trying to keep them as accurate as possible along the axis of the part;
- Drill with the described manual crank alternately from both ends, passing each time no more than 3-4 thicknesses of the part;
- Chips from the holes after each pass are carefully removed;
- After connecting the jumper, the hole is passed through twice, from one end to the other. This is necessary to remove the step inside, which the cable can catch on when tightening.
How to bend a tree?
Lamp from bent wooden parts it is quite possible to do it yourself: aged fine-grained wood softens under heating, without delamination, but cooling down, retains the shape given to it. Bamboo, walnut and soft wood, eg. Linden. More difficult - medium hard wood: maple, ash, hornbeam. For bending oak, beech, mountain ash and other hard species, it is better for a novice cabinetmaker not to take it. MDF also bends well.
Wood is bent either steamed in boiling water or heated dry to more than 150 degrees. The first method is easier, but it is suitable, except for bamboo, for few species. The second is more difficult, but more accurate, because the wood does not swell and, when cooled, does not shrink.
To bend wood, you need a piece of steel pipe: with a welded end for steaming or with both open for bending dry. The steaming pipe is installed obliquely, the workpiece is placed in it, poured over with water and boiled. Boiling water must be vigorous so that the workpiece bathes in bubbles of steam. The process continues for 10-120 minutes, depending on the thickness, species and condition of the tree. You can take out the workpiece for a few seconds to check its readiness, but you only need to add boiling water instead of boiled water. Dry bending, blowing the workpiece in the pipe with a construction hairdryer. First, on a sample of wood, you need to check what temperature it can withstand without charring and cracking.
How to tighten the cables?
The cables in the tubular parts of the luminaires are tightened using a guide rod - "fishing rod" - made of copper wire with a diameter of 0.5-0.7 mm. The "rod" must be completely flat; a smoothly bent wire wound from a coil can also be crumpled in a narrow channel. The wire of the "fishing rod" is straightened by pulling it through a rag tightly clamped in a fist. The best guides come from enamelled winding wire, which is smooth and slippery.

The "fishing rod" is introduced from the far end. Before this, its tip is tightly bent, see fig., So that it is rounded. The traction is pushed into the curved canals, slightly feeding and turning. When passing from channel to channel (see below), the running end is directed with thin long tweezers or a screwdriver.
When the end of the rod appears from the opposite side, it is cleaned by 20-30 mm and tinned. The cable wires are stripped and tinned by the same amount, up to 3 for 1 "fishing rod". Then everything is twisted and soldered together. The twist is bent in the opposite direction of tightening so that it does not cling. Tighten by alternately feeding the cable and tightening the guide. When tightening, the cable in the channel must not be pulled all the time! If caught, pull it back a little, turn it a little and pull it again.
Note: in a straight metal tube with an inner diameter of 12 mm, you can tighten up to 4-x 2-wire cables in double insulation with a cross-section of copper conductors up to 0.5 sq. mm. In a channel of the same diameter in a tree - only 1 of the same cable.
Starting from the ceiling
Suspension of the luminaire to the ceiling or wall is the most critical and vulnerable node. It is allowed to suspend lamps at the 1st point only if the base is a tough, durable material, for example. oak beams, pos. a) in Fig. In other cases, you must either use at least 2 suspension points, or the luminaire anchor must press on the material from above, i.e. ceiling slab should work in compression, pos. c) - e).


A chandelier weighing up to 5 kg is suspended using a fixing bar, see fig. on right. The distance between the centers of the fixing holes in the strip must be, for a concrete ceiling, at least 9 of their diameters. If the ceiling is gypsum plasterboard, or suspended, or tension, then the suspension is lowered from the main ceiling to the decorative level with the help of wooden or metal crosspieces or plywood plates, at the top in the same place. How to make a suspension in some other cases, see below.
The main requirement for a suspension is that the luminaire should never hang on wires. It should be held either by a rigid bar, or by a strong cord / rope, or by a cradle made of chains or the same cords. The power cable must be in a loose loop under the top suspension hood and must not be pulled, pinched or pinched anywhere.
How to make a lamp?
Now he will try to bring the information received into a single piece, at the sight of which the guests will gasp as sincerely as the master expressed himself while working. We will be guided by the following principles:
- Complicated and / or requiring special skills of technological operations are avoided in every possible way.
- We use glue or solder joints only for auxiliary ones that keep the parts to be joined from displacement. Assembled without gluing and soldering, the product should, in the absence of external influences, keep intact in the normal position for an unlimited time.
- From an additional tool, we will try to get by with a manual electric drill and a small removable bench vise with a screw clamp for fastening to the table.
Let's start with a chandelier as the most complex type of household lighting fixture.
Chandelier
On a cord
The simplest suspension of a chandelier weighing up to 5 kg is on a cord, pos. 1 in fig. In this case, 4 additional holes will have to be drilled in the lampshade mounting ring (see article on lampshades); marked in green at pos. 1a. The knots of the cord must be knitted that do not slip and do not open, for example. any fishing hooks. Cord - any rotting strand (eg linen) with a loose diameter of 8 mm. Spiral cords and ropes are not designed for prolonged tensile load!

The most important detail is the suspension hook (red gearbox). It needs to be bent from steel wire with a diameter of 4 mm; a hook made of 6 mm wire rod will withstand a weight of up to 35 kg. Of course, if you buy a ready-made chandelier hook, it won't get any worse.
Suspension rods with the same weight are made of 4 mm wire; with a weight of up to 5 kg, you can do with 1.5 mm, and with a weight of up to 12 kg - 2.5-3 mm. The ring is made of galvanized sheet steel 0.4 and 0.8 mm, respectively, or, for weight up to 35 kg, 1.4 mm.
Note: the technology of brazing steel at home is described in.
In this case, it is better to fix the upper cup from slipping with a rubber ring, because The spring washer can transfer the cable underneath. A good pallet comes from computer disk... Depending on whether the lamp is in the lamp shade or in the shade, it is turned downwards, respectively, with the painted or mirror side. Radial cuts are made under the lampshade extensions in the pallet.
The top cup and cap are made of plastic dishes, see above. The cap lies loosely on the pallet. Glue - any mounting glue.
Note: the bottom nut of the chuck fastening should go into the hole of the pallet, and not press it down. Otherwise, it may be difficult to repair or clean the chandelier.
On the tube
In a chandelier suspended on a rigid tubular rod (pos. 2), firstly, it is not necessary to bend the suspension rods so that it is convenient to knit a knot on their crosshairs. Secondly, the number of rods can be any from 3. Accordingly, the ring can be made without an additional row of holes, such as described in the article on lampshades.
It is preferable to fix the cap in such a chandelier with a shaped (decorative) spring washer. It can be obtained from a thick plastic button by drilling a hole in the center 0.5-0.7 mm narrower than the outer diameter of the tube and making an oblique cut from the side at 45 degrees to the axis of the washer, a round link of a plastic chain with the same cut, etc. P.
An eyelet for a hook in the suspension bar is obtained by flattening the tube and drilling a hole in the resulting lamella (petal). After that (and not before) a hole is drilled for the cable laying, otherwise dangerous mechanical stresses may remain in the material. A rod for a luminaire weight up to 15 kg can be made of the following types of pipes:
- Steel one-piece - inner diameter from 6 mm, wall thickness from 0.5 mm. Finishing - painting or covering with a heat-shrinkable tube (HERE) of the desired color.
- Steel with a seam - int. diameter from 8 mm, wall thickness from 0.7 mm. The finish is the same.
- Copper gas in plastic sheath - int. diameter from 8 mm, wall from 1 mm. No finishing is necessary, and so it shines with copper for years. You can not solder, under the glue joint you need to remove the plastic cover in that place.
- For air conditioning systems made of oxygen-free copper - int. diameter from 10 mm, wall from 1 mm. It is very easy to solder and stick. To preserve the copper shine, you need to coat the finished bar twice with a clear water-based acrylic varnish, diluted twice with distilled water.
- Plain red copper - int. diameter from 12 mm, wall from 1.5 mm. It is brazed after stripping, you need to use a flux paste with borax. It gets dark over time and under the coating, so it is better to make retro-style lamps from such tubes.
- Taped propylene is very strong, but does not stick and, of course, is not soldered. Decorating is useless, the design is terrifying anyway.
Multihorn
The tubes can be used to make chandeliers with horn brackets for individual lighting fixtures. The device for connecting the arms with the rod is shown in pos. 5. Horns with an even number are connected in pairs by through threaded rods M2.5-M4 with nuts and spring washers. Pairs of holes for studs are located at different levels, this must be taken into account when calculating the height of the straight part of the horn and making markings on their blanks. You can use horns, incl. with an odd number of them, fasten with pairs of small self-tapping screws for metal, but then tighten the cables very carefully so as not to tear the insulation on the sharp ends of the hardware protruding inward.
Note: complex / extended bends of the tubes are formed in sections, gradually advancing manual pipe bender along the length of the future bend.
If the free ends of the horns are without squiggles (sorry - volute), etc. curls, then it is better to cover the knot of their connection with the bar with a cap lying on the lower cup (shown in dotted lines in pos. 5). In addition, then the cabling will be much easier: a terminal block will fit under the hood, in which the cables from the horns will converge, and only one 2-wire cable will pass up in the rod.
Multi-arm chandeliers are most often made with switchable lighting. The diagram for connecting lamps to a 2-section switch is shown in pos. 6. Do not forget - SB switches (commutators) must be included in the phase wire! And yet, it is extremely important: if the house is equipped with a protective earth, under no circumstances use ground wire as neutral (zero, N) regardless of the power supply scheme (solidly earthed or isolated neutral)! The earthing switch is always in yellow insulation with a longitudinal stripe, and the neutral insulation in properly arranged wiring is black. But in any case, before starting the electrical work, you need to find the zero and the phase with the phase indicator!
About phases, zero and ground
Safety regulations (PTB), electrical installation devices (PUE) and Codes of Rules (SP) for the production of electrical work for related industries (e.g. construction) unambiguously regulate the color of the insulation of only grounding wires - yellow with a green stripe; the colors for phase conductors A, B, C and neutral are only recommended. The reason is that in countries where the only acceptable power supply system with an isolated neutral (Germany, Japan, etc.), it is customary to designate phase A in white or light gray. Therefore, choose from the commercially available cables suitable for making apartment wiring “without knots, without a hitch ”is not always possible.
The chandelier is heavy ...
For ceiling luminaires weighing 15 kg or more, mounting on the 1st rod or cord is no longer considered reliable enough. These need to be hung on a chain or rope cradle of 3-4 branches. 1 branch should support the full weight of the luminaire with 3 times the headroom.
The cradle is attached to the ceiling using a triangular or square bearing plate made of steel with a thickness of 5 mm, pos. 7 in Fig. The number of attachment points is 4 or 5, respectively. An attachment point in the center is required: without it, if one of corner fixings will be excessively weakened, the mechanical load will "bump" on the next weakest, the suspension will break out according to the domino principle and the chandelier will "all of a sudden" collapse.
Corner attachment points should be located on a conventional circle (red dotted line) with a diameter in centimeters of at least 0.85 of the chandelier weight in kilograms. In any case, the smallest distance between the centers of the holes in concrete ceiling should be from 9 of their diameters, as with a 2-point suspension on a bar, see above. Lugs or hooks under the cradle branches are welded to the base plate. Homemade eyelets can be made from 6mm wire rod.
... and ultralight

Hobbyists make a lot of fixtures out of disposable plastic dishes, PET bottles and paper. Their weight is negligible, therefore, firstly, it is permissible to mount the cartridge in the lampshade / plafond from the same kebab sticks, see fig. In this case, take the cartridge E17 or E10 with lugs, see fig. left. The "ears" of the cartridge with the help of a sewing needle are simply tied to the crosshairs of the sticks with thread, thin copper wire or fishing line.

Secondly, the suspension of a lightweight lamp can also be made from a cradle, but from a fishing line. In the ceiling cap, its branches are introduced together with the cable, as for a chandelier on a cord. Such a suspension is almost invisible. If the cable (remember, it should not be pulled, pinched or crushed anywhere) is twisted or twisted in a spiral, then an ignorant guest may at first be dumbfounded: levitation? telekinesis? superconductor and magnets?
Floor lamp
A floor lamp based on the same design and technological principles is, in general, an inverted chandelier on a rigid rod with some differences, pos. 3 in Fig. above with lamp designs. First: the bar (which is already a stand) is made of a steel pipe with an inner diameter of 10 mm and a wall thickness of 1.5 mm. Ring - galvanized from 0.7 mm. Second: all joints of steel parts are soldered.
Further, in the lower support of the floor lamp, a sufficiently heavy and extensive structure must be provided for fixing the bottom of the rack. A crosspiece from about 450x450 mm from an oak bar 100x100 mm will go under a standard floor lamp. A blind hole 75-80 mm deep is drilled in it in the center along the outer diameter of the rack, and glued into the socket with mounting glue. They also glue the rack into the shelf of the floor lamp. It will be useful, both in design and in strength, to put on the glue a polished washer with a diameter of 60 mm and a thickness of 2 mm (steel) or 4 mm (aluminum). The described design allows an amateur to do without turned-to-order parts in the manufacture of a floor lamp.
Table lamp
A working table lamp based on our principles of construction is even simpler than a floor lamp, pos. 4: a sufficiently massive and solid base (wood, plastic) with a stepped through hole along the axis. The lampshade ring is placed on the step and fastened with self-tapping screws. Then it will at the same time press the mustache of the lampshade extensions and it will not dangle.
Note: for the base table lamp from ceramic or glassware, you need to make a top-knob with a stepped hole, which is fitted on its neck. The most suitable material for this is plastic.
For outdoor lighting

We will leave outdoor lamps for 220 V purchased: it is impossible to make “forever” a sealed cable gland for mains voltage and also a sealed case with glass at home. We will work with voltages up to 12 V, then the cable gland turns out to be quite simple, see fig. And if the light source is powered from a current stabilizer, then no short circuit will be scary.
However, it may not come to electricity: for temporary lighting in a garden or at a picnic, and in the 21st century, an ordinary candle is often more convenient and cheaper, it is also more romantic. And you can make a candle lantern with your own hands from a coffee can in just a few minutes, see the video:
Video: DIY candle lantern from a coffee can
Such a lamp is also suitable for a light bulb; then there is no need for ventilation holes and the carrying handle can be fixed to the lid for more reliability.
The permanent outdoor luminaire must already be electric. the main problem at the same time - reliable sealing. Here again glassware with a screw lid comes to the rescue: an outdoor lamp comes out well from a jar. In this case, since a more powerful light source is required, it is better to take a container from under conservation. The cable gland is made by punching the cover with a round pointed rod. To ensure complete tightness, aquarium silicone is once and for all applied to the rim of the lid from the inside before screwing it in.
Luminaire "once and for all" assumes the use of very reliable and durable light sources. Requirements for its quality and spectrum fade into the background, because it is not a living or working space that is illuminated. Taking these conditions into account, an outdoor lamp on the porch or, say, at the entrance to the garage, is best done from led strip: with negligible electricity consumption, it will give a fairly bright lighting. For an example of making such a lamp, see:
Video: DIY garden lantern in 15 minutes
In the garden and in general on the site, a high brightness of lighting is no longer needed, here, in general, if only you do not leave the path and make out the door to the bathhouse, cellar, shed or bathroom. But it is very, very desirable to have a garden lamp autonomous: here it is not about electricity costs, but about cable costs, and who would like to chick a well-groomed area with trenches?
Garden lights powered by solar panels (SB) and a buffer storage battery (accumulator battery) are on sale but, either are expensive, or turn out to be short-lived. Let's try to figure out if we can do it on our own, especially since it is quite possible:
- 4 white LEDs with a current of each 20 mA in a shade made of milk glass or a frosted plastic bottle, more or less acceptable for gardening needs, will illuminate a circle with a diameter of 4-5 m.With a current of 10 mA each in the light spot it will still be possible to see where the stone is, and where is the pit. Total 60 mA on average.
- The battery, taking into account the weak recharge in winter and the decrease in capacity in the cold, should provide the maximum current of the illuminators for at least 30 hours. Finger-type accumulators for 2500-3500 mAh, frost-resistant up to -20, are on sale. We take the minimum allowable battery capacity of 2500 mAh.
- Luminous diode voltage drop approx. 2 V. In order to stabilize the total current consumption and the discharge mode of the battery, on which its resource significantly depends, we give twice as much to the quenching resistors, for a total battery voltage we get 6 V.
- SB, taking into account the energy efficiency of the Ni-Cd battery of 74%, should provide a current of approx. 75 mA. For winter in mid-latitudes, we take a rated current of 100 mA.
- Also, taking into account the energy efficiency of the battery and voltage losses during charging, we take the SB voltage of 9 V.
- So that the battery resource does not fall from overcharging, the overcharge current through it should not be more than 5% of the hourly discharge current. With a battery capacity of 2500 mA / h and a short-circuit current of 100 mA, this condition is maintained, with a battery of 3500 mA / h, even more so. That is, instead of an expensive and complex charge controller, you can simply put a silicon rectifier diode.
A diagram of an autonomous garden lamp built taking into account the described conditions is shown in Fig.:

Despite its simplicity, the battery in it is never brought to the degradation of the active medium due to overcharging and only in exceptional cases can it reach a deep discharge; therefore, its resource remains normal during operation in hard temperature conditions... The "highlight" here is SB. Their internal resistance is large and nonlinear, according to the power law, it grows with increasing load current, as a result of which the short-circuit current of the SB is only slightly more than the nominal one. From this point of view, it is more profitable to use less expensive polysilicon SBs in this scheme.
The CU control unit closes the switch S when the SB voltage drops to the “twilight” level. VD1 by that time has already closed and the battery charge will stop. It is connected to the UU battery only for power supply. Switch - diode or transistor optocoupler or electromagnetic relay; in this case, the reed switch is better, because a conventional low-voltage coil will take more current than all LEDs. It is impossible to use a thyristor optocoupler as an S in this case: in order for the opened thyristor to close, the current through it must drop to a very small value, practically to zero. Since the current is constant here, the thyristor, once opened, will not "quit" until it completely sinks the battery.
About aquarium lighting
Special linear fluorescent lamps are used to illuminate aquariums. Not like phyto lamps for flower shelves: the range of aquarium lamps is tailored to the optical properties of the water and the vital needs of aquatic plants. Both lamps are unsuitable for general lighting of premises: light that favors photosynthesis is by no means always useful for human vision.
There is no doubt that the right kitchen lighting sets the tone for the entire interior. A chandelier can become a central element in this cozy and warm room.
Using materials at hand - or even junk - you can make a lampshade from threads, an eco-style lamp from jute twine or plastic bottles, or you can make a real masterpiece - a beautiful chandelier made of wood or glass beads.
And a hand-made lamp can not only be hung in the kitchen or in the dining area, but also presented to loved ones.
Method 1. From scrap materials - everyone can!
The simplest DIY lamp is made of threads. Indeed, even a child can handle such a design. So, to make a thread chandelier, we need:

- Threads - you can take ordinary jute twine or thick cotton threads, with a total length of at least 100 meters, the color is chosen based on your imagination and the existing interior;
- PVA glue and a brush for applying it;
- Petrolatum;
- 2 air balloon - one for work, the second for checking; it is better to take a ball not ordinary, but round, then the shape of the lamp will be of the correct shape.
Advice! A baby or rubber beach ball is also suitable. For very large fixtures, a fitball ball, for example.
Work on creating a ball of threads is carried out in the following sequence:
- Inflate the balloon of the required size. Do not forget that the resulting thread lampshade will repeat the shape of the ball. Draw with a marker one or two circles above and below (you can get more below).
- Pour the glue into a container and carefully process the threads. And the ball itself can be coated with Vaseline with a brush.
Advice! You should not immediately apply glue to all threads - it is better to move along the winding site.
- This is followed by winding threads on a ball, taking into account the drawn holes - the winding density depends on how your lampshade will end up.

- After the ball is wrapped around, you need to leave the future chandelier to dry for at least 24 hours.
- The ball bursts and its remains are easily removed from the now solid structure. The result is a solid thread lampshade.
- A hole is cut from above - for the cartridge.
- It is necessary to check the strength - another ball is inserted into the lamp and inflated. This will demonstrate design flexibility.
Thus, you can also perform local lighting in the kitchen by creating several thread lamps with your own hands. Or you can hang it in the dining area, as shown in the photo.


Do not forget that for a ball of threads you can make additional decor in the form of interesting coloring, beads, butterflies or artificial flowers, or you can make a whole bunch of balls different sizes.

Following the same principle, you can come up with your own unique lamp design. For example, lace, or a ceiling lamp as in the photo below.


Method 2. Create a masterpiece - you need to try!
Excellent lighting of the kitchen will work out even if you make a lamp from beads or fabric with your own hands. You get a lamp in style or a real chandelier-chandelier.
For such work you will need:
- Old hoops, garden basket, hanging metal planter, or wire to create a frame;
- Decorative chains;
- Beads, beads, ribbons, strong threads;
- Lamp holder.


The luminaire will be a two- or three-level structure of rings arranged one above the other and connected by chains or wire.
The rings can be taken in different sizes, creating a lampshade in the spirit of vintage classics, or the same - this is exactly the kind of lighting that is performed in.


The base of the lamp is certainly painted, wrapped or decorated, after which they begin to string beads.

The consumption of beads in this project is as follows:
Bottom part: beads with a diameter of 16 mm, 15 pcs. on a thread;
Upper part: beads with a diameter of 12 mm, 31-32 pcs. on the thread.
Here you can vary the amount of tension and the number of threads.
Advice! The work should be carried out after hanging the chandelier and inserting a cartridge into it.
By analogy, you can create an artificial fruit chandelier for the kitchen. And dim lighting will turn out if you use fabric for sheathing the frame. As a rule, such a lampshade is made for country styles and.
Method 3. Lamps from waste materials - for a modern kitchen!
The most original lamp can be made from such waste material as plastic bottles and disposable spoons - it's beautiful, cheap and environmentally friendly!
We make a lampshade in the style of minimalism and - no additional embellishments from threads and beads, only matte white or colored plastic. To make such muted kitchen lighting with our own hands, we need:
- Base from a 5 liter plastic bottle;
- Socket with wire and lamp;
- Adhesive for high-quality fixation;
- Many disposable spoons.
To make a chandelier with our own hands, cut out the bottom of the bottle and cut off the handles of the spoons (not completely, so that a small stalk remains). Using glue we fix the cut spoons on the base bottle. They need to be arranged evenly, orderly, then the lampshade will look attractive.
Advice! Each next row is overlapped, without gaps.
The resulting chandelier will resemble fish scales. However, it should be remembered that such a structure is quite dense, which means that additional lighting will definitely be needed in the kitchen.
The shape of the lamp can be different, for example, in the form of a lotus.

Such decorations can also be made from disposable spoons.

A lamp made from plastic bottles, or rather from their bottoms, made by hand, may seem lacy or consisting of many small flowers.

Advice! Such a lampshade can be made not white, but colored - which means that you need to take colored bottles or paint it with paint of the original color: copper, gold, steel, pink, black, etc.
The resulting lampshade can be hung in the kitchen or over the dining table.
Let your kitchen be cozy and light! We wish you creative success and present some more great ideas for making kitchen lamps with your own hands from improvised means.


Materials
The most suitable and affordable materials are paper and the cloth ... They lend themselves easily to transformation, each of us is familiar with them and they can be found in each home ... Wonderful lamps are obtained from threads or yarns. Naturally, glass can also be used for shades. At home, these are ordinary or unusual, with an interesting shape, banks or bottle ... In especially bold projects, plastic containers, coffee packaging, and plastic children's toys were noticed.
Also, don't throw out options like rattan, bamboo, and rubber. As a basis for a future product, both raw materials and an already finished product can serve. So, for example, designers got the hang of creating delightful lampshades from beads, globes, parts of sets, mirror shards and even crumpled sheet music! One has only to look closely at the objects around you ...
Realizing how difficult it is to move from thought to action, especially to see an exquisite accessory in an ordinary bank, we have prepared several master classes for you. By following the step-by-step instructions, you can easily make hand-made new things dear to your heart for any room in the house.
Ideas and their implementation
Since we have already announced the materials suitable for the manufacture of shades and lampshades, let's start with paper.
Plafond with butterflies
For work we need:
- white thin cardboard
- thin twine or line
- glue gun
- wire for frame
- clerical knife or scissors
- round nose pliers
Advice! Before starting work, decide on the dimensions of the finished plafond. In our example, the diameter is 30 cm, which means we need a piece of cardboard 90 cm long.
- Making a frame. Cut off a piece of wire 96-98 cm long. Roll the wire into a circle with a diameter of 30 cm and fix the ends with round nose pliers.
- We cut 3 suspension elements from twine or fishing line. We measure the length of the pieces, based on the height at which you plan to hang the lamp. We tie them to the wire in three places, evenly distributing the load.
- We draw butterflies of different sizes on cardboard and cut them out.
- We roll up the cardboard, glue the joint with a strip of thick paper or stitch it with a stapler.
- We fix the upper part on the wire. For this, you can use both glue and thin wire.
- The joints and cuts can be decorated with butterflies remaining after cutting.
See what an elegant lamp we have. It will fit perfectly into the nursery and the bedroom. You will see a special chic when you turn on the lamp and butterflies flutter along the walls.
Advice! Instead of butterflies, you can cut snowflakes, stars or flowers. Decide for yourself what you like best.
60s style
If you ask our grandmothers, they will certainly remember floor lamps with lampshades in the form of an inverted bucket, tied with colored threads. We can do exactly the same with our own hands.
We need:
- frame for lampshade - 2 pcs.
- decorative braid (3 colors, choose a combination according to your taste)
- scissors
- crochet hook
Let's start manufacturing.
- We tie the first braid to the lower ring of the lampshade, leaving a tail of at least 5 cm.
- We pull it over the upper ring from the outside, throw it over it and stretch it through the inside of the lower ring. We alternate actions until the beginning of the next sector of the frame.
- We fasten the first braid and use a braid of a different color. We knit it to the next sector, not forgetting to leave the tail on the first knot.
- We do the same with the third sector, filling it with the remaining tape.
- We stretch the ponytails along the bottom of the lampshade using a crochet hook.
Here is our shade from the distant 60s and is ready, it remains only to insert the cartridge and assemble the chandelier in any order.
Fringed braid
Another original idea for a do-it-yourself lampshade is also associated with braid, but not single-layer, but with fringe. What do we need for this?
Prepare:
- two metal hoops or use an embroidery hoop
- fringed braid
- line
- acrylic paint, the same color with tape
- glue gun
- scissors
Advice! Fringed braids are available from curtain and furniture stores.
- We paint the hoops or hoops with acrylic paint. If they are already covered with varnish or other paint, it is better to sand and clean them.
- We wait until the paint is completely dry, and make three marks on each ring of the lampshade, placing them at an equal distance from each other.
- Cut three identical pieces of fishing line.
- We tie them to the smaller ring of the lampshade, leaving the upper ends with a margin, so that we can then tie them to the lamp cord.
- We measure the length of the fringe, subtract 2 cm from it, and tie the fishing line to the second ring for the resulting length. So we can get a cascade.
- We heat the glue gun and carefully glue the tape along the lower ring.
- We do the same with the upper ring, pulling it out of the lower one.
Advice! Note that hot glue can melt the line, so be careful not to apply it directly to the line. Drop the glue onto the paper, let it cool slightly, and then apply it to the line.
The problems with the choice of lamps are familiar to many. The lamps are purchased last, so it can be difficult to combine them with all other interior elements. But you shouldn't despair. After all, spectacular lamps can be made independently without spending a lot of money time.
1. New Year's decor on the chandelier

You can decorate a finished lampshade with plastic beads, which can be purchased in the New Year's decor department. Bright colors and brilliance will turn the lamp into a real decoration of any interior.
2. Cityscape

The city roofs, cut out of dark paper, are pasted onto a light-colored lampshade. Such an applique will easily transform a boring monochromatic lamp.
3. The whole world at a glance

In every house there are old cards that have been unused for years. You can make a lamp from them yourself. Just wrap an old lampshade with a piece of a suitable size card. For a cleaner look, the paper can be coated with acrylic varnish.
4. From papier-mâché

For the manufacture of original lamp with your own hands, you will have to remember the papier-mâché technique, familiar to everyone from childhood. The paper must be torn into small pieces and left for a couple of hours in an aqueous solution of PVA. Then, layer by layer, the object of the desired shape is covered with paper pulp - for example, inflated balloon... After the papier-mâché has dried, the lampshade is ready.
5. The second life of old newspapers

Just covering the lampshade with a newspaper artificially aged with tea or coffee is too simple a solution. Cut circles out of it and glue them so that they partially cover each other. An interesting play of light and shadow is guaranteed. Additionally, it is better to varnish the lampshade.
6. Eternal lampshade

You can make a lamp with your own hands from an old metal basket or ordinary wire, which will become a champion in strength and durability. In addition, such a lampshade is also completely fireproof.
7. From bright cocktail tubes

The lamp made of cocktail tubes looks democratic, but at the same time spectacular. Proto glue the tubes on one side of the old lampshade using silicone glue. If you cut the tubes in half, the lamp will turn out to be smaller.
8. Chic and shine

Beads that have not been used can be used to decorate the lamp. String them onto fine jewelry wire (available at craft stores) and attach to the metal base of the lampshade.
9. Clear geometry

Cocktail tubes, painted in gold or silver, will become the material for making a lamp with your own hands. They are fastened together with a threaded thread.
10. Lace patterns

Simply cover or glue the solid color shade with contrasting lace. In the first case, it is better to use elastic laces: they will fit more tightly to the surface of the lampshade and look neater.
11. Paper chaos

Plain white paper, rolled into tubes, becomes the raw material for the original lampshade. Glue them together in a chaotic manner, moving from bottom to top.

12. Cozy lamp for needlewomen
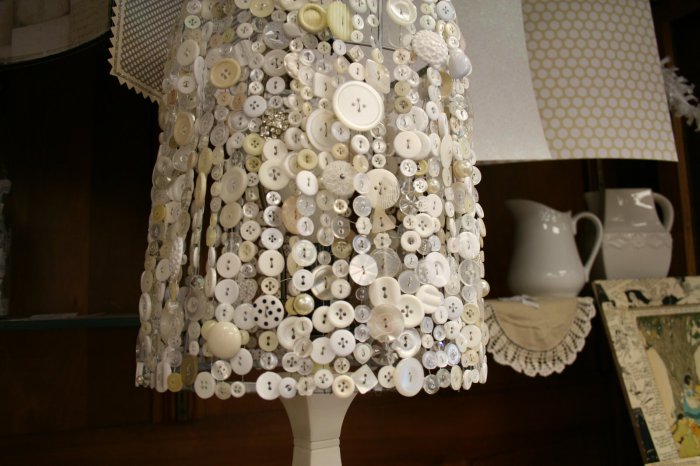
All buttons that do not find a use for themselves can be used to make a cute lamp. String the buttons on strong threads and secure them at the top of the lampshade.
13. In harmony with nature

An intricately shaped branch will be an excellent basis for an unusual lamp. In addition to her, you will need several bulbs in sockets. Just wrap the wires around the branch.
14. Almost edible chandelier

The base from the old lampshade, decorated with cutlery, looks quite brutal. Such a lamp will perfectly fit into the interior of a country-style kitchen or a loft.
15. Delicate textile petals

For the manufacture of such a lamp, a fabric is selected whose edges do not crumble. The petals cut from it are attached to the lampshade with glue.
16. From decorative rope

Spread generously the base for the future lampshade with a thick one and wrap it tightly with a rope with a rough texture. It is not at all necessary to use an old lamp as a basis. Even old dishes like glasses or bowls will do.
17. Lamp in a skirt

Semi-transparent textiles, for example, tulle from old curtains, can find a second life. Gathering it at the top in folds, fix it on the annoying lampshade.
18. In the patchwork style

Many colorful shreds are tied on a base from an old lampshade. The more, the better.
19. From favorite postcards

Often postcards and photos, even those that you like, lie idle for years. Cover a boring lamp with them and it will instantly transform.
20. Our whole life is a game

A deck that is missing a few cards should not be thrown away. Thick glossy paper with a contrasting pattern is an excellent material for decorating a lampshade, practical and beautiful.
So, the lighting problem is solved. It's time to get acquainted with
A chandelier in any room has long been not only a lighting device. It will not be an exaggeration to say that this is the piece of furniture that is the main decoration in any room.
Of course, a do-it-yourself chandelier will be an especially valuable thing. This will allow not only to highlight the special taste of the owners of the house, but also their creative mind.
Despite the fact that deciding to make a lampshade with your own hands for a chandelier, you will need to spend a lot of effort, because the process requires special concentration - for sure, the work time cannot be considered wasted, since the work will bring incredible pleasure and after that even a pleasant aftertaste will remain, and in the future you will definitely want repeat again this kind of work.

If you are thinking about how to make a chandelier, then you have probably already seen that today you can use the most various materials and sometimes quite unusual. For example, very often the shade for a chandelier is made of wood or glass.
However, if you want something even more incredible, then you can also use cardboard, and wood skewers, and even wine bottles. The choice here depends solely on the ideas that the creator has, as well as on the various wishes of the apartment owners.

In addition, a chandelier made of scrap materials must also be created taking into account the overall interior of the room.
Chandelier made of plastic spoons
Disposable spoons, which most are accustomed to using exclusively for a picnic, in reality can also act as one of the simplest and at the same time easily accessible materials for everyone to create an interesting version of a chandelier in any room.

If you look at a photo of a chandelier of this kind, you will be struck first of all by the variety colors, and in the future it will be easy to understand that the material will last a long time.

In addition, in order to create such an interesting piece of furniture, you will need a minimum of financial and material investments.

What materials will you need?
- Any empty plastic bottle. The only condition is that its volume cannot be less than five liters.
- Any plastic spoons. Their number depends solely on the chosen size of the future chandelier.
- Glue that will allow the plastic to stick together.
- The cartridge is from an old, no longer working chandelier.

The process of creating an original chandelier
Prepare plastic bottle... First of all, you need to get rid of the label and bottom, and also dry it properly.

Remove the plastic spoons and use a knife to remove any handles that you don't need. The only thing that needs to be done is to leave a couple of centimeters above the so-called “scoop” level.

Glue the blanks to the base of the prepared bottle. On the "tail" that remains, you need to apply as much glue as possible and then press it to the surface.
It is very important to continue to cover the entire bottle in this way directly in a circle until the entire prepared perimeter is “occupied” with plastic spoons.

It is best to arrange them in a classic checkerboard pattern and slide them together a little.

Thus, it will be possible to reduce the number of "free spots" to a minimum.
- The ceiling is removed from the old prepared chandelier and placed in a dried bottle.
- If there is a desire, then decorative can often be done in a similar way.

That's all. It remains only to install the chandelier in the chosen place, and also check its operation by connecting it to the power supply.

Another interesting chandelier option is a chandelier with decorative butterflies. It is worth noting that going to almost any master class on making a chandelier, designers always offer to learn how to create it, which is not surprising, because it can perfectly fit into almost any interior of the room.
Note!

In addition to the fact that this option looks truly luxurious and expensive, even a child can do it with the help of an adult, so its popularity is easily explainable.

DIY chandelier photo


Note!


