Connecting IR underfloor heating. Infrared film warm floor. Purchase of materials and tools
The system of infrared underfloor heating of the film type is one of the innovative and unique developments that allows you to solve the problems that arise when arranging home heating.
How to choose the right components for the system and lay the infrared heated floor with your own hands, we will consider in more detail.
Infrared underfloor heating is a rather complex system that cannot be made at home on your own.
The system is created on the basis of a unique nanostructure that is capable of generating infrared radiation invisible to the human eye.
Depending on the type of design of heating elements, infrared systems are divided into two main types: rod and film
Film systems are made of strips of carbon paste - high-strength carbon fiber reinforced plastic, which are hidden under a heat-resistant polyethylene film.
All strips, the thickness of which does not exceed ten millimeters, are located at an equidistant distance of 10-15 mm and are connected in parallel with each other by flat current-carrying buses protected by a silver coating.

Under the action of an electric current supplied to the tires, carbon elements begin to emit infrared radiation, the wavelength of which in the bioresonance range varies within 9-20 microns
The core of the rod systems is made up of graphite-silver rods, inside of which a carbon material is laid. They are interconnected by stranded wires and sealed in a protective copper sheath. Systems are available as individual cables or pre-assembled coils.
Infrared rays in such systems, they act in a straight line, and therefore they cause heating not of the ambient air, but of objects located inside the room: flooring, furniture, walls and ceilings. Due to this property, the speed of infrared heating is much higher than traditional analogs - electrical and water systems.
The indisputable advantages of an infrared film warm floor include:
- Environmental friendliness. Infrared rays are similar in effect to sunlight and therefore have a beneficial effect on all living organisms. They have no side effect.
- Ease of installation. Design features systems allow for minimum costs and efforts to make quality installation, owning only the basic skills of construction work.
- Compatibility with different types of coatings. It is allowed to lay the infrared warm floor immediately "on dry" under the carpet, parquet board, linoleum or laminate.
Due to the fact that the heating elements in the film system are tightly laminated with a polymer layer, they are not afraid of accidental dents and punctures, as well as exposure to moisture. But even if one of the carbon strips is damaged due to the parallel connection, the remaining elements will continue to work.
Image gallery


The thickness of the thermal film does not even reach 5 millimeters, and therefore practically does not "eat up" the height of the room. Thanks to this, it can be safely installed under almost any coating. In addition, such a film is allowed to be placed on vertical surfaces, fixing it to the walls and ceiling, providing zonal heating of the room.

The vulnerability of the system is the fear of "locking", in which the heated areas may fail under the weight of large objects installed on them
For this reason, the film material is laid only in those areas where large equipment and furniture will not stand. Caution should be exercised when using infrared systems in damp rooms, as there is a risk of electric shock.
Electricity consumption for the operation of an infrared warm floor directly depends on the operating mode of the system and the working area of \u200b\u200bthe room. We also recommend that you familiarize yourself with our other, which describes in detail the film type of heating for rooms.
Selection of system components
In addition to the carbon heating strips, sealed in a polyester film, the film floor system requires a thermostat equipped with a temperature sensor.
Film options
There are many options for film floors on the modern market. And they all have approximately the same characteristics: power consumption from 25 to 80 W / h, and operating temperature from 30 to 50 ° C.
There are two types of film systems on sale:
- solid - in them the film is completely covered with carbon material;
- striped - in them the carbon material is applied to the surface in the form of stripes 15-20 mm wide.
The difference between them is that in continuous systems the material is applied by rolling over the surface in the form of a paste, and in striped systems - by means of fragmentary spraying.

For small rooms, it is better to choose a film with a width of 50 cm; for more spacious rooms it is more profitable to purchase strips 100 cm wide
The thickness of the material can vary from two microns to 0.4 millimeters. The roll length is 50 meters.
There is an opinion that it is better to choose the thinnest films. But, as the reviews show, the smaller the carbon layer, the faster the system fails. Therefore, it is more advisable to purchase material not thinner than 3 mm. For example, for European countries and the USA the best option the thickness of the material is considered to be 0.338 mm.
Such systems are not cheap. The average price range of IR film systems from leading manufacturers ranges from $ 20-25 per square meter... You can read more about the types of film floor heating in.
Calculation of the required quantity
Installation of a film floor with infrared heating is performed only over the usable area of \u200b\u200bthe room.
The percentage of the covered area depends on whether the infrared system acts as the main or additional heat source:
- 80% area - as the main heating;
- 40-50% of the area - as a supplement to radiator heating.
Determining the total length of all strips will help the layout of the system zones previously drawn on the sheet. Having calculated the length of each fragment and adding their number, it will not be difficult to calculate the required total length of the coating.

When calculating the area to be covered, it should be borne in mind that, according to the norms, it will be necessary to indent each wall by 10 - 20 centimeters
To prevent premature failure of the floor system, it is necessary to distance yourself from the pipes and risers of central heating when laying out. The laid strips must not intersect or overlap each other.
When placing fragments on the plan and calculating their length, also keep in mind that the length of each strip must be a multiple of 17-18 centimeters, since it is in these places that the cutting lines are located.
Thermostat for temperature control
The IR system is operated by a thermostat. The temperature sensor included in the package is placed between the heating elements, and connected to the device through contacts. The sensor reads the temperature from the surface of the film and transmits the data to the thermostat, which, in turn, is triggered and starts the system into operation.

The main purpose of the device is to monitor the floor temperature according to the sensor readings and adjust the heating power in accordance with the specified parameters
There is a huge variety of regulator modifications that differ in functionality on the market today.
All of them are conventionally divided into two types:
- Mechanical - equipped with keys and mechanical wheels and are suitable for arranging small systems.
- Electronic - equipped with push-button control and display, applicable for small non-zoned rooms.
Programmable models are equipped with touch screens, with which you can set 4 time modes at once, thereby saving up to 50% of energy consumption.
Temperature sensors are available in two versions, depending on the type of device and type of floor covering. For soft coatings they are available in compact plastic containers. For solid - in the form of larger elements, equipped with gel protection against the effects of adhesive on the strips and prevention of mechanical damage.

Some models of thermostats are able to read information about the heating of the floor surface, others - to additionally analyze the degree of heating of the air in the room
When choosing a device, you should focus on the power of the thermostat. It is calculated based on the fact that one square meter of film consumes on average 50-70 watts. To determine the required value, the indicator is multiplied by the size of the working area covered with heating elements.
Budget models that operate from the network often “sin” in that in the event of an emergency power outage they cannot resume work on their own. Therefore, it is better to give preference to models that have a battery. Read more about the choice and installation of a thermostat for a warm floor.

If the film system is supposed to be combined with a porcelain stoneware coating or tile, you will need to build a cement-sand screed
Installation of infrared underfloor heating
Installation of an IR system under a particular coating has its own characteristics. So, planning to use as topcoat soft materials such as linoleum or carpet, sheets of fiberboard or plywood should be laid as an interlayer between the heating strips and it.
A hard layer will protect the film from "injury" due to the pressing of the coating by the legs of heavy furniture or women's heels.
In any case, the installation of an infrared underfloor heating system is performed in several stages.
Image gallery


Purchase of materials and tools
In addition to the infrared film itself, it is also necessary to purchase rolled thermal insulation material, as well as metallized, or one-sided construction tape to fix it. The film itself is attached to the base using double-sided tape.
To carry out the work, you will need a set of tools:
- grinder equipped with a stone disc;
- puncher;
- knife or scissors;
- pliers or pliers;
- construction mixer;
- notched trowel;
- wide brush;
- container for mixing the solution.
If you have not yet drawn up a layout diagram at the stage of material selection, this must be done now, taking into account not only the size of the room, but the width of the strips used.

The plan of the room should reflect the placement of furniture and areas with fragments of heating elements
The arrangement of the films can be both longitudinal and transverse. The best option should be chosen based on material savings. But still, experts recommend placing stripes in length. This minimizes the number of connection points.
Preparing the base
When preparing the base for laying the IR system, it is not at all necessary to dismantle the old coating. Dismantling is required only if the base base is badly damaged and the surface is "dotted" with deep cracks and potholes.
According to the standards, the permissible height difference of the base base for the film system is only 0.2-0.3 cm for each running meter regardless of the direction of the control strip or building level applied to the surface.

When preparing the base, it is necessary to clean the surface from the remnants of debris and dust, and, if necessary, to putty the cracks and eliminate other minor flaws
The technology of laying the IR system involves arranging a heat-insulating layer, the main task of which is to prevent heat leakage through the floor slabs, thereby increasing the efficiency of the system.
As a heater, it is best suited:
- Izolon or Penofol- rolled polyethylene foam insulation. They are distinguished by excellent waterproofing qualities, because in the process of foaming, closed cells that do not pass water are formed;
- Cork backing - compressed cork wood particles mixed with suberin binder.
When installing underfloor heating, the priority is given to substrates with a metallized or foil lavsan sheath. It enhances heat transfer due to its own reflective effect.
The structure of these materials will prevent moisture absorption, acting as a waterproofer, and the reflective surface will direct the generated heat directly into the room, and not to the underlying floor.

The roll material is laid on the cleaned surface with the foil side up, placing the strips end-to-end to each other
The substrate is spread over the entire area of \u200b\u200bthe room close to the walls. The joints of the strips laid on the floor are fastened together with masking or aluminum tape. If the thickness of the material is small, you can also fasten the strips laid with a small overlap with construction brackets.
Laying the film system
In accordance with the marking, the film is cut into separate fragments, taking into account that maximum length a single piece of cloth should not exceed eight meters. Cutting can be done with scissors or a knife. The cut fragments of the strips are sequentially laid out on the substrate according to the drawn up scheme.

Divided strips in accordance with the scheme are laid out on the surface, directing with contacts to the wall where the thermostat is planned to be installed
Film cuts are placed face up or down according to the manufacturer's instructions. The bands of the IR system are placed strictly according to the instructions. For example, strips of Caleo foil flooring are laid with a side overlap so that there is a gap of 1 cm between adjacent copper rails.
If the brands, the manufacturers of which are recommended to lay strips without overlap and with a more impressive distance between the tires. When laying, it is not allowed to bend the carbon strips at an angle of 90 °, as this can damage the part of the system.
If necessary, the strips are cut along the perimeter of the room, making cuts in the places strictly indicated by the dotted line on the film. Approximate cut lines are usually located every 18 cm.
Image gallery


Double-sided tape is used to fix the film to the surface. This solution allows you to prevent the shift of elements relative to the markup and each other. In the process of laying strips of infrared underfloor heating, it is important to prevent damage to the material, which often happens when the tools used during installation accidentally fall on them.

The places of the film cuts, where the conductive conductors are affected, must be covered with bitumen insulation, excluding the ingress of air between the tire and the tape
System connection diagram
Each strip is equipped with a copper clip that connects securely to a conductor made of the same material. To connect the terminal, you will have to separate a section of 8-10 mm from the cut from the lamination, and carefully peel the silver and copper bus at the edge.
The contact is inserted strictly in the middle of the end of the conductive bus so that one side of it is in contact with it, and the other is adjacent to the inner side of the film. Contacts are crimped with pliers, trying to prevent sparking.

The wires leading from the temperature sensor to the thermostat are also laid in accordance with the diagram and fed to the device through a box of plinths
Current-carrying wires with stripped 10-12 millimeters of "tails" of conductors are brought to the contact terminals and connected: to one - "0", to the other - "phase". The connected terminals are carefully clamped with pliers or pliers. If it is possible to use soldering, the wires can be simply soldered to the busbars, and the joints can be sealed with insulation.
After connecting each piece of film, it is necessary to check the fixation of the clip by slightly pulling on it. It should not move relative to the film.
The strips are connected using a parallel circuit. This means that the wiring will be done on one side only. For "powering" use stranded copper wires with a cross section of 1.5 sq. Mm.
The joints of the clamp with the wires after crimping with pliers, as well as the sections of the cut of the copper bus on both sides, must be insulated with cuts of vinyl-mastic tape, which always comes with the system.
The resistance of the circuit is measured at the free ends of the wires attached to all sections of the heating film. Ideally, the calculated load should be 20% lower than that declared by the manufacturer of the selected thermostat model. If the received load corresponds to the maximum allowable indicator of the selected thermostat, they begin to connect it.
Installation of the control device
In order for the heat regulator to work correctly, a thermal sensor is fixed on the lower side of the heating cloth with tape. Its installation is carried out using the 16 mm corrugated tube included in the factory.

The thermal sensor should be placed strictly on the insulating layer; otherwise it will not show the true floor temperature
To prevent the formation of a bump at the point of installation of the temperature sensor, it is recommended to make shallow grooves in the base and in the heat-insulating layer. The location of the device is chosen as close as possible to the thermostat. The distance from the wall must be at least 30 cm.
There are no special requirements for the installation of the thermostat. It can be placed in any accessible place, hidden from direct hit sun rays... However, you should choose a place for its installation in advance, because It is better to lay the strips of the film system with contacts to the wall on which the regulating device will be mounted. This method reduces the length of the connecting wires.
The mounting option can also be any:
- outer - in which the device is fixed directly to the wall surface;
- hidden - involves the creation of a depression in which the device will be hidden.
To perform flush mounting in the wall using a grinder or a punch, grooves are made 20 mm deep, into which the electrical wiring is laid.
The technology for installing the thermostat is not much different from the process of installing a conventional electrical outlet. To equip the "nest" in the wall with the help of a crown, they make a niche into which the socket is buried. The device is placed at a height of 80-90 cm from the floor level.

To connect the wires, the ends of the cores are stripped and brought into the appropriate contacts, focusing on the marking and color of the insulation
Having connected the thermostat, it remains only to connect the free end of the temperature sensor laid in the corrugated pipe to the sensor terminals.
Trial run of the IR system
After completing the installation and connection of the infrared heated floor, it is necessary to check the functionality of the system. Before starting, check the reliability of the isolation of the connection points. First, the check is performed using a tester. The system indicators must correspond to those indicated by the manufacturer.

With the correct calculation of the power of the thermostat and the installation of the temperature sensor, the automatic shutdown of the system should occur within half an hour from the moment of switching on
After starting the system, you should carefully check the uniformity of heating of each element. If malfunctions are found in individual fragments, they are eliminated or the sections of the strips are replaced with new ones.
If, when turned on, everything heats up evenly, and the contacts do not "smell" and do not spark, you can proceed to the stage of installing the floor covering. It is better to save the plan for laying the IR system by attaching it to the product passport or sketching it on the back of the warranty documentation.
We also suggest that you familiarize yourself with our other material, which describes in detail the rules for installing and operating infrared.
Thinking about installing an infrared floor system but not sure where to start? Or do you have experience in the installation of such systems and can give practical advice to our readers? Please leave your comments, ask questions, share your experience of using the film floor system in the block below.
Installation of an infrared heater: connection and principle of operation. Modern developments aimed at reducing energy costs have become especially popular in last years... Moreover, such devices also make it possible to increase the efficiency of heating devices by controlling their operation. A common example is a thermostat for an infrared heater. Consider the features of its selection, connection and operation.
The thermostat regulates the operation of the heaters, thereby significantly reducing electricity costs
Varieties and characteristics of thermostats
A thermostat is a device that periodically measures the air temperature in a room and, depending on the results obtained, adjusts the operation of the heater. That is, if the air temperature reaches the set point, the power is limited and the heater stops working. As soon as the air cools down, the device enters the active phase again, thus constantly maintaining the required level of heat in the room. The design and operation of temperature control devices can differ significantly from each other. There are two main types of thermostats:
- Mechanical.
- Electronic.

Mechanical type thermostat for infrared heater
The first version of thermostats is a small plastic box, the outer part of which is equipped with a switch. As a rule, it is round, which allows you to smoothly change its position. The division value may be different, for example, in some models it is 1 °, while in others the transition occurs immediately from 2 ° to 5 °, etc. In addition, there is a power button on the case and a light indicator showing whether the device is active in this moment. There are also more modern mechanical models of thermostats that are equipped with a display. True, not so much data is displayed there, and temperature control is carried out using only two control buttons.
Helpful advice! It is convenient to use a mechanical thermostat only if one of the residents is present in the house for a considerable time. This is an important point, since it is better to turn off the device in the absence of people. Remote control function is not provided.

An electronic version of the thermostat that controls the operation of the IR heater
Electronic thermostats have much greater control capabilities. The design and construction of these devices are constantly being modernized - for manufacturing modern models even LCD screens are used. Depending on the selected model, setting and control can be carried out both using buttons and touch. In some devices, to protect the screen as well as create a more attractive appearance, use special hinged covers. Such devices can be used without problems even in those houses where the owners are often absent or live seasonally. The device is easy to program and can be easily controlled remotely using mobile devices. The only difficulty in purchasing such a thermostat is the rather high cost.
How to connect a thermostat to an infrared heater
Whichever of the above options you choose, for its accurate and correct operation requires correct installation... First of all, this is due to the choice of a suitable place, in which you must take into account the following factors:
- the device can be damaged by high humidity;

Diy thermostat installation process
- there should be no sources of heat or sunlight nearby.
If these factors are not taken into account, temperature measurements will be made inaccurately, which will lead to incorrect operation of the heater and its inability to maintain the required temperature in the house. A separate issue is the connection of the device itself to the network and an infrared heater. In order to connect all these elements together, it is necessary to use an automatic relay. It will serve as a power source for the heater. Let's consider some of the most common connection options.
Diagrams for connecting an infrared heater through a thermostat
The fastest and most understandable scheme for connecting a thermostat to an infrared heater is to use 1 thermostat for 1 heater. In this case, the connection diagram is as simple as possible: the machine has 2 pairs of wires, one of which goes to the thermostat. Design of electrical circuits of any complexity https://www.pointcad.ru/product/autocad-electrical. One wire is zero, the other is phase. And you need to connect them accordingly. A second pair of wires is used to connect to the heater itself.

Options for connecting infrared heaters through a thermostat
The second, slightly more complicated, method of connecting an infrared heater through a thermostat involves using a parallel connection. Thus, two heating devices can be connected to one thermostat at once. One pair of wires from the machine is connected to a thermostat, from which, in turn, wiring is made to two different heaters. The most difficult, but at the same time, the most practical option is to use one thermostat for several household heaters. For this purpose, it is necessary to use a magnetic starter, and develop the connection diagram individually. Of course, you can try to find a ready-made one, but this method cannot absolutely guarantee the smooth operation of the system.
Helpful advice! Pay special attention to calculations and design individual plan is also worth it because your safety depends on it. Malfunctions in the heating system can lead to fire hazardous situations.

To connect multiple heaters, you must use a magnetic starter
There are even manufacturers who produce original magnetic starters for their devices, as well as sets of wires required to connect them. Thanks to this, it is much easier to connect, and the quality of such goods is considered higher. But in any case, if you have not previously dealt with electricity, it is better to entrust the development of the circuit and the connection of the system to professionals.
Infrared heater with thermostat: prices and characteristics of three popular models
Wall and ceiling models of infrared heaters are quite popular, their main advantage is their compact size. In addition, buyers are attracted by the design and the ability to choose a model for the interior of the room. Below you can find the characteristics and prices of several popular infrared heaters with a thermostat. Nikaten 200 - one of the most modern infrared heating plates. Control of the dynamics of changes in temperature conditions is regulated by a built-in thermostat. In addition, there is a security system that automatically turns off the device in the event of a dangerous situation or fire hazard.

Changing the temperature regime of the Nikaten 200 heater is controlled by a thermostat built into the structure
The main characteristics of the heater Nikaten 200:
- ceramic panel;
- size - 30x60 cm;
- cools down within 90 minutes, continuing to generate heat;
- silent work;
- the most simple installation.
The distinctive qualities of this panel can be called a huge selection color solutions, and also quite affordable cost - about 3,500 rubles. Heater Zilon IR-0.8 S was designed as a wall / ceiling. This model can be fixed to any suitable surface. The kit includes a thermostat that regulates the correspondence between the set and real temperature parameters. To protect the device, an automatic shutdown in case of overheating is provided.

The manufacturer provides a thermostat complete with Zilon IR-0.8 S panels, which helps to maintain a comfortable temperature in the room.
The main characteristics of the Zilon IR-0.8 S:
- power - 0.8 kW;
- size - 119x13x4 cm;
- weight - 3.2 kg;
- does not affect the content of carbon dioxide in the air;
- consumes a minimum amount of electricity.
Nevertheless, users point out some disadvantages of using this model. So, during warming up or cooling down, the device emits a characteristic crackle, which not everyone likes. And being located on the ceiling, it can not always warm up the floor well enough. And yet, if we consider that the cost of such a heater is only 2,400 rubles, the device can be called one of the most worthy.

Layout of Zilon IR heaters
Noirot Royat 2 1200 - universal wall heater, equipped with three modes at once, which makes it convenient to use throughout the year and in any room. The direction of heat flow can also be corrected by turning the surface at different angles (up to 30 °). In order for the regulation to be carried out as conveniently as possible, the developers took care of the possibility of attaching the control unit both to the right and to the left. The main characteristics of the Noirot Royat 2 1200:
- quartz heating element;
- three power modes - 0.3 / 0.6 / 1.2 kW;
- size - 45x12x11 cm;
- there is a thermostat and an overheating fuse;
- works silently.
Perhaps the only drawback of this device is the rather high cost - about 9700 rubles. Otherwise, the appliance is considered reliable and is often used to heat rooms such as the bathroom.

Infrared heater Noirot Royat 2 1200 is equipped with a thermostat and an overheating protection system
Floor standing infrared heaters with thermostat
Another popular type of device is floor-standing infrared heaters with a thermostat. The price of such devices does not differ much from other options, however, due to their mobility, they are often more convenient. If you want to buy an infrared floor heater with a thermostat, you can easily choose the model that suits your specific conditions among a wide range of offers. As an example, consider such a popular line as Ballu infrared heaters, which cannot be connected to a thermostat on your own, but choosing an already equipped model is very simple. The connection of the Ballu infrared heater via a thermostat is carried out according to standard schemes. The control device is built into the heater body. One of the most popular models of these heaters is BALLU BIH-L of the Bali series. A modern steel telescopic stand BIH-LS-210 is provided with this device. It provides a solid fixation of the device and allows you to use it on summer grounds, verandas, in the garden.

BALLU electric infrared heater selection scheme
The main characteristics of the heater BALLU BIH-L:
- power 2-3 kW;
- mounting height on a tripod up to 4.5 m;
- for uniform heating it is equipped with a special reflector with ribbing;
- the set includes brackets for surface mounting;
- the body is made of steel;
- the connection of the thermostat to the Ballu infrared heater is made by the manufacturer;
- there is a function to control the heating of the device.
This model is considered the most versatile, as it can be installed almost anywhere: in the house, on the street or on the veranda. Providing uniform heating, it creates a comfortable temperature for everyone who is in the range of action, while not wasting extra energy for heating the air.

Electronic thermostats are easy to program and can be easily controlled remotely using mobile devices
Helpful advice! As a stationary outdoor heater, you can consider purchasing an infrared umbrella designed specifically to create comfortable conditions in the yard.
Choosing a thermostat for an infrared heater
If we talk about purchasing and connecting a thermostat to an infrared heater as individual element, then the main thing here is to do right choice at the time of buying. Using a small table, you can compare several of the most affordable models. a brief description of and the cost of thermostats for heaters:
| Model name | Features and characteristics | Cost, rub. |
| Ballu RTR-E 6202 | Simple mechanical control. It is universal for use with any devices and in any premises. | 1100 |
| Ballu TA2N-S | Mechanical temperature control combined with an on and off function. There is a diode light that indicates the current state of the device. | 700 |
| Eberle RTR - E6163 | A universal device, suitable not only for heaters, but also for connection to a floor heating system. Has a temperature adjustment range from +5 to + 30 °. | 1150 |
| Eberle instata 2 | Push-button model equipped with a small black and white display for setting the temperature. | 2850 |
| Eberle Instat + 3r | A modern model of an electronic thermostat that lends itself to programming. | 3600 |
Which model you want to purchase depends only on your desires and capabilities. The variety and functionality of the devices on sale can satisfy the requirements of even the most demanding customer. Today you can easily purchase both devices for the home or garden, and, for example, infrared heaters with a thermostat for a chicken coop or any other purpose. It is difficult to underestimate the importance of using thermostats in the operation of heating devices. After all, we are talking not only about maintaining a comfortable temperature at any time of the year, but also about significant savings and safety. Especially considering the fact that everyone can buy the simplest mechanical thermostat.
Sooner or later, developers or future homeowners have to deal with one of the most thrilling questions of how to choose the right heating system. There are a lot of options for arranging a heating system, but more and more often, owners of new buildings deliberately choose electric infrared heaters and convectors for heating. Unlike bulky water and gas heaters, the use of electrical appliances is much easier and cheaper. It is only necessary to choose the right layout and install an infrared heater in every room of the house. Nothing complicated, at first glance, but certain nuances in installation and use.
How an indoor infrared heater works
Most of the radiant infrared heaters have a universal mount on the body that can hold a small weight on any surface - on the wall, on the ceiling and even on the outboard ceiling rods and consoles. The power of a radiant heater, depending on the version, model and used heating element, can range from 0.8 kW to 2.5 kW.
The main problem that arises when choosing a circuit, where and how to install an infrared heater, is associated with a high concentration of radiant energy in the stream. It's like being around a fire - the closer you get to a hot surface, the stronger the heat. True, the density of the radiating flux produced by the infrared heater decreases in a quadratic relationship. At a distance of three meters, the thermal effect is four times less than at a distance of a meter from an infrared spiral or a ceramic panel.
When installing the heater, observe the following restrictions:
- The distance of maximum comfort from the heater for low-power devices of 700-800 W is only 70 cm, for 1300-2000 W the distance from the radiating surface of the heater to the face, as the most sensitive part of the body, must be at least 130-150 cm;
- If it is necessary to warm a room with an infrared heater, in which people spend quite a long time in almost one position, the distance from the plane of the device installation to the open parts of the body - hands and face should be at least 2 m for a one and a half kilowatt heater;
- For cases where several infrared heaters are planned to be installed in a room, each heater should be directed to its own blind zone, without crossing the streams or the direction of the radiating elements on one directory.
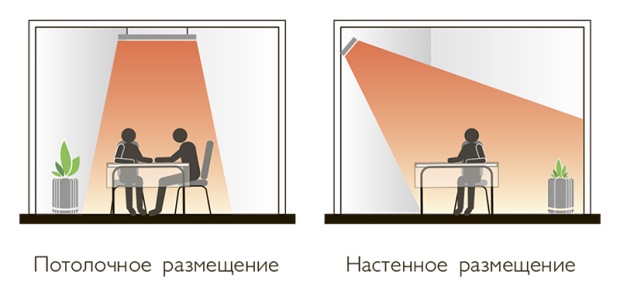
For powerful heaters, they traditionally choose to be installed in a corner on swivel arms, which allow adjusting the angle of inclination of the infrared heater's reflective mirror. The best effect is obtained by installing radiant heaters on the ceiling. It turns out, as it were, the antipode of a warm floor. The ceiling scheme allows you to maximize the heat flow in the room, just like fluorescent lamps create uniform lighting.
Important! The heat energy of an infrared emitter of several hundred watts in a concentrated form can heat objects to a high temperature, therefore, in the immediate vicinity, at a distance of 60-70 cm from the heater, there should be no plastic, paper or fabric objects.
Otherwise, the surface may warp or burn out, and if it is very close or touched, the material may be partially destroyed.
Optimal location of the heater
Of course, radiation alone, even from the most powerful heater, cannot guarantee warming up every corner of the room; anyway, convection cannot be avoided. Only warm air, moving under the action of the ventilation flow, is able to equalize the temperature and evenly warm the entire room.
For different premises own, the most optimal heater installation scheme is used:
- For a bedroom, the most convenient and effective location of the infrared heater will be at the maximum height above the head of the sofa or bed, so that 2/3 of the surface is located in the shade of the heat flow;
- For the kitchen and living room, the installation of the heater is performed so that the heat flux of infrared radiation is directed into the window sill, the place where cold air flows into the room;
- In hallways and corridors, the heater is installed on the ceiling with the vertical direction of infrared radiation down to the floor. A heat radiator has a truly unique ability to quickly dry the floor and remove drops and residues of moisture brought into the room from the street on shoes and outerwear. In order not to damage the shoes, they must be removed in time from under the heat flow of the heater.
In addition, the height of the ceiling suspension of the heater must be correctly calculated. For the ceiling in the hallway, the best option would be to locate the heater in the center, at a standard height ceiling slab at 250 cm, under an infrared heater with a power of 700 W, only people with a height of 170-175 cm will feel comfortable.
Therefore, when planning the installation of infrared heaters, you will need to make ceilings in the hallway under 260-270 cm, or instead of one device, use two low-power heaters of 500 W, so that it does not bake into the crown. The features of such an installation can be found in the video:

We install the heater on our own
The simplest and most effective method installation provides for the placement of a heating device on the ceiling of the room. Suspension of the body is carried out in the following order:
- On the short ends of the body, it is necessary to unscrew the screws and remove the covers, the suspension brackets are inserted into the slots and fixed with a latch;
- The distance between the brackets on the ceiling is used to mark the installation locations of the anchor hooks;
- According to the marking, holes are drilled in the ceiling slab, plugs are clogged and the suspension hooks are screwed in.

Before fixing the infrared heater, it will be necessary to lay the wiring from the power supply panel to the thermostat installation site and then to the heater. Ceiling structures are rarely equipped with built-in thermostats, therefore the box responsible for controlling the heating process is placed at a height of 1.6-1.7 m near the entrance to the room according to the diagram below.

To connect an infrared heater, you will need to strip the ends of the wires and fix them in the chips according to the scheme given in the product passport or glued on the inside of the cover. It remains to connect the wiring to a separate bag on the dashboard, and you can start the infrared heater into action.
Digital thermostats allow you to control room temperature with high precision. But in practice, infrared devices have little heating inertia. For example, setting the temperature in the room to 22 ° C on the device, the heater will actually raise it by half a degree-degree higher, since the red-hot radiating spiral or the heater panel continues to heat the air by inertia for another 5-7 minutes after the thermostat has cut off the power supply.
Does it make sense to contact infrared heaters
There are about the same number of admirers and ardent critics of heating residential premises using infrared radiation installations. It should be admitted that, despite the fierce criticism of fans of water heating, the idea of \u200b\u200busing electric infrared heaters is becoming more and more popular.
Radiating electric heaters have their own rather interesting advantages:
- Versatility. You can install an infrared heater on any surface, at any angle, without restrictions on height and method of fastening;
- Locality of heating. An infrared emitter allows you to organize heating of a part of the room, even if there is no way to limit the loss of warm air;
- Easy to install. It is enough to competently lay the electrical wiring to the places where the heaters are installed, connect the input to the house and a meter designed for increased power consumption;
- Low inertia of infrared heaters. Heating of the room stops 10 minutes after the electric heater is turned off;
- Possibility of smooth adjustment and precise dosage of room heating.
Note! Due to the very low thermal inertia of infrared heaters, the air temperature in the room can be regulated with an accuracy of half a degree, it is enough to install digital or even mechanical thermostats.

Of course, similar options for keeping the air temperature in a house or apartment at a given level can be realized with the help of a warm floor or electric convectors, but in both cases, good results can be achieved only in closed rooms, when there are no drafts and walk-through rooms.
Practice proves once again that the use of radiant devices makes it possible to heat a room no less efficiently than using convectors or water and oil radiators. In this case, it is important to choose the correct scheme and method for installing an infrared heater.
Conventional electric water-oil heaters and radiators, regardless of the installation scheme, heat the air by convection:
- Most of the heat-dissipating surface is covered with a casing or screen to improve, according to the developers, the flow of air to the spirals or tubular sections;
- In some designs, convection electric heaters simply unsuccessfully copy the shape of cast-iron central heating batteries;
- Such designs of heaters are designed for installation in window niches, where warm air mixes with the influx of cold air from the ventilation valve and spreads well throughout the room. In all other cases, the efficiency and economy of heaters are significantly lower than those of infrared heaters.

Important! There are many comparative tests that measure heating performance, but the most reliable data show the difference between infrared heaters and convectors by almost 18%.
In addition, infrared heaters are practically insensitive to the position of the body, while for the convector, manufacturers require installation only in a vertical position, with an angle of inclination of at least 4-7 °.
Low temperature infrared heaters
The most frequently criticized lack of an infrared heater is associated with high temperature radiating surface. Most often, the spiral or ceramic panel heats up to 300-500 ° C, which can cause overdrying of the air in the room.
More recently, so-called cold or low-temperature heaters have been used for heating. The new infrared heaters look like ordinary square tiles of 60 cm or 50 cm in size.The smooth heating surface is made of polymer ceramics, on the back there can be a protective grill or plastic panelcovering the heating element.

Such heaters are heated to a temperature of 90-95 ° C, therefore, even with prolonged contact with fabric, curtains or furniture, there is no damage. Installation of such an infrared heater can be performed almost anywhere, but preferably no closer than 40-50 cm to open parts of the body, you can use the advice on the video:
The most important thing is that the efficiency of heating the premises of such a heater is about 20-25% higher than in comparison with the vaunted convectors and oil radiators.
Conclusion
For example: heating an ordinary apartment, with an area of \u200b\u200b55-60 m 2, without external thermal insulation, with the installation of infrared heaters it will be cheaper by about 25-30% of conventional water centralized heating, video The use of convectors at cost is approximately comparable to centralized heating, and the use of an electric boiler costs 10-15% more expensive. If you add a two-tariff meter to infrared devices, then the practical benefit from installing a heater will increase by another 10%, provided that the walls of the house are well insulated.
Infrared panels are gaining more and more popularity every year. They are easy to operate and provide quick heating of the room, and the built-in thermostat allows you to set the desired heating temperature in a few clicks. Moreover, installing infrared heaters with your own hands is quick and easy if you follow the instructions. Other advantages of this equipment include:

It is not surprising that many people are interested in installing infrared heaters with their own hands. This process does not require any special skills and takes from 25 minutes to one and a half hours.
Attention! Pay special attention to your power selection before purchasing. For example, a room with a footage of 20 m2 requires an apparatus up to 2000 watts. For 8 m2, 800 watts is enough. Detailed information about the equipment is available on the manufacturer's website. If the room is too large, you can install multiple devices.
Training
Required tools

To install an infrared heater as expected, you must have the tools:
- screwdriver;
- pliers;
- roulette.
More complex equipment can be used as needed. For example, if you are interested in installing infrared heaters with your own hands in the amount of several pieces, it is best to use a pyrometer for calculations. It will allow you to determine the warmest and coldest places in the room. Based on the information received, you will select the optimal location for each device.
Safety engineering

Important! Keep in mind that installing infrared heaters with your own hands involves working with electricity. Therefore, you need to be very careful.
There is a set of measures that will prevent accidents both during installation and during operation:

The device must not be switched on until installation is complete The device must have an appropriate degree of protection if the panel is installed in a bath or sauna. If all these rules are observed, the installation of an infrared heater will be quick and easy.
Important! It is best not to install the panel over a sofa, bed or table. Move it a little to the side - this will allow you to use the device with greater comfort.

When installing infrared heaters with your own hands, you need the distance between the ceiling and the body to be at least 3 millimeters. AT country houses the panels are taken out to heat the external space, for example, summer kitchen... In such cases, insulating material or foil must be placed under the housing to increase efficiency.
Installation
Installation process

To make the installation of an infrared heater as simple as possible, it is better to place the panel with a connector to the wall. In most models, the contacts are self-locking. The delivery package includes elements for fixing the device to the ceiling.
The installation process includes the following steps:

As you can see, installing infrared heaters with your own hands is not a particularly difficult process. The panels can also be wall-mounted, but the heating effect will be much less.

Installation different models IR heaters:
Network connection
Important! It is best to lay the wires in a decorative box.
The device is connected to a thermostat that will maintain the desired temperature. This is done through three terminals: "ground", "phase" and "zero". Accordingly, the supply cable must be three-core. Alternatively, you can use PVA 3x1.5.

The classic heating system in the modern world has outlived its usefulness. And this happened due to the presence of a lot of shortcomings in it: significant heat loss, slow heating, stratification of air masses, and so on. It was these factors that influenced the emergence of a special interest of users in infrared heaters.
Feature of infrared heaters
The infrared heater can be fixed to a wooden surface
Infrared heaters are a unique opportunity to make life comfortable in summer cottages, apartments, private houses. Today, such devices are also in great demand in offices and other similar institutions where a regulating thermal system is needed.
Can an infrared heater be used as a single heating system? A very interesting question, which can definitely be answered in the affirmative. This type of heating is great both for the main heating system and as an add-on. The difference will be expressed solely in design power.
This type of heating has several advantages:
- It does not require huge costs, either money or labor, to establish powerful structures.
- It is characterized by silent operation and automation.
- It guarantees safety and environmental friendliness.
- Provides the possibility of zone heating. At the same time, it can maintain different temperatures in two different zones.

The device can be installed for zone heating
The infrared heater is easy to install, attach and use. It starts performing its functions as quickly as possible, providing a high level of comfort in its area of \u200b\u200boperation. A huge advantage of using this type of heating is a small percentage of moisture reduction in the room. That is, there is no problem of dry air.
For getting maximum benefit from the use of such a useful installation, it should be correctly installed.
Installing a ceiling heater

Installation of an infrared heater is carried out on different surfaces
Users search additional sources heat, which perform their functions as much as possible, while being practical and economical. The above considered advantages of infrared heaters are just suitable for the qualities of economy, practicality and profitability.
Today, the topic is of great relevance: "How to install and connect an infrared heater." After all, the final result depends on the correctness of the procedure. Any mistake can lead to unwanted events.
Types of infrared heater:
- as a separate device;
- as a film.
Installation of an infrared ceiling heater is much easier than working with foil. In this case, only general principles are required. Firstly, there must be a good fastening that will not bend under the weight of the heat unit. It is better to use brackets to install the device.

The safest way to mount devices on metal brackets
They provide the ability to mount the device at a horizontal angle. What does it mean? This means that with their help, installation is possible not only on the ceiling, but also directly on the wall.
Instrument installation rules:
- Electrical cables must only be routed over a non-combustible surface.
- The fastening elements must not touch the heating part.
- When installing a thermal structure, you should exclude possible contact with a flammable surface and carry out complete insulation of the wiring.
- The products should be fixed at a height of 2.5 to 3.5 meters.
To install the device in a residential area, you should purchase those devices whose power does not exceed 800 watts.
Always remember the rules fire safety... In this case, they also cannot be ignored, since this can lead to a fire in the room.
Installation of a film heater

Installation of a film heater is carried out on a prepared surface
Installing the film also requires a number of nuances. For example, ceilings should not be lower than 230 cm. If this condition is not met, there will be discomfort associated with overheating.
Installation rules:
- Laying the film should be carried out on a perfectly prepared surface, on which finishing work will already be fully carried out.
- Canvases are attached to moisture-proof material.
- If the installation site borders on the attic, you should first of all do its insulation. Only in this case there will be a guaranteed result from use.
- The cutting of the film should be carried out exclusively according to the manufacturer's specified marks.
- For maximum efficiency, the length of one strip should be taken into account when laying. It should not exceed eight meters.
- As for the location of adjacent elements, there must be a distance of more than 5 mm between them.
- It is prohibited to bend the film heater more than 90 °.
- Fastening should only be done with staples.
- Spend assembly work should be done only at positive air temperature. If you lay the film at rates from -5 0 C and below, then after warming up the room, folds may form.

The film is fixed with staples
The thermoregulator plays a huge and irreplaceable role in the operation of an infrared heater. Let's talk about what it is and what is its relationship with the considered heating object? Its most important task is to control the regulation of the device. It should also be noted that thermostats exist to save energy. The air temperature is periodically measured, then, during the test, the operation of the infrared heater is regulated, turning it on or, on the contrary, stopping the operation.
Types of thermostats

With a thermostat, it is easy to control the air temperature
The current construction market presents a large selection of various parts that serve to save energy. Among them are thermostats. Before you connect the thermostat to any type of infrared heater, you need to know what types there are. It is also necessary to take into account their feature and the method of fastening.
Main types:
- mechanical;
- electronic.

Mechanical thermostat
The mechanical thermostat is a box, the top of which is equipped with a special switching device. The body also has a light indicator of the activity of this device.
It should be noted that mechanical models are best not used unattended. Since there are no remote control functions in such a device. There are, of course, more modern models, but still they are not produced in huge quantities.

Electronic thermostat
Electronic thermostats have several advantages. First of all, their broad functionality and control ability are noted. Control can be carried out using buttons or by a touch method. Their design and appearance is characterized by a huge variety. And even, despite a decent level of aesthetics, they are being improved further and further.
The option under consideration also makes it possible to control using a mobile phone, which is accordingly very convenient and practical. The only drawback is its high cost.
Both types require two installation rules: avoiding moisture that can harm the device and avoiding sunlight and heat. Otherwise, the operation of the thermostat will be incorrect and, of course, there is a possibility of damage to both devices.
Ways to connect the thermostat to the heater

Thermostat connection
There are several methods for connecting a thermostat to an infrared heater. The first one is the simplest one, consists in connecting one thermostat and one electric heater.
The second indicates the possibility of parallel connection. That is, one thermostat can control several heaters in parallel. This happens as follows: from the machine, one pair of wires is connected to the thermostat, from which there are already two directions to the heating devices.
Operation of one thermostat for multiple heaters is ideal option use. In this case, the maximum practicality, convenience and economy can be traced. A magnetic starter should become an assistant in this matter. Mandatory in this case is the use of a specially designed, individual connection diagram. There is a variant of using a similar scheme, but this is only for those who, as they say, do not take care of themselves. Carefully thought out work is the key to your own safety. It should be remembered that even a small inaccuracy and breakdown can cause a fire hazardous situation with disastrous consequences.
Some manufacturers provide a magnetic-type starter with the heater in the initial kit. Also, wires go to it to connect the required connection scheme. You can start getting started if you have such knowledge, or you can turn to a specialist for advice.
So, we can summarize the above and note that any man can correctly install an infrared ceiling heater. There is nothing supernatural about this. You just need to properly and informatively prepare in order to do everything right.
A prerequisite for a good installation should be the use of a thermostat, which will help to carry out the maximum necessary control over the operation of the thermal heater. Infrared heater is energy saving. Connecting such a device through a thermostat is already double savings, which is never superfluous anywhere. This is especially true for summer cottages or agricultural premises.
Everyone decides for himself the level of comfort. Choosing to use an infrared heater means choosing the maximum comfort.