Do-it-yourself incubator from the refrigerator: step by step instructions, drawing. How to make a reliable and simple incubator from the refrigerator with your own hands How to assemble an incubator from the refrigerator
And other poultry in a personal household is an interesting and exciting activity, and with proper organization it is also very profitable.
Modern breeders are constantly working to increase the productivity of chickens, creating more and more new breeds, aimed mainly at industrial breeding, as a result of which the instinct of incubation of eggs has greatly weakened in chickens, and in some breeds the instinct to hatch eggs has completely disappeared. This problem is easily solved with the help of an incubator.
If you take and consider a budget household incubator of factory production, you can be sure that there are no space nanotechnologies there, but on the contrary, everything is quite simple, this leads to the thought - "I can do it myself."
There are many different ways, but we will consider the most, in our opinion, convenient and economical, namely an incubator from an old refrigerator. Using the refrigerator as a future incubator, we have the advantage of a high-quality factory case with excellent thermal insulation, and this greatly simplifies the work and saves us money.
Basic conditions for incubation

Before proceeding to the description of the design, I would like to write a couple of lines about the conditions that need to be created in the incubator:
- The number of days from bookmark to withdrawal should be 20-21 days.
- The distance between eggs in the incubator should be 10–20 mm.
- It is necessary to provide a certain air temperature throughout the incubation, depending on the period.
- Eggs in cells are placed vertically, narrow side down, or laid out horizontally. Having placed the eggs vertically, it is better to set the trays at an angle of 45 degrees for the convenience of turning them over.
- When the eggs are horizontal, they must be turned 180 degrees from their original position. In automatic mode, the eggs are turned over once an hour. Manually, at least three times a day, but preferably every 3 hours. About three days before the end of incubation, turn the eggs over.
- It is very important to create good air circulation. Circulation at a speed of 5 m/s is considered optimal.

It is important to know: do not put eggs in the incubator that have been stored for more than seven days. The percentage of hatching from such eggs will be much lower.
Three different ways to build an incubator
Let's look at several different options for making an incubator from a refrigerator.
Horizontal way

A simple and common design that does not require much effort. The main requirement is the presence of a refrigerator with a whole casing and thermal insulation.
You will need:
- refrigerator (if there is a freezer, it must be removed);
- 4 bulbs of 100 W;
- thermostat;
- drill;
- trays;
- scotch;
- screwdriver.
Note: because the homemade incubator will be located horizontally, that is, with the door up, then all the shelves from the refrigerator must be removed as unnecessary.
- First of all, we make a small hole in the door (about 5x5 cm) for ventilation and launching the thermostat sensors inside, which is attached next to the hole with adhesive tape. You can purchase a ready-made thermostat, or you can make it yourself. How to make a thermostat for an incubator with your own hands, tells in detail
- On the inside, we fasten a sheet of plywood, on which we install four bulb holders. The same hole is cut in plywood as in the door.
- A container with water is placed at the bottom of the incubator to humidify the air.
- Place an egg tray above the container.
vertical way

- fridge;
- welding;
- metal wire with a diameter of 6 mm;
- fiberboard sheets;
- thermistor, thermometer;
- drill;
- glue, spatula;
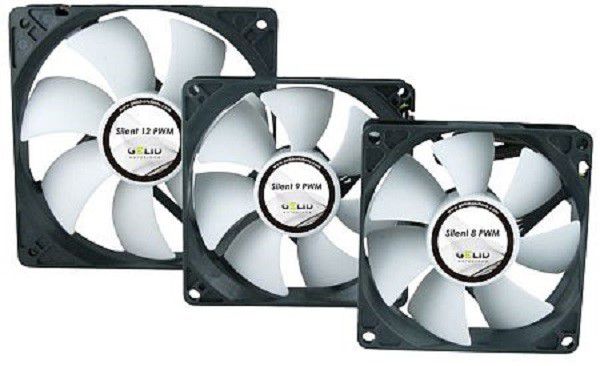
- fan for additional ventilation and even distribution of heat (in case you plan to place more than 50 eggs, you will need a fan.
- You will need:
Step-by-step description of the stages of work:
- First of all, we get rid of the shelves and irregularities inside the refrigerator and close the cracks that have arisen from this with the help of a fiberboard sheet.
- In the case of the incubator (top) we make two holes in which we mount the thermostat and thermometer.
- From the bar we make a frame for the trays and tie it with a wire mesh. We fix the trays in the refrigerator case.
- We mount a fan with a heating element on the back wall, which can be simple light bulbs or a tubular heater.
- A water container is also installed at the bottom of the incubator.
The main disadvantage of this design is the lack of automation. You will have to turn a large number of eggs manually. has a more complex device than the design described above, but at the same time it flips eggs without human intervention.

semi-automatic way

The most complex of the presented options, however, saves time and makes it possible to increase productivity.
You will need:
- fridge;
- self-tapping screws;
- trays;
- metal racks;
- a heating element;
- fan;
- metal axles, as many as trays;
- thermostat;
- sinker;
- bar with holes for the axle;
- pin;
- water container;
- screwdriver and drill;
- breathing tubes with a diameter of 30 mm 2 pcs.
Step-by-step description of the stages of work:
- We cut out the freezer section with a grinder.
- In the center of the side walls of the refrigerator, we fasten the strips with holes for the axles with self-tapping screws.
- We pass axles through the middle of the trays, which are inserted into the slats in such a way that the trays are fixed between the slats.
- Another metal bar is attached to the side of the trays closer to the front of the trays, combining them into a single structure. We attach the load to the lower part of the bar, and bring the upper one up through in advance drilled hole. Now, pulling this bar up or down, we turn all the trays at once. To fix the bar in the upper position, it is enough to drill a small hole in it, and fix it by inserting a cotter pin into it.
- We mount breathing tubes in one of the side walls, in the upper part and at the bottom, at a height of about 1/3 of the refrigerator.
- In the lower part we have four 100 W bulbs and a thermostat.
- We set the fan so that the air flow, passing through the bulbs, heats the eggs.
- A container with water is installed at the bottom of the finished incubator.

Take note: it is recommended to solder wire arcs on a container with water, on which, like on a clothes dryer, it will be possible to hang wet gauze to increase the evaporation area.
The semi-automatic option for making an incubator will save you time and allow you to incubate a large number of eggs at once without additional labor costs.
From this video You will learn how to make an incubator from the refrigerator with your own hands:
Poultry farmers involved in breeding chickens or other productive breeds of birds, sooner or later decide to purchase an incubator. However, going to the store, they do not expect to see sometimes too high prices for different variants much desired device. How to leave money in your wallet and at the same time become the owner of a capacious device for breeding chicks without the participation of a chicken? Very simple: make an incubator out of the refrigerator with your own hands!
Many of us have old summer cottages old, Soviet refrigerators are stored, working, however, cannot be compared with modern models. It's time to get rid of the trash, turning it into agricultural utility!
The installation will be located lying on the back wall, with a door to the ceiling, so immediately remove shelves and other interfering elements from inside the refrigerator.
"Lying" incubator from an old refrigerator
Advantages
We list the main list of advantages that incubators independently created from refrigeration units have.

Necessary materials
So, in order to independently assemble an incubation device from an old refrigerator, we need the following materials:

Getting Started
Step 1
We stack old refrigerator in a horizontal position and take out everything superfluous from the inside. Then, with the help of cleaning agents and disinfection liquids, we process the body from the inside, and at the same time from the outside, in order to prevent the development of pathogenic bacteria near future chicks.
Step 2
We cut a hole in the door of the unit through which the thermoregulation device of your choice with a sensor will crawl through. Then, carefully insert the device into the hole and fix it on the outside and inside with adhesive tape.

Step 3
We take a prepared sheet of plywood and install 4 cartridges on it, to which we reach electric wires, and then we screw in all four lamps with a power of 100 watts. After that, we install the assembled heating and lighting device on the inside of the refrigerator door, securely fixing the plywood panel on the body of the future incubator.
Step 4
Let's prepare the air humidification system. It will consist of a plastic tray, which we will install on the back wall of the refrigerator (it is now the bottom of the incubator). Pour clean water inside the container and set it inside.

Step 4
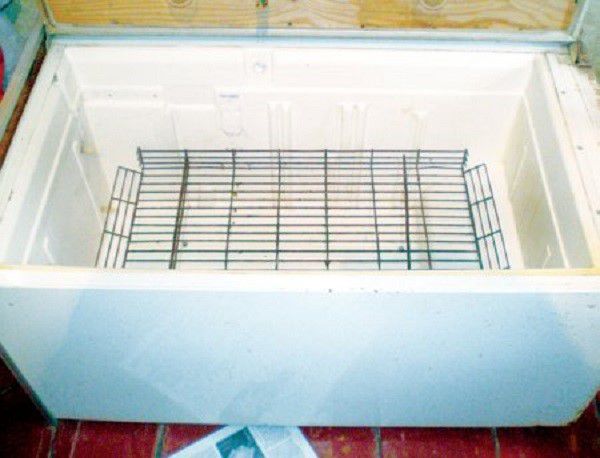
A bit higher installed pallet mount a metal grate on which to place plastic egg crates. This is necessary so that the eggs are at some distance from the water and do not become waterlogged.
Making a vertical incubator from a refrigerator
The unit resulting from the execution of this instruction is obtained standing upright. This design is more convenient than horizontal, as it leaves the opportunity to make a window for observing hatching birds.

Required materials
Let's start listing the materials and tools that will be useful to us in the process of transformation refrigeration unit in the incubation unit:

Let's get started
Step 1
We extract everything superfluous from inside the future incubator:
- cells;
- shelves;
- side niches;
- boxes, etc.

The first stage is the removal of unnecessary parts from the refrigerator
After removing all the unnecessary parts of the refrigerator, we proceed to clean the case inside and out. As mentioned above, at the beginning we wash the case with detergents, then using antiseptics. After washing and processing each slot, we proceed to the second stage.
Step 2
Let's start leveling the internal and external damage to the body of the old refrigeration device. To do this, carefully examine the surface of the walls and close each hole found with a piece of fiberboard, carefully gluing it over the damage.

Step 3
We make trays. Calculate how many eggs are planned to be placed inside the future incubator. Based on the figure obtained, we will proceed to the purchase or manufacture of boxes. Read on to learn how to make boxes.

Step 4
We equip ventilation. In order for the air to circulate through the incubator constantly, it is necessary to mount the fan on the back wall of the refrigerator, the motor part is installed outside. Along the perimeter of the front door of the refrigerator, several holes must be made through which air will penetrate into the unit.
Step 5
Heating queue. Around the fan blades, on the back wall of the refrigerator, carefully place the tubular heating element. This position next to the ventilation system will allow you to distribute heat evenly in the incubator, capturing even remote corners.
Step 6
Installing a water container at the bottom of the refrigerator. Since the humidity level needs to be kept stable over a long period of time, it is better to use a device that is deeper, about the size of a cat litter box, as a tray.

The disadvantage of this type of incubator is exactly the same as the previous one: the lack of automatic egg turning. This will again have to be done manually, gently raking the houses of unhatched chicks. It is best to work with gloves.
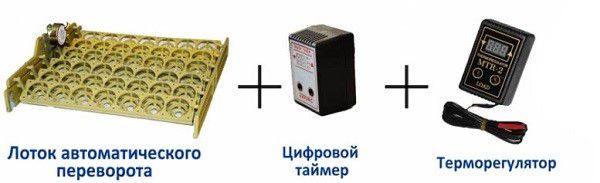
Vertical incubator from the refrigerator with semi-automatic egg turning
This type of incubator from a refrigeration unit is more difficult to implement than the previous ones, however, it can be used to significantly reduce the time spent on turning eggs on your own. No, the incubator will not do it on its own, however, it will now be possible to turn the cells over in one motion.
The manufacturing principle is similar to the previous described method, however, there are significant differences in the installation of additional mechanisms. You will have to spend a little more time, but the result will make you experience real pleasure.
Materials and tools

Video - Do-it-yourself heating element for an incubator
Let's start building
Step 1
We cut off inside the section separating the freezer and refrigerator chambers, if there is one in the design. We remove everything superfluous from the inside and close the gaps, by analogy with the instructions for the second and first methods.
Step 2
We process the body of the future semi-automatic incubator with cleaning agents and antiseptics, wipe it dry and prepare it for the installation of the main parts.

Step 3
We find the center of the front door and the rear wall of the refrigeration unit and install racks at this level, which we fix in the device case using metal screws. We make holes in the racks at the level of the shelves.

Step 4
We insert a metal axis into each cellular egg tray, the diameter of which will be approximately 8-9 millimeters. With both ends we install the awn in the racks, getting even rows of boxes between them.

Step 5
We fix a metal bar on the egg boxes, using screws as fasteners. The gap must be at least two millimeters. From the bottom side of the bar, it is necessary to hang a five-hundred-gram load, which can be played by absolutely any heavy object. A pin is attached to the free part of the bar from below, which plays the role of a fuse, preventing it from going inside due to the pressure of the suspended load.

At the top of the incubator, a bar extends outside the body. To do this, drill a slot in the top of the refrigerator.
Step 6
We install the breathing tubes in the sidewall of the refrigerator, having drilled the corresponding holes in the case, at the top and bottom, each time at about a third of the height.
Step 7
We equip lighting and heat by installing three lamps on the back of the refrigerator, with a power of about 100 watts. According to the diagram, we connect a thermostatic device to them.

Step 8
Ventilation in the form of a part from a computer or a small household fan is installed so that air passes through the heating elements without fail.

Step 9
We fill the pan with water and place it on the bottom of the incubator.
Everything, the semi-automatic incubator is ready! To turn the eggs, you just need to lift the bar up, and then release it, securing it with a pin in another hole. During the implementation of this procedure, the trays attached to it tilt to the other side, changing the position of the embryo inside the egg, and also substituting the other side for heating. So you save a lot of time on manual egg laying and get high-quality and healthy feathered offspring.

However, we all understand that a semi-automatic incubator is not ideal yet. Therefore, we advise you not to make a decision before reading the following instructions, with which you can build a fully automatic incubator!
We make an incubator from a refrigerator with an automatic egg turning device
Study this carefully original way making an incubator from an old refrigerator that will turn eggs inside itself automatically. Then you will have to take only a minimal part in the artificial incubation of eggs, which consists in:
Required materials and tools
So, for the manufacture of this wonderful unit, we need:

We build the unit
Step 1
We wash the refrigerator and remove everything unnecessary from it. Since in this type of home-made incubator the heating elements will be at the level of the freezer, we cut out four holes in the plastic segment separating it from the main refrigeration unit, equal in diameter to small fans, remove all shelves, cells, grills and other accessories to the refrigerator.

Step 2
We make a window in front of the refrigerator from below. It can be any size you want. Cut a hole in the refrigerator to the required size and process the cut points.
Step 3
Install an aluminum or wood frame in the cut hole, it is better to give preference to the first material, as it is more durable. At the same time, install glass or a plastic plate inside the frame. Seal the joint gaps with sealant to prevent cold air from passing through the gaps into the incubator. The window is ready. Now you can watch what happens to the eggs during the incubation process without opening the refrigerator door and disturbing the microclimate.
Step 4
Insulate the front surface of the refrigerator with heat-reflecting material, especially carefully around the makeshift window. Foil insulation will do. This is necessary so that the heat produced by the lamps does not pass through the thin parts of the body to the outside, but is reflected inward.

Step 5
Mastering metal carcass to install the grates, on which we will later put the trays with eggs. To do this, we weld thin profile pipes together and fasten them to the bottom of the refrigerator. We fix metal gratings one above the other.
Step 6
We make the mechanism responsible for turning over. The role of the motor drive is played by parts from an ordinary bicycle - chain sprockets. They are attached to a metal sheet welded to the side of the profile frame of the device. The driven sprocket of the drive is welded on the outside of the sheet, the leading sprocket is mounted on the pin.
Limit switches will act as elements supplying electricity to the system. Once the device reaches the end position, power will be cut off and the system will stop working.
The motor is driven by a pair of timers set to restart every 6 hours.
Step 7
The thermostat is installed at the level of one third of the entire height of the refrigerator. It is mounted and fixed in the case. Heating elements in the form of lamps are installed in place of the former freezer. Turning off and off the heating is done using the regulator on the relay.
Step 8
Ventilation set as follows. In the holes we cut in advance in the plastic segment that separates the freezer from the refrigerator, we install fans connected to electricity and fix them on the surface with metal adhesive tape.
So, our automatic incubator is ready! Now you can relax and really enjoy the poultry breeding process!
How to make your own egg cage
The easiest way is to buy plastic cellular trays, since they are designed for an incubator and you won’t have to spend time making them.
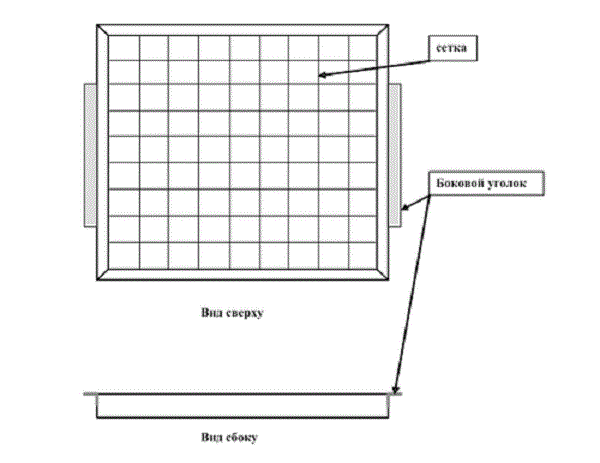
However, if you decide to make them yourself, you will need the following materials:
- metal mesh;
- wooden bars, 4 pieces;
- two wooden corners;
- nails.
What size the grid cloth will be depends on the size of the refrigeration device you have chosen as the basis for the future incubator. However, there are recommendations regarding the size of the meshes of the metal mesh, depending on what kind of birds are hatched inside the device. We suggest you familiarize yourself with them in the table below.
As you can see, the size of the cell changes depending on the size of the future egg, which is installed inside.
Let's start making cells yourself

We present a table of pros and cons self-manufacturing cells:

As you can see, it is better to give preference to a purchased plastic box. However, if you are still an adherent of a completely independent production of an incubator, replace all wooden elements in the design of a homemade cell with metal rods or tubes, and nails with welding machine in order to minimize the negative effects of humidity inside the incubator and extend the life of the manufactured part.
Windows for incubators
You can make a window in the body of an incubator made from an unnecessary refrigerator in each of the methods described in this article. Only the place for cutting the opening for the frame and glass will differ, as well as the materials used.
We list the most popular materials that are suitable for manufacturing window frame inside the refrigerator:
- aluminum;
- tree.

It is easy to understand why these two names are preferred. Everything is simple, they are easy to work with. However, aluminum is much easier to clean and treat with antiseptics than wood, so give preference to it.
You can also look at how eggs develop through two materials:
- plastic;
- glass.
These options are equally suitable for installation in an incubator from a refrigerator, but still, glass has a special advantage - strength. Since the assembled unit will be in operation for years, make an investment in the future and install a glass window.
electrical wiring
It is not necessary to additionally insulate the wiring inside the incubator, since in most designs they do not interact directly with newborn chicks or other possible hazards. However, if you're worried, it's possible to run wires inside regular rubber hose cuts. There is a high degree of practicality in such protection: the likelihood of accidental damage to wires by an awkward hand movement or as a result of another accident is reduced.

Where to get details
Most farmers have one thing in common - the refusal to accumulate unnecessary trash. Of course, everything is useful in the household, but only a slovenly person will conduct business in a mess. Therefore, there may not be an old refrigerator or metal grills at hand. Don't think buying everyone necessary materials will go to hell. On the contrary, many people dream of attaching rubbish accumulated over the years and getting at least a minimal profit for it.
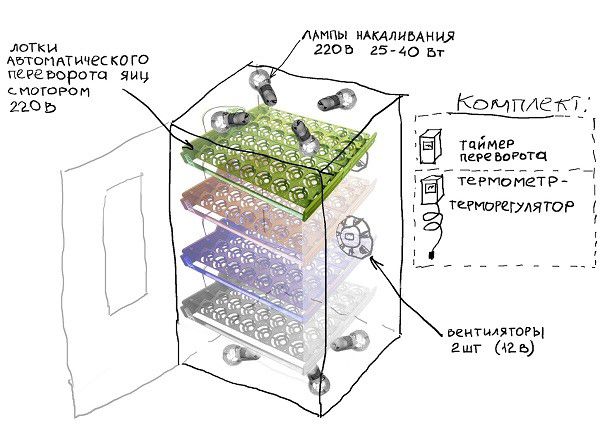
Automatic Incubator Kits
For those who do not consider themselves a technical genius and cannot repeat the installation of an automatic system even according to the attached diagram, we have an interesting hint. Many agricultural stores sell kits for automatic incubators, which contain the following required items.
Depending on the cost of the set, it is supplemented with a ventilation system, additional trays, etc. In the kit, additional devices are often given that are useful to poultry farmers, for example, an ovoscope, with which they check whether the fetus continues to develop inside the egg.
Summing up
So, now you know how to independently assemble the following types of incubators based on an old refrigerator:
- ordinary, requiring human participation;
- semi-automatic, with the help of which the turning is carried out in one motion;
- an automatic incubator that requires only periodic water additions.
Of course, to recreate each of the described units requires a certain skill, building knowledge and experience. The work is not hard, but painstaking and meticulous, requiring perseverance and perseverance of the master. It is possible that during the installation process it will be necessary to redo some parts and mechanisms.

An important point is the quality of the selected parts. Even though you will find many of them in the stash, keep an eye on the strength of the materials. Completely worn out ones cannot be used, because there will be no sense from them. Breakage will occur after a few days of use and not only your work will be lost, but also a whole brood of feathered babies.
We believe in your success! Carefully follow the instructions, view the diagrams presented in the article, and then you will succeed.
Video - Incubator from the refrigerator
A do-it-yourself incubator is very useful homemade for home which can provide household young birds
All those who live in private houses usually have a household, most often it is poultry: chickens, geese, ducks. Some breed turkeys or quails. But no one will argue with the fact that every spring everyone thinks about early pets. Early young chickens turn into full-fledged laying hens by autumn. But where is it so early to find a hen. The answer is - do it yourself.
For all the time of my passion for making makeshift incubators I made 5 of them. There are fully assembled with my own hands according to my personal calculations, and there is a conversion of an old broken refrigerator into an artificial hen. It is one of these incubators that I will try to show today and share all the secrets of its manufacture.
As it turned out, refrigerator incubators are excellent at keeping heat, it is good to work with them and in a fairly short time, it turns into an incubator. Incubator to be presented was made by hand from an old refrigerator Minsk, dimensions 550x570x1400, 
.First you need to prepare the refrigerator, removing all unnecessary from it,
In the place where the freezer was, I inserted a window through which I can observe the whole process, including the change in temperature on a glass thermometer, 
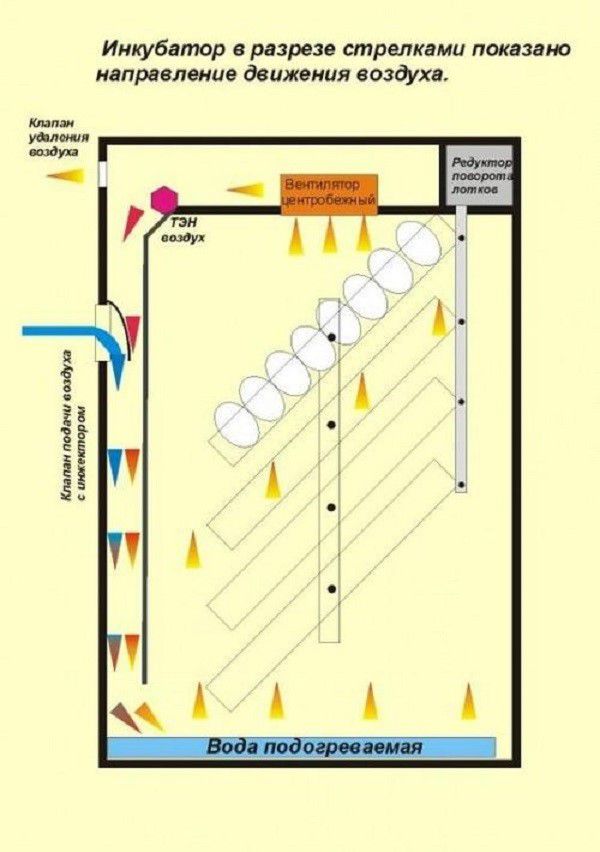
This figure shows that there are ventilation holes above the window, similarly, they are also made in the lower part of the incubator. They are necessary for air to enter, because. during incubation, young birds breathe first from the air chamber in the egg, and only then punching a hole in the shell through it. If there is not enough oxygen, the chicken will simply suffocate. Having drilled holes, it is necessary to insert tubes, since there is glass wool under the skin of the refrigerator and, after making a hole, it prevents air from flowing freely inside. The amount of air must be adjusted different periods incubation, for this it is enough to close a few holes with cotton wool or foam rubber. At the bottom of the incubator I installed a small fan so the air could mix well and flow through the 5 trays I installed.
After reading the article, do not forget to see what useful articles our authors, craftsmen and needlewomen, can do!
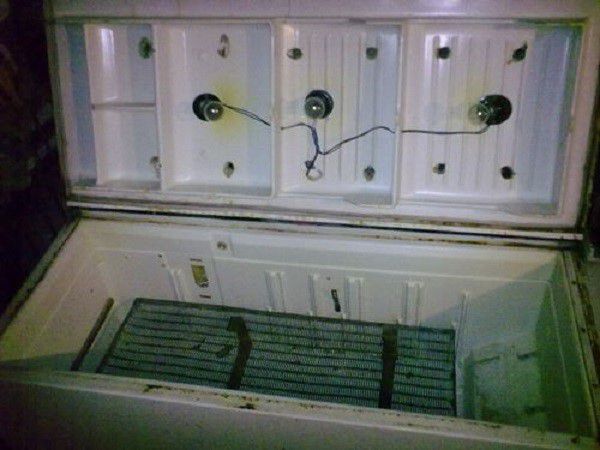
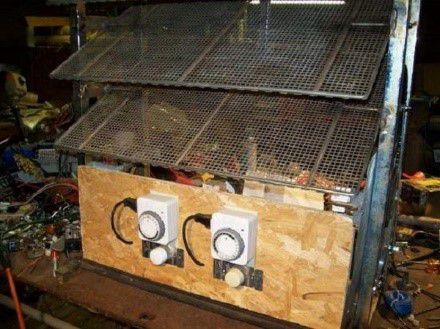
The next step is the installation of heaters, they are made on ordinary incandescent bulbs of 220 volts, but not more than 25 watts. To do this, you need to purchase 4 cartridges in a hardware store, of a type that makes it possible to attach them in the refrigerator from above and below. After dismantling the refrigerator, in the lower part of it, where the motor stood, the back wall had a slope of 45 degrees, it was there that I installed the two lower cartridges and the fan. Ask why not at the very bottom? This is necessary so that at the bottom it is possible to place a tray with water, so this tray is located under the lamps. The same is done in order to prevent water from entering high voltage wiring.
egg trays I made from plastic boxes that I purchased at the store as a fruit container. They need to be cut so that the height is 5-6 cm. When buying boxes, look carefully, they are different, you need to choose such that they can be cut along a rigid border. Well, in principle, you can make them yourself. I installed all the trays on the axis and tied the bar together so that it went out through the hole at the top in the refrigerator. With the help of this bar, without opening the incubator, we will change the slope of the eggs. There will be 3 clamps that fix the position of the eggs in a horizontal position and at an angle of 45 degrees. On the diagram, 
, this device for semi-automatic egg turning is shown schematically.
Operating modes of a homemade incubator
Now let's dwell a little on the modes of incubation. For example, I will give the regime for chickens. Any other modes can be found on the Internet, it will not take you much effort, I just want to draw your attention to the fact that, depending on the location of the thermometer, there are different temperature regime. I will talk about the modes in which the thermometer is located on the surface of the eggs. I place it in the top tray on the eggs.
So, first, before laying eggs, you need to turn on the incubator for a day so that it warms up. Put dishes with water on the bottom, I used baths for photographs, you can use any others, just take into account that the humidity needs to be changed by increasing or decreasing the number of dishes. I have two small baths 15x23 cm in size, they make up 100% humidity, if you need 50%, I remove one, if you need 75% I put a bath 23x28 cm.
On the 1st day I set the thermostat to 41 degrees and keep it for 12 hours, this is necessary to activate the embryo. Further, until the 11th day of incubation, the temperature on the surface of the eggs should be 39.5 degrees, humidity 100%, air at a minimum. Do not forget to turn every three hours, for this I take out the position lock and turn the trays. The next period from the 11th to the 19th day, we lower the temperature to 29 degrees, make the humidity 50%, and increase the air flow by opening several ventilation holes. During this period, it is necessary to cool the eggs once a day. Well, the final period is from 19 to 21 days. Temperature 38.5 degrees, humidity 75%, air at maximum. The first chicks may appear as early as the twentieth day, especially if overheating was present. And the rest on day 21, and if there was underheating, then on day 22.
For control development of the embryo of the egg is checked on the ovoscope on days 6, 11 and 19. You can do the ovoscope yourself. For the first time, the embryo and the rudiments of the circulatory system are already clearly visible; during this period, eggs without an embryo are rejected. In the second period, depart those eggs that did not survive incubation, mainly due to the poor quality of egg preservation. This happens through the hemorrhage of the embryo, which can be seen from a clearly defined blood ring. Well, in the third period, you can already clearly see how the chicken moves and tries to get out. During this period, the eggs no longer turn.
I also want to attach a diagram 
And printed circuit board for a homemade incubator 
Which too made by hand. Only for it you need to install a fan, so it works perfectly, when the temperature changes by a hundredth of a degree, the thermostat reacts clearly. Choose a thermometer with at least a division of 5 tenths. Well, in general, at this the incubator holds more than 200 chicken eggs, the withdrawal percentage is quite large. In Fig.7-10, a view of the thermostat and in more detail you can see the placement of some parts. Here is a homemade I made with my own hands.


A high-quality incubator for breeding chicks can be made from an old refrigerator at home. There is already a ready-made insulated housing, energy will be spent economically. Shelves are ready-made pallets. By following the manufacturing method given in this article, you will create the ideal microclimate for raising poultry.
A self-made incubator from a refrigerator has several advantages:
- Spaciousness. A unit of the same size costs a lot of money. And the use of an old two-chamber refrigerator for these purposes will be cheap, if not free.
- Ideal microclimate. The design of the refrigeration device and the body material is perfect option to create and maintain a microclimate suitable for chicks.
- The simple construction of this device.
- Low cost parts. Many details can be completely free.
- Receiving a profit. Perhaps the creator will receive income from breeding chicks.
Materials used
For self-production of the incubation apparatus with your own hands, you must use:
- fridge;
- plastic trays for eggs;
- Temperature regulator;
- plywood sheet;
- metal grate;
- tools;
- electric drill;
- light bulbs (power - 100 watts);
- scotch.
The process of creating an incubator
You can make the unit yourself for breeding poultry using improvised means and materials. The poultry farmer must follow the exact algorithm of actions. Let's consider it in detail:
- Remove excess from refrigerator. Lay the device horizontally. Disinfect the inside and outside of the case using cleaning agents and liquids.
- Cut a hole in the door. A thermostat with a sensor should fit into it. Insert the device into the hole and secure it from the outside and inside with adhesive tape.
- Install four lamp sockets on the prepared plywood sheet. Screw in 4 bulbs. Install the assembled device on the inside of the door. To do this, fix the plywood panel on the body of the future incubator.
- The next stage is the preparation of the air humidification system. It includes a plastic tray that is mounted on rear surface refrigerator. Pour water into the tank and set it inside. Slightly above the installed capacity, the installation of the grate is carried out. Small boxes are placed on it, which are intended for eggs. The lattice is the protection of eggs from waterlogging.
Important! The slots and the entire refrigeration apparatus should “shine”. According to statistics, dirt and developing bacteria are the main cause of death for chicks inside the incubator.
Do-it-yourself refrigerator incubator with auto-rotation
The device will turn the eggs inside itself automatically. The participation of the owner is practically not required.
Materials and tools
To make this unusual unit, use the following products and tools:
- fridge;
- aluminum or wooden frame;
- glass;
- elastic mixture (sealant);
- heat reflective product;
- a motor from some small apparatus;
- chain sprockets from a bicycle;
- metal gratings;
- motor timers;
- metal rod for a fixed connection;
- thermostat;
- four lamps;
- PC cooler;
- assembly tools.
Algorithm for creating an incubator with automatic rotation
Follow the following algorithm to make an incubator with an automatic turning mechanism:
- The first step is cleaning the refrigerator. You also need to remove all unnecessary from it. The heating elements will be located at the level of the freezer. Therefore, cut four holes in the plastic segment that separates the freezer from the refrigeration unit. The diameter of the holes should be equal to the small fans.
- Make a window in front of the refrigerator from below. Size is optional. After that, process the incision site.
- Next is the installation of aluminum or wooden frame into this hole. Glass must be installed in the frame. Use sealant to cover the gaps in the joints. So cold air will not pass through them.
- The fourth step is to insulate the front surface of the refrigeration device with a heat-reflecting material. You can use foil insulation. This is necessary so that the heat produced by the lamps does not escape through thin body parts.
- Then a metal frame is created, which will be intended for installing gratings. Trays with eggs will be stacked on these grids. Then move on to welding. profile pipes. After that, these pipes must be screwed to the bottom of the refrigeration unit. Next, metal gratings are fixed one above the other.
- Now we turn to the installation of the mechanism that will automatically turn over. Here the chain sprockets are the motor drive. Fix these parts to a sheet of metal. The driven bicycle sprocket must be welded to the outside of the sheet. The leader must be installed on the pin. Limit switches will supply electrical energy to the system. When the end position is reached, electricity will not flow. The motor starts moving with the help of two timers. The installation is carried out so that the resumption of work begins every six hours.
- The thermostat is installed at the level of 1/3 of the entire height of the refrigeration unit. Lamps are mounted in place of the freezer. The heating is switched on and off by the regulator on the relay.
- The last stage is the creation of ventilation. Since in this case there is no natural ventilation. In four holes, you need to install coolers (PC fans). Use tape to secure them to a metal surface.
Reference! It is better to use a frame that is made of aluminum. This will increase the service life.
The drawing shows the location of all elements of a homemade incubator.
This completes the manufacturing process of the incubator with auto-rotation. Now the procedure for breeding poultry will become more pleasant and relaxed.
As you can see, you can make an incubator from the refrigerator with your own hands. You need to follow the instructions above. Homemade apparatus will save time and possibly make a profit!
Currently, both rural and urban residents breed poultry. All amateur poultry farmers are faced with the need to breed chicks. Special industrial incubator devices for artificial hatching of birds are quite expensive.
Most people involved in poultry farming think about building incubators on their own. There is a variety of experience in their construction in the form of barrels, furnaces, etc. And today we will learn how to make an incubator out of the refrigerator with our own hands to get rid of the need to buy such a device in the store.
Primary requirements
To create this device you need:
- Before the immediate hatching of the chicks, about 10 days should pass;
- During this decade, the eggs are stored 1-2 cm apart at a temperature of 37.3-38.6 degrees;
- Humidity at the time of pecking eggs should be 40-60%, and then in the process of hatching - about 80%. As a general rule, humidity should be lowered before chick selection begins;
- The arrangement of the eggs can be twofold;
- When hatching ducks and geese, the angle of inclination should be 90 degrees;
- If the eggs are located horizontally, then from the starting point they are moved at an angle of 180 degrees. During the day, they are rolled at least three times, and optimally - every hour. Before pecking eggs, and this is 2-4 days before their hatch, it is not recommended to move them in trays at all;
- Artificial ventilation is essential for incubation. Ventilation regulates temperature and humidity. The ventilation speed reaches 5-6 m/s;
- Incubation brings the artificial environment of chick hatching closer to natural conditions.

Construction
Do not rush to throw away a broken, unnecessary refrigerator. It is freed from the old freezer and other details. In the future, it will be necessary to connect the device to a network with a voltage of 220 V. We take an electric contact thermometer and a KR-6 relay or other modifications. The power of the coil resistance should not exceed 1 W. We connect this design to the network with our own hands and turn on the lamps L1, L2, L3 and L4. These lamps raise the temperature up to 38 degrees. The coil KR, connected to the electrical network, opens the contacts KR2. The process is updated when the temperature drops. Lamps L5 equally warm up all the eggs of birds, contribute to optimal humidity. After the initial heating of the eggs, it is necessary to continue to maintain the air regime with the help of several lamps. Here it is very important to minimize the frequency of operation of the contactor-relay, as can be seen in the photo.
The designed device should not consume more than 40 watts.

It is not necessary to equip the incubator with a fan, you can rely on natural air circulation.
Eggs can be moved and rolled both manually and with the help of a special turning of the eggs 3-4 times a day, as seen in the photo.
Using the freezer from the Orsk-50 refrigerator, you can fill it with up to 60 eggs. Chicken eggs are placed in cardboard trays with a blunt end up in a vertical position. After nine days, the temperature should be reduced to 37.5 degrees, nineteen - to 37 degrees.

There are power outages. In these situations, the lamps can be replaced by dishes with hot or warm water. Do not heat the water too much.
frame
As an incubator frame, you can take the packaging from the TV. From the inside, the frame is reinforced with slats and reinforcement, as shown in the video. Four cartridges with low-power lamps are placed inside the frame to warm and moisten the eggs. For fire safety it is better to take porcelain cartridges. The middle lamp is connected during the weakening of the electrical voltage.

You will need a humidifier, for this you can use a simple jar, air evaporates well in it, and the eggs do not overheat.
From the lamp to the eggs should be about 19 cm, and under the grate - 15 cm. You can use the most ordinary thermometer.
The outer wall must be removed and inserted, it is better to cover it with dense material. The tub is attached to the wall. An 8 x 12 cm hole is made directly on the lid of the incubator for temperature monitoring and ventilation.

Base
At the base of the incubation structure, 3 open ventilation holes 1.5 x 1.5 cm are made. Water is needed no more than half a glass per day. To moisten the bath, place a rag.
Between the slats, eggs are placed in special recesses. The tray is not completely filled, leaving free space for turning the eggs 180 degrees up to 6 times every 3 hours.
For evaporation, 25 or 15 W lamps are used. To facilitate pecking of eggs, the evaporator is not turned off. Otherwise, due to the rigidity of the shell, the chicks will not be able to hatch.

During turning, the eggs also cool. For this, 1-2 minutes are enough. During the entire period of chick hatching, the temperature is maintained at 39 degrees.
Upper body
The upper body is also covered with a grid. In the same place, two 40 W lamps are mounted with their own hands. They use not only "used", but also existing hives. Laid on the frames metal mesh so small that the bees could not get inside. The liner is placed directly above the net, where the first layer of eggs is placed - 50 pieces, covering it with linen or burlap. Bees are excellent natural heat conductors, they also regulate the optimal humidity regime.

In a homemade incubator with chicken eggs you can perfectly implement the output of goslings. The tray is filled with goose eggs of 24-26 pieces.
Summing up
A used refrigerator is a great tool for creating an incubator with your own hands. Such an improvement is efficient and economical, and has great practical value. This will save you money that would be spent on buying an incubator in a store.


