Homemade wind generator for home and summer cottages: principles of operation, schemes, what and how to do. How to make a vertical wind turbine with your own hands Generator. Final assembly
The set of necessary communications to ensure comfortable conditions in a building of any purpose involves, among other things, the device of a ventilation system. Ideally, it should be non-volatile - this is very important in modern conditions without stopping the rising energy prices. That is why, even at the design stage of communications, natural ventilation is primarily considered. At the same time, the correct approach to the technological solution of the system is a rotary deflector integrated into the ventilation duct.
There can be no problems with cravings
The meaning of any ventilation system is to remove polluted air, excess moisture from the premises, that is, to ensure normal air exchange. This will be the case if the ventilation duct is functioning efficiently and correctly - the draft is excellent. If there are problems in this regard, then they are often provoked by rain, snow, wind masses falling into the channel shaft. Also, poor draft can be caused by an incorrect location of the ventilation pipe, its insufficient height or an incorrectly selected duct diameter. The installation of a rotary deflector is designed to eliminate such shortcomings of natural ventilation.
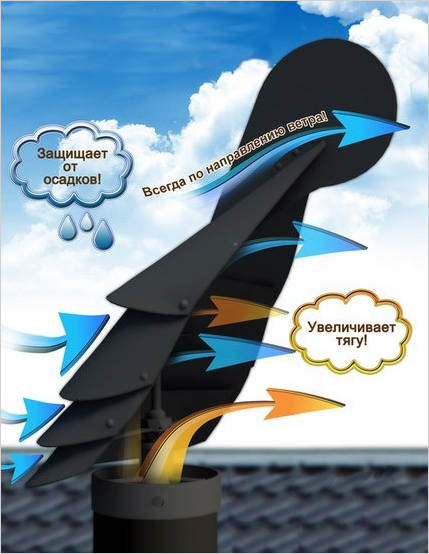
Reference. The rotary deflector also has other names - turbo deflector or rotary turbine. This is a complex mechanism with a rotating part - an active head equipped with a special system of blades. Also, the structure has a static part - the base to which the head is attached and connected to the ventilation pipe.
The benefits of a rotary deflector

- Regardless of the direction of the wind, the active head rotates in the same direction. As a result, the effect of "partial vacuum" in the ventilation duct is obtained - the air is rarefied, the force of the flow increases, and the risk of reverse thrust is close to zero.
- Rotary models completely exclude the influence of external factors on the ventilation efficiency - precipitation and gusty winds.
- The autonomy of the functioning of a mechanical device that increases the performance of the air exchange system is one of its most important advantages.
- Low costs for modernization of ventilation.
- Rapid return on investment for a turbine deflector.
- Protection of the ventilation mine from the ingress of debris, birds, etc.
- The decorative completeness of the pipe brought out to the roof - any facade benefits from the presence of such a spherical object.
Important! The rotary deflector increases the efficiency of a standard natural supply and exhaust ventilation system by 2-4 times. In this case, "amplification" does not require connection to the power supply, which corresponds modern trends energy efficiency of buildings and structures.
What are the disadvantages of a turbo deflector

The rotary design is weather-dependent - this is actually the only, but very important disadvantage of it. In calm weather, the turbo deflector is essentially no different from the usual protective visor on the duct pipe.
Is it possible to make a rotary deflector with your own hands
Simpler types of deflectors, used in practice for a long time, are often made by skilled householders on their own. In principle, a technically savvy person can handle this job. True, for this it will be necessary to develop a working drawing of the future design, correctly take measurements, and develop a scheme for mounting the deflector.

Regarding the turbocharged variation, not everything is so simple - it is a technically more complex design. Therefore, almost always, having decided to use the rotary model, they acquire it in the form of a professionally made product.
What the market offers
Turbovent
The range of rotary deflectors of this brand is represented by models of different geometric shapes, in terms of the immovable base:
- A - round pipe;
- B - square tube;
- C - square flat base.
Product marking in the assortment is presented as TA-315, TA-355, TA-500. The digital index indicates the diameter of the round or the parameters of rectangular bases. It is by them that one can judge the dimensions of the mechanism, as well as the scope of its application. For example, TA-315 and TA-355 are relevant when organizing air exchange in the under-roof space. But the TA-500 is a universal device and can be integrated into the ventilation of a residential building.

The rotary deflector "Turbovent" is produced in Russia - in the Nizhny Novgorod region, in the city of Arzamas.
Rotowent
Deflectors made of stainless steel made in Poland. Suitable for all roof configurations. Products are made of high quality stainless steel. The devices are universal - suitable for both ventilation systems and chimneys. The boundary indicator of the operating temperature is 500 C.
Turbomax
Rotary deflector manufactured by a company from the Republic of Belarus. The manufacturer positions its products as the Turbomax1 rotary chimney hood. But it is also suitable for ventilation. It can be safely used in areas with II and III wind load zones. The company focuses the attention of consumers on the fact that they are ready to make a product to order according to the parameters for a specific object.
Installation features
Factory turbo deflector - one-piece design, ready for installation. It has an active movable top and a base containing zero resistance bearings. The product is thought out in such a way that even in a strong gusty wind it will not tilt or carry it down.

Attention! When installing, it is important to take into account that the deflector of any modification should rise 1.5-2.0 m above the roof. If this device is observed, the draft in the ventilation duct will increase.
In conclusion, we would like to note that rotary deflectors in their segment are the most expensive ones. At the same time, the consumer is invited to choose a suitable structure made of stainless steel, galvanized or structural steel with a protective polymer coating, the color of which can be matched to the facade design. Of course, the type of material from which the deflector is made affects its cost.
The ventilation deflector is a special nozzle mounted on the upper end of the exhaust pipe to protect the duct and facilitate the ventilation process. After all, the deflector overlaps the cut of the pipe, preventing the penetration of precipitation or small debris, and, at the same time, creates an additional exhaust force in the channel generated by the wind blowing this nozzle. Moreover, the chimney can belong to both ventilation and the system for removing combustion products from the furnace or boiler (chimney).
This packing works on the basis of the Bernoulli effect, a Swiss mechanic who discovered the relationship between the flow rate and the static pressure in the channel. Bernoulli found that with an increase in the flow rate, provoked by the narrowing of the channel, the pressure in the duct or pipeline drops, creating a vacuum in a certain area of \u200b\u200bthe pipeline.
That is, the deflector “catches” the wind rushing into a narrow channel - a diffuser, and provoking a drop in pressure in the upper part of the ventilation channel. As a result, the rarefied void under the diffuser is filled with a portion of air drawn in by the ventilation duct.
In this case, the correct deflector can regulate the air flows in the diffuser and the direction of the discharge of the medium transported by the exhaust pipe. And with due diligence of the designers of this nozzle, the thrust in the duct increases by 15-20 percent.

Actually, because of these percentages, a deflector is used, with which you can level the insufficient height of the duct or the overly modest dimensions of the ventilation duct.
Typical types of deflectors
We have already figured out what a deflector is for, so further in the text we will consider the types of construction of such nozzles. By design features, the assortment of such products is divided into four groups, which include the following nozzles:
- Deflectors with a flat "cover" (pommel). You can even make such attachments with your own hands. After all, a flat lid can simply be cut out of sheet steel or copper, without the trick of forming a cone.
- Nozzles with a removable lid, which are especially in demand in case of arrangement of a chimney duct that needs periodic cleaning.
- Deflectors with a gable (gable) cover. Such nozzles provide maximum protection of the chimney or ventilation duct from snow and rain.
- Ball-head attachments that are used on the "front" side of the exterior. Such deflectors have the most aesthetic external forms and can fit into any style of roof and facade design.
The most popular models of attachments include the following products:
- Ventilation deflector series 5.904.51 - this model is produced in the form of rounded or rectangular nozzles mounted on a pipe with a diameter of 200 to 1250 millimeters or on a profile air duct with dimensions from 400x400 to 1000x1000 mm. That is, this series includes both household and industrial attachments. In this case, the deflectors of the 5.904.51 series are distributed both in the form of finished products and in the form of diagrams and drawings designed for independent cutting and assembly of the product.

- The rotary ventilation deflector is a typical nozzle with a spherical cover. However, not only the diffuser is hidden under this pommel, but also the impeller - a wind turbine that generates additional draft force. As a result, the capacity of the hood increases by almost 50 percent, and the likelihood of "overturning" the air flow decreases to almost zero. Therefore, rotary models are mounted not only on chimneys, but also on exhaust ducts of industrial and household ventilation, fan risers sewers, roof vents and so on. The diameter of the exhaust tube, on which such a deflector is mounted, varies from 200 to 900 millimeters. The cost of such a product is 3000-4000 rubles.

- The TsAGI ventilation deflector is a special nozzle, supplemented by a cylindrical screen in which a classic product with a conical roof is “wrapped”. The diameter of the air duct, ready to accept the TsAGI deflector, ranges from 100 to 1250 millimeters. Moreover, the cylindrical screen guarantees the absence of back draft even in the largest diameter air ducts. The cost of a TsAGI household deflector ranges from 400 to 5000 rubles, depending on the dimensions of the product.

- The Grigorovich deflector is a classic version of the product, mounted not on a pipe, but on a nozzle made in the form of a truncated cone. Moreover, both the nozzle and the classic conical lid with spacers form a single structure. This is the most common oven and ventilation deflector, which can be bought at any store or made by hand.

- Double H-shaped deflector - a classic model with an unusual inlet. This part of the nozzle is made in the form of the letter "H", into the middle bar of which a pipe is cut, connecting the products and the hood. That is, instead of one deflector, we mount two nozzles on the exhaust channel, increasing the efficiency and productivity of the exhaust at least twice.

As you can see: the assortment of deflectors abounds different models and structural diagrams. However, you can choose from this variety and high-performance, active ventilation deflectors, and homemade option, for the manufacture of which you need to make a minimum of effort.
The manufacture of the packing begins with calculating its dimensions. At the same time, we must understand that a classic deflector consists of the following parts:
- An inlet pipe, the throughput dimensions of which must match the outer diameter of the pipe.
- The outer cylinder located on top is a diffuser, the dimensions of which should not be 30 percent larger than the throughput diameter of the duct.
- Conical, ball or flat dome, held by brackets above the diffuser. The dimensions of the hood should be 70-90 percent larger than the throughput diameter of the hood.
Well, in height, the deflectors of ventilation systems should be no more than one and a half internal diameters of air ducts.
Having decided on the dimensions, you can start cutting sheet blanks from galvanized or stainless steel - black rolled products are not suitable for the deflector. And first we draw the sweep of all structural elements - from the inlet to the brackets - and then transfer these templates to the metal. The separation of the blanks from the sheet is carried out using metal shears. Well, if you cannot make a scan according to the workpiece drawing, use ready-made drawings and patterns.

The assembly of finished elements is carried out for rivets, screws, bolts or welding. The latest technology, of course, guarantees maximum reliability, but not every welder is able to "cook" thin sheet metal. Therefore, rivet mounting is the optimum assembly technology.
In this case, first we assemble the diffuser, then we attach to it the brackets that hold the cap, to which we mount this part of the deflector. Next, we attach the bottom brackets to the inlet and mount the top of these spacers to the cone diffuser.
In ducts and air ducts. But over time, debris can get into the mine, the channels can simply become clogged with dust, which adheres firmly to their walls, especially if they have a fatty deposit. All this reduces the diameter of the air ducts, which negatively affects the operation of the entire ventilation system.
That is why many homeowners install special devices called deflectors on the tops of ventilation pipes.
Features of the device
installed to increase thrust in air ducts, mines and channels. This device, by deflecting the air currents created by the wind, creates a zone of reduced pressure at the outlet of the ventilation system. The air masses in the pipe, trying to compensate for the vacuum, rise to the pipe head, thereby increasing the thrust.This is a description of the principle of operation of all deflectors, the designs of which exist in a huge number. Many devices not only deflect air flows, but also increase the speed of their passage over the head of the ventilation pipe, by narrowing the channel, thereby significantly increasing the thrust (airbrush principle).
Proper use of the deflector helps to increase the performance of the entire ventilation system up to 20%, it is especially useful for ventilation ducts with large horizontal sections and bends.
In addition, the deflector on ventilation pipe perfectly protects against the ingress of various debris, small birds, insects, and most importantly, atmospheric precipitation. Basically, the material from which these devices are made is resistant to corrosive manifestations. It is galvanized or stainless steel, ceramic or plastic.
Existing types of deflectors
Today there are a huge number of different designs of such devices. Among them, the most popular models are:
- - effective and structurally simple wind diverting device.
- Is also a very popular deflector design.
- H-shaped device for effective increase of draft in ventilation and chimneys.
In addition, various designs of open deflectors are often used, both on the tops of ventilation and chimneys.
All varieties of models can be classified according to some distinctive qualities:
- By the shape of the top of the device.
- Rotating (rotary or turbine).
- Deflectors-weather vane.
In addition to such a common material as metal, these devices are made of plastic. The plastic ventilation deflector is less durable than its steel counterpart, but has a lower cost and a more sophisticated appearance.
That's why plastic fixtures adorn the ventilation shafts of most private houses. But he, besides the service life, has another serious drawback. Plastic can't stand high temperaturestherefore it is not recommended to use it on chimneys.
 Weather vane - deflectors are usually installed on chimneys, but they are quite suitable for ventilation systems. The air flow, passing through the system of visors and slots in the product body, is redirected, thereby creating a zone of reduced pressure above the pipe. It should be recalled that the weather vane has a design that allows this apparatus to be constantly turned, with the working side to the wind.
Due to its design, the rotating one not only increases the draft in the ventilation shaft, but also effectively protects it from various debris and insects. This device, as a rule, has a spherical shape, therefore it stands out among all the original design.
There is another original type of ventilation deflector - rotary, or as it is also called turbine. This device converts the energy of the air currents into the rotary motion of the turbine, which swirls the air, like a tornado, thereby creating an increase in thrust in the duct. This device shows excellent results even in the warm season, creating a draft in the ventilation system.
Making the simplest device with your own hands
 Despite the complexity of the design, everyone can make a deflector with their own hands house master... It's enough just to have necessary tools and materials. For self-made this device will need:
- A sheet of thick paper or cardboard.
- Galvanized metal sheet.
- Deflector drawing with calculations relative to the pipe diameter.
- Rivet gun.
- Metal scissors.
- Drill with a set of drills.
- Marker or scribe.
After preparing the tool, material and personal protective equipment (glasses, gloves), you can start making a ventilation deflector with your own hands.
- First of all, you should translate the contours of the product from the drawing to the metal. There should be a sweep of all the main parts of the device: a hood, a diffuser, an outer cylinder, stands.
- After that, you need to cut out all the parts of the device, according to the resulting pattern.
- Connect all parts of the device, according to the drawing or sketch, using a rivet gun.
- Connect the two parts of the deflector using uprights cut from the same metal.
After manufacturing, you can install the deflector on the pipe head, carefully securing it with clamps.
Advice:
The deflector will create additional traction in the channels only if all its parts are made to a certain size. It should be remembered that the installation should be carried out while working at a height, so it is better to do this with two people and with insurance. If you are not confident in your abilities, turn to professionals who have experience in the manufacture and installation of these necessary devices.
Recently, fans of renewable energy sources have preferred vertical wind turbine designs. Horizontal go down in history. It's not just that making a vertical wind generator with your own hands is easier than a horizontal one. The main motivation for this choice is efficiency and reliability.
Benefits of a vertical wind turbine
1. The vertical design of the wind turbine catches the wind better: there is no need to determine where it is blowing from and to orient the blades to the air flow. 2. Installation of such equipment does not require its high location, which means that the vertical wind turbine with your own hands will be easier to service. 3. The structure contains fewer moving parts, which improves its reliability. 4. The optimal blade profile increases the efficiency of the windmill. 5. The multi-pole generator used to generate electricity is quieter.
Let's talk about how to make parts and assemble a vertical wind turbine with your own hands.
The algorithm of actions in the manufacture of a turbine with your own hands
1. Supports (upper and lower) of the blades are two concentric circles of the same size. They are made of ABS plastic - cut with a jigsaw. In one of them (it will be the top), a hole with a diameter of 300 mm is made.
2. The lower support should rest on the hub, which can be used as a hub passenger car... To connect the parts, you need to mark and drill 4 holes. 3. Assembling a vertical wind generator with your own hands, pay special attention to the attachment of the blades. For correct location blades need a template. On the lower support we draw a six-pointed star (Star of David), the corners of which will be at the edge of the circle. We project the drawing onto the upper support. The blades are made of thin sheet metal in the form of a strip 1160 mm long, the width of which is slightly larger than the side of the star's ray.
 4. Attach the blades with two corners at the top and bottom, while they must be bent so that a quarter circle is formed. Place them one after another around the circumference, setting them on the edge of the rays.
We make a rotor
1. Bases for a rotor with a diameter of 400 mm are cut from 10 mm plywood. Outside radius with liquid nails or epoxy glue are attached to permanent neodymium magnets with high inductance. They are positioned similarly to the numbers on the hour dial (exactly 12 pieces), observing the polarity (it is recommended to mark them). To keep the magnets in place, they are temporarily fixed with spacers made of wooden wedges.
 2. The second rotor is made similarly and symmetrically to the first. The difference in the polarity of the magnets - it must be the opposite.
How to assemble a stator
The stator is assembled from 9 inductors. There should be 3 groups of coils connected in series (3 pieces in a group): the end of the previous one is connected to the beginning of the next one ("star" configuration). The coils are located symmetrically at the vertices of three triangles inscribed in a circle. Winding is in progress copper wire 0.51mm in diameter (24 AWG type). 320 turns are required. This will provide a voltage of 100 V at 120 rpm at the generator output. turbines. A vertical wind generator with your own hands can be made with different parameters of the output voltage and current by reducing / increasing the number of turns and the diameter of the stator winding wire. The turns of the coils are wound in the same way. It is necessary to observe the direction of winding and mark its beginning and end. Epoxy glue is applied over the outer coil and wound in four places with electrical tape - to prevent unwinding.

Rules and nuances of connecting coils
The ends of the coils must be cleaned of varnish insulation. The connections are made by soldering. The coils prepared in this way are laid on a paper sheet, on which a diagram of their arrangement is applied (in accordance with the position of the permanent magnets of the rotor). Fix them with tape. All free margins of the paper (except for the centers of the reels) are sealed with fiberglass, filling epoxy resin with a hardener. The winding leads must be located outside or inside the stator. To fasten the bracket, holes are made in the stator.


Final assembly and installation
They are assembled on one axis (from top to bottom): the lower support of the blades, a disk with permanent magnets (upper rotor base), stator, lower rotor base and hub. All components are attached with studs to the bracket. For good contact we use stainless steel bolts. Having completed the rest of the little things, we get a finished device. A vertical windmill with your own hands should be installed in an open area, where the wind is strongest. It is desirable that there are no tall structures nearby. Then the wind generator will efficiently generate electricity, which will help save money.
It is difficult not to notice how the stability of electricity supply to suburban facilities differs from the supply of city buildings and enterprises with electricity. Admit that you, as the owner of a private house or summer cottage, have repeatedly encountered interruptions, inconveniences and damage to equipment associated with them.
The listed negative situations, together with the consequences, will cease to complicate the life of lovers of natural spaces. Moreover, with minimal labor and financial costs. To do this, you just need to make a wind power generator, which we talk about in detail in the article.
We have described in detail the options for making a useful household system that eliminates energy dependence. According to our advice, an inexperienced home craftsman can build a wind generator with his own hands. The practical device will help you to significantly reduce your daily expenses.
Alternative energy sources are the dream of any summer resident or homeowner whose site is located far from central networks. However, receiving bills for the electricity consumed in a city apartment and looking at the increased tariffs, we realize that a wind generator created for household needs, we would not hurt.
After reading this article, perhaps you will make your dream come true.
Wind generator - perfect solution to provide a suburban facility with electricity. Moreover, in some cases, its installation is the only possible way out.
In order not to waste money, effort and time, let's decide: are there any external circumstances that will create obstacles for us in the process of operating a wind generator?
To provide a summer cottage or a small cottage with electricity, it is enough, the power of which does not exceed 1 kW. Such devices in Russia are equated to household products. Their installation does not require certificates, permissions or any additional approvals.