Installation of a metal pallet on bricks. How to mount a shower tray with your own hands. Do-it-yourself pallet construction
The main stage of work when installing a cabin in a bathroom is installation shower tray. You can do this yourself, subject to technological requirements.
The easiest way to mount acrylic, ceramic or steel products - this does not require unique knowledge and complex tools. But with certain skills in construction and repair, it is possible to equip a bathroom with a concrete pallet, ennobled ceramic tiles. The installation of a shower tray made of marble or cast iron must be carried out by specialists due to the heavy weight of the products.
Choosing the right model

Shower trays are available various forms- square, rectangular, with rounded edges. The choice here depends on the desire of the owner. It is much more important to consider the depth of the structure when installing:


In some cases, a waterproofed floor with drains for draining water acts as the bottom of the shower cabin.
Pallets are also built-in and removable. This moment must be taken into account during installation.
No less important is the wall thickness of the selected plumbing element.
Pallets with thin walls are made of acrylic and plastic. The advantages of such models include ease of transportation and installation, as well as a budget price. But thin-walled models have a number of disadvantages:
- mechanical deformations from the feet of washing people;
- surface cracking due to temperature changes;
- the need for a solid foundation.
The coating of steel pallets may peel off, appear on damaged areas rust spots. Acrylic analogues are easy to scratch if, for example, you decide to wash your beloved dog.
Ceramic pallets, or those made from brick and concrete, are more durable. The most durable are cast iron models.
How to choose a shower tray, video:
What is the best base for the pallet
The installation of a shower tray can be done in various ways:
- on a brick foundation;
- on plastic support parts;
- on metal carcass.
The base is chosen depending on the configuration of the model and its technological characteristics. The need for a foundation is due to the fact that the drain hole must be located above the level of the sewer line so that the water leaves well. Masters believe that the angle of inclination from the bottom to the entrance to the sewer line should be at least 3 degrees. If it is not possible to make a pedestal or lower the sewer inlet, a special pump will be required to pump out the water.

Most deep models are equipped with a special metal profile frame. But if the tray is thin-walled, the feet of the swimmers will quickly push through the bottom between the guides, especially if the owners of the bathroom are not distinguished by a fragile constitution. In these places, the acrylic options may even form through cracks. Therefore, deep, thin-walled pallets also require a stable foundation.
Installation of a ceramic shower tray is possible without a foundation, directly on a flat floor without a mounting gap.
Here it is necessary to monitor the quality of laying sewer lines so that the drain hole is higher than the outlet, and the water quickly leaves the tank. The element itself is attached to the floor with glue or cement tile mixture.
Cast iron elements are usually simply placed on the floor. Their height is sufficient for reliable discharge into the sewer. The same goes for stone products. But there may be a problem with the siphon. It will have to be equipped directly on the floor surface, or a flexible unit must be connected and hidden in a specially equipped niche in the wall.

Consider how to mount different types of foundations when installing shower trays.
Metal or plastic frame

If you still choose this type of base, a lot of time for installation will not be required. The main steps here will be:
- Leveling the legs with a building level.
- Shower tray installation.
- Connection to the sewer and fixing the drain hole.
Under the bottom, you can place a plate of extruded polystyrene for thermal insulation of the area. In the same way, they use mounting foam. This is especially important when installing steel pallets. It will also help reduce the sound of falling water.
When the installation of the shower tray is completed, you need to check its stability. If the pallet staggers or creaks, additional supports from steel corners or brick posts will be required.
To protect the thin bottom and give the structure stability, you can make a removable formwork and pour concrete. The installation of the shower tray will be carried out on the resulting pedestal. This method has disadvantages: it is impossible to check and fix the leak. Replacing the sewer unit, and bringing the siphon down is also quite difficult. Alternatively, you will have to use flexible connections and hide the siphon in a niche in the wall.
This perfect solution for most pallets, allowing you to eliminate any deformation and extend the life of plumbing. The main thing is to choose the place where the siphon will be installed.

Bricks in this case are laid not only around the perimeter of the product. Otherwise, the bottom will bend over time. In designs with legs, to eliminate this drawback, an additional support is provided in the center. Since there is a bulge there, you cannot install a similar model on a flat brick foundation. It is necessary to provide a recess for this tubercle.
The correct technique for creating a brick base is as follows:


The installation of the shower tray is carried out after 3 days, when the masonry fully rises.
If the pallet is semicircular, on the bend, the bricks are laid out with a fan of bonded faces outward.

A welded frame made of metal corners 20 by 20 mm can act as a support in the center of the bottom. It is installed between rows of bricks and is fixed to the floor with dowel-nails. Acrylic should be protected from friction against metal surfaces with a layer of insulating rubber glued to the metal.
A deep pallet on a high foundation will require the creation of a ladder to the entrance to the shower stall. Steps can be created from concrete or bricks and overlaid with tiles. The walls behind the pallet are finished with tiles or other waterproof material. The tile adhesive must also have excellent moisture resistance.
Do-it-yourself installation of different types of pallets
Each shower enclosure comes with assembly instructions. Additional tools and materials are also indicated there. But if you decide to choose your technology, then you should take care to select the appropriate tools and consumables. In most cases you will need:
- building level;
- screwdriver;
- marker;
- drill and perforator;
- pliers;
- wrench;
- sealant.
If you need to do brickwork, you will additionally need a mixture for mortar and a trowel.
Preparatory work

Regardless of the type of pallet, it is necessary to prepare the bathroom for its installation. For this you should:
- carry out waterproofing of the floor and walls;
- check the possibility of connecting to the water supply system and sewage lines (pipes should be with convenient outlets for ease of connecting hoses);
- close all pipe openings with plugs during installation work.
An important point is the wiring. It must be hidden and moisture resistant, with a minimum number of twists. For the connection, you should choose a copper three-core wire with a cross section of 2.5 mm or more with double insulation. It is laid directly from the electrical panel with the installation of a residual current device.
Installing an acrylic shower tray (step by step)

Most modern showers are equipped with acrylic trays. They are easy to assemble:

Now you can attach the decorative part of the pallet, or do it during the installation of the entire booth. To check the correct installation, you should carefully stand in the pallet and feel how stable and reliable it is.

After completing the work, check all attachment points, as well as the water supply and its drainage. If there is a leak somewhere, tighten the connections a little more. If necessary, carry out additional insulation work.
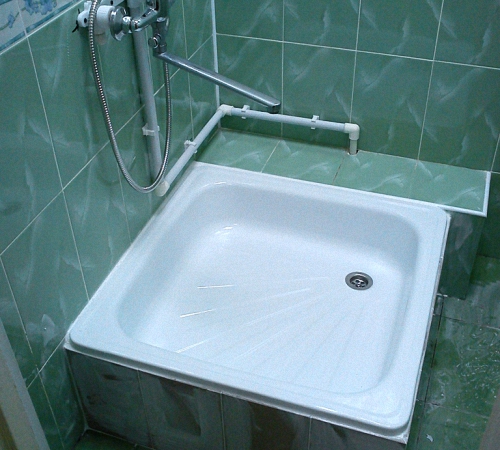
Installing a shower tray made of steel (step by step instructions)
Similar designs are made by stamping. They do not involve the manufacture of legs at the same time with the body. The installation of a steel shower tray is carried out on a special stand: a profile laid along the perimeter of the bottom, to which threaded bushings are welded. The legs are screwed into them.

For correct installation necessary:

It is possible to strengthen the steel pallet with the help of supporting pillars, for example, made of brick. They must necessarily correspond to the structure in height. Otherwise, the support elements may push through the bottom.

To make the steel pallet look aesthetically pleasing, you can overlay the stand with bricks and glue it with tiles. It is placed with a slight slope towards the pallet so that water does not accumulate.
Installation of a steel shower tray, video:
Installing a ceramic or cast stone shower tray (step by step)

Such products are heavy and massive, so they are installed on the floor without any stands and legs. They sometimes have niches for the siphon, but more often the structures are monolithic, with only one drain hole. In this case, you will either have to use a flexible drain system, or install the tray on a pedestal. The last option requires the following steps:
- We carry out waterproofing of the floor and a cement screed on top of it.
- We create brickwork around the perimeter of the product so that the height allows you to place the drain system.
- We connect the pallet with the siphon, and the outlet pipe with its outlet pipe.
- We install the shower tray together with the drain system on a layer of cement so that the siphon and the drain pipe are placed in the niches intended for them.
The facade parts of the pedestal are faced with ceramic tiles or mosaic modules. Joints of products of any type are treated with sealant. If appearance does not suit the owner of the shower cabin, you can strengthen the joints with plastic decorative corners, which are fixed with glue or sealant.
How to veneer the side of the shower tray, video:
Creating a pallet according to individual sizes (step by step instructions)

It is realistic to create a shower tray with your own hands, without purchasing a finished product. The advantages of this option are individual design. You can choose any shape, size and color of the cladding.
How to install a shower tray:

After the final solidification, the surface is covered with tiles, mosaic modules or other waterproof decorative materials.
How to create a pallet with your own hands, video:
What should I do if the shower tray was damaged during installation?

Most often, small chips and scratches occur on the surface of acrylic products. Do not be upset, such damage is easy to repair. With the help of a special restoration composition, it is possible to eliminate even through breakdowns.
- To do this, you need to purchase a suitable composition in a hardware store and follow the instructions:
- Remove all installed parts from the pallet.
- Find out the degree of damage - whether it is a scratch or a through breakdown.
- Drill holes from both ends of the crack slightly larger in width than the damage. They won't let the crack grow.
- In the case of a through breakdown, a strip of fiberglass is glued to the bottom. Epoxy resin is used as glue.
- Cut off the edges of the crack with a sharp knife so that the composition penetrates better (cut off chamfers), and pour it.
- After the mortar dries, smooth the restored area with a soft sandpaper to remove the sagging.
Cast stone products are restored in the same way.
Ceramic pallets are difficult to restore. Even the strongest adhesive will not last long, and the structure will, unfortunately, collapse rather quickly.
In products made of steel and cast iron, enamel most often suffers. If there are no through breakdowns, then it is not difficult to repair the damage. To do this, use liquid acrylic with a hardener. Either epoxy is applied, and liquid enamel is applied on top.
Installing a standard shower tray with your own hands is quite realistic. However, if you want to create an unusually shaped shower enclosure, or have purchased an extremely expensive or complex model, it is better to seek help from professionals.
For long-term operation of the shower cabin, it is necessary to properly install the shower tray. The technology for performing work must be accompanied by a competent installation of all structural details. In this article, we will describe the features of installing a shower tray in accordance with the rules and recommendations of experts.
Types of pallets
The shower is a great addition to the bathroom, which saves free space in room. The installation method of the shower tray must be installed in a safe manner. Installation options depend on the type of pallets and the technology of fastening to a certain material. However, it is important to remember that not all pallets can be installed independently, and in some cases, you need to seek help from specialists.

Shower trays are distinguished by the type of material from which they are made. So, the following types of structures are distinguished:
- cast iron products;
- pallets made of marble and ceramics;
- steel products;
- acrylic trays.
Marble products are considered the most durable and reliable, however, their cost is quite high, so not everyone can afford such an acquisition. Ceramic pallets are also expensive and have excellent decorative properties, but are too sensitive to various damages.
An affordable option is to install a shower tray made of acrylic materials. To mount the structure, it is necessary to build a special frame that would support the pallet, because such products tend to sag under weight. Special fixing legs are added to the kit, as well as reinforcing parts, which ensure the strength and reliability of the future installation. For example, cast iron pallets are the cheapest among other types of products. The peculiarity of such pallets is durability and reliability, which is indicated by the material used.

Pallet Installation Aspects
The cost of a shower cabin depends on the variety of functionality of the product. For example, a shower room with hydromassage, telephone, lighting and other effects will have a high cost. At the same time, it is important to take into account the payment to workers for the installation of the entire structure. With your own hands, it is easiest to install acrylic or steel products.
During the do-it-yourself installation process, it is important to remember to level the surface under the shower for the vertical position of the legs. The assembly technology of the structure can be seen in the instructions for the product. They indicate the features of installing a product made of plastic or metal, and also describe tips for connecting the sewer system to the shower. Pallets can be installed on plastic support elements, which can be replaced with bricks.
It is important to know! To insulate the shower tray, as well as to seal all voids, it is necessary to use mounting foam in the work. However, this method can complicate the dismantling or repair work. For check correct installation shower trays, you need to get into it with extreme caution, after which you will determine the stability and reliability of the structure.
Do-it-yourself installation of an acrylic pallet: features of work
The main disadvantage of acrylic products is the lack of support under the central part of the pallet. Thus, the surface may be damaged by careless movement. This will cause the installation to break down and damage the human body as a result of the fragment.
Therefore, when installing an acrylic pallet, it is important to follow the sequence.
Preparatory work
During repair work in the bathroom, special attention is paid to connecting the sewer system and water supply. The shower cabin must be connected to several systems, which are the supply and removal of water, as well as the wiring of electricity. At the same time, the last part must have a high resistance to moisture and water.
To install a shower tray for showers, you need to purchase high-quality pipes and other products in order to avoid leakage in the future. After installing all communication systems for the bathroom, it is important to carefully check everything, especially the water supply and the operation of the sewer. All pipe openings are closed with temporary plugs at the time of installation work.
Installation process
During installation, it is important to align all pallets strictly vertically. This is due to the need for proper flow into the sewer, only if the product is perfectly level in a horizontal position. This will prevent the formation of puddles in the shower. To install the pallet, it is important to make a flat base of tiles or ceramics.
To properly mount the pallet, you need to fix the central part of the product, while the horizontal structure should not be disturbed. To simplify the work, draw a contour around the entire perimeter of the pallet to establish the exact position of the product. After that, you can start connecting sewer pipes and other elements.
Strengthening the shower tray
For the strength of the installation of shower trays, it is necessary to measure the distance between the product and the floor. At the beginning, it is important to leave space for the sewer so that the sewers can be cleaned or replaced later. Bricks or steel pipes can become additional parts of the support, depending on the design parameters.
Rubber is laid on top of pipes or bricks, after which the supports must be firmly pushed under the base of the acrylic pallet. After that, you can connect the communication systems.
Detailed instructions for installing shower trays
Before proceeding to installation work need to prepare essential tool. For installation you will need the following materials:
- FUM tape;
- sealant or special glue;
- twin to the sewer network;
- if there is no siphon in the kit, then you need to buy it at any plumbing store.
1. The pallet with legs must be leveled in a horizontal position. To do this, the legs are separately unscrewed and fixed in special locking screws. If you purchased a booth without supports, then you need to fill the floor with cement mortar. The level of the base must correspond to the position of the floor in the bathroom. After that, they proceed to the installation work and do the finishing, using ceramic tiles or other products.
2. It is important to fix the pallet from the side of the wall using adhesives. Joints and fastening points must be additionally sealed with sealant. All work must be carried out carefully to avoid further leakage of water between the wall and the structure. A double is attached to the sewer system, in the presence of other types of connection, a tee is installed.
3. All parts and connections of the pallet must be carefully sealed to avoid water leakage and destruction of the pallet.
4. It is important to install the pallet above the level of the sewer pipes. This is necessary for further access to communication items for their repair or dismantling in case of breakage or damage.
5. In conclusion, it is necessary to check all attachment points. Also check the supply and drainage of water. If there is a leak in some areas, then it is important to tighten all connections more carefully. If necessary, carry out additional insulation.
Features of installing other types of pallets
Pallet for cheap cab can be installed different ways, for example, on a brick base, on plastic supports or a metal frame. The technology of work depends on the characteristics of the product and the materials from which it is made.
For a ceramic pallet, you do not need to install supports or other racks, because the structure is mounted directly on a flat floor. In this case, there will be no mounting clearance, therefore it is important to lay all communication systems with high quality and professionalism. To carry out repairs or to replace sewer parts, you will need to dismantle the pan. Answering the question: how to install a shower tray without ceramic legs, you need to attach the product with glue or cement mixture for tiles. Lastly, install the drain hole.
For the installation of steel or cast iron products, it is necessary to use more reliable support elements, which are bricks. Initially, the boundaries of the pallet installation are set on the floor. After that, a cement mortar is prepared and masonry is made of bricks. The height of the masonry must correspond to the parameters of the pallet and have the same shape. The pallet must not come into contact with the floor in order to be able to install the communication system.
Three days later, after the cement mortar has dried, a pallet must be installed. A layer of cement must be applied over the masonry, after which the product must be applied and leveled in a horizontal position. A hose must be attached to the drain system. As facing materials tiles are used decorative panels, mosaic and other finishes. This is necessary to give completeness to the installed structure.
Unlike installing a low shower tray, for other products you need to use a metal or plastic frame, which makes the DIY installation process simple. The process of performing work consists in aligning the legs, installing the pallet and fixing the drain hole.
At the end of the installation, it is necessary to check the stability of the structure. If the pallet staggers or fastens, then additional support elements must be made as a brick laying or attaching steel pipes.

The process of making a pallet with your own hands
It is quite possible to install a pallet with your own hands without buying such products in plumbing stores. The main thing is to follow the rules and detailed instructions for performing work. The shape of the base for the shower cabin can be different, you can also use different materials for decoration, creating your own design design. The work process has the following sequence:
1. First, we designate the place of drainage and installation of the drain system. We cover the surface of the base under the shower tray with a waterproofing layer, and the height of the wall covering should be 30 cm.
2. A barrier of bricks is installed along the perimeter of the structure, the height of which should be more than 5 cm above the position of the drain hole. Next, the screed is poured, which should be 6 cm below the drain point.
3. After the screed and brickwork have hardened, the barrier is covered with a layer of insulation. The pouring of adhesives or cement mortar is carried out with a slight slope towards the drain system. The technology for applying the mixture starts from the edge and moves towards the center. It is important that there are no steep angles of inclination, as this creates significant and sloppy transitions.
4. At the end of the work, the surface is finished different materials, for example, ceramic tiles, mosaics and other products at the discretion of the owners.

Features of installing shower tray bumpers
After determining the installation features of the shower tray, the video of which is presented at the end of the article, you can proceed with the construction of the sides. If the pallet has a large height, then it is necessary to build one or more steps for the shower cabin. Masonry can be made of bricks with the installation of formwork, however, the type of material used does not matter, because the surface will be tiled.
After laying the steps and removing the formwork, it is important to cover the surface of the sides with a primer and a layer of waterproofing. After that, the processed and correctly erected structure can be covered with finishing materials. It is important that the shade and type of finish match the look of the shower enclosure and the style of the bathroom. It is important to tile the walls behind the pallet if they are not treated with waterproof materials. As a tile adhesive, you need to choose waterproof products without the addition of silicone, as it darkens over time and spoils the appearance of the shower cabin.

To equip a shower cabin in an apartment, it is better to seek help from specialists. This will allow you to properly distribute the load on the base, as well as lay all communication systems. It is easier to install such a structure in a private house or in a country house, where there is no danger of flooding the lower floors of the house. In the process of performing work, it is important to fasten all parts and elements firmly and securely in order to extend the life of the shower tray.
At installation of shower trays two main tasks are solved:
- providing space for the placement of drain devices (siphon and outlet pipe)
- ensuring the verticality of the walls of the shower cabin, for which the pallet serves as a foundation
Order shower tray installation depends on its type. More precisely, from the material from which it is installed.
Most modern shower cabins are completed. They are well adapted for installation, and it is simple to assemble them.
Acrylic shower tray with reinforcement - bottom view
1.1. Turn the tray upside down and screw in the legs. They can be from three to five. If the pallet is provided with a separate metal or plastic support frame (in addition to the reinforcement of the pallet itself), then do this operation with the specified frame, because holes for screwing the legs will be made in it. Strive for the legs to be longer than the siphon of the drain system and protrude from the bottom of the pan by approximately the same length.
1.2. Install the drain system. In most designs, for this you need to put the pan on its side, insert the connecting sleeve from the side of the bath (cavity for washing) into the drain hole; From the bottom side, tightly put the siphon pipe on the protruding end of the connecting sleeve. Use glue to secure the connection. Cover all joints and cracks with sealants. There are options using threaded connections with gaskets - see the instructions for the shower cabin.
 Acrylic tray feet adjustment
 1.3. Place the tray on its feet. Make sure that the bottom of the siphon does not touch the floor. By adjusting the length of the legs by rotating, achieve the horizontality of the upper surface of the tray (the one on which the walls of the shower cabin will be installed). This is important, because if the cabin is tilted, it will quickly begin to leak.
To ensure horizontality, use the building level. As a rule, this is a wooden block into which a glass flask is inserted with an air bubble floating in it. On a strictly horizontal surface, the bubble should be located in the center of the flask opposite the corresponding mark.
If you do not have a building level, then you can check the horizontality of the pallet more in a simple way. Take an ordinary shallow dinner plate with smooth edges. Put it on the side of the pan and gradually fill it with water. From the side of that edge of the plate, from which water begins to drain earlier than from the others, there is a slope - this side of the pan must be raised.
Repeat this operation on all sides of the tray until the plate begins to fill evenly. After leveling, fix the pallet legs with stoppers.
1.4. If the pallet is installed in the corner of the room or against its wall, grease the sides that touch the walls with glue and press them firmly against the wall (s). Wait for the glue to dry and additionally lubricate the junction of the walls of the room and the sides of the pallet with sealant.
1.5. Connect a drain pipe to the outlet pipe of the siphon and replace the decorative casing of the tray, covering its lower part together with the legs to the floor (this operation can be carried out after the complete installation of the shower cabin).
This completes the installation of the acrylic shower tray.
If you decide to install a marble shower tray in the bathroom, see its advantages and where you can buy it.
Installation of a cast iron pallet
Installing a shower tray from cast iron is fundamentally similar to the installation of an acrylic pallet. The difference is that:
2.1. The cast iron pallet is strong in itself and does not require additional reinforcement;
2.2. The legs of the cast-iron pallet are cast integrally with the body. Therefore, its horizontal alignment is possible only by placing some objects under the legs. Let's say, steel strips of measured thickness (for example, a metal ruler cut into pieces).
 The cast-iron pallet almost does not need installation!
 In this case, the question arises how to fix a shower tray so that his legs do not move off these plates? After all, the sides of the cast-iron pallet are not glued to the walls of the room ...
The problem is solved by creating a cement frame-boss around each leg of the cast-iron pallet. For its molding, you can use at least a “box” from an ordinary matchbox as a formwork.
Another thing is that factory-made prefabricated shower cabins are not equipped with cast-iron pallets. Cast iron shower trays are usually used in conjunction with simpler shower enclosures in the form of screens that do not require very precise tray geometry for installation.
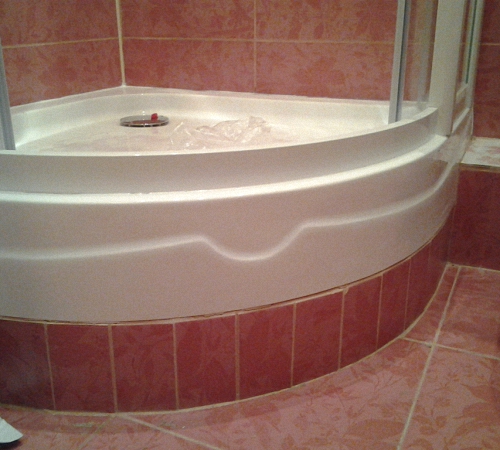
 Preparing a place under the parapet for a cast-iron pallet
 2.3. Sometimes the height of the legs of a cast iron pan may not be enough to place a drain siphon under it. In this case, the cast-iron pallet will have to be lifted with a parapet. This task is not very difficult. A brick parapet is laid out along the perimeter of the pallet (or a concrete collar is made), sufficient in height to accommodate a siphon inside it. A hole or groove is left in the parapet for the passage of the outlet pipe from the siphon. A pallet is installed on this parapet, if necessary, it is adjusted in a horizontal plane; the legs of the pallet are fixed with cement bosses; view surfaces of the parapet are faced with tiles or mosaic modules.
Installation of a steel pallet
Today, the installation of a plastic shower tray is gaining popularity. General and non-general cases of its use can be found.
You can also find it on our website.
How to make a shower tray yourself?
The main part of the procedure is described above. Only in this case, on top of the pedestal, the side of the bath (cavities for washing) is also laid out with a brick. The drain hole of such an impromptu pallet is combined with the siphon inlet pipe. The cavity in which the siphon and the outlet pipe are installed is subjected to comprehensive waterproofing, blocked from above with a cement plug or brickwork. The bathtub (washing cavity), as well as the rest of the pedestal, is lined with tiles or mosaics.
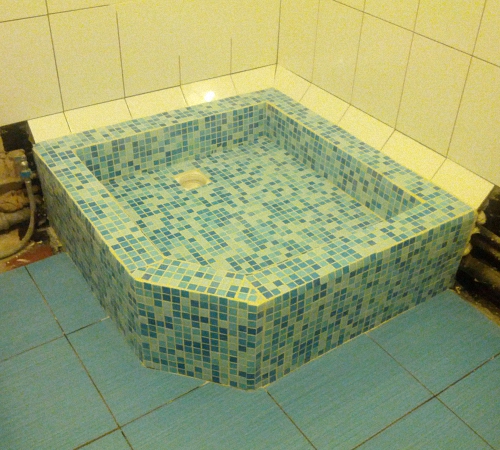
 Homemade shower tray before facing
 How to lay out a shower tray these materials? Just like any other surface. It is only necessary to remember that when laying tiles and mosaics, a slope should be made towards the drain hole. Possibly by varying the thickness of the adhesive layer or cement substrate. Seams between tiles or mosaic modules are coated with a water-repellent compound.
It is possible to preliminarily fasten profiles over the sides of the pallet with dowels or by pressing into a cement screed for the subsequent installation of the cabin fencing.
 Mosaic cladding shower tray
 How to install a shower tray
Little to know how to assemble a shower tray, you need to have an idea where to put it.
Most of the shower trays are designed to fit into the corner of the bathroom. But it may turn out that the distance from this corner to the inlet to the sewer or to the water pipes is too great. That is why rectangular pallets are preferred because they provide more freedom in the placement of the cabin: they can be placed both in the corner and against the wall, and even in the middle of the room.
 Connecting the shower tray to the sewer
 In general, since the water from the water supply is supplied under pressure, and the distance from the cabin to the point of connection to the water pipe is not critical, when choosing a place to install the cabin, you need to focus on the distance to the sewer entrance. It is set rather rigidly by the height of the legs of the pallet (pedestal). The outlet pipe from the siphon to the sewer for normal water flow should go down at a slope of 7-8 degrees.
Sometimes the drain hole of some pallets (especially steel ones) is located not in the bottom, but in the side walls. Accordingly, the pallet must be deployed from the sewer outlet with the side in which it has a drain hole.
How to fix a shower tray
For many buyers of shower enclosures, the strength of acrylic trays, even reinforced ones, seems insufficient. Steel pallets also need strengthening.
General rules for how to strengthen acrylic or steel shower tray, No. Usually, strengthening the structure comes down to laying bricks under the bottom of the pallet or installing supporting pillars. In this case, one thing is important: the surface of the supporting element should correspond as much as possible to the surface of the bottom of the pallet, and all the supports should be of the same height. Otherwise, it will be even worse: the supporting element will simply push through the bottom of the pallet.
 Reinforcing the shower tray with bricks
 What to do? Arrange special cement lodgements for pallets with careful adjustment of these structures to the configuration of the bottom of the pallet. But this kind of “monuments” can be more expensive than a new shower cabin, not like a pallet.
How to seal a shower tray
During installation, you may damage the shower tray. Especially if it's made of acrylic. But even through cracks up to 300 mm long can be repaired quite simply using special restoration kits. For example, "Akrol", which is sold in most construction stores in Moscow.
The procedure for this is as follows:
8.1. Dismantle the pallet, remove all cabin parts from it.
8.2. By a comprehensive inspection of the pallet, make sure of the nature of the damage: through or not through.
8.3. Drill holes at both ends of the crack with a drill slightly larger in diameter than the crack itself - so that it does not spread further.
8.4. If the crack is through, then glue a strip of fiberglass cloth onto it from below (from the side opposite to the wash cavity) using epoxy resin.
8.5. Remove (using a drill with a cutter or just a sharp knife) chamfers 1.0-1.5 mm deep along the entire crack - so that the restoring solution can be poured into it more easily.
8.6. Fill the crack with liquid acrylic with a hardener.
8.7. After drying, remove the acrylic deposits near the crack with a “soft” sandpaper.
Damage to steel and cast iron pallets most often consists in chipped enamel. The elimination of non-through damage of this kind also consists in sealing with restoration compositions. Either - epoxy resin with a layer of liquid enamel applied over it, or with the help of liquid acrylic with hardener.
 It is impossible to restore a broken ceramic pallet ...
 Damage to ceramic (faience) pallets is most often fatal: they break when the permissible loads are exceeded or from impacts. Those who wish can try to glue them together with any glue known to them, but it will not be possible to restore acceptable strength and appearance.
The repair of mineral cast pallets is no different from the repair of acrylic pallets.
Installation of a shower tray - price
If you don't feel like bothering with the question, how to assemble a shower tray, then you can invite specialists for this. For example, " Range of household services"(Moscow) takes 1,500 rubles for the installation of an acrylic shower tray with a connection to the sewer. But, as a rule, this service is provided in conjunction with the assembly of the entire shower cabin, and in itself is not very popular among Muscovites. In the end, everyone can screw four legs to an acrylic dish.
Another question if you need install shower tray original design, individual project, and even from some unusual material. Then the lower threshold prices determined by your ability to bargain, the top does not exist!
Modern dwellings are distinguished by fairly large bathrooms, but the bathroom for many takes only a few squares. For this reason, people try to install a shower stall in order to free up at least a little space for other things. We will help you cope with this work, consider the options for shower trays and the main points of their installation.
Which material is better - metal, ceramic or acrylic?
The easiest way today is to purchase a ready-made shower cabin, the installation of which does not take much time. This design is equipped with many functions, such as hydromassage, radio, telephone. However, such functionality is not always in demand, and the cost of the cabin can reach fabulous figures. In this regard, most people prefer not to spend money, but to purchase a shower tray that you can install in your home with your own hands.
Before installing the shower tray, you need to decide on the material of its manufacture, since some of the installation nuances will depend on this. And there really is plenty to choose from:
- A natural stone. Expensive options that should be installed by professionals, because they are heavy, and with the slightest wrong movement, the pallet can be damaged beyond repair.
- Metal. Such pallets are quite noisy and slippery, especially steel ones, although modern manufacturers are trying to make more advanced models, struggling with these shortcomings. But there are very few such options. Therefore, you need to be prepared for independent soundproofing of the bowl.
- Ceramics. Heavy, but at the same time reliable design. Their disadvantage is the price and the possibility of damage by heavy objects.
- Acrylic (plastic). The most common option, due to its affordable price and low weight. Such structures heat up easily, they are non-slip and do not make noise, unlike steel counterparts.
Modern models can also be various sizes and heights. Here, as they say, everyone chooses according to their own parameters. If the house is inhabited by people aged or with any physical limitations, then options with a slight rise will be relevant, so that it was not difficult to get into the pallet . But if you have small children, and you plan to use the structure as a miniature bathroom, we advise you to take pallets with high walls. Indeed, in some models they can reach 40 cm.
Preparatory stage - what you need to take care of in advance?
Installation of a shower tray should begin with the preparation of the very place where installation is planned. For this, some corner of the room or a specially equipped niche is usually used. The walls must be leveled, waterproofed and finished with ceramic tiles before installation. This material, judging by the reviews and practice, best tolerates direct contact with water. However, tiling is not mandatory, and everyone has the right to choose any other material at their discretion.

It should be noted that the installation can be done on the floor, on specially designed supports or a metal frame. First you need to level the floor, especially if you have to mount the pallet directly on it. Pay special attention to the installation of plastic and acrylic models. They can bend under the weight of a person, so you need to provide additional reinforcement. For this purpose, they lay out a frame of brick or foam blocks with their own hands, on which the pallet will then rest. Alternatively, you can fill the place with concrete - create a kind of screed right in the area where the structure is located.
Before installing the shower tray, all pipes must be checked for serviceability and brought directly to the location of the font. Pay special attention to the drain system, since a faulty sewer can subsequently cause great trouble to both you and the neighbors below. If you plan to install a shower tray, then you also need to consider an electricity supply system for connecting lighting and other functions inside the structure. For this, hidden wiring is used, and a separate machine with an RCD is installed in the shield.
Installing a shower tray - each material has its own way
Installing acrylic pallets is the easiest. To do this, put the bowl on its back and screw into it the legs that come with the kit, the number of which varies depending on the model. It may be that the pallet will be equipped with a frame, then the legs will need to be screwed into it. The next step is to install the drain system. Most of its elements are threaded, so it will not be difficult to assemble it. We recommend using a special thread or linen to seal the seams. Coat all connections with silicone sealant.

Since the acrylic bowl can sag under the weight of a person, it is better to make a supporting wall out of bricks or blocks. Then place the tray on the floor and adjust the height so that the siphon does not touch the surface. The installation of the shower tray must be carried out strictly according to the level, otherwise there is a high risk of leakage. The edges of the connection of the pallet with the walls of the bathroom must be filled with adhesive or sealant. On final stage connect the sewer pipe and put a protective screen, if one is included.
Cast iron, steel and others metal constructions do not require additional support of the central part, so they are mounted either on legs or on a specially equipped frame. The installation method is similar, with the only difference being that mounting foam is used to soundproof steel structures, which is used to fill the cavities between the pallet and the base.
The installation of ceramic pallets and models from natural stone. Such structures have an impressive weight and are installed directly on the base, and not additional fasteners. However, with its severity plumbing equipment quite fragile, so care must be taken when handling it so as not to damage it. When installing heavy pallets, pay special attention to the sewage equipment and the installation of a siphon. Since the font is placed directly on the main foundation, it is necessary to provide for a small niche at the design and foundation stage, where the drain and drainage system can freely fit.
In addition, it is necessary to create a technological gap through which it will be easy to service the siphon with your own hands in case of a malfunction. This place can later be decorated by installing a hatch or a removable trim element there. Glue is applied to the base where the bowl will be attached, after which a pallet is installed on it, which is aligned strictly horizontally on all sides. After that, we wait for the complete drying of the adhesive solution and connect the sewer pipes to the siphon. The place where the bowl touches the wall is treated with silicone sealant or tile adhesive to create a reliable hydro-barrier. If you wish, you can install a ceramic or plastic corner on the joint.
After completing all the work, we proceed to the installation of the protective screen, and if the pallet was attached directly to the frame of blocks or bricks, then we plaster the wall, prime it and line it with the material that is most suitable for the interior of the bathroom. To protect against splashes, we install glass doors or hang a waterproof curtain. Each model may have its own characteristics, so before starting work, you must read the attached instructions.
Repair in the house is always perceived positively only at the first stage, when everything planned is brought to life on paper. When the stage of the direct installation process comes up, a lot of disputes, disagreements and pitfalls arise, which simply no one knew about.
In this article, we will describe in detail the process of repairing the bathroom, or rather, installing a shower cabin on a “brick pillow”.
Shower cabin from improvised materials
As you know, the price of a finished shower cabin sold in a store can vary greatly, this is due to various factors. For example, some devices are more modern, they have more electronics, others use cheap materials, and some are completely non-standard.
The choice is large enough to find something worthy of affordable price extremely difficult, so we suggest not to focus on finished products. Let's better make a shower cabin ourselves, save money, and at the same time work with our hands.
The very first thing you should pay attention to is the shape of the pallet:
- Rectangular.
- Semicircular.
- Pentahedral.
As for the materials from which the pallets are made, the choice is quite diverse:
- Cast iron- the most expensive, but at the same time, the most durable and durable. By weight, they are considered the heaviest, so a reliable base is required for them. On the other hand, supports can be placed around the perimeter, leaving the central part in limbo.
- Steel pallets are slightly inferior in strength and durability, but on the other hand, they are more affordable at a cost. There is one drawback, steel makes noise when exposed to water, so you need to use a special noise suppressor under the pan.
- Acrylic- the most diverse in forms, but the least durable. Under the weight of an adult, such a pallet will easily bend, and with increased load it will completely crack. Therefore, pallets are installed with an additional supporting element made of metal parts.

Note! You can make a brick shower tray with your own hands, but it must be lined with ceramic tiles. Firstly, it is better from the aesthetic side, and secondly, tactile contact with a brick cannot be called pleasant.
Now let's choose one of the above pallets to describe the installation process using its example. We will give preference to the most durable and reliable - the cast-iron version.
Additional materials
To install a shower cabin with your own hands, we need:
- Plumbing elements: siphon, hoses, valve, rubber rings, fum tape, shower head.
- Silicone sealant will also come in handy.
- To prepare the solution, cement, sand and a plasticizer are needed.
- Building brick (for example,).

- For finishing it is better to use tile.
As for the tools, you need to purchase:
- Building level (laser device).
- Roulette.
- Putty knife.
- Master OK.
- Mallet.
- Sealant gun.
Room preparation
Important! If the bathroom renovation is country house, then be sure to ensure that the pipeline is initially located correctly. To do this, the drain is mounted in the floor, in any part of the room. Pipes with supply of cold and hot water it is better to install in the wall so as not to spend money on additional decoration during repairs.
- The first step is to vacate the premises, dismantle the old flooring and cut off all the old plumbing fixtures.
- Measure the working area and calculate the amount of building materials.
- Prepare a cement-sand mortar using water and a plasticizer.
- Align the walls and floor using mortar or putty. You can skip this stage, but, you see, in a more even room, repairs are easier to do, at least Decoration Materials easier to fasten.
Base installation
The instructions will be described below, from which you will learn in detail how the pallet is attached to the bricks:
- After the floor is leveled, it is necessary to mark the boundaries of the cast-iron pallet on it.
- Now you can knead cement mortar for brickwork.
- The next step is to use a spatula to apply a few strokes of cement to the surface of the floor.
- Put a brick on them, lightly move it through the mortar. The final position of the material must coincide strictly with the line of the pallet.
- Then hit the brick several times with a mallet in order to press it to the floor as best as possible.
Note! The thickness of the seam for brickwork may vary, it all depends on where it is carried out. In this case, 5-7 mm is enough to maintain strength.
- Lay the second brick, perpendicular to the first, to make a letter "G".
- Lay as many bricks in height as necessary so that the pallet does not touch the floor surface and there is room for a drain hose.

In the photo - under the pallet passes not only the drain, but also the water supply
- Do the same in all other corners, observing the drawn line of the pallet.

- While the solution dries, you can mount plumbing elements.
- After waiting a certain amount of time (at least 2-3 days), you can proceed to the direct installation of the pallet.
- Before you lay the cast iron product on the bricks, it is necessary to apply cement mortar to them.
- Having put the pallet, you should press it well and check with the building level whether the horizontal plane is observed.

- If everything is fine, you can connect the drain hose to the drain hole of the pan.
The next stage is finishing. Since we took tiles as a basis, we only need two things: plastic crosses to install them between the tiles, and grout for the joints. And in desired color. Here, in fact, the shower cabin is ready, it remains only to hang the curtain to the ceiling so that the spray does not fly in all directions.
acrylic pallet
A cast iron product is still expensive, not everyone can afford it, so let's take a brief look at the process of installing a more flexible and elastic material - acrylic.
- It is best to use a metal frame for support in the central part of the pallet. It can be welded from corners of 20x20 mm.
- As for brickwork, you can save a little Money and buy a double silicate brick M 150.

- They should also be installed in the corners.
- The welded metal frame is attached between the brickwork to the floor using dowel-nails.
- To prevent the metal from rubbing the acrylic surface, an insulating material must be used. The most affordable thing that can be found in improvised materials is ordinary rubber, which is glued directly to the metal.
Important! The joints of pallets (even cast iron, even acrylic) should be treated with silicone sealant. If you think this option is not too aesthetic, then you can use plastic decorative corners which are fixed with glue or sealant.

As he sees, a do-it-yourself brick shower is quite affordable, even for people not involved in construction and repair. The main thing is to do everything as professionals advise, then the result will please you longer.
Conclusion
Brickwork is not afraid of high humidity, it is important to isolate the remaining elements from direct contact with water. For example, the main source of excess moisture can be a drain hose.
If it is installed without the appropriate materials (fum tape and rubber rings), then there is a high probability of leakage, as a result of which water will accumulate under the pan. And this is an excellent environment for the reproduction of harmful microorganisms.


