How to hang the heating battery yourself. Correct installation of heating radiator with different diagrams of the heating radiator high where to put
In order to be warm in the house, the installation of the heating system should be adjusted. At the same time, it is important not only to fully implement the necessary complex of work, but also to properly connect all heating elements. It is necessary to take into account the current norms on the number of heating elements for placing a specific area. If desired, everything can be done with your own hands.
Is the assembly required?
If the radiators are supplied in the assembled form to install the plugs and. Most models have four holes located in the four corner corners. They are used to connect highways of heating. In this case, any scheme can be implemented.
Before the installation of the system is started, it is necessary to close extra holes using special plugs or aircraft taps. The battery pack includes adapters that need to be screwed into the collectors of the product. These adapters should be connected to various communications in the future.
Prefabricated models
The battery assembly is worth starting from laying the entire product or its sections on a flat surface. Best for the floor. Before this stage should determine how many sections will be installed. There are norms that allow you to determine the optimal amount.

The connection of the sections is carried out using nipples having two external threads: the right and left, as well as turnkey protrusion. Nipples should be tied in two blocks: at the top and bottom.
Collecting the radiator, it is necessary to use gaskets supplied with the product.
It is necessary to ensure that the upper edges of the sections are correctly located - in the same plane. The tolerance is 3 mm.
Features of the installation of various species
The material from which a specific heating element is manufactured, presents certain requirements for its installation. If cast iron is not afraid of a serious mechanical impact, then others require special accuracy.
Cast iron classic
Still remain relevant. Special characteristics of the material used in their manufacture make it possible to effectively heat the room of any area due to slow cooling.
To mount such a heating item correctly, it follows to connect:

- disassemble the finished product on the section;
- stretching all the nipples, collect the product in the reverse order.
When performing installation work, it is worth considering the weight of the product and the composition of the material from which the house was built. Installation of the heating element can be made exclusively on brick and concrete walls. near plasterboard Wall It is performed on the floor stand.
Modern models
Such products are low weight and increased fragility. For them, it is necessary to provide for the crane of Maevsky.

In the process of performing installation work, you should not remove the packaging to eliminate surface deformation.
How will we connect?
The diagram of connecting radiators can be different. From how the option will be given preference, the level of heat transfer and the comfort of staying in the apartment depends. Incorrectly selected layout can reduce the power of the heating system by 50%.
Side
The one-sided lateral scheme, which distinguishes the highest heat transfer rate obtained the greatest distribution. In this case, the pipe supplying the coolant is connected to the top nozzle, and the discharge with the bottom.

If you draw on the contrary, the effectiveness of the heating of the room will decrease almost 7%. To connect multisective radiators, such a scheme is not always justified, as insufficient warming of the last sections is possible. You can avoid this by installing water duct extension.
Lower
In the apartment with hidden in the floor or passing under the plinth pipes use the bottom connection.

This is the most aesthetic option in which the nozzles for supplying and removing the coolant are located at the floor, and therefore the bottom holes are used to connect.
Diagonal
Installation of batteries that have twelve or more sections, is carried out in a diagonal scheme.

The coolant is supplied through the upper nozzle, which is located on one side of the radiator, and is given through the bottom on the other side.
Consistent
Such a connection scheme assumes the presence in the system of pressure heating sufficient for the movement of the coolant through pipes.

It should be provided for the crane of Maevsky, intended for removal of excess air.
It is important to remember that the performance of repair and preventive work will be accompanied by the disconnection of the entire heating system.
Parallel
The parallel wiring assumes the presence of a special heat pipe, which is built into the heating system through which the coolant is supplied and the outside.

The presence of special cranes at the inlet and outlet makes it possible to replace individual radiators without turning off heat supply. However, the scheme can cause insufficient heating of pipes under reduced pressure in the system.
Sequence of performance
Installation of batteries begins with full overlap of the contour. When replacing old radiators, water merges, and heating elements are dismantled. It will be right to use the pump to eliminate the presence of the remnants of the coolant in the system.
After all the water is removed, the battery mounting is reconciled in both planes. Installed brackets.
Packaging
The next step is the packaging of radiators using sealing flax, packaging paste or special shut-off valves. Using the dynamometer key, tighten the connection, creating the force specified in the documentation.
Mounting work
Installation of radiators on the wall is made by means of welding or polypropylene pipes. In the first case, it is enough to use two fasteners, in the second they will need at least three. Two must be at the top one below.

At ten or more sections, the number of fasteners should be increased to five. The top should be three, down - two.
Control of spatial location
Monitoring the position of the batteries in both planes. It is advisable to provide a small slope towards the wall. This will avoid bringing the system during its operation.
The final stage
Cutting threads on risers and connecting all elements of the heating system. The tightness of all connections is carefully monitored.

After that, you can perform trial tests in order to detect possible leaks.
Test
If until now everything was performed with your own hands, at this stage it is better to invite a locksmith ZhReu. Broken the "American" cranes, you can open a connecting faucet. Opening the reverse tube is better to trust the locksmith.
In the absence of leaks in places, it will be possible to open a crane on the batteries and close the bypass crane. The coolant will begin to enter the heating. For air booming it is worth using Maevsky's crane.

As soon as the heating circuit warms out in all rooms, the locksmith will open the straight pipe. This will restore the pressure in the system. We can assume that control tests are completed. If the installation was performed correctly, the apartment will be comfortable at minimal cost.
Called the battery? Want to replace the old bulky cast-iron battery compact and more economical bimetallic?
Installation of heating radiators - inexpensive and sure way to get warm in your home!Installation of heating radiator
Before starting work, consider some nuances:
- Before replacing the battery, the water should be blocked only in the apartment of the customer, and not in the whole house.
- Water must overlap only the employees of the HSEA, which have appropriate qualifications for this. Even when replacing the battery, you will instruct this occupation to specialists. Otherwise, you risk leave without water supply all the tenants, whose apartments are located on the riser.
- The replacement of the battery, ideally, should also be made by employees of the Jeep or specially hired for this workers. If the removal and installation of the customer were carried out independently, then all responsibility for the serviceability of the system to go to it.
- Installation and replacement of the battery when using the method of bending pipes and work by gas welding, instead of the usual installation system, should also be carried out by workers who have a certain qualifications to carry out an increased level of safety.
Selection and installation of radiators of different types
The market today shows radiators made of cast iron, aluminum, steel, as well as bimetallic radiators. How to choose the right one among them?
Cast iron radiators
Modern cast iron radiators are no longer the bulky accordions that we are accustomed to see in "Khrushchev" and most Soviet apartments. Today they look like flat panels having smoothed corners and a presentable look. At the expense of its physical properties of the cast iron, heating, long retains heat, gradually giving it to the room.
Benefits: Improved heat exchange, service life of about 25-50 years. Multi-stakes: high weight (one section of the cast-iron battery weighs about 8 kg), because the installation of heating radiators from cast iron is not possible in a number of rooms, the walls of which are made of wood or, for example, drywall. The only option to fasten the radiator in such houses is through the wall. In addition, due to a rough surface and small gaps between sections such radiators are heavy in cleaning.
Disadvantages:large weight (one section of the cast-iron battery weighs about 8 kg), because the installation of radiators of heating from cast iron is not possible in a number of rooms, the walls of which are made of wood or, for example, drywall. The only option to fasten the radiator in such houses is through the wall. In addition, due to a rough surface and small gaps between sections such radiators are heavy in cleaning.
Manufacturers:Model MS-140 or the so-called "harmonica" - an eternal classic, who knows well to us well. Pre-convertible cast iron radiators can be found in the VIADRUS (Czech Republic) catalogs, Roca (Spain) and Ferroli (Italy), as well as domestic producers - Chaz (Cheboksary Aggregate Plant) or MSOO (Belarus). Price: from $ 8 per section.
Aluminum radiators
According to the design, modern aluminum radiators from cast iron differ little. However, the essential difference between them is the weight of the radiator sections.
Benefits:good heat transfer indicators, the presence of ventilation winds, evenly distributing warm air through the room, the weight of the sections (only 1 kg!), the smooth surface can be fixed on any surface.
Disadvantages:susceptibility to the chemical composition of water, pressure surges in the pipeline.
Manufacturers:Due to the fact that a small radiator can drop a relatively large area, on the market you can meet models from 80-100 mm depth and intercentrose distance from 300 to 800 mm, and the number of sections in the radiator from 4 to 16. More commonly common models of Italian production: radiators Fondital, Decoral, Ragall, Faral, as well as a number of radiators of domestic production - QMS (Stupino) and MMZIK (MIAS). Price: from $ 12 per section.
Bimetallic radiators
It can be said that this type of radiators is a compromise between cast iron and aluminum. Externally, bimetallic radiators are difficult to distinguish from aluminum, but such products are not sensitive to the composition of water and change in pressure. The universal design of such heating radiators directs hot water from steel pipes that heat the heat to aluminum panels, and they heat the air indoors. Installation of the heating radiator of this type is the best of options and by price, and by the physical properties of the goods.
Benefits: Weight, improved battery design, good heat transfer.
Disadvantages:not yet detected.
Manufacturers: On the market you can find products predominantly Italian (Sira, Global) and Czech manufacturers (ArmAThermal). Rafar radiators (GAY, Orenburg region), Tsellyt-R (Ryazan) and Santechprom (Moscow) are considered from the domestic best. Price: from $ 15 per section.
Steel radiators
Guided by the general rules of the location of the radiator relative to the window, place the installation sites.
If it is necessary to cover the surface of the wall with heat-reflecting material and fasten the brackets on the wall (be sure to use the level to determine the horizontal, as well as the roulette to determine the length of the clip of the bracket into the wall).
Radiator fix on the brackets, placing their hooks between battery sections.
Connect the radiator with a centralized or autonomous room heating system by the selected connection scheme.
Installation of aluminum radiators can be manufactured in both the same and in two-pipe heating systems with a horizontal or vertical pipeline. These radiators can also be used to heating the premises with natural and coercive hot water circulation. Today, the market may offer two variants of aluminum radiators:
- Reinforced radiators with a working pressure of up to 16 atm. Such batteries are used for heating of high-rise residential and non-residential buildings. For the heating of a private house, the use of this type of radiators is unjustified due to the high cost of sections.
- European type of aluminum radiators designed to heat the room with autonomous heating systems. The maximum working pressure in such radiators is no more than 6 atm.
The set of aluminum radiators consists of:
- automatic or manual air outlet valve (the so-called Maevsky valve);
- plugs (right or left thread);
- sealing pads;
- racks or brackets;
- shut-off or thermostatic fittings.
Installation of cast-iron radiators
Installation of pig-iron radiators procedurally does not basically differ from the installation of aluminum heating devices. In the case of cast-iron products, it is important, however, not to overload the wall, as well as more attention to dynamometric moments. Circulatory radiators are recommended to be installed under a slight bias so that hot air does not accumulate inside the radiator (this can lead to a decrease in the heat transfer device).
Cast iron radiators also have a different assembly system: before installing such a radiator, you need to develop, twisted the nipple and again collect the radiator together Outdoor stands. At the same time, the wall mounts are also performed, but they only perform a supporting function.
Installation of bimetallic radiators
The advantages of mounting are bimetallic radiators, rather than iron or aluminum in the fact that they are relatively little weigh and, provided that they are not inferior to aluminum heat transfer indicators, bimetallic radiators are uninterrupted even at high pressure in the system. Method of installation, as well as general recommendations The installation of such heating devices are indicated in the instructions for the product.
IMPORTANT! Pay attention to the manufacturer's recommendations for use in a complex with bimetallic pipe radiators made from a particular material. For example, for most houses there is an installation of only metal pipes, and metalplastic can only stand in private homes, whose heating system works when high pressure.
$ Heating radiators
The cost of installing the radiator will be directly dependent on the material of the product, the number of installed sections for one heating point, as well as the total number of heating points installed in the apartment. The total amount of installation costs will also affect the connection scheme, and the cost of components required for the work. They can accomplish such work, of course. However, this will place all responsibility for you for the performance of the system, as well as for all possible negative consequences associated with its breakdown. And how much is the installation of the radiator? On average, all work on the arrangement of one heating point in the apartment can be tightened by $ 40-50.
Radiator mounting:
- Kiev - 250-350 UAH. per point;
- Moscow - 2 650-3 000 rubles. per point.
- Separately calculated the cost of work on the fodder or replacement of heating pipes.
Radiators Mounting: Video
Installing heating radiators with their own hands: video
Performing an independent installation of the heating system, among other questions, we need to decide on what distance from the wall to hang the radiator. Let some of this aspect seem insufficiently important, but in fact, the efficiency of the system is largely dependent on compliance with the installation parameters.
In our article, we will tell you why you need to follow the distance from the battery to the surfaces, and also give recommendations for installing the radiator on the wall or to the floor.
The importance of compliance with installation parameters
Heating devices, as follows from their name, are installed in the room for its heating. At the same time, for most models of radiator type, the heat radiation is characterized by the entire surface, which imposes certain restrictions on the installation.
As a rule, the distance from the wall to the heating radiator is from 25 to 60 mm. This value is determined, in fact, two parameters: the principal possibility of installation (the size of the windowsill, the dimensions of the niche, etc.), as well as the power of the device.
Note!
The more powerful the device and the higher its heat transfer, the greater should be the gap between the rear surface and the wall.
Installing the battery close to the wall is not recommended, and that is why:
- First, for an effective heat exchange between the radiator material and air, it is necessary to ensure at least the minimum level of circulation. In a small gap, the air remains almost motionless, and therefore the heat is lost.
- Secondly, in too narrow space between the rear wall of the radiator and the wall surface, high temperature is constantly maintained. Because of this, the level of heat dissipation is reduced, the wall of the battery overheats, and the device is eager to fail.
Note!
This is important both for water radiators and for electrical heaters.
In the first, with constant overheating, corrosion is activated, the risk of closures is growing.

- Finally, the narrow slot is very quickly clogged with dust, to extract which when cleaning it is extremely inconvenient. If you leave dust where it has accumulated, then overheating and heat sliced \u200b\u200bproblems will begin to manifest pretty quickly.
It is, based on these considerations, specialists and decide how much the distance between the wall and the radiator must be kept. Well, how to implement it in practice, we will tell below.
Method of installation
Wall variant
When performing installation works, with their own hands, it is much easier to fix the battery on the wall. This task is less laborious compared to floor installation, but at the same time all operations need to be performed very high quality.

The installation process itself includes such steps:
| Stage of work | Operated operations |
| Preparation of the site |
|
| Marking | On the surface we apply markup to install the battery (in principle, it must be taken into account when buying a radiator, but it will not be abandoned here):
|
| Installation of fasteners |
|
| Installation of radiator |
|

As you can see, the instruction does not differ in difficulty, but it is necessary to control the quality of work performed at each stage.
Outdoor option
Sometimes the battery turns out to be too heavy to hang it on the wall - there is a risk that the material simply will not stand it. In this case, the installation is carried out using floor brackets. Yes, the price of such products will be somewhat higher than the wall mounts, however, the reserve of reliability is incomparable.

The installation process itself implies such actions:
- We choose a pair of brackets, the carrying ability of which is sufficient to hold the weight of the battery.
- On the base of the floor, we install racks that fix with anchors. We seload the distance to the wall so that the minimum gap between her and a rich radiator was 60 mm.
Tip!
Mount the floor brackets better before the pouring of the screed - so we can disguise the point of attachment.
- Fill the screed, hiding the bases of the brackets and the hats of fasteners anchors.
- On the racks you wear hooks that exhibit on the desired height and fix bolts. If the product package is provided - we establish metal gaskets that protect the material of the radiator at the point of contact with the hook.
- On the hooks hang the radiator, which then thoroughly align.
![]()
Despite the greater complexity of the implementation, this system has obvious advantages: the load from the battery is not transmitted to the wall, but to the floor, so that the risk of loosening fasteners will be minimal.
Conclusion
Ensure the distance between the wall and the heating radiator can be provided for an efficient heat transfer. different ways. At the same time, it is important to make this clearance sufficient so that the air in the gap is freely circulated, making the room heating with makismally efficient. For a more detailed study of the technique, you should watch the video in this article.
heating in the apartment is the right and inexpensive way to get warm in your apartment. In addition, it cannot be called a complex process, it is important to observe all the installation nuances and the installation rules.
Examples of connecting the battery.
Preparatory work
Before starting work, you need to take into account some nuances:

Battery Connection Can be trusted qualified specialistwhich will fulfill all the work quickly and efficiently.
- It is not worthwhile to replace the battery, but it is better to entrust this business to a specialist who lies all responsibility for further malfunctions in the work of the radiator. In addition, when replacing your own hands there are risks to leave without the water of all residents at home, whose apartments are located on the riser. Water before work in the apartment should overlap only the employees of the housing staff with appropriate qualifications.
- If the installation and replacement uses the method of bending pipes and the operation of gas welding, then the work should also be carried out working with a certain qualifications to work with increased security.
Choosing radiator
The market today presents a wide range of radiators, designed for different buyers. Here, the principle does not always work "the more expensive, the better." You need to make your choice based on the following grounds:
- accommodation places;
- wiring of the heating system;
- from how it will be necessary to establish heating radiators;
- temperature regime in the heating system;
- accounting which material was used in the production of pipes;
- the need for regulating elements and reinforcement;
- location of the room in the building.
By making this analysis, you can proceed to the choice of the battery.

Today, pig-iron radiators may look quite presentable, they can be reappeted. Thus, they can easily fit into the overall design of the room.
Cast iron radiators modern type - These are no longer huge accordions, which were in the Soviet apartment, and flat panels with smoothed corners and presentable appearance. Having good physical properties of heating, the cast iron retains heat for a long time and gradually gives it to the room. Such radiators have a long service life, 20-50 years. The main disadvantage is a big weight (one section weighs about 8 kg), so it is impossible to mount them correctly in rooms, where the walls are made of wood, drywall. Having a rough surface, they are not very comfortable in cleaning.
Aluminum radiators are not much different from the cast iron, the only difference is the weight of the sections (1 kg). Also, such devices have good quality heat transfer, a smooth surface, the ventilation windows evenly distribute air indoors, can be fixed on any surface. The main disadvantage is a slight perception of the chemical composition of water and pressure surges in the pipeline.
Bimetallic radiators are a compromise solution between cast iron and aluminum. Externally, they are almost no different from aluminum, but not sensitive to the composition of water and jumps of pressure. Have good heat transfer indicators, low-cost are easily mounted.
Steel radiators have panel appearance and relief surface. Have different connectivity, good thermal properties. Large deficiencies have not been identified.
Ranitarian installation rules
Before replacing, you need to agree with the specialists of the installation scheme, which will allow correctly performing mounting work And effectively heating the room. It is necessary to follow the sequence of actions:
- Plant water in the apartment and at a particular site.
- Dry water from the site to be replaced.
- Throw pipes and extract the remaining water.
- Install a new battery based on the instructions for installing and recommendations of the manufacturer.
- After installation, test the system for the leaks and operation of the radiator sections.
Attention! When choosing a radiator, consider the temperature capacity of heating, the area for normal heating with a certain number of sections, the working pressure of the coolant.
Rules for the installation of the radiator according to SNiP
Installation of radiators in the room should be made in accordance with SNiP 3.05.01-85.

From the radiator to the wall should be at least 2 cm.
- The radiators setting norm correctly assumes the installation of the battery relative to the window of the window: the window of the window and batteries must be coincided, the error is allowed at no one 2 cm.
- The width of the battery should be 50-70% of the windowsill width.
- The height of the battery over the floor should not be more than 12 cm from the first floor, the distance from the upper edge of the battery to the windowsill should not be more than 5 cm.
- The distance from the radiator to the wall is 2-5 cm. Special wall treatment with heat-reflecting material can be served as an exception.
Attention! You can not install the radiator too close to the floor and wall, as it affects the heat transfer indicators. In single-tube heating systems, use a larger number of sections than before it is excluded. In systems with artificial circulation of water, if the number of sections is more than 24, when installing, it is necessary to apply a versatile method for connecting heating instruments.
Rules for installing aluminum radiators
- Correct the radiator correctly by screwing the radiator plugs with gaskets, install thermostatic fittings, shock fittings, Maevsky valve.
- Guided by the general rules for the location of the radiator relative to the window, mark the places of fasteners.
- If necessary, then cover the surface of the wall with heat-reflecting material and attach the brackets on the wall.
- Secure the radiator to the brackets, placing hooks between sections, and connect to centralized or room.
Mount aluminum radiators can be both in one-tube and in two-pipe heating systems with vertical and horizontal pipeline. Today's market can offer two types of aluminum radiators: reinforced radiators with a pressure of up to 16 atm., Which are used for heating high-rise buildings, and European aluminum radiators are not more than 6 atm. Used for heating in autonomous heating systems.
Rules for installing cast iron and bimetallic radiators
The process is not much different from the installation of aluminum. It is important not to overload the wall here, and it is recommended to install them under a slight inclination so that hot air does not accumulate inside the battery, which leads to a low heat transfer device.
Before installing, the radiator is needed to develop correctly, twisted the nipple, again collect all together. In wooden houses with a weaker wall design, the mount is not provided on the brackets, but on the floor supports, the mounting on the wall carry a supporting function.
The heat supply system is an integral part of engineering systems mounted in each home. And to its arrangement must be treated with special attention. This also applies to the assembly of pipelines, and hanging heating radiators. After all, even a small problem can lead to global consequences, so it is important to know how to make a heating radiator.
Work on the installation of radiators must be started with the definition of the circuit of their connection. In practice, 3 methods are used, they are determined by building standards:
- Side. Used very often, as it ensures that it provides the maximum thermal return.
- Diagonal. Most effective when connecting long heating devices.
- Lower connection. Apply for heat supply systems from pipes that are placed directly under the floor surface.

Instructions for installing heating radiators
After the connection schemes are defined and the heating batteries are purchased, it is necessary to find and carefully examine SNIP 3.05.01 - 85. It sets out the requirements for the installation of heating radiators. Most manufacturing companies apply detailed instructions for the installation of heating devices to their products. If you follow the requirements of regulatory and operational documentation, problems with the installation of radiators should not occur.
The main requirement is observing the size of fixing the heating battery relative to the floor and wall. Otherwise, the heated air will be badly circulated, and the efficiency of the thermal appliance will fall greatly. The requirements of the regulatory documentation determined that the distance to the inner surface of the windowsill and to the flooring should not be less than 100 mm. Practice shows that 120 mm will be optimal.

The distance from the inner wall of the niche to the rear surface of the radiator should not be less than ¾ from the depth of the battery. If the specified dimensions are not followed, then, as already noted, the efficiency of the heat flux will decrease. If the heating device is not mounted in a niche located under the window, but directly around the wall, then the marked distances should not be less than 200 mm. The neglect of the established indicators will result in the difficulty of moving warm air and the accumulation of dust on the back wall.
What tool is needed for installation work
In order to complete the installation of the heating battery, it is necessary to carry out a small preparatory work and prepare a tool.

When installing will be useful:
- perforator;
- bur (its diameter is determined by the size of the dowel, which will turn out the bracket);
- roulette;
- building level;
- flooring tool.
Procedure for assembling radiator heating
Before starting the installation of the battery, it is necessary to determine the installation locations of the fastener. The number of fastening elements is determined by the sizes of the heating device. But even when the radiator is installed with minimal dimensions, the number of attachment points should not be less than three.

The next step is to install brackets for fastening the battery. To increase the reliability of the system, you can use a dowel or a cement solution. The work on the installation of the battery needs to be started from checking the configuration of the radiator. You can then start installing component elements (plugs, fasteners, adapters) on the heating device.

The requirements of the regulatory documentation determined that automatic air ventures should be installed on heating radiators. If it is possible, it is advisable to use the crane of Maevsky.

Crane "Maevsky"
In addition to installed devices on the heating radiator, it makes sense at the inlet and output to mount ball Valves. Their presence will avoid difficulties with dismantling if it is necessary to repair it. Broken cranes, the radiator will calmly be removed.

It will not be superfluous and the installation of thermostats. The presence of their presence will allow to regulate heat supply to heating devices, which will create a comfortable temperature in each room.

After installing all devices and reinforcements, pipelines can be connected. The way they are connected to the radiator (traditional welding, crimp or threaded compound) depends on the inclusion scheme into the heat supply system. The type of connection between the pipes and the battery is determined by the material from which they are made.

At the last stage, it is necessary to test the heat supply system. It should be remembered that during testing in pipes and radiators, a pressure of 1.5-2 times higher than the nominal one is supplied. It is desirable to withstand some time a system under high pressure. This will help installers to see how junctions on pipes and connections with radiators behave.
Important! The heat carrier and on the tests, and when the system starts, it is necessary to serve, gradually opening the crane. Otherwise, it is possible to provoke such a phenomenon as a hydraulic blow that can lead to the destruction of the components of the thermal energy supply system.
After mounting the radiator on the installed fastener, it is necessary to check the correctness of its placement in the horizontal and vertical planes.

It is allowed to raise the edge of the radiator on which the air vent is placed. This will ensure accumulation in the air system at the highest possible, and its release will be performed quickly and with maximum efficiency.

But the change in the level of more than one centimeter is unacceptable, as well as the return tilt. In this case, the formation of air traffic jam is guaranteed, and the flow of the coolant further on the pipeline will be limited or terminated.
Tip! Almost all companies producing heating devices require installers to make the installation only on pre-prepared walls. That is, the surface must be smooth and clean. This will make the right markup of places for fasteners.
The heating radiator is placed on two hooks (bracket), which are located at the top, and the third must be installed as the backup of the lower edge of the device. The installation worker must remember that the number of brackets is determined by weight and length of the battery.
High-quality heating is the key to a favorable climate in the house and lack of cold weather even in the strongest frost. Because if you have an old and non-efficient radiator in your apartment or cottage, it is worth replacing it. At first glance, it seems very difficult work available only to specialists with significant experience. But with due respect to the case and the availability of some tools, installing heating batteries with their own hands does not represent a serious problem.
Battery Location Rules and Connection Schemes
In addition to the characteristics, one of the factors affecting the effectiveness of the heating system is the choice of the right place to locate the product. True, in most cases it is predetermined in advance - the new battery is likely to stand on the place of the old cast-iron, which was since the construction of the building. But still we give several recommendations for the competent placement of the radiator.

First, it is advisable to have a battery under the window. The fact is that it is a "bridge", through which the cold from the street falls into the apartment or cottage. The presence of a radiator under the window forms a peculiar "thermal veil" that prevents the process described above. At the same time, the battery should be placed strictly in the middle of the window, and, it is desirable to occupy up to 70-80% of its width. What is and how to install it, you can look at our page.
Secondly, from the floor to the radiator should be at least 80-120 mm. If less, it will be uncomfortable to remove under the battery, a huge amount of dust and garbage will be accumulated. And if the radiator is set above - a certain amount of cold air will be collected under it, which requires warming up and as a result of this worsens the work of the heating system. In addition, negatively affects the efficiency of the battery too small distance to the windowsill.
Thirdly, the distance from 2.5-3 cm is allowed between the rear part of the radiator and the wall. If it is less - the processes of convection and movement of the flow of warm air, and, as a result, the battery works less efficiently and spends part of the heat in vain.

Table. Standard heating battery connection schemes.
| Name | Description |
|---|---|
| Due to the specifics of the location of risers of heating systems in residential buildings, such a diagram of connecting batteries is the most common. It is quite easy to implement, the efficiency of the radiator is average. The main disadvantages of this method of connecting are visible pipes and inability to batteries with a large number of sections. |
| The second prevalence scheme for connecting radiators. The main advantage is uniform circulation of water throughout the battery, and, as a result, high efficiency of work. |
| Such a scheme is often used in country houses - many hosts of cottages prefer to hide the heating communications under the floor so that they do not spoil the appearance of the room. But at the same time, the lower connection of the radiator is 12-15% less efficient than the diagonal. |


Video - Replacing heating radiators in winter
Installing the heating battery with your own hands - Step-by-step instructions
Consider the installation process of the bimetallic battery connected by a side method to a single-tube heating system. It is worth saying that in this case the work was carried out in the building, where the temperature in radiators was relatively low, because the eyeliner and bypass are made of metal-plastic pipes. Before the beginning independent installation Batteries Check out the device and characteristics of the heating system at home. It is possible for your apartment or cottage connecting pipes need to be made from materials with greater resistance to high temperatures.

We split the process of installing the heating battery with your own hands into several separate stages:
- dismantling of an old radiator;
- installation of a new bypass and shut-off reinforcement;
- installing the battery and connect it to the eyeliner.
Preparation for work. Dismantling old battery
The installation of the heating battery is begins with their own hands from the preparation of the tool and dismantling the old radiator. In this example, we will talk about the standard product from the cast iron, which still warms many apartments. How are installed You can read in our article.
Step 1. Bring home a new battery. Unpack it, check the completeness - if you bought, in place. Also inspect the radiator itself - whether it does not have any damage or defects.

Step 2. Cut the packaging from under the new battery into two equal parts. Use one as a substrate for the radiator - so you do not scratch it about the floor covering. Will the second part of the packaging for the heating riser - when dismantling with the help of a grinder, a cardboard sheet will protect the wall from pollution.


Step 3. Prepare everything that needs to dismantle the old and installing new radiator - fittings, cranes, pipes, tools. Determine for yourself what and where it should be - the search for the necessary for installation, but the things lost among disorder can significantly slow down the work on replacing the battery.

Step 4. Remove the three-way crane connecting the heating riser, bypass and eyeliner. To begin with, loosen it with an adjustable key. If water starts dripping - immediately tighten everything back - most likely, the riser was not blocked properly. And if everything is in order - work on the dismantling of the crane further.


Step 5. Next, disconnect the old battery and tilt from the riser. First, unscrew the nut on the thread slice. Then determine how much you can cut this thread to then mount the tee connecting the eyeliner, bypass and riser without any problems.


Tip! In some cases old paint., applied to the nut and connection of the riser with bypass and eyeliner, can interfere with the work. It can be removed using a conventional knife with a retractable blade or metal brush.
Step 6. Remove the battery with fasteners.


Step 7. For a previously defined label on the carving, connecting the heating riser with the battery, perform cropping with a grinder.


Step 8. Remove the old battery and take there, where it will not interfere with further work. Given the high mass of the cast-iron radiator, do it if possible in a pair with someone.

Step 9. Remove the old battery mount from the wall. If they keep especially hard - use the hammer and chisel.


Any heating system is a rather complicated "body" in which each of the "organs" performs a strictly reserved role. And one of the most important elements is heat exchange devices - it is on them that the final problem of transmitting heat energy or to the room at home is assigned. In this capacity, the usual radiators, convectors of an open or hidden installation, which are gaining popularity of the water heating system of floors - pipe contours, laid in accordance with certain rules.
You may be interested in information about what is
This publication will be discussed about heating radiators. We will not be distracted on their diversity, device and specifications: on our portal on these topics - enough comprehensive information. Now we are interested in another block of questions: Connecting radiators of heating Schemes for the installation of batteries. Proper installation Heat transfer devices, the rational use of technical capabilities laid in them is a guarantee of the efficiency of the entire heating system. Even from the most expensive modern radiator will be a low return, if not listening to the recommendations on its installation.
What needs to be considered when choosing a straightening schemes of radiators?
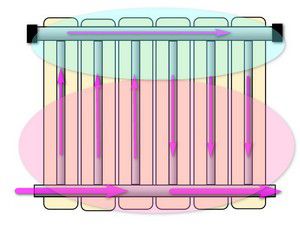
If you simplify look at most of the heating radiators, their hydraulic design is a fairly simple, understandable scheme. These are two horizontal collectors, which are interconnected by vertical jumper channels, along which the coolant is moving. This whole system is made of metal providing the necessary high heat transfer (a bright example -), or "dressed" into a special cover, the design of which involves the maximum contact area with air (for example, bimetallic radiators).

1 - upper collector;
2 - lower collector;
3 - vertical channels in the radiator sections;
4 - heat exchange case (casing) radiator.
Both manifolds, the upper and lower, on both sides have outputs (respectively, on the top pair of B1-B2, and the bottom B3-B4). It is clear that when the radiator is connected to the pipes, only two exits from four are connected to the heating circuit, and the remaining two jammed. And from the connection scheme, that is, from the mutual arrangement of the pipe supply pipe and the exit to the "return", the efficiency of the installed battery depends largely.
And above all, planning the installation of radiators, the owner must accurately figure out what kind of heating system functions or will be created in his home or apartment. That is, he must clearly represent where the heat carrier comes and in which direction its flow is directed.
One-tube heating system
In multi-storey houses, a single-tube system is most often used. In this scheme, each radiator is inserted into the "gap" of the only pipe, according to which the coolant is also carried out, and its removal to the side of the "returns".
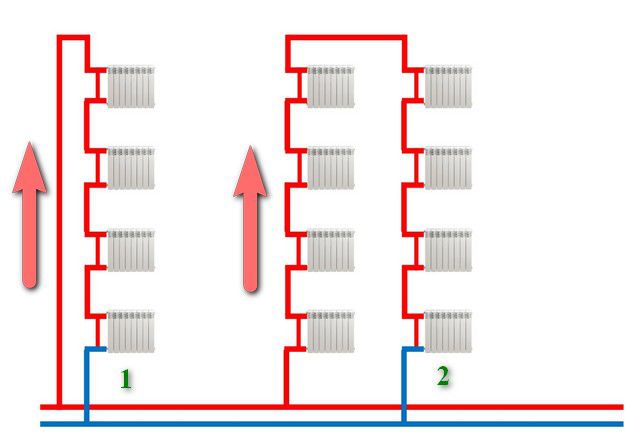
The coolant passes consistently all radiators installed in the riser gradually cleaned heat. It is clear that its temperature will always be higher on the initial stretch of the riser - it is also necessary to consider when planning the installation of radiators.
Another point is important here. Such a single tube system apartment house It can be organized on the principle of the upper and lire of the lower feed.
- On the left (pos.1) shows the upper feed - the coolant in a straight pipe is transmitted to the upper point of the riser, and then consistently passes through all radiators on the floors. So, the flow direction goes from top to bottom.
- In order to simplify the system and save supplies Often, a different scheme is also organized - with lower feed (pos. 2). In this case, on the top floor of the pipe, radiators are also consistently installed, as well as on lowered down. So, the direction of the coolant flow in these "branches" of one loop is changing to the opposite. Obviously, the difference in temperatures in the first and last radiator of such an outline will still be tangled.
It is important to deal with this question - on which pipe of such a single-tube system, your radiator is installed - the optimal circuit of the insertion depends on the flow direction.
Mandatory condition for the strapping of the radiator in one-tube riser - bypass
Under the "Bypass" name is not completely understandable for some, the jumper connects the pipe connecting the radiator to the riser in the one-pipe system. What is needed by what rules are guided by installing it - read in a special publication of our portal.
A single-tube system is widely used in private single-storey houses, at least for considerations of saving materials for its installation. In this case, the owner is easier to deal with the direction of the coolant flow, that is, from which side it will be served in the radiator, and with what - the output.

Advantages and disadvantages of a single-tube heating system
Attracting the simplicity of its device, such a system is still somewhat alarming the complexity of ensuring uniform heating on different radiators of the house wiring. What is important to know about how to mount it with your own hands - read in a separate publication of our portal.
Two-pipe system
Already on the basis of the title it becomes clear that each of the radiators in such a scheme "rests" into two pipes is separately for feeding and "reverse".
If you look at the two-pipe layout scheme in a multi-storey building, then the differences are immediately visible.

It is clear that the dependence of the heating temperature from the location of the radiator in the heating system is minimized. The flow direction is determined only by the mutual position of the pipes embedded in the risers. The only thing you need to know is what specifically the riser acts on the role of filing, and what is the "return" - but it is usually easily determined even by the temperature of the pipe.
Some residents of apartments can mislead the presence of two risers, in which the system will not cease to be one-tube. Look at the illustration below:

On the left, although it seems that there are two risers, a single-pipe system is shown. Just one pipe is carried out the top of the coolant. But on the right - a typical case of two different risers - feed and "returns".
Dependence of the efficiency of the radiator from the scheme of its insertion into the system
What is said all that. What is posted in previous sections of the article? And the fact is that the heat transfer of the heating radiator is very seriously dependent on the mutual arrangement of the supply and reverse tube.
| Scheme of the radiator in the contour | Direction of flow of coolant |
|---|---|
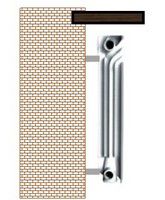
| Diagonal bilateral connection of the radiator, with a feed from above | |
 |  |
| Such a scheme is considered the most efficient. In principle, it is precisely it takes as a basis when calculating the heat transfer of a particular radiator model, that is, the battery power is taken in such a connection. The coolant, without meeting any resistance, completely passes through the upper collector, through all vertical channels, providing maximum heat transfer. The entire radiator warms up evenly throughout its area. | |
 |  |
| Such a scheme is one of the most common heating systems of multi-storey houses, as the most compact in the conditions of vertical risers. It is used on risers with the top of the coolant, as well as on reverse, descending - with the lower feed. It is quite effective for small in size of radiators. However, if the number of sections is large, the warming can be carried out unevenly. The kinetic energy of the flow becomes not enough to propagate the coolant to the very end of the upper feed collector - the liquid seeks to pass along the path of the smallest resistance, that is, through the coming vertical channels. Thus, in the far from the entrance part of the battery, stagnant zones are not excluded, which will be significantly colder than the opposite. When calculating the system usually proceed from the fact that even with the optimal length of the battery, its overall heat transfer efficiency is reduced by 3 ÷ 5%. Well, with long radiators, such a scheme becomes ineffective or will require some optimization (it will be described below) / | |
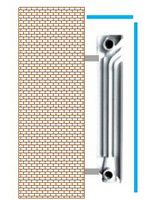
| One-sided connection of the radiator with the feed from above | |
 |  |
| A diagram similar to the previous one, and in many respects repeating and even reinforcing flaws inherent in it. It is used in the same risers of single-pipe systems, but only in the schemes with the lower feed - on the rising pipe, so the coolant is fed from below. Losses in general heat transfer with such connections can be even higher - reaching up to 20 ÷ 22%. This is due to the fact that the closure of the movement of the coolant through the dipped vertical channels will also contribute to the difference in density - the hot liquid is striving upward, and because heavier passes to the remote edge of the lower feed collector of the radiator. Sometimes it is the only connection option. The losses to some extent are compensated by the fact that in the upstream tube the overall temperature of the coolant is always higher. The scheme is to optimize the installation of special devices. | |
| Bilateral connection with the lower connection of both eyeliner | |
 |  |
| The Lower Scheme, or how else is often called the "saddle" connection - is extremely popular in autonomous systems of private houses due to the wide opportunities to hide the pipes of the heating circuit under the decorative surface of the floor or make them as imperceptible as possible. However, the heat transfer similar scheme is far from optimal, and possible loss of efficiency is estimated at 10 ÷ 15%. The most affordable coolant path in this case is the lower collector, and the distribution over the vertical channels goes to more due to the difference in density. As a result, the upper part of the heating battery can heat significantly less lower. There are certain methods and means of Sveti this lack of minimum. | |
| Diagonal bilateral connection of the radiator, with the feed from below | |
 |  |
| Despite the seeming similarity from the first, the most optimal scheme, the difference between them is very large. Efficiency loss with such connection reach up to 20%. This is explained simple enough. The heat carrier does not have any incentives to penetrate into the far portion of the lower feed collector of the radiator - due to the difference in the density, it selects the closest to the entrance to the battery vertical channels. As a result, with a fairly uniformly heated ringer, in the lower corner, the opposite enter, it is very often formed, that is, the surface temperature of the battery in this area will be less. This scheme is applied in practice extremely rare - it is even difficult to present the situation when it is absolutely necessary to resort, rejecting other, more optimal solutions. | |
The table is intentionally not mentioned the lower one-sided connection of the batteries. With him - a question is ambiguous, so in many radiators involving the possibility of similar inserts, special adapters are provided, which in essence turn the lower connection into one of the options discussed in the table. In addition, even for ordinary radiators, it is possible to purchase an additional snap-in, in which the lower one-sided appliance will be constructively modified to another, more optimal option.
It must be said that there are more "exotic" schemes of the insertion, for example, for the radiators of the vertical performance of high height - nicer models from this row suggest a double-sided connection with both eyelbs. But the structure of such batteries itself is thought out so that the heat transfer from them is maximum.
Dependence of the efficiency of radiator heat transfer from the place of its installation indoors
In addition to the diagram of connecting radiators to the pipes of the heating circuit, the effectiveness of these devices heat exchange is seriously affected by the place of their installation.
First of all, certain rules for placing the radiator on the wall relative to the designs and elements of the interior of the room next to it are observed.
The most typical location of the radiator - under window outlook. In addition to general heat transfer, the ascending convection flow creates a peculiar "thermal veil" that prevents free penetration of colder winds.

- The radiator in this place will show maximum efficiency, if its total length is about 75% of the width of the window opening. At the same time, it is necessary to try to install the battery exactly in the center of the window, with a minimum deviation not exceeding 20 mm in one direction or another.
- The distance from the lower plane of the window sill (or another obstacle, located on top - shelves, the horizontal wall of the niche, etc.) should be about 100 mm. In any case, it should never be less than 75% of the depth of the radiator itself. Otherwise, a difficult obstinate barrier is created for convection flows, and the battery efficiency drops sharply.
- The height of the lower edge of the radiator above the surface of the floor should also be about 100 ÷ 120 mm. When you enlighten less than 100 mm, firstly, considerable difficulties in conducting regular cleaning under the battery (and this is the traditional location of the dust accumulation, carrying air convection flows). And secondly, the convection itself will be difficult. At the same time, and "down" the radiator is too high, with a lumen of the floor of 150 mm and more - also completely nothing to do, as it leads to the uneven spread of heat in the room: a pronounced cold layer may remain in the field bordering the surface of the floor air.
- Finally, the radiator must be attributed to the brackets at least 20 mm. Reducing this lumen is a violation of normal air convection, and in addition, well-notable dust traces may appear on the wall.
These are the estimated indicators that should be followed. However, for some radiators, there are also their own recommendations developed by the manufacturer on linear parameters of the installation - they are indicated in the manuals for the operation of products.

Probably, it is unnecessary to explain that the radiator located open on the wall will show the heat transfer much higher than the one that is completely or partially covered with those or other interior items. Even too wide a window sill is already able to reduce the effectiveness of heating a few percent. And if we consider that many owners can not do without a dense portor on the windows, or in favor of interior design, try to cover unsightly, nor their eyes, radiators using facade ornamental screens or even completely closed housings, then the calculated batteries may not Praise for full-fledged room heating.

Power losses that depend on the features of the installation of heating radiator on the walls are shown in the table below.
| Illustration | Effect of shown placement on radiator heat transfer |
|---|---|
 | The radiator is located on the wall completely open, or installed under the windowsill, which closes no more than 75% of the depth of the battery. In this case, both main heat transfer paths are completely conserved - and convection, and thermal radiation. Efficiency can be taken per unit. |
 | The windowsill or shelf completely overlap the radiator from above. For infrared radiation - it does not matter, but the convection stream has a serious obstacle. Losses can be estimated at 3 ÷ 5% of the total thermal power of the battery. |
 | In this case, it is not a windowsill or shelf from above, but the top wall of the wall niche. At first glance, everything is the same, but the losses are already somewhat more - up to 7 ÷ 8%, since part of the energy will be necessary for the heating of a very heathed wall material. |
 | The radiator from the facade part is covered with a decorative screen, but the lumen for air convection is sufficient. Loss in thermal infrared radiation, which is particularly affected by the effectiveness of cast-iron and bimetallic batteries. The loss of heat transfer at such an installation is reached 10 ÷ 12%. |
 | The heating radiator is covered with a decorative casing completely, on all sides. It is clear that in such a casing there are lattices or sloping holes for air circulation, but also convection, and direct thermal radiation - sharply reduced. Losses can reach up to 20 - 25% of the calculated battery power. |
So, it is obvious that some nuances of the installation of the heating radiators are free to change towards increasing the efficiency of heat transfer. However, sometimes the place is so limited that it is necessary to put up with existing conditions relating to both the location of the pipes of the heating circuit and the free area on the walls of the walls. Another option is the desire to hide the batteries from the eye prevails over common sense, and the installation of screens or decorative housings is already solved. So, in any case, you will have to make amendments to the total power of radiators in order to be guaranteed to achieve indoors. required level Heating. Correctly enable the appropriate adjustments will help the calculator below.
Installation of batteries is an important process that affects the performance of the entire system of heating a private house or apartment. It is necessary to pay attention not only to the quality of plumbing compounds, but also on the observance of air gaps to the windowsill, gender and walls. More information about this in our article.
Fastening radiators
Modern market to buyers is a large selection of various materials and options for the performance of radiators.
By fastening methods, they are all divided into the following groups:
- Outdoor - Equipped with small legs, installed directly on the floor of the premises. This option allows you to guarantee the required heat gap to the windowsill and lower horizontal surfaces of the rooms.
- Hinged - Maintaining directly on metal brackets, fixed in the outer walls of the house or apartment.
The required distance from the wall to the heating radiator is best provided with products attached to the vertical surfaces of the room, which is provided by a special form of brackets. W. outdoor species This parameter must be adjusted independently.
The effect of the gap between the wall and the radiator
Many novice home masters are incomprehensible to the importance of the need to adjust the mandatory gap between batteries and outer walls. This ultimately leads to a significant increase in unreasonable heating costs at home. Let us dwell on the problem.
The outer wall has a constant contact with the ambient air, which leads to its significant cooling. In the event that the heating batteries secure directly on the inner surface carrier structures, the bulk of heat will be consumed not to heat the air in the interior of the house, but to heat the material of the walls.

Low thermal insulation properties of concrete products will not allow to maintain an acceptable internal microclimate. Up to 70% of thermal energy in the case when the distance between the wall and the heating radiator will minimally be spent on the heating of the atmosphere. Therefore, moving the heating device for a short distance, create the necessary air insulation that reduces unreasonable spending.
How to determine the required distance
Many construction workscarried out inside residential premises is governed by the construction regulations and rules (SNIP). There is your SNiP and on the installation of heating batteries.
From it, you can not only find out how much the distance between the wall and the radiator must be observed, but also other parameters of its installation:
- the device should be placed directly under the windows so that the opening centers and batteries coincide;
- the width of the heating device should not exceed 70% of the width of the subcast niche with its presence;
- the distance to the floor should not exceed 12 cm, to the windowsill - 5 cm;
- the distance to the wall lies within 2-5 cm.

There are several parameters affecting the choice of the optimal gap. Most often it is affected by the material of the walls of the house and the size of the windowsill. In some rooms, you can observe an unsightly picture when the batteries significantly appear beyond its limits.
Note!
A significant reduction in the gap between the wall and the instruments of the heating systems contributes to the additional processing of the surface of vertical structures with special heat-reflecting materials, the price of which is available.
These include foil insulation or aluminum foil screens.

Installation of heating radiator
The main way to adjust the desired distance to the walls is the quality and competent installation of heating devices with their own hands or with the help of specialists. Let us dwell on this aspect.
Installation of outdoor species
This embodiment is optimal for products having a high mass and made most often from cast iron. Such batteries are equipped with removable or stationary legs, which are fixed to the floor. Depending on the base material, the fastening can be carried out by self-storms on wood, self-drawing and plastic dowels, a dowel-nail.

The wall bracket is also the necessary element of the floor-mounted heating instrument. It is installed on the required height, which is determined as the desired distance from the floor to the upper longitudinal pipe of the radiator, taking into account the gap. With the help of fasteners and markup of their places, their installation is achieved by the optimal distance to the floor, walls and windowsill.
Turn the wall radiator
Each heating device is equipped with a particular view of the suspensions used to install on the walls. The material and the strength characteristics of the brackets should correspond to the mass of the heating taking into account the filling of its coolant. Otherwise, the system leakage is possible.

Before direct installation, it is necessary to determine the place of installation and the required distances to the main surfaces.
To do this, perform the following steps:
- We define the center of the window and put markings on the wall for combining subsequent with the center of the radiator.
- We measure the distance from the bottom edge of the batteries to the top pipe and add 12 cm. This size will postpone from the floor in the installation places of the brackets by checking the horizontal point of fastening points by level.
- In the locations of the suspension places, we drill the winning hole drill, we set the dowels in them and the brackets are fixing the brackets.
Note!
A similar instruction is attached to each package of realizable radiators.
Differences may be in the specific form of the suspensions and the features of their installation.

Summing up
As part of this article, we considered at what distance from the wall to hang the radiator, to which it affects and how it is done directly when installing the heating system. For more information on this topic - in the video in this article.