Making a modern hive for bees. Bee hive with your own hands. The main types of hives with drawings
Undoubtedly, the invention of such a device as a collapsible frame-based hive was a real breakthrough in the field of beekeeping. The manufacture of beehives was introduced into practice by the famous Russian and Ukrainian scientist P. I. Prokopovich. Until then, people had no idea how to organize the work of insects, and the procedure for collecting honey led to the ruin of nests, from which the honeycombs broke out.
The design should be large enough for reproduction and honey supply, as well as unified so as not to disturb the bees during its assembly and disassembly.
Production can be done by any master. The technology is not particularly difficult and does not require certain skills.
Material selection
The best materials for beehives are the following trees:
- pine;
- fir;
- aspen.
This takes into account the moisture content of the material. It must be thoroughly dried. The humidity coefficient should be no higher than 15%.
Making beehives with your own hands requires the choice of quality wood. You should not buy boards with cracks, rot, knots and wormholes. Material with pores is also not recommended. Its use is possible only for facing works.
Basic principles in the manufacture of beehives
Making hives at home involves the following rules:
- Details for the future product must be smoothly planed. Burrs and notches are not allowed. The cut points must be at right angles to the longitudinal edges.
- It is necessary to ensure that when stitching the cases, the cut from the side of the core is outside.
- Planks are connected with nails. Their thickness is selected taking into account in order to avoid splitting the material.
- Dry wood may develop cracks. To avoid this, the outer walls of the hives are recommended to be primed based on drying oil. Light-colored paint is added to it: white, blue or yellow.
- The manufacture of houses for bees can be carried out from boards of any width. The walls from the inside are recommended to be made from one solid board or from two, which are connected by a tongue or groove. The outer skin can be made of tesin of any size. They should be located at different levels.
- According to the pattern, do-it-yourself beehives are made. Drawings are of paramount importance. Without them, it will be very difficult for the master to imagine what he is doing.
Possible dimensional deviations
With a process such as making beehives with your own hands, dimensions, drawings must be accurate. The value of the possible deviation is 1 mm, according to the diagram. If it has a higher indicator, then additional adjustment will be required.

Increasing the life of the hives
The manufacturing technology of hives has its own characteristics. But devices require further care. If you want the design to serve you for many years, you must adhere to a number of rules:
- use only high-quality material;
- paint the outside of the hive every 2-3 years.

How to make a hive?
Making bee hives with your own hands has a lot of advantages. The service life of such a design is at least 10 years. You save money and enjoy the work done.
In such a case as making beehives with your own hands, the dimensions of the planks are very important. In beekeeping, they often resort to making a double-walled model of 16 frames. Frame dimensions are 435x300 mm.

The production of hives involves the following steps:
- First of all, the inner walls of the house are cut out (rear, front and side parts). The thickness of the boards is 2 cm. They are assembled like shields. They are connected by tongue or casein glue. The size of the back and front panels is 605x320 mm, and the side panels are 530x320 mm. Grooves are selected in the sidewalls. Their depth is 5 mm, and their width is 20 mm. The distance between the grooves is 450 mm.
- Next, proceed to the manufacture of the rear and front outer walls. They are assembled into temporary structures in the form of shields. The thickness of the boards is 15 mm. The size of the shields is 675x500 mm. The side outer walls have dimensions of 560x500 mm. Each board of the outer wall is nailed separately. This is where fit is important. The glued inner walls are fixed with temporary nail plates. All corners should be straight and the bottom edge should be horizontal.
- In the building, which consists only of internal walls and does not have a bottom, a lower notch is made. Its size is 10x250 mm. It starts 50 mm from the right side of the hive. The letok, located on top, has a size of 10x100 mm. It is located at a distance of 120 mm from the right side of the hive, and in height - 30 mm from the extreme side of the frame bars located on top.
- A wedge-shaped hole is made in the back wall of the hive along the bottom level. It goes into the space under the frame, which is necessary for protection against varroatosis. It is closed with an insert of a similar shape. Its size is 450x40 mm (inner side) and 450x45 mm (outer side).
- The entrance holes help to protect the space between the walls of the hive with small corridors based on planks. Their thickness is 10-15 mm, and their width is equal to the space between the walls of 20 mm.
- On the body, which has only internal walls, the first layer of boards that make up the floor is nailed parallel to the front (their length is 635 mm). The first board protrudes forward by 10-15 mm beyond the redistribution of the structure. Arrival platforms are mounted on the ledge. In this case, the straightness of the corners between the bottom and the walls of the house is checked. Then, subject to accuracy, the boards of the first layer of the floor are nailed, while the wall space should not be blocked. A sheet of roofing felt or cardboard is placed on the first layer of the floor, and then the bottom layer is nailed. It covers the space between the walls of the hive.
- On the area of \u200b\u200bthe ends of the walls located from the inside (protrude by 20 mm), the outer front and outer rear walls are nailed. Work begins at the bottom of the hive. Each board is nailed in turn. The end of each bar should also protrude 20 mm. In parallel, the walls are insulated. A notch is made in the first front wall. A hole is cut in the back wall into the space under the frame.
- In order for the outer walls to be stable, in the area that forms the rim above the nest, the boards are nailed from the outside to the corner plates. On the ends of the rear and front walls, which protrude 20 mm beyond the side inner parts, the side outer parts are stuffed. Their thickness is 15 mm.
- Planks 40x20 mm in size are nailed to the inner walls of the hive along the entire perimeter, which cover the space between the walls with the upper part.
- In the strips that are nailed to the front and back of the device, 10x10 mm folds are selected in order to put frames. The planks should fit snugly against the insulation in the space between the walls, and in case of corner splicing, they should merge into a single line of the plane.
How to make insulation?
To insulate the space between the walls, they resort to using various materials.
For example, when making a hive on inner wall you can spread out an even layer of sphagnum moss and press it tightly against outer wall. Moss is used not dried, but dried. It has elasticity.
Styrofoam sheets can also be used. Their thickness for the above design should be 22 mm. They are also placed on interior walls.
They also resort to the use of a building insulating board, as well as soft porous cardboard, the thickness of which is 12 mm. Slabs or cardboard are cut to the shape of the walls and pressed against the outside with boards.
The use of tow, cotton wool, or wool as insulation is not recommended, as these materials do not allow air to pass through and often contain odors.
Making the hive roof
The roof of the hive should be lightweight. The beekeeper often takes it off and puts it on. In order for these procedures to be performed without the help of outsiders, the design should not be cumbersome.
The height of the roof trim is 120 mm. It is assembled from boards 15 mm thick. Above the nest under the roof is formed free space. Its height is 240 mm (120 mm of the side under the nest and 120 mm of the roof trim). In this space, there is a store on a half-frame, and an insulating pillow is placed on top. It is placed on top of the nest between the sides on the canvas that covers the frames. The pillow should fit snugly.
The pillow and pillowcase are large in comparison with the inter-board space by 70-100 mm. Therefore, the recommended dimensions of the pillowcase are 750x538 mm, and the thickness after stuffing is 70-100 mm.
A pillow is placed on the nesting frame. It is laid between the sides. It helps retain heat. This is especially important in the spring period, after the first flight, when the lack of heat becomes fatal in the northwestern region, where the bees grow in spring.
The choice of material for the pillow
The best and cheapest material for a pillow is moss. But many beekeepers are of the opinion that moss is not suitable as insulation both in the pillow and in the side walls. Pillows, in their opinion, are subject to sediment. As a result of this, an empty space is formed, in which it will always see through, since the insert board also does not differ in tightness. The microclimate in the hive suffers.
Instead of moss, a variant of slabs or polystyrene is offered. Such designs are extremely warm.
The size of the board for the passage of bees is 8-10 mm. It is important that winter insulation is used along with ventilation. good insulation required, as we said, and in the spring.
The hive can be designed on the basis of 12 and 14 frames. Then the indicator of its internal length will be 450 and 530 mm. Therefore, it is necessary to increase the size of other parts.
For greater clarity in the manufacture of hives, it is advised to resort to the use of drawings. They will make your job much easier.
Each beekeeper, striving to improve his apiary, is looking for modern drawings and materials. Innovative designs include beehives made of polystyrene foam. The material has thermal conductivity and lightness.
Conservative beekeepers will not exchange a wooden hive for any other design. In their opinion, there is nothing more practical than making beehives from wood. But no material is absolutely perfect.

The advantage of Styrofoam hives
The design has a number of advantages:
- it turns out a house, distinguished by silence and durability;
- hives are not subject to hypothermia or overheating;
- housings can be made the same size and interchanged;
- there are few allowances in the design;
- hives do not pass moisture and do not crack;
- they do not contain chips and notches;
- they are durable and comfortable;
- easy to understand;
- protect insects from bad weather;
- ensure the stability of the microclimate for bees;
- expanded polystyrene is not subject to rotting;
- the walls of the body are inherently smooth;
- no additional insulation with canvases and pillows is required.
It should also be noted that the house is easy to make yourself. Its drawings are quite simple. This design is economical. But many beekeepers note that making such a house with their own hands is somewhat difficult.
Cons of such structures
There are a number of disadvantages in this design:
- The internal seam parts do not have a fortress.
- Cases from propolis are cleaned with difficulty.
- In wooden hives, you can disinfect with lamps, but here you cannot do this. You will need chemicals that can be harmful to insects and disrupt the structure itself. Some beekeepers resort to washing the hives with water or alkaline products. For example, sunflower tops ash is used.
- The case does not absorb moisture, it flows to the bottom of the structure.
- In polystyrene foam hives, the amount of food eaten by bees increases. If the family of bees is strong, then it produces up to 25 kg of honey. This requires ventilation, which reduces feed intake.
- The hive is more suitable for weak families of insects.
- Due to the impossibility of regulation of the entrances, the bees begin to steal honey from each other, the microclimate is disturbed. It is possible that rodents will penetrate there.
What tools will be needed?
Making hives from polystyrene foam requires the following tools:
- pencil or felt-tip pen;
- self-tapping screws (5 cm and 7 cm);
- glue;
- stationery knife;
- meter ruler made of metal;
- screwdriver;
- plastic squares for finishing (for starters, they are glued into the folds so that the material is not painted when the frame is removed).

It is important to carefully make hives with your own hands. Dimensions, drawings must be clearly marked. Expanded polystyrene is brittle.
There should be no gaps, as rays of light can begin to penetrate between the walls of the case, and insects will begin to gnaw the hole. As a result, an additional notch is formed.
All tools should be at hand. should be well sharpened.
At the bottom is a solid ventilation mesh, which corresponds to the size of cells no more than 3.5 mm. An excellent choice would be a car tuning mesh made of aluminum.
Manufacturing steps
For the manufacture of structures made of expanded polystyrene, they resort to using a drawing. Everything must be marked in advance.
- A knife is taken and along the marked lines, while maintaining a right angle, it is carried out several times until the plate is cut to the end. This is how blanks are made.
- The surfaces to be glued are smeared with glue and tightly compressed. Parts are fastened with self-tapping screws. Make fasteners with a retreat of 10 cm.
They are accustomed to hiding their homes in hollows or dense crowns of trees. Therefore, in order for insects to acclimatize faster in a new environment, experienced ones are trying to create optimal conditions for bees to reproduce and create delicious food. In this article, you will learn how to create a beehive with your own hands, what materials are better to take for bee housing and arrangement options.
Basic structural elements
Before you create a design sketch, you need to know what the beehive consists of. This is due to the fact that the beekeeper is trying to create housing for insects that supports their biological needs. However, this design will not always be convenient for bees.  Mostly, all hive structures consist of a body, two compartments, a lid and a magazine. Outwardly, it looks like an elongated box with a dense roof and bottom.
The buildings are made up of walls. Dimensions depend on the type of construction. There may be several. There are bee nests on the walls.
The store may not be necessary, however, it is suitable for preservation when honey collection occurs. There is also a liner (another version of the store, but without notches). It is located between the roof and the top. It serves as a heater. You can also install a feeder for bees in the liner.
The bottom is located under the body and can be removable and non-removable. The first option allows you to properly care for the bees if they need medical attention. The non-removable one forms a ledge that serves as a landing pad.  Some beekeepers make a ceiling that will keep the heat inside the hive. You can place it at the top of the nest above the frames.
The roof is protection and the main element of the hive. It is able to shelter insects from atmospheric phenomena. The roof is flat and gable. The first allows you to transport the hive.
The frame serves to arrange honeycombs for bees. It consists of a top and bottom bar, as well as two side bars. The frames are equipped with dividers and are located in the bar on top.
How to choose materials and tools for creating
To create a hive, only natural and high-quality materials are used. In the following sections, you will be able to understand what are needed to build a nest, as well as learn the advantages and disadvantages of each of the materials.
Most popular content
The first and quite popular material for creating a hive is tree. It breathes well and lets steam out. Basically, choose wood, such as, and. You can also take poplar, or aspen. Wood has a low level of thermal conductivity, protecting bees in hot and cold weather.
Important! For the manufacture of hives, choose a material that does not have rotten areas, knots and cracks.
The only drawback of this material is the ability to retain moisture that enters the hive.
Plywood hives are characterized as environmentally friendly and durable. They are quite heavy and carry transport well. Plywood is superior to wood in terms of thermal insulation and dryness.  To do this, plywood needs to be coated with special acrylic paint and the walls of the hive should be insulated with polystyrene foam.
In such hives, bees spend less energy on heating, because all the comfortable conditions for living and producing honey are already created inside.
Many beekeepers choose Styrofoam because it is cheap and has a high level of thermal insulation. It is easy to work with and carry out repairs.  The only disadvantages of this material are low strength characteristics and an unpleasant aftertaste of honey, as bees can taste polystyrene foam.
If you want to produce honey, but you have a small amount of Money then you can make a beehive out of polystyrene. The design turns out to be quite light, retains heat in winter and maintains coolness in summer.
The only drawback is the painting of the finished hive to protect the foam from atmospheric phenomena.  polyurethane foam used to insulate buildings. It has a low level of thermal conductivity, but this property will be useful for creating a hive. Polyurethane foam does not allow moisture to pass through, does not rot, does not react to solvents and protects the nest from germs and fungi. The material is strong enough, and mice will not be able to damage it.
The only drawback is flammability. But this can be corrected with an additional ventilation system.
Polycarbonate is strong, lightweight and durable. The material is suitable for keeping insects, as it withstands low and high temperatures, it is not afraid of direct sun exposure.  Inside the nest made of this material, an optimal microclimate for bees will be maintained.
List of bee house building tools
To create a hive, you will need the following tools:
- Axe
- Hacksaws different sizes
- Hammer
- Drills
- jointer
- Bit
- planer
- Marking tool
- power tools
- Angle spikes
- PVA glue"
- Nesting frame (can be borrowed from an experienced beekeeper).
How to make a beehive with your own hands
Now that you have chosen for yourself optimal material and collected everything the right tools, let's get down to the most important thing. In the following sections, you will learn how to build a bee hive from different materials. 
Wood
To make a hive, choose wooden planks with humidity, which fluctuates around 15-16%. Depending on the number and size of the case, the amount of material is also selected. Drawings are best taken from experienced beekeepers.
Important! Adhere to the basic parameters of the main elements to simplify operation.
Housing on the beehive
You will also need boards 4 cm thick for the manufacture of the bottom and body. We make grooves in the boards to connect the walls of the case.
We produce strips measuring 18x4 mm.
We connect the boards into shields, lubricating the grooves with PVA glue. It is very important to press them tightly against each other so that gaps do not form.  And so we do 4 walls. It is necessary to assemble the body in the form of shields, which can be connected with the help of tongue and groove and casein glue. The dimensions of the rear and front walls are 605x320 mm. Side walls - 530x320 mm. In the side walls we make grooves 5 mm deep and 20 mm wide.
Important! Distance between slots-450 mm.
Let's start creating the back and front walls. They should be collected in temporary shields from boards (thickness - 15mm). Wall dimensions - 675x500 mm. The dimensions of the outer side walls are 560x500 mm.
On a permanent place, the boards of the outer walls must be nailed separately in order to properly fit into place. We fix the inner walls with glue, the corners must be fixed strictly straight. The lower edge of the case is best placed horizontally.
Lower and upper trays
The lower tray must be made according to the following dimensions - 1x25 cm, placing it from 5 cm from the right wall of the hive. The upper tray has dimensions of 1x10 cm, it should be placed at a distance of 12 cm from the right wall of the hive. Its height is 3 cm below the edge of the upper bars of the frames.  Frame space
A wedge-shaped hole must be made in the back wall at the level of the bottom to make it easier to deal with varroatosis. It can be closed with an insert (dimensions 45x4 cm).
With the help of holes for trays, you enclose the inter-wall space of the hive with small corridors of planks. Dimensions - 1.5x2 cm.
Parallel to the front inner wall on the body, we will nail the first layer of the floor. The length of the floor is 65 cm. The first board must be positioned so that it protrudes 1 cm beyond the body. On this ledge we make arrival boards. Then we nail the rest of the floor boards. After that, turn the case upside down and lay a layer of cardboard and roofing felt. The next layer of the floor is boards.
External walls
After you have made the floor and nailed the inner walls, install the outer walls. We nail the front and rear from the bottom of the case each. The ends should protrude 2 cm beyond the side inner walls. At this time, lay the insulation between the walls. Holes for the tray should be cut in the front board. There should be a hole in the back wall for the subframe space.
Also, for stability, it is necessary to nail the lining to the corner outer walls.
At the ends of the rear and front walls, which protrude 2 cm beyond the side inner walls, it is necessary to fill the side outer boards with a thickness of 15 cm. Planks 4x2 cm should be nailed along the entire perimeter of the inner walls.
On the slats on the front and back sides of the hive, folds (dimensions 1x1 cm) should be selected to install the frames. Planks must be placed tightly on the insulating material.  Warming material
To fill the inter-wall space, you need to use moss. It should be more dried, as such moss will fill the voids well.
Styrofoam, insulation board, wadding, wool and tow are also used.
Since beekeepers often have to lift the roof and put it back, the product must be light. For this you need a harness. It should be made 12 cm high from boards 15 cm thick.  Above the nest under the roof, it is necessary to leave a free space 24 cm high. In this place we place a store on a half-frame and a heating pad.
Pillow
The pillow is placed between the sides on the canvas so that it fits snugly against the walls of the side.
The pillow occupies 1 cm above the nest. Dimensions - 75x53. The thickness of the padding is 10 cm. Moss can also be used, but it is best used to insulate the side walls.
Entrance for bees
It is necessary to leave 1 cm between the bottom and the lower edge of the housing for the passage of bees and ventilation in winter time.
Did you know? It is better to paint the hive white, as this color is better remembered by insects.
Styrofoam
To make a foam hive, you will need foam sheets, self-tapping screws (5 cm), fine sandpaper, water-based paint, liquid nails, a paint roller, a ruler, a screwdriver (screwdriver), a clerical knife and a circular saw. 
Important! All hive objects are connected in the same way as the wooden bases of a bee nest.
Styrofoam sheets must be following sizes- 3x5 cm. We prepare a sketch of the structure on paper and transfer it to the foam using a marker and a ruler.
We cut out the design with a clerical knife, saw or hacksaw for metal. We clean the edges with sandpaper.  We fasten the side walls with overlaps (at the joints we cut out quarters and tightly drive the walls into each other). We fix the elements with liquid nails.
To fix the result, use self-tapping screws around the perimeter. 
Polyurethane
For the body you will need 8 metal plates. Four plates will form the outer contour, and the remaining four - the inner. Spacers must be installed between opposite inner plates. External tiles should be bolted together.
Metal plates must be screwed to the inner sides of the outer tiles, forming recesses for gripping in the body.
The base and cover are made with grooves. Plates will be inserted into them. Strips of metal are applied along the edges and the parts are connected with bolts.
Holes should be drilled along the inner and outer perimeter of the body and cover. Threaded metal rods will be inserted into them during assembly.
Bolts should be screwed onto the rods, holding the entire structure firmly. In the lid, holes should be made for pouring the mixture and a valve with a plug. They will close this hole. Bottom and roof
For the roof you need 2 rectangular parts. One should have protruding sides along the edges, the other - a protruding rectangular interior.
The bottom is a rectangular frame with metal mesh in the middle. It is made from individual polyurethane foam bars. You can fasten them with bolts.
You should have 4 molds for the bars. In all bars, you need to put a strip of metal around the inner perimeter, which will form folds. We lay and nail a metal mesh on them with a stapler.
The front bar is best placed lower in height to get a slot for the tray. After casting with a cutter, we select the grooves in the inner side walls for the bottom valve. It is cut out of polycarbonate. We also place the rear bar lower in height to insert the valve into this slot. Preparation of a mixture of polyurethane foam
This material is obtained as a result of the reactions of a polyol and a polyisoconate.
When pouring the mixture, you need to correctly calculate the total mass for the process. This can be done by calculating the volume of the hive part: multiply it by the width, thickness and length. The resulting amount must be multiplied by the technological loss factor (1.15) and the estimated density of polyurethane foam (60 kg / m2).
After processing, we assemble the form. The inner plates are installed in the grooves of the base, and plastic corners should be placed inside the plates, which will serve as folds for the frames. Corners can be fixed with a thick thread.
We install and fix them with screws and braces of the internal strut. Then we install the outer plates and fix them with bolts, placing the top of the mold with grooves on the walls. We twist it all with metal rods.
In this form, we fill the polyurethane foam mixture into the holes, but not completely, as it expands. As soon as the foam begins to appear from the hole, the mold must be closed with a valve.
In the same way, we fill the molds for the lid and bottom. After pouring the mold for the lid, pour a small amount of gravel into it so that the lid holds steady against gusts of wind.
The mixture hardens within 30 minutes. After that, unscrew the bolts that hold the rods. Using a wooden block and a hammer, knock down the top of the mold.
After that, we unscrew the bolts on the edges of the form, doing it little by little so as not to deform the structure. So we go through two circles on all the bolts, after which we remove the spacers.  Parts of the mold are cleaned of polyurethane foam particles, and excess along the edges of the body can be removed with a sharp knife. After that, the structure is cleaned with a fine-grained sandpaper.
Then we cover the product with facade acrylic paint to protect the hive from ultraviolet radiation. Such a coating will not be disturbed by temperature changes.
Coloring occurs within a week after production, but not earlier than 8 hours later.
Hive arrangement
Now you need to start building a hive for bees.
In the American way of breeding bees in the apiary, 5 types of insect colonies are created: maternal, paternal, starter, incubator and foster family. For this method, you need to have a 24-frame hive-bed, a notch, two diaphragms that will move freely in the hive, one blind diaphragm with a rubber band, one diaphragm with a dividing grid. A feeder and pillows are also needed.  In autumn or spring we populate a family with a good breeding queen. In the fall, they are fed with honey and treated for varroatosis and prophylaxis with anti-nosema drugs. spring
3 years ago
New!!! Router lift in this table: Part 1 - https://youtu.be/RA4-75ijmWg Part 2 - https://youtu.be/GHqP4Wceu08 April 2015. Continued topic: table for Bosch 1400 ACE hand router. This time I finally made a cabinet for milling table- cabinet, frame, table base, whatever ..) The most important thing is that the milling table is now independent and does not need workbenches or something else. I didn’t bother with the pedestal and essentially made a frame, but quite durable and stable for working on a milling table. In the future, you can make walls out of plywood, make shelves. But this is still in question, because how is it possible that I will make a system for lifting the router (departure of the cutter above the surface of the table) using a car jack (as many have already done), for this I will need full access under the countertop, from all sides of the cabinet. So for now, it's just a framework. I also made a switch with a socket for my milling table and now it has become very convenient to use, and at the same time I didn’t have to cut the plug at the device, because. it will be needed more than once as a manual router 🙂 I made a bracket for fixing the table in a raised position in order to adjust the reach with both hands or, in fact, to replace the cutter itself. It's not over yet. There will be videos about clamps for the milling table, guides, side carriage and I don’t even know what yet ... The topic is rich 😉 First part: http://www.youtube.com/watch?v=1CiOU66Sers Second part: http:// www.youtube.com/watch?v=rF7BVRbK4hE THANK YOU FOR WATCHING AND SUBSCRIBE!!! http://maximkozlov.ru
PHOTO HIVES KALINKA LLC
Good day, dear visitors!
This section of our site is a photo gallery where you can see photos of the entire range of Kalinka hives "without embellishment", that is, photos are posted here without any processing, so that each of you, even without being able to come and look at the hives “live”, however, could see the product “as it is”. We have nothing to hide, so we hope you enjoy our photo tour.
Below are photos of Dadan-Blatt hives. We produce them in two types: for 10 frames and for 12. You can install as many cases as you need. Convenient recesses are made on the sides of the hulls in order to make it easier to remove them. On each hull, entrance barriers for 4 functions are installed on the entrances.
Do-it-yourself beehive
They are included in the basic package of hives. In one of the photos, there are canvases on the hive, which can also be bought from us at the enterprise.
Here is a retractable anti-varroatous bottom with a special mesh can be installed on any of the hives. It is not included in the basic package of hives, but is installed at the request of the buyer. On the site in the article "Antivarroatous bottom" you can see a video that tells about its structure and how and for what it is used.
Photo of the hives of Kalinka LLP at the agro-industrial exhibition-fair.
If you are interested in our products, you can always call and place an order. The beehives of Kalinka LLP can be purchased not only in branded stores in Moscow and St. Petersburg, but also be ordered to any city in Russia with delivery to the apiary.
PS: If you need a small number of hives, then in order to reduce delivery costs, you can team up with other beekeepers from neighboring apiaries and make a single order, then the delivery cost is about 200-300 rubles per hive.
Interesting on the topic:
Benefits of Kalinka LLP hives (video)
Prices for hives and beekeeping equipment
Hive-lounger. How to build it with your own hands
A bee hive is an artificially made housing for bees. For a long time, bees lived on tree branches, in crowns, hollows, in rock crevices, in pits and stumps, under the roofs of houses. Later, people began to tame honey plants, sitting them in non-separable hives - sapets, hollows. Well, now bee colonies live in frame hives, which you can buy in a special store or make yourself if you have the time, desire and necessary tools for this.
Today we will devote our article to how to make a bee hive? This question is asked by all beginner beekeepers. First you need to take a closer look at this design in order to understand what you have to deal with. Nowadays, the hives of Dadan Blat and Langstroth-ruth are the most common with some modifications and changes. Beekeepers have heard of another name - the Alpine hive or Roger Delon's hive in another way (with a reduced frame). There are other bee houses - Lapunov and Ozerov with an enlarged frame, hives with glass, and some still use old decks.
Any hive consists of the following parts:
Frame- hive walls. The cases are different in size, in the hives there is one case or several, depending on the type of construction. Each case on the inside has parallel grooves for the hangers of the frames. In some types of hives, the grooves for the frames are placed in a different way, but for self-manufacturing they are complex. In addition to the grooves, the body may have tapholes. If the hive has a removable bottom, then the notch is made above the middle, round, with a diameter of 25 to 35 mm. If the bottom is nailed to the lower body, then a slotted notch is made with a width of 100 mm and a length of 10-20 mm. All these indicators depend on what kind of hive is made and what the beekeeper wants to make.
Bottom- there is an inseparable and detachable. It is better to create hives with the last type of bottom, because in this case it will be easier to take care of the bees: you can quickly clean the nest, easily work with the bodies without touching the frames (this is an important part of many methods), and if necessary, carry out the necessary treatment of bee colonies. The integral bottom is simply nailed to the bottom of the body so that it protrudes slightly from the front edges - the formed ledge serves as a landing area for the bees.
The shops- these are hive bodies shortened in height.
We make a beehive for bees with our own hands
They are an optional part of the design and are used to store honey during honey collection to facilitate the work of the beekeeper. In addition, they are very convenient to use in weak families that do not collect large stocks of honey.
liner- this is a store, but without recesses for frames. It is placed between the upper body and the roof. It helps to improve the living conditions of bees during migration, you can put a feeder in it or place insulating material. Some beekeepers put it under the lower body, thereby creating a space under the frame, which has a beneficial effect on the microclimate of the nest during wintering.
Roof- made from strapping (sometimes beekeepers make ventilation holes in it) and flat shield(plywood, boards). Top with a thin sheet of iron. It is put on the body (liner, magazine) in a quarter or in a hood.
Framework- we will talk about them a little later. One has only to say that the frames come in different sizes, depending on the type of hive.
Drawings for hives
All frame hives are similar in design, but vary in size. The dimensions of the hive primarily depend on the number of frames that will be used in this hive, their size. The size of the bee house also depends on the thickness of the walls. As a rule, for hives with a frame of 300, a board with a width of 40 is used, with a frame of 230 - 30. According to GOST, the recommended board thickness for a frame is 300 - 37 mm, since wood is processed from standard 40 mm to 37. There are designs with double walls, and others drawings with different sizes enough. This happens because the regions where bees are grown are different, have different conditions, and each beekeeper has his own opinion on the care of families, which he adheres to. So it is difficult to name any specific dimensions.
To remember from the whole mass of information about drawings for hives, you need the following:
- the width of the hive directly depends on the number of frames and is equal to the number of frames multiplied by 37.5 mm;
- the length of the hive directly depends on the length of the frame itself (from the left side bar to the right, including the dimensions of the bars themselves). It is equal to "frame length plus 14 mm";
- the height of the hive is determined by the formula "the height of the folds plus the height of the frame."
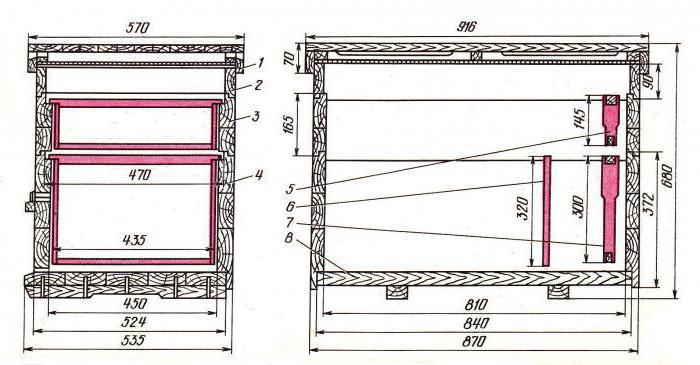
Everything else in the construction of hives is done at the request of the beekeeper. Of course, each species has its own drawings and rules. Consider, for example, the fairly well-known structure "beehive-lounger". This bee house is a frame horizontal hive. It resembles an elongated box with a nailed bottom and a removable roof. During the period of family growth, frames are added to the side of this structure in which the uterus lays eggs. This hive has stores that are used during honey collection. The lounger allows you to keep next to the main family and a backup, with a spare queen. The hive-lounger for 16 and 20 frames has become widespread. The dimensions of the house with 16 frames are 615x450x330 mm. A 35 mm bottom shield protrudes beyond the front wall. The extension is constructed with a height of 165 mm, the wall thickness is the same as that of the walls of the body, there are also 16 frames in it. The dimensions of the hive lounger for 20 frames are 810x450x330. If you think that this species the house for bees suits you, then we present you a drawing of a lounger hive, in which all its most common sizes are shown:

How to make hive frames
And now it’s worth talking about the frames, or rather about their manufacture, because if you made the hive yourself, then you will make the frames very quickly. The hive frame is considered one of the most important elements in a bee home. Her standard sizes for a two-hull hive - 435x300 mm. They need to be made from linden, as it does not crack when the structure is hammered together. But this material has one drawback - it absorbs moisture and increases in weight. For this reason, experienced beekeepers advise making frames from spruce wood, the main condition is that it should not be resinous.
When creating a frame, it is worth making sure that there is a distance of no more than 9 mm between the bottom and the lower bars of the frames. Such a passage for bees is the most optimal. If it is larger, then insects will begin to build it up. Between the wall of the hive and the side bar should be from 8 to 10 mm. If the distance is less, then the bees will fill it with propolis, if more, they will build up honeycombs. If all dimensions are met exactly, then it will be easy to get the frames.
For more information about creating a frame, see the video below:
I would like to note that in the created bee house it is necessary to maintain conditions that are most optimal for the bees in your region. The hive is not just a dwelling or a means of production. It's all together - both a house and a beekeeping factory that supplies some of the most useful products in the world.
Hive device for bees
Every beekeeper knows that wild bees live in natural hives: a tree hollow, under a roof, etc. But if you decide to engage in beekeeping, then you will need to make a lot of effort in order to equip bee housing. The arrangement of a beehive for bees begins with the collection useful information about the types of hives, the materials that are necessary for construction, from approximate drawings.

Hive device for bees
What types are hives?
Before you start building a beehive, you need to understand what kind of design you want to get as a result. The fact is that today the most practical types are considered to be the following:
- The hive is horizontal. The beekeeper can expand it by setting up additional buildings.
- The vertical hive is a 2-3-tier structure, on each tier of which there are about 10 frames. You can expand the vertical structure by adding new tiers.
Also, the hives are conditionally divided by the types of frames, because the frames are the main element of the whole structure. Depending on the width and height, they are square, narrow-high or, conversely, low-wide.
What material is best to make a hive?
Hive material is very important topic. The bees may simply not like their house, and the beekeeper will be forced to redo it.
Today there are a huge number of different materials on the market, but not all of them are suitable for a hive.
Wood is a win-win. It is better to purchase coniferous wood, such as pine, spruce, fir, etc. Before working, make sure that there is no rot or mold on the wood. Note that the tree has one minus, this is the increased humidity inside the hive.
To equip a bee house, choose boards 5 mm larger than required by the design. They will shrink in size as you grind. The boards need to be carefully planed so that there are no chips, roughness, protruding chips on them.
Plywood is another great option. It is an environmentally friendly material that is durable. Beekeepers say that plywood, in its characteristics, surpasses even wood in terms of thermal insulation.
To make a beehive from plywood, it is necessary to cover its outer walls with a layer of acrylic varnish, and put polystyrene foam inside the house. By the way, hives are also made from the latter, which are characterized by fragility and fragility.
It is possible to make such a plywood hive only according to the drawing, it will become optimal for the comfortable life of insects.
Polycarbonate is a hard plastic that cannot be impacted climatic conditions. Differs in stability, durability, does not suffer from decay, a fungus, well washes.
Polyurethane foam can act as a heater, which does not rot and is not covered with a fungus, mice do not gnaw it.
Do-it-yourself hive: video, drawings, sizes of frames and hives
Its main disadvantage is combustibility, and when insulating the hive with polyurethane foam, be sure to design a small ventilation system.
Bee hive device

The hive consists of the following elements fastened into a single structure:
- bottom (wood or mesh) and ceiling, front, rear and side walls;
- liner, insulating pillow, canvas;
- planks and linings for them, folds;
- gable roof and roof trim;
- ventilation hole;
- notch, arrival board, nesting frame;
- waste tray or tray;
- glass for observing bees and a board that closes the glass if necessary.
How the hive works: dimensions and additional details
Proper sizing is fundamental to building the right hive. The beekeeper involved in the construction must observe the dimensions with great accuracy. We provide universal sizes for all hives that you can use as a basis:
- The distance between adjacent frames is 3.75 cm.
- Streets subject to a honeycomb thickness of 25 cm - 1.25 cm.
- During the installation of the second case or additional magazine, a gap of 1 cm is made between the upper bars and the lower bars.
- The space between the front and rear walls and the side rails should be 0.75 cm.
- The space between the bottom bar and the bottom is 2 cm.
Deviation from dimensions is allowed within 0.1 cm. If there is a large discrepancy with the dimensions, other structural elements will have to be adjusted, and the hive will no longer be composed of equivalent parts that you can replace in the future.
How to assemble a hive: instructions
So, all the elements are ready, and the drawings are drawn. It's time to collect the hive. Start assembly by preparing four walls, machined and cut in accordance with the drawing. One of the front walls is connected to two side walls, after which the last wall is fixed. After that, the side frames are attached to the side panels of the hive, then the wood or mesh floor is attached. And on the front wall you need to cut a notch.
The design is knocked together, set on the floor and a pillow with a canvas is reported, covering everything with a lid. Cushion and canvas needed for control temperature regime. The bottom of the hive is best made of galvanized material, it should be removable, which will facilitate the transportation of the hives. And for the manufacture of frames, choose a good, but not resinous tree.
Do not forget about the feeder, which is most often made from nomadic netting. In winter, at low temperatures, the hives are heated with electrical appliances with a power of not more than 10 watts.
Summing up, it is worth saying that the independent production of hives requires great attention and strict adherence to the drawing. It must be remembered that the hive must be comfortable for insects in all respects: not hot and not cold, without chemical odors that some synthetic materials emit, with a normal ventilation system.

http://medovoemesto.ru

The honey bee spends a lot of energy on repulsing the attacks of enemies, but it is not always possible to repel the attack. In this case, the enemy, a red tick of the species Verroa, clung to the thoracic region of the drone.
- KEY FACTS
- Name: honey bee (Apis mellifera)
- Range: Europe, Western Asia and Africa; in other regions of Asia, as well as in America and Australia, it is distributed by man.
- Number in a typical hive: 10,000 to 60,000 worker bees; uterus; at certain times of the year a small number of drones and young queens.
- Stages of development: egg, larva, pupa, adult.
- Lifespan: 21 days of development from egg to adult; In summer, the worker bee lives for about 30 days.
The bee family has a strict social organization in which all the work in the hive, such as building cells for the eggs laid by the queen and storing food or collecting nectar, is done by worker bees.
There are about 20,000 species of bees, but only about 800 of them are truly social (eusocial). Striking details of the organization of their community (family) can be learned by observing the life of a honey bee, or domestic bee (Apis mellifera).
History of bees
The honey bee is an evolutionarily successful social insect that originally lived in Europe, Africa, and Western Asia. Wild honey bees make their nests in natural cavities and shelters: hollows of old trees, depressions in the ground or rock crevices. Man provides them with artificial housing - beehives.
When nesting in a natural cavity, honey bees build double-sided sheets of wax from wax that are attached to the ceiling of the cavity. The hexagonal cells that form the honeycomb are made from wax secreted by the glands located on the abdomen of the bee.

A queen checking a cell before placing one of the 2,000 eggs she lays in a day. The sex of the future bee depends on which egg the queen has laid.
The distance between adjacent sheets of combs (the so-called "bee space") is usually from 6 to 9 mm - quite enough for the movement of bees on their surface. Beekeepers try to recreate similar conditions in the hive by installing removable frames in it, the distance between which is also equal to the bee space. The base of the honeycombs is attached to the frame, on which the bees build cells.
Breeding
Honeybees use cells of honeycombs for two purposes: as containers for storing food (honey and plant pollen) and for breeding offspring (brood). In nature, bees tend to fill the honeycomb cells in a certain order. Cells with eggs are located in the center and at the bottom of the combs, and honey is stored in the upper and side cells. Cells with pollen are located between cells with eggs and honey. In the hive, however, the combs in the lower boxes contain mostly brood, while the upper boxes contain only honey and pollen. This distribution of the contents of the cells is due to the fact that the lower and upper sections of the hive are separated by a wire mesh, called the queen limiter. Its cells are large enough to allow the worker bee to pass through, but too small for the queen to pass through. As a result, the queen is confined to the lower section of the hive where she lays her eggs, and the beekeeper can take out the top boxes of honey-filled combs without disturbing the queen. In hives, honey bees live in the same highly organized community as in nature. Most of the bees are worker bees, females with underdeveloped genitals, in some hives there are up to 60-80 thousand of them. The uterus is also a female, but with fully formed genitals. Its sole function is to lay eggs, all worker bees come from eggs laid by a single queen. In spring and summer, the queen also lays a small number of eggs, from which males, called drones, emerge. The drones don't work, and they don't have the sting that the worker bees use to protect the hive from enemies. Their only purpose is to mate with the queens, after which they die.
Queen's life
The queen of honey bees lives for about 5 years, during this time from spring to autumn she lays about 2000 eggs every day. When a colony of wild honey bees grows too large in spring, it divides into two parts (swarming). At the same time, the queen leaves the nest and flies away with about 70 percent of the worker bees.

When the weather permits, the worker bee can move up to 11 km from the hive every day in search of nectar and pollen. This work is usually done by older bees, whose life is already coming to an end.
The worker bees left in the nest grow a new queen, after which the colony begins to grow very quickly. However, bees bred in hives do not create swarms. With an increase in their number, beekeepers add additional sections to the hives, thereby reducing the overcrowding of the hive.
Unlike the queen, worker bees live for about 30 days in summer and up to 6 months in winter. The worker bee develops in a closed cell in 21 days, passing through three stages: egg (about three days), larva (about seven days) and pupa (11 days). On the last day of development, the bee, with the help of its mandibles, destroys the wax cover that closed the cell, and immediately begins to work. According to her age, she performs various tasks. A young bee spends almost all the time in the hive: first, it cleans the cells of the combs, then takes care of the offspring, feeds the queen, and builds or repairs the cells.
Somewhat later, she moves closer to the exit of the hive and works as a food acceptor, taking nectar and pollen from foraging bees returning to the hive, or becomes a guard bee, protecting the hive from strangers. Finally, at the last stage of her life, she becomes a forager, flying away in search of water, nectar and pollen at a distance of up to 11 km from the hive. Guarding the hive and foraging for food are the most dangerous jobs, so they are performed by "elderly" bees approaching the end of their lives.

worker bees honey bee, lowering their heads into the cells of honeycombs. Their name speaks of their functions in the family. They do all the work both inside and outside the hive: rearing the young, collecting nectar and pollen, cleaning and protecting the hive.
Labor and conflicts
Life in the hive is well organized, with each individual primarily taking care of the family.
In good weather, forager bees fly away from the hive for water, nectar and pollen. If they find nectar-rich patches of untouched flowers, they take the nectar and return to the hive without delay to report the find to their female relatives remaining in the hive and thus increase the number of foragers in that rich patch. If you have the opportunity to observe the surface of the combs, for example, through the glass wall of the research hive, then you can see how the returned bee, surrounded by "spectators", moves up and down the combs, describing the eight, the so-called. "wagging dance". With this dance, one of the most complex forms of communication in the animal world, the bee informs the audience about the direction in which the rich source of food is located, and about the distance to it. Such information is especially important when the stocks of poverty in the family are small.

Beehives in Bavaria (Germany). When such a structure overflows with bees, the beekeeper adds additional sections, thereby preventing the swarm from flying out.
Gatherers can become aware of depleted food supplies. The “unloading” by the receiving bees of the pickers returning from distant feeders does not take much time. On the other hand, if a forager has to wait for a long time for the help of the receivers, this indicates the simultaneous return of many foragers with a large amount of nectar, i.e., an increase in food supplies. In spring and summer, any food that is not consumed immediately is stored in honeycombs. It will be needed in winter or when bad weather will not allow you to collect nectar. Over time, the nectar stored in the comb turns into honey.
Pheromones
Another well-known example of the collective action of bees is the defense of the hive. Whenever a threat arises, guard bees release alarm substances or pheromones, catching which, the defenders gather at the entrance, and each tries to hit the enemy. This is undoubtedly selfless behavior, because, having stinged the enemy, the bee loses its sting and dies. The poison found on the sting of the bee also contains an alarm pheromone that attracts new defenders to the battlefield and stimulates them to attack the enemy.

Worker bees on honeycombs with a queen cell. In the initial period of life, worker bees spend a lot of time caring for the queen and feeding her, as well as building new and repairing old cells.
However, cooperation does not always occur in perfect harmony in a honey bee hive. It is often believed that only the queen can lay eggs in honey bees, but this is not true. Although worker bees cannot mate, they retain a functioning ovary and can lay unfertilized eggs that develop into males. Why do they raise the mother's offspring, and not their own? Ironically, it is not the queen that prevents the worker bees from reproducing; this is done by all the other worker bees.
This moment in the life of the bee colony is called the "working police", it consists in eating by the bees any eggs of their sisters they find. The bees can easily determine which eggs to destroy because the queen marks the eggs she lays with her pheromone.
Do-it-yourself hive for bees: how to make, drawings
Such cannibalism is practiced due to the fact that all the worker bees of the hive have one mother, but during the mating flight she mates with about 30 drones, i.e. the bees have quite a few fathers. This means that any bee is genetically closer to its siblings produced by the queen than to any "nephew" developed from the egg of another worker bee. As a result, each bee prevents the others from breeding and cooperates with them in caring for the queen's offspring. By doing this, honey bees ensure that as many of their own genes as possible are passed on to the next generation of the family.
- Did you know?
- Before starting to lay eggs, the honey bee queen goes on a nuptial flight, and then stores about 5 million spermatozoa, using them all her life. Each time, laying an egg, the uterus determines the sex and type of the future bee. If a worker bee is to develop from an egg, the queen fertilizes it with one of the spermatozoa stored in her body and lays it in a normal-sized cell. If a drone should develop from an egg, the egg is not fertilized and is deposited in a cell bigger size. The eggs from which new queens are to form are fertilized and look exactly like the eggs from which worker bees develop, but they are laid in special cells - queen cells, shaped like an acorn, and the larva is fed a special food called royal jelly for the entire period of its development.
- The expression “to work like a bee” is connected with our idea that bees are tireless workers, carrying honey to the hive “tirelessly”. This view is erroneous: each bee rests, remaining on the comb, 80% of the working day.
- To survive winter months, a family of honey bees needs to create a reserve of 20 kg of honey.
A good hive must meet the following requirements:
1. The hive should be warm and well protect the bees from sudden changes in temperature, from rain and dampness. In summer, the walls of the hive should not get very warm. If the hive is single-walled - up to its thickness of -30 mm. Double-walled hives - the space between the walls is clogged with moss - cuckoo flax.
2. The hive should be spacious enough to accommodate the brood of a good queen, as well as storing honey and bee bread in it. At the same time, it should be arranged in such a way that, depending on the season, its volume could be increased or decreased, ventilation could be regulated.
In winter, the nest is smaller, the number of frames is reduced. The remaining space should not be empty, it should be filled with insulating pillows and separated by a special diaphragm.
3. The hive should be convenient for work, easily and freely disassembled into its component parts and reassembled, so that during inspections it does not press and does not disturb the bees much.
4. All parts of each hive should be exactly the same in size. This will facilitate the setting up of shops, the rearrangement of frames (or cases), the relocation of families and a number of other works.
Frames of the same size give the beekeeper the opportunity to: 1) if necessary, rearrange the frame from one hive to another; 2) apply the same methods of caring for bees in all families; 3) have beekeeping equipment designed for a frame of a certain standard. The same hives in the apiary will simplify the care of bees and reduce labor and time costs.
6. Hives should have in their design special devices for combating ticks. This is either a removable bottom or a special grid with a pallet.
In Russia, the most common hives of the following designs:
1)
single-hull hive or Dadan-Blatt hive, consisting of a bottom, a nest box containing 12 frames, a width of 435
mm and height in 300
mm, one or two stores accommodating 12
frames half the height; often use two buildings with shops;
2)
hive-lounger, consisting of one large body, accommodating 16,20
or 24
frames are also sized 435×300 mm (often frames are made in 300
mm wide and 435
mm high - Ukrainian lounger);
3)
multi-hull hive, consisting of three to five interchangeable housings of the same size, on 8-10
frames, size 435×230 mm.
Components of the hive
The hive should consist of one or more buildings, a magazine, a roof lining, ceiling boards (or canvas), a bottom, an insert board (diaphragm), a landing board, a stand and nest and magazine frames.
Framework subdivided into nesting and shop. In typical hives, nesting and magazine frames have standard sizes and differ from each other only in height. The height of the nesting frames of single-hull, double-hull hives and sunbeds is -300 mm, magazine frames -145 mm. The height of the frames of multi-hull hives is 230 mm.
The width of the upper bars and lower bars of the frame is 25 mm, the thickness of the side bars is 8 mm, and the bottom bars are 10 mm. The thickness of the upper bar is 20-22 mm. The side bars of the nesting frames in the upper part are expanded to 37 mm, which ensures the normal size of the street and good stability of the frames when transporting bee colonies. 
The width of the frame is determined by the following circumstances: the length of the comb is 12 mm, equal to the length of the worker bee. 1 mm - wax thickness.
How to make a Dadan hive with your own hands
12+1+12=25 .
Frame- the main part of the hive, where the nest of bees is located. Hives with two or more bodies are common. The case has the form of a box without a bottom and a roof, in the upper edge of the front and rear walls of which a fold is selected for hanging the nesting frames. In addition to the frames, the body of many hive designs includes diaphragms and a hive partition. On the front wall of the case in its upper part is made notch for entry and exit of bees. In shape, it can be round or in the form of a slit.
If the frames in the hive are placed perpendicular to the entrance - cold drift, if parallel - warm drift.
Bottom hulls, depending on the design, can be nailed to the hull or detachable. It consists of a shield knocked down from boards and a strapping of beams. The front bar has a slot - a lower notch 20 mm high, which is regulated by special liners. At the lower entrance to the front bar of the bottom strapping is attached arrival board for bees.
Roof worn over the body or magazine extension and protects the nest of bees from rain, heat and cold, enemies and pests. The roofs of most typical hives are flat in construction.
liner designed to accommodate the feeder and create a free space above the frame.
Magazine or magazine extension. In height, it is usually half the height of the buildings. The magazine extension fits magazine frames. It is used to increase the volume of the nest, mainly during honey collection. Depending on the size of the honey collection, one or more extensions are placed on the hive.
Shop extensions) are closed from above with a solid ceiling or boards up to 10 mm thick. Often used for this purpose canvases made of loose fabric (burlap).
Diaphragm(separating board). It consists of an upper bar, two side bars and a shield (thin board) fixed between them, 15 mm thick. In height and length, the diaphragm must correspond to the internal dimensions of the housing. D diaphragms necessary to reduce and insulate the nest.
Hive dimensions
In the hives of all systems, the following mandatory dimensions of the "hive rule" are observed: the angles must be strictly 90 0 (from dry wood - fir, aspen); the overframe space (the distance between the top plank and the ceiling planks) should be 10 mm; subframe space (distance between the bottom and the bottom bar of the frame) - 15-20 mm; side space(distance between the side bars of the frame and the front in relation to the notch and the back walls of the hive) - 7.5-8mm; distance between frames - 12 mm; the distance between the central axes of the frames of neighboring cells is 37-38 mm. If there are several bodies in the hive, then the gap between the upper and lower frames should be 10 mm. If it is less, they will cover it with propolis, more - with honeycombs. 

How the hives are calculated (standard 12 frame hive)
12+25/2+25/2=37
+0.5 for propolis = 37.5
12 - frame hive 37.5*12=450
When examining and working with bees, the beekeeper needs: a net to protect the face from bee attacks, a smoker, a beekeeper's chisel (for tearing off the frames), a brush for sweeping bees, a box for tools and rotten, a box for transferring honeycombs, a swarm (closed sieve), feeders for feeding bees, pillows for warming the hive - top and side (stuffed with moss); cages for queens (Titov non-metal), a dividing grid for isolating the uterus (Hoffmann), a board-pattern for waxing honeycombs, a knife for cutting zabrus (lids on sealed combs), a honey extractor (due to centrifugal force - sealed combs with honey are first printed using a special beekeeping knife, then inserted into the honey extractor and rotated), wax melter (metal pan). 
Device 12-frame hive with two magazines (dimensions in mm):
- body, 2 - nest frame (cross section), 3 diaphragm, 4 - magazine, 5 - magazine frame (cross section), 6 - liner, 7 - roof, 8 - upper entrance, 9 lower entrance

Section of the hive body:
- - frame, 2 - over-frame space -10 mm; 3 - between the frame and the back of the hive 7.5 -8 mm; 4 - bottom of the hive, 5 - subframe space 15-20 mm; 6- between the frame and the front wall of the hive - 8 mm.

Nesting frame (dimensions in mm)

Types of hives: a - single-hull 12-frame with a magazine;
b - two-hull.
Hive-lounger

Multi-hull (four-hull) hive
Both beginners and experienced beekeepers come to the conclusion that it is better to make a hive with your own hands. You are sure of the quality of your own product, if you need development, you can quickly make the missing parts. How to make hives on your own will be discussed.
Popular hive designs
Before you build a hive with your own hands, you need to choose its design. Basically, novice beekeepers use two types of hives:
- Dadanovsky for 12 frames. Has a vertical design, builds up. If necessary, one more standard case or store is set on top (an additional case half the height of the main one, in which half-frames are installed).
- Sunbed - for 20 frames and more. Differs in size - has a greater width than depth. The number of frames used by the bee colony is regulated by rearranging the partition.
Both of these designs use standard 470*300mm frames which are widely used. These two types are the most common among beginner (and experienced) beekeepers. Sometimes they use Ruta hives, but they have frames of a different format - 470 * 230 mm and are not so easy to find. It is also more difficult to work with Ruts than with Dadanovsky or sunbeds, more experience in beekeeping is required. Therefore, choose from two options - Dadanovsky or sunbed. What exactly - it is better to find out from the beekeepers in your area.
Hive blueprints
Since the Dadanovsky hive and the sunbed use standard frames, they differ only in width: one should fit 12 pieces of frames, the other - 20 or 24 pieces. The rest of the parameters remain the same.

Changeable parameters for hives with different number of frames are shown in the table. Substitute them in the drawing and get the option that you need.
| Number of frames in the case, pcs | Case width B, mm | Width of the inner opening of the housing B1, mm | External installation size of the body fold B2, mm | Internal installation size of a fold B3, mm |
|---|---|---|---|---|
| 10 | 455 | 375 | 419 | 425 |
| 12 | 520 | 450 | 494 | 400 |
| 14 | 595 | 525 | 569 | 575 |
| 16 | 685 | 615 | 659 | 665 |
| 20 | 880 | 810 | 854 | 860 |
What you need to know before you start making a beehive with your own hands
Even before the start of independent production of hives, it is necessary to know the requirements for materials and technology for the construction of evidence for bees. A lot of them. Let's start with the requirements for the material.
What are they made of
The most common material is wood. Can be used as non-resinous coniferous wood (spruce, fir, tarless pine), and loose hardwoods- poplar, linden, etc. Dense wood should not be used - the hive will be heavy and cold.
Wood requirements are strict. It must be dry - no more than 16% moisture, without falling knots, rot, wormholes, redness. Blueing is acceptable (it does not affect quality indicators). If there are knots, they can be removed, sealed with corks from the same type of wood and puttied. Do not use wood with other defects.
Today they make beehives from plywood, preferably birch. In this case, the walls are made double with a gasket between the layers of insulation - foam. These hives are warm in winter and cool in summer. Their minus is that the walls are vapor-tight, moisture does not escape through them. Therefore, special attention should be paid to the ventilation system of the hive (make an additional notch at the top, and, if necessary, open it for ventilation).
Sometimes hives are assembled from polystyrene foam, polyurethane foam and polystyrene foam. Most good option- polystyrene foam. Even some fasteners can be installed in it, neither bees nor other insects gnaw at it. The remaining two materials are collected on glue, and bees also sharpen them, and ants and other neighbors undesirable for bees can settle.
Handling and assembly requirements
When assembling a hive with your own hands, you must strictly maintain the internal dimensions of the body and extensions. Then increasing the volume will not cause difficulties. Parts of the hive - bodies, extensions, stores, roof - must be connected to the castle and the castle parts must also match. This is necessary for a reliable connection without gaps and drafts, which bees do not like very much. In this regard, the maximum tolerances during processing are 1-2 mm.
There are also requirements for the quality of material processing. Most of them relate to wood, but they can also be applied to other materials:
- Boards and bars should be smooth, without burrs, scuffs and chips.
- It is necessary to cut materials strictly at an angle of 90 °, avoiding deviations.
- The hive bodies must be knocked down from solid boards with a thickness of 40-45 mm or using a tongue-and-groove connection, glued for reliability.
- To pair the parts of the hive in detail, choose a quarter - for a reliable gapless connection.
- On the front and back walls of the hive, a fold is made - for hanging the frames. The depth of the fold should be such that there is a distance of at least 8-10 mm from the top edge of the plank to the cover or extension. If the distance is shorter, the frames may stick to the lid, which creates maintenance problems.
- If the walls are made two-layer (with insufficient thickness of the boards), the outer ones connect them in a quarter, making sure that the seams in the layers do not match. It is better to connect the inner parts and the bottom into a tongue or groove.
Structural elements and their features
Most often, the hive has a modular structure - it consists of several detachable parts. This is convenient, as it allows you to increase the volume as needed. Each of these parts is made separately and the manufacturing accuracy must be high - all parts must be interchangeable.

Frame
This is the central part of the hive, in which the nest of bees is usually located. By the number of housings, hives are single, double-hulled or multi-hulled (3 or more). Corps are instructed as the family grows.

Roof
The roof of the hive can be single-pitched (tilted backwards) or gabled. In the forehead case, it should be with overhangs - to protrude beyond the geometric dimensions of the hive and protect the walls from the effects of bad weather.

The roof consists of a liner - a flat body for placing insulation or feeders for feeding bees - and the actual roof planks nailed to the liner with nails or screwed with screws. The height of the armpit depends on the thickness of the insulation, and this value depends on the region. Usually the height of the liner is 80-140 mm. Ventilation holes are often also made in the liner - to remove moist air from the hive.

In the manufacture of the roof, the boards are laid either in two layers with overlapping seams, or from thicker boards in one layer, but the seams must be closed with thin strips. over wooden roof hives can be laid roofing iron, roofing felt or roofing felt.
In the manufacture of the roof, pay attention to the fact that it "sits down" tightly, without gaps. To seal the connection around the perimeter of the body, you can stuff a felt strip or nail a plinth outside the body to cover the joint.
Bottom
The bottom of the hive can be nailed to the body (deaf) or can be pulled out or pulled out, that is, it can be detachable. The detachable bottom facilitates the maintenance of the hives - it allows you to clean the bottom without disassembling the entire hive. Structurally, the bottom happens:
- cold - from a single board;
- warm - from two layers with a warming backfill.
Also, the bottom is double-sided - with protrusions of different heights on both sides, which allows you to adjust the internal volume. They knock it down tightly, without cracks, connect the boards in a quarter or in a groove with additional sizing of the joint with moisture-resistant glue for wood. The cracks must be carefully sealed (putty on wood), as wax crumbs are poured into them, and then the wax moth starts up. Therefore, from time to time they prefer to replace the bottom, knocking together a new one.
Video about the manufacture of beehives from different materials
Often, amateur beekeepers who keep 2-3 families of bees are faced with the problem of "overcrowding". After all, the bees begin to swarm, which means that the question arises of acquiring new hives. But what about in such a case? Not everyone can afford to buy new ones, and used ones are also dangerous. After all, it is not known why they are sold and what diseases can be acquired along with the “home”. That's when the thought arises - why not make a beehive with your own hands? Today we will try to figure out how difficult it is and what is required for this. Surely this information will be useful to those who are just thinking about beekeeping.
Read in the article
Beekeeping for beginners - where to start for an inexperienced beekeeper
The main thing is, of course, to understand whether a person can do this difficult work. After all, not everyone can do it due to physical indicators or health status. The first and most important requirement is the absence of allergies to bee stings. After all, some people can not stand even isolated cases. If a novice beekeeper has such a strong reaction, then the path to the apiary is ordered for him. You should also know that bee venom, entering the body, contributes to a sharp increase blood pressure. That is why people with heart disease and hypertensive patients are strictly forbidden to engage in such activities.
Now for the physical state. Those who plan to do beekeeping should understand that this is hard, everyday work. You will need to move the hives, work on the honey extractor and much more. And do not think that this is a very profitable business that will begin to generate income from the very first season. After all, at first it will require large costs for the bees themselves, beehives, and additional buildings. And if there are no honey fields nearby, it will be necessary to transport the beehives from place to place, negotiating with the owners of the meadows about the stay of the apiary, resolving issues with its protection. So the first 2-3 years there is nothing to think about any slightest profit.

But if it has already been specifically decided to do this difficult task, then one of the primary costs can be minimized - to build beehives for bees with your own hands. True, this will require some knowledge and experience. But if you want, attentiveness and accuracy, this is quite doable.
Beehive device: general information about what types they are
To understand how the hive works, you need to study all the information about them and figure out what this or that compartment is for. Many beekeepers, sometimes even hereditary, do not even know what is called. But that doesn't stop them from doing what they love. However, beginners will have to understand this. Indeed, for the construction it is necessary to be able to read the drawings of beehives for bees, and sometimes draw them yourself. Now we will analyze some types and try to understand which one is easier to build for a start. Those who later take up this business on a larger scale will eventually understand all kinds of houses for bees. For now, let's start with the most common.
The Dadan-Blatt hive: its description, device and some features of use in beekeeping
Initially, this hive bore the name of only one of its inventors - Charles Dadant. But its design, although it was quite successful, still required improvement. It was she who made the Swiss beekeeper Blatt, who added some innovations. But until today, among beekeepers (perhaps for simplicity), the name "Dadan's hive" is applied to this bee house.
This design is practically not used in industrial honey collection, but among amateurs it is almost the most popular. The size of the 12-frame dadan hive, the drawing of which is shown in the image below, is 585 × 585 × 815 mm.
1 of 4

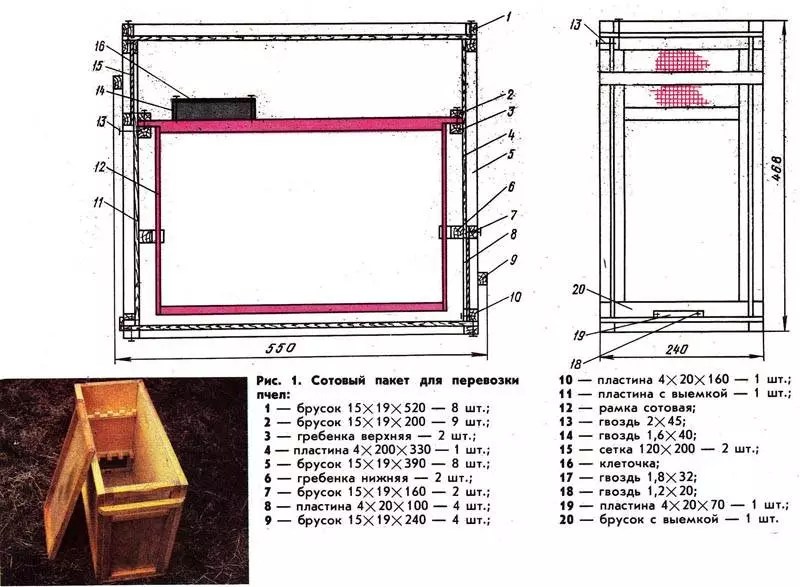

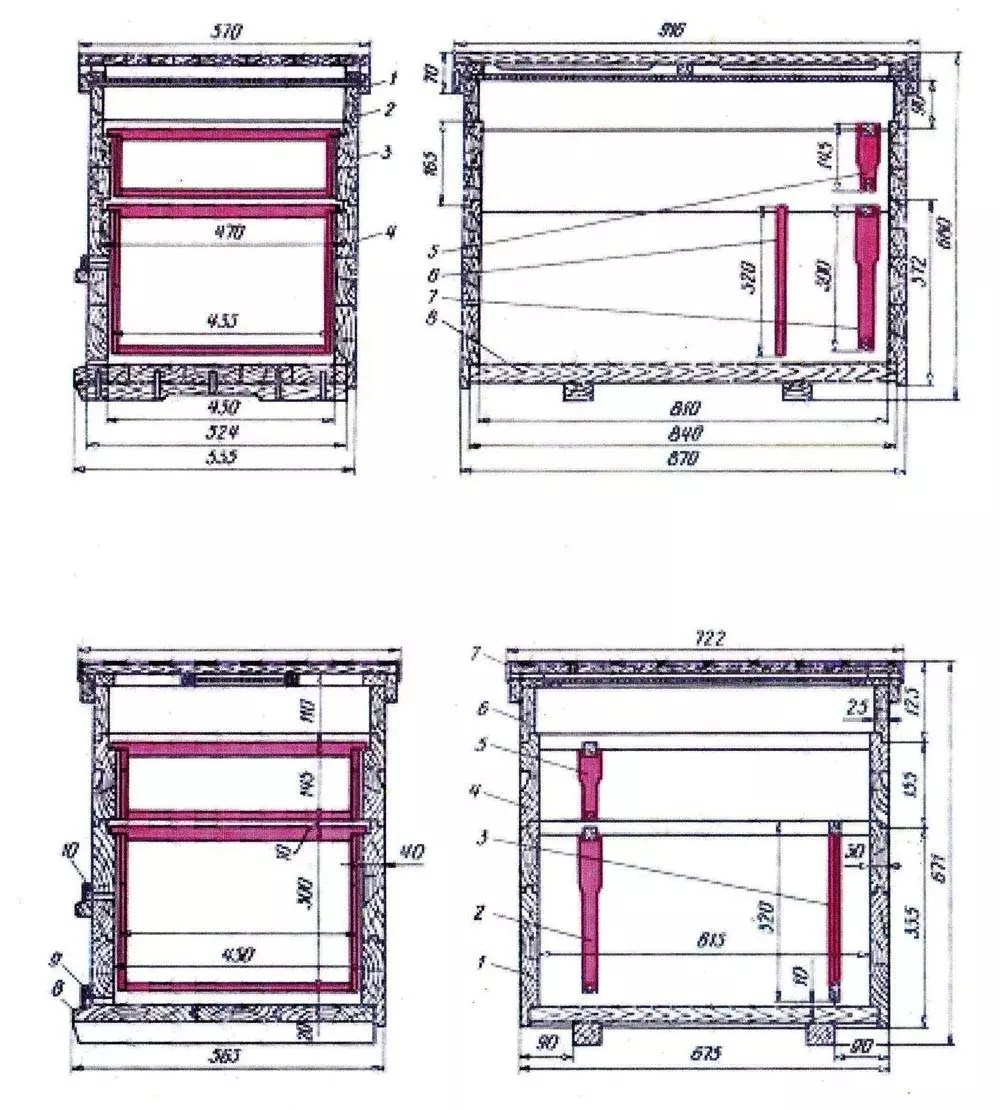
Important information! It doesn't matter what the hive will be. It is important to make as many stores as possible. After all, this is the most important thing for honey workers. But fanaticism in this case is also useless.
In fact, such a house for bees is quite simple. In other words, the construction, if there are drawings in front of your eyes, a Dadan hive with your own hands, will not be any particular problems.
What is a Langstroth-Root hive and how is it arranged
This design is also quite popular. And not only among amateurs, but also among industrial assemblers. It originates from the beginning of the nineteenth century. At that time, the first version of it was invented by the beekeeper Lorenzo Langstroth. However, it was somewhat inconvenient due to the fact that the bottom of the hive was not removable. This made cleaning and maintenance much more difficult. However, already at the end of the same century, the beekeeper-industrialist Amos Ruth slightly changed, and one might even say, simplified the design. And even today, his descendants own a company for the production of various apiary devices, making such hives.
The main difference between such a bee house and the previous one is the absence of shops. In addition, the frames themselves are somewhat lower, although their width is completely identical. Ruta hive drawings can be easily found on the web, therefore, it makes no sense to post them all here. course for general concept we will present to the dear reader some of them below.
By themselves, the drawings of Langstroth's hives differ slightly from the structure of Root. But among beekeepers, the name of this design was fixed with only one surname. By analogy with Dadanovsky, they were simply called Rutovsky.
1 of 4
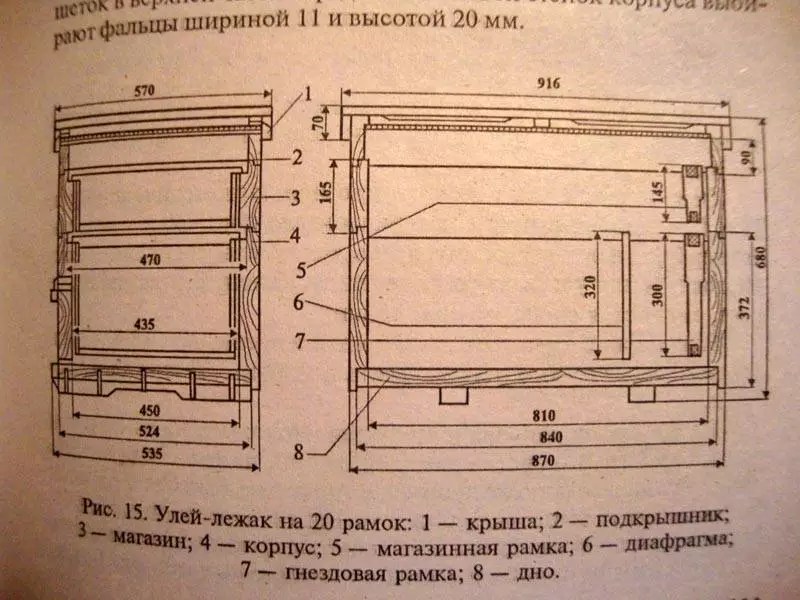


Horned hive of Mikhail Palivoda - the most budget option
Although many of those who have been professionally engaged in beekeeping for a long time and speak of such a design with disdain, for a novice beekeeper it can truly be a godsend. In addition to the fact that it is much easier to make it than the previous two options, it can also be done from almost any scraps.
Important information! When we say “from any”, we do not mean oiled or rotten wood. The bee will not live where there is a stranger, even the slightest smell. It is for this reason that experienced beekeepers assemble hives with nails or screws and never use adhesives. And staining is used only outside the bee house.
As for the ease of manufacture, looking at the photos of the drawings of the horned hive presented by us, even a schoolboy can probably make it with his own hands.
1 of 3


It is also good news that almost all breeds of bees can live in such a house. But especially such a structure is to the liking of Buckfast and Carpathian. The famous Burzyan bee also feels quite good in it, but for some reason the beekeepers of Bashkiria have chosen other types of structures for themselves. Perhaps due to the fact that such hives are made quite small.
Alpine hive or design according to the method of Roger Delon
Quite a convenient design due to the fact that as the number of bees in the family increases, there is no need to rebuild a new hive. You just need to add inserts, raising it in height.
Roger Delon is a fairly well-known French beekeeper who keeps apiaries in the Alps. Moreover, due to his design of the hives, he does not have time to collect honey in the summer, and therefore he does it already in the winter.
The very design of the bee house is fundamentally different from all that were mentioned earlier, not only in structure, but also in size. It is for this reason that the maintenance of such hives is not very convenient. It is quite difficult to choose a suitable honey extractor for non-standard frames. But in terms of performance, alpine hives outperform any others, even in a non-melliferous year.
It is also difficult to switch from ordinary bee houses to alpine ones - “it is difficult for new settlers to get used to a different structure. For this reason, if a novice beekeeper, having considered all the options, settled on alpine, then you should not start with something simple with the thought that over time it will be possible to change the design. It is better in this case to immediately build a hive according to the design of Roger Delon.

Such designs appeared relatively recently, but now they have both supporters and opponents. At the same time, the second is many times more than the first. The essence of the design is to save space by narrowing the distance between the frames. This is where the main bone of contention lies.
Experienced beekeepers claim that this will cause layers of propolis to appear between the frames. As a result, they will not work. At the same time, there is no reason not to trust the opinion of experts.

It is also doubtful what it is advised to do from such material as. To be honest, anyone who understands at least a little about beekeeping will say that there can be no talk of any honey in such houses. The bees just won't live there.
Pchalyar: In the early 90s, one of my relatives decided to become a beekeeper. I don’t remember where, like from Moscow, they sent him a brochure with drawings, descriptions and technology for keeping bees in a hive of the original design. The honey flow in this hive was promised simply unprecedented. Boiled work. I sawed boards, dragged from somewhere the posters "Give ...", "Glory ...", "Long live ..." from and built 8 pieces. He also built a pavilion, though stationary, not on wheels. Why am I all? Yes, just that hive and yours are the same. The height of the frame seems to be more, or maybe not, I don’t remember exactly. I must say that he is a guy with hands, everything was done soundly ...
Read more at Pchelovod.info: http://www.pchelovod.info/index.php?showtopic=25251
We do not provide a review in full, for those who are interested - you can read it in the source. For those who have no desire to visit the sites, we can say that in this review the person writes that now no one lives in those hives. Well, sometimes stray bees appear, but not those that give honey, but those that do not live periodically.
Hive lounger and how it differs from other houses for bees
If you ask such a question to professional beekeepers, you can hear completely different answers. And it's not that some are right and others are wrong. It's just that the design is different.

Looking at this hive, you can understand that it looks the same as the others, but at the same time it seems to be lying on its side. The lid also opens up, but it is the upper wall. Outwardly, it resembles a chest. That is why they called him a sunbed. The design of such a hive may be similar to any of the above. It can be both a rutovsky and a dadanovsky hive.
Let's also try to turn to the reviews of professionals - what do they think about the do-it-yourself sunbed hive?
Danicek: I can’t answer in the affirmative, because I don’t have experience driving bees, for example, in multi-hulls, which means I can’t compare. Although, I remember that in his lectures Kashkovsky claims that in Siberia it was with the help of sunbeds that beekeepers achieved record honey collections both from one hive and from the apiary as a whole. In my opinion, the sunbed most of all allows you to create a strong honey cake (which is what we strive for), disturb the bees less with inspections (each inspection, whether the beekeeper wants it or not, brings nervousness to the family, and for a couple of days the family gets out of its normal rhythm life)…
More details on nn.ru: https://www.nn.ru/community/user/pchely/lezhak_na_20_ramok_plyusy_i_minusy.html
Hive boa constrictor: why he was so fond of beekeepers lovers
The secret of the popularity of such hives is their compactness and ease of installation and maintenance. Outwardly, it is somewhat reminiscent of the Alpine, but much smaller in size. Although those who have been engaged in beekeeping for more than a year say that it will not be easy for a beginner beekeeper to cope with such a hive. But, as you know, everything is known in comparison, and for those who are close to such a design, nothing prevents them from starting with just such bee houses.
Making boa hives with your own hands according to the drawings is not difficult, we will present them to the dear reader for review below. If the provided will not be enough, you can always find Additional information online.


Do-it-yourself hive: step-by-step instructions with photo examples
Let's take an example of six actions on how to make a beehive with your own hands from boards:
| Photo example | Actions to take |
  | First of all, we align the blanks previously fastened “into a spike” in a width of 250 mm. |
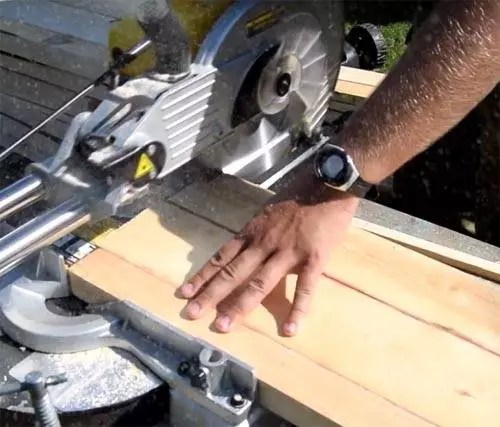 | Now you need to align them along the length of 439 mm and 434 mm. |
 | Cut out the folds - top, bottom and side. |
 | This is what the finished parts should look like. Now it's up to the small thing - to put everything together. |
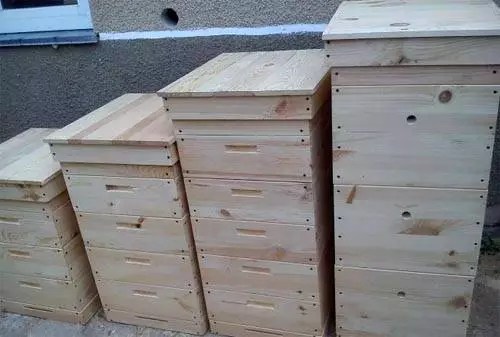 | Approximately such result also should turn out. |
Of course, it is impossible to show everything in the instructions, but in fact this is not necessary. After all, any beekeeper learns all his life, trying something of his own, and therefore you will never find two beekeepers who make hives in exactly the same way. And yet we suggest watching a video on making a hive with your own hands according to drawings and dimensions. We think that after this there will be no questions left .. Do not forget that in different types houses, it is performed in its own way.

You can insulate the building with both ordinary foam and (polyurethane foam). These materials are non-toxic and odorless.
Important! In no case should you insulate the hive from the inside. Otherwise, a situation will result in which, due to wax, it will simply be impossible to pull out the frames.
If possible, try to avoid gluing. In extreme cases, you need to choose a composition that is odorless. You can use hot glue - it is neutral, non-toxic and the bees do not react to it.
The choice is very important. Best Option may become aspen or linden. Conifers are also suitable, but in this case, you need to be prepared for the fact that in the first year the honey will have a slight, but noticeable smell of resin.

Difficulties that may arise when building a house for bees
The main task in such work is the exact observance of all given dimensions. And this is not just a whim of the one who invented this or that hive. It's a necessity that's been tested over the years. Many people think that it is possible to design and build a house for bees according to their own invented sizes, and then get no less honey than the rest. Will not work! It has already been said that if the distance between the frames is smaller, bees will accumulate propolis between them and they will become non-working. What happens if the distance is increased?
In this case, the bee decides that it is necessary to build intermediate combs, and as a result, the first option is obtained - everything sticks together tightly. As for the height, there are practically no restrictions here. But it should be remembered that you will have to carry the hives, which becomes problematic with a lot of weight.

Quite a big problem is also stray, alien bees. Often they come with them various diseases and it is with such incidents that the degeneration of the breed begins. If we again cite the Burzyan bee as an example, then its degeneration in Bashkortostan has already become noticeable. And the reason for this is the frequent arrival of beekeepers from neighboring regions.
And of course, do not forget about feeding insects with sugar syrup during wintering. After all, the main part of the honey that they prepared for the cold period is taken from them. It is worth learning more about all this before you make a hive yourself and settle the first guests there.
If you think about it, then the process of making a hive with your own hands is a complicated matter, but quite interesting and exciting.
Frames for a bee house - the nuances of their manufacture
Frames are the basis of the hive. And a lot depends on the quality and their correct execution.
Important! Whatever material the bee house is built from, the frames should always be made of good tree- linden, aspen or apple tree. This will ensure the best taste of honey. The wire shackle must be made of stainless wire if it is not wood.

Summarizing
Everyone knows that honey is not only a sweet treat, but also an excellent medicine. And the quality of the final product also depends on what the hives will be like, how they will be equipped. So the responsibility for this lies on the shoulders of the beekeeper. Don't forget about it. Well, what kind of bee house to choose is up to you, our dear reader.
If anyone has any questions, we will be happy to answer them in the discussion, and perhaps argue. After all, as you know, truth is born in a dispute. If you find an inaccuracy in the information provided by us, we will be grateful if you point it out.
And finally, a video on the topic of making frames.


