How to make a jacket out of a sock for a doll. Socks-slippers from the remnants of knitwear or unnecessary things. Sweater for a doll or bunny
Warm socks do not have to be knitted all winter in the evenings. You can sew socks from the sleeves of an old warm thing in half an hour. They will look very comfortable. In such a hand-made miracle, it will always be warm and comfortable. How to change a sweater?
Home boots from an old warm thing are sewn like this:
1. First, the sleeves of the sweater should be tested for suitability for making socks from them. To do this, pull the sleeves over your legs. If the gum does not press, then everything is fine and you can continue.

2. The sleeves are completely cut off. Then it should be cut obliquely so that there is no accordion on the heel when you pull the future sock over your leg. To do this, cut the sleeve at an angle of approximately 45 degrees. The heel should be on the side where the seam is.
3. The sole is cut out. It is very easy to do this if there is any insole.
4. The sole is cut out from some part of the thing.


5. The stocking is turned inside out and the sole should also be turned inside out. The stockings are sewn together with the bottom of the sock. It is better to start stitching from the heel.
6. The resulting sock is turned inside out on the front side. You should put it on and see where the excess fabric should be collected in front. A fold of fabric is made in front and stitched with a thread.


7. A button is sewn to the ends of this seam right size.


8. Stylish homemade socks-boots are ready. You can make the sole of leatherette. For this, an additional sole is sewn on top, which will be resistant to abrasion.
You have free time, old things and creative work gives you only pleasure. Then this article is especially for you. We recommend reading everything to those who are seriously thinking about giving things a second life and reusing them.
 If you are seriously thinking about turning an old sweater into socks, then you need to carefully choose raw material. It can fit both warm knitted and knitted, depending on what kind of socks you want to get. The material should not be worn out and have a presentable appearance.
Important! The sweater should not be too tight and tight. This can lead to leg swelling. You should choose a pleasant and comfortable shape for you.
The material is chosen, the matter is small. Let's start the transformation.
How to sew socks from an old sweater: a step by step guide
 Do you think that whole evenings are spent on socks and this is a very long and tedious process. Socks can be made from an old sweater in one evening, just a few hours.
- Choose material based on what you want to do.
- Cut sleeves to desired length.
- Make a blank insole for future socks.
- Cut the sole along the contour of the workpiece.
- Sew both parts together.
- Seal all seams and prevent them from coming apart.
- If desired, you can add decorative elements. If the seams are too visible, then you can make embroidery on the top of the sock. Then it will be a wonderful decoration.
Warm socks with your own hands
 Warm socks can be made following this plan. This will require warm and soft wool.
There are two options for shaping the bottom of the sock.
- Close the incision with soft threads.
- Cut off the workpiece under the foot and carefully sew it. You will get warm socks similar to boots.
Attention! The seam should go inward, but this should not form a ridge that will cause inconvenience. For this, a cross seam is used, which tightens the edges of the fabric and at the same time forms a frame (the needle goes along the edge, making the primary seam, then goes 4-5 cm from the edge to the left and right sides so that the primary seam does not form a rough comb).
Leggings from an old sweater
 Another great product can be made from a sweater. It's about the gaiters. Basically, the sewing plan is practically no different from that described above.
We only choose the desired shaft height and make the sole without a frame. The seams should be soft and the relief changes along the contours of the foot.
Important! Gaiters were originally used by dancers to keep their feet warm and to protect them from hypothermia. Therefore, in accordance with their main task, you should choose a warm woolen sweater, not prickly, but soft and pleasant to the body.
Leggings for dancing
 This is the easiest option.
- Cut the sleeve to the length you need.
- Then we sew the place of the incision (from the wide end) carefully so that the seam is not visible and it does not fray.
- We leave only a small area open under the heel. Ready!
Important! Before cutting off the sleeve, slide your leg into it. Feel how the sock will sit on your foot. There should be no discomfort or pressure
DIY short socks from an old sweater
 In order to make fashionable short socks, you need use a knitted sweater, since these should not be warm socks, but neat miniature socks for everyday wear.
- We cut off the same sleeve, but in this case the length will be small and therefore it will not work to sew in the incision (it will come out ugly and uncomfortable).
- For the sole, cut off a piece of fabric from the same sleeve or any other part of the sweater and carefully cut the blank to the shape of the leg.
- Then sew the bootleg and sole together. Get good socks with your own hands.
Now your old sweater will not gather dust in the closet, but will serve a good cause.
By popular demand, I'm starting to publish my sewing from socks. Moreover, my MK from a neighboring site has already begun to actively surf the Internet.
Those who have seen my tops have probably noticed that many of my outfits for dolls are made on the basis of blouses and hats sewn from socks. Although there is a lot of information on sewing from socks on the Internet, I was often asked to make MK.
So I decided to show and tell how I do it. A lot has been written, but I approach everything thoroughly, so everything will be shown and described in as much detail as possible. Even a person who does not know how to sew, in my opinion, MK can easily sew a beautiful blouse the first time.
WHAT WE NEED
1. Socks in beautiful colors and prints.
welcome small flowers, polka dots, little animals and especially stripes. You can also sew from plain ones, but it's boring
2. Sharp scissors.
Scissors are needed not necessarily tailor's, but always SHARP! If the scissors are blunt or with notches, we won’t be able to cut the sock into pieces well ... or rather, we can cut it, but it’s unlikely to sew something beautiful from these pieces
For cutting, I use both tailor's scissors and regular stationery scissors bought at Ikea. It sells a set of three scissors, different sizes with colored pens in blue, red and yellow color. Any of these scissors are great. Dull scissors will “chew” the fabric of the sock, because of this there will be an uneven cut, or the canvas will move, which means the details will become different. And since our sizes are very small, it matters a lot!
3. Thin needle.
Also very important point!!! I sew with a beading needle with a large eye. The needle is not the thinnest of beading, but thin enough to make small, neat stitches.
I understand that not everyone has such a needle, we find the thinnest in our reserves. Believe me, manually lay beautiful, small and even seams
thick needle is not real! But we want beautiful seams, on a beautiful blouse
4. Threads of a suitable color.
Threads can be any, but of course not thick. Ordinary sewing type Dor Tak or Ideal. Even threads from Fixprice are also great.
5. Good mood and fighting spirit!
Before we start cutting, a little theory about the selection of socks for work.
There are a lot of socks in my stocks, I will not show all the stocks, so as not to scare the public, I will only show by what principle I try to select a combination of socks of different colors and patterns.
I really like Lenta socks. These were sold as a set. For the slats, I added trimmings of a gray plain sock. I sewed a set for Alice Runway Star 45 cm. The set has not yet been shown, the image is not finished yet.

Another example of socks from Lenta.
Here are two socks from Lena, the bottom one is just striped, bought in another store. The color matches perfectly and the stripes are beautiful, thin.

As an example of the use of such socks, a set made for Paolka. The image is already completely finished, but has not yet been filmed, has not been shown anywhere. 
For Baby Asterisk, Baby Girl sewed boleroshki and hats from these socks. The doll is smaller, one sock was enough. For a bolero with lilac flowers, the edging was made from a cut off strip of a plain lilac sock of a suitable shade.

Another big set of socks, 5 pairs from Lenta. In the photo, crops from three types from the set. Whole socks lie far away, I won’t show you.
Sewn for Alice, the full image is in the process of being created, has not yet been shown anywhere.

Now I will show just examples of socks from which I sew.
here too from Ribbons striped socks. Polka dots for teenagers are not cheap, lilac and blue are the most inexpensive, bought in deshman stores 
Here the socks are all from different stores. With birds from Lenta for teenagers from a beautiful set, lilac with flowers, I know exactly what the local manufacturer makes, there are almost all of our stores. All striped ones are bought in cheap shops. 
Well, as an example, a sock from the previous photo and what I sewed from it for Baby Star. The set is actively worn, Baby travels with me everywhere in this set, so the look is already slightly shabby at the set

Now I will show semi-finished products, which are in varying degrees of readiness.
As an example, an almost finished blouse, it remains to decide what the neck will be and finish it, and sew on a micro Velcro. In the photo there are socks, from which I sewed and various trimmings of this color to use for the neck, well, the unfinished jacket itself. 
It is more difficult to cut from teenage socks, they are narrower and shorter. In the photo, cut from such a sock, cut the sleeves from another sock, a suitable color. Because the desired length of the sleeve did not pass in the layout. And of course, there are fewer scraps 

Another cut. Two types of socks. Top for the hat, have not yet decided what it will be. Most likely I will process the neck with my favorite rack, I will cut strips from the upper piece. Haven't decided on the hat yet.

So let's start!!!
I must say right away that maybe I’m doing it wrong, but I never use patterns when I sew from socks. I'll show you how you can safely do without them. I will make a reservation, it is not necessary to sew from other fabrics, this applies only to the sock theme.
Ah, yes! Sewing tights and stockings according to patterns is welcome. But this is a different story, we will not consider it yet, especially since there are quite a few MKs on the Babys.
I offer two options From one pair of noses and from two socks of different pairs.
The first option for a 32 cm Paola Reina doll
I will sew from socks that everyone loved in my products.

Due to the fact that the elastic band, which is an ideal plank, is located at a great distance from the pattern we need, I will cut off the elastic band and then sew it on, but on the other hand, to turn the pattern over. I want it to be positioned correctly.
I show the cut line with a ribbon 

Now you need to measure the length of the blouse. I just put the doll on and look at it where the cut line will be. My daughter's Chinese doll, disassembled for parts, serves as a mannequin. The size of the body almost completely coincides with the body of Paola Reina. I now try not to wag the original doll once again, how I got this carcass. Since I sew and knit a lot on Paolok, you can imagine how my doll can rattle :-)


Now from the second sock I will cut a hat. Since the strip from the elastic band to the pattern is too wide, this interferes with the beautiful arrangement of the pattern on the cap.
Cut off the rubber band. We'll sew it on later. 
I forgot to mention an important point!
Don't cut straight toe if you want a round piece. That is, we cut a small hole, and then carefully cut in a circle, observing the equal width of the strip. If you cut by simply laying the sock on the table, due to the nature of the sock line, you will most likely be beveled. And on one side you will be evenly cut off, but on the other, you will most likely grab either more or less. This is also important when cutting socks in stripes. We make an incision and cut clearly along the strip.

This is what the hat will look like. Most likely I will change something, but I usually decide this in the process of sewing. I'll show you everything! 
Now we will cut the sleeves.
I don't use a pattern, I just attach the doll and cut. The photo shows what the finished sleeve looks like under the shoulder-arm of the doll. 
You can mark the length and width of the sleeve on a piece of paper. The photo clearly shows what the width and length should be relative to the body of the doll.
I deliberately do not give you a pattern so that you can learn how to sew from a sock on any small doll. The sock cut for plus size dolls is completely different. By applying I sew on all sorts of dolls from 8 cm to 45 cm.
In the next photo, I show how the sleeve will be located on the sock for the cut. In fact, I already cut it out by eye, attaching the doll, make a small notch along the length of the sleeve, notch along the shoulder, cut the line to the desired cuff width. Having attached the doll, I make a mark where the armhole will end. I cut along the eye line, which I already remembered. But it can always be adjusted by tailoring a little more than necessary. Well, I connect the line from the armpit to the bottom of the sleeve.
Girls, I do not own programs in which you can draw on a photo. I really hope that my explanations will be clear to everyone.


With these socks, it is not easy to cut because of the inscriptions and inappropriate flowers on the sole.
Pay attention to how I use the heel area in the cutting! This is the perfect sleeve!
The main thing is to make sure that you do not get on the sleeve of the line of reductions on the heel. This line is clearly visible, this is the place due to which the narrowing of the heel is obtained.
Eh, I didn’t take a photo, but now it’s already dark, the light is bad ...
Here are the sleeves I got. The flowers will be on the inside and partially go into the seam, they will practically not be visible. And then I’ll come up with some kind of decor for the letters, I’ll creatively hide it. Well, you can always make a three-quarter sleeve!

Now let's see what we get
Should be something like this

Now you need to make bevels of the shoulder seam. If this is not done, the fit of the blouse will not be beautiful, the shoulder will stick out. An approximate cut line was shown with a ribbon. 

Slightly cut the neck. You can leave it like that for now, then trim later. I do not deepen the front on purpose, you can always do it later. For that, the edges of the neck will not fray much, but we will do the fitting, and the neck is processed last. I also do the fastener on the back later for the same reason.

Now we attach the sleeve to the "body" of the future blouse. In my photo you can see that with the width of the sleeve I missed a little. Therefore, the following photo shows how I cut the width a bit, capturing the eye, it is in the region of the eye that there is too much. If left the same way, then the armhole will be almost to the waist. but we don't need that!

Now it's much better! 
Now you need to cut out the openings of the armhole on the "body" of the future blouse.
We measure by attaching the sleeve. For clarity, showed with a ribbon 
I make the cut to the desired length. We look clearly at the collar of the sleeve. Then we cut off a little, literally 2 mm, rounding to the bottom edge of the armhole.
Pay attention, the armhole is a little smaller, I leave a little for landing. i.e. then when I sew on the sleeve, I’ll put the sleeve on quite a bit.

photo with cropped excess 
So, now we will sew the details.
I will show and tell how I do it. My sequence does not claim to be original, but it was all achieved through trial and error. As a result, I worked out the sequence that produces the highest quality beautiful result, with even lines and a “clean” inside.
For sewing we will use the following seams:
SEAM BACK NEEDLE

OVERLIGHT STITCH 

First we sew the hem of the sleeves. I make the thread not very long, so that it would not get tangled, but not short either, so that I would continue to sew further avoiding a large number of knots.
I always sew with a thin needle, always in one thread !!! This is the only way to achieve a neat line!
I make a hem of 3 mm, this is quite enough for the sleeve.

We sew the needle with a seam back with very small stitches no more than 2 mm, the injection should be at one point. For this we need a thin needle.
in the photo I will not have very even lines, but I was in a hurry, because many were already waiting for the continuation. I can sew at any time of the day, but I can only take pictures during the day, in natural light. So I try to do everything quickly. 
This is what the underside looks like.
The photo is zoomed in so you can see it. The stitches are actually very small, due to this the edge will not crumble. 
Front side photo 
Further, without tearing off the thread, we begin to sew the sleeve along. We do the initial stitches as carefully as possible, do not forget, this place will be visible if the doll, for example, raise the handles horizontally. 
We sew with a seam back with a needle, leaving an edge of 2-3 mm. We also make stitches no more than 2 mm. After sewing to the end, without breaking the thread, turn to the other side. 
Now we overcast the cut with an overcast seam, again with small stitches, the stitch pitch is not more than 2 mm. This will not allow the seams to fray and the wrong side will be beautiful. 
Having sewn to the hem, we make such a feint ;-)) fold the edges in different directions and carefully, with small stitches, sew to the hem. The photo shows how I do it. 

This is what the seam looks like from the front. Agree, the view is quite neat! 
Thus we sew both sleeves. I sewed one, because I'm in a hurry to show you faster, but you sew both at once.
We put the sleeves aside, after turning them on the front side very carefully, trying not to stretch the raw edge. And we take the "body" of the blouse. We begin to sew the shoulder from the sleeve edge, sew with a seam back with a needle to the neck.

Then we turn without breaking the thread and continue to sew with an overcast seam in the opposite direction.

We do not break the thread, if, of course, it remains.
Next, sew on the sleeve. The sleeve on the front side, insert into the armhole, combine the points: the center of the eyelet with the shoulder seam, and the armpit seam with the middle of the armhole cutout.
Carefully distribute the sleeve in the armhole, cleave with tailor's pins. I sew without pins, I no longer need them, I advise you not to neglect them for the first time. 
We sew a needle back with a seam, as always, with small stitches in a circle. 
And of course, without breaking the thread, we continue to sew with an overcast seam. 

This is what our sewn sleeve looks like.

Here I actually lay the finishing line right away, but since I was in a hurry, I didn’t do it yet. Moreover, if the thread remains, I continue to sew without breaking it)))
Thus we sew both sleeves. I only have one sleeve in the photo.
Now we need to make a cut along the back so that we can put on a blouse on the doll. We do exactly in the middle of the skinki. 
Then we hem the hem for the fastener. I will talk about the fastener separately.
We bend 3 mm, this is quite enough.


Now the important point. If you are sewing a blouse for a children's game, then we will do it a little differently. If you sew for your favorites (applies to collectors), then we repeat how I do it.
If you didn’t cut off the elastic because your sock allowed it, then we skip this step too. I'll show you later how to do it with a one-piece plank. I need to sew and take a picture.
In order to sew an elastic band to the cat's body, we need to sew the bottom of the shelves so that they would then hold tight. Believe me, this is important! Checked by own experience. 
I sew finely-finely to one side, make a strong bartack and go back to the edge. I turn it to the front. If the thread is enough, then I do not cut it off.
We put it inside our cut off gum, evenly distribute it, chop it off with pins. We sew with small stitches, overcast with an overcast seam finely.
We look at the photo.


And now, turn it on the front side and lay the finishing line forward with a needle, small stitches of 2 mm, pressing the seam with your finger and grabbing this seam, as if making it flat. Ufff, I don't know how to describe... I hope it's clear
The photo shows the difference between what the canvas looks like with and without a seam.


The photo clearly shows that I laid a finishing line along the armhole of the sleeve. I try to do this stitch on all blouses, it improves appearance, the sleeve in the armhole area does not bulge. Separately, I don’t show a photo of how I do it, because everything is clear anyway.
I decided to make the neckline on the orange blouse without a rack. An image is already being born in me, and such a neck would be more appropriate for it.
To do this, cut the neckline from the center to the shoulder seams. We turn the edge inward and carefully sew it with the same seam as the sleeves were hemmed. We make the shovchik as usual with small stitches. And here is the almost finished jacket. It remains to make a clasp. I will make from micro Velcro. 
THE SECOND METHOD OF CUTTING AND SEWING FROM SOCKS
We will also sew for a 32cm Paola Reina doll
Now I will show another cutting option, from two types of socks
Selection first.

Liked this combination. 
Let's see how to place the drawing on the chest-belly of the doll :-)))

Now cut off 
From a striped shortened sock, you can tailor the sleeves the only way 
no, of course it is possible in another way, but we choose the most profitable layout method
VERY IMPORTANT
If we need to cut off part of the striped sock, DO NOT cut through both layers!!!
We make a small incision, scissors into the hole and carefully cut the sock clearly along the strip.
Believe me, you will never cut the strips evenly! And you will have stripes offset in the seam, or worse, the two parts will be different!
And if you cover an extra color section from the desired part, how do you then return it back??? 
For the cut of the sleeve, I attached our previously cut sleeve. If you are cutting for the first time, then see my cutting instructions above. 
I cut the second sleeve so that the stripes completely match. 
I do not throw away all the scraps, except for very small ones. I am a noble plushkin, I find a use for everything.
like this 
Let's see what we get 
all OK!!! 
maybe so? 
Mmmmm… I like it more!
Then let's do it! 
Wow! Perfect! Get a beautiful sports blouse with a cool cat on the belly
top stripe for the neckline. I don’t cut it to length, that’s all later, after stitching the shoulder seams
Somewhere I missed the stage of cutting the shoulder bevels, but everything is exactly the same as in the first version. And one more clarification. because the sock is a little narrower than I would like (as a teenager), we make the cuts of the armhole simply, without cutting off anything superfluous, as in the first version. There will be no dropped shoulder due to the narrow toe.
Those stages that are almost the same as in the first MK, I will not show in the photo.
The only clarification - when sewing parts with stripes, strictly follow the coincidence of the strips, with a manual seam, this is not difficult. But for that you get a beautiful junction.
Here is our blouse in almost finished form. I trimmed the neck line slightly from the center. Please note that a finishing line is also laid along the armhole.


In the photo of the cut, you saw the strip that I prepared for the collar, it is about 1 cm. We fold it face to face along, from one edge we sew the seam forward with a needle. Cut the corner from the inner edge of the strip very slightly obliquely so that the corner does not bulge when we turn the collar. Look, do not snip off too much, otherwise you will get a hole.

Turn out to the front side. Now we need to try on the collar - we apply the edge to the edge of the stitched side of the collar, slightly stretching (just a little bit straight), we apply it along the neck, we reach the opposite edge. Now we cut off the excess from the strip, remembering to leave 2 mm for the seam. 
Now we can sew the collar from the second edge. 
We pin the collar to the neck with tailor's pins, evenly distributing it, and sew it on.
We overcast. we bend the collar, we lay the finishing seam, having pressed our seam down, i.e. the collar itself should be straight. 


And here is our collar and almost finished blouse. 

CUT AND SEW FOR BARBIE DOLL
Now let's look at how to cut a blouse for Barbie dolls.
Barbie dolls and others of the same format are different from Paola Reina dolls. Therefore, we will cut out a little differently!
I have a daughter, Steffi, but I will sew for my future Babri yoga, which I will pick up on Friday. maybe the blouse will be a little big for my Barbecue, but I can always adjust. And in principle, while I will open it with a small margin
I chose the sock you saw in the photo above.
We attach the doll to the sock, we look where we will cut off the sock. DO NOT FORGET to add on the shoulder bevel and on the seam.

If our striped sock is like mine, then we cut it off as I taught above. We find a joint in the figure and cut the sock along this joint.
We get it like this 
Barbie dolls and other madams of 1/6 format, the girls are slender and the width of the adult sock will be great.
Therefore, we look at how much we reduce the width. But DO NOT FORGET that we need to leave a margin for hemming the edge of about 2-3 mm on each side. 
I have such a surplus 
To cut out holes for the armhole, we need to fold our rag correctly.
My method was obtained through various trial and error, showing you the correct option right away!
We fold it in half inside out, hold the fold tightly, bend both parts in different directions so that the edge protrudes 2-3 mm from the fold of its sides.
we look at the photo. That is, we get such a small harmonica.

We apply our accordion to the doll in order to outline the length of the armhole. 
Cut out according to the intended distance. the armhole should not be deep at all, but our chrysalis is small. 

We try on a doll, everything is OK!

Do not forget to make a bevel of the shoulder, if it is not done, then the shoulder will stick out ugly. We make a small bevel of 2 mm, this is enough 

Now we need to cut the sleeves. Again we apply the doll to the sock. At first I looked at how both sleeves would go through with me. On the other side that I placed the doll, both sleeves are just obtained

We make a small incision in the shoulder area. this is our label. do not forget about the increase in the bottom hem and the seam of the hem. I do with a small margin. You can always cut off the excess, but if the length is not enough, then everything has already flown by ... 
Now we need to outline the width of the sleeve. Again, do not forget about the increase in the seam and freedom of fit 
We cut a straight line a little obliquely 
Cut out the second sleeve 

Well, we need to make an okat on the sleeves. Of course, they sew without an okat, but landing suffers from this. But we need to get beauty! Therefore, we will do an okat!
For dolls, when sewing from socks, it is too correct, according to all the formulas, we do not need an okat. We just cut off 3-4 mm along the upper edge, slightly rounding.
We look at the photo, how I do it and repeat. 
Well, what we got 
I do not cut out the neck, I wrote above why.
As you can see, the cutting is slightly different, because the dolls are slimmer. We get a cut along the gum line. For play dolls for children, it is better to make the back fully hinged. This applies to small children, older girls and adult lovers of dolls should make a small cut on the top of the back for ease of dressing, and sew it down. Then the front of the doll will look like a real stylish girl in a beautiful sweater.
I must say right away that it was for Barbie that I sewed for the first time, but from the experience of sewing for other formats, I came to the conclusion that this would be the most advantageous option.
First you need to slightly cut the thread that sews the elastic to the wrong side. You can not cut it, but just stretch it a little and it will bloom. The main thing is not to overdo it, literally 2 mm. 

We connect the halves, and sew one layer back with a needle, then without breaking the thread, carefully tucking the edges inward, we continue to sew with a regular seam very finely. This moment is very important here: try to sew very finely and carefully !!! If you do not sew carefully, the small rubber bands that are in the elastic band of the sock will pop out of your seam after two or three fittings of the blouse !!! 


And this is what it should look like on the front. 
We sew the seam to the place where you suppose the end of the incision. And sweep it 
I will make a small digression. There may be differences, depending on the clasp. I prefer to sew on a micro Velcro or a hinged eyelet and a micro button, you can use a large bead or a small bead, whoever has something in their arsenal. If you have micro buttons, then you need to sew a little differently. I have few such buttons in stock, I use them in other models where another clasp cannot be made.
In order to make a smell for the buttons, you must first flash the hem of the shelves, then make a smell, pin it with a pin above the gum. Trim the excess gum, but so that there would be a margin to sew the gum. Then we sew as I described and showed above.
Now I'll show you how to make a collar from a heel or a toe from a toe. I wanted the collar to be the same color as the waistband. For this purpose, the toe suited me perfectly. Since the neck is completely small size, then we need a small strip of fabric.
I cut off the seam of the toe, this is how the toe looks before cutting and the already cut strip 

And then we repeat almost the same thing, as I showed and described for a blouse with a kitten and striped sleeves 


And here is our blouse or rather sweater 
I decided to make a fastener with a hinged eyelet and a micro button. Hanging loops can be made different ways. I will not describe them, there is a lot of information on the Internet. 
Well, these are the MKs I wanted to show you.
I will be ready to answer questions that may arise.
If you want to sew a soft kitten or bunny, there are very simple ideas. For example, a do-it-yourself sock toy is very easy to make. Try and make one of the cute souvenirs - animals or dolls. This thing will be a nice gift for a child for any occasion.
What can be made
A do-it-yourself sock toy is made quite quickly and easily. Kids always love to get new toys, and you can easily make lots of different animals and funny characters out of socks. Very often, either unpaired socks remain in the house, or with large holes that can no longer be mended. Put them to work. Make cute heroes for your baby. These toys will please not only the child, but will also cause tenderness in any adult. You can make the following characters out of a sock:
- Kittens.
- Puppies.
- Monkeys.
- Mice.
- Mishek.
- Funny dolls.
- Snowman.
If the socks have multi-colored elastic bands with frills and decorations, they are good to use as clothes for soft friends. Such toys will become not only a pleasant gift for the baby, but also a good souvenir for the holiday.
Basic manufacturing principles
Although socks can be made into a variety of characters, the actions that are performed are usually similar. There are two ways to make such a souvenir:
- Create a shape from a whole sock by tying with threads the junction of individual parts of the character's body.
- By cutting out details, as from ordinary fabric.
The first way is easy to make a snowman or a doll, but, most often, both approaches are combined. The following two diagrams show the steps for making a puppy. In fact, any other toy is made in exactly the same way. The meaning is that a body with a head and hind legs (legs) is formed from one sock.
From the second element of the pair, the front paws or hands are made, as well as small parts, such as ears, tail and others.

Given that the sock is a seamless product, you can use the folds of the parts in your favor so that you have to grind the parts less.
Any figure can be made using only the second way of working, that is, when all elements are cut out as separate parts. In this case, the heel of the sock is most often taken as a muzzle.

What materials and tools will be required
So, to make an original do-it-yourself sock toy, prepare the following:
- At least one sock, and preferably a pair (not necessarily the same). The choice depends on what you want to do or is determined by what material you have.
- Sintepon, cotton wool or other material for filling the toy.
- Scissors.
- Threads with a needle.
- Elements of decoration and face (muzzles).
As you can see, nothing complicated. Every ordinary housewife has all this, and even more so for a needlewoman, even a beginner.
What decor can be used
To make the toys you made from socks with your own hands turn out to be original and spectacular, use the capabilities of the material itself. Especially good socks with a suitable pattern, texture, as well as for girls with all sorts of bows, frills, ruffles, roses.
Be sure to pay attention to color combinations: stripes, ornaments, inscriptions. Some socks have rhinestone embellishments. For example, the word "Love" will come in handy to decorate the breast of a hare for Valentine's Day.
To create an appropriate image of any character, you will need eyes, nose, mouth. They are embroidered on a plane or three-dimensional details are formed using stitches. It is also easy to buy ready-made plastic elements or take buttons, beads. On fabrics where there is no pronounced texture (not on coarse knitted wool), you can draw a face using acrylic paints. To do this, the surface is usually pre-primed. This method is more often used in the manufacture of the head of a textile doll, but can also be applied here.
In addition to all of the above, you can take any other decorative elements: lace, ribbons, bows, flowers, decorating clothes, hairstyles, tails of your animals with them.
DIY sock toy: master class
To make the same or similar thing, namely a funny monkey, you need to take a pair of identical golf (if the paws and tail are long, as in the sample). Two multi-colored blanks or a pair of those where the heel and toe differ in color from the base are also suitable. It is good if they are dark, for example, black. This option is presented in the diagram showing the details and the sewing process. Buy plastic eyes or prepare two buttons or beads.

A do-it-yourself sock toy (photo above) is made following the example of how it was done in the case of a puppy (see the section on manufacturing principles). The sequence of work will be as follows:
- First, fill the tip of the sock with synthetic winterizer to the desired volume and tie or stitch with threads.
- The upper part of the sock to the elastic (it is better to cut it off, especially if it is of a different color) is cut into two parts at a distance equal to the length of the legs of the future monkey.
- The semi-cut parts of the paws are sewn together, while a hole for stuffing is left between them.
- Fill the torso and legs with padding polyester, sew up the hole.
The rest of the details are cut out from the second sock. The elements are conveniently arranged as shown in the diagram below. The main thing is that the muzzle is made from the heel.

After all the parts are cut out, sew them on the wrong side in the right places and turn them out on the face. Fill the tail and front paws with synthetic winterizer, cotton wool or whatever you have prepared, for example, with the remains of shreds. The ears can be left flat by connecting the two parts along the contour. The muzzle (the heel of the sock) is more convenient to stuff when it is sewn to the head. The filling hole is easy to baste last.

When all the individual parts of the toy are prepared, do the following:
- Sew on handles (front paws).
- Fasten the tail.
- Attach a muzzle.
- From a cut elastic band in a contrasting color, you can make a headdress for the little animal.

Now you need to "revive" the character a little by adding eyes to him, embroidering a smile. If you're making a girl monkey, dress her in a skirt, or decorate her head with a bow or hairdo in a matching color of yarn.
DIY sock toy: kitten
As you already understood, the principles for creating any characters are similar. Below is a photo instruction for making another cute character.

It is even easier to make such a souvenir, since it does not imply the implementation of the hind legs as separate parts. The animal looks like a tumbler or nesting doll. A densely stuffed part of the body serves as a base.
What characters are still easy to sew
DIY sock toys can be made in the form of dolls or funny baby dolls. The photo below shows options that are made from a single sock. Only the rubber band has been cut off. It is used as a cap. The shape is created by making stitches.

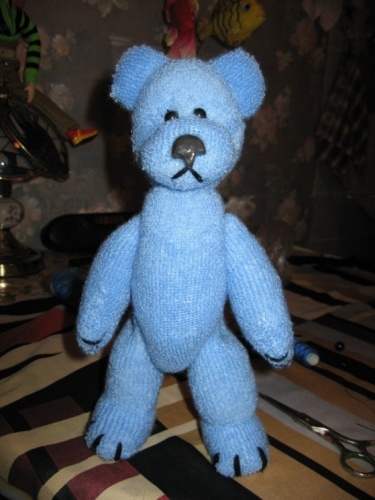
You can make an original souvenir in the form of a bear, which is dressed in a hat and blouse, according to the following illustration.

A beautiful do-it-yourself sock toy will turn out if you use one more idea (next photo).

So, you saw how a do-it-yourself toy is made from a sock. The master class and the given photos with the manufacturing sequence will help you make such a souvenir yourself.
Such a cute cat can be made from old children's socks that have become small for your child. Homemade toys are always popular with children, especially funny animals. I hope our cat from socks will not be an exception.
The work is not very difficult, children of 10-11 years old can cope with it on their own. The younger ones need help, of course.
For our toy, both socks will be needed. From one we will make a torso with paws, and from the second we will make a head and a tail.
We straighten one sock and lay it with the heel up. We outline the cut lines for the front and hind legs, cut along the marked lines. 
Now we need to sew the paws. Turn the sock inside out and sew the cuts together. The gap between the hind legs is not sewn up, leaving a hole for stuffing. We specifically used contrasting threads to make the seams stand out in the photo. You can also choose the threads by color so that they do not show through on the front side. 
We turn the part on the front side and stuff the body and paws with filler. For stuffing, you can use cotton wool, foam rubber or synthetic winterizer. When finished, quietly sew the place of the stuffing. 
We lay out the second sock, too, with the heel up and draw the outline of the kitten's head. 
Cut out, sew from the wrong side and turn right side out. We also stuff the head tightly, paying attention to the ears.
We also need a ponytail. We cut it out from the remains of the second sock. You can make a ponytail from a piece of fur or other fluffy material. It's up to you. We sew the tail and fill it with filler.
Now we make out the muzzle of a kitten. You can stick cardboard eyes and a nose, but we found small black buttons, painted them with yellow and black nail polish. The nose was made from a pink piece of a sock.
From the spout down and to the sides, the line of the mouth was stitched. You can make antennae from fishing line, but at our fingertips suitable material did not appear. 
When all the details of the toy are prepared, we sew the head and tail to the body. We sew the front paws, denoting the fingers. 
Our cheerful cat made of socks is ready to play and delight our children. 
Kittens are perhaps the cutest animals that all children love without exception. From simple cardboard, you can make a kitten with moving parts, which many people also like.
Children's socks are constantly lost, this is the sad truth of life. But there is good news: if you miss colorful children's socks without a pair at home, they can be turned into cute little and funny toys.
You will succeed, even if you picked up a needle only a couple of times in your life. The beauty is that they are elastic, and easily take shape, without the use of patterns and patterns. A few stitches - and you do not have a lonely sock, but a chubby character, which the child will squeeze with pleasure.
Make crafts from socks with your own hands with your child: he will definitely like this magical process when a familiar thing in his hands turns into a cute little animal.
How to make a puppy from a baby sock, master class
Cut one sock in the area of the foot, just below the heel. From the top, make blanks for the ears and tail. And the bottom one will become the puppy's head.
Lay the second sock on the table, heel up. Sew the bulge of the heel so that the sock takes the form of an even "pipe", and cut off the excess fabric. This is a blank for the torso of a puppy.
Make triangular cuts at both ends of the body. Make sure they are evenly centered, and leave the same amount of fabric on the sides. These will be the legs, and they should be exactly the same.
Sweep the paws on one side, fill the body with soft filler, and sew the paws on the other side.
Take the bottom of the sock that you prepared for the head. Thread the thread around its perimeter with stitches, and pull it off a little. Stuff your head with filler, pull the thread to the end and sew the resulting bag. Straighten the filler so that the head takes the correct rounded shape.
Sew the blanks of the ears and tail, turn right side out and fill the tail with filler.
Prepare the eyes and nose from plush black fabric, sew them onto the puppy's muzzle, and mark the pupils with contrasting buttons.
Sew on the puppy's ears and tail, paint a blush with pink powder, and the good cheerful pet is ready.
DIY sock crafts for beginners: fluffy koala from terry socks, (video)
I continue the theme of toys from socks. I also found many simple and interesting toys and master classes. We will cut and sew toys from socks with our own hands for beginners and not only.
Look how cute and funny raccoons are!


What we make from:
- From children's socks;
- From fabric or felt in white and gray;
- From buttons - 3 pcs. (2 smaller, 1 bigger);
- Thread;
- Muline
- Cotton wool, synthetic winterizer.
How to do:

Source
Elephant


What we need:
- High toe or golf;
- Fabric, felt or thin felt;
- Threads for sewing and embroidery;
- Buttons.
Master Class:

Dog

We do it step by step:
- The future Dog is cut out according to the stencil.
- Sew up and fill in the details.
- How to sew a dog to make it with drooping ears? Any place of the bend is almost not filled with silicone. Then it will bend freely.
- All parts of the toy are sewn on.
- A nose is embroidered on the muzzle and button eyes are sewn on.
- Fingers are separated on the paws. To do this, the thread is threaded through at a distance of several centimeters from the edge; and pulled tight.
bear
Materials:
- Socks - 2 different (from one we will make the Mishka himself, from the second - to decorate it);
- Button and 2 beads;
- seal;
- Threads.

- You need to cut out simple details: head, torso, paws. From another sock - muzzle and breast.
- Sew and fill in all parts.
- Connect with each other.
- Sew an oval on the head. Sew buttons above it, and a button on the oval. Under the button, make embroidery - the mouth of the Bear.
- On the body, make a semicircular breast from another material.
baby dragon


Source
- Socks - small (multi-colored) and larger (solid);
- Felt;
- Buttons and beads - 2 pcs.;
- Muline;
- Threads;
- Sintepon.
Instruction:

More master classes
Let me remind you that last time I invested master classes, if you like, click on the picture and follow the link to the master classes:

1. GENERAL PRINCIPLES FOR MANUFACTURING SOFT TOYS FROM SOCKS
In previous articles, we told you about how quickly and easily you can make a toy out of tights, how to crochet a soft doll for a little girl. But there is another great way to make a soft toy with your own hands - sew it from socks. Making soft toys from socks or from old gloves as an outer shell and different kind fillers (we will discuss the choice of stuffing in detail below) has become not only a fascinating type of needlework for many craftswomen, but also a great opportunity to make good money on orders for handmade toys.
Some mommas are attracted to this creative work their children, who sometimes create real masterpieces of applied art with their own hands!
If your child (especially girls) is already 6-7 years old, be sure to invite him to take part in the manufacture of a soft toy out of socks! After all, making such products is very simple, and the results of the work are often simply amazing! You never know in advance how the final toy will look after the completion of all stages of work!
From this material you will learn how to sew soft toys from socks, and with the help of detailed wizard classes, you can make real masterpieces of applied art with your own hands from old, unnecessary socks!
First, let's get acquainted with the basic principles of making a soft toy:
Since this is our first work, we will adhere to simple option her execution:
√ Take your scissors and cut off all the elastic of the open part of the sock.
√ Now we fill the shell of our toy with synthetic winterizer. Do not pack too tightly.
√ When you fill the sock with padding polyester, carefully sew the hole with threads.
√ Now one of the most exciting moments of work has come - the transformation of a soft oval blank into two parts of a toy. With the help of a nylon thread, we create a head and a body, strongly dragging the soft blank in a ratio of about 1 to 2. In the larger part, which will be the body, we form the legs of the toy , dragging two identical parts along the edges of the bottom of the workpiece with a thread.

√
The main structure of the sock soft toy is framed. Now you can detail it by sewing buttons in the form of eyes to the face, embroidering the mouth with red thread and attaching the nose. For the legs, you can make trousers by cutting off a ring from the other sock and stitching the square in the center. You can make a jacket from an elastic band cut off by a ring.
How to make a boa constrictor from an old sock:
For work, we need a long green sock and a small red sock. From a red sock we make a small oval and sew it into the "mouth" of the boa constrictor, cutting a seam on the toe of a long sock. We evenly stuff the toy with padding polyester and sew up the hole in the gum area, forming a snake tail. It remains to decorate the muzzle by sewing the eyes cut out of the fabric.
2. POPULAR FILLERS THAT CAN BE USED FOR SOCK FILLING
In order to sew a high-quality and durable toy from a sock, it is important to choose the right stuffing material. Natural materials can be used as a filler for soft toys, but they are inferior to synthetic ones in terms of wear resistance and durability.
For the manufacture of toys from socks, we recommend using the following synthetic fillers:
▫ sintepon chopped into small pieces. It is advisable to use high-quality siliconized synthetic winterizer to fill socks and give the desired shape to the toy. Otherwise, it falls off over time, worsening the appearance and shape of the soft toy.
▫ soft and bird-like sintepuh. A great option for filling socks and creating light, voluminous toys! In specialized stores they sell in large volumes, so it is better for needlewomen to buy sintepukh through online stores.
▫ perfect option for filling soft toys - sinteukh balls. According to many craftswomen who have created many different toys from socks, the balls ideally retain the shape of the product, do not cake, and after washing, a soft toy with synthetic down balls practically does not deform.
▫ foam rubber can also be used to stuff the sock. You can buy sheets of foam rubber at a hardware store. Before filling the sock with this material, it is cut into small cubes, and thin sheets are simply torn and crushed. But the foam rubber quickly crumbles in the sock and the toy deforms over time. In addition, foam rubber is quite toxic and homemade toys with such a filler can be hazardous to the health of small children who try everything on their teeth.
To make toys from socks with your own hands, you can also use natural fillers:
▫ e.g. wool, which can be "obtained" by shredding an old sweater into shreds. Each patch must be fluffed. Such a filler is best placed first on the sides, and then gradually fill the middle.
▫ cotton wool This filler is used by many needlewomen to make soft toys, because it is always at hand. But cotton wool has many disadvantages - it is difficult to evenly distribute it in the sock, it quickly loses its original appearance and the product quickly loses its shape. After washing, the look of a homemade toy becomes deplorable....
▫bulk fillers (various seeds, cereals, pebbles). As a rule, they are used in combination with soft stuffing materials and are additionally placed in a separate plastic container. Ideal for sewing soft rattles.
▫ some needlewomen fill their socks with sawdust. It turns out very cute toys, pleasant to the touch. For such toys, choose socks made of dense fabric and sew the details of the craft with strong thick threads.
3. HOW TO MAKE A SOFT TOY IN THE FORM OF A BUNNY
This master class will help you sew a long-eared bunny from a sock with your own hands. For work you will need: a long striped sock, strong threads, scissors, synthetic winterizer, buttons and .... a little imagination :) - after all, each craft must be unique and for this you need to breathe a piece of your soul into it ....
4. How to make an adorable teddy bear out of a sock
This master class with a photo clearly demonstrates how to make a cute soft toy in the form of a teddy bear. You will learn how to make a pattern of a bear's silhouette, how to properly cut ears, paws from a sock and how to sew all the details correctly.
Follow this one.
5. SCHEMES AND PATTERNS FOR SEWING DIFFERENT TOYS FROM SOCKS
If you are an experienced needlewoman and have already made toys consisting of a shell and a filler with your own hands, then these patterns and patterns will help you create new soft crafts from different socks.
6. VIDEO MASTER CLASSES AND TIPS FOR MANUFACTURING DIFFERENT TOYS FROM SOCKS
Has your child grown up and there are a lot of old socks left that are too small for him? Do not rush to throw away these socks - we will make very beautiful dolls, baby dolls, bunnies and bears with our own hands from them!
What you need for work: unnecessary children's socks, a piece of felt, beads, ribbon buttons. Take sintepuh as a filler.
How to sew a funny doll out of an old sock? This video master class clearly demonstrates all the stages of work. You can easily make exactly the same soft toy from an unnecessary sock at home:
How to quickly sew the details of a toy with your own hands:
If you use high-quality fillers in your work, then soft toys sewn from socks with a filler that is safe for the child's body can be used during educational games with the baby. As you know, soft toys contribute to the development of tactile sensations and hand motor skills in children under one year old. So it is not at all necessary to buy high-quality expensive toys for your children. You can make different toys from socks with your own hands. It's very easy and doesn't take much time!
ALSO DISCOVER...
DIY toy Kitten from socks. Step-by-step instruction with photo
Master class: Soft toy "Kitten" from socks, with step by step photo.
Nechaeva Elena Nikolaevna, teacher primary school KSU " high school No. 21 Saryozek village "Osakarovsky district Karaganda region Kazakhstan
Description: The world of soft toys is very diverse. And sewing a soft toy out of socks with your own hands is not only an exciting activity, it is always a great mood at the end of work and a good mood for those who get this toy in their hands. The needlework master class is designed to work with children 9-12 years old. The material can be used in labor lessons and in circle work.
Target: making soft toys from socks.
Tasks: To teach how to sew a soft toy from socks, to fix the rules for safe work with a needle and scissors; develop cognitive activity to instill aesthetic taste; cultivate accuracy, accuracy in work, diligence, positive emotions.
Equipment: sewing tools (needles, scissors, pins), threads, socks, filler, routing, sample.
Hello guys! Solve the riddle.
We are familiar with this animal.
And he only lives at home.
He has a big mustache
Sing a song for you.
Only the mouse is afraid of him,
Runs away quickly. (cat)
Well done! That's right, it's a cat or a cat. Guys, do you all like soft toys? Do you know who was the first to sew a soft toy? And why is the bear called Teddy?
The history of soft toys began in the 70s of the 19th century in Germany. Then many women's magazines began to print patterns and tips for making soft toys with their own hands. In 1879, Margaret Steiff, a resident of the German city of Gingen, was chained to wheelchair, sewed some funny little animals as a Christmas present for her nephews. The toys were such a success with the neighbors that a flurry of orders literally hit Margaret. Soon the girl's father opened a small workshop.
At the end of 1902, US President Theodore Roosevelt spared a bear cub while hunting. This event became an occasion for jokes - for example, in one of the cartoons, a delegation of bears demanded that Roosevelt conclude a non-aggression pact with humanity. One of the cartoons in the newspaper caught the eye of Morris Michtom, an immigrant from Russia, the owner of a toy store in New York. Morris's wife, Rose, made the first teddy bear in the image and likeness of a cartoon character. The teddy bear was installed in a shop window next to the caricature and in honor of the President of the United States received the name "Teddy Bear" (Teddy is an affectionate version of the name Theodore). The merchant turned to Roosevelt with a request to give his name to the new toy and received consent. And now in the US, UK and Scandinavian countries Teddy Bear Day is celebrated on October 27th.
And today we will sew a soft toy from socks. For work, we need two socks, scissors, needles and threads. Guys let's remember safety precautions when working with needles and scissors:
Store your needles in a needle case.
Don't put needles in your mouth.
Do not use rusty needles when working.
Do not use needles instead of pins.
During operation, stick the needles into a special pad.
Use a thimble when sewing.
During operation, do not stick needles into clothes and fabrics.
Do not tear off too long a thread for work.
Pupils should sit at a proper distance from each other.
Do not bite the thread with your teeth - you can ruin the enamel and hurt your lips.
Before and after work, check the number of needles.
The needle should always be threaded so that it is easier to find if it gets lost.
A broken needle should be wrapped in thick paper and discarded.
During work, be attentive, do not be distracted and do not distract others.
Use scissors with rounded ends.
Store scissors in certain place, put them with closed sharp ends away from you.
Pass the scissors with the rings forward with the blades closed.
You can't cut on the go.
When working with scissors, it is necessary to monitor the movement and position of the blades during operation.
Do not use blunt scissors or loose hinges.
Do not hold scissors with the blade up.
The process of making a soft toy (kitten) from socks:
1. First, sew the body of the kitten. Take one sock, cut off its cuff and make cuts at the sock and from the side of the cuff.
2. Turn the sock inside out. Sew from the side of the sock completely along the edge of the cut, and sew from the side of the cuff, leaving a hole in order to turn the sock out later.
3. Turn the product inside out.
4. Stuff the kitten's body with filler and sew up the holes (gather the hole in a circle with a thread and tighten it by hiding the edges inward).
5. At the second sock, cut off the cuffs and sock, the heel of the sock - this will be the kitten's muzzle. On the resulting pattern, cut out the ears.
6. Sew the detail of the head from the side of the ears.
7. Turn out the head piece. Stuff it with filler. Type the edges on the thread and pull off, securing the thread.
8. Sew the part of the head to the body.
9. From the remaining sock, cut out the tail, sew along the edge.
10. Turn the tail inside out, fill it with filler and sew it in the right place to the kitten.
11. Let's make the eyes for the kitten (you can sew on beads, cut and sew eyes from the fort). We will make from buttons.
12. Sew the eyes on the muzzle. Cut out a nose from felt, sew a kitten to the muzzle, make a mustache and a mouth. Made from black thread.
We have a nice kitten.
The students in my class sewed kittens out of socks.
They can play with these toys themselves, or they can give them to their younger brothers and sisters. And look, they got very interesting kittens.
The loss of one sock from a pair is not a reason to be upset, because the remaining fellow can be turned into an interesting children's toy or a funny souvenir, which is not a shame to give to either relatives or work colleagues.
Materials for work:
- . Socks of any color and size;
- . Needle with thread;
- . Buttons, sequins, beads, ready-made eyes, ordinary buttons and floss for embroidery;
- . Sintepon for stuffing the finished toy;
- . A pencil or felt-tip pen that can draw lines on any material;
Do toys for children with their own hands from old socks is not difficult at all And yes, it takes a little time. In addition, it is very interesting to watch how a cute and cute little animal is born from an ordinary sock.
Do-it-yourself hare from socks
To get started, we suggest you do this hare from two different socks. A solid one will serve as the basis for shaping the body, paws and head of the toy, and a colored sock will help dress it in a multi-colored outfit.
First, mark the lines on a plain toe as shown in the figure. Be careful, since both the felt-tip pen and the pencil are not so easy to remove from the surface of the knitted fabric, therefore we work only on the wrong side of the product.

The first line cuts off the toe near the heel itself, and the second outlines the contours of the ears of the future hare. We allocate the remaining space to a small round tail and paws.
We cut the sock along the marked lines and form the first seams - these will be the ears. Sew the needle back with a seam by hand.

We turn the almost finished part on the front side and outline the needle of the line under the very ears with a seam forward. While we do not tighten the canvas, but create volume, stuffing each ear with padding polyester so that they keep their shape. After that, we tighten our seam as tightly as possible.
We mark the next line with a seam forward needle in the center of the resulting workpiece. We place another small lump of synthetic winterizer in the upper part and tighten the seam again to form the head of the toy.

And only after that we stuff the second part of the toy and form the very last bottom seam. We don’t touch the paws yet, we will sew them to the product after we put them on. We sew the back and front of the workpiece together exactly in the center to create the appearance of legs, and sew on a tail formed from a round part and filled with padding polyester.

Put the workpiece aside and take the colored sock to work. We cut off the part with the heel, and the remaining sock is long into two parts - the narrower one will help us form a neat bow, and the wide dress for the bunny.
Toddlers spend daily kindergarten for 8-10 hours. While their parents are at work, caregivers feed the children, entertain them, put them to bed, ...
To hide the cut, we tuck the upper part of the large segment by about 0.5 centimeters and fasten the needle forward with a seam. Putting on a dress white color and tighten the collar around the neck of the bunny.
We divide the short part of the colored sock into two halves and form a bow out of them. To do this, we sew one part along the edges, leaving a hole on one side so that the workpiece can be turned out. We sew the details with a seam back to the needle. We turn out the part, and do the same with the second part. Moreover, we wrap the second part around the first, and sew it clearly in the center.
We fix the finished bow between the ears of the bunny.
All that remains is to sew on the paws from the pieces of a white sock, as well as decorate the lower part of the dress to hide the edges of the cuts. And then you can proceed to the design of the muzzle. As eyes, you can use either ordinary buttons, or ready-made eyes that you can buy at the store. We embroider the mouth with the help of floss threads, and the cheeks can be drawn with ordinary blush, applying them with a brush or a cotton swab.
Do-it-yourself sock cat
But this is not all that can be made from a pair of socks. We offer you another master class thanks to which you will turn any socks into charming cat, a symbol of wealth, good luck and good mood.
For this toy, you will need two identical short socks. We take one of them and completely fill it with padding polyester, but not too tightly. Since this sock will serve as both a head and a body, we divide the synthetic winterizer into two lumps of different sizes. First we put in the sock the one that is larger, and then the small one.
After that, we sew the edges of the sock in a straight line. So you will not only fix the synthetic winterizer inside the toy, but also form the ears of the kitten. With a felt-tip pen or pencil, we outline the lines of the muzzle, after which we embroider them with floss along the outlined contours.
We take the second sock and ruthlessly divide it into two halves, setting aside the part with the heel.
We cut the sock as shown in the photo, and turn the two parts into neat paws.
After the formation of the seams, we give the details volume and sew to the body. We give the shape of bent legs with a couple of inconspicuous stitches.
The final touch - we cut off the upper gum from the rest of the sock with a heel, put it on the neck of a new resident of your apartment, fix a small bell, and we get a completely finished cat.


How often can we observe a situation in which one of a pair of socks magically evaporates, and the second is still completely new, forced to lie idle, and most likely it will be thrown away. It happens that a very beautiful couple did not fit in size. And how many beautiful socks you can buy now in the store! The colors are striped, dotted, and even with muzzles. Terry, plain, with fingers, which they just do not exist now! We suggest you give the single sock a chance, and even more so give it to paired socks. What should we turn them into? And why don't you and me turn it into a cool soft toy?
After all, such an author's craft can be a wonderful decoration for your interior, a favorite for your child or a wonderful gift for a girlfriend. Such cute toys are becoming more and more popular. How can you create soft toys from the most ordinary warm socks? Is it difficult or simple, what may be needed for this when working with your own hands?
We knit a toy in the form of a striped hare from a sock with our own hands
Let's just try to make a simple toy first. For example, a striped hare.
Materials. Sock - 1 pc. Buttons - 2 pcs. or eyes for crafts, suitable size. Any soft material - for stuffing, it can be either cotton wool or synthetic winterizer or special small balls, or even small grains. Needle of medium size and thickness for stitching toys and thinner for embroidery small parts. Threads to match the sock for stitching. Black thread for decoration. Knitting needle or thin stick. Scissors. Pencil. Any small decorative elements suitable for the theme: hats, scarves, buttons and everything that your imagination and resourcefulness will tell you. You can use a hot glue gun if you like.
Understanding a simple workflow
Choose your favorite striped sock.
Cut off the upper elastic band from the sock and a small piece from the opposite edge. We fold the sock so that the heel is sticking out at the top.
Using a pencil or colored chalk, draw an outline for the rabbit ears.
And carefully cut out along the resulting contour. If you feel confident enough with scissors, you can cut without a preliminary sketch.
We sew the edges along the contours and turn it back.
Let's get to stuffing.
We fill our product with what we like, with cotton wool or padding polyester. The main subtlety is that the ears, as the thinnest part, are filled with a long stick or knitting needle. You need to take a small piece of stuffed material and use a stick to push it into the very edge of the ears.
We collect the sock along the edges with a needle and thread, but do not finally fix it. We turn to the design of the muzzle of our animal. At your discretion, you can draw a muzzle or sew some details with black thread. It remains to solve the issue with the eyes: you can make them from pretty buttons or glue the eyes with warm glue.
From the bottom of the bunny, we sew a circle with a simple basting stitch. Then tighten and fasten

As you understand, what color you choose a sock, how you sew a muzzle, it will depend on what kind of hero you get. At this stage, we will need those small decor options that you have prepared. Maybe you will make a hare a haircut from a piece of wool or give him an object in his hand.

Other options for crafts from unnecessary clothes and accessories
We really hope that you liked our simple sock toy master class, and you have already become fans of such cute animals and weirdos. Of course, there are various schemes for making toys from socks, from the simplest to the most complex.
We will show you a few of them.


Making fun crafts with patterns with your child

Since we are talking about children, there are also very interesting toys that you can not only make from a sock, but also play a little performance with them.

We suggest you now sew a toy out of a sock as your fantasy tells you. Maybe you will invent a toy or figurine that no one has ever seen before you. tried to do.
In order to give your imagination more inspiration, we will show you some videos about sock crafts.
Content
Modern fakes are made from any material, for example, old and unnecessary socks can be an excellent basis for creating original toys, jewelry, paintings and much more. Very beautiful fakes are obtained from children's terry, bright and soft socks, there are many ideas on how to use old socks with benefit.
soft hare

In order to make a soft toy, you need to take materials such as threads, scissors, a marker, cotton wool, a needle and, of course, the main detail is a sock, in this case light. The work begins with the fact that the upper part of the sock is divided into two identical halves, a rectangle is cut out in the middle, two bunny ears are obtained. Then, the ears should be sewn, and the sock filled with cotton, from the side of the heel, using a marker, draw the mouth and eyes of the animal. From below, so that the cotton wool does not fall out, the material should be sewn, thus, an original and soft hare is obtained, everything is simple and fast.
More details can be seen on the video
Monkey

To create this soft toy, you will need a simple pair of socks, this option for making fakes is the most inexpensive and accessible to anyone. Old socks are used as materials, and not only cotton wool, but also synthetic winterizer or fine foam rubber can serve as a filler.
One sock will serve to make the body, hind legs and head, and the second will go to create the front legs, tail and ears. For the muzzle, you can leave the cut off part of the heel. After all the details are cut out and prepared, you should sew the large ones first, then fill them with filler, finish the job and move on to small items, tail, ears and paws.
When all the details, individually, are ready, you can assemble the toy into a single whole, for this, ears, tail and paws are sewn on, a muzzle is formed, buttons are sewn in place of the eyes.
By the same principle, you can sew not only a monkey, but also a raccoon, for example, you just need to use old socks of a different color. Among other things, the raccoon should not forget to sew one detail on the muzzle, in the form of glasses, this will be a common feature of the toy with a real animal.
This version of a fake can be an original and real gift for those people who appreciate items from the category "just like that." It will become a favorite sofa toy and a memory for a long life.
For more details on how to make a toy, the video will show
Small fakes from old socks
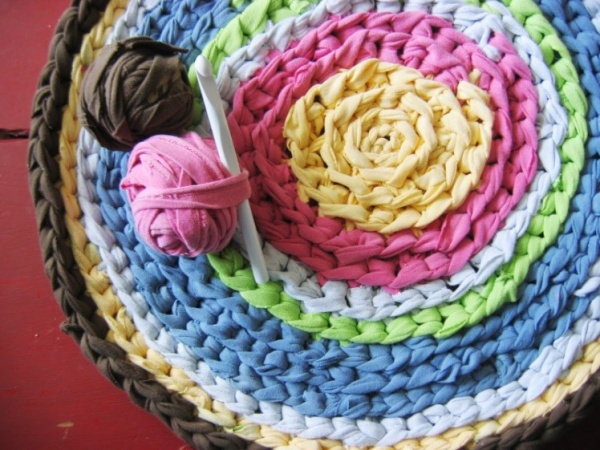
Material such as worn socks can be used to create not only toys, they can be used to make, for example, small rugs. To do this, there are two manufacturing options, for example, cut the products along and use the resulting pieces like ordinary yarn, or you can sew the resulting shreds yourself. The process is laborious, but as a result, you get a very beautiful rug.
Using an old sock, you can decorate the cup, for this you need the neck of the sock, carefully cut out a rectangle, hem it from the bottom so that the fabric does not fray, you can sew buttons in random order or in places where the sides will connect. A small patch will turn out or a large one, it doesn’t matter, you can sew buttonholes, it will look very original.
And if the socks have a bright pattern, then decoration will not be needed, the result will look, in any case, good. If the fabric of the socks is plain and gloomy, you can sew not only a button, but also another detail for decoration. It can be another colored fabric, decorative mesh or beads, beads or straws, as well as plaits.
Bear
To work, you will need two terry socks, threads and a needle, filling material, scissors, a felt-tip pen or a stamp, a button for the nose.
First of all, you need to make a pattern, cut out the bear, one sock will be used to create a head with ears, the second will go to the torso and hind legs. All details are carefully cut out and sewn together, only one side remains open, because through it the paws, head and torso will be filled with padding polyester.
All components are sewn on the wrong side, after which they are turned inside out, if the socks are terry inside, then this part can be made front. Next, take the part that will be the head, cut off the elastic, fill it with filler and pull off the edges, attach a circle for the muzzle on top, and draw a smile and eyes with a felt-tip pen. These elements can not be drawn, but embroidered; a small button is suitable as a spout.
Similar processes must be done with the second toe, cut out the details, sew the edges on the wrong side, turn it right side out and fill it with filler. Thus, the torso and hind legs will turn out, the final stage involves connecting all the parts into one.
Important! The main advantage of fakes made from old socks is obvious, the toys are soft and unpretentious, they ask for their hands, one has only to look at them. And most importantly, any animal can be made in this way, it is enough to show your imagination.
Owl
Any fake made from old, worn out socks can be played with by kids without having to spend a lot of money on materials. If you show initiative and imagination, you can turn a simple owl from an old sock into a rattle, for this, you just need to put a capsule from a kinder surprise into it, fill the container with peas and it will rattle.
To begin with, all the details must be cut out, these are the wings, tail and beak, after which they should be sewn and set aside. The top of the toe, which is located at the very heel, must be cut off and pulled off, the resulting bag should be filled with soft material, then cut off the excess elastic. Do not forget about the capsule with peas to make a rattle.
Further, the body is sewn together, attaching a beak on one side and a tail on the other side, 4 lines should be drawn on the forehead of the bird, and stitches should be sewn, connected, as a result, two rollers will be obtained. final stage there will be eyes and wings, the original rattle is ready.

Horse
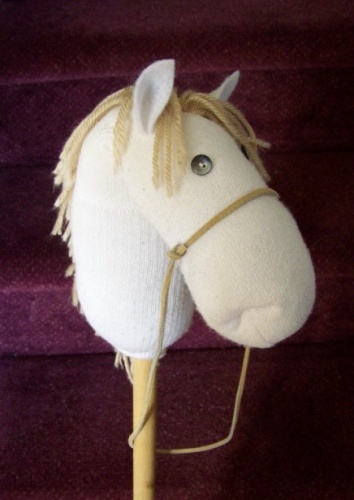
In order to create an original horse on a stick for a child, it will take a little time and a minimum of materials, but it will really please any tomboy. For a fake, you should take a stick, the length of which is 1 m, and stick the head of the animal on one side.
Such a fake is made quite simply, you need to take an old sock, stuff it with any material, for example, foam rubber, cotton wool or even hay, sew on eyes and a mane, put on a bridle and put your head on a stick.
Each fake confirms the fact that special skills and talent are not required to create toys from socks, and such work will not take much time, the main desire.
Cheerful do-it-yourself cat from old socks
To make a cat, you need to take a knitted sock, a synthetic winterizer as a filler, a thread with a needle, buttons and a woolen thread from which the bow will be made.

The height of the toy is optional, you can cut off a piece of the sock of any length, tightly stuff this part with a padding polyester. In the place where the toe was cut, fold the edges and sew, using a blind seam to form the ears of the animal, you must pull the corners. Pull the woolen thread in the place of the sock where the neck will be, pull it over, after that, sew a button on the body, which will be a tie. On the cat's face, draw a smile, eyes and nose, using a thread and a needle, embroider along the contour.
Additionally, how to make a cat out of socks, you can watch the video
Snowman from an old sock
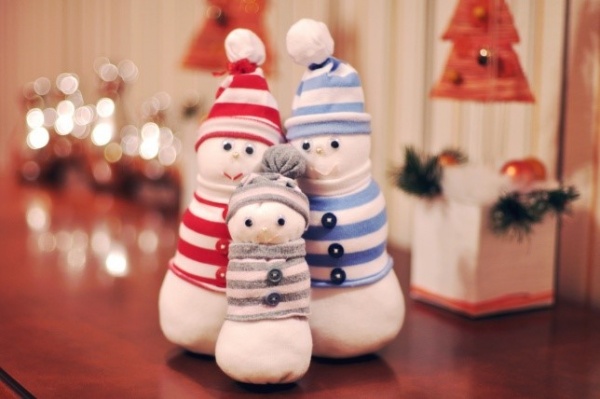
Each toy will be unique, and will be a great gift for any celebration, because it is made by hand. The manufacturing technique is very simple and does not require professional knowledge, homemade products will please not only adults, but also children.
It is necessary to take white socks, filler, beans, woolen thread or floss, any decorations, such as small pompoms, buttons, or any other items that are at hand. Black beads are suitable for the eyes, you will also need a ribbon or a small piece of knitted fabric, a thermal gun.
Fill in the third part of the sock dried beans, tie it on top, let this part go and roll back the edges so that you get the brim of the hat. A special gun should be used so that the fields do not roll, they must be glued.
Using woolen threads or ribbons, tie the snowman's neck around the body to make a scarf. The head of the toy should be large, because it will still have beaded eyes, a mouth embroidered with black thread and a nose in the form of a colored pom-pom, the torso can be decorated with other elements.
Additionally, how to make a snowman, you can watch the video
Surprise guests by getting alcohol from the original mini-bar, which will be a doll made of nylon tights. And from socks, prints you can sew soft toys for children.
Toys from socks and children's tights

Even a very young child can make such a funny caterpillar.
To create such a thing, you can use old tights, from which the baby has already grown. Cut off one leg, turn inside out, sew on one side, pulling it with a thread.

Turn the workpiece inside out, stuff it with padding polyester and drag it in several places with a thread to create rounded fragments of the caterpillar's body.
Finish this sock toy by turning the edges inward in the tail area and sewing them together. Instead of eyes, we attach two beads, make a mouth out of threads, after which the work is over. Here's how to make a DIY soft toy out of almost nothing.

You can also make amazing things out of socks, for example, such a funny bunny.

To create it you will need:
- two socks;
- threads;
- scissors;
- needle;
- sintepon.
Lay the first sock vertically in front of you, cut it as shown in the photo. You will get a blank head with ears.

On the wrong side, sew this blank, leaving the bottom edge free. Stuff your head with synthetic winterizer through it.

For such a sock toy, a second part will also be required, which will become both the body and hind legs. To get it, cut out the second sock as shown in the photo below.

On the wrong side, sew this blank, leaving the part near the elastic band untouched. Stuff it with padding polyester through this hole. Insert the head element into this part and connect the parts of the soft toy with a seam.

From the socks you have 2 parts left, which you will quickly turn into the front legs of a hare. Also sew them in place.
From another small piece that remains from cutting out the details, make a ponytail. Sew it on, decorate the eyes, mouth, nose and admire what a wonderful sock toy you made with your own hands.

We turn old gloves into a useful thing

To make such a cat, you only need one glove.
Sometimes one glove gets lost, don't throw away the other one, use it to create a soft toy.
Cut the glove as shown in the photo. In place of the little finger, put the ring finger and sew it on, it has become the second front foot of the soft toy.

Stuff the glove with a padding polyester, make it up, in the area of \u200b\u200bthe elastic band, shape it in the form of ears, give them a texture with a thread and a needle.

Drag the thread under the cat's head to indicate the animal's neck. Stuff the cut off little finger with synthetic winterizer and sew it instead of a ponytail.

Embroider the cat's eyes and nose, tie a beautiful bow around the neck, and another soft toy from unnecessary things is ready.
How dolls are made from nylon tights

Seeing this dashing Ukrainian with a forelock, not everyone will guess that this is a mini-bar. A bottle is cleverly hidden inside.
It can be presented to a man on February 23 or surprise guests. When you put such a doll from nylon tights, remove her head, there will be a bottle of alcohol inside.
For crafts made with your own hands, you need the following:
- plastic bottle or canister;
- scissors;
- flesh-colored nylon tights with a density of 40 den;
- needle and thread;
- patches of fabric;
- thick wire;
- yarn;
- 2 eyes for toys;
- foam rubber;
- braid;
- rope;
- foam rubber 1-1.5 cm thick;
- sintepon.
Cut off the top of the canister, put the bottle inside to see if it will fit inside so that the neck looks out. If the height is not enough, put a piece of foam rubber on the bottom of the canister.
Now take a rectangle of foam rubber, wrap the bottle around it, cut off the excess. Sew it seam at the top and bottom plastic bottle cut off the excess.

Now drag the waist of the toy with a rope.

Twist the hand blanks from the wire. Wrap them with foam rubber and padding polyester.

Sew the arms in place as shown in the photo.
From a white fabric, cut out 2 identical blanks (they will be sleeves) and one that will become a panel for the body. The last part should be long so that one part of it freely enters the inside of the plastic bottle.

Now cut out a rectangle from the blue fabric. Its width should be such that you can pick up the canvas and put it on the bottom of the bottle. These are the wide pants of the doll.
Sew them in place, and tie a strip of red ribbon around your waist, which will become a belt.

How to decorate the face of a toy with your own hands

To make the head, cut the neck of a 1.5 liter plastic bottle below the shoulders. Wrap it with foam rubber, sew it.
Wrap your head with a padding polyester, sew it. Cut the cloth from the tights, pull it over the doll's head, chipping off the top with a pin.

In order for the nose to be wide, the face to be realistic, it is necessary to make doll tightenings from nylon tights. In the photo, the places of the tightenings are marked with numbers so that you can understand where to lay the stitches. You don’t need to draw them on the blank of the face itself, pin the pins here.

Make a few stitches from point 1 to 2. Remove the needle from 2 and pierce it at 3. Sew several times, tightening the thread, from 3 to 4.
Also, without cutting the threads, we pierce with a needle from point 4 to point number 5, make several stitches along this path.
We take out the needle from point 4, stick it into point 3, and then from it into the area indicated by the number 6. We make several stitches here.
We take out the needle from point 3. We need to make the wings of the nose. To do this, taking the needle from point 3, we stick it into 5, passing the thread through the top, tighten it. Thus, we have designed the wing of one half of the nose. To perform the second, we make the same punctures, from 3 to point 4. And then from here we return through 6 to 4, passing the thread through the top and tightening it.

We turn to the design of the nostrils of the doll from nylon tights. To do this, pin 2 pins as seen in the photo. To create a tightening, pierce point 3 with a needle, then - 5. Pulling the thread on top, return to point 3. From there you need to go to 4, and then to point No. 6.

When tightening, do not cut the thread. If it ends, you must first fix it by making a knot, and then use a new thread.
We continue to form the face of the doll from tights, made with our own hands. Put the synthetic winterizer through the bottom of the stocking, making the chin, cheeks, lips more voluminous. Mark with pins the places of the tightening (No. 7, 8, 9, 10).


