A master class on making crafts "Stork" for decorating the territory of a kindergarten. Garden crafts from plastic bottles: DIY stork DIY wood stork
An old legend says that God gathered all the reptiles from the Garden of Eden into one bag and ordered the man to throw him into the sea with his own hands. And the curious Homo sapiens wanted to look at the creatures, untied the bag, and, of course, missed everyone. Vladyka got angry and turned this man into a stork so that he would protect other people from all kinds of toads and snakes. Since then, storks have always settled near a person, feed on reptiles and bring us happiness.
Many old pictures depict a stork with a baby. Among the Slavic peoples, it is customary to believe that this particular bird is responsible for childbearing and well-being. If storks settled on the roof, the house will be full of happiness and children's laughter. And if you haven’t settled, then a wonderful stork with a baby can be made with your own hands from improvised material and installed on a skate or on an apple tree in the center of the garden.


bottled happiness
It will take
To make a stork out of plastic bottles for the garden, we need to prepare the following materials:
- empty bottles;
- thick wide board for the base;
- a rod or thick wire for legs;
- a piece of foam 10 cm thick;
- corrugated hose from a vacuum cleaner;
- 2 plastic canisters with a volume of 5 l;
- metal mesh for wings;
- stapler.
Master class on making happiness
It only takes a few hours of passionate DIY work to make almost real storks appear on the paths of your garden.
- Cut out a head with a beak from a piece of foam, draw eyes or glue black beads with your own hands.

- Cut out a two-piece beak from a dark bottle and glue it in place.

- We begin the master class on making the torso by cutting off the handle in the canister. Then you need to bend the mesh in the shape of a canister with your own hands and cut off the excess.

- To make the legs, bend the bar and fasten its ends to the board.

- We are holding a master class on the preparation of plastic feathers.

- We attach the feathers to the canister, starting with the tail.
- The master class on fitting the neck begins with attaching the reinforcement wire. Then a hose is put on it.

- Attach small "feathers" on the neck with tape.

- Fix the feathers on the grid.

- The stork for our garden will stand with its wings folded, so we simply fasten all the feathers with a stapler with our own hands, overlapping each previous row by a third.

- We finish the master class by connecting all the details and decorative tinting of the eyes, beak and legs. This bird can be installed with your own hands in the depths of the garden for the whole summer. It will not deteriorate from the rain and will not fly away.

Today's fashionable toys are hand-sewn from ordinary fabric according to simple patterns. We will not fully describe the master class for their manufacture.
- Cut out the details of the craft from the fabric, sew and stuff with any filler.
- Separately, you need to make a beak (can be made of cardboard) and attach to the head. It remains to make clothes, glue eyes, wrap the baby and hand it to the stork.

Of course, you cannot place such a wet bird on the branches of the garden, but it can decorate a flower pot on the windowsill.
Another way to make your home rich and happy is to make a stork on a nest. As a basis, you can take patterns of a tilde bird. Cut feathers out of plastic white milk bottles, fasten them together and make wings, decorating the ends with real feathers. Place a few white feathers on top of your head. Form a tail out of real feathers, sew or glue eyes and a tie, and plant the bird in the nest.

It can be made from ordinary rods, fastened with wire. To get a stork with a baby, put any doll in his wings. The master class on making a lucky amulet is over.


These two rag birds cannot be left on the paths of the garden, and the master class for making the first stork requires a lot of time and materials. Do not be upset and just make a nest and cut a flat bird out of textolite or plywood. Color it in, give it a string bag with a baby doll in its beak and that's it, the stork with the baby has already settled on your roof.
A well-groomed and attractive garden will always please the eye. To make your garden more comfortable, you can decorate it with various hand-made ones. Today we'll talk about how to make a stork for the garden and what materials can be used for this.
Let's start with the simplest - PET bottles.
Option number 1. Making a stork from plastic bottles
Before you get started, you need to take a small sheet of plywood and make templates out of it. The templates must be made in the form of the body and wings of a bird, as shown in the image. You will also need opaque plastic bottles (preferably white or black), red tape and self-tapping screws. The procedure is as follows.

Step 1. First you need to connect the previously made templates with self-tapping screws. Plastic milk bottles will be used as feathers. The bottles should be cut into strips of the same width, and then make a fringe on the edges of each of them.
Step 2 Next, the finished feathers must be fixed on the "body" of the stork with a glue gun. It is characteristic that PET bottles of already black color will be used for the lower part of the body and tail (usually shampoo containers are used for this).
Step 3 The beak should be wrapped with red tape.
Step 4 For the manufacture of legs, ordinary wire is used. Eyes for a bird are bought at any needlework store. That's it, the stork is ready with your own hands!


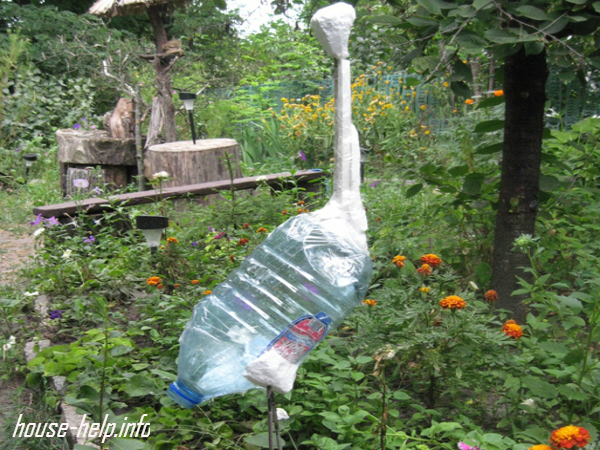
Option number 2. Making a stork from polyurethane foam
Now let's talk about another option for making a stork for the garden with your own hands. Now you need to pre-prepare a plastic container of 5 liters, mounting foam, styrofoam and tape. The algorithm of actions should be as follows.

Step 1. First, body parts are attached to the bottle using a container. For the neck, an ordinary wire is used, overlaid with pieces of foam. The hips must be made in a similar way (using foam and wire). An ordinary large-diameter nail is quite suitable as a key.
Step 2 The blank will look at the preliminary stage as shown in the image below.
Step 3 For the legs of the bird (at least in this implementation), used electrodes are used. In the absence of electrodes, you can select a similar material - for example, a thick wire twisted into several turns, or metal rods from thin reinforcement.
Step 4 So, all parts of the "body" of the stork are assembled, but before proceeding to the next step, it is necessary to carefully check the strength and reliability of the fasteners.
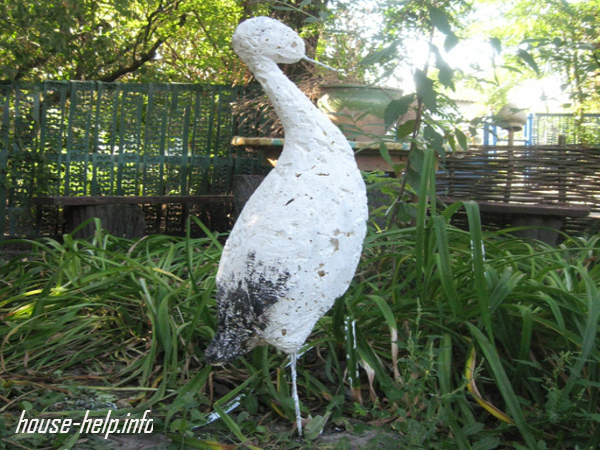
Step 5 After that, the entire layout must be covered with mounting foam.
Step 6 All excess is neatly trimmed.
Step 7 Now the sculpture is almost ready. If the mounting foam is already completely dry, then the bird needs to be painted with acrylic paint.
Step 9 Natural feathers are inserted into the wings and tail to make the stork look as realistic as possible. See what a wonderful garden stork you will get (if you do everything right, of course).


Option number 3. Making a stork for a garden from a canister
Before you get started, make sure you have the following Supplies:
five liter cans
plastic bottles (black and white color);
· plastic tubes;
· thick wire;
foam plastic;
After that, you need to perform the following sequence of actions.
Step 1. Cut out blanks from foam, use a knife to outline the head. Cut out the eye sockets, make the beak flatter.
Step 2 Use sandpaper to make the surface as smooth as possible. Place toy eyes in the eye sockets (we have already talked about where you can get them).
Step 3 Cut a beak out of a plastic bottle and secure it with glue.
Step 4 From a plastic canister, make the body of a bird, cut off the handle.
Step 5 Cut out a piece of mesh large enough to wrap around the canister. Round the mesh a little so that it looks more like wings.
Step 6 A thick metal rod must be bent and legs made from it.
Step 7 Stork feathers are cut from white bottles.
Step 8 After that, you can proceed directly to the assembly of all elements. Work should start from the "tail".
Step 9 For the “neck”, a corrugation is put on the wire (for example, from a vacuum cleaner) or something similar. Feathers are attached with self-tapping screws. Due to the fact that the wings of our bird are folded, feathers can only be fixed on the stomach and a little on the sides.
Step 10 White bottles are cut in half, fringe is formed at the cuts. Bottles are attached to the "neck" with adhesive tape.
Step 11"Wings" must be done from one edge of the prepared mesh. It is important that the second row covers the first by 1/3. On the third row, white plastic is already used.
Step 12 For the "legs" of the stork, the corresponding blanks are cut from 0.5-liter bottles.


Step 13 It remains only to paint the "beak" and "paws" of the bird in red. That's it, the garden stork is ready with your own hands!

For a more detailed acquaintance with this manufacturing method, we recommend watching the thematic video.
Video - DIY Stork
A decorative stork made of plywood with your own hands will decorate any adjoining territory. Playgrounds, summer cottages looks boring without any kind of decorations. A well-groomed flower bed will attract even more attention and please the eye if it is supplemented with a fake bird shown in the photo. There are many variations on the manufacture of artificial birds, made from all sorts of improvised materials, which sometimes you can’t even imagine in the form of crafts.
Some animals require special skills, abilities and take a lot of precious time, so it is better to take on a job that will surely turn out to be effective without painstaking efforts. One of these creations is a stork made of plywood with his own hands.
Why stork? The answer is well reasoned. Even little child it is known that this noble bird personifies peace, tranquility, family well-being, fidelity, constancy. Many beliefs and signs are associated with the location of the stork nest, their annual return and offspring.
How to start decorating


It has been proven and tested in practice that all ingenious inventions are simple and accessible to everyone. So this unpretentious composition is acceptable in terms of material costs and complexity for people who seek to embellish and ennoble not only their territory, but also the surrounding space.
You will have to work with plywood. Quite suitable material for those who are trying to learn the lessons carpentry. The material is easy to cut, although it is quite strong and dense. You can process it without a grinder, using sandpaper. After coating with several layers of drying oil or varnish, it is generally not subject to swelling, delamination, cracking due to external effects of precipitation and temperature changes.
Garden plywood storks are made from medium grades and thicknesses wood board. Eliminate the influence of factors external environment it’s impossible, but looking for the most expensive and high-quality plywood for outdoor exposure is an unreasonable decision. Therefore, it is meaningless to describe in detail the characteristics of the material. Whatever you get, from that an excellent creature from the feathered family is molded.


You need to start by roughly representing the actual size of the bird in order to know specific parameters consumable. Plywood sheets are different sizes, but there is no need to cut a two-meter bird. If a stork settles in the front garden, then a small bird will fit into this space, perhaps more than one. And if you mount it on the pediment of the house, a good example in the photo, then it is advisable to make a larger decor so that it is visible from afar and not lost.
How can such beauty be lost, even if the color scheme is simple and at the same time bright. Running a little ahead, you will have to stipulate that the color of the finished stork, cut and assembled with your own hands, includes only three colors: gray, red, black.
Based on the description of a stork for a summer residence or a garden, you can already draw up an estimate of materials for its manufacture:
- plywood sheet;
- paper or finished sketch;
- pencil, scissors;
- jigsaw;
- paint with a brush;
- ship varnish.
Work sequence
You can cut a stork out of plywood in a matter of hours. Sleight of hand and imagination will speed up the process without hindrance. The first step is to draw it. Everyone imagines what a stork looks like, but not everyone will be able to portray it.
Drawings of a plywood stork in the photo simplify the first step. It remains only to project them onto a large paper format. As can be seen in the proposed sketch, a pattern, a compass and others technical tools, are not useful. Anyone can draw two ovals and connect them with smooth lines. Try to depict a bird with a long neck, beak and wings in such a way that the silhouette resembles a representative of the stork order. The better the proportions are respected relative to the template, the more likely it is to get a similarity to the source.
Next, the drawn silhouette must be cut out. The plywood stencil is ready. All stages of creating a symbol of devotion and good luck are within the power of even a schoolboy, so the participation of children will not hurt. The paper stork must be placed on a plywood sheet and lightly attached with buttons, a stapler, tape, whatever comes across. Outline with a pencil. The lines should be clear in order to preserve all the smooth curves of the body and the sharp angles of the beak, tail and wings when cutting. Now you can start cutting. At this stage, haste and strong pressure on the jigsaw is useless. You have to work without haste.
The plywood stork template will be completely ready after its careful grinding from all sides. The first grinding is done with coarse sandpaper, after which it is necessary to walk a couple of times with fine-grained sandpaper, including cuts. When the surface becomes smooth, without burrs, the most beautiful stage of creating a creation with your own hands begins: the assembly of all parts into a single product.
Screwing on the legs and gluing the wings is quick and easy. If the stork settles in the garden, it must be installed on the base. Take a small wooden block, drill holes in it, generously coat them with wood glue and insert the legs. Drying of the wings and support will take a little time. It is advisable to press with a clamp and fix the wings with the body.
Then it's time to color the bird. The most popular and suitable paint is acrylic. The color sample is shown in the photo: the beak and legs are red (can be dark orange), the body is light gray, the plumage of the tips of the wings and tail is black, the eyes are marked with small black circles. Cover with varnish when the paint dries.
That's the whole procedure! A video with a lesson in making a magic bird is attached.
Crafts arrangement
It is not enough to make a stork out of plywood. Regardless of the location of the plywood stork, you still need to make a nest for it. It will even resemble the present, because it will have to be built from thin twigs. On a horizontal surface, the nest should become like a stork. The same wide, deep. On the gable of the roof, the nest can also imitate the nest. Make it voluminous so that the composition looks complete.


If desired, the stork is paired. Then he is not alone. "Procreating" miracle birds is inexpensive, so after a few training sculptures, you can take on more complex and labor-intensive designs.
And your bird can also become the ancestor of a whole bird family in the country. For example, a stork can open a bird gallery, but homemade flamingos, peacocks, herons will continue it ... Fantasy is limitless! Some craftsmen simply paint a plywood blank, varnish it. It turns out such a kind of painting on wood, where fantasy images are combined with your own creative abilities.
Your garden will indeed become a place of miracles.

What else can you make a stork from
We list only the most popular options:
- car tires(perhaps the most popular option);
- forged parts;
- plastic lids(but this is jewelry work);
- tree;
- shells;
- disks.
The easiest option is a plywood stork. You simply make a template with your own hands, according to which you cut out the future sculpture. Paint your bird of happiness on both sides with acrylic paints. Or those that you have, covering the pattern with construction varnish on top.
DIY decor for a summer residence (video)
A stork in the country can only be the beginning of your creative experiments. As practice shows, appetite comes with eating: even people who are far from artistic work get a taste, and other interesting characters appear on the site over time. And this is great, they delight not only the owners, but also the guests, who are becoming more and more in connection with such country art.
Reviews and comments
Oksana Vladimirovna 20.12.2015
Interesting idea. But is there enough talent? And I'm also worried that the design will not be stable. If you make a body from a plastic bottle, then it will probably need to be weighted with something. Not to be blown away by the wind.
Artem 03.03.2016
I made a pig using a 5 liter plastic bottle, though they are mostly just made from bottles, cutting out the shape they need, but I still had polyurethane foam and covered the bottle with it. The pig came out fat and looked natural. Only to smooth the foam in the form of leather, I used gloves and lubricated with oil, so the foam practically did not stick. Painted on top and done.
Sergey 14.06.2016
I do too garden sculptures with the help of plastic bottles, but I prefer to stick around them with plaster and give them any necessary shape. Pretty easy and low cost. Then I just paint with any paint and the figure is ready.
Igor 01.02.2017I also want to make a couple of storks :) (I have two adults, only the price is exorbitant) There are pieces of hard foam, but it's scary to cut - I'm not an artist - an electrician :) 😮 . But, I think, I will decide all the same .. I will try to provide the result. By the way, the cart wheel has already been sculpted from foam plastic ..
Add a commentA beautiful well-kept garden is always pleasing to the eye. Garden sculptures that can be made independently, for example or, will help to make it more comfortable. One of the most popular is the stork. In this article we will look at what a stork can be made of.
How to make a stork with your own hands from plastic bottles?
To work, it is necessary to cut a template from a sheet of plywood. This is the body of a bird and wings on the sides. Also prepare white and black plastic opaque bottles, self-tapping screws and red electrical tape.
- We fasten the templates together with self-tapping screws.
- For feathers, we use plastic milk bottles. We cut them into strips of the same width and make a fringe along the edges.
- Next, using a glue gun, we attach the feathers to the body of the bird.
- For the tail and lower body we use black shampoo bottles.
- We wrap the beak with red tape.
- Legs can be made of wire. And toy eyes can be purchased at a needlework store.
- Do-it-yourself stork for the garden is ready!
 |
 |
 |
 |
 |
 |
We make a stork from polyurethane foam with our own hands

Now consider another option, how you can make a stork with your own hands. In this case, we use a five-liter container, adhesive tape with polystyrene and polyurethane foam.
- Using adhesive tape, we attach body parts to a plastic container. The neck consists of wire lined with foam pieces.
- For the hips, we also use pieces of foam.
- To make a beak, a large nail will do.
- This is how it looks like at this stage.
- The author of the lesson proposes to make legs from used electrodes. You can pick up similar material: it can be metal rods or thick wire in several turns.
- Before proceeding to the next manufacturing step, check the reliability of the support.
- Next, simply apply mounting foam on top of the layout.
- We cut off the excess.
- We paint the finished sculpture with acrylic paints.
- We finish the nose from a piece of wood and fasten it to a nail.
- To make the stork look like a real one, we insert real feathers into the tail and wings.
- Here is such a wonderful stork turned out.
 |
 |
 |
 |
 |
 |
 |
 |
 |
 |
 |
 |
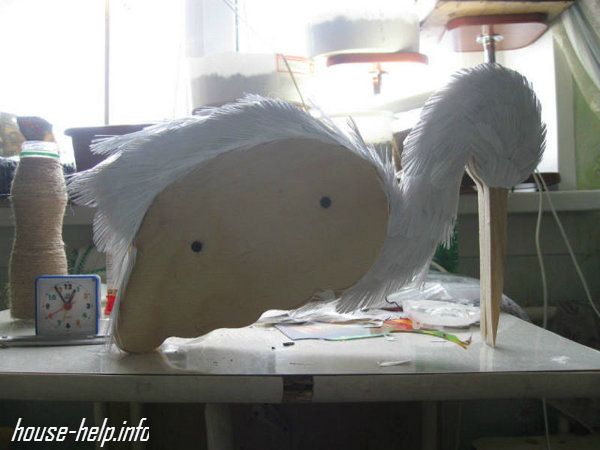
Making a stork with your own hands from a canister

For work you will need the following materials:
- five-liter canister;
- strong thick wire and plastic tubes;
- net;
- Styrofoam;
- white and dark plastic bottles;
- corrugation.
Now let's look at all the manufacturing steps step by step.
- We cut blanks from sheet foam.
- Next, with a knife, we give them the outlines of the head.
- We give the beak a flatter shape and cut out the eye sockets.
- With the help of a sandpaper we make the surface smooth. We insert toy eyes into the eye sockets.
- Cut out a beak from a plastic bottle and attach it to Titan glue.
- We make a body for a stork with our own hands from a plastic canister.
- Cut off the handle.
- Cut out a piece from the mesh so that you can wrap it around the canister.
- Round the mesh a little to make it look more like wings.
- We bend a thick rod and make legs.
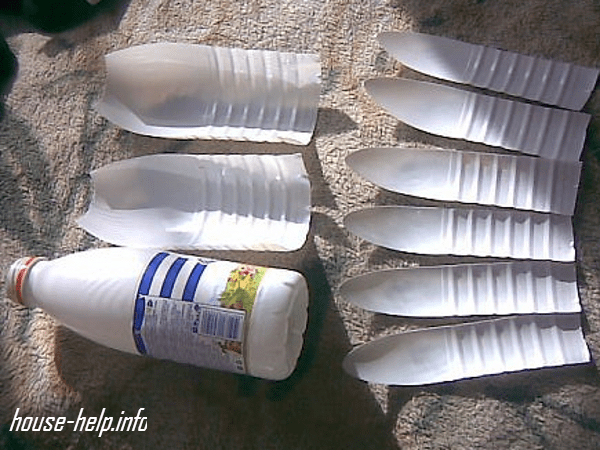
- We cut feathers from white bottles.
- Now you can start assembling all the components together.
- We start work from the tail.
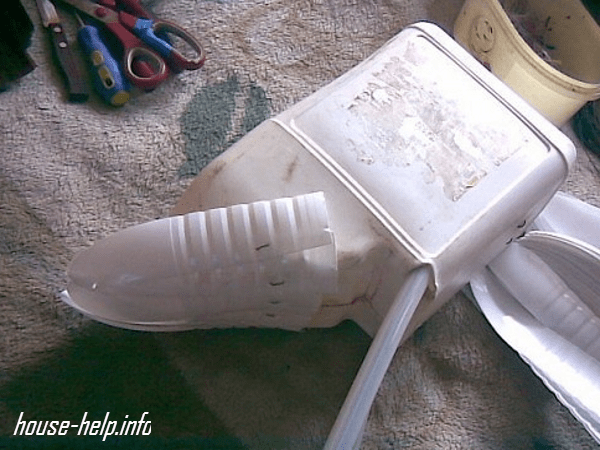
- To make a neck, we put a corrugated hose from a vacuum cleaner or a similar part on the wire.
- We fasten all feathers to self-tapping screws.
- Since the stork's wings are folded, it is enough to attach the feathers to the stomach and a little on the sides.
- We cut the white bottles in half and make cuts in the form of a fringe. We fasten them to the neck with adhesive tape.
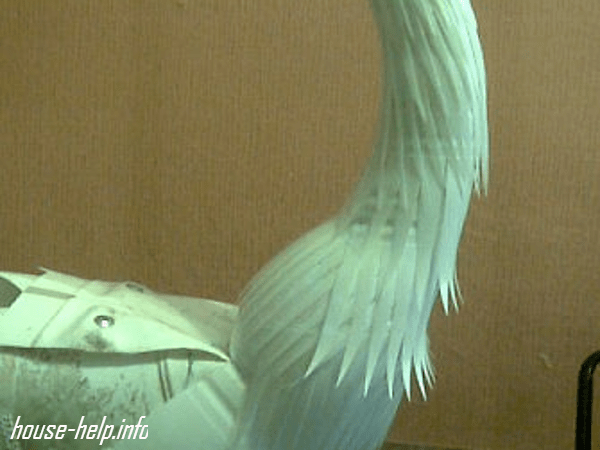
- We start making wings from the edge of the grid.
- The next row covers the previous one by a third.
- Starting from the third row, we use white plastic.
- To make paws, cut blanks from half-liter bottles.
- At the end, we paint the beak and legs of the bird in red.
- Do-it-yourself stork for the garden is ready.
 |
 |
 |
 |
 |
 |
 |


