Electric drivers for LED lamps. Drivers for LEDs - everything a home master needs to know. Current source and voltage source
The advantages of LED paws have been discussed repeatedly. The abundance of positive feedback from users of LED lighting willy-nilly makes you think about Ilyich's own light bulbs. Everything would be nice, but when it comes to costing the conversion of an apartment to LED lighting, the numbers are a little “strain”.
To replace an ordinary 75W lamp, there is a 15W LED bulb, and a dozen of such lamps need to be changed. With an average cost of about $ 10 per lamp, the budget is decent, and the risk of acquiring a Chinese "clone" from life cycle 2-3 years. In light of this, many are considering the possibility of self-manufacturing these devices.
The theory of powering LED lamps from 220V
Most a budget option you can assemble with your own hands from these LEDs. A dozen of these little ones cost less than a dollar, and are as bright as a 75W incandescent bulb. Putting everything together is not a problem, but you can’t connect them directly to the network - they will burn out. The heart of any LED lamp is the power driver. It depends on how long and well the light bulb will shine.
To assemble a 220 volt LED lamp with our own hands, let's look at the power driver circuit.
Network parameters significantly exceed the needs of the LED. In order for the LED to be able to work from the network, it is required to reduce the voltage amplitude, current strength and convert the AC voltage to DC.
For these purposes, a voltage divider with a resistor or capacitive load and stabilizers are used.
LED Light Components
A 220 volt LED lamp circuit will require a minimum number of available components.
- LEDs 3.3V 1W - 12 pcs.;
- ceramic capacitor 0.27uF 400-500V - 1 pc.;
- resistor 500kΩ - 1MΩ 0.5 - 1W - 1 sh.t;
- 100V diode - 4 pcs.;
- electrolytic capacitors for 330uF and 100uF 16V, 1 pc.;
- voltage regulator for 12V L7812 or similar - 1 pc.
Making a 220V LED driver with your own hands
The 220 volt ice driver circuit is nothing more than a switching power supply.
As a homemade LED driver from a 220V network, consider the simplest switching power supply without galvanic isolation. The main advantage of such schemes is simplicity and reliability. But be careful when assembling, since such a circuit does not have a limit on the output current. The LEDs will take their prescribed one and a half amps, but if you touch the bare wires with your hand, the current will reach ten amperes, and such a current shock is very noticeable.
The simplest driver circuit for 220V LEDs consists of three main stages:
- Voltage divider on capacitance;
- diode bridge;
- voltage stabilization stage.
First cascade- capacitance on the capacitor C1 with a resistor. The resistor is necessary for the self-discharge of the capacitor and does not affect the operation of the circuit itself. Its value is not particularly critical and can be from 100kΩ to 1MΩ with a power of 0.5-1W. The capacitor is necessarily not electrolytic for 400-500V (effective peak voltage of the network).
When a half-wave of voltage passes through a capacitor, it passes current until the plates are charged. The smaller its capacity, the faster the full charge. With a capacity of 0.3-0.4 μF, the charging time is 1/10 of the half-wave period of the mains voltage. talking plain language, only a tenth of the incoming voltage will pass through the capacitor.
Second cascade- diode bridge. It converts AC voltage to DC. After cutting off most of the voltage half-wave by the capacitor, at the output of the diode bridge we get about 20-24V direct current.
Third cascade– smoothing stabilizing filter.
A capacitor with a diode bridge acts as a voltage divider. When the voltage in the network changes, the amplitude at the output of the diode bridge will also change.
To smooth out the voltage ripple in parallel with the circuit, we connect electrolytic capacitor. Its capacity depends on the power of our load.
In the driver circuit, the supply voltage for the LEDs must not exceed 12V. As a stabilizer, you can use the common element L7812.
The assembled circuit of the 220 volt LED lamp starts working immediately, but before connecting to the network, carefully insulate all bare wires and solder points of the circuit elements.
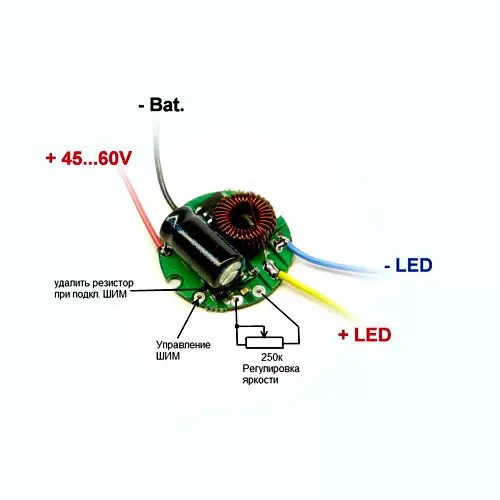
Driver option without current stabilizer
There are a huge number of driver circuits for LEDs from a 220V network on the network that do not have current stabilizers.
![]()
The problem of any transformerless driver is the ripple of the output voltage, and therefore the brightness of the LEDs. A capacitor installed after the diode bridge partially copes with this problem, but does not completely solve it.
There will be a ripple with an amplitude of 2-3V on the diodes. When we install a 12V regulator in the circuit, even taking into account the ripple, the amplitude of the incoming voltage will be above the cutoff range.
Voltage diagram in a circuit without a stabilizer

Diagram in a circuit with a stabilizer

Therefore, a driver for diode lamps, even assembled by oneself, will not be inferior in terms of pulsation to similar units of expensive factory-made lamps.
As you can see, assembling a driver with your own hands is not particularly difficult. By changing the parameters of the circuit elements, we can vary the values of the output signal over a wide range.
If you have a desire to assemble a 220 volt LED spotlight circuit based on such a circuit, it is better to convert the output stage to 24V with an appropriate stabilizer, since the output current of the L7812 is 1.2A, this limits the load power to 10W. For more powerful light sources, you need to either increase the number of output stages, or use a more powerful stabilizer with an output current of up to 5A and install it on a radiator.
How to check the LED driver for performance and compliance with the declared power parameters can be found in the video:
Checking the LED spotlight matrix:
Types of drivers by device type
There are two types of LED drivers:
- Linear. A typical linear driver circuit is based on a P-channel transistor. Such a device is best used if the input voltage is unstable. It provides smoother current stabilization, is reliable in operation and has affordable price. Despite these disadvantages, this driver has not been widely used. It is characterized by low efficiency, it generates a lot of heat during operation and cannot be used to connect powerful ones.
- Pulse. The operating principle is based on pulse-width modulation. The current conversion efficiency of such devices reaches 95%. They have small size, emit little heat, protect against negative effects external factors. Their use has a positive effect on the duration of the LED-lighting.

Important! Pulse drivers have a fairly high level of electromagnetic interference. In theory, people using pacemakers may feel discomfort from being in a room lit by such devices. However, as practice has shown, in order for the driver's magnetic field to affect the pacemaker, it is necessary for a person to be at a distance of less than a meter from a high-powered LED spotlight.
Dimmable LED Drivers
Modern drivers for LEDs in most cases include devices that regulate the brightness of lighting fixtures. The application allows you to adjust the comfortable level of lighting in the room. In addition, this allows you to save the working life of LED-illuminators.

The dimming device can be placed between the power supply and the LED illuminator. Such devices directly control the energy supplied to the LEDs. As a rule, these are pulse devices based on PWM regulation. They regulate the amount of current flowing. In some cases, when using low-cost LED sources, negative effects such as flickering can be observed.
The second type of dimmer converter controls the power supply. In principle, their influence is both PWM regulation and control of the current flowing through the device. In this case, not only a change in brightness, but also the color of the LEDs can be observed. For example, white LEDs with this adjustment can emit yellowish light when reduced in intensity and bright blue exaggeration.
Do-it-yourself driver circuit for LEDs based on PT4115 with a dimmer

The use of PT4115 in the driver circuit allows the use of several types of power supplies: with a voltage of 12÷240 V and 12÷18 V in the second case in general scheme LED drivers with PT4115 need to introduce a diode bridge with a capacitor installed at the output.


Making a driver for LEDs with your own hands
| Illustration | Description of works |
 | To facilitate the work, you can take the old one from the mobile phone. |
 | The device actually is and incorporates almost all the necessary radio components for connecting several one-watt LEDs. |
 | It is necessary to remove a limiting resistor from the circuit, which protects the phone from applying excessive voltage. In this case, this is a 5 kΩ resistor located at the output channel. |
 | In place of the static resistor, you need to solder a tuning resistor. At first, it is advisable to set it to the same 5 kOhm. During the tuning process, the voltage can be raised to the desired level. |
 | 3 LEDs are connected to the output channel in serial connection. Provided that they have a power of 1 W, the total power consumption at the output will be 3 W. |
must be connected to the mains through special devices that stabilize the current - drivers for LEDs. These are 220 V AC to DC voltage converters with the parameters necessary for the operation of light diodes. Only if they are available, it is possible to guarantee stable operation, long service life of LED sources, declared brightness, protection against short circuits and overheating. The choice of drivers is small, so it's better to first purchase a converter, and then select it for it. You can assemble the device yourself according to a simple scheme. About what a driver for an LED is, which one to buy and how to use it correctly, read our review.
are semiconductor elements. Current, not voltage, is responsible for the brightness of their glow. For them to work, you need a stable current of a certain value. With a p-n junction, the voltage drops by the same number of volts for each element. It is the task of the driver to ensure optimal operation of LED sources, taking into account these parameters.
What kind of power is needed and how much it drops during the p-n junction should be indicated in the passport data of the LED device. The inverter parameter range must fit within these values.

In fact, the driver is. But the main output parameter of this device is a stabilized current. They are produced according to the principle of PWM conversion using special microcircuits or based on transistors. The latter are called simple.
The converter is powered from a conventional network, at the output it produces a voltage of a given range, which is indicated in the form of two numbers: the minimum and maximum values. Usually from 3 V to several tens. For example, using a converter with an output voltage of 9 ÷ 21 V and a power of 780 mA, it is possible to ensure the operation of 3 ÷ 6, each of which creates a 3 V drop in the network.
Thus, the driver is a device that converts the current from the 220 V network to the specified parameters. lighting device ensuring its normal operation and long service life.

Where apply
The demand for converters is growing along with the popularity of LEDs. are economical, powerful and compact devices. They are used for a variety of purposes:
- for lanterns;
- at home;
- for arrangement;
- in automobile and bicycle headlights;
- in small lanterns;
When connected to a 220 V network, a driver is always needed; in the case of using a constant voltage, it is permissible to get by with a resistor.

How the device works
The principle of operation of LED drivers for LEDs is to maintain a given output current, regardless of voltage changes. The current passing through the resistances inside the device stabilizes and acquires the desired frequency. Then it passes through a rectifying diode bridge. At the output, we get a stable forward current, sufficient to operate a certain number of LEDs.
Main Features of Drivers
Key parameters of devices for converting current, which you need to rely on when choosing:
- Rated power of the device. It is listed in the range. The maximum value must necessarily be slightly more than the power consumption of the connected lighting device.
- Output voltage. The value must be greater than or equal to the total voltage drop across each circuit element.
- Rated current. It must match the power of the device to provide sufficient brightness.
Depending on these characteristics, it is determined which LED sources can be connected using a specific driver.

Types of current converters by device type
Two types of drivers are produced: linear and pulse. They have one function, but the scope, technical features and cost differ. Comparison of converters different types presented in the table:
| Device type | Specifications | pros | Minuses | Scope of application |
| Current generator on a transistor with a p-channel, smoothly stabilizes the current at an alternating voltage | No interference, inexpensive | Efficiency less than 80%, very hot | Low-power LED lamps, strips, flashlights |
| Works on the basis of pulse-width modulation | High efficiency (up to 95%), suitable for high-power appliances, extends the life of the elements | Generates electromagnetic interference | car tuning, street lighting, household LED sources |

How to choose a driver for LEDs and calculate its technical parameters
The driver for the LED strip is not suitable for powerful street lamp and vice versa, therefore, it is necessary to calculate the main parameters of the device as accurately as possible and take into account the operating conditions.
| Parameter | What does it depend on | How to calculate |
| Device power calculation | Determined by the power of all connected LEDs | Calculated according to the formula P = source PLED × n , Where P is the power of the driver; PLED source – power of one connected element; n - amount of elements. For a power reserve of 30%, you need to multiply P by 1.3. The resulting value is the maximum driver power required to connect the lighting fixture. |
| Output voltage calculation | Determined by the voltage drop across each element | The value depends on the color of the glow of the elements, it is indicated on the device itself or on the packaging. For example, 9 green or 16 red LEDs can be connected to a 12V driver. |
| Current calculation | Depends on the power and brightness of the LEDs | Determined by the parameters of the connected device |
The converters are available with or without housing. The former look more aesthetic and are protected from moisture and dust, the latter are used for flush mounting and are cheaper. Another characteristic that must be taken into account is the permissible operating temperature. For linear and pulse converters it is different.
Important! On the packaging with the device, its main parameters and manufacturer should be indicated.

Ways to connect current converters
LEDs can be connected to the device in two ways: in parallel (several chains with the same number of elements) and in series (one by one in one chain).
To connect 6 elements, the voltage drop of which is 2 V, in parallel in two lines, you need a 6 V 600 mA driver. And when connected in series, the converter must be designed for 12 V and 300 mA.
A series connection is better because all the LEDs will glow the same, while with a parallel connection, the brightness of the lines may vary. When connecting a large number of elements in series, a driver with a large output voltage is required.

Dimmable current converters for LEDs
- This is the regulation of the intensity of light emanating from the lighting device. Dimmable drivers for allow you to change the input and output current parameters. Due to this, the brightness of the LEDs increases or decreases. When using regulation, it is possible to change the color of the glow. If the power is less, then the white elements may turn yellow, if more, then blue.

Chinese drivers: is it worth saving
Drivers are produced in China in huge quantities. They are low cost, so they are quite in demand. They have galvanic isolation. Their technical parameters are often overestimated, so when buying a cheap device, you should take this into account.
Most often these are pulse converters, with a power of 350 ÷ 700 mA. They do not always have a case, which is even convenient if the device is purchased for the purpose of experimentation or training.
Disadvantages of Chinese products:
- simple and cheap microcircuits are used as a basis;
- devices do not have protection against fluctuations in the network and overheating;
- create radio interference;
- create a high-level ripple at the output;
- They don't last long and are not guaranteed.
Not all Chinese drivers are bad, more reliable devices are also being produced, for example, based on PT4115. They can be used to connect household LED sources, flashlights, ribbons.
Driver life
The service life of the LED driver for LED lamps depends on external conditions and the original quality of the device. Estimated service life of the driver is from 20 to 100 thousand hours.
The following factors can affect the service life:
- temperature fluctuations;
- high humidity;
- power surges;
- incomplete loading of the device (if the driver is designed for 100 W, but uses 50 W, the voltage returns back, which causes an overload).
Well-known manufacturers give a guarantee for drivers, on average for 30 thousand hours. But if the device has been used incorrectly, then the buyer is responsible. If the LED source does not turn on, or perhaps the problem is in the converter, incorrect connection, or a malfunction of the lighting fixture itself.
How to check the LED driver for performance, see the video below:
Do-it-yourself driver circuit for LEDs with a dimmer based on the PT4115
A simple current converter can be assembled on the basis of a ready-made Chinese PT4115 microcircuit. It is reliable enough to be used. Chip characteristics:
- Efficiency up to 97%;
- there is an output for a device that regulates brightness;
- protected from load breaks;
- maximum stabilization deviation 5%;
- input voltage 6÷30 V;
- output power 1.2 A.
The chip is suitable for powering an LED source over 1W. It has a minimum of strapping components.
Decoding the outputs of the microcircuit:
- SW– output switch;
- DIM– dimming;
- GND- signal and power element;
- CIN- capacitor
- CSN– current sensor;
- VIN- supply voltage.
Even a novice master can assemble a driver based on this microcircuit.

220V LED lamp driver circuit
The current stabilizer in the case of is installed in the base of the device. And it is based on inexpensive microcircuits, for example, CPC9909. Such lamps must be equipped with a cooling system. They serve much longer than any others, but it is better to give preference to trusted manufacturers, since Chinese ones show manual soldering, asymmetry, lack of thermal paste and other shortcomings that reduce the service life.

How to make a driver for LEDs with your own hands
The device can be made from any unnecessary phone charger. It is worth making only minimal improvements and the microcircuit can be connected to LEDs. It is enough to power 3 elements of 1 watt. To connect a more powerful source, you can use boards from fluorescent lamps.
Important! During work, safety precautions must be observed. When touching bare parts, an electric shock of up to 400 V is possible.
| Photo | The stage of assembling the driver from the charger |
 | Remove the case from the charger. |
 | Using a soldering iron, remove the resistor that limits the voltage supplied to the phone. |
 | Install a tuning resistor in its place until it needs to be set to 5 kOhm. |
 | Solder the LEDs to the output channel of the device by serial connection. |
 | Remove the input channels with a soldering iron, solder a power cord in their place to connect to a 220 V network. |
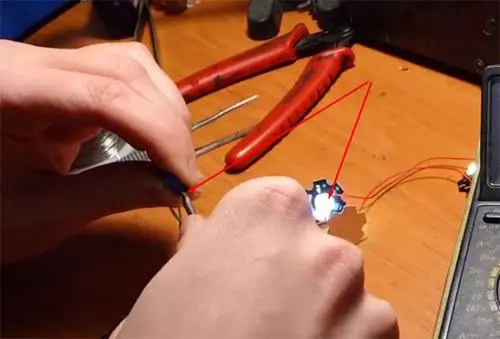 | Check the operation of the circuit, set the desired voltage with the regulator on the tuning resistor so that the LEDs shine brightly, but do not change color. |
 An example of a driver circuit for LEDs from a 220 V network
 Drivers for LEDs: where to buy and how much they cost
Buy stabilizers for LED lamps and microcircuits for them can be found in the store of radio components, electrical engineering and on many online trading platforms. The last option is the most economical. The cost of the device depends on its technical characteristics, type and manufacturer. Average prices for some types of drivers are shown in the table below.
Today, probably, not a single apartment or a private house not without LED lighting. And street lighting is gradually changing to economical and durable LED-elements. But looking at today's topic of conversation, one asks - what does the driver have to do with it (from the English “driver” is translated that way)? This is the first question that comes to the mind of a person who is ignorant of the LED lighting device. In fact, without such a device, light diodes do not work with a voltage of 220 V. Today we will figure out what function the LED driver performs, how to connect this device and whether it is possible to make it yourself.
Read in the article:
Why do we need drivers for LEDs and what is it
The answer to the question, what is an LED driver, is quite simple. This is a device that stabilizes the voltage and gives it the characteristics that are needed for the operation of LED elements. To make it clearer, let's draw an analogy with the ballast of a fluorescent lamp, which also cannot work without additional equipment. The only difference is that the driver has a compact size and fits in the body of the light fixture. In fact, it can be called stabilizing starting device or frequency converter.

Where are stabilizing devices for LED elements used?
LED drivers for LEDs are used in various fields:
- street lights;
- household lighting lamps;
- LED strips and various lighting;
- office lamps with the form of fluorescent lamps.
Even car daytime running lights require the installation of such a device, but everything is much simpler here, you can get by with one resistor. And although the driver for an LED strip (for example) differs in characteristics from a light bulb voltage regulator, they perform the same function.

Working Principle of 220V LED Lamp Driver Circuit
The principle of operation of the device is to maintain a given current at the output voltage (regardless of its value). This is the difference from the stabilizing power supply, which is responsible for the voltage.

Considering the circuit, we see that the current, passing through the resistances, stabilizes, and the capacitor gives it the desired frequency. Then the rectifying diode bridge comes into play. We get a stabilized direct current on the LEDs, which is again limited by resistors.
Noteworthy Driver Features
The characteristics of the converters required in a particular case are determined based on the parameters of the LED consumers. The main ones are:
- Driver Rated Power- this parameter must exceed the total power consumed by the light diodes that will be in its circuit.
- Output voltage- depends on the magnitude of the voltage drop on each of the light diodes.
- Rated current, which depends on the brightness of the glow and the power consumption of the element.

It is important to know! The voltage drop across an LED depends on its color. For example, if you can connect 16 red LEDs to a 12 V power supply, then the maximum number of green LEDs will be 9.
Separation of LED drivers by device type
Converters can be divided into two types - linear and pulse. Both types are applicable to light diodes, but the differences between them are noticeable both in cost and in technical characteristics.

Linear converters are characterized by simple design and low cost. But such drivers have a significant drawback - the ability to connect only low-power light elements. Part of the energy is spent on heat generation, which contributes to a decrease in the coefficient of performance (COP).
Pulse converters are based on the principle of pulse-width modulation (PWM) and during their operation, the magnitude of the output currents is determined by such a parameter as the duty cycle. This means that there is no change in the pulse frequency, but the duty cycle can vary by values from 10 to 80%. Such drivers allow you to extend the life of light diodes, but they have one drawback. During their operation, it is possible to induce electromagnetic interference. Let's try to figure out what it threatens a person with a simple example.

A person living in an apartment or house has a pacemaker installed. At the same time, in small room a chandelier was installed with many devices operating on pulsed ice drivers for. In this case, the pacemaker may begin to malfunction. Of course, this is exaggerated and to create such strong interference, you need a lot of lamps that are less than a meter away from the pacemaker, but there is still a risk.

How to choose a driver for an LED: some nuances
Before purchasing a converter, calculate the power consumed by the LEDs. The rated power of the device must exceed this figure by 25 ÷ 30%. Also, the stabilizer must match the output voltage.
If hidden placement is planned, it is better to choose a converter without a case - the cost will be lower with the same technical characteristics.

Important! Drivers made in China usually do not meet the declared characteristics. Don't skimp on purchasing a "made in" converter. It is better to give preference to the Russian manufacturer.
How to connect LED elements to the converter: methods and diagrams
LEDs are connected to the driver in two ways - in series or in parallel. For example, let's take 6 LED emitters with a voltage drop of 2 V. When connected in series, you need a driver for 12 V and 300 mA. In this case, the glow will be even for all elements.

By connecting the emitters in parallel in a group of 3, we get the opportunity to use a 6 V converter, but already at 600 mA. The problem is that due to the uneven voltage drop, one line will glow brighter than the other.
We calculate the characteristics of the converter for LEDs
For an accurate calculation, we first determine the power consumption of the LEDs. After the issue is resolved with the connection diagram - will it be parallel or serial. The output voltage and rated power of the required converter will depend on this. This is all the work that needs to be done. Now, in an electrical engineering store or on an online resource, we select a driver according to the calculated indicators.

Good to know! When purchasing a converter, ask the seller for a certificate of conformity for the product. If it is missing, it is better to refrain from buying.
What is a dimmable LED driver
Dimmable is called a driver for LED lamp, which supports changing the input parameters of the current and is able to change the output depending on this. This is achieved by changing the intensity of the glow of LED emitters. An example would be a remote controlled LED strip controller. If desired, it becomes possible to "dim" the lighting in the room, to give rest to the eyes. It is also appropriate if a child is sleeping in the room.

Dimming is performed from the remote control, or from a standard mechanical stepless switch.
Chinese converters - what is special about them
Chinese friends are famous for their ability to fake equipment so that it becomes impossible to use. The same can be said for drivers. When purchasing a Chinese device, be prepared for overstated specifications, low quality and a quick failure of the converter. If you are going to build the first LED-lamp in your life, practice and gain skills in radio electronics, such products are indispensable due to their low cost and ease of execution.

What affects the service life of converters
The reasons for the failure of the converter are:
- Sudden power surges in the network.
- High humidity if the device does not meet the degree of protection.
- Temperature fluctuations.
- Insufficient ventilation.
- Increased dustiness.
- Incorrect calculation of consumer power.

Any of these causes can be prevented or corrected. This means that it is in the power of the home master to extend the life of the stabilizing device.
PT4115 LED driver circuit with dimmer
We are talking about a Chinese manufacturer, which is an exception to the rule. A microcircuit, on the basis of which it is possible to assemble the simplest converter just by its production. The PT4115 microprocessor has good performance and gaining popularity in Russia.

Related article:
If the lighting is LED and conventional regulators are not suitable, then they are installed, which are slightly different structurally and technically. Today we will figure out what they are, how to choose and even make such a device yourself.
The figure shows the simplest circuit driver PT4115 for LEDs, which can be assembled by a novice home master without experience with radio electronics. Interesting in the chip is an additional output (DIM) that allows you to connect a dimmer (dimmer).
How to make a DIY LED driver
Any novice master can assemble an LED lamp driver circuit. But this will require accuracy and patience. From the first time, the stabilizing device may not work. To make it clearer to the reader how the work is done, we offer several simple schemes.


As you can see, there is nothing complicated in driver circuits for LEDs from a 220 V network. Let's try to consider step by step all the stages of work.
DIY step-by-step instructions for making a driver for LEDs
| Photo example | Action to take |
|---|---|
 | To work, we need a regular power supply for the phone. It makes everything quick and easy. |
 | After disassembling the charger in our hands, we already have an almost complete driver for three one-watt LEDs, but it needs to be slightly modified. |
 | We solder a 5 kOhm limiting resistor, which is located near the output channel. It is he who does not charger apply too much voltage to the cell phone. |
 | Instead of a limiting resistor, we solder a tuning resistor by setting the same 5 kOhm on it. Subsequently, add voltage to the required. |
 | 3 LEDs of 1 W each are soldered to the output channel, connected in series, which will give us a total of 3 W. |
 | We find the input contacts and unsolder from the printed circuit board. We no longer need them... |
 | ... and in their place we solder the power cord, through which 220 V will be supplied. |
 | If desired, you can put a 1 Ohm resistor in the gap, set all indicators with an ammeter. In this case, the attenuation range of the LEDs will be wider. |
 | After complete assembly, we check the performance. The output voltage is 5 V, the LEDs are not yet lit. |
 | By turning the knob on the resistor, we see how the LED elements begin to “flare up”. |
Be careful. From such a converter, you can get a discharge not only of 220 V (from the power cord), but also a shock of about 450 V, which is rather unpleasant (tested on yourself).
Very important! Before you check the LED driver for performance and connect it to a power source, you should once again visually check the correctness of the assembled circuit. Defeat electric shock life-threatening, and a flash from a short circuit can cause damage to the eyes.
Current converters for light diodes: where to buy and what is the cost
Such devices are purchased in electrical stores or on the Internet resources. The second option is more cost effective. In addition, many manufacturers offer free shipping. Consider some models with an input voltage of 220 V with technical specifications and value as of December 2017.
| Photo | Model | Protection class, IP | Output voltage, V | Power, W | Cost, rub. |
|---|---|---|---|---|---|
| DFT-I-40- LD64 | 20 | 60-130 | 45 | 400 | |
| ZF-AC LD49 | 40 | 40-70 | 54 | 450 | |
| XS0812-12W PS12 | 20 | 24-44 | 12 | 200 | |
| PS100 (open) | 20 | 30-36 | 100 | 1100 | |
| PF4050A PS50 | 65 | 27-36 | 50 | 500 | |
| PF100W LD100 | 65 | 23-36 | 100 | 1000 |
Looking at the prices, we can say that the independent manufacture of a current converter is more suitable for those for whom it is only a hobby. You can buy such a device quite inexpensively.

Summarize
When choosing a current converter for LED lamps, you should carefully calculate everything. Any error can lead to a decrease in the service life of the purchased device. Despite the low cost of the stabilizer, it is rather unpleasant to constantly throw money away. Only in this case the driver will serve its due period. And when self-manufacturing follow the rules of electrical safety and be careful and attentive when assembling the circuit.
We hope that the information provided today was useful to our reader. You can ask any questions in the discussion - we will definitely answer them. Write, ask, share your experience with other readers.
And finally, a short video on today's topic:
LEDs continue to push the next frontier in the world artificial lighting, confirming its superiority with a number of advantages. Much of the credit for the successful development of LED technology belongs to power supplies. Working in tandem, the driver and LED open up new horizons, guaranteeing the consumer stable brightness and the declared service life.
What is an LED driver, and what functional load is assigned to it? What to look for when choosing and is there an alternative? Let's try to figure it out.
What is an LED driver and what is it for?
Scientifically speaking, an LED driver is an electronic device whose main output parameter is a stabilized current. It's current, not voltage. A device with voltage stabilization is commonly referred to as a "power supply" with an indication of the rated output voltage. It is used for asking LED strips, modules and LED-lines. But it's not about him.
The main electrical parameter of the driver for the LED is the output current, which it can provide for a long time when the appropriate load is connected. Individual LEDs or assemblies based on them act as a load. For a stable glow, it is necessary that the current indicated in the passport data flow through the LED crystal. In turn, the voltage on it will drop exactly as much as needed. p-n junction at a given current value. The exact values of the current flow and forward voltage drop can be determined from the current-voltage characteristic (CV) of the semiconductor device. The driver receives power, as a rule, from a constant network of 12 V or a variable network of 220 V. Its output voltage is indicated in the form of two extreme values, between which stable operation is guaranteed. As a rule, the operating range can be from three volts to several tens of volts. For example, a driver with U out \u003d 9-12 V, I out \u003d 350 mA, as a rule, is designed to connect three 1 W white LEDs in series. Each element will drop approximately 3.3 V, for a total of 9.9 V, which means it falls into the specified range.
Three to six LEDs of 3 W each can be connected to a stabilizer with a voltage spread at the output of 9-21 V and a current of 780 mA. Such a driver is considered more versatile, but has a lower efficiency when turned on with a minimum load.
An important parameter of the LED driver is the power that it can deliver to the load. Don't try to get the most out of it. This is especially true for radio amateurs who make series-parallel chains of LEDs with equalizing resistors, and then overload the output transistor of the stabilizer with this home-made matrix.
The electronic part of the driver for the LED depends on many factors:
- input and output parameters;
- protection class;
- applied element base;
- manufacturer.
Modern drivers for LEDs are made according to the principle of PWM conversion and using specialized microcircuits. Pulse-width converters consist of a pulse transformer and a current stabilization circuit. They are powered by 220 V, have high efficiency and protection against short circuit and overload.
Single-chip drivers are more compact, as they are powered by a low-voltage DC source. They also have high efficiency, but their reliability is lower due to the simplified electronic circuit. Such devices are in great demand for LED car tuning. An example is the PT4115 IC, you can read about a ready-made circuit solution based on this microcircuit in.
Criterias of choice
I would like to note right away that a resistor is not an alternative to a driver for an LED. It will never protect against impulse noise and power surges. Any change in the input voltage will pass through the resistor and result in a step change in current due to the non-linearity of the I-V characteristic of the LED. A driver assembled on the basis of a linear stabilizer is also not the best option. Low efficiency severely limits its capabilities.
You need to choose an LED driver only after you know exactly the number and power of connected LEDs.
Remember! Chips of the same size may have different power consumption due to the large number of fakes. Therefore, try to purchase LEDs only in trusted stores.
With regards to technical parameters, then the following must be indicated on the housing of the LED driver:
- power;
- input voltage operating range;
- operating range of output voltage;
- rated stabilized current;
- degree of protection against moisture and dust.
Open-frame drivers powered by 12 V and 220 V are very attractive. Among them, there are various modifications in which you can connect either one or several powerful LEDs. Such devices are convenient for laboratory research and experiments. For home use, you still have to place the product in the case. As a result, monetary savings on an open-type driver board are achieved at the expense of reliability and aesthetics.
In addition to selecting a driver for an LED according to electrical parameters, a potential buyer must clearly understand the conditions for its future operation (location, temperature, humidity). After all, the reliability of the entire system depends on where and how the driver will be installed.
Read also


