Railway track. How to make a do-it-yourself railroad layout? DIY train modeling for grandpa
Toy railroads are inherently associated with childhood. Many of us at a young age once had a plastic or iron prefabricated model railroad. And those who could boast of a foreign-made model were considered lucky.
In modern times, the hobby of toy railroads has grown into a major modeling industry. Moreover, this business is already more focused on an adult audience than on children.
Trees, houses, roads, cars, relief surroundings were added to the main attributes - a track and a locomotive with wagons. And a table with a full-fledged model of the railway, with many details and trifles, is already a real art.
Abroad, such products cost from 2 thousand dollars, but in this article I will tell you how to make a full-fledged model of a toy railway with your own hands.
Table
You will need space for the layout. Ideally, this should be a separate table, but you can get by with a small table, or just a fenced-off area on any suitable surface. It all depends on your desire and scope. I recommend starting with a small area, like part of a table, and then, if inspired, make a large layout. It is better to start small than to immediately take on a large amount of work and throw it halfway.
starter kit
The thing without which it will not be possible to make a model of the railway is the railway itself. Or rather, a set of rails, a train and a power system for it. Here, alas, there are no alternatives - it's all you need to buy. It's good that there are plenty to choose from in the market today.
sketch
To know what you are moving towards, you need to have a goal in front of your eyes. Make a rough sketch on paper - where what should be, and what it will be general form your layout. Surf the Internet, look at the numerous models of railways and take note of what you like - bridges, crossings, houses, stations. You can make a model of a station in the Wild West, or you can make a station in the center of a modern city. But be sure to decide before you get to work. And make markings on the table so as not to suddenly discover that the track goes beyond the boundaries of the table, or that the barrier will cling to a passing train.
Mountains
The presence of a mountain, with a tunnel through which the train will pass, will be the decoration of the layout. To create a small mountain you will need polyurethane foam, plywood, knife, alabaster and sandpaper.
First, think over and, if possible, draw a sketch of the future mountain. Then knock over the rails a small box of plywood or other suitable material. Make sure that the size of the box will allow your train to pass freely through the tunnel. Then start applying foam around the box, with pauses of one and a half to two hours, to allow the layers to dry and not sag under their weight. After you apply the foam of the desired volume, leave it to dry for a day, no less.
In a day, pick up a knife (more convenient - a clerical one), and start picking the mountain - cut off the extra pieces, giving it the shape you intended. Cut out hollows, crevices, try to make it as natural as possible.

Then you will need alabaster. Dilute it with water, and cover the entire mountain with a thin layer up to 3 mm. It dries quickly, so dilute it in small portions. Then again wait a few hours until everything hardens - it is better not to use a hair dryer.
Now you need to paint over the mountain in gray. To do this, buy a can of primer in any auto shop, the color of a gray stone, and you can paint your mountain. Just test the paint on something else first to make sure it's the right color for you.
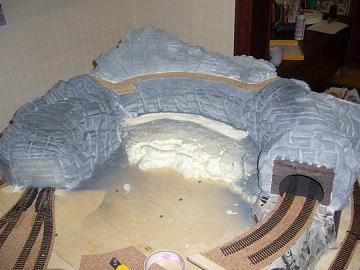
Next, use sandpaper and rub the mountain in places to remove layers of primer in some places. This will give the mountain a more naturalistic look, so that it is not a uniform color, but a shade from light to dark gray. You can repeat painting and sanding several times until you get something that suits you. You can also paint individual pieces of the mountain white or black for more believability.

Finally, take green paint and tint the pieces of the mountain also in the color of greenery - this way it will be even more naturalistic. Only the paint should be a believable, "mossy" color.

Your mountain (or slide) is ready. Congratulations, you've already done a lot of work. Next in line are the rest of the relief details.
Here everything depends on your imagination, size free space and suitable parts you have. Fill in the unoccupied tabletop with, for example, fake turf that is sold in stores. Toy houses, figurines of people, vehicles, railroad crossing, a train station with a station, a bridge, trees - these are all the details that will decorate your layout. Many of them can be found in Lego bricks, or just individually in toy stores. Train modeling firms also sell great kits, but be prepared to spend a lot of money if you do.
You can make a layout on a large table, with lots of details, terrain, electric movement and a real miniature town. But you can also make a small model - a battery train, with a small piece of landscape and a few decorative elements.
Whatever option you choose, the model you made will be an adornment of any home and will be of interest to any company - both children and adults.
For young modellers and enthusiasts who feel sorry for or do not have money for purchased rails, but have time, below we present you an example of a budget modeling railway track.
foundation our road is a stretcher, knocked together from slats and plywood. Its size can be approximately 3000x500x120 mm or more. It depends on the area of the room. The role of the ballast is performed by wooden bars on which the sleepers are laid. Homemade rails are attached to the sleepers.
And to make the canvas of your road look like a real one, grease it with liquid carpentry glue and sprinkle it with sand sifted through a fine sieve. When the glue dries, shake off the excess sand. You can do otherwise: paint the stretcher with paint. Of course, you must first putty it, clean it with sandpaper ...
Sleepers can be made from strips of plywood or pine planks 60x10x4 mm. In order not to mess with the manufacture of each sleeper, the work can be simplified. Take a sheet of plywood, mark it according to the size of the sleepers and cut it with a fine-toothed hacksaw, then clean up all the irregularities with a bastard file and sandpaper and paint oil paint or black ink.
Finished sleepers are laid on the canvas - they are glued at a distance of 20-25 mm from each other.

They need a stamp to make them. It is made from two metal rectangular bars of the same section.
On a milling or planer process these bars. On one, mill a groove 7x10 mm in size and two grooves with a diameter of 3 and 4 mm, on the other - the same grooves, but instead of a groove, a protrusion. You get a fixture like a punch and a matrix. The rail head is stamped in the recess (see figure below). For a 1:50 model, a 3.5 mm notch is used, and for a 1:100 model, 2.5 mm.
Let's talk about the sequence of operations. Take a strip of tin (see figure below), draw a center line, fold. Insert a wire with a diameter of 2.5-3 mm inside - for the rail head, crimp it with wire cutters and now lay it in a stamp. Clamp the stamp in a vice, and you will get a rail that is even along the entire length with a good head and neck.
Without removing the rail from the stamp, flare its base with a screwdriver in different directions and level it with a mallet.
Attach the finished rail to the sleepers with carnations. Do this carefully and as accurately as possible. First of all, mark the line of one thread of rails along the entire length of the canvas. To do this, pull the thread exactly at a distance of 15 mm from the edge of the sleepers, reinforcing it on two nails temporarily driven into the first and last sleepers. Lay the rails and nail exactly under this thread. At the same time, they should neither touch it nor pull it to the side.
There is another way. Plan out a rectangular bar measuring 1000x32x10 mm. Lay it in the center of the ballast, secure it with nails and lay rails on both sides of it. You will see how exactly they fit, and the distance between them will be accurate along the entire length - equal to 32 mm between the heads.
It is necessary to connect the rails to each other at the joints with rods that are inserted into the rail heads. Rail joints should be in the middle of the sleepers.
When you make one section of the track, test the locomotive on it and proceed to the construction of the next section.
Fasten the sections together with metal hooks or loops attached to the stretcher.
So, you have built a railway track, laid sleepers, rails. Now you need to install the support masts and pull the contact wire.


Support masts. From a bar with a length of 200 mm and a section of 21 x 21 mm, cut out a support. For the base, take plywood (30 x 30 mm). Drill a hole with a diameter of 10 mm in the center, clean it with sandpaper and fit the bottom of the mast under it.
You can make the suspension on which the contact wire is attached from any wire with a diameter of 2-3 mm. Do not forget to wind the spring as shown in the figure, for this, take a nail with a diameter of 2 mm, clamp it in a vise and wrap a spiral around it with a height of 10-12 mm. The pendant is ready. It is attached to the supporting mast through a bracket and, in addition, for greater strength, it is pulled up with a string - an ordinary thread or thin wire.
insulators there may be plastic beads or small buttons.
contact wire runs along the entire railroad track. It is supported by the support masts that we just told you about, and the support wire. It is fixed above the contact wire and connected to it by wire braces.
To make the model portable, the overhead wires have a break in several places and are connected by connectors - two metal plates: a contact wire is soldered to one, and a support wire to the other. The plates are equipped with a lock - cutouts are made on one, rivets are soldered on the other. Thanks to this, the plates are easily and quickly separated.
You can "green" the finished railway. The material for the "grass" is dry sawdust, painted with gouache in green color. They are sifted through a sieve onto a tablet smeared with carpentry glue, drying oil or oil varnish.
"Trees" are made from a rubber sponge, foam rubber or a bundle of copper wire. The bundle is folded in half and twisted to the distance of the "trunk", and for the "branches" the wire is disconnected. In order for the “tree” to “turn green”, it is dipped in liquid glue, allowed to drain and the “crown” is sprinkled with finely chopped dyed tissue paper.
Thinking about how to make a model of the railway with your own hands? To implement such an idea, you will need to stock up on a huge amount of patience, since such work does not tolerate haste. In addition, before construction, you will have to study a lot of theoretical information and draw up competent drawings. Read more about all these nuances in our article. Be sure that very soon you will be able to build your own railway to decorate your apartment.
The main types and features of modeling
A miniature railway is such a piece of furniture that will please the eye of not only children, but also adults. If you are interested in a do-it-yourself model of making railways, then most likely you had a similar toy in your childhood and decided to bring your memories to life. Well, or you just want to please your household with an unusual handmade decoration. Be that as it may, in the following sections you will find detailed instructions, which describes each stage of work on the layout in detail.
To make a real beautiful layout, you will need to work hard, because even the smallest detail of the composition requires close attention. If you have ever studied the construction of real railways, then it will be much easier for you to realize your idea. However, do not be upset if you do not have the necessary skills, because all necessary information can be easily found on the internet. For example, our article will present several original ideas, which will allow you to make a high-quality and unusual layout for your home.
As for the main varieties of layouts, they are quite difficult to classify. If we talk about the scale, then you can find small medium and huge layouts that fill almost the entire space of the room. Some compositions are used for a toy train to ride on them. Others - serve as part of the interior. Quite often, various elements of nature can be found on mock-ups: rivers, mountains, forests and fields, and sometimes they may simply be absent, and the railway itself is located on an ordinary plane. In general, there are quite a few options for making a layout, especially for a person who will do it for the first time.
What materials will be required for work?
Have you decided to make a model of the railway with your own hands at home? First you need to decide on the materials that you will use in the construction process. This can be done only if you carefully study the options for ready-made layouts, the photos of which are presented in our article. In this list you can find the most commonly used materials in construction and their purpose:

- plywood sheet - suitable as the main plane for the layout;
- construction foam - perfect option to create mountains with a tunnel;
- boards and cardboard - suitable for creating decorative objects.
It should be noted that the possibility of using various materials limited only by the skill and imagination of the master himself. For example, if you are good with plaster, then you can quite make several objects out of it for the layout. Can you design bridges? Why not add this design to your composition. What about real water in the layout, which will symbolize the river?
Also, do not forget that some items can be purchased in stores, and not made by hand. For example, it will be quite difficult for a novice designer to make a human figurine from improvised materials, but such an element can be ordered on the Internet at a very modest price. Or you can place your collection of sports cars on the layout so that it no longer gathers dust on the shelf, but pleases the eyes of your guests and family members.
List of required tools
We have already said that it is easiest to make the basis for a railroad layout with your own hands from a large sheet of plywood. You can buy such material in a furniture store or remove it from an old unnecessary bed. However, what tools may a designer need in the process of work? As a rule, they directly depend on the materials that you decide to use. Although in the list below you will find the most commonly used tools, as well as their "field of activity".

- Electric jigsaw - indispensable for working with plywood and wood.
- Construction adhesive is ideal for attaching small parts.
- Sandpaper - suitable for processing uneven surfaces.
In the process of work, you will need quite a few more different tools that are related to materials for work. For example, if you want to paint the layout with different colors, then you will need brushes of different fineness. Decided to add a couple of metal parts? Do not forget to get a grinder with discs and welding machine with electrodes.
As you can see, the list of tools for work can be quite extensive, so it is recommended to find everything you need in advance so that you do not have to be distracted by anything in the process. If you don’t have some kind of tool at home, you can ask your friends for it, but in no case do not resort to alternative options(screws instead of nails). Making a layout is a very delicate work that requires certain rules to be followed.
Design or drawing
How to make a model of a railway at home step by step and with your own hands? You will find detailed information on this in the following sections. However, before you start building something with your own hands, you need to correctly draw up drawings of the future product, which would take into account all the features of the composition.

First of all, you need to decide on the dimensions of the layout. It should be understood that the larger the area of \u200b\u200bthe product, the more small details you will have to add to it. A novice designer should first learn how to make small layouts, and only then move on to large compositions. Although if you are confident in your abilities or work under the guidance of a real professional, then you can forget about this rule.
However, do not forget that not only the quality of the future design, but also its decorative look. As a rule, people start making layouts when they already have a certain idea. For example, the master wants to include in the composition several mountains with a tunnel, a river, a bridge, as well as a small village in the middle. Such a layout may require quite a lot of details, however, it will look very decent.
We make a sub-model
We make a model of the railway with our own hands. The first step will be the manufacture of a sub-model, on which all the main elements will be placed. It is strongly recommended to use a sheet of plywood as a building material, since it has good enough strength and is light in weight, which will allow you to drag the layout even alone. You can buy such a product at any furniture store, but if you want to save money, then go to the construction base, where a sheet of plywood of the right size will be sawn off right in front of the buyer.

As soon as the plywood sheet is ready, it must be carefully processed so as not to be damaged by sharp edges in the process. For this purpose, you can use an electric jigsaw with a special nozzle or medium grit sandpaper. Try to process plywood as carefully as possible, because then this may not be possible. In addition, it is much easier to apply paint and stick on a smooth surface. small parts. And if you want to cover the layout water-repellent coating, then it is simply necessary to process a sheet of plywood with sandpaper.
Landscape work
The next step in making a model of a railway with your own hands from plywood is to work on the landscape. This stage can be called the most difficult, since the quality of the future design depends on its correct implementation. If you can not realize the idea the first time, then do not despair. At any time, you can throw away the plywood sheet and purchase another one. Luckily they are quite inexpensive.

A variety of methods can be used to work on the landscape. For example, mountains can be made from ordinary building foam, releasing it from a spray can in the right amount. If you mean that a tunnel will pass through such a natural element, then you should take this into account in advance by placing a plastic or cardboard pipe on the layout. After using the foam, you don't even need to take it out. Let it lie inside the mountains, and the seams can be masked with almost anything.
Another indispensable material for landscape work is gypsum or building putty. Unlike foam, such material is much easier to modify to the desired shape, but it is most often used as a decorative element, and not the main one. Firstly, gypsum weighs quite a lot, so you should not make large objects out of it. Secondly, over time, putty can crack, especially if you do not use a water-repellent mixture during construction. In general, there are a lot of options for working on the landscape, so you should approach their choice wisely.
Sanding and painting work
The next stage in the construction of a do-it-yourself railway model is grinding and painting work. If you used wood for construction, then you can eliminate all irregularities with ordinary sandpaper. Dried building foam is easiest to trim with putty, applying it to all uneven areas. After that, the mountains will become quite smooth. If this doesn't suit you, don't be afraid to chip off a couple of pieces of putty to give the natural formation a more natural look.

As soon as the landscape acquires the desired shape, we open several cans of acrylic paints, pick up brushes and start creating. It is best to have an image of real mountains with vegetation in front of you in order to better understand which colors from the palette should be used first. Do not be afraid to apply several layers of paint, as this will only give the future composition a natural look. For example, you can paint stones in grey colour, after which add a little white paint on top, thereby depicting snow on top.
Laying the railroad
We are still making a model of the railway with our own hands and are gradually approaching the longest stage of construction - laying the railway. As a rule, most craftsmen prefer to purchase ready-made material in toy stores, since for the manufacture of the railway with my own hands it can take an unrealistically long time. In addition, plastic parts are quite cheap and it will not be a pity to break them in case of inaccurate use. This is especially true for those people who have children in the family.

The railroad is attached to the layout using ordinary building glue. You should not use too long parts while working, as this can give the road an unnatural straightness. It is best to make it so that it has more turns and elevations. Remember that you should not use too much glue to attach parts to the surface. Also on any tube you will find information that for a good fixation, the pressing force of the part to the surface plays a huge role, and not a long pressing time.
Creation of scenery
Once the main element of our layout is done, we can start creating various decorative elements. You can buy such parts in toy stores or make your own from building materials if you have a talent for it. For example, on some layouts you can see ordinary medical cotton wool, which plays the role of snow, although most professional designers still prefers to use a special mixture, which is sold in small cans in Christmas shops.

The same applies to other elements of the composition. You can make lanterns for a model of a railway with your own hands from ordinary plasticine or buy a ready-made decoration in a store. By the way, if you are planning to make a layout for Christmas, then it would be a very good idea to replace the standard street lighting on christmas garlands, however, such a solution should be foreseen in advance by cutting out several dozen holes for light bulbs in plywood - this way the wires will be at the bottom, attached with electrical tape.
Video and conclusion
We hope that now you better understand what it is to make a mini-model of a railway with your own hands. If the information from our article seemed not enough to you, or you still have some questions, then we recommend that you watch a short video in which the master demonstrates the entire process of making a landscape with his own hands. Such video material will be useful for both a novice designer and a real master of his craft. If you watch it in its entirety, you will certainly learn how to craft with the help of improvised materials. beautiful mountains and other natural objects.

The history of this crafts short. During the summer holidays I had quite a lot of free time and wanted to do something do it yourself. One day, passing by a railway crossing, I had an idea to make a working model of such a seemingly ordinary object.
For foundation you need a drawer from the table. We mark the locations of objects on the box and drill holes for attaching the semaphore and lanterns, as well as drill holes for wiring the house.
For the house you will need:
- a piece of thin plywood;
- thin transparent plastic;
- matches;
- whatman;
- led with wires to illuminate the house.
We cut out the walls and the roof of the house, then saw through two windows in the walls and glue the resulting parts together with hot glue, paint. We cut glass from plastic. They should be slightly larger than window hole and glue them on. We cut and paint matches. Using super glue we make window frames. At the end, we attach the LED in the center of the roof of the house.

Now let's deal with the road and the landscape:
Road consists of glued finely sifted screenings, which are rolled. The surface has been painted and marked.
Railway track we do the same as the road, only we add a second layer (smaller width). On top we lay sleepers made of ice cream sticks and rails made of thick aluminum wire.

Grass made of shavings painted green.
Lanterns will need :
- LEDs with wiring;
- Housing conventional ballpoint pen and a rod from helium;
- incomprehensible gizmos that lay in my desk.
Putting it all together, we get:

Semaphore:
- Dowel for skirting boards
- Pen body and helium pen refill
Cut off the top part of the dowel. Bend the rod at an angle of 90 degrees. We cut off half of the handle, drill the cut off part of the dowel and the handle, connect them.

barriers: We make them from two pieces of plywood of different thicknesses and make two holes at the ends of a narrow strip.
Electronics and mechanisms
We make a simple multivibrator circuit and attach it to semaphores. They turn on when the barriers are lowered using a makeshift "relay".


