DIY boat: the best projects and tips on how to make a wooden or plywood boat. Double folding boat Preparation of material and tools
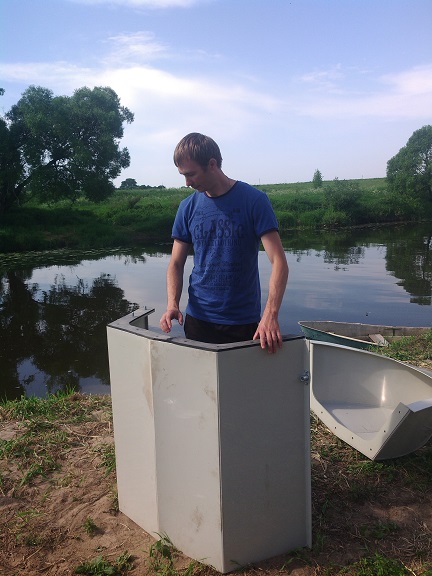
First of all, hello everyone! This boat has been in my dreams for a long time, - a few years ago I made a model of this boat, but everything was somehow lacking. And then my "Ufimka" burst (it's time already, it's from 1985), so much so that a meter-long hole formed in the side in the form of the letter "G". Believe me, if I wanted to, I could also repair it, but imagine how much material I had at once: oarlocks, and excellent bottom and side fabric rubber, oars, etc. It remains for small - to purchase sheet plastic. I considered aluminum as an option, but after getting acquainted with the properties of polypropylene (it is also lighter than water), I finally settled on plastic. I’ll make a reservation right away, nothing came of the propelen - about 1000 shek one sheet, but I need at least two. I picked up 3mm plastic with the main properties: do not crack under bending load and keep the rivet line from destruction (many samples cracked exactly along the line of holes for rivets) at a price of 200 NIS per sheet. My initial conditions were the following: a folding boat, with a maximum folded length of 1.5 m, 2-seater with a load capacity of at least 180 kg, absolute buoyancy, i.e. not sinking even when completely flooded, stern, keeled with a keel transition to a minimum at the stern, stable in waves, easy to use with oars and with a low dead weight, with an option for a small electric motor and with useful gadgets, such as a chest of drawers for accessories and boxes for bait under the seats, light racks for spinning rods and of course with a minimum time for installation and dismantling. I have gone through all of these options. Boat weight 18 kg. And now its dimensions: in working order, length 2.5 m, width 0.95 m, height of the sides 0.3 m, total height 0.45 m; in transport condition: length 1.5 m, width 0.3 m, package thickness 0.08 m. The kit also includes 2 seats, aft insert, frame stiffening tubes and oars. Now about how I had to achieve some parameters. Buoyancy - strips of material similar to soldier mattresses are glued along the sides (they do not sink and are moisture resistant), the seats and feed are glued with the same strips, all the tubes of the frame are plastic with plugs at the ends, which does not allow water to fill them, in extreme cases, if this will not be enough (although this is unlikely) I have marked places on the bow and stern of the boat for attaching 2 floats, similar to those that the rescuers from the famous series have). As a connecting material, I used rubber strips from the bottom, and the aft flexible part from the side of my "Ufimka", planted on glue with subsequent riveting. He carried out all the work in his apartment, in the absence of household members - fortunately, when they arrived, the whole system easily hid behind the sofa.


I indicated the weight of the boat -18kg. Cost: 400 sh - plastic, 100 sh - glue and rivets, 100 sh - pipe and couplings for the stiffening frame, 50 sh - connecting screws with wing nuts and fasteners for onboard plastic. Everything else: rubber and oarlocks from an old boat, plywood for seats and oarlocks - trimmings, edging along the top of the side - trimming pipes for drip irrigation. The rest is hands. And how much it can cost for sale, I don’t know, maybe the fishermen themselves will appreciate it? As for the pressure on the lower seam, I distributed the main pressure (in a sitting position) into 3 seams, there is an option for connecting with a tube and side seams for oblique supports, as well as the keel part. As for the flooring, it's enough wooden lattice 50x60cm between the seats with two transverse ribs along the outline of the bottom. I also want to pull the umbrella fabric over the top with Velcro from the bow of the boat to the first seat in case of rain, to keep things dry. At first I wanted to make a 3-meter one, but I had to buy another sheet of plastic with a large residue after cutting. So I went to the minimum.
PS. The cost of materials is indicated in NIS.
Production time, so, leisurely, - about a week. It took a lot of time to find the right plastic. After all, I am retired, so when my household members left, I took everything out from behind the back of the sofa and did it. I already wrote that I had rubber, oarlocks and oars from a broken boat, and the rest is a matter of technology. But first I made a 25 cm model of thin plastic. And with this boat it was easier for me also because it is my second homemade boat. The first was a frame plastic pipes and thin canvas. She was in a disassembled state no longer than a meter. In short, a bag with tubes and a cover. Here's what I want to do as well. That one was even lighter, and with the current choice of material, there should be shine in general.
As for the pattern, everything is simple there. The width of the canvas is 30 cm, the short part is 1 meter long, the bow is 1.5 meters. Step back from the nasal edge 1 meter and reduce with two arcs to the middle. The photo is clearly visible. But, I advise all the same to start with a small model. There, instead of rubber, you can use adhesive tape (adhesive tape). The model can provide all possible options and mistakes are much easier to fix. To be honest, I did not betray the name of the plastic. At first I was looking for polypropylene, since it is not brittle and lighter than water, but it has an exorbitant (for me) price. Then he began to select according to the principle: crushed, felt, broke. The main condition is not to burst at full bend (this means that the body will not burst upon impact), not to crack along the holes for the rivets. And I kept the buoyancy in the flooded state due to additional side pads from the soldier's rug. Glue is ordinary rubber, but the main condition for gluing: cleaning, cleaning and degreasing the surfaces to be glued, and obligatory curing for min. 15 minutes after applying the adhesive, before bonding. And I also consider it very important to glue the edges of the rubber strips along the entire length of the boat with thin strips of rubberized fabric, like in factory boats.
About changes. I have already changed: the boat is designed for 2 people, but with one person the center of gravity goes to the "bow" of the boat and it goes down, and the stern rises, the wave overflows, so the seat for the rower moved closer to the center of gravity, which is easy to determine from the layout -models. As for the board height, I proceeded from the maximum cutting of a standard sheet. but, for the future, I think that a side width of 40 cm, instead of 33 cm, will still be preferable, and stability will increase by increasing the overall width of the boat.
The boat is double in terms of the number of seats and carrying capacity.
You don’t need to beat anyone with oars, when there are two in the boat, then the seat is inserted closer to the “bow” of the boat, and when there is one, then 30 cm to the stern. As for convenience, it is naturally more convenient for one, but, if desired, the boat will withstand the second. Good luck!
Foldable boat under mercury 3.3
Homemade folding boat
InstaBOAT For Sale_Setup the Boat
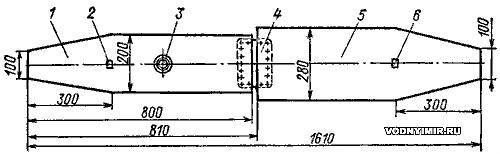
The main goal pursued by our designers when starting to develop folding boat "Sprutbot-2600", this is the creation of a light and inexpensive portable motor boat for a 5 hp engine. With.; with such an outboard motor, the boat begins to plan with three people on board. Ease of transportation was a special requirement. cars in the luggage compartment.
Folding boat parameters:
motor type: up to 5 hp
Dimensions: Length 2.6m. Width 1.10m. Height 0.4m.
Package dimensions (unassembled: 1x1x0.6m
Weight: 30kg.
Load capacity: 200kg.
Max speed: 25 km/h.
boat material: impact-resistant polyethylene (HDPE).
As a body material, in contrast to the "old-fashioned versions", high-impact polyethylene (HDPE) is quite strong and ductile, corrosion-resistant, well-welded.
To reduce the cost of manufacturing the hull and reduce the amount of necessary technological equipment, the contours of the motorboat, as well as its design, were decided to be simplified as much as possible. At the same time, we tried to make sure that the reduction in weight and the simplification of the hull contours did not cause a deterioration in the seaworthiness of the future boat.
The navigation area of most collapsible boats is limited to small rivers and reservoirs, we equated the Sprutbot-2600 in this respect with existing non-collapsible motor boats. The design of the boat ensures safe navigation of the boat with a full load in waves up to 0.38 m high, which practically corresponds to the operating conditions of the previously produced Yantar-2 and Neman models.
Boat hull lines- sharp-chinned with a constant deadrise angle of the bottom (12.5 °) on two thirds of the length of the boat. The bow lines have a large deadrise, but are made thick enough for the boat to climb the wave well.
For reasons of manufacturability of the design and to ensure the possibility of laying the boat in a package that is small in size and convenient for storage and transportation, the boat hull is divided into three rigid sections. Sections are connected with bolts through flanges, which are rigid frame frames (a similar design is used on sectional boats "Malyutka" and "Malyutka-2"). The watertightness of the connections is ensured by rubber gaskets between the flanges.
The main method of connecting parts and assemblies of the boat structure is extrusion welding with a special tool, which provides double strength at the welding point. Riveting or rolling is completely absent. With sufficiently large dimensions, a boat that lifts 225 kg weighs only 60 kg. It can be noted that the specific volume indicator ( L. V. N per 1 kg of weight) of our "Autobot" is significantly higher than that of currently produced 4-meter motor boats. This was achieved through the use modern materials and technologies of welding and cutting parts.
Assembly order. You will need no more than 15 minutes:
1. Unloading - 2min

2. Installation of seals and fixing bolts - 6min
3. Pulling parts of the boat with bolts - 4 min.


4. Install benches - 2min

5. Launching - 1 min.

Video demonstration of the boat
Sending equipment across Russia by a transport company.
I have long wanted to have a light boat that can be folded into a small package, in which it would be convenient to fish or travel, reaching the most distant and tempting corners of the Karelian Isthmus, in which two people could sit, and even put a couple of backpacks. From what I saw in stores, some did not suit me as purely single-seat (55-ruble “hunting”, for example), others turned out to be too heavy and not suitable for transportation in the same bus. As a rule, they were all cramped, uncomfortable for rowing, equipped with short oars, under which you could not get anywhere even in a light wind.
Finally, the idea of building folding double boat, which met all my requirements, on its own. I made such a boat, and have been sailing on it for six years now. Tourists and fishing enthusiasts who met on the way asked more than once where I bought it? And most often they did not believe when I explained that it was not so difficult to make such a boat yourself. So I decided with the help of the collection to tell about it in more detail and make it available to everyone. (Or maybe some factories will also be interested in my boat?)
 The length of the boat is 3 m, the overall width is about 1.1 m. With the total weight of the boat less than 20 kg, its carrying capacity is more than sufficient for going out together with all the equipment. Even with a load of 400 kg, you can safely continue swimming on it, although at the same time it sits in the water up to half the height of the side.
Under two-meter swing oars, the boat has a good speed - 8-9 km / h, it is easy to control; on it you can freely make large transitions. Seaworthiness restrictions are the same as for any other rowing "two". Once I had a chance to test my folding boat on a real sea wave- in the White Sea. In fresh weather, on an 80-centimeter wave, we safely reached the place.
The boat is also convenient for fishing: it easily goes along the reeds, does not sail; stable enough - it does not roll over if you stand up to your full height or even one person sits on the edge of the side.
The boat is assembled in 15 minutes, the same amount of time is spent on disassembly. A fully folded boat turns into a package measuring 1X0.45X0.2 m, stacked on a lightweight three-wheeled folding cart (the wheels fold like an airplane). With such a package, I can get into any transport, it almost does not take up space at home.
Now about how to make such a boat. I collected it on winter evenings, slowly, spending two or three hours every day. Of course, now, having experience and not wasting time thinking, I could do it much faster.
The main material for 12 flat body parts are duralumin trimmings. I used duralumin 0.5 mm thick and I think that this thickness is quite enough; the use of a thicker sheet (0.8-1 mm) will make the boat heavier, although, of course, it will simplify the design and make it more reliable. To mark the mating edges of parts 3-9, 4-10, 6-12, 5-11, make a cardboard template (one template is enough, since the bow and stern of the boat are the same, symmetrical).
(conditionally shown are keel squares placed outside)
increase  1-12 - duralumin parts; 13-15 - keel square, duralumin 30X30; 16 - rubberized fabric; 17 - butt shorty 30X30; L = 200, 2 pieces; 18 - washer-lining in the area of the bolt hole, δ = 1.
Obviously, this pairing could also be done in a straight line, but it would be better if it were a curve with a crescent (deflection arrow) of about 50 mm. If I had to make a second such boat, then I would try to make deadrise in the bow so that the oncoming wave would not hit, and I would make the stern wider and transom - there would be more space and I could hang the Salyut motor.
As waterproof flexible "hinges" connecting duralumin parts, 50- and 100-mm strips of any reliable rubberized fabric are used; I layered a 9mm drive belt into 3mm layers. The transverse wider strips are made whole, the longitudinal ones are split. At the intersection, the joint is made on B88 glue with a "burr" over a length of 25 mm. I spent a lot of time on these connections, but for all six years I didn’t have to use a repair kit (I always have pieces of a belt and glues with me).
a - fixing the side branches of the frame and transverse struts; b - fastening of stem crossbars; in - support cans.
1 - payol; 2, 3 - longitudinal stem spacers; 4, 5 - folding "fenders", duralumin tube Ø18 with a butt hinge lock and a key; 6 - central frame; 7 - nasal transverse strut; 8 - bow bank, plywood 1000X180X6; 9 - aft transverse strut; 10 - feed bank, plywood 1000X180X6; hang on three or four loops to the crossbar; 11, 12 - stem cross member, square 30X30 L = 100 mm; 13 - square 15X25, which rests on the ends of the bank; 6 pcs; 14 - frame position lock along the length of the boat, strap 20x40x2, 6 pcs.
The strips are superimposed on the duralumin from the outer side of the “plating”, glued to it with the same B88 glue and riveted with aluminum rivets d = 3 with a single-row seam with a step of 15 mm. At the extremities, under the heads, riveted everywhere on the inside of the skin, washers were placed. According to the keel fold in the DP (it was made only in order to reduce the dimensions of the package) on det. 1 from one side and on children. 4-6 on the other, three parts (13, 14, 15) of the keel square are riveted simultaneously with a strip of fabric. When unfolding the skin - assembling the boat, the ends of these parts are rigidly connected by two 200 mm butt plates 17 (sections of the square 30X30) on M8 bolts - two on the side of the joint.
The rigidity of the hull of the assembled boat, in addition to this outer keel, is provided (see the "set" diagram):
- plywood flooring, against the ends of which longitudinal stem spacers rest with their forks;
- central frame;
- "fender bars" along the upper edge of the side;
- nasal transverse strut;
- bow bank for the rower;
- aft transverse strut with a stern bank.
Plywood floorboard, assembled from two parts with a flexible hinge in the middle, is laid freely on the bottom. Along the length, its position is fixed by longitudinal struts fitted in place. In the middle part of the boat, a middle frame is placed on it.
1, 5 - plywood sheets δ=6; 2, 6 - rectangular cutouts - nests for fixing the position of the lower end of the folding rack under the transverse struts; 3 - duralumin socket (shoe) with a shaped groove for fixing the lower end of the rack under the bow can; the position of the can along the length of the boat is selected depending on the height of the rower; 4 - soft hinge (belt, rubber) for folding the floorboard.
The bottom branch of the frame is made of a dural tube, the side branches and struts are made of a 25X25 duralumin square. The connection of the branches on the cheekbones is hinged (rivet) for the possibility of folding. The struts are hinged at one end, and at the other - on a bolt with a wing nut. To attach the frame to the skin, one hole with a diameter of 8 mm is drilled in the upper part of the side branch and a free shelf is cut off; the end of the frame is between the skin and the tube of the fender.
a - central frame; b - transverse strut; c - fastening of the "fender" and the ends of the side branches of the frames; g - longitudinal stem strut.
1 - dural square 25X25 or 30X30; 2 - M8 bolt; 3 - duralumin tube Ø18-20 mm;
4 - sheathing.
On the bow and stern transverse struts, vertical (side) squares and racks - pillars in the DP - are also hinged. When assembling the boat, the entire set is assembled into a rigid system with ten M8 bolts with wing nuts passed through the fender. Two of the same bolts are attached to the sheathing with stem crossbars pivotally attached to the ends of the longitudinal struts.
To make the fenders folding, the simplest loop locks were used. One end of the loop bent along the tube is attached to one tube tightly, the second is hinged so that the other tube freely rotates around the axis. In the center of the loop there is a hole for the M8 bolt, which fastens the tube to the bead (the nut is superimposed on the outer side of the body). This bolt must be welded to the hinge.

1 - rivet; 2 - hinge axis, around which one of the tubes folds up; 3 - M8 bolt for fastening to the skin.
The cans lie freely on top of the square supports riveted to the sides; to fix the bow can from shifting along the boat, grooves are made in the ends - cuts for the thickness of the shelf. A tubular piller with clamps is placed under the bow can, when the tube is turned, it enters the grooves of the upper (on the can) and lower (on the floorboard) shoes. You can put the same pillers under the stern can.

To one of the tubes of each fender (not closer than 100 mm from the break), a shackle is riveted.
Oars - composite. The oar itself is wooden (the spindle diameter is 35 mm), the blade is made of 1 mm thick duralumin with three stiffening ribs. In the middle of the length, the paddle is folded due to the sleeve connection; during assembly, a cap nut is screwed on to fix the connection.

1 - blade; 2 - brackets for attaching to the spindle; 3 - two parts of the spindle; 4, 5, 6 - details of the connection: bushings fixed at the ends of the spindle, and a freely put on union nut; 7 - oarlock.
L. K. Pressler, "KiYa", 1976
Many did not even know that you can swim in a homemade plywood boat. The article will provide a step-by-step description of all the processes for its manufacture, drawings and lists of everything needed from materials to tools. The instructions are also accompanied by illustrations of work and a video on the manufacture of the structure by the master.
Preparation of material and tools
- Plywood;
- polyurethane adhesive;
- Nails;
- Latex based paint;
- silicone sealant;
- Construction syringe (it will be needed to seal the seams of the structure);
- Sandpaper;
- Jigsaw;
- Screwdriver;
- Roulette;
- Brush;
- clamp;
- Drill;
- Paracord (staples).

One of the sheets of purchased plywood must be divided into 3 parts for the bottom of the structure: 46x61 cm, 61x168 cm and 31x61 cm. The sides of the boat will be two pieces measuring 31 by 244 cm. To create props, we take 3 pieces with parameters 25x50x2400 mm. A cut of 25x76x2400 mm is required for the stern and bow of the boat. Corps homemade boat from plywood for fishing is made from pieces with parameters of 25x50x2400 mm.

Note! Subsequently, the pieces on the body will be connected with paracord.
Creating a project with drawings
There are many projects for homemade plywood boats, ranging from a simple punt that is used for fishing to a complex tourist kayak. There are both prefabricated and folding structures. To begin with, let's dwell on the simplest drawing of the vessel, which is presented below.

If a home-made boat made of plywood according to the drawings that was found does not suit you, then you can design your own version, but such an event will require more accurate calculations regarding the carrying capacity of the structure. Otherwise, with the wrong parameters, you can make a huge souvenir that is not able to keep you on the water.
So, having chosen or created our own project for building a plywood boat, we transfer our parameters to paper, creating a design drawing. Using these paper templates, we draw the outlines of the main elements of the boat on plywood sheets, which will serve as an orientation for cutting sheets and frames for sheathing.

Note! In most cases, the size of the factory plywood does not allow you to cut out a single element of the side of the boat. Therefore, it will be necessary to carry out the procedure for splicing the sheets.
The splicing of the pieces begins with squeezing the ends of the sheet at an acute angle. As a result, the hewn part should have a length equal to the thickness of the sheet, increased by 7-10 times. The connected parts with bevelled ends are perfectly shown in the diagram below.

Pieces that are ideally beveled under each other must be smeared with glue along the bevel and firmly clamped with clamps using the “whisker” method. While our pieces are sticking together, you can prepare the bars for the frame of the boat. It will be more convenient to work on goats specially created with your own hands from 5x5 cm bars.
You can also make a homemade folding plywood boat, the drawing of which is presented below.

Assembling the hull of a simple boat
First of all, we will make frames (although you can make them after assembling the plywood frame). Having drawn and sawn the necessary bars, we fasten them with self-tapping screws and epoxy glue.

Frames
Note! At the stage of sawing out the elements, deviations from the drawing parameters should not be more than 1 mm, otherwise the sides may not be sewn together.
The assembly of a homemade plywood boat is shown in detail in the video, which is added to the article.
First of all, we install a transom on our goats, to which we attach the bottom and sides, leading them a little to the middle, connecting them with brackets on the nose. With a small thickness of the plywood sheet, the sheathing can be connected with suture material or an adhesive mixture. When assembling, make sure that all elements match in size.
Gluing the frames and the side is necessary to provide greater thickness, and, accordingly, increase the strength of the structure. Also, in order to increase the reliability of the connections, it is recommended to additionally fasten the transoms and frames with tin-plated or galvanized self-tapping screws 18 or 25 mm long and 3 mm in diameter. Self-tapping screws for the stern and sides are taken a little more: 60 by 4-5 mm.
Adviсe! If a gap is obtained when connecting the elements, it is necessary to disassemble everything and cut the frames to the desired size. And for a home-made boat made of plywood for a motor, you need to remember to glue the transom with fiberglass, as well as fasten wooden planks made from solid wood.

Special overlays can also be cut on the transom to strengthen the structure as a whole. When all the elements are assembled and converged with each other, then you can start gluing the structure. To make the seams come out especially neat, you can use masking tape, which is glued on both sides of each seam.

We produce sizing with a mixture of Aerosil and epoxy resin(1:1), we carefully work with fiberglass so that no bubbles result. The gluing seams should come out even, and the wood structure should still be visible through the fiberglass layers.
Then we turn the almost finished boat upside down and remove the staples if they fasten the elements, and also round the seam joints. Having obtained the desired streamlining, you can also glue the seams from the outside.

In addition to gluing, the structure can be reinforced with 3 layers of glass tape or completely sheathed with fiberglass. You can also add benches to the design, for which we make planks, as well as cut out the stem and install the bow eyebolt. The outer stringers and keel will need high quality materials to keep knots out. The polished elements will strengthen the structure, and also serve as protection for the skin during mooring.

The basics of making a folding structure
You can also make a homemade collapsible plywood boat according to the above drawing. Such a boat will consist of several independent sections, which in turn represent a part of the structure, the length of which is equal to the distance between the frames, which are located nearby. In other words, the boat is "cut" into pieces.
The sections are assembled by means of bolts, and for a snug fit of the parts to each other, a rubber seal is laid between the sections. When assembled, all the rest are placed in the largest middle section with a nesting doll. And then all the elements can be packed in a cloth case and easily transported by car or other means of transport.

For the manufacture of a collapsible structure, you will need the following materials:
- Plywood: 2.5 sheets for sheathing - construction 4x1500x1500 mm, part 1 sheet for the stem and frames - 10x900x1300;
- Boards for removable seats.
Plywood must be purchased in grade 1 so that there are no knots, but there is a hitch! Boards 6 m long - we take one coniferous tree 2 cm thick, and the other from any tree 4 cm thick. We also need meter-long beech boards to finish the side of our boat.
First of all, we also create a design drawing, after which we make paper templates for the transom, frames and stem. In the frames cut with a hacksaw according to the templates, it is necessary to drill the corresponding holes for the bolts, after which we connect the sheets. The frames must be filed and glued on the outside with a rubber seal 1 mm thick.
Also, in the frames, you need to make holes for rivets, which will be located in pairs for every 1-5 cm, screwing in 1 cm from the edge. They can be built independently from wire with a diameter of 1.5 to 3 mm from aluminum wire. With the help of a conductor, sections are assembled.

When all the elements are made and assembled, the entire structure must be impregnated with drying oil, it is recommended even in two layers. But always on top of dry plywood. When the drying oil dries up, the inside must be opened with varnish, and the outside with oil paint.
This time, the editors provided the pages of the "Built by amateurs" section to the authors of the original portable watercraft the simplest design. Each reader can make any of them with their own hands. You don't have to spend a lot of time searching the right materials or assembly rooms: several meters of rubberized fabric, duralumin tubes or wooden slats, the help of a wife who owns sewing machine, - and the boat is ready.
True, none of the presented designs resembles a “real” boat either in shape or in its seaworthiness; you can use these structures only on quiet rivers and forest lakes. They are attracted by such a quality as the possibility of carrying in a backpack, which is important for hunters and tourists making trips along mixed routes - on foot and along the river, when it is simply difficult to carry a kayak weighing 25-30 kg. From this point of view, the idea of the multi-purpose use of a boat, developed by a Muscovite V. A. Strogonov, which serves as a backpack, a tent, and a bunk, is interesting; to assemble it, you don’t even need to take special rails with you - suitable thin trunks can be picked up in the forest.
Evaluating this design from the point of view of a shipbuilder, one can note its stability, which is quite sufficient for crossing a river or fishing near the shore, as well as the presence of a reserve of buoyancy (in inflatable chambers) in case of damage to the fabric lining.
However, it is possible to do without rigid longitudinal struts at all, if they are left to play their role ... air. To do this, longitudinal inflatable balloons can be provided on the panel in place of the onboard sections of the skin: they can be easily made in the form of a strip of the second layer of rubberized fabric sewn from the inside of the body. True, this will require more careful work and the use of airtight material. Apparently this is not a problem for the home boat builder; after all, Muscovite V.P. Demyanov was able to make a portable inflatable catamaran, which, in terms of weight, is practically not inferior to the set of V.A. Strogonov, but is distinguished by even greater stability and better driving performance. The conclusion of V.P. Demyanov is also correct, that in order to increase the carrying capacity, in principle, it is more expedient to increase the size of the cylinders than to take one more additional cylinder with you. It is obvious that the increase in weight in this case will not be greater, and the speed and stability will increase to an immeasurably greater extent.
With a slight improvement in the contours of inflatable floats and the installation of a centerboard, a Meduza-type catamaran can turn out to be a good tacker - this is evidenced by the positive experience of operating similar foreign pleasure craft.
The boat of A. P. Lisitsa from Kiev can be useful for a city dweller who goes fishing and is not going to overcome vast expanses of water. Packed in a flat package, it does not differ from a portable suitcase and does not embarrass the owner at all when traveling by bus and train. The principle of expanding the soft shell can also be applied to larger boats of a different configuration than a box with an inclined front wall. The disadvantages of the boat of A.P. Lisitsy include the low survivability of the structure and the lack of a reserve of buoyancy. If the skin is damaged, the fisherman will have to swim to the shore. Critical values are the width of the boat and the height of the side, which should be slightly increased. An emergency buoyancy reserve in the form of thin plates of durable PVC-type foam can be provided in the design of the seat and footrest (for example, by gluing the foam to their lower surface). It is enough to have 12-15 cubic meters. decimeters of buoyancy - and the boat will simultaneously serve as a reliable rescue vehicle. We do not recommend going out without life-saving equipment on such a boat even at low water.
Finally, a collapsible floating dacha-tent, designed by Muscovite N. P. Mittrakh, provides very wide opportunities for recreation on the water. The owner of such a dacha is just as free to choose a route as a kayaker, but he can sit on his ship with much greater comfort and, moreover, is relieved of the daily worries of setting up a tent.
In the portfolio of the editors there are several more descriptions of similar most (may their authors forgive us!) Primitive boats. Not all of them answer modern requirements applicable to recreational and fishing boats. But the very fact of the appearance of such improvised designs speaks of the existing shortage in the industrial production of small-sized portable boats - watercraft for fishermen and tourists. Apparently, the need for them should be mainly covered by the expansion of the production of inflatable boats - reliable in operation, technologically advanced in large-scale production, and therefore inexpensive. It would be useful to release to the trading network simply elongated inflatable balloons of two or three standard sizes, using which one could, like a children's designer, assemble catamarans or even rafts of various carrying capacities.
We cannot close our eyes to the other side of the problem with portable boats. As a rule, these self-made vessels are beyond any supervision of navigational and technical inspections, although they often have a far from safe design. The serial production of tested and approved samples would greatly contribute to reducing the number of accidents on the water.
Canvas boat
The folding boat made by me is convenient for transportation by any means of transport. Dimensions of the assembled boat - length 2 m, width 0.8 m, side height 0.35 m; when folded, the package has dimensions of 1X0.35X0.15 m.The main parts of the boat are two folding longitudinal frames, cross braces, including seat and footrest, and a canvas cover. Frames and spacers can be made of dural square or slats (waste of motorcycle packaging or furniture is suitable). For the cover, you need 6 m of rubberized fabric or a thin tarpaulin, provided it is impregnated with rubber glue or other waterproof composition.
The ends of the rails for joining into frames are cut into subtrees. The seat and footboard are assembled from plywood, reinforced with slats, and attached to the frames on detachable hinges (hinges from the window are used, from which the pins are knocked out and replaced with wire of a slightly smaller diameter).
The cover is made from two three-meter pieces of fabric, sewn together with an edge approach of 6-7 cm. Previously, these gluing points are cleaned with sandpaper, separated with a rail, so as not to clean off the excess, then glued with rubber glue. It is better to glue together so that there is no delay and distortion when gluing. Under the place of gluing, you need to put something hard or glue on a flat floor. After gluing, the joints are stitched. A full-length strip of tarpaulin is glued over the joint.
The longitudinal frames are temporarily fastened with slats so that the boat is 80 cm wide, then the resulting frame is placed on a cover laid with a rubberized layer down. Excess material on the sides is cut off, leaving only 2 cm per fold. It is better not to cut the tarpaulin at the corners of the frame, but to bend it, just as they wrap sweets with paper or make boxes for them. The extra square, which is formed during bending, is cut off, the junction is stitched manually. The tarpaulin should be stretched as tightly as possible.
To make it easier to pull the cover, loops are sewn to its upper edge - petals with holes. These loops are folded over the top of the side frames and put on metal hooks (medium-sized nails without heads, bent in the shape of the letter L). Then the boat is turned upside down and strips of tarpaulin 6-7 cm wide are attached along the longitudinal frames to protect the cover from wear.
The assembly sequence is as follows. The side frames in a half-bent position must be inserted into the cover, directing exactly to the corners and immediately putting on the hooks the side loops sewn over the cover. Then, with a push, the frames are straightened to their full length. The upper struts are inserted, then the seat, footboard and transverse rails along the bottom in the bow and in the back of the boat.
"The idea" is elementary simple in design. I made it on my own at home from quite available materials such as old ski poles and thick tarps. The frame is assembled from duralumin tubes 16X0.7 and 14X0.7, 450-1400 mm long. Almost all tubes are straight; when assembled, they are simply inserted into crosses, corner couplings and tubular brackets. After assembly, the entire frame is pulled along the bottom with two diagonal cables from corner to corner, and the board along the upper edge is fitted with a cable around the entire perimeter. The subsequent covering with a tarpaulin and lacing it to the frame give the entire structure final rigidity.
All knees and crosses are made using a wire-reinforced paste prepared on the basis of epoxy resin ED-6 (resin - 100 parts by weight, dibutyl phthalate - 20 parts by weight, hexamethylenediamine - 10 parts by weight, aluminum powder or sawdust - in ratio 1:1 to the volume of the binder). To obtain a reliable connection, the metal must first be carefully cleaned with a file, degreased with white spirit; the parts to be joined are connected with a wire with a diameter of 1-1.5 mm, then a cementing paste is applied and the assembly is kept at a temperature of 50-70 ° C until the paste has completely hardened. The tubes, if there are gaps in them, are filled with paper so that the paste does not penetrate inside.
The plating of the floating boat - a rectangular panel 2500X4000 with eyelets along the edges (200 mm pitch) - is freely laced to the tube bordering the upper edge of the side. The underwater part of the skin is made of thick waterproof tarpaulin, and the sides above the waterline are made of raincoat fabric. All connections are stitched sewing threads No. 10 in two or three seams and impregnated with rubber glue (you can use a solution of 1 part by weight of raw rubber in 2 parts by weight of B-70 gasoline). The weight of the finished skin is about 7 kg. From the inside, pockets with flaps on buttons are sewn to the sides for storing small items.
Covering the frame with a tarpaulin at the corners requires some experience. The tarpaulin should be rolled up so that the outer folds, which inevitably form at the corners, have a direction from the bow to the stern - along the course of the water. From the inside, on the bottom, two sheets of corrugated fiberglass 1.5 mm thick are laid, attached by straps to the bottom tubes. Such flooring has sufficient rigidity to bear the weight of people or cargo.
A tent serves as shelter from bad weather. gable roof, stretched on rafters installed in the sockets of the side crosses. The tent is made of soft PVC film MMP 0.15-0.20 mm thick.
The crew (he usually consisted of 4-5 people during campaigns) is placed on folding seats, made in the form of a frame made of 14X0.7 duralumin pipe, covered crosswise with a wide braid. It is also very convenient to sit on air mattresses, which are laid on the bottom along the sides and attached to the frame; they, of course, serve not only as a place of rest, but also as a means of providing emergency buoyancy.
When disassembled, the floating boat is placed in two relatively small packages - one with a diameter of 100 and a length of 1700 mm and the other with dimensions of 500X900. The whole process of assembling the vessel, from the moment of unpacking the bales and ending with the installation of the seats, is carried out by two people in 40 minutes. Disassembly takes even less - 25 minutes.
We built "Zateya" 12 years ago. Since then, more than 3,000 km have been sailed on it along quiet rivers and lakes in the most remote, reserved places of the Ryazan Meshchera. On their first trip they went only with a pair of swing oars (and then overcame more than 250 km). And when a jet engine made from a D5 bicycle was hung on the “transom”, the average ground speed increased to 5-6 km / h, the “Zateya” turned into a floating “rest home” for the family crew.
It must also be emphasized that despite the primitiveness of the device (I'm not talking about the mockery of experts appearance), our "Zateya" is a completely reliable vessel: underwater obstacles and waves are no more dangerous than, for example, for a padded kayak. For all these years, the canvas hull had no holes. Some mobility of the skin and elasticity of the frame soften the blows when meeting with driftwood, stones and snags. Pushing our "Zateya" off the shallows or any other obstacle is quite simple. By the way, the relatively small weight of the hull makes it easy to pull it out onto land and use the houseboat on halts.
No steering device is needed, since the Zateya is well controlled by oars or, moreover, by a rotary motor-oar.
We believe that this type of portable boat has a number of advantages. In addition to the simplicity of the design, these are, for example, transportability and low weight (body 22 kg plus equipment 13 kg) with a large load capacity (over 450 kg) and usable area (3.0X1.5 m), low draft (about 100 mm), high stability.
Catamaran in a backpack
For three navigations, a collapsible inflatable four-seat catamaran "Medusa", built with my own hands in a small apartment (where, by the way, it is stored in winter and summer, without embarrassing anyone, has served me - on the mezzanine). Behind 26 trips, including one-day walks along the rivers and reservoirs of the Moscow region (Oka, Ugra, Moscow, Protva, Desna, Uchinskoye and Pirogovskoye reservoirs). People participated in these voyages of the Medusa different ages- from 8 to 70 years old, and no one complained about the inconvenience. There were no accidents, thank Neptune.The rowing version of the catamaran weighs only 7 kg, and with the mast, rudder and sails - 12 kg. It takes only about half an hour to assemble and prepare the Meduza for sailing. Two of our friends, who have their own collapsible kayak, in cases where the time budget is limited to Saturday and Sunday, willingly prefer Meduza to it.
The length of all rigid structural elements does not exceed 140-160 cm. A small bundle of such rails and tubes and a backpack almost half full - this is how a disassembled vessel looks like, which can be transported by all means of transport, including car and plane.
The manufacture of a catamaran is not difficult, except for the search for a light and durable material for floats. The two-layer aluminum fabric "500" ("silver", as it is called in everyday life) turned out to be quite suitable. A float with a capacity of 200 liters glued from it weighs less than a kilogram. Depending on the size of the crew, not only two, but also three such floats can be inflated. In especially critical cases (for example, when going on a hike in late autumn, and even with passengers who cannot swim), we had to use a fourth float: it turned out not to be a trimaran, but a raft with a carrying capacity of half a ton.
We tested a total of nine floats different sizes and forms. For short trips together, floats with a length of 2100-2400 mm and a diameter of 300-340 mm are best suited. If the trip is long, and the crew consists of four people, it is more profitable to take not three floats from the "500" fabric, but two more and from a thick fabric rubberized on both sides; it sticks together well and allows you to give the float a more streamlined shape. With a maximum diameter of 400-420 mm, such a float has a volume of about 350 liters.
All floats are single-section with inflatable tubes (nipples) glued into the upper part, which allows you to blow air even afloat. The floats are inflated with homemade furs, like a beekeeper's smoker, and often just with their own lungs.
The rigid frame of the catamaran is assembled from slats with a section of 50X20 or 30X40 using wing bolts. The floats are attached to this frame with the help of a wide braid covering them around the circumference.
Two crossbars 1400 mm long are made of aluminum square: folding canvas seats on duralumin tubular frames can be attached to them, which easily recline when switching to sailing.
The mast is composite, of three wooden bars, tightened with bolts, or duralumin tubes on couplings. The tubular mast turned out to be less rigid than the wooden one, but it is convenient in that a hafel and a boom (composite) made of aluminum ski poles are inserted into its two long links (1600 mm long) during transportation. Percale sails weigh no more than a kilogram.
The sailing catamaran is controlled by a simple balancing rudder with an area of 6 dm 2, which is fastened with a clamp to the aft cross member. One of the oars can also be used for this purpose. The Meduza does not go steeply to the wind, although when installing the screws, this is apparently not excluded.
When rowing with short oars, like in a canoe, the catamaran develops a speed of 5-6 km/h in calm water. True, we are lagging behind the kayak, but we are making up for lost time during the drifting of dams and other obstacles. Under sail with a fair wind, the speed reaches 8 km / h.
When I go camping, I usually tie two air mattresses across the catamaran (they have to be taken anyway if spending the night is coming). Seats in this case, of course, do not take.
Mattresses will not let the catamaran tip over and sink, and in the most extreme case, we always have a waterproof bag with spare clothes with us (so far it has never come in handy). We always put a spare float, a bottle of glue and a piece of fabric for patches in the backpack.
Before difficult long trips, we strengthen the frame with additional connections (two longitudinal and one transverse). From above, instead of a grid, we stretch a canvas panel, add two more oars.
A set of equipment for a fisherman and a hunter
The proposed set of lightweight - weighing no more than 4 kg - equipment for hunters and fishermen can be made at home within one or two days. It consists of just a few parts, various combinations of which turn into a backpack, tent, boat or bed.The main parts of the kit are a cloth measuring 2.7x2 m, two floats and a luggage strap.
The middle part of the panel, which serves as a tent and boat shell, is cut out of rubberized fabric, the sides are made of a raincoat. In order to be able to set up a tent, there are 8 eyelets (holes) and two straps for stretching the "horse" of the roof. The cloth is attached to the ground with pins made of 2.5-3 mm wire (stainless steel); By the way, they can also be used as a tripod for a bowler on a hike.
The floats of the boat are two bags sewn from any lightweight material, 1080 mm long and 480 mm wide, in which three inflated chambers from a soccer ball are placed. The tubes of the chambers are brought out through the holes swept with threads. The space between the chambers is filled with improvised material - reeds, hay, dry leaves, etc. Six canvas pockets for the rails that make up the frame of the boat must be sewn to each bag.
The slats of the frame of the boat and the oars can be made of composite duralumin tubes, but where possible, it is easier to cut them out of dead wood in the forest. Then you will need to take with you only two plywood blades and two oarlocks cut out of thick rubber, for example, from a car camera.
Two longitudinal rails supporting the upper edges of the sides are inserted into special pockets 3 sewn to the cloth from the inside (cutouts 4 for oarlocks must be made in the pockets); the ends of the rails abut against the cloth nests on the covers of the floats. Two more slats with a diameter of about 25 mm are inserted into the same sockets in the middle of the side height and on the bottom. After assembly, cord 5 is tightly fitted, the whole structure acquires the necessary rigidity. At the same time, the edges of the cloth hang down inside the boat along the sides, and during rain they can be pulled up like a protective apron. On the bottom you need to either make a light lattice (slant), or just throw a few branches. A rowing seat is obtained from a rubber cushion enclosed in a cloth cover.
The boat turned upside down becomes a camp bed.
The kit is packed using a luggage strap with a removable leather handle (sold in the store). The same belts are used for additional tightening of the two upper rails when assembling the boat, as well as stretch marks when setting up the tent.
I have been using this set of equipment for several years on trips around Moscow, the Arkhangelsk and Vologda regions. It is very convenient for hunting and fishing in sparsely populated areas where it is difficult to get a boat.
The hanging bed, tent and, in addition, the gauze canopy provide protection from both mosquitoes and dampness even on wet marshy soil.
Slow, but quite stable boat allows you to raft on calm rivers, swim on small lakes.


