Lesson "the procedure for threading the upper and lower threads in the sewing machine." How to properly thread a sewing machine How to thread a sewing machine
When working on a sewing machine, a lot of difficulties can arise, and if an experienced craftsman is able to quickly cope with them, then a beginner can have serious problems. Experienced Master knows that the wrong location of the thread can cause the stitching to be uneven and sloppy, and as a result, the fabric may deteriorate altogether, which will lead to material costs. It is for this reason that it is worthwhile to take a responsible approach to studying the basics of working with this technique in order to try to eliminate the likelihood of malfunctions as much as possible, and if they do occur, be able to quickly fix them. The threading algorithm depends on the brand of your sewing machine. To become a master in this matter, you must first study the instructions included in the kit. If you do not have one, we will try to figure out on our own how this can be done quickly and without errors.
Sewing equipment Singer is known for its characteristics and quality. This is a great choice for beginners who want to further learn how to create real masterpieces with their own hands. The technique has parameters that make it very convenient. Learning to sew on the equipment from this manufacturer is a pleasure. One of the main advantages of working on a machine is the possibility of automatic operation of the main work item. To place the thread element in the technique, it is necessary to follow a certain pattern.
Singer should work as follows:
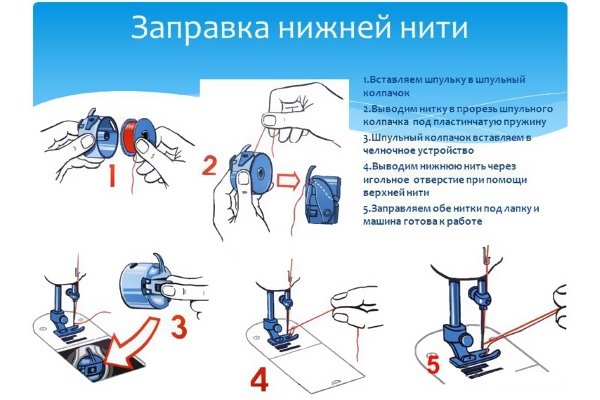
- Install the coil in its place - at the top of the housing. The manufacturer has provided a protective element, which eliminates the possibility of the coil jumping off.
- Pull the thread element to the thread receiver, then move to the bobbin.
- Pass through the opening on the coil. The coil is located on the right side of the equipment case.
- Bring the machine into working condition, wind the required amount of thread on the bobbin. Now you can remove the bobbin, ready for further use.
 Using this scheme, you can wind on a bobbin. To place the thread directly into the eye of the needle, it must be raised, this can be done by turning the wheel, which is designed to control. Spin it towards you.
Place the coil in the appropriate holder, it is located on top, fix with a cap. Using the thread guide, pull it through, the next fixing step will be the spring, which is designed to be tensioned.
After that, follow into the compartment, which is located above the needle, go through a special lever. Next, move back and down, here do not forget about the tensioner, this is a compact clamp that is located above the needle. The final step will be filling in a needle. Head from front to back.
IMPORTANT. All actions must be performed only when the equipment is disconnected from the network, otherwise the likelihood of injury is too high.
Threading errors
In the process of performing this operation, it is quite possible to make mistakes, which will affect the quality of your work. To eliminate the possibility of obtaining a poor-quality result, consider what errors can be in order to provide for them.
In the event that the line loops or rings form, you did something wrong. This may be the cause of insufficient tension on one of the threads. Some needlewomen mistakenly believe that it is enough to control correct installation only the bottom thread. This opinion is wrong, only with the precise execution of each of the preparation operations, the technique will work correctly.
REFERENCE. The quality of the stitching largely depends on the correct installation of the upper thread.
For work, choose good quality threads. In order for the stitching to be even, you should check if the thread guide is functioning correctly. If it doesn't fit, fix the problem.
The most common mistakes:

Where to put the upper thread
For refueling, you need to raise the foot to press the fabric, then you need to move the wheel a little and move the needle to its highest position. You can work on the technique no earlier than the upper thread is tucked.
The filling algorithm is as follows:
- Place the bobbin on the rod, you can see it from above.
- Grab the end of the thread and pull.
- Insert the end into the top eye for threading. Thanks to this stage, the thread will be regulated during operation.
- Slip the thread from the bottom into the eye located on the thread guide, and then go to the needle.
If you do not complete at least one of the steps, be prepared for the fact that you will have to rethread the thread. Please note that a certain angle of the thread must be observed for proper functioning.
What to do if you have a non-new type of equipment?
Many needlewomen have old-style sewing machines installed in their homes. Some people inherit this technique from their mothers or grandmothers, but not everyone knows how to work with it, and the instructions for use have long been lost. They quite cope with the tasks assigned to them and it remains to figure out how to thread the thread manually sewing machine.

The old-fashioned technique has a similar thread drawing pattern. The difference lies in how the thread is fastened on a typewriter.
IMPORTANT. The thread is threaded into the needle into the groove, it is located along the needle. You can determine it by running your finger over the needle.
It is necessary to refuel the equipment according to the scheme, which is given on the cover. Rotary machines have their own scheme, because these are old-style units.
Refueling algorithm old car, next:
- Lock the coil.
- Very carefully thread the thread element into the tensioner, which is located on top.
- Pull it out through the spring. She looks like a hook.
- Thread the thread into the thread guide, it also has a hook for this.
- Now it remains to go to the needle lock.
In this type of technique, a fork is used, it allows you to throw the thread over yourself.
What to do with the bobbin?
REFERENCE. First of all, it is worth noting that the thickness of the thread that is installed in the bobbin should be one size thinner.
Before threading the bobbin, you should check if it fits under the bobbin case. To do this, you need to place it in a cap, while not forgetting the need to follow the direction of the wound thread. Its tip should be threaded into the tension regulator. Pay attention to how the bobbin spins, it should not move in jerks. The movement must be smooth.
REFERENCE. The bobbin case is one of the most important parts of the sewing machine and must always be kept in perfect condition. There should be no chips or damage on its surface.

When sewing, a lot of problems can arise, especially for beginners. Incorrect threading of the upper and lower threads will cause the stitching to slip, resulting in damage to the sewn fabric. This problem may occur if the bobbin thread is not threaded correctly. Wrong and uneven stitching can ruin appearance fabrics, children's clothing, any outfit. That is why it is necessary to initially correctly thread the thread into the sewing machine. Threading depends on the type of machine. In order to manually thread the machine, you need to study the instructions for the old type machines. Modern cars allow you to place additional instructions on the steps on your body, you don’t have to flip through the book.
The Singer sewing machine is good tool for sewing for beginners. It has features that make it easy to operate and apply. Skills to hone on such a machine is a pleasure. The main advantage of the Singer brand is the ability of the thread guide to work automatically. In order to place the thread element in the Singer electric machine, you need to follow the diagram.

Singer threading scheme:
- Place the spool of thread in a special place at the top of the machine. It is fixed with a special holder that will not allow it to fall off while the thread is being unwound.
- You can use the thread guide to guide the thread by pulling it and wrapping the bobbin.
- Pass through the holes located on the coil.
- Coil location - must be installed in a special place, which is located on the right side of the machine body.
- Press down on the pedal that sets the machine in motion. It is necessary to keep the end of the thread, which is free. This will help to gently wind the thread onto a spool that is suitable for a Singer typewriter.
- Remove the reel ready for use.
The scheme allows you to wind the thread on the spool that belongs to the machine, and not wind it from its native, factory spool. How to thread a needle on a typewriter? It is necessary to raise the needle itself, this can be done as much as possible by turning the wheel, which is adapted to control the hands on itself. You should insert the coil into a special holder, which is located on top of the body. Raising the holder, place a spool of thread on it, fix it with a cap.
Next, pull the thread into the compartment, above the needle, through the lever adapted to work with the thread guide. After the lever, it is necessary to direct the thread back and down. Use a lower tension device. The bottom pull is a small clip that sits above the needle. The next and final step is threading the needle. Fill it in front and stretch it back. Before threading and installing the spool, you need to remember to do all the work with the machine turned off, otherwise injury or incorrect installation may occur.
Steps for threading the upper thread into a sewing machine
The top thread is the one that passes through the spool to the needle and is inserted into the needle hole, called the eye. To thread it into a certain type of machine, for example, into a manual (not electric) machine, you need to raise the foot that presses the fabric, turn the handwheel, put the needle and thread take-up in the highest position from the top

How to thread the upper thread:
- Place the coil on the rod intended for its installation;
- Thread the thread from the spool through the upper thread guide eye, it will regulate it when pulled;
- Pass the thread from below into the eye of the lower thread guide and put on the needle.
If you skip even one thread guide, you will have to redo the work again. You need a certain angle of thread for normal operation. The thread is inserted into the sewing needle with the groove oriented. It is located on the side of its entrance to the needle.
Detailed diagram: how to fill an old-style sewing machine
Non-rotary type machines have an almost identical thread installation pattern. The only difference is in its mounting on the machine itself. Modern products have on their body a lot of tips for threading, which greatly simplifies the process itself - it will become more difficult to make a mistake and incorrectly thread the thread.
The thread in the needle must be threaded into the groove, which is located along the needle. It is determined after running a finger along the length of the needle.
Overlock should be filled, focusing on the scheme indicated on the cover. There is a scheme for a rotary machine, because such sewing tools are old-style units.

Threading the rotary machine:
- Attach the spool of thread to the machine;
- Thread the thread into the upper thread tensioner carefully;
- Bring it out using a compensation spring that looks like a hook;
- Thread the thread into the threader, it has a special hook;
- Having finished with the thread guide, lower the thread down and insert it into special clamps up to the needle.
Rotary sewing machines use a fork that allows the thread to be thrown over itself. This replaces the thread guide. Such machines exist, but are rare. These include the machine Rzhev, Volga.
sewing machine threading errors
If the stitching is looping, or rings of thread are formed, then this means that the thread in the sewing machine is not threaded correctly. This happens due to the weak tension of the upper or lower thread. Sometimes it seems that it is worth setting only the lower thread correctly, and everything will be in order. This is an erroneous opinion.
The quality of the stitch depends on the top thread.
It is necessary to choose better threads, preferably those that can cope with even the most harmful fabric - knitted. To prevent the stitch from looping, you need to see if the thread guide is pulling the thread. If not, correct this mistake and continue to do what you love.

What other errors are there that lead to a poor-quality line:
- The spring that regulates the tension of the thread does not press it well. It is easily determined. The presser foot is released, the thread is tucked into the needle and pulled up. Then the foot rises, is released again and the thread is pulled again. These manipulations must be done several times, noting how tightly the thread stretches. If the thread does not create any problems during tension, then the tensioner spring is stuck.
- The thread tension is too strong. It happens that the thread is literally like a guitar string, very tense and taut. This is especially noticeable when stitching on the bottom thread. The line winds and runs unevenly. In this case, the lower thread and its tension are adjusted.
- The bottom thread is thicker than the top thread. The upper thread is the leading link in the entire line. It is she who should be responsible for the bottom. Moreover, the lower thread should be elastic and thin. The reliability of the machine and the quality of the manufactured product depend on this.
How to thread a sewing machine (video)
In all cases of working on a sewing machine, you need to remember that you need to work on it slowly and smoothly. Be careful and be able to take care of your assistant. You need to thread it correctly with threads that will help you create masterpieces from simple scraps of fabric. And if the work done by yourself is liked by others, inspiration will come every day.
For people who are just getting started with a sewing machine, threading can seem like such a daunting task that they are ready to give up sewing altogether. Instead of letting your sewing machine sit idle and collect dust, it's smarter to just learn how to thread it properly. You will have to start work by winding the bobbin, if it has not yet been prepared, after which it will be necessary to thread the upper (bobbin) and lower (bobbin) threads into the machine.
Steps
Part 1
Winding the bobbin- Be aware that you can sometimes buy pre-threaded bobbins at fabric and craft stores if you don't feel like bothering with winding the bobbins yourself.
-
Install the bobbin onto the winder pin. The small bobbin winding pin is also usually located on the top of the sewing machine near the spool pin. Place the bobbin on this pin. Then move the pin to the right or move the lock next to it to the left (depending on the design of the sewing machine) to fix the bobbin in the winding position.
- At the moment the bobbin is fixed, a slight click should be heard when you move the pin or latch to the desired position.
-
Start winding the bobbin. Start winding the bobbin for a few seconds by pressing the foot controller of the sewing machine or the special bobbin winding button (if your sewing machine has one). This will ensure that the thread is securely attached to the bobbin. After a few turns of the bobbin, you can stop to cut off the end of the thread sticking out of its hole.
Finish winding. Gently press your foot on the foot controller of the sewing machine or press the winder button again to completely fill the bobbin with thread. Winding may stop automatically when the bobbin is full, but if this does not happen, stop it yourself when the thread is wound on the bobbin almost flush with its outer edge.
Remove the bobbin from the pin. Slide the winder pin or latch to its original position (if not automatically) and remove the bobbin. The spool and bobbin will still be tied together with thread, so take your scissors and cut it so that a tail about 5-7.5 cm long remains on the bobbin.
- Once the bobbin is ready, you can start threading the sewing machine.
Part 2
Upper threadingInstall the coil onto the coil pin. The spool pin will be located on the top right of the sewing machine. In size, it is noticeably larger than another pin designed for winding the bobbin, which can also be nearby. Place the spool on the pin and unwind some thread from it.
- The spool can be more stable when sewing if you set it so that the thread comes out from behind it when you look at it from the front.
- If the sewing machine has an upper threading pattern, pay attention to the mark on the location of the spool pin and the direction of winding the thread from the spool.
-
Hook the thread into the thread guide. Pull up the thread from the spool on top of the sewing machine. Draw the thread to the left along the top side of the sewing machine and pass it through the thread guide located there. The thread guide is a metal or plastic part, which the thread clings to before going down.
- Be sure to guide the thread behind the thread guide, not in front of it, so that it can then safely slide down the front of the sewing machine and continue to make its U-shaped path there.
- Most likely, the machine will have a scheme for guiding the thread through this section.
-
Pull the thread down to hook it onto the disc tensioner. Following the arrows on the machine body, pull the thread from the thread guide towards you. Next, it will be necessary to hook it to the disc tensioner located lower in front of the sewing machine body, and then again raise the thread up and pass it through or along the second thread guide (often represented by a slot). As a result, the thread forms an elongated “U” letter in front.
Pass the thread through the thread take-up. After the thread has been shaped into a “U”, you will need to hook the thread or pass it through the hole in the thread take-up located at the top, and then lower it down towards the needle mechanism. The thread take-up is a metal part that sticks out of the sewing machine body from the slot of the second thread guide. The thread take-up has a special hole or hook through which the thread must pass. When you complete this step, the thread will already draw a large S-shaped zigzag on the front of the sewing machine body.
-
Thread the sewing machine needle. Pull the thread towards the needle. Hook the thread on the last thread guide above the needle (if provided by the design of the sewing machine), and then thread the thread into the small eye of the needle and pull out a tail about 10 cm long on the opposite side. Then pass the tail of the thread under the sewing machine foot through the slot in its front part .
- Now the upper thread of the sewing machine is fully threaded, and you only need to thread the bobbin thread before you can start sewing.
Part 3
Threading the lower threadRemove the cover from the shuttle mechanism. The shuttle mechanism is usually hidden under a cover, which is located on the platform of the sewing machine body directly in front of the needle or slightly to the side of it. Find this cover and open it. Inside you will see a hook into which you will need to insert and thread the bobbin.
- The hook cover should come off easily. If you're having trouble getting it off, check your sewing machine manual to make sure you're really trying to open the hook.
- In some models of sewing machines, there may be another protective cover on the hook itself. It will also need to be removed to get to the place where the bobbin is inserted.
Place the spool of thread on the spool pin. Attach the spool of thread to the spool pin on the top of the sewing machine. The spool should be positioned so that the thread unwinds from it counterclockwise.
Pull the thread from the spool. Pull the bobbin thread to unwind it a little and loop it through the thread tension disc from above on the sewing machine. Usually this tensioner is located on the opposite end of the upper side from the coil sewing machine about above the needle. A small wire can also be attached to the disc tensioner to help hold the thread in place.
Attach the end of the bobbin thread to the bobbin. Next, you need to thread the end of the bobbin thread into one of the holes on the spool, and then wind several turns of thread on the bobbin axis for its primary fixation.
When buying a new model of a sewing machine, many questions arise with the device of the needle and how to properly thread the thread. However, in order to no longer have problems, you either need to train for a long time, or understand the sewing needle itself. The needle has found its current form thanks to the developers of the brand Singer and now on all modern models it has the following form:
With a thickened flask with a cut off part, the needle is inserted all the way into the needle bar;
The sewing needle ends with a point and grooves of different shapes and sizes.
In some older models of machines, needles with a round bulb are still used, their installation is somewhat different from the updated form. Such needles are also used in industrial machines.
When using complex sewing devices from foreign manufacturers, you must first read the instruction manual, which will tell you which side to insert the needle and thread. However, it is worth remembering a few recommendations that apply to any model of a machine for home use. To replace the needle, you must first put the needle bar in the upper position, then unscrew the fastening screw with a special screwdriver, whose length does not exceed 12 cm, otherwise it simply will not fit in the distance between the sleeve and the holder. For error-free installation of the needle, it is recommended to use a mirror.
When the electromechanical machine is completely ready for threading, you can proceed, while the machine must be turned on. First you need to wind the thread on the bobbin. To do this, you need to install a spool of thread on a special rod on top of the machine and stretch the thread around the tension disk of the prepared bobbin. Then the bobbin winder moves to the right to fix the position. Then gently start winding by simply pressing the pedal of the machine. The machine will automatically stop when the bobbin is ready for further work. Next, you need to remove the coil from the holder by simply pushing it to the left.
After winding the bobbin or if there is already a wound bobbin, you can start working by first threading the needle:
If everything is done correctly, then you are provided with a beautiful, even line without skipping stitches and constantly torn threads. If the stitch quality is not ideal, it is recommended to rethread the thread.
How to thread an industrial sewing machine?
Industrial sewing equipment is much more complicated than conventional sewing machines for the home. However, knowing certain tricks when threading, you can easily master this science on your own. First, the thread can be threaded into the guide plate from either side. Secondly, when winding the thread on the bobbin, it is necessary to remove the thread from the needle hole to avoid tangling. The presser foot should be raised so that the teeth do not wear out too quickly. Thirdly, if a piece of napkin or office paper is placed in the bobbin case, the bobbin will slide tighter. Otherwise, the process of threading in industrial machines is no different from ordinary household, electromechanical machines.
Sewing machine stitch quality and other problems
A complete process of working on a sewing machine, regardless of experience with this device, is impossible without its correct settings, which are performed manually. So, let's look at this article detailed diagrams how to properly thread a sewing machine.
General instructions for refueling a sewing machine
The general instructions for refueling a sewing machine look like this:
- Wind the thread with which you will work on the bobbin and at the same stage put on the upper pin on the spool for the upper thread.
- The next step is to thread the upper thread in the sewing machine. For this process, there is usually an instruction on the instrument case. The upper thread is the one that is pulled from the spool into the eye of the needle. Before threading through the eyelet, raise the presser foot and set the needle so that it is at the very top.
- Check thread tension. Modern devices have special tension regulators.
- After threading the upper thread, you can thread the lower thread. To do this, turn off the drive (moss wheel) and insert the bobbin into place. After that, you need to turn on the wheel and turn it until there is enough thread on the bobbin.
- Insert the bobbin case into the bobbin, making sure that the bobbin pin aligns with the bobbin slot. If everything is done correctly, a characteristic click will be heard.
- The thread must be brought out through the valve plate, close it. The upper and lower threads must be connected and brought back by the shoulder blade.
To check the correctness of the work done, you should scroll the flywheel. After the needle rises and falls, a loop of the bottom thread should form from the hole in the plate on the upper thread.
To understand how to thread a bobbin into a standard-type sewing machine, we recommend watching a video tutorial that tells not only about the sequence of actions, but also about where the bobbin is located and what nuances you should pay special attention to:
Correct threading order
This process will vary depending on the type of machine. Modern devices have detailed instructions on how to properly thread a sewing machine, and the devices themselves are designed in such a way that you can intuitively guess how to do everything. But with rotary-type machines, difficulties arise, so we will present two instructions in detail:
Top threading
- Pass the thread from the spool through the mount at the body of the device.
- Thread the thread into the thread tension regulator and bring it into the compensation spring, which looks like a hook.
- Pass the thread through the hole in the thread guide, bring it out through it and pass it into the existing fastening, then into the eye of the needle.

In some models of machines, instead of a thread guide, there is a fork. In this case, you just need to put the thread on this fork, and not thread it into the hole.
Threading the lower thread
- Wind the lower thread not on the spool, but on the bobbin.
- Insert the bobbin into the bobbin case, while the thread should be tucked under the spring plate.
- Check thread tension. A certain tension is set for the model of the machine.
How to thread a twin needle?
If the machine sews a zigzag stitch, then a double needle can be installed in it. In this case, the threads will be threaded into the needles in the same way as if it were done with one needle, the only difference is that an additional - second - spool is required. In this case, both threads must pass through the same upper thread tensioner.
Instructions on how to thread two needles into the machine:
- A double needle is installed in the same way as a regular needle. The cut of the needle should be directed away from you, and the round side of the needle bulb itself should be directed towards you.
- The threads from both spools must be passed through all the thread guides, not forgetting the upper thread tensioner. It should turn out that the lowest thread guides will separate them.
- The left thread must be threaded into the needle on the left, the right thread, respectively, into the needle on the right. If the device has one thread guide, then the left thread must be passed through the thread guide, and the right thread next to it, tucking it under the eye of the needle.
It is not difficult to use a double needle, the main thing is to thread both upper threads correctly, as well as loosen their tension (in the bobbin itself). The lower thread will be used when sewing at the same time as the upper thread, thereby forming a zigzag, so it is imperative to loosen the tension.

The twin needle makes it easier to sew double stitches on the machine, as well as to sew decorative stitches with just one twin needle stitch.
Manual sewing machine: how to thread
When setting up a manual machine, it is important to choose the right needle and thread number for a particular type of fabric, as well as adjust the thread tension, otherwise the quality of the stitch will suffer. Otherwise, refueling a manual sewing machine should not cause difficulties, as can be seen from the instructions for refueling the Chaika machine:
- Turn the handle so that the mechanism that attracts the threads is at the top.
- Insert the needle into the holder until it stops. The flat side should be facing towards the pin that the foot is on.
- Use the screw to secure the needle.
- Install the spool of thread on the rod intended for this.
- Pass the thread through the friction washer and thread guide.
- Insert the thread into the thread guide, fix it in the needle holder.
- Pass the thread through the eye of the needle (this will be the upper thread).
Threading the lower thread:
- Wind the thread onto the bobbin.
- Insert the bobbin into the cap. The thread should be outside.
- Insert the cap back until a characteristic click sounds.
- To tighten the thread, you need to turn the handle of the machine to tension.
- Tuck both threads (top and bottom) under the foot.
How to properly adjust the thread tension:
- Use the screw that is on the bobbin case. The tighter the screw is tightened, the tighter the thread is.
- Adjust the tension using the adjuster, which is located at the lever that raises the foot.

A few useful rules for using the Seagull machine:
- Without a pre-lowered needle under the foot, the line cannot be started.
- The handle of the machine turns strictly “towards itself”, it is impossible to change the direction of rotation.
- To work on this machine, you need to choose those fabrics that are suitable for all types of stitches, otherwise you can ruin not only the fabric, but also bring your machine into complete disrepair.
Video: How to fill the Podolsk manual sewing machine?
Another old machine that grandmothers had at home is a device of the Podolsk brand. Despite the fact that such a model is old and manual, it is pleasant to work with it if you understand all its mechanisms and learn how to refuel, which will help the following video:
In order to enjoy work, as well as avoid problems during work, it is worth thoroughly studying the instructions for refueling the sewing machine, because not only the quality of the sewn product, but also the life of the device will depend on this.
In contact with


