The best tool boxes - an overview of modern types and the best devices for storing hand and power tools. How to make a tool box: choose a shape and drawing for self-manufacturing Make your own folding tool box
Any responsible owner always keeps all the tools in their place. Even small sets should be kept neat and orderly. To organize a place to store tools, keys and other devices, you can independently organize cabinets, tables and drawers with the possibility of transportation.
A wooden case for keys is not only part of the image of any craftsman or carpenter, but also a functional component. At a certain point, the range of tools reaches such a state that without the organization of orderly storage, the desired key or screwdriver becomes simply impossible to find. In addition, there is also a tool that is demanding on storage conditions and from interaction, friction and shaking can be damaged and become unusable.
 If you need remote repairs, when you need to perform some task away from the workplace, a transport suitcase or tool case will help out a lot, and also if you want to organize storage by dividing it into sectors for automotive, plumbing, carpentry tools .
So we need a storage box the right tool, consumables and fasteners. On sale you can find a fairly large selection of various suitcases and boxes, light, comfortable and compact. Finding one for the right tasks will not be a problem, but they cost a lot of money.
Construction and material
Let's first define what types of boxes are:

Before starting work on manufacturing, you need to clearly determine which option you need. And it’s worth starting with a complete overhaul of your instrument, decomposing them into groups and sizes. As a result, you will be able to choose the right number of boxes without much effort.
 Material selection
- Metal. Quite difficult to make. May need welding and cutting metal structures from sheet metal. As a result, such a product will weigh a lot and be difficult to move. But due to its advantages, this option is worthy of attention. In the case of storing heavy and dimensional tools, there is less chance of damage to the compartments. But at the same time, it is not suitable for storing carpentry fixtures. The ideal combination would be the manufacture of a workbench and built-in metal boxes. By making a mobile version on your own, you can use thin tin and copy the design from a factory product. Still very interesting option- mobile trolley with boxes. It is equipped with special swivel wheels for ease of movement. This option has gained its popularity among auto repair shops, garages and vehicle maintenance services. Trying to make such an option yourself will bring many difficulties.
- Plywood. It is possible to make almost identical boxes using plywood. A big plus is the ease of processing such material.
You should start with a drawing with dimensions. Dimensions must be made in accordance with the dimensions of the tool that is planned to be stored in it.
Particular attention is paid to the layout, fasteners and other elements that are taken into account at the design stage.
tool box
When creating a wooden tool box with your own hands according to the drawing that we already have, we will need:
- Lumber, board 10-20 mm thick.
- Wood saw.
- Pencil and ruler.
- fasteners.
The classic design has no compartments, cells and other functional devices, it is a deep box and a handle for transportation. The shape of the handle is made for more comfortable carrying, if the instrument is unevenly located in the box. The only addition that would be appropriate is an insert in the middle of the box to divide the container into two compartments. The left section can store drills, bolts, nuts, screws and other small parts. On the right are hammers, keys and other large items.
If such a box is not planned to be constantly transported, it would be rational to make a retractable lid on top of the box. Details are cut from the board according to the dimensions from the drawing and fastened with self-tapping screws. To increase the service life, you can paint or cover with a protective coating of the plywood surface of the craft.
DIY iron organizer for tools

A case is taken as a basis, consisting of several boxes fastened together by movable slats, one of which goes into a handle.
- A sheet of iron or tin of small thickness.
- with cutting and cleaning wheels.
- Bolts, nuts, washers for fastening parts.
- Pliers.
- File.
- Anvil.
- Hammer.
Of course, the first step is to draw a drawing and dimensions for the required size of the tool and storage compartments for various Supplies and fasteners. In dimensions, you need to take into account the joints and folds, make a small margin of 1-2 millimeters. Marking can be done with a core directly on a sheet of iron. After marking the sheet, we proceed to the clipping.
For straight external cuts, angle grinders can be used, for closed corners - only metal shears. We start manufacturing with the main part of the boxes, we get 2 of them open, 2 closed with organizers and one large one, which is the base. The rails are made of thicker iron and are secured with bolts or rivets so that they have free play to allow the case to be folded.
Summing up, we can say that if you wish, everything is possible. If everything is fine in your inventory, supplement it with compartments and storage containers. If you have a huge number of all kinds of tools, as well as power tools, you should think about creating a large box that will fit everything in itself and help keep everything safe and sound. You no longer have to constantly look for the right key or screwdriver, because you will have everything in its place.
There are many professions in which different kinds tools. Most often, tool boxes are purchased for their storage, but sometimes high-quality storage is easier to do with your own hands.
 If you are interested in this or that type of craft, and you are not sitting at home idly by, naturally, you have a fairly large number of tools. To ensure that your tools are always at hand and securely stored, they need to be provided with a storage system in the form of a separate closed space called box for storing tools. In addition to safety, the use of such a box will greatly help in the work, since the filling will be neatly sorted into compartments and in the future you can find the necessary device “blindly”. Also, this device is necessary for car owners, or rather, owners of trucks and gazelles. The box must be well secured in the car. And this means that when making it with your own hands, you need to think carefully about where it will be located in the car and how to fix it there.
Decide on two criteria:
- Will you only store tools in it, or do you also need it for ease of transportation?
- what sizes of tools do you intend to store in it?
Crate classification
Body material:
- plastic - light in weight, convenient in everyday life and for transportation;
- metal - much heavier than plastic, but at the same time much stronger, more stable, have a more rigid structure, cannot be large sizes due to the severity of the metal;
- metal-plastic galvanized - light, durable and roomy, suitable for both storage and transportation professional tools. But all these advantages determine the corresponding price - it can range from $150 to $500 and more.
- wooden - the most affordable material for making a tool box. Moreover, it is easier to do it with your own hands from this material, or rather from plywood 10 16 or 18 mm.
By type of stored instruments:
- hand tools - as a rule, they are represented by one large compartment for large tools (screwdrivers, hammers, keys) and 2-3 small ones for smaller tools;

- an electric tool is a case that is functionally designed to store and move a specific power tool. Most often it has one main compartment for the device itself and several recesses for equipment.
- organizers - boxes designed to accommodate a large number of different sizes of tools. They have many compartments, models with modular partitions deserve attention, which, for the convenience of the owner, can be rearranged from one place to another.
- professional tool - a special kind of cases with certain seats for specific tools, more resistant to falls and adverse environmental conditions.
- non-professional tool - consists of boxes of both small and large enough sizes with many compartments and niches for various kinds of tools, often these are cases in the form of bags.
There are many tool box companies such as stanley, fit– american firms, keter- no less popular Israeli company, Spanish company tayg, german Kroft and many others, differing in quality and price of products.
As an alternative to all these firms - the ability to make a tool box with your own hands. You can thus save on cost and get a completely competitive option that meets exactly your requirements.
Types of boxes
Tool boxes made in home workshops are mostly made of wood and come in a variety of shapes. Boxes of the classical form - "bast basket" are popular and easy to manufacture. in the second and third place - a box in the form of a chest - a container, and in the form of a case.
 |
 |
 |
Materials for making a tool box
- wooden boards 15-25 mm thick
- round wooden rod of the desired length
- self-tapping screws, wood glue, sandpaper for cleaning surfaces
- a set of tools - a grinder, an electric drill, an electric jigsaw, a screwdriver
- measuring instruments - ruler
- screwdriver, hammer
Manufacturing steps

Using this technology, it is possible to manufacture boxes of more complex designs, creating required amount compartments and niches.
Using the same technology, it is possible to manufacture a closed box, which is more reliable and convenient for transporting tools.
Additional steps in the manufacture of a box with a lid
For self-manufacturing popular now transformer boxes you will have to break your head more, but it is quite possible to implement this idea.
To do this, using computer programs it is necessary to develop the design you want, but a set of necessary elements that can be purchased in special stores will help you to translate it into reality. The number and complexity of the selected elements depends on your requirements for the box. Assembly can be done on wooden base using aluminum strips and corners. Fasteners are made with rivets.
If you are a purposeful and creative person, then the process making a tool box will not be difficult, but by seeing the fruits of this work, you will increase your self-esteem and save budget funds.
This article is about how to make a wooden tool box. If you have a lot of tools and want to keep them organized, the best thing you can do is to create a simple wooden box. From our experience, we find them very useful as they are lightweight, durable and provide plenty of storage space for tools. Don't forget that you can adjust the size and design to suit your needs.
The main components of the tool box are made from 20mm boards, as they have a beautiful appearance, and very durable. In addition, we recommend that you glue the joints and fasten everything with self-cuts. Try to screw in the screws as symmetrically as possible.
Upon completion of the assembly, it will be necessary to sand the entire surface of the box. Make sure all edges are smooth. Otherwise, you may injure your hands on sharp edges. Also, be sure to check that the heads of all screws are flush with wooden surface. Get rid of dust and chips before painting.
What you need to make a wooden tool box
In order to make a wooden tool box, you will need the following:
materials
Tools
- protective gloves, goggles;
- ruler, ;
- crayon, tape measure, level, carpenter's pencil;
- and drills.
Adviсe
- Pre-drill holes in wooden components before tightening screws.
- Make a handle out of a cylindrical stick.
Time
- 1 hour
Drawer decoration
Making a simple wooden toolbox is one of those projects that can be done in less than an hour. But it can make your life easier, especially if you work with tools a lot.
Smart Tip: Before joining the parts, add some glue to the joints. Immediately remove excess adhesive with a dry cloth, otherwise it will be difficult to remove after drying.
The first step of the project is markup. As you will see in the next step of the project, we will be using 1x8 boards to make the tool box. Therefore, you should use a carpenter's pencil and square ruler to mark lines on wooden boards.

In order to get accurate cuts, we recommend using a jigsaw or a good circular saw. Make sure the saw has smooth teeth or it may tear off the edges.
Smart Tip: Also, check that the blade will pass exactly along the cut line before sawing.

In the picture, all the components needed for the box. circular machine can make the job easier as many of the cuts need to be made at an angle.

You must use this blueprint when crafting crate components. Make sure you double check all measurements otherwise the components may not match.

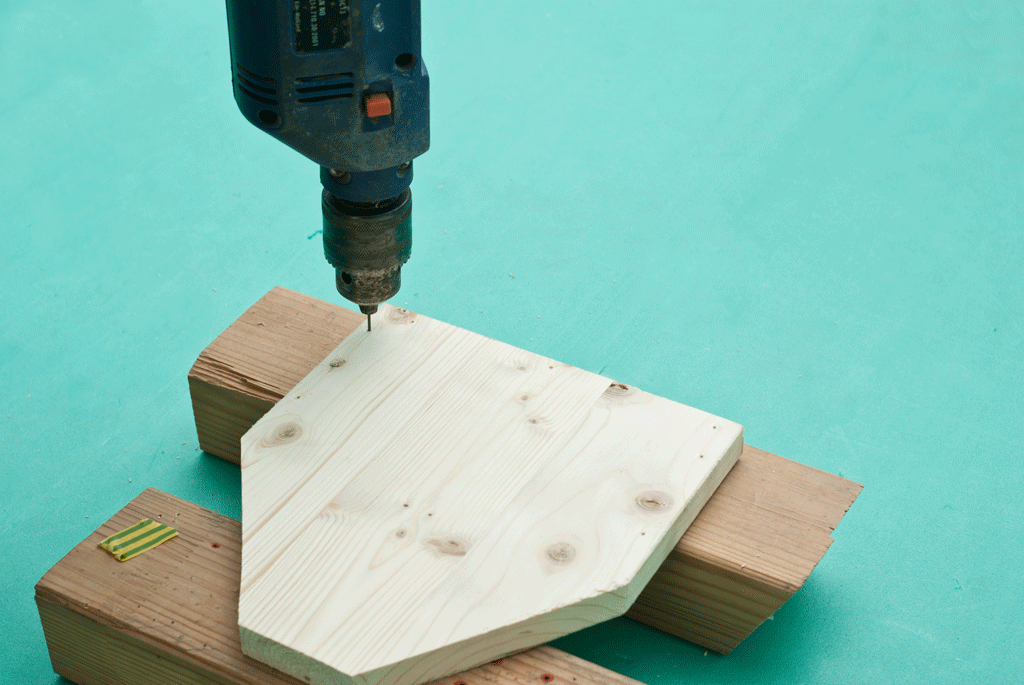
After creation wooden parts you need to drill holes around the edges. As you can see in the picture, you need to plank wooden beam ok to prevent damage to the surface. Drill three holes on the bottom and two holes on the sides.
Smart Tip: If you are not experienced in woodworking, you should draw guidelines for pilot lines. Indent from the edges to prevent splitting of the wood.
If the bottom edges are not smooth, you should carefully sand them with 120 grit sandpaper before assembling.
Coat the bottom ends with wood glue to strengthen the connection. Remove excess glue with a dry cloth, otherwise you will waste time cleaning it.
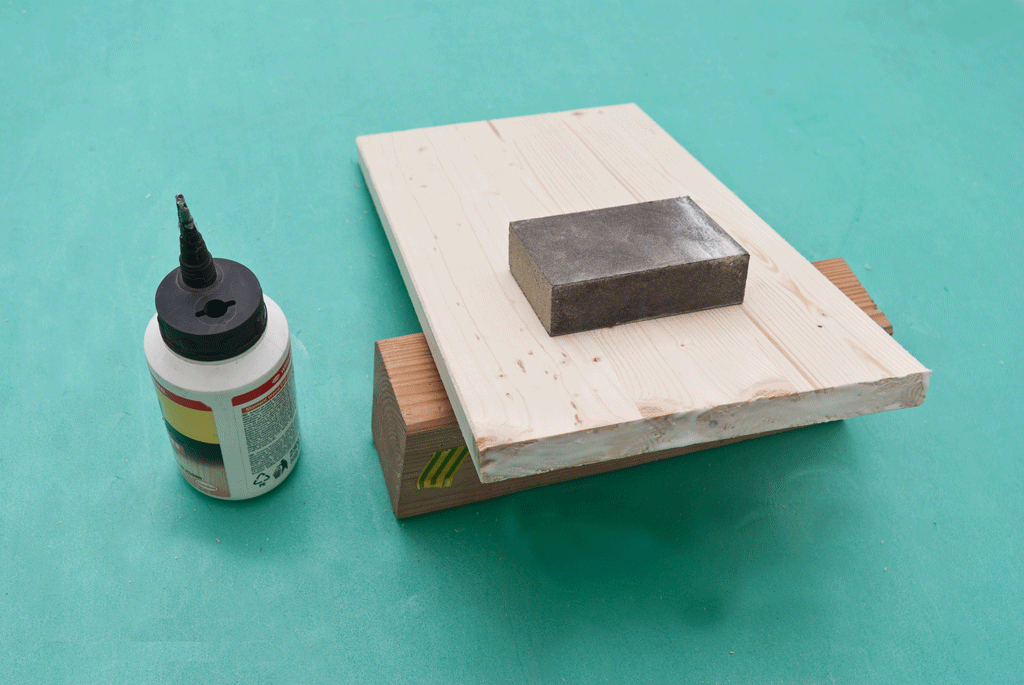
Press the components firmly and leave for half an hour. If you use good glue, it will hold the joints together well.
Still, screw the self-tapping screws into the drilled holes anyway.

In order to obtain a solid construction, we recommend using self-tapping screws. Work carefully to prevent damage to wooden components.
Smart Tip: Align all parts before twisting. As you can see in the picture, the edges should be even.

After installing all the components together, the tool box should look like the one in the photo below.

Make a handle from a cylindrical wooden rod. Handle diameter is approximately 20-25 mm.
Smart Tip: Use a ruler to cut the rod to the desired length.

Add some wood glue to both ends of the rod before pushing it back into place. Then drill a hole and screw in the screw. Hold the handle while twisting, otherwise it may move out of place.
Smart Tip: Leave about 15 mm from the top edge to the wooden handle.

Don't forget to smooth the edges of the wooden components with sandpaper.
Smart Tip: Clean the box of dust and chips before painting.

After completely sanding the entire surface of the box with sandpaper.
Smart Tip: Apply multiple coats of paint, varnish, or stain to enhance the look of the wood and protect the materials from rotting.

If you want your box to have the same dimensions as in our article, we clarify that 1 inch equals 2.54 cm.
Hello everybody!
A toolbox today is a very indispensable thing for every owner. Most of us have a lot of different tools that we may not use very often, but nevertheless, we keep them, since not one repair can do without them. In order for the tool to be in one place, and it was convenient to transport it, we use special boxes. Often we just buy them in the nearest store, the range and variety allows us to do this. But why not make it yourself? The manufacturing process is not too complicated, anyone should be able to handle it, especially with a handmade thing, which is much more pleasant to use than a purchased option. This article will describe 4 different ways production of boxes, a photo report is attached.
Let's start making!
Manufacturing Method No. 1

We will need:
Material
Plywood;
- pine board;
- nails;
- wood glue.
Tool
- drill;
- hammer;
- chisel;
- manual frezer;
- ruler;
- pencil;
- roulette.
First of all, you need to find necessary material, plywood or trimming boards are suitable for this. Further, according to the presented drawing, it is necessary to mark up, then cut out all the details of the case. It is necessary to make special grooves into which the partition will be placed, for this we use a manual milling cutter, or another available tool.

The diagram shows the following body parts:
1 - wall (2 pcs.);
2 - sidewall (2 pcs.);
3 - bottom;
4 - groove along the thickness of the partition and a depth of 1/2–1/3 of the thickness of the material
When everything is ready, all elements of the box body should be sanded. Next, we assemble the body together, fix the parts with wood glue, and then additionally fasten with small nails.
Now we make a partition for the box, cut out a special handle, for this we use a jigsaw.

When the partition is ready, grease the grooves with wood glue and install it in its place.

Next, from the planks we make overhead handles, with the help of a planer we round the corners. Then we make tool holders from the rails, use a jigsaw, and a drill. The holes will serve for screwdrivers, and pliers, etc. will be installed in square cutouts. tool.

In order for the box not to get dirty, and to be protected from the environment, we cover the surface with varnish. As a result of the work done, we get such a homemade box.

Manufacturing method No. 2
Drawer-stool

Material
Plywood or OSB;
- wooden beam;
- self-tapping screws;
- wood glue.
Tool
Available cutting tool;
- screwdriver;
- ruler;
- pencil;
- roulette.
We take an existing sheet of plywood, make markings on it, and, according to the dimensions presented, cut out the lid (Fig. 1), then the longitudinal drawers (Fig. 2) and sidewalls (Fig. 3).

Next, we take a wooden beam with a section of 40x50 mm, cut out a handle, and 4 legs with bevels at the ends at an angle of 15 °.

Next, we assemble the structure together, using self-tapping screws as fixing elements.


Parts layout:
1 - cover;
2 - tsarga;
3 - handle;
4 - leg;
5 - sidewall.
When everything is ready, use sandpaper or a grinder to round off sharp corners and clean the surface. Next, you can apply a protective coating.
The end result should be such an unusual tool box, which, if necessary, can be transformed into an ordinary stool, for this it is enough to turn it over and put it on legs, with it it will be convenient to reach the place we need, at a time when growth does not allow do it.
Manufacturing method no. 3.
Box for the young master.

Does your child love to craft? We offer to make a small box with him, where he will store his favorite tool.
To make a box with our own hands, we need the following
Material
16 mm boards;
- round wooden beam;
- self-tapping screws;
- wood glue.
Tool
Available cutting tool;
- screwdriver;
- ruler;
- pencil;
- roulette;
- clamps.
First you need to take the existing boards with a cross section of 16 mm, then we make the markup, according to the dimensions provided, after which we cut the wood into the component parts we need.

The drawing shows the following details:
1 - sidewall;
2 - bottom;
3 - handle;
4 - handle stand;
5 - holder.

Using sandpaper, we grind the surface and remove sharp corners. When everything is ready, we begin to connect all the parts together, first you need to connect the bottom and sidewalls, then we put vertical racks along the marked lines and at the same time we put a horizontal handle.
We fix everything with glue and screws. Then we install special holders for screwdrivers.

Now you can paint, choose the color and coating at your discretion.
The toolbox is ready.
Manufacturing Method No. 4

The next version of the tool box is well suited for carrying various and necessary equipment for us, its appearance will be distinguished by solidity and reliability.
To make a box with our own hands, we need the following
Material
The board is not thicker than 12 mm;
- self-tapping screws;
- joiner's glue;
- pen;
- corners 8 pcs.;
- latch 2 pcs.;
- loop 2 pcs.

Tool
Available cutting tool;
- screwdriver;
- ruler;
- pencil;
- roulette;
- clamps.
For the manufacture of the box we use such wood as: pine, linden or poplar. The most optimal thickness of the boards will be a thickness of 12 mm.

Next, we make the markup, according to the indicated dimensions in the drawings, after which we cut it into its component parts, as shown in the photo.

Full list of required parts.

In order to make sure that the wood was cut correctly, you need to put all the parts in a single box.
First, we assemble the bottom part and the lid of the box, for convenience we use clamps and corner clamps. We fix the parts together with carpentry glue.

Then, using a drill, we drill a hole for the self-tapping screws, we drill the holes.
It's no secret that good master starts with a good tool. And any tool must be carefully stored. In this article, we will talk about how to make a tool box with your own hands. At the same time, use in your work available materials.
In addition, there is a tool that cannot be stored simply in bulk. For example, files or drills. From friction against each other, these objects become dull. And during work, a carelessly lying tool forces you to spend time looking for it.
So - we need a storage box necessary devices, consumables and fasteners.
Making your own tool box
First, let's define the purpose and its functionality. What is it and what should it be.
Portable tool box
A small number of items are placed in it, usually the equipment corresponds to the type of work. Such a box must have a strong lock so that it does not accidentally open during transportation. During movement, the tool should not hang out inside, each element has its own niche, and, if possible, is fixed.
Stationary tool box
True, this is a relative concept. It’s just that such a box is not carried with them to the place of work. It can be gently moved within the workshop.
In this design, there are no fixtures for tools, but they are arranged in compartments and, as a rule, are divided into groups.
Dedicated tool box

Unlike the first two options, such storage is intended for a specific group of devices. For example, wrenches, or a set of bits and drills for a screwdriver. In addition to the main contents, maintenance materials are usually placed in such boxes.
Such devices are more convenient than universal ones, but they will need several pieces.
Therefore, before manufacturing, you need to decide which option you need. First, take inventory of your tools. Sort them into groups and sizes. And it will immediately become clear to you how many boxes, and what size you will need them.
How to make a toolbox
Choosing a material:
- Metal tool box. Making it is not so easy. Welding may be required. A self-made steel box will be too heavy to carry, but it also has advantages. A heavy and bulky tool will not break the cells as quickly. You can not stand on ceremony too much with the accuracy of laying a 38x52 key weighing half a kilogram. A weighty set of cap heads will not break through the wooden bottom.
 But for devices with sharp sharpening, or files - it will not work. The best option- installation of such a box under the workbench. It is only necessary to install a limiter so that the heavy pallet does not fall on your feet. When making a mobile or portable version, you can use thin tin and make a box following the example of factory designs.
 - Another option to follow is an iron cart with drawers for tools and accessories. This design is popular in car services. For the home workshop perfect option, only manufacturing is associated with technical difficulties;
- If you need the same strength and functionality, try making a tool box out of plywood. The strength will decrease slightly, but it is much easier to process such material. Before you make a box with your own hands, draw the drawings. The craft should be neat and fit the size of your instrument. For the main body, choose a thickness of 8-10 mm. You can buy wheels (if you need them) at a hardware store. All connections must be on screws. Nails loosen quickly. The joints are additionally coated with PVA glue. Boxes with cells can be made of plywood 6-8 mm. The frame walls of the material are thicker, the bottom and cells are thinner. If the tool is not too heavy, we choose hardwood bars as guides. You can screw metal corners.
note
If you have additional funds, buy roller guides in a furniture accessories store.
 Then you will not be afraid that the box will fall on your feet. Wide and low pallets are perfectly divided into sections by internal partitions. The more of them, the easier it is to sort the tool and consumables according to their intended purpose. DIY tool box - provides ample opportunities for creativity;
 - Handmade wooden box. This is a carpentry classic. Drawings of such a portable storage were published in the magazine "Young Technician" 50 years ago.
 For manufacturing, you will need a board with a thickness of 10-20 mm and a hacksaw for wood. That's actually all. Therefore, despite the many modern designs, the masters of the old school choose this option. The classic design does not provide compartments or other functional devices. Just a deep box and a comfortable handle along the entire length. This shape of the handle is of practical importance. If the weight of the tool is unevenly distributed, you can always find the center of gravity, so it is always convenient to carry the box;
 - A practical addition is the insert section with its own handle, which occupies 50% of the height of the drawer. This insert is used for small tools (screwdrivers, awls, small wrenches) and consumables (drills, screwdriver bits, etc.). It can be made from plywood or thinner wood. A large tool is located in the lower (main) compartment. Hammer, drill, planer, large pliers;
- If a wooden box does not require constant carrying, you can make a box with a sliding lid. There are several such containers, of the same size. They are placed on racks, an inventory is made at the end of what is inside. A completely different design can be made from wood and plywood. Drawer-dressing table (only without mirrors).


