Do-it-yourself doors for a sliding wardrobe: assembly and installation of doors for a sliding wardrobe, instructions. Sliding doors to order! for wardrobes and dressing rooms! exactly according to your measurements! no overpayments! from the manufacturer! Drawing and detailing
Doors for wardrobes, developed by experienced designers, using quality materials and fittings, have excellent characteristics. They work smoothly and quietly, contribute to the practical use of the available space in the room, and also increase the aesthetics of the room, make it more attractive and appropriate to the tastes of users.
At ADEM GLASS you can do individual order doors to the closet, which will be made with high quality and taking into account the interior features of the room where it will be used. You can order either a whole compartment door from one type of material, or combine a door from different materials... The page contains popular options for combining materials in compartment doors - choose.
Where to make custom-made compartment doors in Moscow?
Today, you can order the manufacture of doors to your size in different companies, but not all offer customers really favorable terms of cooperation.
Many clients choose ADEM GLASS because we offer: 
1) Favorable prices. You can order a compartment door for your closet inexpensively from us. The cost of our products starts from 3 600 rubles.
2) Professional approach. We have been in the market for over 20 years, and every year we are improving our service.
3) Quality assurance. Thanks to the use of only high-quality supplies, we can guarantee that all our products will serve you as long as possible.
4) High speed of work. We quickly manufacture doors according to your dimensions and deliver finished products in Moscow to the address specified by the client.
5) Large selection. We are chosen because our assortment includes a huge selection of glasses and mirrors with and without drawings for making a door, so that it is guaranteed to fit into the interior of your room, hallway, dressing room. The main advantage of our glasses and mirrors that we use in wardrobe compartment doors is that the pattern is applied by chemical etching, which visually looks presentable and more expensive, compared, for example, with sandblasting. Here you can choose an insert for a cup door  e with any pattern as in classic styleand modern: geometry, floral design, monograms, feathers, just plain painted glass or even an aged mirror - which looks just incredibly beautiful in the compartment doors!
6) Practicality. In production, we use glass and mirrors with drawings or painted glass, which retains its consumer properties for many years, for example, compared to sandblasting.
You can independently verify all the advantages of cooperation with us by ordering the manufacture of a door, and we will do everything necessary to make you a happy, satisfied client!
Contact us, we will be happy to advise you on all issues of interest and calculate the cost of manufacturing a door for your cabinet.
The website contains retail prices. If you are a furniture maker, ask the manager for wholesale prices for sliding doors by phone: + 7 499-110-62-63.
Zoning the space of residential or office premises is the most functional and widespread use of such doors. After all, they are suitable for rooms of any size, even the smallest. Here you can select and inexpensively buy sliding doors to separate
- balconies and loggias,
- terraces and verandas,
- kitchens and living rooms,
- kitchens and dining rooms,
- offices and living rooms,
- sliding doors for wardrobes,
- utility rooms, storage rooms, technical rooms.
They are appropriate and convenient almost anywhere you need to save space.
Benefits
The popularity of compartment doors in Moscow is constantly growing, since people have managed to appreciate their indisputable advantages:
- suitable for all types and styles of layout,
- possibly ,
- being correctly selected, they combine functionality and aesthetics,
- the price of compartment doors does not exceed the cost of other structures,
- installation requires a minimum of effort and time, practically without affecting the existing interior,
- their safety is higher than that of conventional swing doors.
You should only entrust the production of such an important part of your interior to professionals, whose practical experience will allow you to realize all your ideas and wishes.
You can order inexpensive sliding doors at RIAL-MOSCOW. The quality level always remains at its best thanks to the professionalism and skill of our employees.
To find out the preliminary cost of a door for a wardrobe or opening, you can send the required dimensions to our e-mail or form feedback, order a call back or call a measurer.
Delivery
* depends on the number of doors in the order and the distance from production. It is calculated individually with the manager. Self-pickup is possible from a warehouse in Shchelkovo and in Reutov as a profile and doors.
** Delivery of a profile to wholesale customers is free of charge from 30,000 rubles, in other cases by agreement, again based on the distance of logistics and the cost of the order.
*** Taking measurements (free).
Payment Methods
- Payment by invoice (for legal entities)
When concluding an agreement for a legal entity, you will be invoiced, usually after payment we see the receipt of money within 24 hours. - In cash
We accept payment in cash both at the office of the company and at the address when concluding a contract. Upon receipt of the money, the employee of the company will provide you with all the necessary documents confirming the payment. - Visa / Mastercard
The field employees of the company are equipped with mobile terminals, so that you can make a payment at the conclusion of an order at your home in a convenient way for you.
The sliding wardrobe is convenient, since the doors do not take up much space when open. It can generally be made uncased - in a niche, from wall to wall. All that is needed in this case is to install the doors for the wardrobe, and then collect the filling (or vice versa, this is not so important.
If we talk about strict restrictions on the size of doors for a wardrobe, then there are none. You can make any length and width. But there are recommended parameters determined based on operating experience:
Sash design
Sliding wardrobe door leaf consists of profiles:

All this together looks like in the photo. In this frame, in the grooves, the material of your choice for the doors is inserted. It can be glass, mirror, and other materials.

Dividing profiles are optional. They are needed if the sashes are assembled from different materials or you just like them in this form. The maximum thickness of the filling material is 10 mm, the minimum is 4 mm. Thinner ones - glass, plastic, mirror - are inserted through the sealing gasket.
In order for the sash to be able to move, rollers are installed on it - above and below. The lower rollers account for the entire mass of the door, and the upper rollers stabilize the vertical position of the web, preventing it from deviating.

The rollers are attached to the side profiles with special fasteners.
Slides for sliding doors
As you can imagine, the sash is not everything. Guides are needed along which these very doors will move. There are two of them - upper and lower. They differ significantly in appearance.


When installing the doors, first they are tightly inserted into the upper guide, raise the sash to the stop and put the lower rollers in the corresponding slot. The whole structure is shown in the following photo.

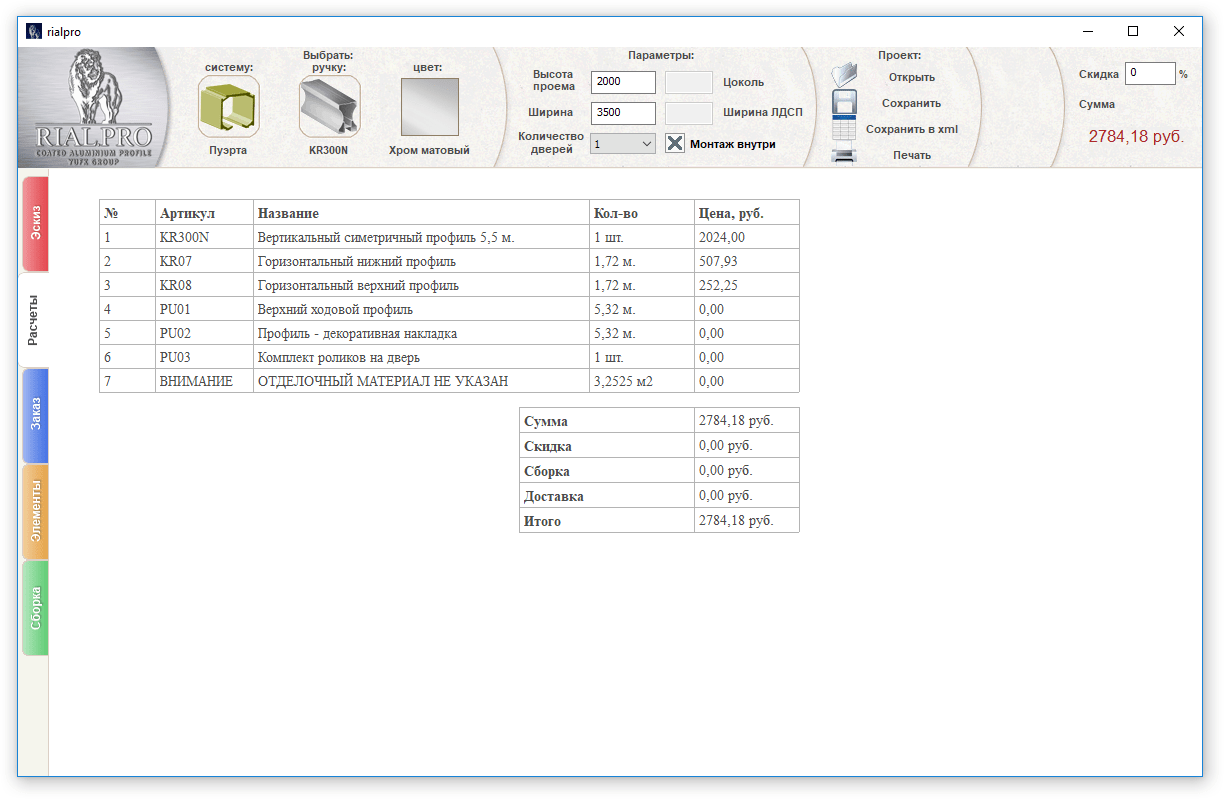
Size calculation
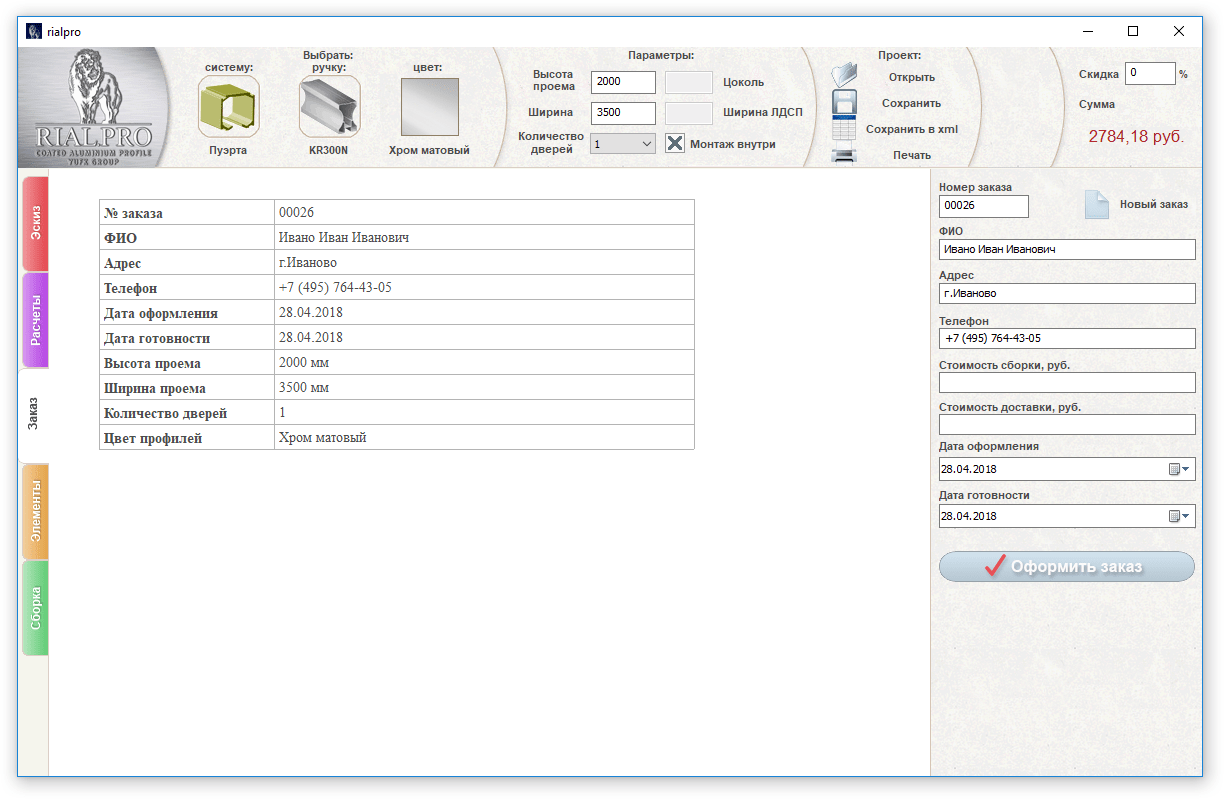
When self-assembly wardrobe doors have two options. The first is to measure the opening, think over how many doors you want and contact the door manufacturer with this information. Just make sure they sell the parts for free. The manager will calculate everything for you necessary materials, will give the dimensions and announce the amount. It's simple. But you will have to buy everything from this office, i.e. choose from what is.
Sash
Calculate the width of the sashes so that only one handle is visible when closed, but close itself door leaf she shouldn't. For a compartment door of two leaves, count as follows: measure the width of the opening, add the width of the profile and divide it in half. This will be the width of the sash.
For example, the opening is 1600 mm, the width of the handle profile is 26 mm. We get 1600 mm + 23 mm / 2 \u003d 811.5 mm. Please note that the width of the handle profile is arbitrary. It can be different in shape and, of course, in width. When calculating, substitute the width of the structure you have chosen.

To calculate a tricuspid, you will need to add twice the profile width and divide by 3.
Example: the opening is 2100 mm, the width of the handle is the same - 26 mm. We consider: 2100 mm + 2 * 26 mm / 3 \u003d 717 mm.
With height, everything is easier. 40-45 mm are subtracted from the cabinet height and the desired sash height is obtained, as well as the length of the side profiles. That's it with the size of the valves.
Filling
Since the filling is in a frame of profiles, we subtract twice the profile width from the total sash width. We do the same with the height - we subtract the height of the lower and upper profiles.

So, the width of our sash is 811.5 mm. The measured width of the handle profile is 18 mm. Since the handles are placed on both sides, we double this figure. We get 36 mm. Total filling width 811.5 mm - 36 mm \u003d 775.5 mm.
We also consider the height: let the original be 2350 mm, the width of the upper profile is 12 mm, and the lower one is 48 mm. Total filling height 2350 mm - 12 mm - 48 mm \u003d 2290 mm. This is if the filling is solid and it is chipboard that does not require a silicone seal. If the sash is a solid mirror or glass, the thickness of the sealing gum must be subtracted from the found height. It is 1 mm, but since it is worn around the perimeter, in general - from above and below - it takes 2 mm. In this case, the filling height is 2290 mm - 2 mm \u003d 2288 mm.
If the sash infill consists of fragments, the thickness of the connecting profile is also subtracted. It is also approximately 1 mm.
Profiles
The height of the vertical frame profiles is equal to the overall sash height. The width of all horizontal ones is calculated depending on the width of the handle: from the width of the sash, we subtract twice the width of the handle (there are two of them).

Let the handle width be 26 mm. We get the width of the vertical profiles: 811.5 mm - 26 mm * 2 \u003d 759.2 mm.
Photo report on the assembly
First, all profiles are cut exactly to the calculated dimensions. The accuracy must be perfect. Cut - strictly perpendicular, at 90 °. Holes are drilled in the handle profiles for the installation of rollers and fasteners.
The holes are made through two diameters. The exact size depends on the dimensions of the purchased fasteners, but basically there are two sizes: 4 mm and 6 mm, as well as 6 mm and 10 mm.

At the top, one such hole is made, the center of which is at a distance of 7 mm from the edge of the profile, at the bottom of the holes there are two - the first at a distance of 7 mm from the edge, the second - departing from the cut of the profile 42 mm.

During assembly, all parts of the filling are assembled first. First, if there is glass or a mirror, a sealing rubber is installed around the perimeter. It is simply put on the end of the part by pressing the finger. At the edges, the seal is cut off, put on end-to-end, but without overlap on the next side.

A protective film is glued to the back of the mirrors. You can use regular self-adhesive. This film will keep the debris from falling apart if the mirror breaks.
If the sash is composite, we assemble it using connecting profiles. The filling parts are simply pushed into the profile. Sometimes it can take a lot of effort. You can tap on the end with the back of your hand or use a rubber mallet for this.

Just insert the filling parts into the grooves of the profile and tap on the butt
When the sash is assembled, according to the same principle, the corresponding profiles are installed at the top and bottom.

Then it's time to install the side handle profiles. Everything is the same: you drive the filling into the groove, make sure that it fits all the way along the entire length without distortions. When the frame is assembled, it is necessary to tighten it with fasteners. We start from the top. Take the fasteners, insert them into the previously drilled hole. If the distance has been accurately measured, the screw will fit into the groove of the head rail.

We tighten the connection with a hex key. Without slightly tightening it all the way, we insert the upper rollers between the screw head and the profile jumper, then we tighten the screw.

We repeat the same operation on the other side. Then we go down. Here the fasteners are installed in the upper hole. Just tighten it all the way. Repeat the same on the other side.


Installation of the lower roller - we put the plate into the profile
We press the spring, tucking the roller body inward. Insert the screw into the hole, trying to get into the socket, tighten it with a hexagon. It may need a different size - slightly smaller than the others - as this screw is usually thinner and longer.

You do not need to tighten it all the way. So that it goes into the plate for half a centimeter or so. Then, when installing the door and adjusting its movement, this screw adjusts the position of the sash - the angle is raised or lowered.

If you press the roller wheel, it will go into the body, then return due to the elasticity of the spring. This simple mechanism ensures smooth movement of the door for the wardrobe.
Having collected all the doors, we proceed to the installation of the guides. They should be located strictly one below the other, even without deviations in a millimeter. Use a plumb line or laser level ().
First, screw on the top guide. It is mounted either to the ceiling or to the top of the cabinet. The distance from the shelves is at least 100 mm, otherwise the doors will touch the shelves, things, and hangers.

Insert the bump springs into the bottom guide from the sides into the grooves. They will restrict the movement of the door. The number of springs is equal to the number of flaps, they are installed at both ends.


If a laser level no, so as not to suffer with plumb lines, for a start, you can simply lay the lower guide, while not fixing it. Then install one blade, putting its upper rollers at the top, and setting the lower ones in the desired groove. This will connect the doors to the top and bottom rails.

By placing the canvas strictly vertically, you will automatically set the lower guide. It only remains to screw it on. Just make sure that the doors do not move.
The last thing to do is to glue the schlegel on the sides. This is a fleecy self-adhesive strip that softens the impact of the sash on the cabinet walls (or just on the walls, if the cabinet is open-frame).

The final touch - the Schlegel sticker
On this, the doors for the wardrobe compartment are installed and ready to go. You can watch the process again in the video.
Sliding wardrobe doors are an important part of sliding furniture. They form an aesthetic façade, decorate the room and prevent dust from entering the cabinet interior.
A wide range of materials are used to fill the door. Often chipboard, MDF, glass, mirror are used for this purpose. There are also rare and exotic decoration Materials - bamboo, rattan, natural solid wood and so on.
Assembly technology and device sliding doors makes them a universal attribute of a house or apartment. They can be part of a cabinet front or interior partition... Moreover, in each case, the design should be as practical as possible. There are a number of sliding door systems for this. They differ appearance, type of profile, method of fastening, presence of a threshold, and so on.
Door design for wardrobes
To fill the doors of the wardrobe, use various materials... The most popular are chipboard and MDF. With the help of fiberboards and panels, real masterpieces of design are created.
Sliding wardrobe "Armadio"
 Sliding wardrobe "Shine"
 Sliding wardrobe Lady
A photo of sliding wardrobes is presented in our photo gallery.
We offer you to familiarize yourself with a number of ready-made solutions for the design of wardrobes. The photo gallery contains sliding wardrobes, which differ in:
- the number of doors (two or more);
- purpose (nursery, bedroom, living room, hallway);
- the presence of elements of glass and mirrors;
- colors of the facade and profile;
- style (classic or modern style);
- internal filling;
- type of building (built-in, cabinet);
- the presence of open shelves;
- decor (photo printing, sandblasting, etc.).
Examples of modern design will help you decide on the appearance of furniture and learn new design ideas.
The developed network of official representatives allows you to buy profiles and filling for compartment doors at wholesale prices. And many of the companies provide an opportunity to place an online order with delivery.
3D wardrobe - convenient visualization of future furniture

The program is a convenient free application that can be downloaded to a PC or laptop in the appropriate section.
Advantages of calculating the door system using a calculator:
- the program does not require an Internet connection;
- no special skills required;
- the proprietary calculator contains all the colors and types of profiles available on the site;
- the program is updated when new systems appear in the range.
To use the program, just click the "Download" button and follow the further instructions.
Video instructions for assembly and installation
To easily and easily install sliding furniture or a partition, just watch the video on assembling the doors of the wardrobe. Depending on the type of system (top-hung, bottom-supported, non-threshold) doors can be installed:
- directly into the closet;
- in the doorway.
Calculation of the size of the doors of the sliding wardrobe systems "Ramir" and "Universal"
Assembly and installation of the doors of the sliding wardrobe system "Puerta"
More videos about step by step assembly and installation of various door systems is presented in the corresponding section.
For each individual case, there is a specific video with instructions.
Before installing the system, it is extremely important to calculate the correct position of the doors. In the videos, you will also find instructions for measuring openings and niches. Thanks to video instructions, you can cope with any task:
- taking measurements;
- door assembly;
- door installation.
The videos detail the options for fastening doors of various systems.
Filling the doors of sliding wardrobes using MDF
One of the popular facade materials is MDF.


