What a fiber-rich list. What foods contain fiber? Correct way to use
Considered:
1) Material for creativity does not require financial investments, because most often the components necessary for its preparation are at hand.
2) Salted dough is easily washed off hands, does not stain clothes and the surface used for modeling.
3) The mass does not stick to hands during use, it keeps its shape perfectly and has high density indicators.
4) You can dry the molded figures both outdoors and in the oven.
5) As a means for coloring crafts, you can use both food colors and standard coloring materials (gouache, acrylic paints, watercolors, etc.).
6) Coating finished products with varnish significantly increases the duration of their preservation of their original attractiveness.
It is better to take the most common flour for salted dough without all kinds of additives and impurities. For example, flour, on the packaging of which there is an inscription "for pizza", "pancake" or "for pancakes", is completely unsuitable for preparing the material. Crafts made from such products, when dried, can rise well, and in the future they can completely crack. Give up rye flour as well - the dough from it will certainly turn out to be tough and inelastic, and it will be very difficult to sculpt from it.

Use regular fine salt for the dough. Iodized and seafood will not work - their large grains will not dissolve, and the dough will turn out to be heterogeneous "speckled". As for water, it is better to use it cold, and it is not worth pouring salt and flour with the entire volume of liquid at once, it is more correct to add water a little at a time and immediately knead the dough thoroughly.

Additional components can also be used to impart certain properties to the sculpting mass during the preparation of salt dough. So, dry wallpaper glue will make the future more durable, hand cream and vegetable oil will give the material plasticity, and food colors will color the mass in desired color.

Classic salty dough with a minimum amount of ingredients - perfect option ... To prepare it, combine half a glass of fine salt and a little less water at room temperature in a deep bowl. Stir the mixture well and set aside for 25 minutes to infuse.
Pour half a glass of flour into a saline solution, stir the mixture well with a fork, knife or whisk. Try to break up the lumps that arise immediately to obtain an elastic homogeneous mass. If the dough is thin, add more flour. Pay attention that the mass does not crumble or fall apart, knead it with your hands until it turns into a tough dough. Check the readiness of the material with your finger. Leave its mark in the mass, and if the print "does not float", but keeps its shape, salty dough ready for sculpting.

To prepare a material that is more delicate in texture, which differs from the traditional salty dough with a lower density, you will need 2 glasses of water, 2 glasses of flour, 1 glass of salt, and 1 tablespoon each vegetable oil and citric and acid. Such a mass does not stick to the hands at all, is easy to process and does not require much effort in the formation of various figures, which is why it is considered an ideal material for children's creativity.
To prepare the choux salty dough, pour the water into a small saucepan and heat it up without boiling. Add vegetable oil to the liquid. Combine dry ingredients in a deep bowl, mix well and gradually cover with hot water, stirring occasionally with a fork or whisk. At first, the dough will seem very liquid to you, but over time the flour will brew and the mass will become denser. Knead the material until it turns into a flexible, stretchy dough, perfect for shaping a wide variety of shapes.

If you add food coloring in powder, liquid or tablet form to the salt dough at the stage of mixing the ingredients, you can immediately get a material for modeling a certain shade. To prepare a colored salty dough in a deep cup, combine 300 g of flour, 300 g of salt and 200 ml of water, knead a thick dough that does not stick to your hands.
Divide the mass into several parts, each of which will acquire a certain shade in the future. Make a small indentation in each piece with your finger, add a few drops of water and dye into the hole, wait for the mixture to absorb and knead the dough again. If the colored mass dries up, add a small amount of vegetable oil to it. Perform the same procedure with all the remaining pieces. Spread the colored material in plastic bags and refrigerate for several hours.

The next integral step in creating figurines from salt dough is drying them in the oven, in which several important recommendations should be taken into account:
- the approximate drying time of products in an electric cabinet at a temperature of 75 and 100 ° C is an hour, at a temperature of 120 ° C - 45 minutes, at a temperature of 150 ° C - half an hour (in a gas oven this process will take 2 times longer);
- to dry products decorated with beads, crystals and other decorative elements, set the temperature not exceeding 120 ° С;
- periodically turn the crafts to achieve the most even drying;
- so that the figures do not stick to the baking sheet, place food foil on it.
Our distant ancestors decorated the surface of loaves with figured images of spikelets, berries, leaves before baking to attract good luck and receive blessings from their deities. Today we do this without any religious background, just for beauty.
In addition to decorating edible products, the use of a special composition of dough allows you to create very effective and beautiful decorative figures, pictures and flowers. In this case, the dough perfectly replaces the more difficult and expensive materials, therefore it is ideal for small children. But this is such an exciting activity that respectable adults are also happy to do it.
Everyone can use salted dough for self-expression and relaxation, it is only important to know how to make a durable and plastic material, as well as to competently dry and paint the finished product.
The subtleties of making dough for crafts
The molding of products itself is no different from working with plasticine or other similar materials. The advantage of salted dough is that it is more plastic, less stains on hands and surrounding objects, gives more opportunities for complex work, and also keeps well after proper drying, becoming hard and durable.
- The difficulty lies in how to prepare the correct dough that will not stick to hands and tools, will not crack and crumble. To do this, you need to use several simple tips:
- Do not use pancake flour for work - it is more sticky and the dough will turn out to be of a poor consistency.
- Use only fine "Extra" salt. Coarse salt will create coarse crumbling dough due to grains when kneaded directly in dry form, and the dissolution of such salt in water will be too long in time. In addition, the rock salt may contain impurities that will stain the modeling dough, and the "Extra" salt is refined and very fine.
Diluting flour with ice water, you can get an excellent, plastic and very homogeneous dough.
With these simple tips, you can start working with your kids to create a variety of amazingly beautiful pieces. Salted dough - simple, inexpensive and very available material for creativity, and children are just crazy about such a useful entertainment.

Used tools and materials
When we sculpt from salt dough, we need special tools to work. They are all found in our homes, in our kitchens or among office supplies, sewing materials and handicrafts.
Basic tools and materials for work:
- Rolling pin for rolling out the dough. If it is not available or the one available is too large for children's hands, you can find a replacement in the form of an ordinary glass bottle.
- Dough cutting knife. Children can be given a plastic knife from a set of colored plasticine.
- Board for rolling out dough and making products.
- Paints for coloring (watercolor, acrylic, gouache - any water-soluble dyes).
- Finishing varnishes (water based, best sprayed). Additionally, you can use spray varnishes "with special effects" - "snow", with sparkles, gold, silver or other metallized varnish.
- A set of brushes for painting.
- A container with water.
- Forms for cookies.
- Various items for giving texture to the finished product - toothbrushes, combs, knitting needles, buttons, lace and much more.
For small children, special clothing should be provided, as they can get very dirty. Before work, stock up on a pack of dry and wet wipes - they are convenient not only to clean your hands, but also to get your brushes wet from excess paint. This will prevent the dyes from spreading over the finished item.

Three best recipes
To knead salty dough, you can use own hands or entrust this process to modern technology - a mixer or dough mixer. With their help, you can get an especially smooth and elastic dough.
In order for the finished product not to crumble, salt must first be poured with the required volume of water, and then thoroughly mixed with flour. It is important to mix the product well until it is completely homogeneous, otherwise, when drying, the finished item may crack or fall into separate pieces.
Basic recipe:
- A glass of flour (wheat or rye).
- A glass of finely ground salt of the "Extra" type.
- Half a glass of ice water.
Combine ingredients and knead dough until smooth. This recipe is great for products with delicate details: for creating flowers, leaves, ornamental plants etc.
Plastic Soft Dough Recipe:
- Flour - one glass.
- Fine salt - one glass.
- The water is very cold - half a glass.
- Vegetable oil - 2 tablespoons.
Instead of oil, you can take glycerin, a fairly fatty cream, or cooking oil. The introduction of fats or oils into the recipe for salted dough makes its consistency more plastic and elastic, as well as avoids cracking of the product after drying. This option is especially suitable for "thick-walled" products that can crack if the dough is completely dry.
To work with fine details or many small elements, you will need to use an improved recipe for salt dough:
- 1.5 cups flour.
- 1 glass of salt.
- 0.5 cups of water.
- 2 - 3 tablespoons of PVA glue, wallpaper glue like "Methylan" or any other water-soluble glue.
Such dough perfectly holds its shape, it is possible to make small thin elements from it, and with definitely "stuffed" hands you can make things that are outwardly indistinguishable from good porcelain.
Any recipe for salty dough can be regarded as a basis, since you can endlessly modify it "for yourself", experimenting with various ingredients until you get the correct composition.

How to dry salty dough perfectly
The main difficulty for beginners is the technology of drying the finished product. Drying can be done in different ways:
- "Bake" in a preheated oven like a regular cookie, at a temperature ranging from 50 to 80 degrees (depending on the size and thickness of the product). The finished piece is placed on baking parchment paper and placed in a preheated oven for about an hour. The processing time depends on the dimensions of the product. Until it cools completely oven the thing is not taken out of it.
- Drying in a cold oven, that is, the product is placed in a cold oven, heating is turned on and brought to the desired temperature. Everything else is exactly the same as in the previous paragraph.
- Salted doughs are best simply air-dried, although this is time-consuming. A well-dried craft becomes strong, firm and unaffected by external influences. Regular drying is great for small items or delicate items.
Do not use electrical appliances or central heating batteries for drying. They dry out the dough unevenly, which can cause cracking or deterioration of the thing if it is dry on only one side, has a dry surface and "damp insides".
Dyes and finishing materials used
When preparing salty dough, the dye can be injected directly into the product itself and get a material very similar to plasticine. But the difficulty in this case will be working with the material - you will have to connect separate colored parts, and for kids it is too difficult. Everyone loves to work with paints, so for children it is preferable to use the painting of a ready-made monochromatic thing.
The easiest way to work is to use water-soluble paints. Acrylic dyes are very good - they give a dense and uniform color, have a large color palette and easy to operate, dry quickly. But you can also use ordinary watercolor. It gives an excellent translucent layer, and paints can be layered with glazes to obtain special effects - volume, transition of tones, overflows and the acquisition of various textures. If there is a need to obtain opaque staining with watercolors, you can use a white primer. It can be played by white acrylic paint, gouache or tempera with the addition of PVA glue to hold it on the surface of the product.
For decoration, you can use volumetric paints, metallized dyes, beads different sizes and shapes, buttons, rhinestones and other little things that do not deteriorate from high temperatureif oven drying is planned.
Should I varnish crafts
In principle, a finished piece of salt dough holds the paint very well, but if you plan to use this thing, for example, for games, or it is a chess piece, a decorative vase, a box, in a word, a thing that will suffer from constant touch, then it should be covered varnish. It will not only protect the finished products from external influences, but also give a beautiful glossy shine, which is necessary for many types of crafts.
The easiest way is to use the varnish in an aerosol, performing the treatment outdoors or in a well-ventilated area. If necessary, varnishing can be repeated several times, drying well each previous layer. To give a special decorative effect, you can use special sprays, for example, with the effect of snow or with sparkles.

Types of salted dough products
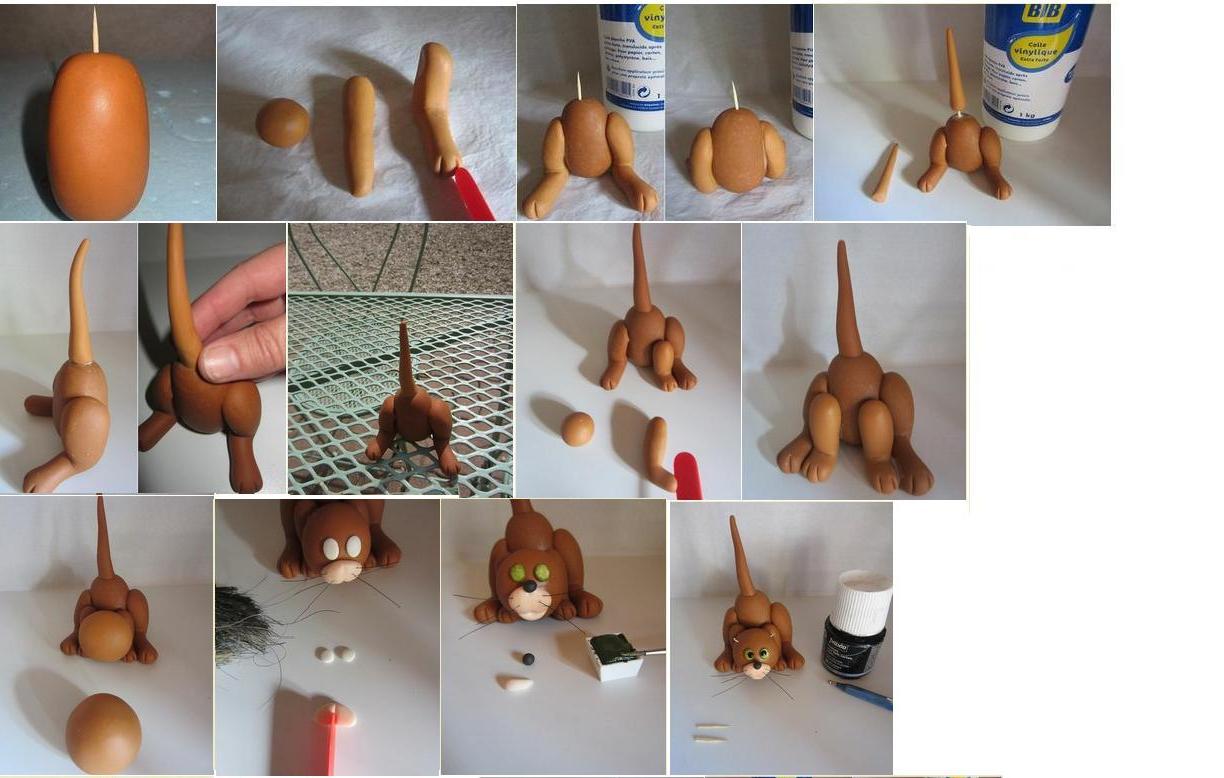
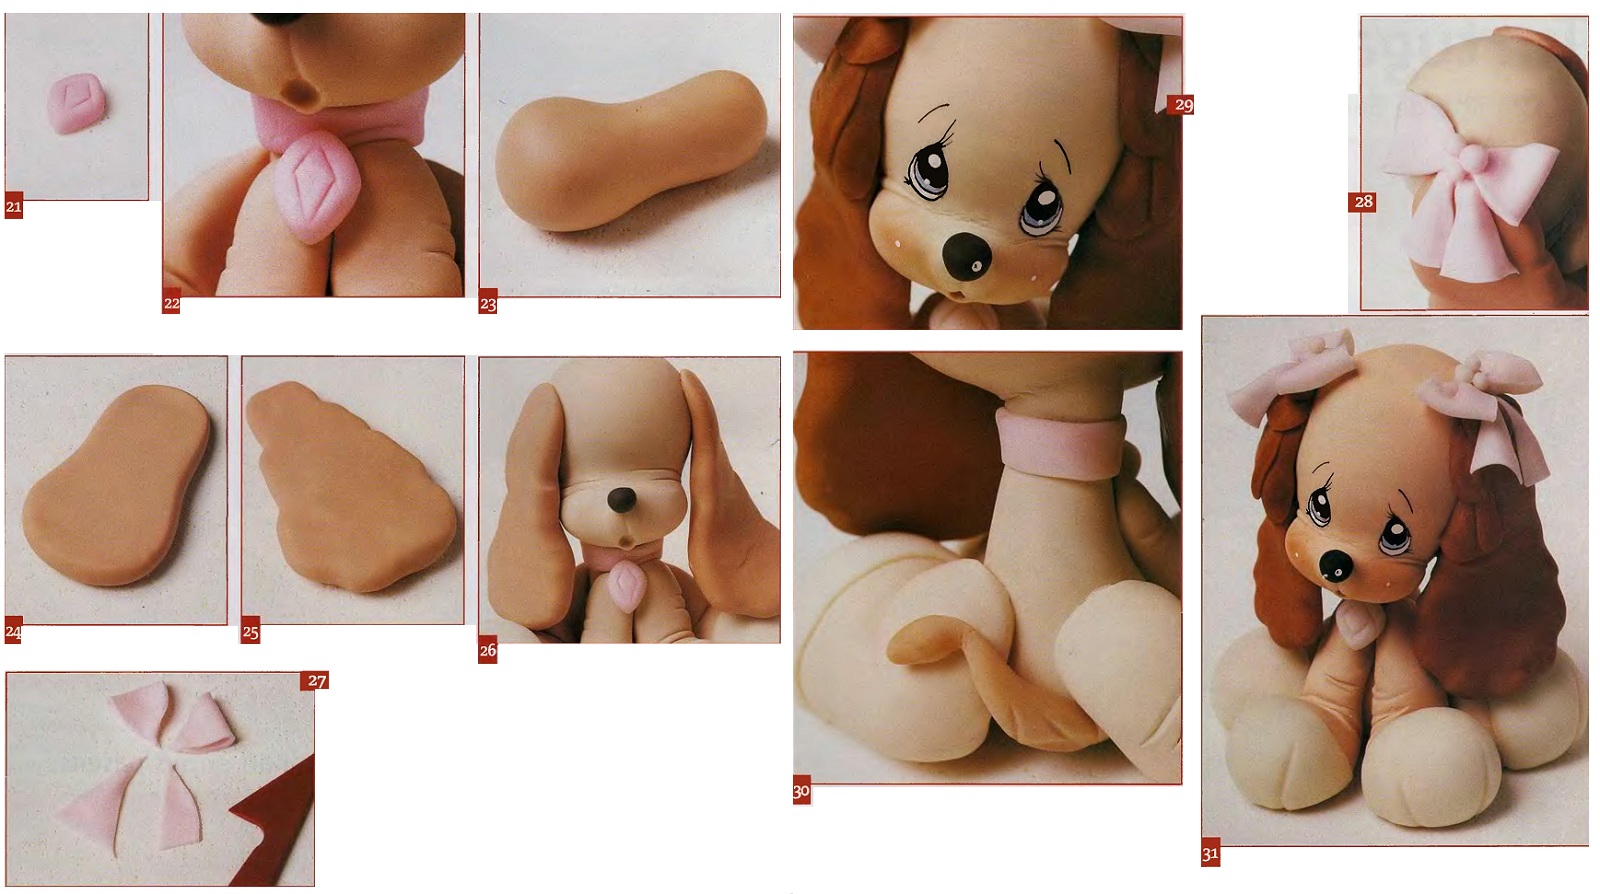
For kids or beginners, you need to use simpler forms and objects that they understand. You can start sculpting with traditional cats or dogs, fruits and berries, cars and other simple figures without numerous and complex details. Gradually, with an increase in the level of skill and the young sculptors themselves, the work can be complicated, moving on to the creation of figures, paintings and compositions.
The pinnacle of skill can be considered the creation of flowers from bioceramics, as salted dough is also called. Of course, even a baby can blind a simple chamomile, but only an "advanced" user can make a full-fledged bouquet of roses or a flowering branch of jasmine.
To learn how to work with salt dough, you need to follow the instructions step by step and not rush to tackle complex products.
Various panels and pictures from dough with salt
Making pictures from dough is not as difficult as it seems. At the first stages of creativity, it is worth using the hint in the form of a photograph of the future “work of art”. For example, let's say you want to create a beautiful autumn landscape. Find beautiful photo with a little small parts and use it for inspiration.
- A piece of thin plywood is suitable as a basis for the picture, but if it is absent, you can also use thick cardboard. A rolled dough layer is applied to the surface of the base. It can be glued with any suitable adhesive.
- All details of the future painting are cut or sculpted from salt dough and superimposed on each other as they move away from the background of the painting. That is, the objects farthest from the viewer will be laid out on the base first. This method will allow you to get very accurate and expressive volumetric images.
- The finished picture is thoroughly dried and then painted with suitable paints. After the paints have dried, the painting is varnished and placed in a frame. The product is ready, it can be hung on the wall in the room or given to someone who can appreciate the creativity and talent of the artist.
If you use foil as the basis for the product, the dried and painted part can be easily removed from it and then transferred to any other material. It can be a dense fabric stretched over a frame, glass, plastic, even metal. Such flat and at the same time voluminous products can be used to decorate caskets, decorate children's furniture, boxes with various things, or use for identification, for example, lockers for things in a kindergarten dressing room.


Bioceramic figurines and dolls
There is nothing more interesting for kids than sculpting "little men". They really like "cartoon" characters, for example, fixies, Masha from a cartoon about a bear, heroes of comics and fairy tales. Salt dough can be used to make not only figurines and dolls, but also various houses, benches, trees, fountains - in a word, everything that imagination can suggest.
If you plan to make large enough figures, you should take care of the inner frame and stands for stable standing. As a support for small plastics, matches with the sulfur head removed, plastic and wooden toothpicks are suitable; for larger items, cocktail skewers or sticks for Asian cuisine may be required. Save wooden ice cream sticks - they can form the basis of many different products.
For stability, the figures need to be placed on a salted dough base in the shape of a circle or oval - this will ensure a flat plane.
If the figure is depicted in motion, it may be necessary to create a wire frame - it will help in sculpting and will not allow the finished product to crumble.
In addition to three-dimensional, three-dimensional figures of people and animals, you can create various fruits or vegetables from salt dough. They are beautiful both in and of themselves and as part of various compositions. For example, elegant fruits can be effectively laid out on a beautiful dish and decorated with them in the kitchen or dining room.
Flat figures can be cut with cookie cutters. Hearts can become original valentines, Christmas trees can decorate the New Year's table, flowers can be used to indicate places when seating guests at a holiday. Only imagination can limit the scope of application of various dough products.
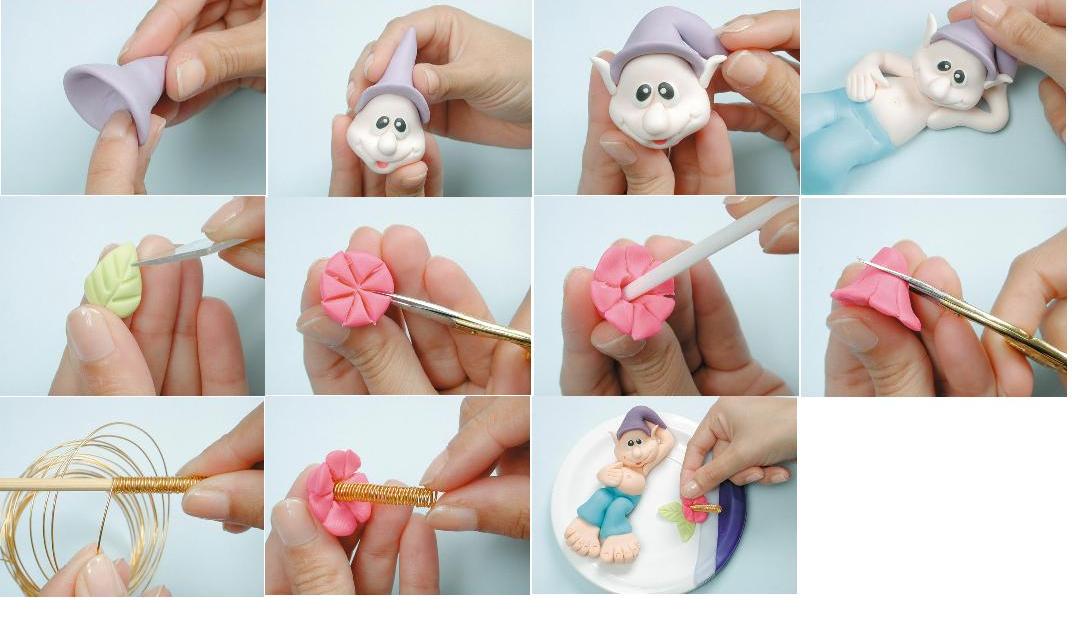

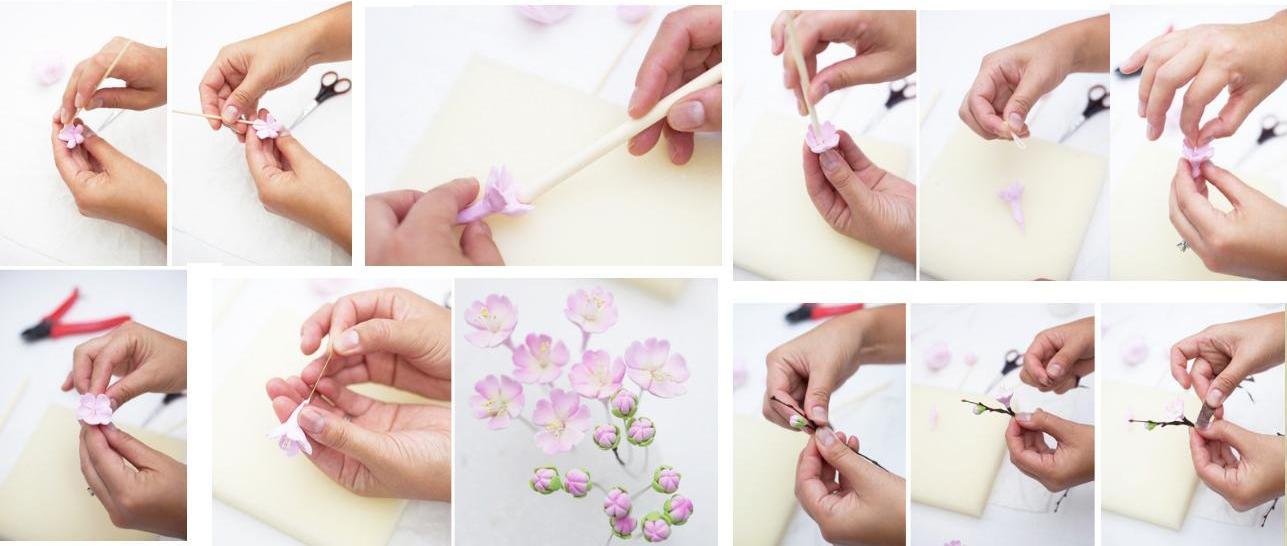
Spectacular flowers and plants from mukosolka
The pinnacle of craftsmanship is delicate and graceful flowers from mukosolka, as the salted dough is also called. This work requires a lot of perseverance, talent and accuracy, so it is more suitable for adults and teenagers. Toddlers can successfully sculpt stylized flowers of simple shapes.
How to mold a complex volumetric flower, for example, a rose?
- You need to take a piece of dough and roll it into a drop-shaped core. The base of the drop is the bottom of the flower.
- Then you need to roll out the dough thinly and cut rose petals of different sizes and shapes from it.
- By carefully placing one petal after another on the teardrop-shaped base, you can get a blank rose. To make it look like a real flower, each petal must be carefully bent, giving it its natural shape and shape.
- At the end of the work, you need to create a flower cup with unfolded sepals, cut out some beautiful leaves with carved edges and connect all the parts together using wire and pieces of salt dough.
- The finished crafts are left to dry completely, and then painted in the selected colors.

According to this principle, you can create any flowers, whole bouquets, complex compositions and even imitation of plants in pots. The choice of the plot depends on the imagination and creativity of the creator. A good example can become a cute cactus, which should be kept near the computer. Living plant, even as stable as a cactus may not survive in an office environment, but a lovely prickly creature made of salt dough will perfectly survive any disasters.
How to deal with possible problems
In any work, errors may appear, or things may not go at all as expected. Even if you do everything in stages, taking into account all the nuances, product defects may appear. Basically, these are cracking and chipping of individual parts of the product.
Cracks in crafts appear due to the incorrect composition of the dough, errors in drying, or the beginning of coloring the finished thing with incomplete drying of the base. If the cracks are small or the surface of the product is covered with a fine mesh of small cracks, they can be repaired.
To do this, you need to finally dry the thing, and then carefully sand the defects with sandpaper of varying degrees of abrasiveness. The surface can be brought to the ideal with "velvet" sandpaper. Then the surviving cracks can be filled with dough and salt slightly diluted with water. The procedure may have to be repeated several times if the cracks are very deep.
The lesson learned will teach that the basis of the future thing needs to be paid much more attention than even finishing - not only depends on its quality appearance the product itself, but also the very fact of its existence.
It happens that during the drying process, part of the product simply falls off, especially often this happens with thin parts or fragile small fragments. Sometimes the elements of the work break off during the scheduling with too intense exposure. In order to repair a toy with a straight break-off line, you can use ordinary PVA glue. You need to apply layers of glue carefully so that ugly streaks do not form. The finished and dried thing must be treated with emery and re-painted and varnished.
If a product made of fresh dough breaks, it is enough to moisten the break points with water, press the individual parts together and wait for the setting. Decorate the dried work as planned.
Damaged figure with loss individual elements you can try to restore it by replacing the missing parts with pieces of fresh dough. Dry and fresh elements may not bond securely, so after the new parts dry, they may need to be glued for strength.
Give yourself and your children the pleasure of creativity, because working with the dough is easy and pleasant, and the cost of materials is scanty. The result of the work can exceed any expectations!