Brooder for growing chickens. Do-it-yourself brooder for raising chickens: step-by-step instructions How to make a brooder out of a non-working refrigerator
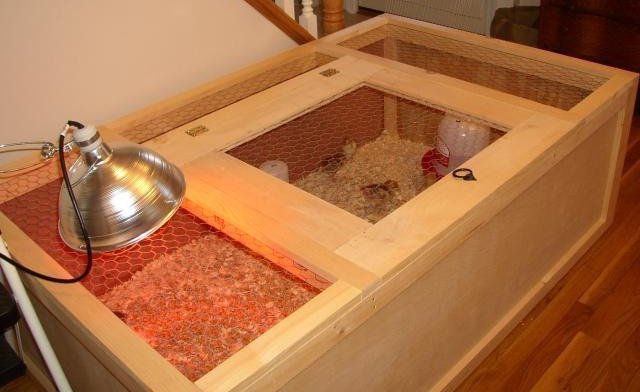
Raising chicken chicks on your own is not an easy task. In this case, for the first few weeks, the mother hen is replaced by a device in the form of a box in which they eat, warm themselves, and grow. If you want to make such a brooder for chickens with your own hands, then study the drawings or photographs provided and follow the instructions.
Raising chickens is hard work
Advantages
Homemade brooders, which are built by poultry farmers for chickens, are characterized by the following advantages:
- determination of the size by the number of heads;
- cost savings;
- original author's design (optional).
materials
A brooder for chickens is often made using improvised materials: boxes, old bedside tables, fragments of barrels. However, to make the frame and other parts, it is better to use new, high-quality tools:
- wooden boards or bars;
- polished plywood;
- thick cardboard.

Brooder for chickens
Additionally, you will need:
- mesh fragments (cell size no more than 15 by 12 mm);
- metal corners;
- hinges on doors.
Homemade brooders that are built for chickens need precision. To ensure that the doors close tightly, and there are no gaps between the walls, carefully mark out.
Tools
- saw;
- hammer;
- screwdriver;
- pliers, wire cutters;
- self-tapping screw;
- tape measure or centimeter;
- emery;
- pencil, paper for marking.
To make a brooder for chickens, you will need work skills hand tools ability to build and read blueprints.
Standards
Requirements for the premises for chicks:
- warm;
- light;
- dry;
- well ventilated.
Remember that each device is equipped with a litter collection tray. The brooders that you are about to make for chickens come in several basic variations.

For the manufacture of a brooder, it is better to use high-quality materials
Option 1
- two square sheets of plywood or multilayer cardboard 1 cm thick and measuring 2 by 2 m;
- fine mesh;
- self-tapping screws (or nails);
- hinges on the door - 4;
- slats or bars;
- metal corners.
Instruction:
- cut the sheets into 2 equal parts, three are the top, bottom and back wall;
- cut the fourth in half (sides of the device);
- using self-tapping screws and corners, assemble the case;
- knock down two frames from the bars to the floor and pull on one grid;
- on the side walls, install pieces of rails above the floor, place the frame made on them;
- fasten sheets of plastic or linoleum to the second frame and place it on the floor under the first frame;
- partially attach the remaining bars to the frame, partially assemble them in the form of doors and pull the material with cells over them;
- install a limiter on the doors so that they do not open inward, and latches; attach to the bars on the frame.
Option 2
Differs from the previous one in greater simplicity of design and assembly. It is also characterized by legs that create convenience in caring for pets. The materials are taken the same, but with a large number of bars (rails):
- assemble the frames for the lower and upper parts;
- using side rails, connect the frames and construct the frame;
- the floor, back and sides are made of solid plywood fragments;
- in the middle vertically connect the top and bottom with a bar or rail;
- assemble the device with screws or nails;
- attach the mesh in front, nail four bars in the form of legs to the sides;
- cut plywood doors and install with hinges on top;
- don't forget to attach the latches.
Option 3
This device has a glass cover and is heated by hot water. Well suited for summer days, so that its inhabitants warm themselves at the closed part, if it gets colder, and go out under Sun rays. The drawing shows the division of the box space into 2 parts.
To make, take:
- ready-made long box or standard materials;
- organic glass;
- metal loops;
- mesh material;
- self-tapping screws;
- canister;
- fabric fragments.

Do-it-yourself brooder for chickens
Observe the indicated dimensions and sequence of actions:
- assemble the frame in a known way;
- mark two segments in a box or assembled case;
- make double walls 15 cm above the floor in the closed part;
- nail canister holders to them;
- make a frame from the rails and insert the glass;
- install holders for the frame in the open part along the walls, select the angle of inclination and attach it to the slats above the double wall with loops;
- attach a side door on hinges, it is better to make a vent with a mesh on the side;
- install the lid, fill the space between the walls with insulating material (sawdust, rags);
- hang a screen between two segments;
- canister with hot water place on the holders and put a layer of cotton wool or rags on top, cover with a lid.
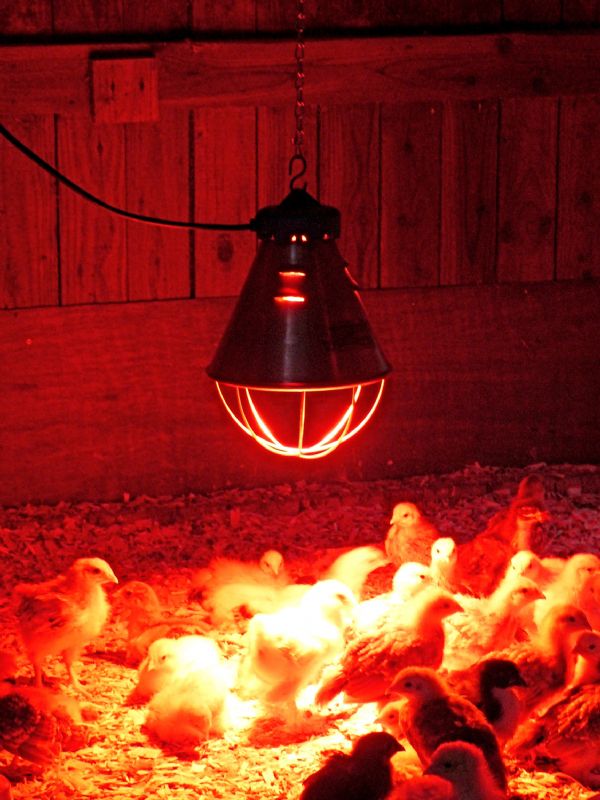
Lighting and temperature
Violations temperature regime affect the behavior and well-being of young animals. If the inhabitants of the device have enough heat, then they move around the perimeter, are mobile, and do not lose their appetite. At low temperatures, they squeak, worry, huddle in groups near heat sources to keep warm.

In the first 14 days of life, chicks need a round-the-clock light regime.
For daily babies, a temperature of 29-30 degrees Celsius is suitable. After seven days, it is recommended to reduce it to 26 degrees, and the monthly young growth feels good at 18. For small broilers, these figures are 2-3 units higher. However, excessive heating will also adversely affect the health of pets. Keep an eye on the thermometer. To prevent abnormal temperatures, also install a power regulator.
In the first 14 days of life, chicks need a round-the-clock light regime. Then this figure is reduced to 14-17 hours for meat breeds and up to 8 for egg breeds. At lower rates, young animals feel worse and develop more slowly. Do not let this happen - calculate the temperature and light conditions in the room so that its inhabitants do not freeze and do not get sick.
Type 1
This floor version. To provide brooders with the right temperature and light for your chicks, you will need:
glass three-liter jar; a piece of light fabric made of natural fiber; cartridge; a piece of cable; fork; light bulb 60 watts.
Assemble the structure:
- connect the cable with one end to the cartridge, the other - to the plug;
- screw the end of the lamp into the socket and place in the jar;
- wrap it with a thick layer of cloth so that the chicks do not get burned;
- securely fix the ends of the rag;
- put the jar on the floor and turn on the electricity.
The disadvantages of such heating are that young animals fight for a place at the can, and weak specimens die from suffocation.

Chickens need light and warmth.
Type 2
The brooder for chickens is also supplied with lighting and heating with a 60 W lamp. If desired, replace it with a mirror or infrared variety. You will also need:
- cable fragment (length depends on the location of the outlet);
- cartridge;
- fork;
- power regulator.
To make a homemade light source:
- attach a plug to one side of the cable;
- to the other - a cartridge;
- fix it under the ceiling of the device;
- follow the power regulator.
Arrangement
Brooders, in addition to heating and lighting, create an opportunity for exercise for chickens. Use decking to provide the young with space to develop and grow. In the summer, arrange a light, thin bedding. In winter, a deep option is preferable. Do not take for this purpose: straw, chaff, fragments of corn husks.

It is important to properly equip the brooder
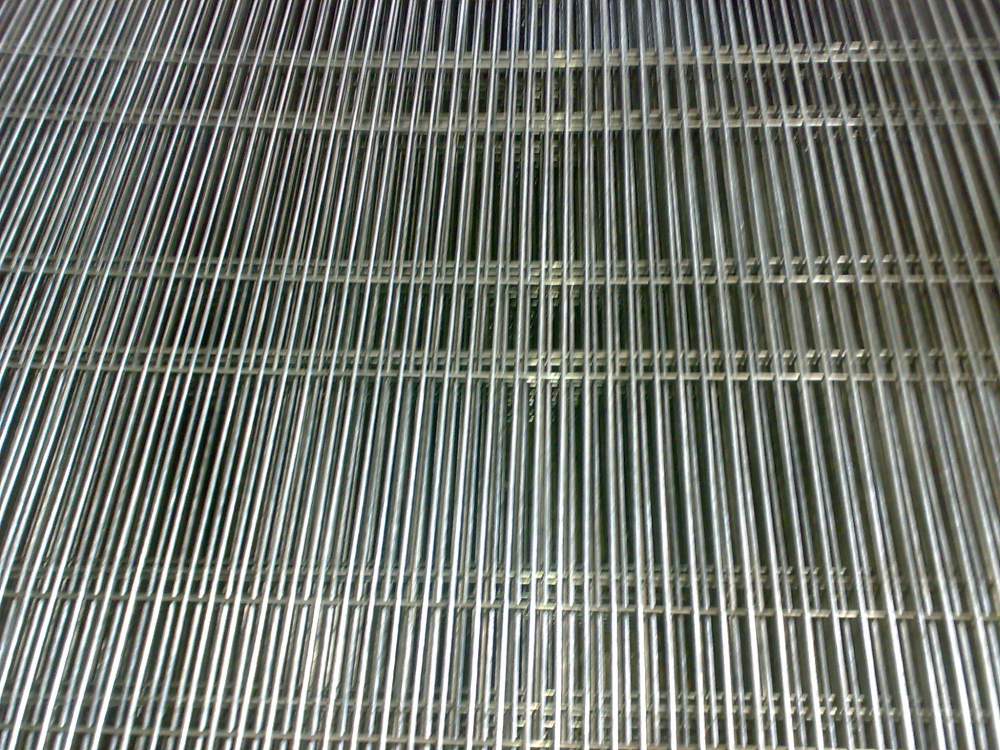
This natural raw material molds easily. Poisoned by a fungus, small chickens will die. Also avoid using sawdust (chicks eat it and die). Lay seed husks, dry peat, sand. Place 2-3 sheets of paper on top. It is better to choose a grid for the floor with small cells - from 10 by 10 mm to 15 by 12 mm. Such sizes will not allow the legs of the chicks to fail, but at the same time they will let the litter go down.
For which an additional hole is cut at the bottom of the wall. They are characterized by the following advantages: pets do not scatter food, you serve food without disturbing the inhabitants of the box, the size is adjusted in accordance with the livestock.
It is not recommended to put large containers or plates with water - the kids drown in them, they also increase the level of humidity in the room. A similar danger is fraught with vacuum microdrinkers for 10 heads. It is better to purchase with a sensitive nipple and install a drip catcher under it.
To prevent the inhabitants of the room from getting sick, provide them with air humidity from 60 to 70%. To maintain this level, timely remove manure and wet food, which release moisture into the environment. excess moisture, additional source which open drinkers become, harms the health of the chicks. Excessive dryness of the air also negatively affects. Maintain the right humidity level:
- ventilate the room;
- keep clean, change the flooring regularly;
- install the size suitable for kids;
- empty the water from the drip eliminators in time.

Chicks will be healthy if the brooder is kept clean
To make the life of pets comfortable, correctly calculate the area for the number of inhabitants. For 30-35 heads, there is enough space in the device 120 long and 45 cm wide. Provide fresh air in the room, ventilate more often. However, avoid drafts - birds easily catch cold and die.
- Attach the mesh to the doors from the inside;
- outside, to save heat, install a removable plastic plate on the grid or use adhesive tape for this purpose;
- the drawing shows a method of fixing the grid;
- cut it not in the middle of the cell, but closer to the connection at the edges;
- plastic plates are also used for the manufacture of the premises;
- the pallet is made of bent galvanized steel.
Brooders - homemade designs for chickens, the production of which does not take much time and money. You only need inexpensive materials and tool skills, and as a result, you will create cozy house in which your future herd will comfortably spend the first weeks of life.
This question occupies most newcomers to poultry farming. Of course, if you are not afraid of additional expenses or want to get a beautiful brooder, then you can buy it. The price of such a device is about 6000 rubles. You can also immediately stock up on feeders, drinkers and other devices that will make caring for chickens a pleasant experience. In general, the price can even increase up to 10,000 rubles.
But is it worth the cost? Experienced poultry farmers will immediately say no. After all, making a brooder with your own hands from improvised means will not be difficult. And at the same time, financial costs are minimal or non-existent. So why pay more then?
So you've decided to make your own brooder. Then you will need tools, skills in working with a hammer and a hand saw, and you also need to figure out what to make it from. But first you need to find a few schemes for making a brooder, so that it is clear what the final result should be approximately. Well, then you can safely get to work.
Tools:
- hand saw or an electric jigsaw;
- roulette;
- hammer;
- screwdriver;
- pliers, and you may also need wire cutters;
- It will be useful to take a pencil.
This toolkit may not be needed in a complete set. It is needed for the manufacture of brooders, which are described in the article. You can also replace any tool with a similar one.

materials
It is difficult to determine the exact materials. After all, you can make a brooder out of anything. If you make it from scratch, then wooden blocks, multi-layer cardboard or QSB boards work well. But it can also be made from improvised materials. For example, it may be an old wooden box, wooden barrel, old bedside table or even a large plastic container. Some ditch the brooder altogether in favor of keeping the chicks on the kitchen or hallway floor, simply by blocking them off with a partition.
As you can see, there are a lot of manufacturing methods. Even you can design your own brooder based on what you have. The main thing is that the chickens should be comfortable, warm and dry in it. And for greater convenience, below will be a few instructions for making a brooder with your own hands.
Manufacturing instructions
Type one

This brooder will be a box 1.5 m long, 0.5 m wide and the same height. It will be made of cheap materials that can be easily found in any hardware store. The floor and door frames are made of wooden bars, and the walls are made of 10 mm thick plywood. There will also be two doors on the front. And under the mesh floor is a litter collection tray.
Materials:
- 2 sheets of plywood 1.5x1.5 m;
- self-tapping screws;
- metal corners;
- Grid with a cell of 10x10 mm;
- Rail 50x15 mm;
- Door hinges - 4 pcs.;
- piece of cable;
- Cartridge;
- Fork;
- Bulb 60 W.
Let's get to work:
- We make blanks for the frame. To do this, we need 2 sheets of plywood 1.5x1.5 m each. Cut both sheets in half. Then we take 1 half and cut it in half again so that we get two squares of 0.75x0.75 m. Three parts of 1.5x0.75 m are the top of the brooder, its bottom and back wall, and two parts are 0.75x0.75 m are the side walls.

- Assembling the frame. We assemble the walls with self-tapping screws and metal corners. To prevent plywood from cracking, you can drill a small hole under it before screwing in the self-tapping screw.
- We make the floor. We make the floor from a grid with a cell of 10x10 mm. The mesh is attached to a pre-knocked frame. The frame is made from wooden slats 50x1000x15 mm and 50x470x15 mm. We fasten the guides, which are also made of rails, to the side walls, then install the floor on them. When installing the floor, you need to remember that there must still be a tray under it to collect litter.
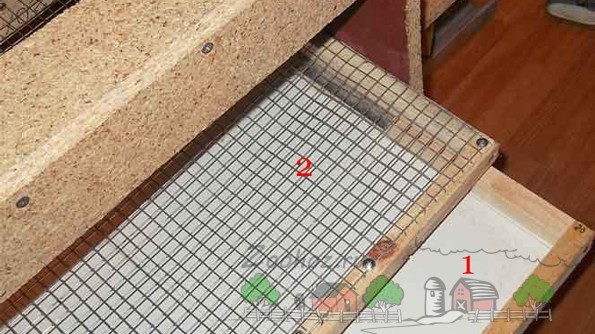 1. Tray for litter; 2. Gender
 - Under the floor, a similar frame is made of slats. But it is not a mesh that is attached to it, but plastic panels. The finished structure is inserted under the floor.
- To fasten the doors, you need to make a frame of rails in front of the perimeter and attach it with self-tapping screws to the brooder.
- Doors. They are made from all the same rails. A frame is made on which a fine mesh is attached, you can even plaster. Then the doors are hinged to the frame of the brooder. You also need to attach a limiter to each door so that it does not close inward.

- We conduct light inside the brooder. To do this, you need a piece of cable, a plug and a cartridge. We connect one end of the cable to the cartridge, and attach the plug to the other. Then we fix the cartridge to the ceiling of the brooder. The length of the cable depends on how far the brooder will be from the outlet.
For lighting, it is desirable to use an infrared lamp for heating, but you can get by with an ordinary 60 watts. Also, at the end of the assembly of the brooder, it can be painted, but this is not necessary at all. We arrange feeders and drinkers inside at our discretion. For convenience, you can make several mesh floors and use a larger mesh on each. Then, as the chickens grow, we change the mesh floor to one that has larger size grid cells.
Type two

Materials:
- Plywood sheet - 2 pcs.;
- boards;
- Grid (you can take plaster);
- Self-tapping screws, but carnations are also possible;
- Cable;
- Cartridge;
- Fork;
- timber;
- washers;
- Staples;
- Door hinges - 4 pcs.
Let's get to work:
- We make a frame from the bars. From wooden bars we make a frame, as shown in the photo. The frames of the bottom and top are made first, then with the help of perpendicular bars they are attached to each other. It must be remembered that the size of the finished brooder should be 1.5 m in length, 0.5 m in height and width.

- We put a jumper on the upper and lower frame in the middle. From below, a jumper is needed so that the floor does not sag, and from above - to fix the door. The jumper is made from the same bars and placed in the middle of the frame length.
- We cut out the side walls, the back wall and the floor from plywood. Then, with the help of small nails or self-tapping screws, we fasten the walls and floor to the frame.
- The front wall will consist of mesh. We cut out the mesh of the desired size and use a stapler to attach it to the frame.

- Next, from the bars we make four legs on which the brooder will stand. We fasten them to the frame on the sides with self-tapping screws.
- Doors are made from plywood. We apply it to the top, draw the desired piece with a pencil. Next, cut off the plywood and attach it to the top of the brooder with the help of loops. Then we install special latches so that the door does not accidentally open.

- We connect the cable to the cartridge on one side. Then we attach the cartridge to the top of the side wall of the brooder. We attach a plug to the other end of the cable. It is important to remember that it is better to use an infrared lamp for heating for lighting.
That's all. It is possible, before placing the chickens there, to slightly adjust the lamp power. To do this, experiment with a thermometer and lamps of different wattages. And you can install a power regulator for convenience, but these are already additional costs, therefore, it is up to you to decide what to do. We also offer you the following instructions to help, which shows in detail what and how to do.
Video "An example of an automatic brooder"
Any owner of poultry when breeding birds should be aware of the nuances that accompany their maintenance. When receiving chickens from a mother hen, there are practically no problems with the provision and nutrition of young animals. If the chicks were born by incubation, for them further cultivation need such modern device like a brooder. Ready-made devices are on sale, the cost of which is quite high. Do not despair, because creating a brooder for chickens with your own hands is not so difficult.
Most beginners in the poultry industry may think that a brooder is a complex device, but it is not. In fact, it is an ordinary box in which the chicks are placed from the moment of birth and stay in it until the first 50 days. A brooder is an almost complete replacement for a mother hen - it is equipped with a heating and lighting system that allows young animals to fully grow and develop. It is these factors that are so important for your poultry to grow up healthy and physically strong in the future. Mandatory conditions for both finished and homemade device are the presence of a non-moist and non-slip floor, an excrement tray (located under the floor), a proper ventilation system, a lamp for heating and maintaining an optimal temperature (which is away from the young to prevent burns).
Tools and materials
To make a chicken brooder yourself, you will need tools such as a hand saw or a jigsaw, a hammer, a screwdriver, a tape measure, pliers and wire cutters, a pencil. There is no exact list of required materials, since it is realistic to make a brooder from many improvised means. For manufacturing from scratch, you will need wooden beams, multi-layer sheets of cardboard or QSB-plates. An old wooden box, bedside table, barrel, plastic container and so on can come in handy.
 Before starting the assembly of the structure, you should carefully study the drawing and decide on the materials. Carpentry skills will also come in handy, if any. Sample list tools for a full-fledged brooder with your own hands looks like this - 2 sheets of plywood measuring 1.5 by 1.5 meters, metal corners, mesh with cells, the dimensions of which are 1 by 1 cm, slats with parameters 5 by 1.5 cm, self-tapping screws, 4 door hinges, plug, cartridge, cable, 60 W warm light bulb, drinkers and feeders.
This option is considered budgetary - fencing off part of the home (for example, the kitchen), by installing a lamp to heat it to the desired temperature. The dimensions in this case are 44 by 96 by 50 mm. The disadvantages include overheating, hypothermia, shoots of young animals from the territory, inverted feeders and drinkers, and, as a result, questionable cleanliness. Therefore, experts recommend purchasing a ready-made device or making a brooder for chickens with your own hands.
Step by step manufacturing
There are many types of homemade brooders today. Novice poultry farmers instead of a full-fledged device use boxes, packing boxes and other improvised containers. Such temporary solutions are simple and inexpensive, but have a lot of disadvantages. It is impossible to use them constantly, since there is a natural demolition of the structure, wear of the material, it becomes problematic to carry out cleaning and disinfection.
Cardboard and other boxes cool faster, are more prone to drafts, more difficult to maintain normal temperature and humidity levels, install lighting and a litter tray. Given all this, experienced poultry farmers are advised to take the time and make a normal device that meets all the criteria. Whichever option you choose, the main thing is that the chicks should be warm, dry and comfortable in it. 
In this section, we will look at the most popular home brooder designs. According to the drawing, the first will be a box measuring 0.5 m in width and height and 1.5 m in length. In order to make it, you will need inexpensive materials. The door and floor frames will be made of wooden blocks, and the walls will be made of plywood, the sheet thickness of which is 10 mm. In front, 2 doors should be planned through which the young will be fed.
All stages must be reflected in the drawing. Under the mesh floor is a tray for bird droppings. To begin with, blanks are made for the frame. 2 plywood sheets of 1.5 by 1.5 m each are sawn in half. From each half obtained, a square is created with dimensions of 0.75 by 0.75 m. Three parts of 1.5 by 0.75 m will be the top of the brooder, its bottom and back wall, and 2 parts of 0.75 by 0.75 will be side the walls of the device.

The frame is assembled using self-tapping screws and corners. You can drill a hole under it before screwing in the self-tapping screw - to avoid cracking the plywood sheet. To make the floor, use a grid with cells of 10 by 10 mm. It is fastened to a frame made of wooden slats with dimensions of 50 by 1000 and 15 mm, as well as 50 by 470 and 15 mm. The guides are attached to the side walls.
When installing the floor, a pallet made of a slatted frame with plastic panels. To fasten the doors, it is necessary to create a frame around the perimeter of the rails in front of the structure, which is securely fixed with self-tapping screws.
Doors should be made from the same rails. Fine-grained mesh fasteners are made on the frame - even plaster is suitable. Do not forget about the limiter so that the doors do not close inward. For the lighting system you will need a cable, cartridge and plug. One end of the cable is fixed on the plug, the other - on the cartridge. The cartridge must be hung from the ceiling of the brooder. The length of the cable directly depends on the distance of its location in relation to the outlet.
For lighting, it is customary to take a light bulb with a power of 60 watts. But better fit special infrared lamp. Some, after assembling the brooder according to the drawing, paint it, but it is not mandatory. To make it more convenient, it is realistic to plan a couple of layers of a grid floor. In the future, when the chicks grow, it remains to change the floor with smaller dimensions to the floor with large ones. The location of the feeders and drinkers inside the structure is at the discretion of the owner.

The second version of the manufacture of the device, in which the optimum temperature will be maintained, looks like this. A frame is created from the bars. Upper and lower frames are made, which are then attached to each other using perpendicular bars. The dimensions of the finished device are 1.5 m in length and 0.5 m each - width and height. A jumper is installed on the top and bottom of the frame - so that the floor does not bend and for reliable fastening of the door. The jumper is located in the middle of the frame. From plywood, you will need to cut the side, back wall, floor. The walls and floor are attached to the frame with small nails. The front wall is created from the mesh - a piece of the required size is cut out, which is connected to the base with a stapler. From wooden beams strong legs are made, which are attached to the base. Doors are made from plywood sheets, cut to size and latches installed.
An infrared lamp is better suited for heating and creating a normal temperature. The cable is connected with one side to the cartridge, and the other side to the plug. Before settling the young, it is recommended to adjust the lamp power. To this end, you should experiment with a thermometer and lamps that have different power factors. If you can spend a little money, you can install a ready-made power regulator.
"Video " DIY quail brooder”
Instructions for making your own from improvised material.
Every poultry farmer who decides to start breeding birds sooner or later faces certain nuances of their content. It is clear that the mother hen will always provide the chicken with warmth and proper nutrition, but what if you raise chicks in an incubation way? In such cases, many bird owners choose a brooder for chickens. We suggest that you familiarize yourself with the basic information about these devices, videos and how to build such a brooder with your own hands with drawings and photos.
Many people, having heard this word, imagine some device of a very complex technology and design. However, in fact, the brooder is essentially a simple box from the outside, if you do not go into details about what is inside it. A brooder for chickens is designed specifically for keeping them inside - the chicks must live in it for the first few weeks after hatching. As a rule, chickens stay in such brooders until the first 50 days.
This device allows you to replace the chicks with a mother hen, which will allow them to develop properly. As a rule, a brooder for chickens is equipped with a lighting and heating system. And this, you see, is simply necessary for a young organism for proper growth in the first time of its life. Not without reason, many leave the chickens to live in such devices for the first 50 days.
Features of choosing a brooder before buying
Many novice poultry farmers sooner or later face the need to purchase or manufacture such devices. The purchase of a structure is relevant for those who can afford it, since the cost of brooders is usually not low. However, there is nothing wrong with making a brooder with your own hands.
However, if you decide to purchase a design, then it will be useful for you to learn about some of the nuances that will allow you to choose it correctly.
- First of all, you should pay attention to the size of the structure. Since broilers up to 50 days grow quite quickly and become not only heavier, but also voluminous, the brooder must be spacious. If the design is too small, then broilers can become weaker, in some cases even get sick, and sometimes do not live up to 50 days.
- The next aspect is gender. It is best that it be two-tiered. The surface that 50-day-old broilers will walk on should not be slippery, as their paws will constantly move apart, which can cause injury. It would be best if the lower tier is pulled out, as this will make it easier for the poultry farmer to change the bedding and wash the floor itself. In addition, the floor will have to be washed quite often, so it is better not to disturb the broilers once again, especially if they are still small and under 50 days old.
- If you have the funds to purchase the device, then it is advisable to buy a brooder with an automatic drinker and feeder. If a broiler overturns the drinker and you try to put it in place by sticking your hand into their cage, this can cause stress. Therefore, it will be better for the brooder to have an automatic drinker and feeder.
- The last nuance will be to ensure the proper level of ventilation in the broiler house and its heating. Many brooders today are equipped with air conditioning and heating systems.
We make a homemade brooder with our own hands
Many poultry farmers discard the purchase option and decide to make a device for 50 day old chicks with their own hands. How to make a brooder yourself, we will tell further. Instructions with dimensions and drawings are presented below.
Materials and tools
What you need to make a brooder with your own hands:
- plywood (1.5 x 3 m);
- set of screws;
- set of corners;
- mesh with a small gap;
- rail;
- 4 door hinges;
- a piece of wire, a bulb holder, the lamp itself and a plug;
- Phillips and slotted screwdrivers;
- saw.
Option one
- First you need to make a frame. Cut the plywood in such a way that you get 2 pieces of 1.5 m each. Next, both parts need to be cut in half. We divide one of the received parts in two. Thus, you will get 2 parts measuring 0.75 x 0.75 m, which will serve as the side walls, and the remaining three parts will serve as the roof, floor and back wall.
- The frame must be assembled, this is done with the help of metal corners.
- The floor itself is made of mesh. It is necessary to make a frame from the rail along the perimeter of the entire floor, on which the mesh is installed. Remember that a tray must still be installed between the grid and the floor itself, into which the litter will be collected.
- Doors are made from rails. A rack frame is made along the perimeter of the front side of the device, to which doors are installed. The doors are a regular frame with a mesh, which are attached with self-tapping screws. You can optionally install a limiter so that the doors do not close inward.
- The final touch is the conduction of light. This is done easily - the cable is connected to the plug and the cartridge, the cartridge itself is directly installed on the cover of the future broiler house. Accordingly, the length of the cable will depend on how much footage is needed to reach the outlet. Some poultry farmers use infrared bulbs as a lighting lamp, but in principle, a regular 60-watt lamp will do. More detailed drawings with dimensions are shown in the photo below. Everything, the brooder with your own hands is ready.
Option two
In addition to the materials above, also prepare washers, staples and timber.
The second option for making a structure with your own hands:
- The frame is made from timber. First, the basis for the top and bottom is made, after which these elements are attached to each other using perpendicular bars. When making a structure with your own hands, you should focus on dimensions of 1.5 meters in length and half a meter in width and height.
- Jumpers made of timber are installed on the upper and lower frames.
- From plywood, you need to cut out parts that will serve as the walls and floor. all this is attached to the frame with screws or nails. As for the front wall, it will be made of mesh - cut the required length to size and fasten it to the frame.
- Further, it is necessary to make legs from the same beam, which will be fixed on the sides to the frame itself.
- The top doors are made of plywood. Cut the desired segment and use the hinges to attach the door to the frame. You can also install additional protection - latches so that the door does not open arbitrarily.
- The final stage in the manufacture of the structure with your own hands is the installation of a light bulb. In this case, it is better to attach it to the side wall. This completes the brooder manufacturing procedure. More information about the manufacture of the structure - on the video.
Photo gallery
 Photo 1. Making the frame
Such methods are cheap. But they are good only when there are few chickens or you have not yet decided on the question of whether you should be engaged in poultry farming. If the answer is yes, then you will agree that it is much more convenient to spend time and money once, but get a clean and tidy stationary installation.
Which is better to choose - ready-made or homemade
So, it was decided - we need a brooder. Where to get it? The first option is to buy. We go on the Internet and study the issue. As a result, we obtain such information.
Ready brooders
Stores have a wide range of these products. Can be ordered with delivery and assembly. There would be money. Here, for example, you can buy one.
Its dimensions:
- width - 1.07 m,
- depth - 0.53 m,
- height - 0.52 m.
It has a retractable plastic tray. The height of its sides is 5 cm. The fact that the manure accumulation tray is made of non-corrosive material is very good. It will be easier to wash.
The case - moisture resistant plywood, 20 mm in size. The material is painted with a varnish that is safe for the health of birds.
The floor is a galvanized welded mesh with a mesh size of 25x12.5 mm. Since the brooder is universal (you can grow not only chickens, but also ducklings, quails in it), the kit includes an additional insert for the floor. Cell size - 5x5 mm. It is intended for smaller birds or until the chicks are older.
The brooder is heated by an infrared lamp, which is switched on through a dimmer. It allows you to smoothly change the heating of the lamp, which must be done as the chickens grow older.
The design of the brooder does not require an additional frame when forming multi-tiered batteries. You can simply put them on top of each other and you get this product.

One section of such a battery costs 7,450 rubles. But it's not all expenses. The package does not include feeders and drinkers. And without them, you can not keep a bird.
As you can see the price is great. For half square meter the area that the brooder will occupy will have to pay a tidy sum. Moreover, chickens need it for a maximum of one and a half months.
Homemade
So is it worth spending that kind of money. Our hens don't lay golden eggs. And if it makes sense to buy a finished product with the cellular content of chickens (you can read about this in this article), then you can not do this for chickens. This is the place of their temporary detention, not permanent.
Looking at the photos of the finished brooder, you can understand that this is a fairly simple product. If you have a skill, a screwdriver, a jigsaw and improvised materials, it is quite possible to do it yourself.
Many craftsmen adapt even old furniture. For example, various bedside tables or playpens, or plastic containers. But the latest products are good only for one-time use and with a small number of chicks. And frankly, they are not distinguished by beauty.
Making a homemade brooder
If you need to place up to 60 chickens in a brooder, then you can build it according to this scheme.
- Width - 1000 mm,
- Depth - 600 mm,
- Height - 450 mm.
A brooder with this size can comfortably accommodate 100 quails or 40 ducklings.
Appearance a brooder with a cut out segment is shown in the figure.

The numbers in the figure mean the following:
- Steel frame.
- Removable floor in the form metal mesh.
- Retractable tray.
- Front drop wall.
- Back blank wall.
- Roof.
- Sidewall.
- Carbolite ceiling cartridge E-27.
- Infrared ceramic heater IOT/75 60 W with screw base E-27.

For the manufacture of the frame, a corner of 25x25x4 mm is taken.
For the floor, a steel mesh with a cell size of 10x10 mm was taken. It is attached to the frame with a screw connection. This size of the cells does not injure the legs of the chickens and at the same time prevents the litter from accumulating in the brooder. Through these cells, the excrement freely wakes up in the pan. It is possible to remove the mesh for washing and cleaning.
The pallet for excrement is made of thin steel - 1,0 mm. The appearance of the frame with the pallet extended is shown in the figure.

Moisture-resistant plywood (10 mm) was used to make the brooder body. It is attached to the frame with screws.
Infrared lamps are attached to the ceiling. The required degree of heating of the lamps is regulated by a thermostat located on the front folding wall.
There is a Plexiglas window in the front wall-door. The door itself can be fixed at the desired angle for ventilation and cleaning of the brooder.
For feeding, you can use standard bunker or tray feeders. And for drinking nipple drinkers with drop eliminators. Depending on the chosen type of drinkers and feeders, they are installed inside the house or outside.
Here is a device you can make yourself. Chickens are kept in it for up to one and a half months. Then they are transferred to adult cages or free range. True, if you make a brooder according to this scheme, it will not work out cheap. But after all, any process must be approached creatively.
conclusions
Don't blindly copy what you see. You need to choose what suits you. And that means, before you start building, do the following.
- Decide what size brooder your chicks will need - single or multi-tiered.
- Conduct a revision. Maybe you recently did repairs, and you still have building materials. These residues will adjust the dimensions of the future product.
- Make a drawing. Consider where to place and which ones are best to use
- drinkers,
- lighting lamps,
- do you need an additional heater and humidifier,
- whether you will use an automatic thermostat or limit yourself to a manual way.
- Calculate your expenses.


