A comfortable do-it-yourself bean bag in just half an hour. Do-it-yourself bag chair: materials and assembly steps How to make a do-it-yourself sitting bag
A soft and comfortable armchair will become an indispensable entertainment for your children. After all, such a chair has no sharp corners and takes any body shape.
Necessary materials
- Fabric (breathable, dense) two-thread (3 meters).
- Plastic zipper.
- Fabric (thick) oxford. Black - 2.5 meters, white - 1 meter, and orange - 50x50 cm.
- Filler (expanded polystyrene) (200 liters). Available from a hardware store.
- Sewing machine.
- Threads, needles.
- Velcro (10-20 cm).
Manufacturing
We sew an external cover
1. Cut out 6 side parts from black fabric and double-thread fabric. They will serve as our inner and outer cover. The side pieces should be pear-shaped. They are larger at the bottom and smaller at the top.


2. Cut out the bottom from the same fabrics. The bottom should be larger than our lid.


3. Cut out the lid from the same materials. In order for our parts to come together, it needs to be made in a hexagonal shape.

P.s. The edges of the hexagon should be equal to the top and base of the pear.
4. Cut out the tummy for our penguin, from white fabric. And we sew it with black cloth.


6. Then we sew the side parts to our zipper, and the tummy.


7. Cut out the legs, from orange fabric, 4 things, and sew them together.

8. Cut out the eyes. To do this, take a white cloth, and cut out an irregular figure eight from it, and then two small, black circles. They also need to be connected.

9. Cut out the nose, two triangular areas. We also sew two parts. Sew the nose to our tummy, and sew eyes on top of the nose.


10. We also cut out the wings from the fabric, 4 triangular areas, and sew them to our body.

P.s. Before stitching the orange fabric and the wings, you need to fill them with cotton or expanded polystyrene.
After all the actions, we should get such an external cover.


We sew an inner cover
It needs to be sewn so that our little balls of polystyrene foam do not fall apart.
11. It is sewn in the same way as the outer cover. In addition to fixing the bottom.


12. We will make the bottom with Velcro to fill the cover. We cut the bottom into two parts, the first part should be less than the second. We attach our Velcro to both parts, overlaying the parts on top of each other.
A frameless chair bag filled with expanded polystyrene balls can be sewn with your own hands. The benefit of patterns of different shapes for these chairs on the Internet is a dime a dozen. I decided to sew for my daughter in the nursery.
DIY bag chair: materials used
- The fabric for the inner cover (I used a regular duvet cover from the linen set, which I don't like at all), it is important that the fabric is breathable and smooth. The inner cover is needed so that the outer one can be safely removed and washed.
- Fabric for the outer cover, I used furniture fabric, thermohackard (1.5 m * 3.5 m), if anyone is interested where it was purchased in Chelyabinsk, this is a store Bel-Tex on the street. Kosarev. It cost me about 1,000 rubles a penny. But on the other hand, it is of high quality, dense and funny colors. Just right for a bag chair in the nursery!
- 2 zippers: preferably 100 cm for the outer cover and 30-50 cm for the inner one.
- Threads, scissors.
- A sewing machine and paper for patterns, but you can immediately build a pattern on fabric (as I did).
- Pear chair filler (foam balls). I share information where they can be purchased in Chelyabinsk, next to the Shershni dam, in the area of \u200b\u200bthe ring there is a miracle company, Thermoplastic, there you can buy these granules 0.1 cubic meters in a bag.
Now, from my own "bitter" experience, I will tell you how many such bags are needed. Initially, this pear chair was conceived in children's sizes, so I decided that two bags of 0.1 cubic meters would be enough, I sewed an inner cover according to the pattern below and ... OH GOD !! it turned out to be just huge, I could curl up in this chair, naturally, these two bags were not enough for me and I went for two additional ones.
As a result, 4 bags of balls were purchased, 200 rubles per bag.
By the way, 4 bags of such balls will easily fit into a car, into an ordinary sedan, 2 enter the trunk with a whistle.
Details of the pattern and location on the fabric
So, here is a pear chair pattern with the dimensions of the details.

Also, like a decent lady, I made allowances for the seams, and it turned out well, very large. Here is a photo with an inner case and filled with 4 (!) Bags of balls. Of course, the photo against the background of the wall (with the daughter's art 🙂) does not convey all scales, but still! Until she sewed the outer cover, my daughter came up with such an idea: she pushed him to the sofa and, with a battle cry, jumped from it into this chair 🙂 When I sat down in it, it gently enveloped me from all sides 🙂

Here is an example of the location of the pattern details on the fabric:

While cutting out the details, I ran into a problem. How to draw a regular hexagon. I make it easier for you. To draw a regular rectangle with a predetermined side, we have it, for example, 10 cm (the side of the top of the chair). You just need to draw a circle with the same radius (10 cm).

Then make notches along the entire length of the circle - these will be the vertices of our hexagon. Then we connect the adjacent vertices and get the desired hexagon.

The sequence of sewing a pear chair with your own hands

- We cut out parts for the inner and outer cover from the fabric, I will repeat once again, if you use this pattern with these dimensions, it is better not to make allowances for the seams.
- Details for the outer cover:
- - 6 side wedges;
- - 1 hexagon with a side of 40 cm for the base of the chair (depending on the location of the parts on the fabric, you will have it in one piece or consist of 2 parts);
- - 1 hexagon with a side of 10 cm for the top;
- - 1 handle for carrying the chair - a regular rectangle with dimensions 5 * 12 cm;
- - for the inner cover, all the same pattern details are used, with the exception of the handle for carrying the chair.
- If the fabric is loose, then it is better to process the cuts of parts on an overlock (if any) or with a regular zigzag on sewing machine.
- We take two side wedges, fold them face to face and grind 15 cm from the top and 15 cm from the bottom along the long side of the parts.

- At the end and beginning of the seams, we make bartacks. We form a cavity for stitching in a zipper.
Attention: the length of these seams depends on the length of your zipper and the length of the side of the piece.
- Next, we sew in a zipper.


- Take the next wedge, grind the side seams. We iron all the side seams and smooth them on one side. On the front side, we make a delay along each seam, capturing the smoothed allowances.


This is how it should work out neatly.
- Now we will sew a handle for our bag chair. To do this, take a part, fold it in half along the long side, and sew a seam on a typewriter.

- We turn it out, iron it so that the machine seam is in the middle of the part. We do a stitch on it.
- Sew on the upper part of the bag, not forgetting to put a handle between the parts for carrying the chair, smoothing the allowances, making a stitching.

- Now let's start grinding the base of the chair. For convenience, let's open the zipper.
We sew the inner cover in the same way. Now the final part of our master class. And the most entertaining part of it: filling the inner case with foam balls.
Filling a frameless chair with polystyrene foam balls
It is important that the bag is filled to 2/3 of its volume.
Why entertaining?
Yes, because without dexterity, these balls cannot just fall asleep in a cover, they just strive to scatter around the room, stick to your fingers. In general, they behave ugly! So that you don't have to run around the apartment with a vacuum cleaner later, I recommend taking the usual plastic bottle, for example, 1.5 liters. Cut off the bottom and top from it, so that a pipe is obtained. Open the zipper of the cover so that you can push the bottle through the hole and tape it to the cover! We fasten the other end of the pipe with tape to a bag with expanded polystyrene balls, in which you previously made a small hole, for example, in one of the corners. Make sure that there are no cracks, where these sticky balls could penetrate 🙂 Now we start pouring them into the bag! The first bag, the second, the third ... We monitor the filling of the cover so that it is not too full and not too much pressed. After manipulating the foam granules, it remains to close the zipper of the inner cover tightly, put on a beautiful outer cover and fall apart in a do-it-yourself bag in a chair. Let your household also love to spend time in it.

P.S .: I deliberately made my outer cover made of thermohaccard smaller so that it would be more suitable for a child than for an adult, so I had to pour the granules back into the bags. This was done by my husband, who did not see my shenanigans with a bottle, scotch tape and balls. Therefore, to the delight of my daughter, the balls rolled throughout the apartment! 🙂 Not without adventures! Although the pear chair turned out to be smaller than the previously sewn inner cover, I still feel comfortable sitting and relaxing in it.
I hope my MK will be useful to you. I would be glad to hear your comments below in the comments!
Ho ho! Dreams tend to come true, especially if you really want to sell them. For years Kostya and I have been staring at a beanbag chair, or as it is also called: a bob chair, pear chair, frameless chair, Big Ben, pillow chair, etc. And somehow everything did not work out to get this coveted thing: either the place in the last apartment was sorely lacking, then there was no repair to accommodate such beauty, otherwise we simply could not find expanded polystyrene anywhere (the same foam balls that fill bag chair).
During the period of nurturing the idea of \u200b\u200bcreating a beanbag chair with our own hands, we managed to accumulate enough information about how and from what to sew it, how to stuff it, how to choose the size. In addition, we found a beautiful natural fabric for the outer cover and an ugly knitted fabric for the inner cover. And we also found out that granular polystyrene foam went into the permanent sale of the Epicenter trading network. And when there was time and Kostya accidentally brought him to the nearest "Epicenter", from where he had brought 200 liters of white balls, it became clear that we would sew a beanbag chair very urgently. And so it happened.
So, how we made a beanbag chair with our own hands.
We needed:
- Cloth for inner cover (2.5 mx 1.4 m). It should be a good stretch fabric. We took an old knitted sheet.
- Outer cover fabric (2.5 mx 1.4 m). Any dense non-stretch fabric (cotton, velor, furniture fabric, even leatherette) will do. Our fabric is thick cotton, it turned out to be very pleasant and soft on the finished chair.
- Expanded polystyrene 200-300 l. These are such balls, into which we broke unnecessary packaging foam in childhood :) In hardware stores, this happiness is sold in large bags. It is better to take smaller balls, they get off less. In Kiev, as I already wrote, we found a suitable polystyrene foam for stuffing a beanbag chair with our own hands at Epicenter (200 l - 95 UAH), Leroy Merlin also has expanded polystyrene, but not always in larger granules (300 l - 120 UAH). We bought 1 bag of 200 liters, although the recommendations stated that we would need 300-400 liters. When we filled the beanbag chair and began testing it, we came to the conclusion that this is just enough for us, since soft bag it conforms to the shape of the body better than elastic. The back rests very well on such a chair, and for a pregnant tummy it is generally an irreplaceable thing :)

- 2 zippers. For the inner cover - 50 cm, for the outer cover - 100 cm.
- Strong threads
- Paper for large patterns. We took craft. You can take old wallpaper.
- 2 Velcro, 10 cm long. You will need them to connect the inner and outer covers.
- Sewing machine. In my opinion, it is unrealistic to sew all this by hand ...
Stages of work:
1. Build a pattern. A standard bean bag chair consists of 6 wedges and 2 round or hexagonal parts (the upper one is small, the lower one is large), and a handle is also attached on top. There are a lot of different patterns of frameless chairs on the Internet, but the meaning is the same. Appearance bean bag chairs do not change much from whether the bottom is a circle or a hexagon, the width of the wedges will be 40 or 50 cm.Of course, the main dimensions greatly affect the size of the finished product, but I mean that the appearance of the wedges and the bottom does not drastically affect what your chair will ultimately look like.
We found and finalized the pattern of the middle bob chair (120 x 90 cm). I think that standard width quite enough. If you increase only the height of the wedges up to about 140 cm, then the length of the headrest will increase, that is, the chair is suitable for a taller person.
Bean bag chair patterns
To transfer the wedge pattern to a large sheet, you need to draw the middle of the wedge - the axis, put marks on it at a distance of every 10 cm and measure the widths indicated on our pattern, and then connect them in one line. This will be the side bend of the wedge. Then we fold the pattern along the axis and draw the second half of the wedge symmetrically. There is a deflection at the bottom of the pattern. We measure the specified deflection size from the axis height. Then we apply a ruler to the two lower edges of the pattern and bend it to the specified deflection mark and draw a deflection under the ruler. Cut out the finished pattern.

How to draw a deflection on a wedge pattern
In order to draw a circle, we take a non-stretching thread and at one end we tie a loop (we will thread a pencil through it). We measure on a ruler the length of the radius of the circle from pencil to finger. Press one end of the thread to the center of the circle, thread a pencil through the second and draw a circle. Cut out.

How to draw a bottom pattern for a beanbag chair
To build a hexagon, you need to draw a rectangle, and then place a hexagon in it according to the specified dimensions. We cut out the detail.
Do not forget about the rectangle pattern for the handle.

Patterns for frameless chairs
2. Now place the patterns on the fabric as shown. This is needed for more rational use material. For the same purpose, the round part is cut into 4 parts. Before sewing a bag chair, they need to be sewn into a full circle. When cutting the fabric for the inner cover, we did not divide the bottom part, since the old sheet was large, and it was enough for us to accommodate all the patterns in full size.

Placing the bean bag chair patterns on the fabric
3. We cut out all the details, not forgetting about the allowances for the seams (1-1.5 cm).
4. We sew the inner cover first. We sew wedges together, sew a 50 cm zipper into the last seam.

This is what the outer case looks like without bottom and top.
5. Sew on the bottom. For convenience, it is worth connecting the wedges and the bottom with pins.
6. Then we sew the top-hexagon. Do not forget to sew 2 Velcro on this detail.
7. We sew the outer cover in the same way. On the inside of the hexagon we sew 2 Velcro, and on the outside of it we sew the handle of the beanbag chair (first fold the rectangle in half with the wrong side up, sew along the edge, turn it out, and then sew it to the hexagon).

Inner and outer covers ready-made
8. When the 2 cases are ready, it's time to stuff the inner case with Styrofoam balls. For this, I advise you to go out into the entrance or at least into the corridor, since the balls tend to crumble and fly in different directions. Have a vacuum cleaner or broom and dustpan on hand. The bag of balls needs to be cut quite a bit in the upper corner. Otherwise, cutting off the entire top of the bag, you risk spilling a lot of balls past the cover. And this means that they will have to be removed for a long, long time. Insert the opening of the bag into the cover of the beanbag chair and lightly shake the bag, slowly pour the contents. This action is best done together. After filling the chair, close the clasp.
9. Insert the inner cover with the balls into the outer one, fasten the upper parts of both covers together with Velcro. Zip up and enjoy your big beanbag chair, which you did yourself :)

Velcro to connect two covers

Kostya is holding a bob chair by the handle
All three of us tested this miracle of comfort all day and discovered the additional functionality of Big Ben. In addition to being a 2-in-1 chair and bed, it has a very good streamlining of the body, which allows pregnant women to finally nest their belly in a comfortable position.

A beanbag chair is a child's joy :)
In addition, Ksenia appreciated the bob and began to use it as an almost trampoline, slide and sofa at the same time. It is noteworthy that it is quite difficult for her to get out of the arms of the chair, which means that she strains her muscles and this is very useful. It is very funny to watch how the kid stuck in a bag flounders, turns over, pushes off and squeals with delight. In addition, through the covers, you can still feel the bumpy texture of the balls, and for small children's feet this is a wonderful massage.

Family evening reading
By the evening, it was discovered that the enveloping effect of the chair helps to lull the obstinate baby :) A couple of episodes of the cartoon, a comfortable position in the chair next to the mother and the cub is sleeping. Another feature of the chair will delight those who love warmth. It is very warm. As you know, polystyrene is an excellent insulation, and foam balls, which cover the body from all sides, heat so that you will not freeze, even if you really want to. You just need to remember to take a cozy blanket with you.
Here is such new item interior recently appeared with us. We immediately appreciated its merits and settled it down, sometimes we even argue over who will sit on it. If you have any questions when creating a beanbag chair with your own hands, write to us and we will definitely answer them.
We wish you inspiration to create wonderful cozy things!
P.S. After 5 months of active use.
The multifunctional off-bag is at the peak of its popularity. It has many advantages over other models.
The absence of a frame allows the product to completely follow the curves of the body.
In addition, the chair is characterized by mobility, light weight and ease of use.
 A design feature is the absence of a rigid frame. The bean bag is available in two sizes - 50 and 100 cm in diameter. It depends on the height and weight of the users, as well as the purpose of the room.
This frameless furniture consists of two covers: an indoor and an outdoor one. Removable cover is sewn from different materials (cotton, linen, velvet, fur, leatherette).
And the main requirement for the inner cover is strength and high density fabrics. The main thing is that the selected materials are practical, durable, pleasant to the touch and harmoniously fit into the environment.
Attention: After some time of use, the chair may shrink. The situation is corrected by adding filler to the inner case.
The features of a frameless chair include the fact that under the weight of a person, it completely takes on the shape of a resting person. On such products, people can completely relax and unwind with a book or laptop in hand.
The advantages of frameless furniture are worth adding:
Shapes: pear, ball and drop
The beanbag chair can have different shapes... But the most popular and demanded are:

Materials
For sewing the outer cover are used different materials... The main thing is that they have:
- abrasion resistance and high strength;
- ease of care;
- attractiveness.
What to make a cover from?
Different materials are used as a removable cover for the bean bag chair:

Advice: The inner cover is made of thicker fabrics. Good choice will become a spunbond with perforation for ventilation. This fabric is sold in rolls and is notable for its low cost and high technical qualities.
Filler
As for fillers, you can use:

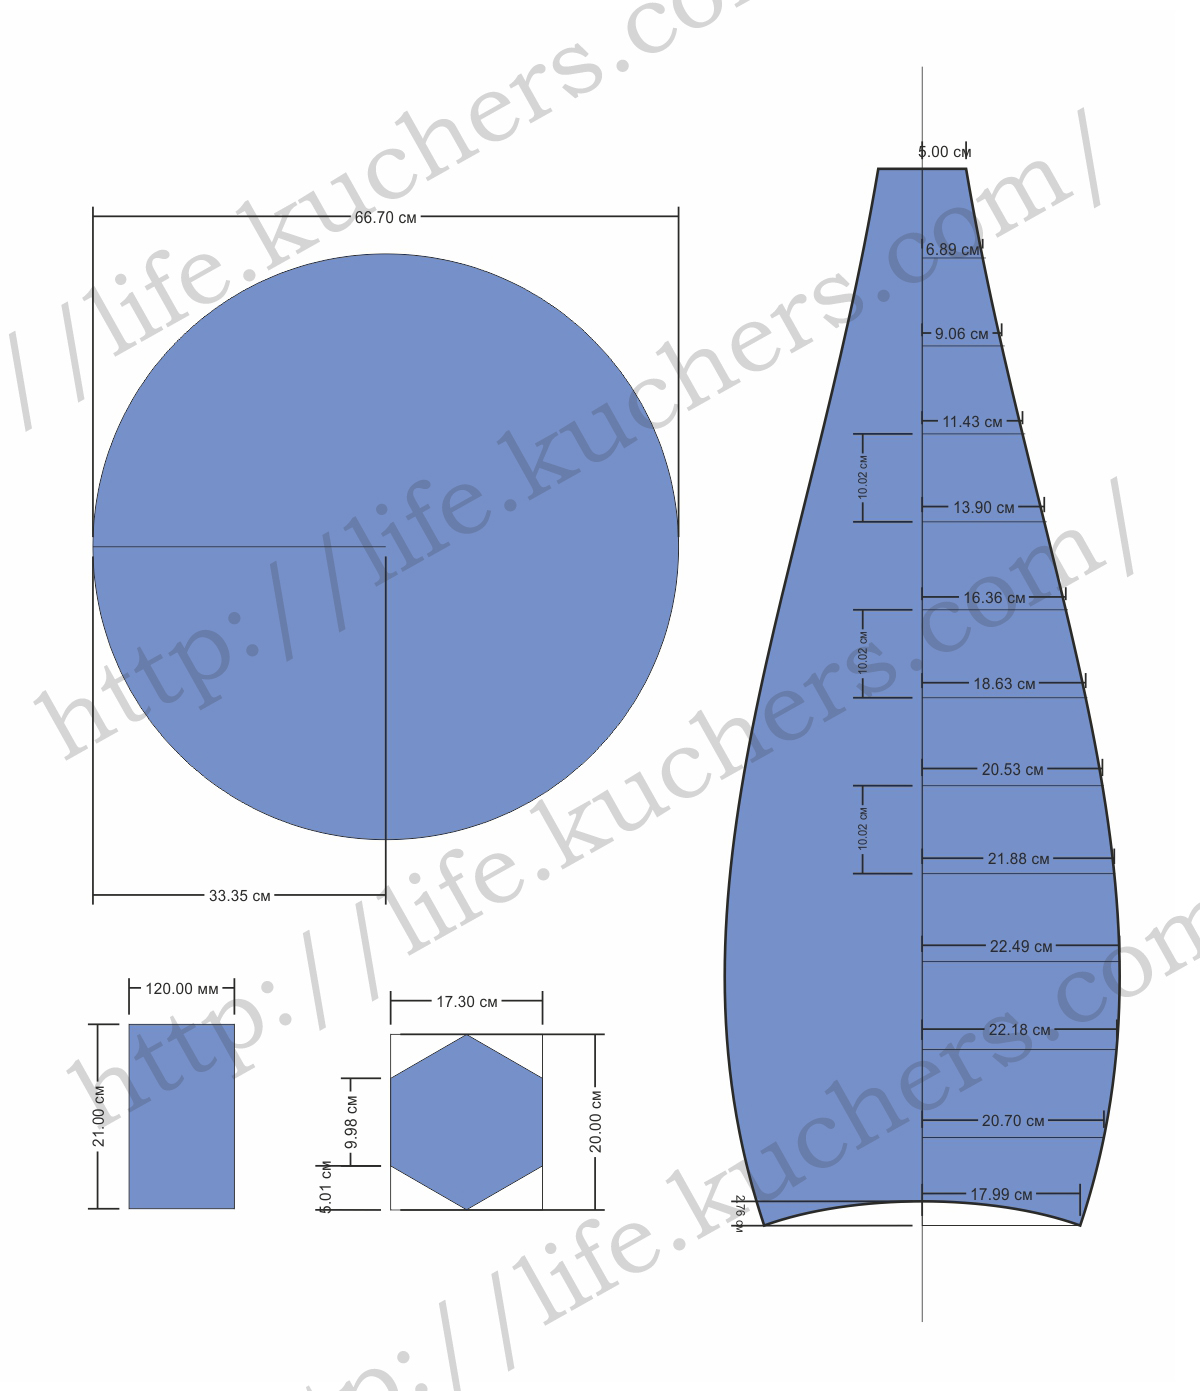
Pattern with detailed measurements for children and adults
To make a pear chair, you need to make a pattern. You can draw it yourself or find a ready-made version on the Internet.
The pattern is drawn on graph paper. And then it is transferred to the fabric. Parts are cut along the contour.

Attention: When transferring the pattern to the fabric, remember to leave allowances of a few centimeters on each side.
A chair pattern for an adult will consist of the following details:
- 6 pieces of wedge-shaped parts, 15 cm wide and 40 at the ends, 50 cm in diameter and 130 cm long;
- diamond-shaped top 15 cm on each side;
- the bottom is diamond-shaped, 40 cm on each side.
The pattern of a chair for a child will consist of the following 6 wedge-shaped parts:
- height - 90 cm;
- diameter - 45 cm;
- width - 40-22 cm.
The beanbag chair consists of:
- Zippered inner cover filled with expanded polystyrene. Here you should choose thick cotton or raincoat fabric.
- Outer cover. Suitable for manufacturing: corduroy, leather, velor. A 1 meter long zipper will need to be sewn onto a removable cover.
Master class on how to sew yourself at home step by step
After making a pattern on the material, it's time to sew a do-it-yourself beanbag chair:

Now it remains to fill the chair with expanded polystyrene and you can install a piece of furniture in the interior.
Attention: Styrofoam adheres to all surfaces. If scattered around the room, the cleaning process will take a long time.
Step-by-step instruction manual
In order for the furniture item to serve the owners as long as possible, it is recommended:

As you can see from all of the above, bean bag chair does not require much work... And with proper operation, it will serve its owners for many years.
Photo
Your efforts will be rewarded - you will receive stylish and comfortable furniture that will adorn any interior:


Useful video
A detailed description of the manufacturing process with a description of little tricks can be seen in the following video:
Conclusion
In conclusion, it should be noted that a beanbag chair has many advantages. It will give its owners maximum comfort during rest, and original design solutions, will allow you to harmoniously fit it into any environment.
In contact with
The beanbag chair combines practicality, convenience and beauty. It will fit into any modern interior and will save space. The main thing is that everyone can make a beanbag chair with their own hands. You just need to stock up on time, patience and, of course, the necessary materials.
Bean bag: design features
Do-it-yourself frameless furniture has a lot of advantages. It:
- ergonomic;
- looks great both in the living room and in the children's room;
- easily transported within the apartment;
- easy to clean thanks to the removable cover;
- even a novice hand-made master can make it.
Before you start a master class on the topic "How to sew a beanbag chair at home", you should consider it design features.
The product consists of two parts: a top cover and an inner one. The upper one has a zipper, so it can be removed and cleaned if necessary. The bottom cover is tightly sewn up, filled with 2/3 foam polystyrene balls.
The balls are soft, elastic, no more than 5 mm in diameter. They roll freely inside the cover, taking the shape of a human body. Thanks to this feature, it is very comfortable to sit in a beanbag chair.
Making a chair-bag with your own hands, you can make it in the shape of a pear, a ball, a rectangle, etc. The most popular model of frameless chairs is a “pear”.
Making a pear chair at home
A master class on how to sew a chair bag yourself begins with the preparation of materials. You will need:
- fabric for the outer cover (cut 1.5x3.5 m);
- fabric for the inner cover (choose any fabric that is breathable and has a smooth texture);
- 2 zippers: 100 cm for the outer cover, 30 cm for the inner one (if you decide to sew the inner cover tightly, you can skip the short zipper);
- pear chair filler (foam balls);
- threads.
Of the tools that you need to sew a beanbag chair with your own hands, prepare:
- sewing machine
- graph paper for patterns (if you are confident in your abilities, you can make patterns directly on the fabric),
- scissors,
- pencil,
- roulette.
Stages of work
Step-by-step instruction for the manufacture of frameless pear chair:

- On graph paper, a pattern of one wedge, the bottom and top of the future chair is built.
- Transfer the pattern to the fabric. Note that you need to make 2 sets of parts - for the inner and outer cover of the "pear".
- Cut, leaving 1.5 cm seam allowances.For the outer cover, you get the following details:

- 6 side wedges,
- 1 hexagon (base),
- 1 hexagon (with a smaller diameter - apex),
- 1 handle for carrying the pear chair.
For the inner cover, cut out the same parts except for the handle.
- Use a zigzag sewing machine or overlock to sew the edges of the parts.
- Take 2 side wedges, fold them face to face, grind 15 cm from the top and bottom along the long side. The length of the seam is equal to the length of the zipper.
- At the end and beginning of the seams, make rivets and sew a zipper.
- Take the next wedge and grind down the side seams. From the front side, you need to sew a stitch.
- We sew a carrying handle. We fold the cut out part in half along the long side, sew on a typewriter. Then we turn it out, iron it with an iron, stitch it again.
- Sew on the upper, lower part of the bag, not forgetting to put a carrying handle between the parts.
- The inner cover is sewn in the same way.

The master class on how to sew a beanbag chair does not end there. The most interesting thing is ahead - filling the "pear" with balls.
How to easily fill a bag with balls: useful advice
The easiest way to place the balls inside the bag and prevent them from scattering throughout the room is to use a regular plastic bottle. The bottom and the neck should be cut off from it, making a kind of connecting tube. Insert one end of the tube into the inner cover of the chair, wrap it with tape. The other end is in a bag with polystyrene balls and also secure with tape. Check that there are no gaps and that the balls do not start to fall out. Slowly pour the filler through the connecting tube from the bag into the case.
When all the balls are in the case, the chair making workshop can be considered over. Now all that remains is to zip up or sew up the inner cover, put on the top cover, sit in the finished pear chair and relax.
Making a ball chair at home
In addition to the "pear", a frameless ball-shaped chair will look interesting.

The sewing of the ball chair is identical to the sewing of the pear chair. Also 2 covers are made, the inner one is filled with balls.
- On graph paper, you need to make a pattern of parts and transfer it to the fabric.

To sew a chair, you have to cut 12 or 20 pieces (depending on the size you want to get). Leave 1.3 cm for the allowance on each side.
- Treat the edges of fabrics to prevent fraying using an overlock, zigzag stitch or piping.
- We split the processed parts with pins and only after that we begin to sew. This will prevent the pattern from shifting.
- The zipper won't fit on one side, so place it like a snake between the two details.
- Fill the bottom case with balls as in the previous example and put on the top case.
Do-it-yourself frameless furniture made by yourself will certainly become an original and useful piece of furniture. Both adults and children will like to relax in this chair.


