The correct angle is 90 degrees. How to mark the foundation. Construction life hack. What materials are used for leveling the tree
How to set an angle of 90 degrees without a special tool (square)?
Let's say we have a line to which we need to set a perpendicular, i.e. another line at an angle of 90 degrees from the first. Or we have an angle (for example, the corner of a room) and we need to check if it is equal to 90 degrees.
All this can be done with just one tape measure and a pencil.
There are two great things, like the "Egyptian Triangle" and the Pythagorean theorem, that will help us with this.
So, Egyptian triangle Is a right-angled triangle with a ratio of all sides equal to 3: 4: 5 (leg 3: leg 4: hypotenuse 5).
The Egyptian triangle is directly related to the Pythagorean theorem - the sum of the squares of the legs is equal to the square of the hypotenuse (3 * 3 + 4 * 4 \u003d 5 * 5).
How can this help us? Everything is very simple.
Problem number 1.You should draw a perpendicular to a straight line (for example, a line 90 degrees to a wall).
 Step 1... To do this, from point number 1 (where our corner will be), you need to measure on this line any distance that is a multiple of three or four - this will be our first leg (equal to three or four parts, respectively), we get point number 2.
For ease of calculations, you can take a distance, for example 2m (these are 4 parts of 50cm each).
Step 2... Then from the same point No. 1 we measure 1.5m (3 parts 50cm each) upwards (set an approximate perpendicular), draw a line (green).
Step 3... Now, from point number 2, you need to put a mark on the green line at a distance of 2.5 m (5 parts 50 cm each). The intersection of these marks will be our point # 3.
By connecting points # 1 and # 3, we get a perpendicular line of our first line.
Problem number 2.Second situation - there is an angle and you need to check if it is straight.
Here it is, our corner. It's easier to check with a large square. And if it is not?

We measure from the corner any length that is a multiple of four, in this case it is 1.6 m.

In the other direction there are three parts, respectively 1.2m.

Apartment and quality repair, tastefully selected modern furniture and comfortable interior - the dream of any person. But only all this splendor fades in rooms with uneven walls. Very often people try to hide a small blockage and cover it with furniture or resort to other tricks. In vain, since uneven planes need to be leveled, not masked. For example, furniture only emphasizes this flaw.
Plastering geometry
Plastering works necessary for leveling the surface of the walls horizontally and with an angle 90 degrees under the furniture. For this, the beacon method is used. All beacons installed on one of the bases should be easily installed using laser level .
Quite a few examples have spread on the Internet showing how to work without the use of beacons. I must say that such technology should not be used, since without beacons it is absolutely impossible to maintain a single plane plastering works surface. A 2 or 3 meter rule will not help align a 15 meter wall in one plane.
And if there is a doorway in the plane, then this task becomes all the more impossible. will give the walls a perfect vertical level and angle 90
Many plasterers suggest fixing geometry rooms, in everyday life it is called " ". This leads to an increase in layer, material consumption and cost of work , and you can only hide the shoals of masons in this way.
The geometry of the room is not fully maintained at the stage of building partitions.
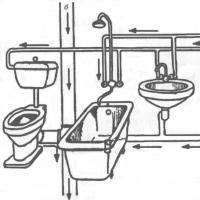
But in every house there are places where it should be 90 ° angle , this is a bathroom, work zone in the kitchen, where there will be a kitchen set (so that furniture assemblers do not adjust the countertop in place), and a couple more places in the apartment, for example, a corner in which a built-in cabinet will stand without a back plane (for the same reason as the kitchen).
When plastering walls bathroom (with a bathtub) the use of tiles leads to the need for high-quality Wall alignment at an angle of 90 ... If this is not done, then trimming the tiles in the corners of the room will repeat all the irregularities and will not be able to hide their slope. If the bath is installed in full length, then there is a need to remove angles at 90 degrees but in most cases this is not a requirement.
When Aligning the walls at an angle of 90 in the kitchen, the quality standard is set kitchen set... It requires not only vertically flat bases, but also corners in 90 degrees ... The plane with the door must also be plastered " under the lighthouse ". The rest of the walls just need to be made straight. Compliance with these requirements allows you to achieve a good end result.
How to make angles 90 degrees
at plastering walls
?
If corners need to be aligned at 90 degrees
, then you should start from the wall in which the door or arched opening is located. And this is very important, since start with another wall at the end of the work, it may turn out that the thickness of the wall in the area of \u200b\u200bthe opening on the left side and on the right is different. This will lead to the fact that it will be impossible to put the door.
How to set the beacons so that all corners of the room are 90 degrees ? And everything is as simple as shelling pears. Plastering walls at an angle of 90 degrees ... For what? You will then have one plane ready, from which you will expose two planes adjacent to it. One of which is adjacent to plastered plane, next to the corner, mark a vertical line.
After the lighthouses are exposed on one plane, you can plaster it, and then proceed to others - pull the fishing line along the base and use a square to set it at 90 degrees to an already plastered wall or use a laser level that automatically gives 90 degrees and saves you time.
Plastering kitchen walls at 90 degrees .In order for the installation of kitchen furniture, hanging cabinets to be successful, it is necessary that the walls are made at an angle of 90 ° ... Nothing emphasizes the curvature of the wall and corners as unevenly adjoining furniture. This package improves the two adjacent walls along which the kitchen furniture, while the remaining planes are not affected, the savings are saved.
It should be noted that kitchen wall plaster at 90 degrees working with ready-made corners, although we get an almost perfect inner or outer cornerhowever it will never be sharp, rather slightly rounded. This is due to the geometry of the mesh corner 35 * 35mm (galvanized ) 3 meters
Corner with metal mesh, galvanized is used for plastering works
for forming outer corners
The corner profile is designed to protect the outer corners inside the premises for the outer slopes and claddings from mechanical damage.
The section of the profile is made in the form of an acute angle (85 degrees), which ensures a tight fit to the surface of the partition angle during its installation.
When the profile is installed, it penetrates into the holes plaster pre-applied to the corner of the structure.
That allows you to ensure strong adhesion of the profile to the mating surface of the corner and base.
Price
The cost on walls without material is 250 rubles / m2.
90 degree angle in cost works included separately ( price one angle 90 degrees outdoor or indoor costs 300 rubles)
Orders are accepted on an area of \u200b\u200bworking surfaces of 70 m2 (in cost turns on priming walls, placing beacons, smoothing the surface, removal of beacons).
Wall plaster cost
with material is from 500 rubles / m2, including delivery of material to the object and varies from layer thickness.
Whoever is engaged in self-construction knows that before starting the construction of a structure, you need to mark the foundation with your own hands. Here is considered the case of starting work on the construction of a screw foundation on the site for a number of reasons horticultural nature is not cleared of useful plants... This made it difficult to work on marking the future foundation, but these difficulties were easily overcome with the help simple adaptation for setting right angles.
How to mark the foundation with your own hands
Usually marking the foundation in self-construction done by eye with a tape measure. First, columns are set to mark the corners of the walls at the distances of the length and width of the future building. Then the diagonals of the resulting rectangle are measured and the process of rearranging two adjacent pillars begins to align the measurements of the diagonals. According to the basics of geometry, a rectangle is a figure in which two diagonals are equal to each other. But precisely because of the landings, the measurement of the diagonals in the fitting process was difficult. Landings made it difficult to pull the tape measure and obscured the rangefinder laser. But this difficulty can be overcome.
1. Before starting work, you must have a minimum knowledge of geometry and know the solution to the Pythagorean theorem :). Let me remind you of the theorem. The square of the hypotenuse is equal to the sum of the squares of the legs in a right-angled triangle.
2. Pull the cord between the two pegs to mark the first wall of the foundation. If the side of the foundation, for example, is 6 meters, then the distance between the pegs must be at least 8 meters.
3. Let's make a device for setting a right angle on the ground. To do this, you must purchase the packaging non-stretching cord or use a steel cable. In total, you will need about 13 meters of cord.
4. Tie the folded together ends of the cord so that the length of the loop obtained is 6 meters. Accuracy of tying and sizing is important.
5. We take a permanent felt-tip pen and from the center of the knot with the help of a tape measure we make marks at a distance of 3 meters in one direction and at a distance of 4 meters in the other direction. So we got a rope rectangular triangle. This invention will allow the direction of a 90 ° angle to be calculated by simply stretching the triangle.
Layout of the first wall Life hack kit Sides of a triangle
6. To work on the ground, we need thin wooden pegs or pieces of thin reinforcement.
7. Install one peg to mark the corner of the foundation on the marking line made earlier in step 2.
8. We take a rope life hack. We place the knot on a peg indicating the angle and stretch the sides of the rope triangle by driving the first peg at a distance of 4 meters into the wall markings in item 2, the bend of the cord should be 4 meters on the felt-tip pen mark.
9. Put a peg at the 3 meter mark. One side of the rectangle is parallel to the first wall markup, and the other side indicates the direction of the 90 ° markup for the second wall. Pythagoras' theorem in action - see photo.
Reinforcement pieces Base peg Right angle Rope triangle10. Pull the marking cord for the second wall parallel to the side of the triangle.
11. We carry out similar actions for marking the third wall.
12. Mark the lengths of the second and third walls on the marking and carry out control at one of the corners of the correct direction of the fourth wall. If the length of the wall in the marking was 6 meters and its direction crossed the wall marking points two and three, then we can say that measuring the diagonals will give an equal result. If the convergence does not work, check again that the markup is installed correctly.
Marking of the 2nd wall Cord of the 2nd wallIt - oldest geometric problem.
Step-by-step instruction
1st way. - With the help of the "golden" or "Egyptian" triangle... The sides of this triangle have an aspect ratio 3: 4: 5, and the angle is strictly 90 degrees... This quality was widely used by the ancient Egyptians and other pracultures.
Fig. 1. Construction of the Golden, or Egyptian triangle
- We make three measures (or rope compasses - rope on two nails or pegs) with lengths of 3; 4; 5 meters... The ancients often used the method of tying knots with equal distances between them as units of measurement. Length unit - " nodule».
- We drive in a peg at point O, we hook on it the measure “R3 - 3 knots”.
- We stretch the rope along the known border - towards the proposed point A.
- At the moment of tension on the border line - point A, drive in a peg.
- Then - again from point O, we stretch the measure R4 - along the second border. Do not drive the peg in yet.
- After that we pull the R5 measure - from A to B.
- Drive in a peg at the intersection of R2 and R3. - This is the required point B - third apex of the golden triangle, with sides 3; 4; 5 and with a right angle at point O.
2nd way. Using a compass.
Compass can be rope or pedometer... Cm:
Our pedometer compass has a step of 1 meter.

Fig. 2. Compass pedometer
Construction - also according to Fig. 1.
- From the reference point - point O - the neighbor's angle, we draw a segment of arbitrary length - but more than the radius of the compass \u003d 1m - in each direction from the center (segment AB).
- We put the leg of the compass at point O.
- We draw a circle with a radius (compass step) \u003d 1m. It is enough to draw short arcs - 10-20 centimeters, at the intersection with the marked segment (through points A and B.). By this action we found equidistant points from center - A and B. The distance from the center does not matter here. You can simply mark these points with a tape measure.
- Next, you need to draw arcs with centers at points A and B, but somewhat (arbitrarily) larger radius than R \u003d 1m. You can readjust our compass to a larger radius if it has an adjustable step. But for such a small current task, I would not want to "pull" it. Or when there is no regulation. Can be done in half a minute rope compass.
- We put the first nail (or the leg of a compass with a radius greater than 1m) alternately at points A and B. And we draw two arcs with the second nail - in a taut state of the rope, two arcs - so that they intersect with each other. It is possible at two points: C and D, but one is enough - C. And again short serifs are enough at the intersection at point C.
- Draw a straight line (segment) through points C and D.
- Everything! The resulting segment, or straight line, is exact direction to the north:). Sorry, - at a right angle.
- The figure shows two cases of border mismatch for a neighbor's site. Figure 3a shows a case when a neighbor's fence moves away from the desired direction to the detriment of itself. On 3b - he climbed into your site. In situation 3a, it is possible to construct two "guiding" points: both C and D. On 3b, only C.
- Place a peg at corner O, and a temporary peg at C, and extend a cord from C to the back of the lot. - So that the cord barely touches the peg O. Having measured from point O - in direction D, the length of the side according to the master plan, you will get a reliable rear right corner of the section.

Fig. 3. Building a right angle - from a neighbor's corner, using a pedometer and a rope compass
If you have a pedometer compass, then you can do without a rope... In the previous example, we used the rope to draw arcs with a larger radius than the pedometer. More because these arcs must intersect somewhere. In order for the arcs to be drawn with a pedometer with the same radius - 1m with a guarantee of their intersection, it is necessary that points A and B are inside a circle with R \u003d 1m.
- Measure then these equidistant points tape measure - in different directions from the center, but always along the AB line (neighbor's fence line). The closer points A and B are to the center, the farther from it are the direction points: C and D, and the more accurate the measurements. In the figure, this distance is taken to be about a quarter of the pedometer radius \u003d 260mm.

Fig. 4. Building a right angle with a pedometer and tape measure
- This scheme of actions is no less relevant when constructing any rectangle, in particular, the contour of a rectangular foundation. You will get it perfect. Its diagonals, of course, need to be checked, but don't the efforts decrease? - In comparison, when the diagonals, corners and sides of the foundation contour are moved back and forth until the corners converge ..
Actually, we have solved a geometric problem on earth. In order for your actions to be more confident on the site, practice on paper - using a regular compass. Which is basically no different.
Homemade rope square is simple and accurate!
The square is always needed. It is difficult to imagine the modern world without the simplest measuring square. Wherever something needs to be placed or strengthened perpendicular to each other, a square is required. It is necessary, for example, to set the wall at right angles to the floor. A small square cannot do this. The longer the mating parts, the larger the square must be to ensure the correct orientation accuracy.

There are large squares, but they are expensive. Elbow measuring 1050x500 mm. sell for 9800 rubles! Probably some kind of barn is cheaper. But, in small, and such a square does not solve the problem. They already need squares with a side of several meters. What to do?
It is easy to solve the problem if you know the "magic" numbers 3,4 and 5!
Our square is foldable and can fit in your pocket.
So, the manufacturing process:

- We drive two nails into a long board at a distance of L \u003d 5 meters from each other. This distance must be done accurately, it is better to mark it with a tape measure
- We put two rings on nails, for example from keys, and tighten the rings tightly with a strong twine or rope. The rope or twine must be securely fastened to the rings.
- We drive two nails into the board at a distance of L \u003d 4 meters and repeat the operation on point 2.
- We repeat the same for L \u003d 3. Everything. The square is ready.

Let's check the perpendicularity of the vertical beam to the horizontal platform. We fasten with nails one of the cables, for example a three-meter cable, on a vertical bar at points 1 and 2. On the same nails we put rings of five and four-meter cables, bring the free ends together and tighten the structure. If point 3 coincides with the horizontal platform, everything is in order. Angle 90 degrees.
Of course, you can make a square not from three separate cables, but from one made with a triangle. Then only three rings are required, correctly positioned on the rope.

A similar option for checking the frame is shown in the photo. And here's another option for checking the same frame if you don't have a square but have a metal meter.

Measure from the corner of the frame two legs of 60 and 80 centimeters, attach a ruler to the risks. If the legs are measured accurately and the ruler meter coincided with the risks, then the frame is made, right. The angle is straight.
And, finally, we will correctly set the fence on the personal plot.

Pull one of the legs of our square along the fence and secure it with pegs. Stretch our square and drive in the third peg. You got a right angle. You can put up a fence.
All these tricks with a rope square are based on the school formula: "the square of the hypotenuse is equal to the sum of the squares of the legs."
The whole numbers three, four and five, satisfying this condition, are easy to remember. These numbers can be changed in multiples.
You can, for example, make lengths of 1.5-2.5 meters, or 0.6 0.8 1 meter and even 0.3 0.4 0.5 meters. It is only necessary to take into account that the smaller the size of the segments, the more accurately you need to fulfill their length.