Drawing on the theme “Insects. Insects outline of drawing classes (preparatory group) on the topic Drawing on the topic of insects
- Introduce photocopy drawing techniques.
- Formation of skills in the technique of drawing with a candle.
Tasks:
development of attention through observation of frosty patterns in winter;
fostering interest in winter natural phenomena;
cultivating accuracy in execution.
Equipment: pattern samples, landscape sheet; an additional sheet, a piece of a candle; watercolor paints; a brush with a wide bristle; a glass of water, napkins, a letter.
1. Organizational moment.
Psycho-gymnastics: "Ray"
Reached for the sun
They took the ray
Pressed to the heart
And they gave it to each other.
Lesson topic message.
Guys today the topic of educational and organizational activity is "Frosty Patterns", and not just an activity, but drawing with a candle
Surprise moment.
Guys, what time of year is it? Children meet winter
It's winter now. Winter is a wonderful time of the year! Winter wonders happen! So I received a small package. Who sent it to us?
Let's see what lies in it, maybe we will find out from whom it is.
Reading the attached piece of paper to the parcel
Guys, here lies a snowflake with a riddle poem. Listen carefully to guess it. Whoever guesses will raise their hand:
Stars fall from the sky, fall on the fields.
Let the black earth hide under them.
Many, many stars, thin as glass;
The stars are cold, but the earth is warm.
What master did this on the glass
And leaves, and herbs, and thickets of roses. Children answer it is snowflakes, because they cover the ground with snow and look like stars
Well done guys, you are very observant, so you correctly guessed the riddles.
Introduction to the topic.
And who is a faithful and indispensable assistant in winter? Children respond frost
Right. With the onset of winter comes the cold. Frost knocks on every house. He leaves his messages to people: either the door will freeze - they prepared poorly for the winter, then they will leave their art on the windows - a gift from Frost. Let's see what kind of messages he sent us
I take out pictures from the parcel - with the image of frosty patterns
What is shown in the pictures? Children answer Twigs, snowflakes, ice flowers, curls and cold hooks
It's true, the guys are here and spruce branches, decorated with frost.
This is how Frost painted the windows for us without brushes and paints.
Guys, how do you think Frost draws these patterns? Children put forward their assumptions Blows on the glass with cold, by magic, throws snowflakes on the windows, and they stick to the window.
In fact, from the cold, frosty air, water droplets that are present in the air settle on cold glass, freeze and turn into ice-needles. During the night, many, many of them are formed, they seem to build up on each other. And as a result, different patterns are obtained, which we have now observed with you.
Guys, what do you think, you and I could draw patterns in such a way that at first they were not visible, and then suddenly appeared, like Frost's? No.
But it turns out you can. And now I will introduce you to this method of drawing - it is called "photocopy".
2. Practical part.
Pick up pieces of a candle and try to run them on a sheet of paper.
Does the candle leave visible traces? Children answer no
And now cover with any watercolor paint on top. What did you get? Lines appeared under the paint, which we drew with a candle.
Guys, why do you think the lines made by the candle didn't color? Children speak their minds
The candle consists of wax, which repels water, so the design made with water-repellent material appears after applying watercolor paint diluted with water to it. Today we will try to create a miracle - draw frosty patterns with a candle.
How do we start drawing? Children are responsible to draw from the top, going down.
It is true that in order for the drawn elements not to overlap each other, it is best to draw the pattern from top to bottom. Cover the finished drawing with watercolor paint. I would advise choosing blue or purple. And so that the sheet does not get wet, apply the paint evenly over the entire sheet, but do not draw over the same place several times.
3. Independent work children.
I provide personalized assistance
4. Summing up
What is the name of the painting technique we used to create these great work? Children answer photocopy
What else do you think you can draw using the photocopy technique? Children answer flowers, patterns, the sun.
Our lesson has come to an end, I am very pleased with you and I really want to know what surprised you today? What did you like the most today?
| Drawing on the theme "Insects"
Educator. The real spring has arrived! Warm and joyful on earth. All people are happy! This is the best time of the year - spring! Many poets dedicated their poems to her. 1st child (reads the poem "Spring Kingdom" by S. Drozhzhin) The kingdom of vernal days has returned. Ringing on the rocks...
Drawing Lesson "Butterfly" Lesson on drawing. Subject:"Butterfly" Target: continue to introduce children to the non-traditional method drawing - hand drawing; develop imagination, interest in creative activity. Methods and reception We: game - a surprise moment, verbal, visual - show. materials: sheets...
Drawing on the theme "Insects" - Abstract of the OOD on drawing using the non-traditional technique "Such different butterflies" in the senior group
Publication "Summary of OOD on drawing using non-traditional techniques ..." Program content: - to systematize children's ideas about the diversity of insects, highlighting their distinctive common features - to introduce children to technology - monotype; - develop an understanding that an image can be obtained using various drawing techniques -...
 MAAM Pictures Library
Summary of GCD on Non-traditional drawing "The World of Insects" Purpose: - to learn how to create an image using various drawing techniques. Tasks: To improve the work of the hand, to promote the development of coordination of eye and hand movements. To consolidate the ability to draw additional elements of the drawing with a cotton swab, fingertips. Develop...
Abstract of the GCD for drawing in the second junior group "Ladybug on a dandelion" Abstract GCD for drawing " Ladybug on a dandelion" for children of the second younger group Objectives: to expand children's understanding of spring and the appearance of primroses and insects, to teach children to draw a ladybug using traditional and non-traditional techniques. Tasks:...
Synopsis of an open lesson in the non-traditional drawing technique "Magic Flowers for a Butterfly" for the middle group Abstract open class on fine arts in non-traditional drawing techniques for middle group on the topic: "Magic flowers for a butterfly." Purpose: to introduce children to non-traditional drawing techniques. Integration of educational areas: artistic and aesthetic ...
Drawing on the theme "Insects" - Abstract of a drawing lesson in the second junior group "Ladybug"
Drawing lesson in the second junior group Topic: “Ladybug” Program content: Tasks: 1. Teach children to draw an expressive image of an insect. 2. Continue to learn how to create a composition based on a green leaf. 3. Improve the technique of drawing with gouache, the ability ...
 For younger preschoolers, drawing classes form the basis of the educational process. At the age of 3–4 years ( junior group) in children, thanks to classes in the fine arts (drawing, modeling, appliqué), there is an active development of mental processes, in ...
Synopsis of an integrated lesson in the preparatory group on the topic "Butterflies"
Yakovleva Olga Vasilievna, educator, GBOU "School No. 842", MoscowDescription of work: I offer you a summary of the GCD on the topic "Butterflies" for children of the preparatory group for school (6-7 years old). This material will be useful to educators working with older children. preschool age. This summary of an integrated lesson aimed at introducing children to butterflies, reflecting ideas about them in visual activity.
Integration of educational areas: cognitive development, speech development, artistic and aesthetic development
Target:
Acquaintance of children with butterflies, reflection of ideas about them in visual activity.
Tasks
Educational:
Introduce children to the variety and stages of development of butterflies.
Improve the ability to work with gouache, continue to master the technique of shading. Continue to learn how to mix paints to get new colors and shades.
Developing:
Develop children's creativity, sense of shape, color.
Educational:
To cultivate interest in the knowledge of nature, the desire to admire beautiful butterflies and reflect impressions in fine arts.
Preliminary work: Conversations, looking at pictures, reading fiction on this topic, observations on a walk for butterflies.
Methods and techniques: Game, visual, practical activities of children, teacher's story, questions for children, use of fiction.
Materials and equipment:
Butterfly illustrations, paper, simple pencils, gouache, brushes No. 1, cups of water, palette, napkins, oilcloths. Organizing time
The teacher thinks riddle
Seeing in the flowerbed
Beautiful flower,
I wanted to rip it off.
But it was worth touching the stalk with your hand,
And immediately the flower flew away. (“Butterfly” by V. Lunin)


The teacher's story(accompanied by illustrations)
Educator: Children, we have watched more than once how multi-colored butterflies flutter over flowers on a warm summer day. Butterflies are one of the most beautiful creatures on the ground! People have come up with many fairy tales and legends about these beauties. The Romans believed that butterflies are revived flowers that fell off the stem. The Slavs, our ancestors, compared a butterfly with the heart of a man in love. In Japan, a pair of butterflies symbolizes family happiness, and in fairy tales, elves live with butterfly wings.
For their beauty, people gave these insects beautiful names. What butterflies do you know?
Children: Lemongrass, hives, cabbage, chocolate, peacock eye, swallowtail, pigeon, admiral, etc.
Lemongrass

Hives

Cabbage butterfly

chocolate girl

peacock eye

Swallowtail

golubyanka

Admiral

Educator: There are many butterflies in the world. What colors did nature paint on their wings? (children's answers)
Educator: Why do you think butterflies need such a bright color?
Children: So that no one can see them on flowers and cause harm.
Educator: Butterfly wings are made up of small scales that are covered with dyes. They give the butterflies a wonderful coloration of the wings. But these colored scales are very, very fragile. Therefore, if you take a butterfly in your hands, you can damage them and then the butterfly will die. Do not take butterflies in your hands and do not allow others to do so. Keep the beauty!
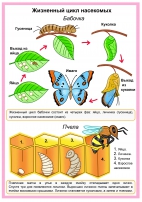
Educator: Look at the pictures, what parts does a butterfly have?
Children: Head, body, four wings, antennae, legs.
Educator: What shape is the head, body, wings?
Children: Round head, oval body and wings.
Educator: The body consists of three parts: a round head, a middle part and an abdomen.
Educator: Compare the wings and find out which of them are the same in color, shape, pattern, which pair of wings is larger in size? (children's answers)
Educator: The mouth of a butterfly is a long thin proboscis. Usually it is folded into a tight spring, but as soon as a butterfly sits on a flower, the proboscis unfolds and sinks to the very bottom of the flower for nectar. Insects sniff with antennae. Antennae smell from afar.
Educator: How many legs does a butterfly have? (Answers of children). A butterfly is an insect, and all insects have six legs.
Physical education "Butterfly"
Butterfly gracefully flew over the flower,
Waving bright merrily wings. (Smooth hand movements)
A beautiful village sat on a flower, (Sit down)
And she ate the nectar. (Head tilts down)
Wings spread again (Stand up, hands to the sides)
IN blue sky swirled. (Spin around)
Didactic game "Wonderful transformations"
The teacher shows a picture of a caterpillar.

Educator: What do you think the caterpillar has to do with the butterfly? (children's guesses)
Educator: Let's help the caterpillar turn into a butterfly. (based on picture)

What does a butterfly lay? (eggs)
Who comes out of the egg? (caterpillar)
What does a caterpillar do? (feeds on leaves and grows)
Who does she become? (in a chrysalis or cocoon)
Who hatches from the chrysalis? (butterfly) She has wet wings. The butterfly dries its wings in the sun, as soon as the wings dry, the butterfly begins to fly.
Physical education "Caterpillar"
Strange this house without windows
People call it a cocoon. (Slow turns around)
Twisting on a branch a wonderful house, (rotations by arms)
A caterpillar slumbers in it. (Sit down, palms under the right cheek)
Sleeps without waking up all winter. (Palms under the left cheek)
But winter passes by (Stand up, wave your hands up)
March, April, drops, spring ... (clap hands for every word)
Wake up, sleepyhead! (reach out)
Under the spring sun (Draw a circle with your hands)
The caterpillar is not up to sleep. (Wag finger)
She became a butterfly! (Smooth hand movements)

Work in the creative workshop
Educator: Today I invite you to draw beautiful, bright butterflies using the familiar stroke technique.
The teacher discusses with the children the order of the work.
With a simple pencil, we sketch out a sketch - a contour drawing. We start with the body. It consists of three parts: round head, middle part and abdomen. There must be antennae on the head. Then we draw the wings.
We take a brush, a palette, paints and begin to decorate our butterflies with strokes.
Patterns on the wings of butterflies can be very different. No wonder butterflies are considered similar to flowers. The patterns on the wings of butterflies are considered one of the wonders of nature - they are so interesting and unusual. Therefore, you can safely fantasize and come up with patterns for your butterflies.
Children draw butterflies with gouache paints using the stroke technique. In the process of work, the teacher provides individual assistance.
Analysis of children's work
The teacher offers to make an exhibition and consider it.
What amazing beauty?
The meadow is covered with flowers!
Miracles happen
Here the magician worked hard
But the magician has nothing to do with it!
These butterflies have flocked
Clear, sunny day
Relax on the grass sat down!
(S.A. Antonyuk)
Outcome
What new and interesting things did you learn? What moments did you enjoy the most and why?
Drawing lesson in senior group on the topic: "Insects"
"Butterfly"
Goal: 1. Expand children's knowledge and understanding of the features appearance butterflies.
2. Introduce symmetry using the example of a butterfly in nature and in a drawing.
3. To improve the ability of children to work in non-traditional fine art - drawing with plasticine, to expand knowledge about the possibilities of this material.
4. To teach children to apply strokes of plasticine, smoothly "pouring" one color into another at the border of their connection.
Material for the lesson: thick cardboard of blue (blue) color with a silhouette of a butterfly, a set of plasticine, a stack, a napkin for hands.
Lesson progress
1. Organizational part
The teacher asks the children to listen to the story.
How the butterfly became colorful
Spring has come. Nature revived: here and there, from various cracks, from the ground, from under the bark of trees, various insects began to crawl out. They sought to warm their little bodies under the warm spring sun.
Under the old last year's leaf lay several pupae, which in the autumn they wove for themselves from the thinnest threads caterpillars. It seemed that they were completely empty, there was no one inside them. But suddenly the shell of one chrysalis broke and through the gap formed, it was no longer a caterpillar, but a completely adult butterfly that got out. Spreading its wings, the butterfly took off and sat on a nearby bench, which was warm from the sun.
“What a warm shop,” the butterfly thought, and looked around with curiosity. - Where's the weed? Where are the flowers? I probably woke up very early. Some puddles still have ice. But the sun bakes great, and a brook murmurs nearby. And in general, today is a wonderful day!”
So reasoning, the butterfly flew off to get acquainted with the outside world, but at first she decided to put herself in order and first wash herself, drink clean water in the stream, whose murmur was heard not far from the bench on which she had just been sitting.
Crouching near the water, the butterfly immediately saw its reflection: a nondescript insect, which had completely white wings, was looking at it. And the world around was so colorful: ladybugs with bright red backs crawled along the branches, blue dragonflies hovered over the water, a green caterpillar hurried on important matters. The butterfly wept bitterly, lowering its wings low. She thought that no one would want to be friends with her, because she is so colorless and ugly.
The sun felt very sorry for her, it stroked the butterfly on the wing with a warm ray, and miraculously left a yellow spot on it. But the butterfly didn't even notice. Ladybug, in order to support her upset girlfriend, gently rubbed her sideways against her and left a bright red mark. A fat caterpillar, crawling past, patted the wing with each of its legs, leaving imprints in the form of green dots. But the butterfly wept so bitterly that she did not notice anything around. And only when a droplet fell on the butterfly’s wing from somewhere above, it involuntarily closed both wings from a cold touch. And when the wings opened again, everyone saw that all the multi-colored spots that were on one wing were imprinted on the other. Everything was enthusiastic gasped and applauded from the miracle that had happened. The butterfly stopped crying in surprise, washed its tear-stained eyes, and suddenly she saw her new reflection in the stream: a charming beauty with multi-colored wings was looking at her. And again the world in her eyes became amazing and beautiful.
Educator: Children, this is, of course, a fairy tale, and miracles always happen in fairy tales. In nature, a butterfly is born with a beautiful pattern on its wings. This bright color is given to them by the smallest scales, which have a bright coloring. If you take a butterfly in your hands, then multi-colored pollen will remain on your hands. An insect, losing pollen from its wings, can die from this. Therefore, you do not need to catch butterflies and take them in your hands, it is better to watch them. Butterflies not only decorate our fields and meadows, but also benefit nature: collecting nectar from flowers, they pollinate plants so that seeds appear in them later.
Physical culture break "Butterflies"
We'll jump so many times
How many butterflies do we have.
Let's raise our hands so much
How many wings do they have?
So many times we swear together
How many paws we see at once.
Children perform movements according to the text of the poem
2. Practical part
Educator: Today we will paint butterfly wings using multi-colored plasticine. It must be remembered that the pattern on the wings of a butterfly is symmetrical, that is, one wing is exactly reflected in the other wing, as in a mirror.
Therefore, when applying color spots on one wing at the same time, it is necessary to make the same spots on the other in the same color, size and location.
1. Choose the color of plasticine for the image of the outline of the butterfly, roll out thin sausages and lay out the finished silhouette with them, smooth the joints with your finger.
2. Butterfly Wings Decoration:
Option I: pinch off plasticine different color paired pieces of arbitrary shape, apply them inside the contour alternately on both wings. Place each color spot next to the previous one, smoothly “pouring” one color into another - slightly smearing one color of plasticine on the other at the border of their connection.
Option II: you can roll out certain shapes: sausages or balls, make a pattern out of them, repeating it on each wing.

3. Roll up the sausage-body from white (yellow) plasticine, roll out the ball-head and place them in the center of the wings, pressing them to the base for fixing. Roll out thin sausages from dark plasticine, cut into strips in a stack and make transverse strips with them all over the body of the butterfly (you can simply draw these strips in a stack), draw black eyes on the head - peas and antennae bent to the right and left.


During work, you should warm up your hands.
Warm-up for hands "Butterfly"
3. Final part
Educator: Our group has turned into a green meadow, over which colorful-winged beautiful butterflies flutter cheerfully, and there is not one of them the same. (Reads a poem by A. Savrasov.)
Municipal budgetary preschool educational institution
Kindergarten No. 9
Synopsis of joint activities on fine arts
"Insect World" in the preparatory group
Educator: Kolchirina Elena Mikhailovna
Kizel
Target: creation of a collage "The World of Insects" in various ways of visual activity.
Tasks:
Developing:
to develop the creative abilities of children, a sense of form, rhythm, color;
continue work on the development of fine motor skills of the hands;
develop curiosity, initiative in the choice of materials;
to form the ability to work in pairs, to establish partnerships in the process of joint activities;
develop mentalactivity.
Educational:
educate the need for friendly relations with other children (tolerance, help) through the organization of a paired form of organizing activities;
to cultivate readiness for mutual assistance in the process of communication with adults and peers;
evoke an emotional response to the beauty of nature;
to educate the basics of ecological culture by means of visual activity.
Educational:
improve the ability to create expressive images of insects different ways visual activity;
create conditions for consolidating children's knowledge about insects;
motivate children to create teamwork;
improve the ability to analyze, establish the simplest causal relationships, make generalizations;
to give an opportunity to put into practice the acquired knowledge about insects.
Preliminary work: conversations, viewing illustrations, reading fiction, didactic and outdoor games on the topic.
Material: col. paper, cardboard, fabric, brushes, paper and PVA glue, gouache, paper napkins, scissors.
Stroke:
The teacher introduces an insect in a jar into the group. Attracts the attention of children.
I went to work this morning and saw a bug, I decided to show you.
What other insects do you know?
When do insects appear?
Where do insects live?
What do insects eat?
What animals eat insects?
What would happen if all insects disappeared?
What would happen if other animals stopped eating insects and humans stopped destroying them?
How are all insects alike?
How are insects different?
Tell me, where can we find all the information about insects in our group?
The teacher invites the children to come to the cognitive corner and in the box “Do you know? find pictures of flying and crawling insects. Prepared in advance.
What are insects?
The game "Fly - do not fly"
The teacher invites the boys to find flying insects, the girls - crawling ones. Children divide the pictures into two groups.
Tell me, is it possible to leave the beetle in the bank so that it lives in our group?
Why do you think so?
Children's answers.
How can we imagine it?
What can we do about it?
Children's answers.
The teacher suggests that the children first make small clearings in pairs, and then combine them into a collage.
Children pair up with the help of split pictures (insects).
And what, besides insects, can be done in our clearings?
Children's answers.
Children using various materials make clearings, then glue them into a collage. Tell what insect they made (reflection).
Draw the missing details.
What a wonderful collage we've got.
The teacher suggests placing teamwork in the locker room.


