How to make a windows boot disk. How to burn a boot disk. I have no idea what to do
Create a bootable disk using UltraISO
First you need to download from the Internet and install the UltraISO program. The program is paid, but already hacked versions are posted on most Internet resources (for example, on the rutracker.org website). You can also download the Windows image there if you haven't already. In addition, you will need a blank CD or DVD disc, which you can buy at any computer store or market 🙂 The process is incredibly easy! Insert a blank disc into your computer drive, go to the folder with the already downloaded Windows image. Right-click on the image, hover over the inscription "UltraISO", move the mouse arrow to the right on the menu that appears and select "Burn to disk ...".
creating a bootable disk using UltraISO
You will see the "Burn Disc" window, there you just click the "Burn" button and wait. When the recording is complete, the drive will give you a finished boot disk.

Creating a Boot Disk with Nero
To create a bootable disk in this way, you must have any version of the popular Nero program installed on your computer. Also, as in the previous method, you must have a blank CD or DVD disc and a Windows image. Launch Nero Burning Rom (Start->Programs->Nero->Nero Burning Rom). You should have a New Project window. On the left, select the “DVD-ROM (boot)” option from the list, then on the right of the “image file” line, click the “browse” button and specify the path to the Windows image.

Click the "New" button, then in the window that appears at the top, select "Record". It is advisable to check the box next to the inscription "Finalize disc". Insert a blank disc into the drive, if you have not already done so, and click the "Burn" button.

Wait until your boot disk is written. Everything 😉 Article on installing Windows XP, and on installing Windows 7.
Sincerely, Alexander Molchanov
Its main purpose is to install or reinstall the Windows 7 operating system (OS). It can also help to reset a forgotten or lost administrator password. You can also use this media to enter the OS Preinstallation Environment (Windows PE), which is the minimum set of operating system functions used to prepare a computer for installing the OS, start its installation, and roll back to a previously created restore point.
What is required to get a boot disk
The first and most important condition is the presence of a so-called Windows 7 installation image file. This is a file containing all the necessary data for installing the OS. It has the filename extension .iso and is about 4 GB in size. It can be downloaded from various Internet sources, such as torrent trackers. Typically, such sources provide the so-called hashes (checksums) of the image, which, after downloading, must be checked to make sure the image is authentic and there are no download errors.
We will need a DVD disc (namely a DVD, not a CD, which is explained by the size of the file - the system image), and one of the programs for transferring (and not copying - the bootloader is also recorded on DVD) this image to DVD. This disc can be either for one-time recording (DVD-R) or rewritable (DVD-RW), and its recording speed of great importance does not have, since it is produced at the lowest speeds. The rest of the article discusses several different ways to accomplish the required task.
Ways to create a boot disk
Now let's go directly to the description of the creation methods installation disk using third party tools such as:
- UltraISO
- CDBurnerXP
- ImgBurn
- Windows 7 USB/DVD Download Tool
All of them are easily downloaded from the Internet and have a simple and intuitive interface that does not require any complicated actions from the user. In addition, the installation disk can be made using the tools built into the seven.
Burning a boot disk with UltraISO
After starting this program, its main menu is displayed, in which you must select the "File" element, and select "Open" in the submenu that opens.
A window opens for selecting the boot image of the seven, in which you need to point to the required iso file and click the "Open" button. Then this window closes and you return to the main menu of the utility. After that, click on the "Tools" item in the main menu and in the drop-down list click on "Burn CD image ...". 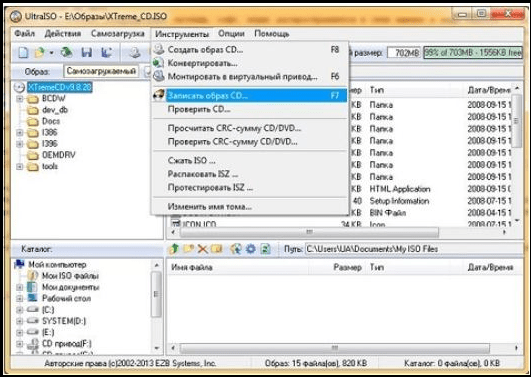
In response to this, a window appears with the recording parameters: 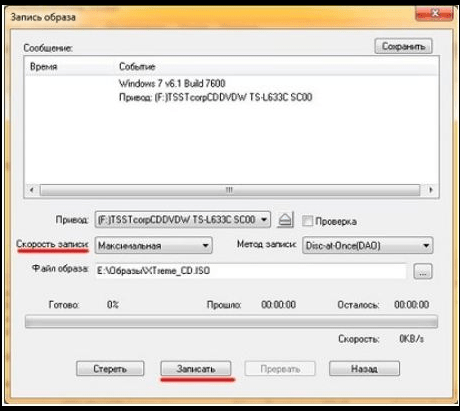
It needs to be set:
- The Drive option is a DVD device with the future boot disk installed.
- Write speed "Minimum".
- Recording method "Disc-at-Once".
After that, you need to click the "Record" button. The burning process starts, which usually takes a few minutes. At the end of it, the tray of the DVD device opens, which is a signal that the process is completed.
Creating a boot disk with ImgBurn
Before you run this utility, you need to install a blank DVD into the DVD device. In the Russified version of the program, its main window looks like this: 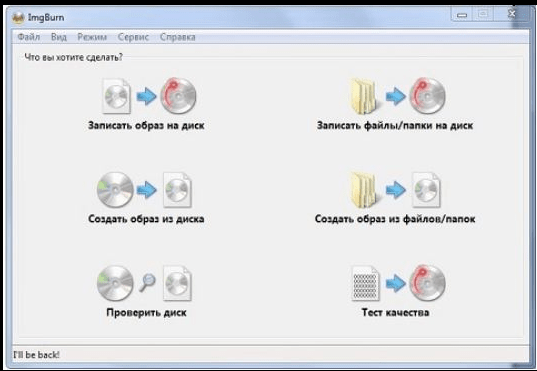 It is necessary in this window to click on the picture "Burn image to disk", after which a window appears for setting the parameters of the process of burning the image:
Here you need to set the following parameters:
- In the "Source" parameter, select (yellow button) the desired image file.
- In the "Destination" parameter, we set the DVD device.
- Set the "Verification" checkbox so that at the end of the recording process, the recorded image is compared with its original file.
- In the "Recording speed" parameter, set the lowest speed.
- We click on the picture with an arrow in the lower left part of the window to start the recording process.
The process of burning the image starts, which also takes several minutes. After burning, the program pulls out the tray of the DVD device, then pushes it back in and starts the process of checking the recorded image. Upon successful completion of the check, the utility plays a melody as a signal that the recording process is completed.
How to burn an installation disc using the CDBurnerXP utility
Despite the presence of "XP" in the name, starting from XP, this utility is functional in all versions of the OS. As for its interface, it is not much different from the ImgBurn interface. This is what the main CDBurnerXP window looks like: 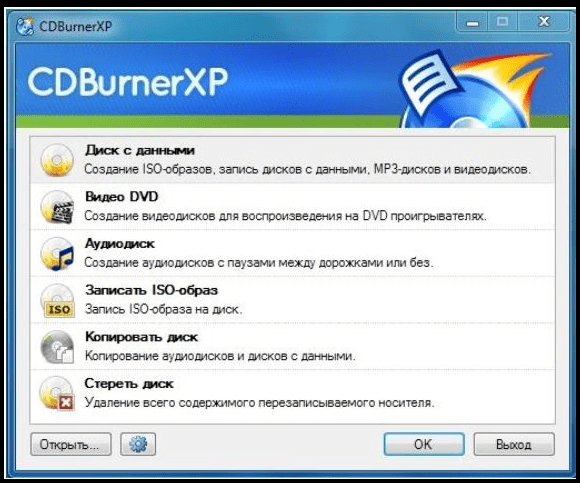
Of course, to make installation media, you should click "Burn ISO image" in this window, and then click the "OK" button. In response to this, a window is displayed for setting the recording parameters: 
What needs to be done now:
- Using the Browse button, specify the file with the iso-image of the seven.
- In the "Recorder" parameter, specify the DVD drive, and to the right of it - the minimum speed.
- Set the Write Method to Disc at Once.
- Check the box "Validate data after recording".
Other parameters are set by the user at his discretion. The process of burning the image begins by pressing the "Burn Disc" button. At its end, a check is made - comparison of the recorded image with its source in the file.
USB/DVD Download Tool
This utility was developed by Microsoft. It can be downloaded from the Internet and installed. The recording process in this utility is divided into several steps, each of which has its own window.
Step 1 of 4. In this window, you need to specify a file with an iso image. To do this, click the Browse button, select the desired file and click "Next". In some cases, the program does not like the specified files, about which the user receives a message. If he is sure that the image file is downloaded correctly and not distorted, then the only thing that can be done is to use another utility;
Step 2 of 4. This step selects the type of media that will be used as bootable. It can be a USB stick (for example, a flash drive) or a CD. To create an installation DVD, press the DVD button;
Step 3 of 4. At this step, the utility asks you to install a blank DVD. Do not try to install an already burned DWD-RW disc - you need to erase it beforehand. We insert a blank DVD-R or DVD-RW blank and press the "Try again" button. The utility will make sure that the disk is clean and display a "Begin burning" button. We press it, the next step begins;
Step 4 of 4. This is the process of burning the image itself. We are waiting for the message “Bootable DVD created successfully”, which means the completion of the process of creating the installation disk of the seven.
Capturing an image using built-in OS tools
It should be noted right away that this method, although it does not require the installation of third-party programs, is not reliable and sometimes requires repeated repetition due to errors that occur.
To make the installation disk native to the OS, follow these steps:
- Insert a blank DVD-R (or DVD-RW - whichever is better) into the drive.
- When using a DVD-RW, erase all data recorded on it. To do this, in the "Computer" window, right-click on the DVD drive and select "Erase this disc" from the list that appears. A message will appear stating that all information on the disk will be deleted. We click on "Next" and wait for the window with a message about the successful completion of erasing, then click "Finish".
- Double click the left button on the iso image. If no program is associated with this file, then a window opens with a choice of a program for recording. In it, select "Windows Disc Image Burner" and click "OK".
- The Disc Image Burner window will appear. In it, you need to set the parameter "Disc writer", check the box "Check disc after burning" and click the "Burn" button. The disc burning process will begin.
Sometimes all of the above actions have to be repeated due to errors that occur.
- The need to set the minimum write speed is explained by the fact that DVD discs do not always support the write speed declared by the manufacturer. It follows from this that errors can occur during recording, which can only be detected after the recording is completed - at the verification stage. If using a DVD-R, this will result in the CD having to be thrown away.
- The recording process must not be interrupted in any case - this usually leads to the same thing as described in paragraph 1.
In order to install Windows OS on a personal computer, you must have an installation disk or . Creating a DVD is much easier and faster, and it's much cheaper than USB sticks. This article details how to ISO onto a Windows 7 bootable DVD. Programs such as UltraIso and ImgBurn will be used for this.
What it is
When a user purchases a licensed version of Windows in a box, he receives a boot disk and an activation key. Using the DVD, the operating system itself is installed, and then it is activated by entering the key.
Those users who purchase the digital version only have an activation key at their disposal. They can download from the official website or from torrent trackers. But to use it, you need to know how to burn an ISO file to external media. For this, they are used special programs. Some of them, for example, UltraIso, are paid, others are distributed freely.
UltraIso Program
The most commonly used program for working with images and creating bootable USB flash drives and disks with Windows is the UltraIso utility. It allows you to work with ISO files directly, editing their contents without unzipping them first. Users can open any image in this program and work with it like a normal folder in Windows Explorer.
To download the UltraIso utility, you will need to go to the fan site http://ultraiso-club.ru/. Next, you need to click on the "Download UltraIso" button in the center of the screen. Enter the captcha and the download process will begin. 
Installing and activating the UltraIso application
Before burning the image, users need to install the program on their personal computer. The process is standard, just follow the instructions of the Windows installer:

Create a boot disk
The process of burning to DVD is very simple. Click on the button with the image of a burning disk on the program toolbar. In the window that opens, you need to select the drive, specify the path to the prepared image and click " Burn" or " Burn".
It is recommended to select not the highest recording speed. The slower the process is, the better the bootable media will be.

Program ImgBurn
An excellent alternative to the paid UltraIso is a simpler free utility -. Its functions are quite enough to create a high-quality bootable DVD. To download ImgBurn, go to the official website of the developer - http://www.imgburn.com/index.php?act=download . Choose any of the offered mirrors, download and install the application.
After successful installation, do the following:

An OS installer media is useful. You never know at what point the system will fail to work or you will need to urgently reinstall Windows to a friend, let alone a recovery disk that can bring a dying operating system back to life. Consider how to create and burn bootable (installation) media for different cases.
How to create a Windows 7 boot disk
To create a disk or flash drive to boot the system, you must have with you what you will need directly in the process of work:
- the media itself (disk or flash drive);
- utility for working with disk images;
- disk image or Windows 7 system files to create it.
Nothing else is required from the user. To begin with, let's get acquainted with the first, preliminary part of creating a boot disk - linking the ISO image for its subsequent recording on media.
Creating and Burning an ISO Disc Image
Creating a boot disk assumes that the user has an ISO image that will be written to the media. A disk image is a file that is a complete copy of the entire contents of a software disk and is widely used in creating boot disks and flash drives. If the image is not available, you can create it yourself without experiencing any problems: that's just for this ... you will need an existing installation disk with Windows 7 or the system installer files copied to a separate folder. If you have any of these, you can safely proceed to create an image for a new boot disk.
ISO is the most popular image format and is what most imaging and burning utilities work with. You can also create a recording file using standard OS tools, but there is no data on the quality of such recording on systems younger than Windows 7. That's why third party programs it is recommended to use in any case.
Ashampoo Burning Studio Free
It's a free, lightweight disk utility that's easy to use, has a clean interface, and is free of ads and built-in malware. In it, you can not only burn files to a disk or flash drive, but also create an image in two ways to choose from: from physical media (CD or DVD, which is previously inserted into the drive) and from a folder with files located on the computer.
Working with this utility is very simple: an ISO image is created in just a few clicks.
You can download Ashampoo Burning Studio Free on the official website.
CD Burner XP
This program is also free, very easy to use and is considered one of the best among utilities of its kind. It is adapted for older versions of Windows, but it also works with a bang in the new ones (unless you are confused by the antediluvian interface). Just like the previous one, the program can create disc images from CDs, DVDs and from user files, as well as burn them.

The utility is available for download on the manufacturer's website.
UltraISO
The most famous and widespread program that is commonly used to create and burn discs is UltraISO. A wide range of functions makes this program a universal tool for creating and burning images, so it is recommended to use it. We will return to this program when we move on to burning a disc, but for now we will consider creating an image in it.

UltraISO is not a free program, but on the official website you can download its trial version, which you can use for free for some time.
Video: creating an image in UltraISO
Creating an image manually
If you don’t want to mess around with programs (note that you still have to write to an installation flash drive), then Windows has good news for you: you can create a disk image through the console, using standard Windows tools. To do this, however, you still have to download utilities: this time, official Microsoft tools that work from the console.
However, there is nothing particularly difficult in this.
- First you need to put the files to be written to disk in a separate folder and save it to convenient location, for example, C:\Win7ISO. Why convenient? Because the shorter the path to the file, the easier it is to write it in the console.
- Then you need to download a set of utilities from the Microsoft website, which will be needed when creating the image. Utilities need to be unpacked and installed.
- After installing the utilities, you need to open the command prompt as an administrator (press the key combination Win + X and select "Command Prompt (Administrator)" in the menu that opens) and enter the following code in it:
oscdimg -n -m -b"C:\Win7ISO\boot\etfsboot.com" C:\Win7ISO C:\Win7ISO\Win7.iso
Dmitriy
remontka.pro
The console will start creating the ISO image, and you only need to wait for the build to complete. After that, the newly created image will be available at the path you specified.
Burning an image to a disk or flash drive
When the boot image is created, it remains to move on to the most important thing - writing it to disk. This can be done both using Windows tools and through special programs, some of which have already been discussed above. Programs are a simpler and more popular option, but we will look at both methods.
Burning an image to UltraISO
We will show the software recording method using UltraISO as an example, since this particular program is the most convenient and popular among users. However, you can use any other utility for this: general principle their work is similar.

Video: how to burn an image in UltraISO
Recording manually
This option is suitable for people who use new versions of Windows (7, 8, 8.1, 10): they are the best for burning discs. In the case of a flash drive, everything is a little more complicated: the instruction will only work for computers with UEFI. If you do not have UEFI, you will have to use programs.
If the system being installed is Windows 7 x32, then this method will also not work.
Let's start with burning a disc. Everything is extremely simple here: you just need to right-click on the image and select the "Burn disc image" option. Of course, you first need to check that the disk is inserted into the drive and there is enough space on it to write the image.
 To manually burn a disk image, just right-click on it and select the appropriate item.
 But with a flash drive, everything is a little different. To write it down, you need a command prompt opened as an administrator (see above for how to do this).
On the command line, enter the following commands in order:
- diskpart
- list disk
- select disk N (here N is the disk number under which your flash drive is displayed)
- clean
- create partition primary
- format fs=fat32 quick
- active
- assign
- list volume
Ready! The flash drive is formatted as bootable, then you need to copy files to it. It is done like this.

Create a multiboot disk
To create a multiboot disk (that is, a disk on which not one OS is installed, but several, and in addition more programs), you will need slightly different software.
The best choice for today is the free program Sardu, which in addition also provides a choice of many images that it downloads itself.
The interface of the program is quite complicated, so some explanations will not hurt.
 In the main menu of the Sardu program, you can select images and burn them either to a USB flash drive or to a disk
 - antiviruses;
- utilities;
- Linux distributions;
- different versions of the Windows system;
- other (allows you to upload your own images, but is only available in the paid Pro version).
On the right are the buttons with which the recording is carried out.

Create a system recovery installation disc
To create a system recovery disk (this is the one with which Windows 7 can be restored in case of a failure), you need the disk itself - and that's it.

Creating a recovery flash drive looks a little more complicated.
- In this case, you should create an image of the system (in the same window as the recovery disk, there is an item "Creating a system image".
- When the system collects and writes the image, you will need to write it to a USB flash drive using one of the methods discussed above. A little longer, but more convenient: a flash drive is more reliable than a disk. The only negative: the system image for recovery weighs quite a lot, so it is recommended to use a large flash drive or a removable hard drive.
Reliable media is a very important point in the matter of "healing" or installing any system. Burn properly and don't neglect recovery discs: you never know when you'll need to reinstall or roll back Windows. And specialized software will help you with this.
Most users can already install the operating system themselves. After all, you do not need to have a lot of knowledge, the main thing is the presence of a head and strict adherence to instructions. Usually installation is done from a disk, or using a bootable USB flash drive.
But today we learn about one more thing, original way install the operating system. If you think about it, then any removable media of a suitable volume can be suitable for these purposes. So why not try it out? Sometimes this can really come in handy when there is no optical drive, or a suitable flash drive.
There are many applications on the Internet that can make bootable hdd. But then it turned out that make HDD bootable using standard Windows tools without installing anything on your computer. Now we will see how this is done.
Hard drive preparation
The very first step in such cases is to make sure that there is no important information. Copy all its contents to another location and save it so that you do not regret the loss later. Customization hard drive We will conduct on the operating system Windows 8.1. But if you use older versions of this OS, then it's okay - the difference is not big and everything is done in much the same way. An interesting feature is that the boot hard drive can simultaneously have Windows and separate files for other needs. This is achieved by creating several partitions on it.
1. Connect an external drive to your PC and open Disk Management
All information on the hard drive will be lost!
Right-click on the Start menu and select Disk Management.
On older versions of Windows, you need to get into "Computer Management". To do this, open the "Control Panel", through the "Start" menu. Next, open the "Administration" section and expand "Computer Management". After that, you will need to expand the "Storage Devices" tab. On it, open "Disk Management".
2. Choose an external drive
4. Partition the disk
Now we do the opposite - we create sections. We will need to create one partition directly for the installation OS, and the second will be for other needs. We right-click on the unallocated field, for this disk and in the context menu that opens, click on Create a simple volume.
5. Create a new volume
A special wizard will immediately appear to create simple volumes. Set the volume for this volume to 4404 megabytes. Click next.
Do the same with the remaining partition on the disk. In this case, it will not need to be made active.
Burn Windows to external HDD
There is nothing complicated at all, everything is done simply. If you have a bootable DVD, then just open it with Explorer, then select all the files and folders that are on it and copy it to the active volume on the external hard drive.
If you have an ISO disk image with the distribution of the operating system, then you can open it with any archiver. After all, such an image is a kind of archive. On the "eight" it can even be opened with a conductor. After you open it, copy all files and folders to the external HDD in the same way. After such a tricky procedure, the USB HDD will work like a regular bootable USB flash drive. It remains only, after connecting the disk, to make the necessary settings in the BIOS. Go to BIOS settings. This is done differently on different computers, usually the Del key, or the F2 button (on laptops). In the options, open the boot section "Boot". Further in the priority boot parameters (Boot Priority order), we put the USB HDD first in the list. To save the settings, press F10 and the OK button. After that, the computer will restart and the download will be completed. Windows installation(or any other OS) from an external hard drive
If you can't make the section active
For unknown reasons, this topic is not found anywhere on the Internet. Even despite the fact that many users are faced with it. But it happens that no partitions on the disks want to become active, this button is simply not pressed. For those who have not yet fully understood the difference between active and inactive, I explain: the computer boots the operating system only from active partitions.
A section is made active using one of two main methods:
- Through disk management. This is the way we have already discussed above. But it doesn't always work. Sometimes you just can't make a volume active.
- Through the command line using diskpart. Here everything is done a little more complicated, but you can resort to this method when the first one did not work. Now we will study it in detail.
How to make a volume active using the command line?
Connect your external drive which is already partitioned. Through the Start menu, on the tab of all programs, open the folder with accessories and select Command Prompt. It needs to be run with administrator rights. If someone does not know, then you need to right-click and select the appropriate item in the context menu. Also using the keyboard shortcut WIN+X.
 After the terminal window appears, enter the following command: diskpart. Then press "Enter". The line DISKPART> should appear.
 Now you need to enter the command list disk and again confirm by pressing the "Enter" button. The window will display a table with all the hard drives that are currently connected to the computer.
 You need to select the one that is used as the boot. This is done with the command select disk 0. And "0" is the number for the disk we need. Since we partitioned disk number "1", the command, in our case, will look like this: select disk 1. Thus, disk number one will be selected.
 Now we will look for the partitions that are on this disk. We need to get a list of them. Therefore, we enter the command list partition and press the Enter button.
 And now, we will need to select the section that we will make active. Enter the following command: select partition 1. After that, press the Enter button. As with disks, one is the partition number. After that, a confirmation message will appear stating that the desired section has been selected.
 After the previous step, enter the following command active and press the "Enter" key. Then a message should appear saying that the current partition is marked as active.
 That's all, if you encounter any new problems, or you have any questions - be sure to unsubscribe in the comments.


