We collect dumbbells with the help of improvised means. How to make home gym equipment with your own hands How to make dumbbells from one and a half
Not everyone who wants to play sports has enough time to visit gym, and home workouts require certain equipment, the cost of which is quite high. The most popular are dumbbells. They are involved in almost all exercises. And if you do not plan to purchase sports equipment in the near future, you should not give up classes. You can make dumbbells with your own hands from fairly cheap materials. To do this, just read the instructions on how and what they are made of.
Ordinary plastic bottles allow you to make dumbbells with minimal cash costs in a short time, which you can use right away. The main thing is to fix the structural elements well so that it does not collapse during training.
To assemble one plastic projectile, you will need: 2 bottles, adhesive tape or insulating tape, filler.
Step by step instructions for making dumbbells from plastic bottles:
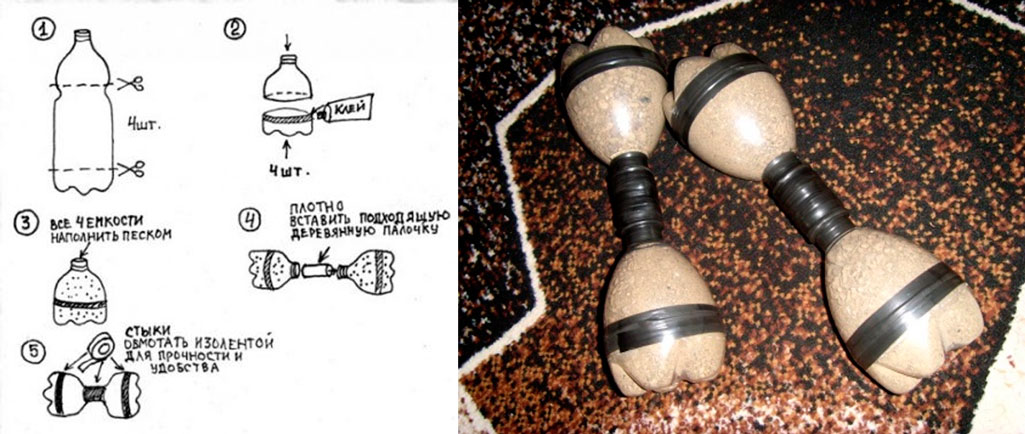
- Cut out the middle part of the bottles. Fasten the separated elements (upper and lower) with adhesive tape.
- The filler is poured into the container. If the projectile is made of low weight, cement with sand is used. Dumbbells with a larger mass require the addition of metal inclusions, which can be balls from bearings, nails, various metal. The choice depends entirely on the availability of a particular material.
- When the bottle necks are filled, a pipe or a stick made of metal or wood is inserted. Wrap the joint with electrical tape or tape. Thanks to this manipulation, you get a non-slip, soft and rather comfortable handle.
Before starting classes, you should carefully check all connections so that the filler does not “leak out”.

Ordinary plastic bottles are suitable not only for collecting dumbbells, but also barbells. This projectile weighs much more, and therefore the amount of source material increases.
To assemble the rod, you will need: at least 8 plastic bottles, a neck, filler material, electrical tape or adhesive tape.
Instructions for making a plastic rod:
- Bottles are filled in the same way as dumbbells.
- Choose the material for the neck. It is better to take fittings or a pipe that lie comfortably in your hand.
- Ready-made weights from filled plastic bottles are placed at each end of the neck and wrapped with adhesive tape. On each side, four weights are obtained.
- Check the quality of fastening. The neck should not move out or form a backlash. If the connection is weak, wind more electrical tape.
- To increase the weight of the rod allows laying additional weights in the form of bars between the loads from the bottles and so on.
- Each additional load must be wrapped with a new layer of electrical tape. You can increase the load up to 100 kg.
It is quite difficult to navigate the choice of material. The approximate weight of a dumbbell or barbell can be calculated based on the data presented:
Weight of a two-liter plastic bottle with various fillers:
- water - 1.997;
- compacted sand - 3.360;
- wet sand - 3,840;
- crushed stone (sandstone) - 2,600;
- lead - 22,800.
Weight is given in kilograms.
We collect shells from concrete

The cement base allows you to get heavier dumbbells and barbells than using plastic bottles. Pancakes are obtained not only more impressive weight, but also look much more solid. They pour from cement mortar in a special form, inside which there is a neck. The disadvantage of this design is that the load of the projectile cannot be adjusted or adjusted to fit anyone else.
To start working with a different weight, you will need to make a new barbell or dumbbells. The weighting agents, in fact, are obtained individually, and also quite fragile and “loose”. The last drawback is eliminated by introducing glue into the PVA solution. And if the classes are not conducted according to the principle of powerlifting, when the projectile is thrown to the floor, then it will last quite a long time.
For the manufacture of concrete dumbbells (barbells) you will need: metal pipe with the required length, bolts or screws, cement mortar, PVA, as well as a mold for casting the load.
Step-by-step instructions for making cement shells:
- At the ends of the pipe, holes are made in four directions with a drill. Screws are screwed into the holes made so that they are fixed as securely as possible at the ends and form a kind of cross shape. They become the framework that holds the cement.
- A pancake pan is made from a flat bucket of mayonnaise or paint. You can also use other containers. The main thing is that the weight should be chosen in such a way that is necessary for classes and is suitable for the complexion of the student. Glue is added to the solution for hardness or oil paint is introduced.
- A pipe is placed in the poured mixture and wait about four days until it completely sets. Repeat the manipulations described in the previous paragraphs for the second side. Make a support. The structure is tied up or suspended for another four days.
- When the cement is fully set, the projectile is soaked at least twice in water over the next week to gain even greater strength.
Shells filled in a two-liter mold can weigh about 5 kg. The exact weight is determined by the composition of the mixture involved.
To complete a farmer's walk, it is not necessary to make shells. It is enough to take two ordinary canisters and hang them on a stick. You can use tires filled with sand or any other filler. Other exercises with a similar design are difficult to perform. They require the use of full-fledged dumbbells.

When sports become regular, it becomes necessary to purchase more professional shells or make them from metal. They practically do not differ from the factory ones. The difference is that do-it-yourself dumbbells will cost much less. From one pipe, you can simultaneously make both a neck and pancakes. It is best to make stacked dumbbells out of metal.
To make shells, you need to prepare in advance: a thin-walled pipe with a diameter slightly larger than that of the neck, for which it is better to take a metal rod, locking locks and sheet steel. Work on the manufacture of dumbbells should be carried out in a locksmith's workshop.
Step-by-step instruction:
- From scrap metal with a diameter of about 3 cm, a neck is sawn off about 35-40 cm. To make the projectile comfortable to hold in your hands, about 15 cm are cut off from a thin-walled pipe. The resulting segment is put on a neck. Further, if desired, it can be covered with a relief or wrapped with electrical tape.
- Pancakes are cut out by autogenous from sheet steel. The weight of one disk with a diameter of 18 cm and a thickness of 1 cm is 2 kg. This makes it easy to calculate the required number of pancakes to get a mass of 10, 20, 30, 40 kg. The dimensions of the discs also make it quite easy to change the weight of the weights from small to maximum. Cutting a whole set of pancakes allows you to constantly work with different weights.
- The next step is making locks. The diameter of the pipe is taken larger than that of the neck. Rings with a width of 3 cm are cut off from the product. They should move freely along the neck, but not slip off. One hole is drilled in the rings with a diameter of at least 1-1.20 cm. They are necessary for screwing in the screws, which allows the rings to hold the pancakes and press against the neck. The main thing is to take care of the high-quality pressing of the screw so that there are no backlashes.
- At the last stage, they begin to assemble the dumbbell. Pancakes are hung on a neck with a pipe section in the middle and secured with locking locks.
Dumbbells made in the described way are not inferior in quality to factory ones, they allow you to work with both small and large weights.
General Tips and Tricks for Assembling Dumbbells at Home

The best without any doubt are metal shells, but they are much more difficult to manufacture than other designs. It is necessary not only to make discs, but to choose the right width of the pancakes, to make high-quality locks according to the calculations. It is recommended to increase not the width, but the diameter of the disks. You can make several heavy and several small pancakes.
To make the dumbbells look presentable, the parts are sanded and painted. This will only slightly complicate the creation process and increase the cost of shells, but they will look no worse than factory ones, and have a much lower price. Classes with such equipment will bring more pleasure, and, consequently, the motivation and effect of training will increase.
You should not waste time and effort on creating dumbbells weighing up to 100 kg. There are plenty of instructions for assembling such structures on the Internet, but it is better to immediately make a barbell with the expectation of 200-300 kilos in order to deadlift. Dumbbells are not suitable for such loads. And if you pull iron, then with a serious projectile, that is, a barbell.
If there is such an opportunity, you can buy a neck with a handle in the store, and either make pancakes yourself or order them in the workshop. The well-made handle contributes to comfortable exercises, and homemade pancakes significantly reduce the cost of the projectile.
Many people want to keep fit and play sports, but not everyone has the opportunity to visit professional fitness centers for a number of reasons. Do not be upset, because this problem can be easily solved. In one of our articles, we told, taking into account all technical nuances. But to start classes, you need to have at least a minimum set of sports equipment.
Modern sporting goods stores offer a wide variety of exercise equipment, but the prices for them are very “bite”. Therefore, many became interested in how to make equipment for a home gym with their own hands, without spending a lot of money. This is what will be discussed in this article.
Homemade punching bag for the home gym

A punching bag is one of the most necessary equipment that will help you develop the strength and technique of punching. Making it yourself is pretty easy:
- To do this, you need to take an old fire hose and rip one of the folds;
- You should get a canvas strip that needs to be washed and boiled so that the fabric is not too stiff and does not hurt your hands;

- We measure the desired length from the workpiece and sew a cylindrical bag with a diameter of up to half a meter. Inside we place another tight bag, well stuffed with sawdust, grain or plastic granules. It is not recommended to fill the product with sand, because it will be too hard at the bottom and soft at the top. This will create inconvenience;
- The finished projectile is best attached to the ceiling with a chain or rope. You can also fix the inventory on a bracket, crossbar or Swedish wall. When exercising outdoors, the bag is hung on a strong tree.

There is another option on how to make a punching bag at home with your own hands. It will turn out the so-called "pugnacious bag", which will help train the reaction and learn how to dodge the blow.
- Stuff a small piece of fire hose unnecessary things or rags and fix well on both sides;
- Hang the product on a tight elastic band or fasten the stretch on two bundles. On impact, the bag will spring back.
Also, such do-it-yourself sports equipment can be made from a tarpaulin from a car cover, but it will have to be sewn together in several layers so that it does not tear.
Homemade kettlebell for home gym

The simplest version of this inventory is a plastic canister with a comfortable handle. It can be filled with sand, gravel or small coins. You can cast the product yourself by making a metal case and lead "insides". But you should not create a projectile completely from lead, since the specified metal, in contact with the skin, can harm it.
There are a couple more simple ways how to make a kettlebell with your own hands:
- We put three strong bags into each other, fill in the filler, and give the product the desired shape with adhesive tape. How it will look, look at the photo below;

- We turn the tube of small diameter into a handle. In a ball with a dense shell (basketball is best), we make a cut, put large bolts and metal waste inside, pour concrete mixture. In it we fix the handle, connecting its ends to each other. Then we sew the incision tightly. The disadvantage of such a weight is that it will be difficult to calculate its exact weight.
Do-it-yourself dumbbells and barbell from plastic bottles
Dumbbells are one of the most common sports equipment that can be used in a variety of exercises. They can be easily made from improvised materials. The easiest option is to use plastic bottles.

Instructions on how to make dumbbells with your own hands:
- To assemble one pair of shells, you will need 4 bottles. Their middle part is cut out, and the top and bottom are fastened together with electrical tape;
- Filler is loaded into the resulting containers, for example, a mixture of cement and sand. To increase the weight, metal elements (bearings, nails, small scrap metal) must be placed in the filler;
- Next, the two parts of the bottles are interconnected by a tube or a strong wooden stick, which must be inserted into the necks;
- The joints and the resulting handle are wrapped with tape or tape.
Before starting a workout, double-check all joints so that the filling material does not "leak" out.

Plastic bottles can also be used to create a barbell. Since the design involves more weight than dumbbells, therefore, more material will be needed.
A simple diagram of how to make a barbell with your own hands:
- We take at least 8 whole plastic bottles and fill them with filler. The weight of each element should be the same so that during the exercises there is no skew to the sides;
- As a neck, we use an armature (wrapped with tape) or a pipe that fits comfortably in our hands;
- Ready weights are evenly placed at each end of the neck and tightly tightened with electrical tape. Each side should have 4 filled bottles. Be sure to check the tightness of the connection and do not regret the electrical tape if the neck moves out;
- To increase the weight of the projectile, additional weights can be placed on top of the bottles, for example, from wooden bars, also taping them with tape to the main cargo.
You can increase the weight on such a bar up to 100 kg. And to make it easier to calculate how much homemade inventory will weigh, use the following data:

Weight of a 2 liter plastic bottle (in kg):
- With water - 1.997;
- With crushed stone (sandstone) - 2,600;
- With compacted sand - 3.360;
- With wet sand - 3,840;
- With lead - 22,800.
Do-it-yourself barbell bench
Almost all sports equipment can be used as separate units without additional equipment. And to work with the barbell, a special bench for the bench press is required. To make it, you must have the skills to work with metal.
To create a metal base you will need:
- Drill;
- Bulgarian;
- Profile pipe with a section of 40x40 mm;
- Roulette;
- Vise;
- Steel strip (length 140 mm, width 40 mm);
- Welding machine.

We make a bench under the bar:
- We cut 2 pieces of pipe 830 mm long each. They will be used to support the bar, so they need to be as strong as possible. From the bottom of each product, 340 mm is measured and a mark is made with a simple pencil;
- We install two pipes at a distance of 520 mm from each other and at a height of 340 mm (this is how much you need to retreat from the weld to the base). The weld must be made taking into account the fact that it will be subjected to a load of more than 100 kg;
- The support element for the bench will have a length of 970 mm. It will combine the structure with the rear and front supports (it is placed on the back on top, and attached to the side by welding in front);
- On the reverse side, a 340 mm leg cuts;
- To evenly distribute the load on the floor plane, an extension of 220 mm is made under the front legs, and 300 mm under the back. The joints are well welded;
- From a steel strip in a vice, 2 supports are bent in the form of the letter “J” of the same length. Their rear protrusion should be high (7-8 cm), and the front, on the contrary, should be small.
Also, holes with a diameter of 1 cm should be provided in the design. They are used for the entry of rods and are located at a distance of 160 mm from the center of the beam that unites the front legs (see drawing).

- Roulette;
- Bulgarian;
- Door hinges;
- Sheet steel 2 mm;
- Welding machine;
- Reinforcing rod without ribs;
- Foam rubber;
- rubberized fabric;
- Cutting board.

Stages of work:
- We cut steel sheets 350x160 and 350x940 mm in size. We fix the first with a weld in the leg area with a protrusion outside the pipe of 1 cm;
- We fix the second one with a steel loop by welding it with one side to the pipe, and the other to the steel plate;
- On the reverse side, 100 mm recedes and two ribless fittings 300 mm long are fixed. This will allow you to set the backrest at an angle;
- At the final stage, we lay a chipboard or edged board on top so that it protrudes half a centimeter in each side. Only at the junction of two plates, on the contrary, it is necessary to cut 1 cm each.
All joints of metal and wood are carefully fixed with self-tapping screws so as not to break through wooden surface. From above, the structure is wrapped with foam rubber and wrapped with a rubberized fabric with maximum density.
Do-it-yourself press roller

The ab roller is the simplest effective projectile that many people use. It's pretty easy to make.
Effective exercises with a press roller for beginners, men and women - .
The main part for such a device is a wheel with a diameter of about 10-20 cm. This spare part from a stroller, a children's bicycle or a large toy is quite suitable. Second required part- a metal tube (you can also use plastic pipe or a piece of wood.) The length of this element is at least 30 cm, and the diameter is at least 3 cm (it should be as close as possible to the hole).

The easiest assembly method is when the tube is threaded into the hole in the wheel and secured on both sides with electrical tape. You can come up with other fasteners, for example, by putting on a plastic bottle cap on each side.
There is another option, how to make a do-it-yourself press simulator. In this case, the design will be more reliable. To do this, we take a metal rod with a threaded thread, thread it through the hole in the wheel and fix it with nuts. For convenience, we put on it two pieces of an irrigation hose on each side.

As you can see, you can make home exercise equipment yourself, and it is not at all necessary to buy expensive equipment that many stores offer. You just need to stock up necessary materials, spend a little time and effort, then you can fully equip your sports corner for comfortable and effective workouts.
Video: Homemade bar from plastic bottles
Probably everyone thought about how to look good ... But beautiful clothes are not everything! Today I want to tell you how you can make simple dumbbells at home that will help you look good without these most beautiful clothes (well, for example, in the summer on the beach) ...
So, let's begin...
For dumbbells we need:
- 2 plastic bottles denomination 2 l.;
- water;
- scissors or hacksaw;
- pipe or fittings;
- scotch;
- sand

First we have to prepare the bottles: for this we need to cut them as shown in the photo...

After that, we connect the two parts of the bottle with adhesive tape as shown in the photo ... We carry out the same operation with the second bottle ...


Now we have all the main parts for our dumbbell: namely, fastened bottles and a pipe ... The only thing left is to fill our "bottles" with sand and pour water into them (so that the weight is greater)...

By the way, if the pipe does not fit in the neck of the "bottle", you can cut off the part in the "bottle" where the cap is located, as shown in the photo...

after the "bottles" are filled with sand and this sand is moistened with water, you insert a pipe or fittings into the "bottles" and fix it ...

That's all!!! Our dumbbell is ready, now you can use it... Well, this is a rather primitive dumbbell, next time I will tell you how you can make a quality dumbbell using cement...
Do-it-yourself dumbbells from plastic bottles are easy to make!
You can not buy expensive exercise equipment and dumbbells, but make them yourself from plastic bottles. This will require quite a bit. Raw material can be found in almost every home, and the work is not very difficult, which everyone can handle. The main thing, as always, is desire.
So, to make dumbbells from plastic bottles with your own hands, you will need some material. First of all, you need plastic bottles. It will depend on the size of the finished dumbbells from plastic bottles. But usually choose two-liter bottles.
In addition to the bottles, which will be the basis for creating dumbbells with your own hands, you will also need to prepare clean river or construction sand, which will be used as a filler for bottle dumbbells.

To connect the structural elements of dumbbells, you will also need a good cork that fits tightly into the neck of the selected plastic bottles. The tighter the cork is, the better. By the way, it can be replaced with any other suitable material, for example, with a wooden stick of a suitable diameter and size.
In addition, to create dumbbells from plastic bottles with your own hands, you need to prepare an insulating tape, good glue and scissors. Instead of scissors, you can also use a well-sharpened, sharp knife.
How to make DIY dumbbells from plastic bottles
Plastic bottles are prepared properly. They need to be washed well, peeled off labels and stickers, and then dried thoroughly. After that, they begin to create blanks.

Plastic bottle dumbbells are made from mini bottles that are made from large bottles. To do this, you need to cut off the top of the selected plastic bottle and its bottom. The height of the cut bottle from the top should be approximately ten or fifteen centimeters, including the neck of the plastic bottle.
The lower part is cut off so that there is a margin for gluing.
After that, both blanks are combined with each other and planted on high-quality and sufficiently strong glue. To give homemade dumbbells from plastic bottles an additional margin of safety, the connection is tightly wrapped with several layers of electrical tape.

As a result of all these manipulations, you should get a kind of mini plastic bottle, which is part of the future dumbbell. But to create dumbbells, you need to make two such bottles, so the same thing is repeated with another plastic bottle prepared in advance.
After the blanks are ready, clean river or building sand is poured into them, which gives weight to the dumbbells. Then both "mini-bottles" are connected with a tight cork. The connection is also tightly wrapped with electrical tape to give homemade dumbbells from plastic bottles more strength.

Everything - dumbbells from plastic bottles are ready and you can proceed directly to the exercises.


