How to make a panel saw from improvised means with your own hands. Do-it-yourself panel saw: drawings Homemade vertical chipboard cutting machine
The panel saw is the main type of equipment that is used in the manufacture of furniture.
Machines carry out cutting of chipboard, chipboard, MDF and fiberboard. Their main property is the accuracy of cutting, on which the quality of finished furniture and the creation of a beveled edge depend.
1 The principle of operation of the equipment
Woodworking equipment:
- cutting machine;
- edge cutter;
- device for laminating chipboard;
- drilling machine.
The design of the machine is responsible for its functionality - how sawing process will be carried out efficiently. Main components:
- Bed. This is the basis on which all mechanisms are fixed. The more stable the base, the more accurate the cut will be. Heavy beds exclude any vibrations and fluctuations - this is the key to an accurate cut.
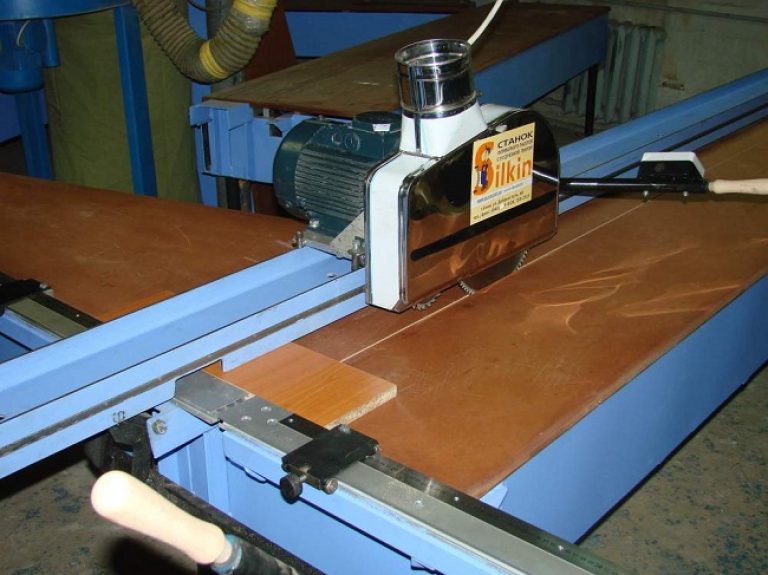
- Saw knot (consists of two disks). A small diameter scoring disc is located in front of the assembly and pre-cuts the workpiece. The second disc is designed for complete sawing of the material.
- Work tables. The node is located on the first fixed table. The second format table is movable and feeds the material onto the disk. The third table supports the cutting parts and acts as an additional support for the part.
- Carriage. This is the machine mechanism that allows the format table to move. It would be better to use an aluminum carriage. Its light weight will allow you to move the table without any extra effort.
- Stops and rulers. The elements are located on the tables and place the chipboard blank in the required position.
The principle of operation of the machine: for sawing chipboard, the workpiece is installed on the left fixed table to the adjustable stop and the required length is measured. Then the saw unit is put into operation. When the disk has reached the required speed, the table is moved forward. Thus, the workpiece is fed to the disk, where the desired piece is sawn off.
Basic machine settings:
- workpiece position;
- cut depth;
- cutting angle.
1.1 Varieties and features of machines
Three groups of equipment:
- Lung. Simple in design and affordable machine. It lacks some additional options (special clamps, additional stops, etc.), and has small size. The device is designed for a load of up to 5 hours. Suitable for small batch production.
- Average. Standard device, designed for operation 8-10 hours. It has all the necessary elements (tables, additional supports, rulers and stops). Designed for use in production.
- Heavy. An industrial model that Equipped with new technologies and has the most durable design. Can be used for 16-20 hours. This is a great option for large businesses.
Additional options:
- a branch pipe that removes chips and sawdust and connects a dust removal system;
- clamps for secure placement of chipboard on the table;
- swivel ruler and corner stops are responsible for cutting under required angle and without markup;
- frame with stubborn foot for processing long workpieces;
- ball and roller carriages.
An edging machine is used to make curly parts and grooves.

Edge milling cutter (trimmer) is used:
- for chamfering;
- for rounding or creating a complex edge profile;
- for forming grooves along the edge;
- for fitting veneer;
- to create a drawing.
Edge router can be taken for less functional option vertical cutter. But trimmer has its advantages.
Edging, it is also a edging milling cutter has a small power (450-720W). Compactness and small weight allow to maneuver the tool without special efforts.
For laminating chipboard, a special drying machine is used.
During production, it is important to evenly distribute the load in order to increase the wear resistance of the finished board.
Paper is made in impregnating machines. In these devices, the lamination process takes place. The finished paper is treated with resin and obtained decorative film, which under the influence of the press becomes plastic-like and is suitable for do-it-yourself lamination.
During lamination, the prepared plate is tightly connected to the paper.

Drilling machines are used to create holes.
Types of machines:
- horizontal drilling;
- vertical drilling;
- single spindle;
- multi-spindle.
Drilling and grooving machine. Equipped with a spindle with a chuck, where a drill with a carriage is inserted. The handle allows you to move the spindle along the axis of the drill, and the carriage moves in the transverse direction. With this machine slots can be drilled. This is possible due to the fact that the slot drill has side edges.
To drill a hole, the workpiece is fixed on the table with a clamp. After fixing, the drill with the spindle is pushed onto the chipboard.
A wood drill (from 10 mm) for a drill should have a hex shank to avoid turning. The thinner the drill, the shorter it will be, otherwise even a slight pressure can break it. A 10 mm drill can be up to 45 cm long, while a 12 mm drill will already be 60 cm.
The Forstner drill is especially popular in furniture making. It allows you to drill blind holes with flat, even and smooth bottoms.
2 Panel saws for chipboard processing: an overview of models
Italian company ITALMAC (Omnia-3200BR). Each saw comes with a one year warranty. Middle class model can work 8-10 hours. Great for furniture production. The presence of additional tables and saw speed adjustment made this machine versatile. Suitable for sawing different sizes Chipboard.
Bulgarian company Brassa. The cutting devices are suitable for operation throughout the whole work shift.
Brassa S315 - designed for large workpieces. Perfect option for cutting parquet, Chipboard, MDF. The machine is equipped with an additional metal support, which allows processing large and heavy workpieces.
American company HighPoint. All devices have additional options and fixtures.

HighPoint STS3200. The representative of the "business class", is intended for a full shift. The device allows you to adjust the rotation speed saw blade. Thanks to this function, materials of different hardness can be processed. A guarantee is given for the carriage (3 years) and for the saw unit (2 years).
Czech company PROMA. Product warranty 3 years. Thorough check of equipment and operability of machines.
PROMA PKS-315F. Equipped with durable guides, which are made of chrome steel. There is a degree scale on the corner stop, which allows cutting without preliminary marking.
2.1 Panel saw JET - JTSS-3200 (video)
2.2 Do-it-yourself sawing machine
The main working component is the cut block. It consists of two saw blades, an electric motor and a socket (connection to a chip vacuum cleaner). Do-it-yourself equipment for machines involves the use of a factory block model (home-made equipment may have problems in operation).
Components for a do-it-yourself panel saw:
- bed - tubular structure with adjusting knives;
- Desktop should have a perfectly flat surface, without defects;
- clamps;
- carriage (in the manufacture, an I-beam or two round pipes are used);
- protective covers.
Required tools:
- welding machine;
- Bulgarian;
- electric drill;
- measuring device.
First you need to make a frame (we use pipes with a square or round section).

We cut them according to the scheme and attach them to each other with a clamp. Then we start welding. To make the structure more rigid, you can install profiles between the legs of the bed.
Do-it-yourself machine manufacturing steps:
- Movable carriage. Install guides. You can use a beam or two pipes with a circular cross section. Carriage design must be equipped with rollers for smooth movement.
- Desktop. At the base is a 3 mm steel sheet. We make a working surface from a chipboard sheet.
- Clamps are lever mechanisms with a relatively large area.
At the end of the assembly, we connect the cutting block to the chip blower.
The panel saw is used for the manufacture of all cabinet furniture and, most importantly, you can make it yourself at home.
With the help of this type of machine, veneer, wood, sawdust and plastic boards and panels are processed. It is very expensive, but for the work of a beginner workshop, you can make a home-made analogue from improvised materials.
Structurally, the machine has the following elements:
- bed;
- movable and fixed parts of the desktop;
- additional table with an installed trolley (carriage, ruler);
- saw knot.
Making a homemade panel saw
1) The main support frame is formed on which the canvas will lie. You can make it yourself from metal corners or a profile, or take a ready-made one, for example, from an old sawmill or other installation.
A blade with a cut for the sawing discs is laid on the finished frame. The surface of the canvas must be flat and smooth to ensure normal sliding of chipboard sheets.
2) Then we make a carriage from sheets of durable chipboard or similar material. It will allow you to securely fix two saws and freely move them along the guides. Between themselves, the sheets are connected at four corners by means of a conical shaft at such a distance that the shaft moves clearly along the guides.

At the top of the carriage, a sawmill starter is mounted. Under the carriage, the first and second saw with a frontal arrangement of discs are firmly fixed. Disks should be covered with a special screen. The best option will become transparent material.
3) For the manufacture of guides, two large diameter pipes are required. They are connected to each other by means of a metal strip. The surface must be smooth without defects.
There is a stop on the edge of the rack. In height, the stop should easily withstand the leaning sheet or part. A metal ruler is placed next to the stop, the zero of which should be located at the saw cut of the canvas. It will allow you to calculate the size on the spot.
4) A clamping mechanism is placed perpendicular to the stop. The pre-clamping mechanism is made of metal profile. Fastened with bolts.
5) A flexible corrugation is attached to the top of the screen of the movable carriage, and its other end, together with the drive, is attached to the wall at the ventilation hatch. An automatic starter is mounted on the wall under the hood.

The machine is ready for start-up and cutting operations. Before turning on the saw, be sure to turn on the hood to keep the room clean.
Video: homemade panel saw
So, I collected a sufficient amount of material and decided to dash off another analytical note. This time the theme is sawing chipboard without chips.
There is a fairly fair opinion that it is possible to cleanly cut chipboard only on professional equipment (that is, a panel saw).
The whole highlight of this machine is that it has two saw blades located strictly on the same axis. The first cuts the chipboard, the second cuts it through.
The cost of this unit is about 700,000 - 1,000,000 rubles (of course, there are more expensive))). NOT VERY ACCEPTABLE FOR THE AMATEUR.
Not a bad way to trim incorrectly marked parts, but you can’t cut the whole cabinet in this way. Chips, of course, are present, but in an amount that is quite comparable with the formatter (it also, in secret, leaves a small number of small chips). A lot of hassle with markup. Only straight cuts can be made.
Method 5 - Fraser
Provides the cleanest edge of the workpiece; the quality is no different from the formatter, often even better.
With it, we first saw the workpiece with a jigsaw, departing from the marking line 2-3 mm, and then we align the line according to the template (I usually use the second piece of chipboard, sawn on a formatter, right size). should be copy, that is, with a bearing.
Very clean cut. The possibility of carrying out curvilinear cuts, that is, the manufacture of many, including several completely identical ones. Cons - a lot of trouble: the need for accurate marking, preliminary sawing of blanks, setting a template or tire under the router, that is, not very suitable for mass use.
In this material, we will touch upon such a topical issue for garage masters dealing with chipboard furniture as cutting chipboard without chips. In fact, the issue is quite topical, because professional equipment (panel saw) on which cutting is carried out in furniture workshops, costs about a million rubles, which not everyone can afford, and the area for its placement should be slightly larger than the standard 18 square meters. meters. A feature of such machines is the presence of two saw blades (the first is a small scoring and the second main, following exactly behind it). What can replace such a machine in an amateur workshop?
The most optimal, in my opinion, replacement is submersible a circular saw complete with guide bar. That's what we're talking about today.
Personally, I use the Elitech plunge-cut saw - this is a domestic budget model, which, despite its simplicity, allows you to achieve good results.
Professional models (e.g. Festool saws cut even better, but also cost 5 times more).
So, how is a plunge-cut circular saw different from a regular one? Firstly, with its spring-loaded working part with a depth limiter. Due to this, it is very easy to set and change the depth of cut, in addition, the “head” returns to its original position on its own in the absence of operator pressure. Secondly, these are the obligatory grooves on the sole for integration with the guide rail. Thirdly, a rigid structure that excludes backlash (the cut passes strictly in one place).
The tire itself is equipped with an anti-splinter tape (as a rule, this is a tape made of hard rubber - the black stripe on the right)

The tape presses the laminate, preventing pieces of it from coming off at the points where the teeth of the saw blade come out. Also, the tire has grooves for fixing on workpieces with clamps and tapes for easier sliding (red stripes).

By the way, the Festool saw is equipped with anti-splinter inserts on the side opposite to the bar, which makes the cut clean on both sides of the blade.
The tire itself is rigidly attached to the workpiece and does not move. Fixation is carried out with special clamps (their shape is somewhat different from the standard F-shaped ones. The price, by the way, is also).

All these features allow you to cut in "two passes". The first - not deep cuts off the top layer of the laminate. The second - through cuts to the full depth. At the same time, there is no longer any material at the point where the tooth exits the workpiece, therefore there is nothing to pull out, respectively, chips are not formed. All this is in theory. Let's see how this all works in practice.
The markup is quite traditional. Using a tape measure, mark the start and end points of the cut (you can use a carpenter's square).

We draw a marking line, connecting these risks.
We set the guide rail along the line so that the edge of the anti-splinter tape is aligned with the markings.

Please note that the tire lies on the part that should remain (there will be no chips on it - the tape on the tire will help). On a free-hanging piece, they are possible due to the lack of an insert on the saw itself.

You can, of course, saw by laying a sheet of chipboard on a workbench, but this damages the surface of the workbench and you need to use interchangeable countertops (I don’t do this, although with large pieces this may be the only true method).

The tire is mounted on the workpiece with a pair of F-shaped clamps, wound into special grooves on the tire.

We take a saw in our hands and set 11-12 mm on the depth regulator, which corresponds to 5-6 mm of cutting depth (the tire itself “eats” about 5 mm).

We put the saw on the tire, combining the grooves on the sole with the protrusions on the tire.

We carry out the first shallow cut. The photo shows that there are a small number of chips on the part of the workpiece not covered by the tape.

And another photo from a different angle.

And close up

We change the depth by 35-40 mm and make a second through cut without changing the position of the tire.

Having removed the tire, we see a fairly neat cut that does not require additional processing.

Separately photographed the detail after removing the tire from above

And from the bottom side.

By the way, the cut from below is traditionally more “clean”, because in this place the teeth of the disk only cut into the material, they tear it out at the exit.
Let me also note one more important fact. Work with sharp discs. The disk used in this lesson is already pretty tired and needs editing. I think that with a zero disk, there would be no chips at all.
In addition to the sharpness of the teeth, the quality of the cut is also strongly affected by the material being cut. There are more caustic finishes and more durable finishes. In this example, 16 mm Lamarty chipboards were used - one of the best domestic boards. Chipboard Egger or Kronospan are much more prone to chipping, and I would most likely not have achieved such a result with this disc.
All these moments come with experience, it's up to you to get a divorce for the purchase of this device.
In principle, it is possible to cut in “two passes” with ordinary circular saws with homemade guide rails, the main thing is that the sole does not hang out, but doing this is less convenient than with plunge-cut saws, primarily because of the inconvenience of changing the sawing depth.
In the production of cabinet furniture, it will not be possible to do without a machine for cutting material. Furniture structures such as a kitchen wall, computer tables and even beds, will require details with high precision in dimensions. Make no mistake that you can start making furniture using only a circular saw for cutting. You will have to resort to making a panel saw with your own hands.
The fact is that a circular saw can cut at a low speed, while the quality of the finished part depends entirely on the master. Thus, the production of furniture will be not only slow, but also, possibly, unprofitable, because the possibility of manufacturing defective products is great.
Vertical sizing mechanism for board material, allows you to remove the responsibility from the master and make precise linear movements during cutting.
Furniture blanks are accurate, and the speed of their production reaches 15 parts per minute.
Sawing machine manufacturing
Such a machine has a lot of advantages, however, there is also a minus - the high cost of high-precision equipment. Not all novice manufacturers have the opportunity to purchase such a mechanism, so many decide to make a panel saw with their own hands.
FRS design
To manufacture a machine that will meet the requirements for quality and production speed, you need to be prepared for the cost of materials and be able to use drawings, because the unit consists of complex mechanisms and three-dimensional structures.
Required items:
- Bed - must be made in accordance with the dimensions of the material being processed, for chipboard - it is 3.5x2.5 m. As practice shows, more is not required, of course, if production has not reached the factory scale. Also, this design, like the whole, must have a low level of vibration. To do this, the bed is made of welded joints and mounted on rubber heels that absorb vibration;
- Tabletop - for a home-made panel saw, suitable from laminated chipboard or metal sheet. The main thing is that the surface is perfectly smooth, otherwise defects may appear on the processed material, in the form of scratches and chips. Also, there should be no depressions or bulges on the surface of the tabletop, this will lead to inaccurate product dimensions;
- Moving carriage - can be made in 3 versions, depending on the choice of machine functionality. However, its main quality is the smooth linear movement of the saw or sawn material;
- Engine - best used without transmission devices (belts, gears). As a driving force for the saw, you can use high-speed electric motors and even motors from angle grinders;
- Dust collector system - necessarily contains a sleeve for removing chips and dust, a waste container and a pump. This system turns out to be extremely important for long-term operation;
- – do not allow sheets to move during cutting. Important characteristics of the clamps are the holding strength and the absence of marks after use. To do this, the clamps are equipped with rubber substrates and the necessary pressure on the part is selected.
How to make a table saw
How to prevent chipping on chipboard
material such as laminated chipboard, It has harmful property, leave chips on the ends after cutting. To avoid such a nuisance, only an increase in the speed of rotation of the saw or a slow feed of the saw to the material allows. However, not all so simple. Chipboard sheets consist of pressed sawdust and a laminating layer. The laminating layer is a thin but very durable material, and the pressed sawdust is a thick and soft layer.
Using a powerful motor, the soft sawdust is cut like butter, causing the hard laminate to simply chip off. The solution is to use 2 saws at different speeds or to cut slowly.
Everything is clear with the speed of feeding the saw to the material, but with the use of two saws it is worth understanding. It is worth noting that here you will need drawings for panel saws. To achieve the desired result, the blade for sawing the laminate is placed so that it cuts no more than 2 mm, and the rotation speed is achieved by reducing the blade or a more powerful motor.

Detail for cutting
For sawing the main layer, a large disc with a cut depth of up to 40 mm is used. It is worth noting that this version of the sawing mechanism allows you to achieve a cut speed of 1 m in 10 seconds.
Options for using the mechanism for cutting
There are 3 options, thanks to which the vertical panel saw cuts materials:
- feeding the saw to the material - the saws are located under the table;
- feeding the saw to the material - the saws are located above the table;
- feeding material to the saw - the saws are located under the table.
In the case of feeding the saw to the material, which is located above the table, the motor and cutting discs are fixed on the carriage. The carriage is mounted on skids placed at the desired height, which allow the entire structure to be held and moved for cutting along the plane of the table. Skids or guides can be made of or powerful pipes.
The location of the saw under the table, which is fed to the material, also implies the presence of guides and a carriage moving along them. The difference of this arrangement lies in the fact that the dust collector system is hidden under the table and does not interfere with the movement of large objects.
When sawing is carried out while feeding material to the saw, a powerful mechanism is required to move the sheets. In this case, the carriage for moving is a table with legs on rollers. It should be noted that the design of such a sawing mechanism requires more space and has a lower throughput.
Clamps
The simplest clamping mechanisms can be taken as the basis, however, in this case, the time to complete the work increases. Ideally, for a sawing machine, make a clamping device in the area of the saw passage. Enough simple device, there will be a pipe laid above the table, along the cut line, on which the clamps will be placed.
Video: Panel saw


