"Finnish candle" - a safe long-lasting fire: how to light it and how to cook on it. Bonfire Finnish candle, options for its manufacture and methods of breeding How to make a fire from a log
The original mini-fire is also called taiga, Indian, Swedish candle. Thanks to the peculiarities of making Finnish candles and the use of intense flame, they successfully replace traditional bonfires on hikes, picnics and evening gatherings in the courtyard. You need a minimum of tools and skills, 5-20 minutes of simple efforts, and you will get a vertical flame source with a burning time from half an hour to 7 hours.
4 ways to make a Finnish candle
With any method, a Finnish candle is made by hand from lump, sometimes replace the block logs... It is allowed to use small stumpsif only one piece of log is required. The burning time depends on the length and diameter of the workpieces.
Method 1. Candle with paraffin wick
- Burning time: from 30 minutes.
- Crafting time: 20 minutes.
Tools and materials:
- drill with a drill 20-30 mm;
- saw (hand, electric or diesel);
- sawing goats;
- lighter;
- block for a candle;
- a block of larger diameter for counterweight;
- paraffin or wax;
- paper or newspaper.

To get a vertical fire, it is enough to light the wick. We recommend placing Finnish candles away from trees on paved or concrete areas, cleared ground, fire-resistant tiles, metal stand to prevent the surrounding vegetation from catching fire.
Method 2. A candle made of logs
- Burning time: up to 2.5 hours.
- Crafting time: 7-10 minutes.
Tools and materials:
- ax;
- block or four logs.

Manufacturing sequence
The whole chock is split into four equal parts. The logs are set vertically in the form of the original chock. When a Finnish candle is made from ready-made firewood, logs of the same length and section are selected, which together form a solid block. The design provides good air flow, but is not sufficiently wind resistant.
Method 3. Three blocks
- Burning time: from 7 hours.
- Crafting time: 5 minutes.
Necessary materials: 3 chunks of the same height. No tools required.

Manufacturing sequence
Simplest a way to make a Finnish candle with your own hands with a long burning. The blocks are installed in a circle with a small gap between them. Then a fire is made in the inner "well". Unimpeded access of oxygen contributes to an intense flame, and thanks to the large diameter, the burning time is lengthened.
More heat is generated than with other designs of taiga candles. It also provides the greatest stability of the disposable oven. Disadvantage (the flame can be blown out by the wind. Tip: as it burns out, move the chocks towards the center to maintain the intensity of combustion.
Method 4. Primus
- Burning time: up to 3 hours.
- Crafting time: 20 minutes.
Tools and materials:
- ax;
- saw (optional);
- wire;
- a chock or a few logs.
Manufacturing sequence

This design provides intense hot flame... In the first two hours after lighting on a mini-oven, you can cook, boil water. The optimal size is considered when the length of the chock is twice the diameter. You can create mini bonfires with a height of 20-30 cm.

Tip: If you plan to cook, make a Finnish candle with two shorter sticks to improve air flow to the flame.
The design represents a vertical oven pyrolysis combustion... A feature of this type of flame is the simultaneous combustion of both firewood and the released wood gas. As a result, less soot and ash is formed, and the heat transfer of the flame is higher. Even a two-hour use of a Finnish candle helps to solve many problems of arrangement and recreation.
Culinary uses of the Finnish candle
In the absence of summer kitchen and on hikes, disposable ovens are easy to adapt for the following tasks:
- cooking in cauldrons;
- singing of carcasses of poultry, game;
- boiling water;
- warming up food.
Unlike a stationary summer kitchen, a Finnish candle can be used anywhere on the site, taken with you on a picnic or on a trip.

Landscape decoration
Mini bonfires are useful for temporarily lighting up dark areas without landscape lights. They create a warm welcoming atmosphere and can complement the decoration of outdoor seating areas for special occasions. Finally, candles will replace outdoor hearths and fireplaces, and help you relax by the fire during an evening rest.
Repair and construction use
Concentrated burning led to the advantage of using a Finnish candle compared to conventional fires for the following work:
- roasting, heating of metal;
- melting roofing material or lumpy bitumen;
- firing and drying of various surfaces and workpieces.
Easy-to-manufacture disposable ovens are compact, simple device, intense burning and easy transportation. This enhances the appeal of Finnish candles for home or tourist use.
Video instructions for making a Finnish candle
Reading time ≈ 3 minutes
The Finnish candle is a kind of mini-fire made from a small stump or cutting a log. It is used for cooking in a boiler, water heating. It can be a good substitute for an ordinary fire when holding evening gatherings in nature. A Finnish candle is made by hand in just 20 minutes, the burning time is about half an hour.
Features of the manufacture and use of a Finnish candle
To prepare a Finnish (Swedish, Indian) candle, you will need a small stump or block. The easy-to-manufacture device can be used for lighting and even for short-term decoration of open areas. Most often used by tourists as a portable light source or for cooking. It takes a little time to create a candle, but the duration of burning and the resulting heat from it are optimal for cooking porridge, boiling water on a hike.
Features of the preparation of a mini-fire
It is convenient to cut the block of wood with preliminary preparation: in its center it is necessary to drill a hole with a diameter of about 2-3 cm.

The same procedure must be carried out with a stump or log. bigger size and weight. A stick is inserted into the hole on the main block (can be replaced with a branch). A log with large parameters is strung onto the installed stick. This counterweight will allow you to make the candle neatly and safely. After connecting the logs and laying them on a goat for sawing firewood, work is carried out according to the following instructions:
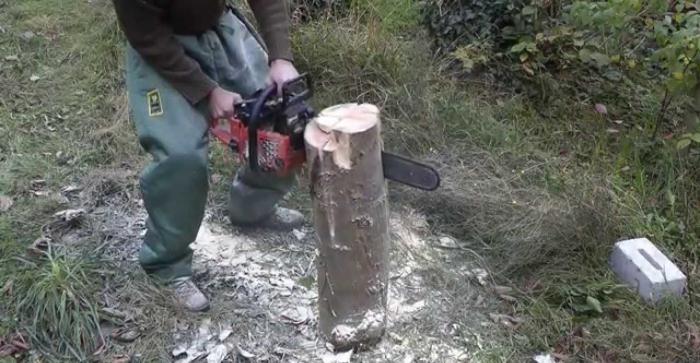
1. The log is cut crosswise using an electric or gasoline saw. The cutting depth should be no more than 2/3 of the height of the entire block.


2. Using an ordinary lit candle, the sides and the bottom of the cut are covered with paraffin (or wax).

3. Cut a small strip of paper (you can use a newspaper) with a length of 4-5 cm more than the cutting depth. Folds in half, then unfolds, paraffin shavings are poured at the place of the fold. It is important to consider that the layer should be made large, but so that the paper then easily curls up, and the wax itself does not spill out.

4. Paper with paraffin wax is wrapped longitudinally. And with the help of a pencil, a thick knitting needle or a screwdriver, it is pushed into a cross-cut. It is important to carry out the procedure carefully so as not to damage the paper and not spill the wax. 4-5 cm of waxed paper should remain above the log.

5. The resulting wick is fixed with molten paraffin. To do this, you need to set fire to an ordinary candle and pour the melting composition over the place where the wick joins the tree. At this stage, the Finnish candle will be completely ready.

To get a burning log, the performer only needs to set fire to the made wick. Due to the presence of paraffin inside, the log will burn out more slowly, and the temperature will be maintained. A Finnish candle is made by hand in just 15-20 minutes. If the contractor does not have an electric or gasoline saw, then the cuts should be done manually. The made mini-fire can be used for hiking (it is important to take into account the weight of the candle) or for home camping.
The attached photo and video materials will help to make sure that the made Finnish candle will burn brightly. But the performer must take into account that the cuts in the log should not be too deep: in this case, it will burn out very quickly. It is equally important to place the block on a tile or metal plate before lighting it. This will eliminate the risk of fire on the surrounding dry vegetation. In the absence of special stands, you can install the candle on an earthen area previously cleared of grass and leaves.
Anyone who loves outdoor recreation (especially not picnic, but active - hunting, fishing, hiking) knows how relevant a properly lit fire is. If you are not carrying a brazier, you need to worry about safety, so as not to run away from a forest fire and not feel like a criminal. And to kindle a fire in the snow, and so that it does not go out every minute, is considered by many to be the pinnacle of fire skill. However, experienced travelers know how to build a fireplace in compliance with fire safety, so that it burns for a long time, does not go out even in the slush and does not require regular feeding. Everyone calls it differently: a Finnish candle, a taiga candle, an Indian or Swedish, but the essence remains the same. There are even several ways to make it.
Maxi bonfire
The most successful Finnish candle is obtained if you "landed" near the sawn logs. No effort is required: pick up three saw cuts of approximately the same height and diameter, put them in a circle close to each other and light a fire in the middle. In order for the fire to burn evenly and the burning out was the same in all directions, it is required to correctly choose the block height in height. The Finnish candle lasts the longest, the logs should be two of their diameters long. The power of such a fire is enough for a five-liter boiler to boil in a third of an hour, and it does not even need to be suspended - it will lean on the logs themselves. As the logs burn out, they seem to fold into a hut. If you need the "Finnish candle" fire for a long time, at this stage you can maintain it as usual by putting firewood on it.

If you have a chainsaw
In the absence of the need for such a large hearth and the presence of an appropriate instrument on hand, you can do otherwise. A piece of a thick log half a meter long is taken and sawn crosswise (not to the end, about three quarters of a piece). If the diameter of the saw cut is large, you can work with the chainsaw a little more to get eight "slices". It is not worth doing more cuts, because the narrower the sector, the faster your Finnish candle will burn out. The log is firmly fixed on the ground (you can dig or prop it up with stones), a kindling is laid inside (from its own sawdust, or just liquid ignition) - and the fire is at your service for several hours.
Field method
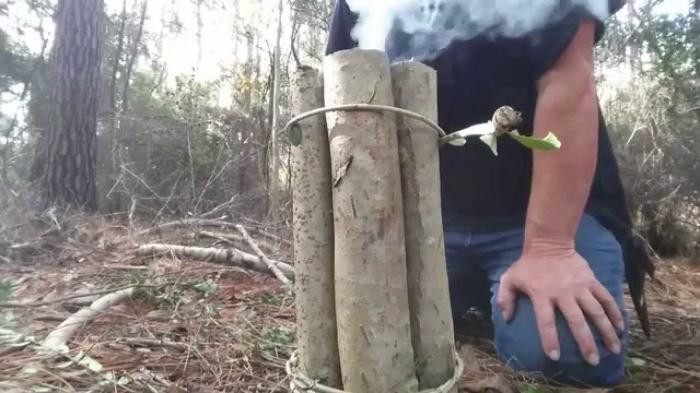
Suppose there is no saw, but you need a Finnish one in this case? Well, there is an ax in nature anyway. The block of wood, looked after for this purpose, is pricked, as for ordinary firewood, only a little more diligently so that the logs do not differ too much in thickness. Then they gather in the original log, only around a thick branch - this will be the hearth. Below, closer to the ground, and approximately in the middle, the Finnish candle is pulled over, preferably with wire - it will definitely not burn out. But if it is not there, twine, and fishing line, and flexible rods will do. It is especially necessary to tighten it at the bottom, because in the middle the logs will burn out faster, and without good fixation near the ground, your fire will fall apart. The central branch is pulled out three quarters from the bottom and sawed off, after which the Finnish candle is placed on the ground. By the way, if the original block is not too massive, you can use this branch as a leg and just stick it into the ground.

Hand candle
If there is no nearby (or a suitable dry object for cutting, or a saw and even a normal ax), then Finnish is done a little differently. Rather thick poles, at least five centimeters in diameter, gather around the district, and gather in a bundle again around the central branch. The side of the poles, which will be inside, you need to cut a little with a knife - it will do better. The rest of the manipulations are the same as when creating a "finca" from logs.
Primus candle
It is used precisely as a stove for cooking. The main points are like making a candle fire in the field. There are two nuances:
- The original log must be partially hollowed out from the inside. Alternatively, you can not cut the core, but split it into poles and clean them already. Such a fire is assembled in the snow in the same way, around the branch, but the cavity inside must be made artificially, and the outer walls are closed as far as possible without gaps.
- On two opposite sides, the logs are either trimmed less, or they move up more strongly, by five to six centimeters. Due to this design, in the center, the fire will be blown up by air, and its tongues will be directed mainly upward.
Such a Finnish candle is not suitable for heating - the fire is all concentrated inside. But food is cooked much faster.
What is a Finnish candle useful for?
In addition to cooking and heating (except for the "primus"), such a fire is simply irreplaceable as a lighthouse. Experienced fishermen, who go to the evening dawn, leave it on the shore as a signal for latecomers - in the dark it can be seen from afar.
It is very convenient when using Finnish candles and the fact that almost until they completely burn out, they can be moved from place to place without difficulty and burns. A big plus can be considered a long-term fire: a medium-sized block of wood gives light and heat for four hours. And the maxi-fire without additional fuel can perform its functions all night.
If you are not a fan of "wild" tourism and fishing, but you like to meet New Year at the dacha, Finnish candles placed along the paths will bring romance and decorate the garden no worse than garlands and Chinese lanterns.
Hello dear users of this site. It's summer. The most convenient and good time for nature hikes, picnics, fishing. In general, the most best time for an active vacation.
Every time they go out into nature, many people take with them a pile of firewood or coals on which food will be cooked. It is not always possible to find dead wood in the resting place to use it as combustible material... Therefore, I want to tell you how you can make the so-called finnish candle... It is good in that it does not take much time to make it and it burns for a long time. To make such a thing, you only need a piece of log, a drill with a drill and a chainsaw.
The author of this master class initially took a small log and was confused about making it convenient to saw. To do this, he drills a hole in a shorter block of wood, drives a stick there and makes a hole in the second, longer log. Plants a small log and a longer one and already saws. This is how it happens and what comes out of it.


Next, he takes an ordinary paraffin candle and dips the cuts with paraffin from the inside.

Then he takes a newspaper, several centimeters longer than the depth of the slot in the log, and crumbles candle shavings into it. The edges are also melted with molten paraffin. The resulting part is inserted into the slot of the block.


Then this wick is lit and the candle is lit.

It's just one option. Usually in nature, my friends and I, having made a blank candle in advance, a thicker log and no candles with a wick. Waste of time. Already in nature, small wood shavings, dry grass are poured into the slot and set on fire. Much faster and more convenient. According to the author, this candle burns for no more than half an hour. And the manufacturing time is twenty minutes. In our case, the manufacturing time is no more than five minutes. And it burns longer. But it depends on the thickness of the log. It is installed simply - either it stands by itself if the lower part of the log is wide enough, or it is buried in the ground. Enough to cook the ear and boil the tea. So that's it. But in general, it is quite a convenient and useful thing. Saves time and effort!
Many tourists, hunters and fishermen, in order to boil the water at a halt, had to decide how to light a fire in windy weather. More than once or twice they thought about how to make sure that they did not have to constantly adjust to the changing wind, putting firewood on the right side, or moving a stick with a kettle hanging on it. And the way out of this situation is not difficult. It is enough to light the "Finnish candle".
This memorable name hides a whole group of wood structures that allow you to warm up and cook food in field conditions with sufficient comfort. The ability to make a Finnish candle among tourists as well as among hunters, fishermen and just outdoor enthusiasts is not common. Let's try to fix it. So here we go.
Today there are many names for this method of making a fire:
- finnish candle;
- swedish candle;
- indian candle;
- hunting candle;
- wooden stove.
Beneath them are bonfires, fundamentally similar in design, built inside a specially prepared block or between several combined blocks, standing vertically.
Application area
Similar options are suitable for both cooking and heating.
Moreover, a full-fledged fire can be kindled even with a lack of fuel, sometimes with just one log.

This long-playing bonfire tolerates windy weather well, it is quite compact, economical, does not require the installation of additional cooking devices and tolerates precipitation quite tolerably. Since even heavy rain, with a pot standing on the fire, will not be able to extinguish it.
During its use, many design changes have been made, depending on the conditions of use. The classic "Finnish candle" fire originally consisted of a log split into two halves, then fastened together in places with a chip with a wire, rope or other materials at hand. Over time, for better burning, the chop was no longer split into two halves, but into more parts. Then, instead of splitting, they began to make cuts and even assemble a fire from several logs vertically pressed against each other.
How to make a Finnish candle
First of all, you need to decide on the design. It depends on several factors:
- the presence of thick logs at the berth and good tools;
- the presence of a wire for tying thin logs and chopped chocks;
- soil composition;
- the number of people in the group;
- the need to dry things.
Almost all options are divided into two groups according to the manufacturing method:
- from one thick enough lump;
- from several logs with a smaller diameter.
Now let's proceed directly to manufacturing.
Solid chock with cuts
To do this, take a chock with a diameter of 20 cm. We make cuts in it in such a way that we get several shares. Usually their number ranges from two to eight. Then, in the center of the block, a fire is kindled with the help of chips and scrap materials. To do this, you can slightly chop off the central parts of the lobes.

The fire gradually spreads down the cuts. The fewer cuts, the longer the burning, the more there are, the hotter the fire. The cuts are made to a depth of 3/4 of the height. Oxygen penetrates through the cuts to the combustion site. Over time, this version of the Finnish candle burns out the upper part of the middle, and the open fire turns into decay. After that, it will be quite difficult to cook food, but it is quite suitable for heating.
Chopped chop
This option is very similar to the first. In it, all parts of the initially beaten chocks are tightly connected with wire to each other. Preliminarily, the central parts of the lobes are slightly curved. This will provide enough wood chips for ignition and create air draft channels. After that, the parts of the chocks are tightly pulled together with a wire, starting from the middle.

It is especially necessary to tighten the bottom, otherwise, as it burns out, your fire will fall apart. You can also use rope instead of wire, but this option is less reliable. Consider one caveat: unlike a sawn cut, the chips are pressed very tightly. The fire on the sides practically does not break through, so this option cannot be used as a heater. But it burns longer without decaying, it can be quite calmly moved from place to place if necessary, and it has a fairly strong directed flame.
Chock with two holes
As the name implies, a couple of holes are made in the upright chock. One from top to bottom, the same length as the cuts in the first version, 3/4 of the height. The other is at right angles to the first at a height of 1/4 from the bottom of the chock, so that the holes are connected.

You can ignite both through the upper hole and through the lower one. This method is the most effective for cooking, but also the most difficult to manufacture due to the need for additional tools.
Assembling from thin logs
This option is suitable in the absence of a tool. In this case, three to five logs are placed on the ends and tied in an upright position.

Such a furnace is easier to manufacture and much easier to ignite, which is important with insufficient experience.
For the first three options, a chock with a diameter of 20 to 30 centimeters is required. It is impractical to use large diameters. The height should be approximately two diameters. With this ratio of diameter and height, your hearth will be the most stable.
And now let's dwell on, perhaps, the most important issue... How to light a fire, which is described above. Even for experienced tourists, this problem will arise on the first attempts. How can you make the Finnish candle burn faster? It's very simple. It is enough to recall the elementary laws of nature:
- the flame burns only when there is a sufficient supply of oxygen;
- heated air always tends upward.
Therefore, for successful combustion, these two conditions must be met. Namely, there must be at least a small gap between the parts of the chopped block so that the flame moves freely upward, and there must be a free flow of air from below. This can be achieved in the following ways:
- slightly cut with a knife or ax the central parts of the chopped chops;
- using improvised means (for example, stones or a pair of thin sticks) to raise the fire above the ground;
- chop off the lower parts of at least two adjacent parts so that a small channel of air flow into the center of the fire is formed.
The second option is not very successful, since the fire, kindled in this way, will not be stable enough.
Cooking
Finally, let's move on to the most "tasty" part. How to cook with a Finnish candle? It turns out, too, nothing complicated. Any utensil that can withstand fire will work.

But do not forget that the fire must be provided with an outlet. If you put a pot or kettle directly on the chock, the fire will stop burning normally and the water will not boil. This issue can be resolved as follows:
- put a stand on top of the chocks in the form of two freshly cut sticks up to 5 cm thick;
- two or three parts of your candle when assembling should be higher than the rest by the same distance.
In the second case, this can be achieved different ways... If we collect a candle from several thin logs, then in advance, when cutting, two of them are made longer than the others. When placed vertically, they will provide the necessary clearance between the dishes and the surface. Or, directly during assembly, two logs can be pushed slightly upward compared to the rest. You can do the same with chopped logs. This method makes it possible to simultaneously provide two air supply channels from below. And the fire will burn more stable and hotter.
Happy travel!