How to make a vacuum cleaner from a motor. Do-it-yourself construction vacuum cleaner, how to make it at minimal cost? Refrigerator engine application
How to make a vacuum cleaner? A homemade unit assumes the presence of an engine at 6000 rpm. Such a part can be removed from the juicer. Please note that not all electrical appliance motors are designed for a long service life. Therefore, when choosing an engine, follow the rule: the motor must withstand a large load and have protection against overheating.
What to do if you can’t find anything other than a part from a juicer?
In this case, it is advised to equip it with a thermal fuse rated at 126 ºС. The cross section of copper must correspond to the dissipation power, so this temperature may not be suitable for the motor you have chosen. It should be noted that the border of 130 ºС is the average for which most transformers are designed.
What can be taken as the basis of a homemade unit?
Many are interested in how to make a vacuum cleaner with your own hands.

You can take as a basis:
- An exhaust motor with an Axial model will not work, as it is used in models of a cheap segment and does not have the necessary power.
- Disused vacuum cleaner engine.
- Engine washing machine.
- Refrigeration compressor motor.
Refrigerator engine application
How to make a vacuum cleaner from It will be difficult to pick up a part, since the rotation speed of the shaft is different models refrigerators are different. If you are assembling a vacuum cleaner, then a strict 6000 revolutions will be required. Compressors of the old rocker type are designed for 3000 rpm.
Crank modifications have half the speed, and linear inverter units are not at all suitable for assembly.
Inside the piston compressor is an electric motor. If you cut the case and remove the motor, then it is suitable for any purpose. It has high power and quiet operation.
Asynchronous motors are rarely used. For example, a collector configuration operates from the outlet if speed control is not required.
Using a washing machine motor
The design of washing machines suggests the presence commutator motor. The speed of its operation is regulated by a thyristor key. If the motor is powered directly from the outlet, then the speed will become high, but they will not reach the figure of 6000 in the absence of a belt gearbox. In this case, the spin function is quite achievable.
How to make the unit suck dust?
Commercials often talk about the vacuum created in the vacuum cleaner. The engine allegedly contributes to the discharge, into which the drawn-in air stream rushes. But is it really so? Rather not, because at negative pressure, a bypass valve is connected to ensure balance. But that is not the essence of the work. To suck dust, a hermetically sealed housing is used, thanks to which the flow of nitrogen and oxygen molecules rushes in the right direction. The container in this case does not play any role.
If you stick to the factory configuration, then you need a bucket made of steel or plastic, the bottom of which has an air intake hole. The motor is mounted on the axis, and something similar to a squirrel cage is installed on the shaft. The air flow is captured by the blades and thrown out to the perimeter. This provides traction. A hose is hermetically attached to the bottom. We will assume that the assembly of the vacuum cleaner with our own hands is completed.
How does a mini vacuum cleaner work?
How to make a mini vacuum cleaner? The speed control of the unit is carried out according to the thyristor circuit. Any electronic part from an old vacuum cleaner, washing machine or food processor will come in handy.

The main thing is the cutting method, not the engine power. But the key also overheats. It is easy to understand whether it corresponds if you compare the power of the device from which the circuit was taken with the power of the engine. If the thyristor indicator is low, then it is advised to attach a radiator to it, and forced cooling is already available.
How to make a container for a homemade vacuum cleaner?
The vacuum cleaner is designed in such a way that it will not work without a container.
For homemade unit fit:
- ordinary bag;
- a container filled with water;
- cyclone chamber.
Filtering the bag is problematic. If you will be vacuuming crumbs from the table, this design is fine. The type of container is selected according to the type of waste. For example, dust collection is best done through a filter with water or a cyclone chamber. Both types of container are easy to construct. The unit itself is stationary. If a gardener uses such a device, then it can be hoisted onto a cart and moved around the garden.
The cost of stationary models of vacuum cleaners is high, so homemade construction will be most welcome.
The most simple model container - a large tank filled with water. It plays the role of a water filter. In this case, the dust will sink. The inlet of the hose is made taking into account that the flow collides with a water barrier. An ordinary flat-bottomed box is two-thirds filled with water. In addition, a baffle hangs from the ceiling above the filter surface. All the dust settles in the water and sinks. Such a device requires periodic cleaning. Such a design will not be suitable for gardening, as the weight of the water is large. Therefore, it is replaced with air.
When assembling vacuum cleaners for the garden with your own hands, adhere to the following rules:
- Air enters tangentially into the tall barrel.
- Along the axis of the tank, up to about two-thirds of the height, there is a pipe that provides an exit.
- Garbage sits on the bottom due to the fact that it is carried to the periphery by centrifugal force.
- The airflow exits in the center.
- The smallest particles get into the engine in any case. Therefore, it is recommended to equip the container with a HEPA filter at the outlet. It's not worth saving. Otherwise, you will have to constantly lubricate the engine. If the vacuum cleaner sucks in water, it will end up in a barrel.
Such a homemade vacuum cleaner for a gardener is large. The unit can be made universal. For example, cut the barrel to fit the diameter of the tank with standard sizes and equip the device with a van for movement. So you can clean up the whole park.
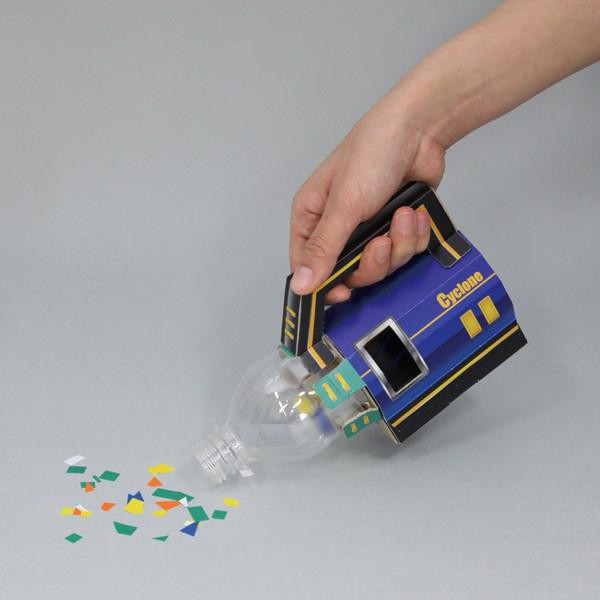
How to make a mini vacuum cleaner from a plastic bottle?
Today, almost every home has a computer. As you know, its body is periodically clogged with dust, which prevents the cooling of many parts. The circuits should be vacuumed from time to time. To facilitate the process, you can use a homemade mini-vacuum cleaner.
For the manufacture of the unit you need:
- fan from the computer;
- plastic bottle;
- hose;
- polystyrene;
- power supply 220 V/14 V;
- insulating tape;
- paralon.
Progress
- A plastic bottle is cut in half. The part that remains with the cork is taken. A filter is cut out of the foam rubber. It is inserted into the neck. The material must be tight.
- A hole is threaded through the cork into which the hose is inserted.
- The cork is screwed onto the bottle.
- A fan is taken from the computer (its corners are smoothed). It is inserted into the bottle in such a way that during operation the air flow rushes to the wide side of the bottle.
- The place where the cooler is located is wrapped with insulating tape. A wire is used for strong fixation.
- The power supply is connected to the fan. The red wire goes to the positive side, and the black wire goes to the negative side.
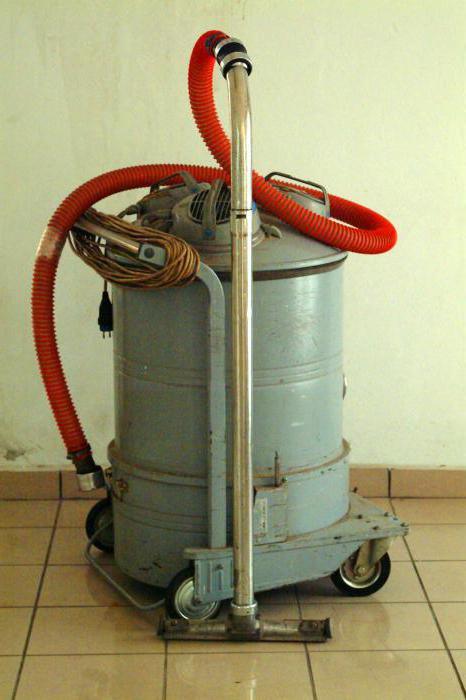
How to make an industrial vacuum cleaner with your own hands?
How to make an appointment? The basis of one of these units is the Ural PN-600 model.
You will need:
- Bulgarian;
- a pipe with a diameter of 4 cm and a length of 20 cm;
- plastic bucket with handle and lid;
- scotch;
- insulating tape;
- drill;
- self-tapping screws;
- glue;
- medical bandage.
Stages of work
- First of all, the Ural garbage collector should be finalized. For this purpose, the wheels are unscrewed from the bottom with a screwdriver. Holes are sealed with tape.
- Then you need a grinder, with which the latches and bartacks are removed. A plug is installed, rewound with insulating tape.
- A hole with a diameter of 43 mm is drilled in the bottom.
- Gaskets are cut out of the seal, the thickness of which is 4 mm.
- A gasket, a bucket lid and a centering pipe are placed in the waste container.
- Using a drill, a hole with a diameter of 2 mm is made.
- The cover is fixed with self-tapping screws 4.2x10 mm.
- An external hole is made for the suction pipe. It is planned at an angle of 15º. The hole is cut with scissors for metal.
- The pipe is fixed with self-tapping screws. For sealing, they use an ordinary medical bandage, which is impregnated with Titanium glue. The bandage is wound around the nozzle.
Second way
To assemble the unit in the second way, you will need:
- old home vacuum cleaner;
- oil based filter;
- bucket with a capacity of 20 liters with a tight-fitting lid;
- PP corners 90º and 45º with a diameter of 40 mm;
- meter of plastic pipe with a diameter of 45 mm (a corrugated pipe with a length of 2 m and a diameter of 40 mm is suitable).
Device assembly
- First, take the lid of the bucket. A hole is cut in it at an angle of 90º. Then a corner of the same size is inserted.
- When a corner is inserted into the lid, all the cracks are covered with glue using a construction gun.
- A slot is made in the side of the bucket, into which a 45º corner is inserted. All cracks are also covered with glue.
- To connect the corrugation to the corner, it is necessary to cut off a piece of pipe with a diameter of 40 mm. The corrugation should fit snugly. If it does not fit on the inlet pipe, then you can resort to using a siphon model on the kitchen sink.
- The narrow end of the corrugation is fitted to a forty-millimeter pipe. The other end is connected to the opening of the vacuum cleaner.
- To prolong the life of the filter, a nylon stocking should be pulled over it.
Can an old vacuum cleaner come in handy?
There is an old vacuum cleaner at home. What can be done from an unnecessary unit?
If the device works, then it can be used for another purpose. Some methods require technical training, since reworking equipment is dangerous. In particular, you should understand the principle of operation of motors.
This article will describe the safest methods.
Air blower
If you connect a hose to the outlet available in most models, you can get a unit for inflating rubber mattresses, pools for children and other similar things. At the same time, the vacuum cleaner container needs to be pre-cleaned from debris.
What can a Typhoon vacuum cleaner do?
What to do with an old Typhoon vacuum cleaner? The principle of operation of the unit is characterized by a high level of productivity.

The case of a Soviet-made vacuum cleaner is impossible better fit to create a device for grinding grass. It has a top opening of a suitable diameter. Typhoon is great option, but not the only one.
What else can be applied?
- The body of the device can be replaced by a container in the form of a cylinder. For example, a pan, a bucket, or a piece of pipe is used.
- The 180 watt motor is taken from an old washing machine.
- A hacksaw blade is used as knives. For the rack you will need a rectangular profile measuring 15x15 mm.
- The sleeve for attaching knives is machined on lathe. Its height is 40 mm.
- The engine with the pulley removed is attached by means of studs from below to the container.
- To clamp the knives, water nuts with a diameter of 32 mm are used.
- A hole is cut for the motor shaft.
- For reliable fixation on the shaft, a pair of holes with a diameter of 7 mm and an M8 thread for locking bolts is made in the sleeve.
- Platforms are machined on the reverse side of the motor shaft to increase the level of reliability of fastening the bushing with locking bolts.
Grain crusher manufacturing
To make a grain crusher, a person must have experience with machinery. Self-manufacturing devices without relevant knowledge is not recommended.
- Take a sheet of plywood square shape. An electric motor is fixed on it so that the shaft goes down by 40 mm.
- The steel plate is mounted on a threaded tail. It is fixed with nuts, bushings and washers.
- Leading edges are sharpened on both sides of the axle.
- The axial hole is made in the middle of the plate.
- To create a working chamber for the future unit, a body is made in the form of a ring. It is based on The correct design of the part involves bending the edges of the rings outward. They should form 10 mm flanges. It is with their help that the body is attached to the base. A sieve is screwed to them.
Making an attraction for children
What can be done from an old vacuum cleaner for children? If the motor of the unit is running, then it can be used for the attraction.
For this purpose, a tennis ball is pierced through with a pin, so that the ends of the pin are on both sides of the ball.
After that, the propeller is made. A jar made of polystyrene is used. The propeller is mounted on top of the ball. One lane is enough for him. It is cut with scissors.
The propeller is pierced in the middle and mounted on the axis of the pin. For speed and ease of rotation, it is advised to make bearings from beads. They are attached on both sides of the strip.
The top edge of the pin is bent in such a way that there is not much play on the axis.
Such a ball can be launched into the air through the outlet. If desired, the ball is decorated with sparkles.
Conclusion
This article described how to make a vacuum cleaner. There are many build options. It was also described what can be done from a vacuum cleaner.
Remember that without the appropriate technical knowledge, it is not worth getting down to business. It will be difficult to make a vacuum cleaner yourself in this case. It is better to seek help from a specialist.
At the moment, the market is flooded not only with universal ones, but also with special industrial ones. But if you want to save money on buying them, you can try to do it yourself.
Such devices are quite expensive, but they are necessary during repair work to quickly clean up your workspace. With the help of an ordinary vacuum cleaner, it will not be possible to achieve a high quality of cleaning, since they are not designed for such debris.
Household models are not able to qualitatively and quickly clean surfaces from oil, chips, plastic fragments, glass, etc.
Before you make such a vacuum cleaner, you need to decide with work front, as some models are designed for cleaning liquids or even small gravel. After the principle of operation is determined, all other parameters should be considered.
There are many real examples self-creation industrial vacuum cleaners. Consider the manufacturing option from the old Rocket model.
What is required for work?
If the old Rocket vacuum cleaner is lying around at home, it will be great consumable to create a construction site (more on what else can be built - in the article).
In addition, you will need the following tools and materials:
- Bulgarian;
- screwdriver;
- bandage;
- branch pipe 200 mm long and 40 mm in diameter;
- metal scissors;
- plastic bucket with lid and handle;
- glue;
- insulating tape;
- drill.
- scotch;
- self-tapping screws.
Let's start creating a construction vacuum cleaner
Initially, you need to do garbage collector which needs improvement. Armed with a screwdriver, unscrew the wheels from the base of the vacuum cleaner and tightly glue all the holes obtained with tape. After the nameplate is removed, its hole must also be sealed with tape.

All fasteners are removed. Now, with the help of a grinder, it is necessary to free the body from all rivets and put a plug, previously wrapped with insulating tape. Next, make a hole in the bottom with a drill, 43-45 mm in size. A gasket is taken as a gasket, approximately 3-5 mm in thickness.
In the bin that has been converted, you need to fold the gasket, centering pipe and bucket lid. Take a 2 mm drill and use a drill to make holes that will later hold the lid.

Next, holes are made already outside the suction pipe. Before doing this, you need to put marks at an angle of 15 degrees. Using scissors for metal, we make a hole. After that, we attach the pipe with self-tapping screws. For maximum tightness, it is necessary to carefully soak the bandage with glue and wrap it around the nozzle.

The nuances of such a device
In order to assemble your construction vacuum cleaner, you must have on hand power unit, whose revolutions must be at least 6,000. As for the material at hand, it can almost always be found at home. As a donor for the engine, you can use not only an old vacuum cleaner, but also a washing machine.

Some craftsmen use homemade vacuum cleaner power units from kitchen machines, but do not forget about their tendency to frequent breakdowns due to their inability to withstand high loads.
If the power unit is found, then you need to take care of it tightness. You will also need a fan. Very often, an ordinary bucket is taken as a housing for a vacuum cleaner, in which a hole is made. Naturally, both a garbage container and a filter are needed, which can be.
The presented videos show several variations of the assembly of a construction vacuum cleaner. It is recommended to study them if you decide to create a homemade model.
Many of us often sit in front of the computer: some work, others play games, but in any case, sometimes it is necessary to clean the work or play space, namely computer desk, keyboard, on which dust, crumbs and so on accumulate. Especially for such cases, you can purchase a mini USB vacuum cleaner in specialized stores, but you can also make it yourself from improvised means.
Watch the process of making a mini USB vacuum cleaner in a video clip:
So, to make our own mini vacuum cleaner, we need a 50 ml syringe, a piece of tin plate, a motor, a felt-tip pen, scissors, a glue gun and a USB cord from an old one. charger, mouse or keyboard.
The first step is to take care of the turbine, which will suck up the dust. To do this, you need to cut a circle from a tin plate under the inner diameter of the syringe, which by the way is equal to the diameter of the syringe piston. To cut a circle, you just need to put the piston on the plate, circle it with a felt-tip pen and cut the resulting circle with scissors.

After that, you need to divide the circle into eight equal parts, draw another small circle in the middle with a cap from toothpaste or healing gel.


After that, it remains only to make radial cuts and slightly bend the turbine blades, making another hole in the very middle for mounting on the motor.

The next step is to take a regular disk holder and cut off all the extra parts, leaving the middle one and glue the turbine to it with a glue gun. After that, it remains only to attach the turbine to the motor.


In order for the air to pass through the body of the mini vacuum cleaner freely, and the engine is not overloaded, you need to make two small slots in the piston of the syringe and glue the engine strictly in the center.


There are no particular difficulties with the upper part of the vacuum cleaner: you just need to glue the neck plastic bottle along with a cork on which it is necessary to make a hole and push a tube through it.
To quickly remove dust from hard-to-reach areas of the workplace in the workshop, my son's computer and other household appliances, DIY mini vacuum cleaner. To make it, it took only two plastic containers, a small engine and one free evening. The design turned out not only useful, but also easy to use.
On the engine direct current with a voltage of 12 V from the side of the axis, I fixed a protective cover made of tin (photo 1) d 100 mm.
I made an impeller out of plastic (photo 2) - I cut out a circle d 95 mm with a jigsaw and glued 30 × 15 mm ribs perpendicular to it on one side. The finished part was fixed on the motor axis with glue from a thermal gun.
From a cut PET bottle and a plastic bucket, I assembled a garbage collector. I mounted a tube from a syringe for attaching a hose to the upper part of the body.
From a tin can desired diameter(should match the diameter of the PET bottle) made an air intake (photo 3). I drilled several holes d 5 mm in the walls of the container, and fixed a cut tube from the syringe in the bottom in the center.
I fixed the part on the engine protective cover with bolts so that the gap between the impeller and the bottom of the intake was approximately 7 mm.
The finished unit (motor with intake) was installed in the body and drilled holes in the plastic at the level of the holes on the intake. The junction for the reliability and rigidity of fastening missed with superglue.
To connect the device to the mains, I soldered the wires of the 12 V power supply to the engine contacts. I fixed the hose on the tube in the case using a metal adapter.
DIY mini vacuum cleaner - photo
Do-it-yourself mini vacuum cleaner - video (option)
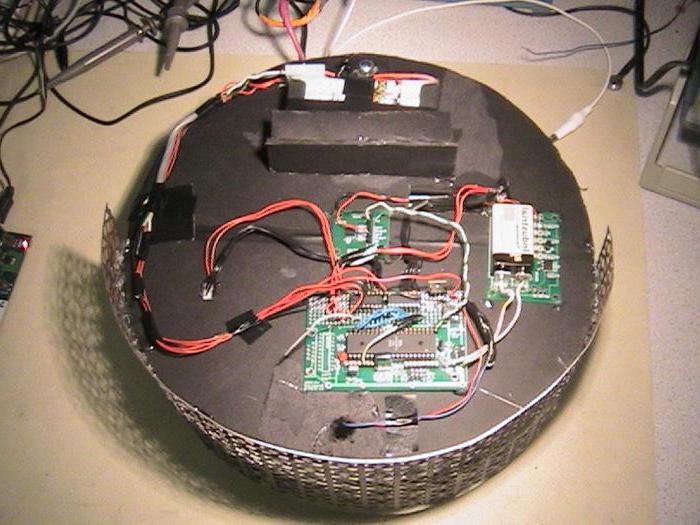
 2019 High quality C30B robot vacuum cleaner, map navigation, 3000Pa suction, intelligent…
RUB 15310.08
Free shipping★★ ★★ ★★ ★★ ★★ (4.90) | Orders (965)
 ILIFE V55 Pro Vacuum Cleaner Robot Sweep & Wet Mop Virtual…
Hello dear friends, today I will show you a wonderful idea on how to make a mini keyboard cleaner. With such a vacuum cleaner, you can easily clean the keyboard and various circuits. Also, this vacuum cleaner is portable and can be used to remove dust anywhere.
Necessary materials:
- soap bubble container
- motor
- bottle neck
- neck from detergent
- crown
- switch
- connector
- thin metal
- pen
Step 1: First we need to make a propeller. From tin can cut out a circle (the diameter should match the inner diameter of the container). Then we drill five holes: one in the center, and four on the sides, as shown in the photo. Then we make cuts, and bend the blades to make a propeller.

Step 2: Then we take the neck of the bottle and attach the motor to it with glue. Then we fix the propeller on the resulting structure. And we fix it all in a container.


Step 3: Then, on the back of the container, we make small holes. Next, take the neck from the detergent and glue it, as shown in the photo. Glue a small piece from the handle to the neck.


Cut out a small piece of breathable fabric, and insert it as shown in the photo.


That's all! Our mini vacuum cleaner for cleaning the keyboard is ready, insert the crown, and use it.


