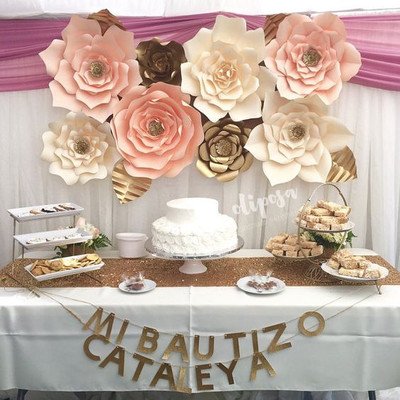
Flowers from do-it-yourself schemes templates. How to make paper flowers with your own hands - a selection of creative workshops and photo ideas. Flowers from disposable spoons
For these flowers, you can create petals in any size! Just make sure that each layer is smaller than the previous one. I used three layers in creating these colors, however, if you wish, you can always add a few more. In addition, you can also experiment with various types centers and leaves.
To create flowers, we need:
- Paper (thick)
- Pieces of cardboard to use as a base
- Scissors

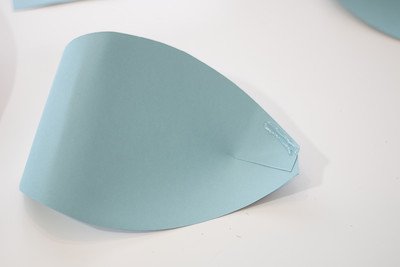
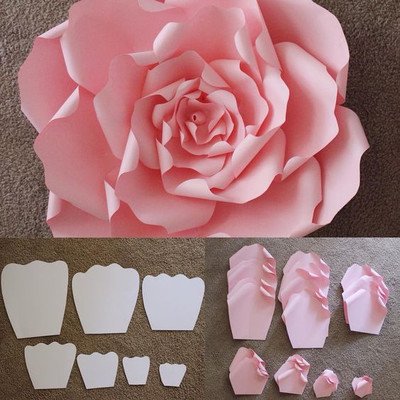
First, let's create patterns for the petals. Then take the paper and fold it in half. I made the template so that the largest petal fits into half of the leaf, and the smallest petal fits into a quarter of the leaf. You will need 6 half sheets for the large petal, 6 half sheets for the medium petal, 3 quarters for the small petal, and 3 quarters for the flower center.

Cut out large petals according to the template.

At the base of the petal, cut out the base for bending, as shown in the photo:

Turn the petal over so that the widest part is at the bottom. Roll the petal away from you to create curls.

Now turn the petal back so that the base with two flaps is at the bottom. Glue the sash so that it overlaps the other. When making the outer petals, do not make too much angle, do not overlap the petals too much. As you advance, the petals should lie flatter.


Remember: for the largest petals, you need to do a lot of overlap, otherwise the flower will be too straight. Do this for all large petals.
Now we will attach more and more petals to each other to form the shape of a ball. Add glue to the edge of each petal and glue.

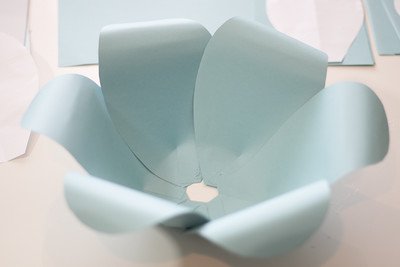
Continue adding petals to form a flower. Repeat all the steps above for medium and small petals.


Glue thick cardboard to the "bottom" of the flower to give firmness and a base to the flower. In this example, I just used this pink cardboard because it happened to have some kind of holdover.

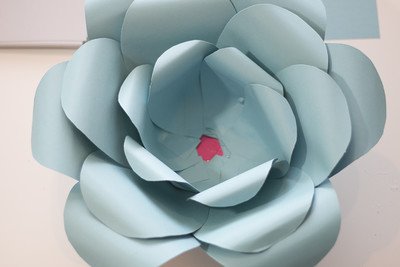
To make the center of the flower, take the last quarter sheet and fold it in half. Now cut off the "brush". Make sure you cut from the side of the fold.

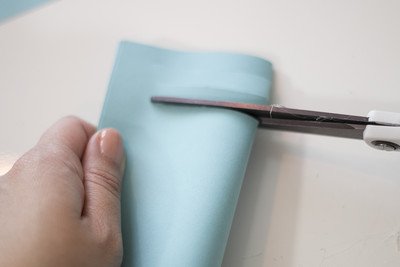
After you cut through 3 sheets, separate and unfold them.

After you finish rolling up the first sheet, attach it to the next sheet and continue rolling. Do this until you have rolled all 3 sheets together.

This is what the center of the flower should look like in the end. Now all you have to do is add glue to the bottom of the center and add it to your flower!


There's so much more you can do different colors, just change the petal's shape, size, color, and center.


I hope you enjoyed this master class. If you decide to try to make such flowers, then be sure to share a photo with us!


- Rate - Excellent Good Not bad Bad Awful
Be sure to read other interesting articles:
flowers from corrugated paper are generally used to decorate gifts. But if you decorate a photo frame with them, Wall Clock, make a panel or elegant, then they will decorate the interior and bring lightness to it. Before you learn how to create do-it-yourself corrugated paper flowers, you need to understand what material is suitable for this and what else is needed to make the craft look like a real plant.
Getting to know the material
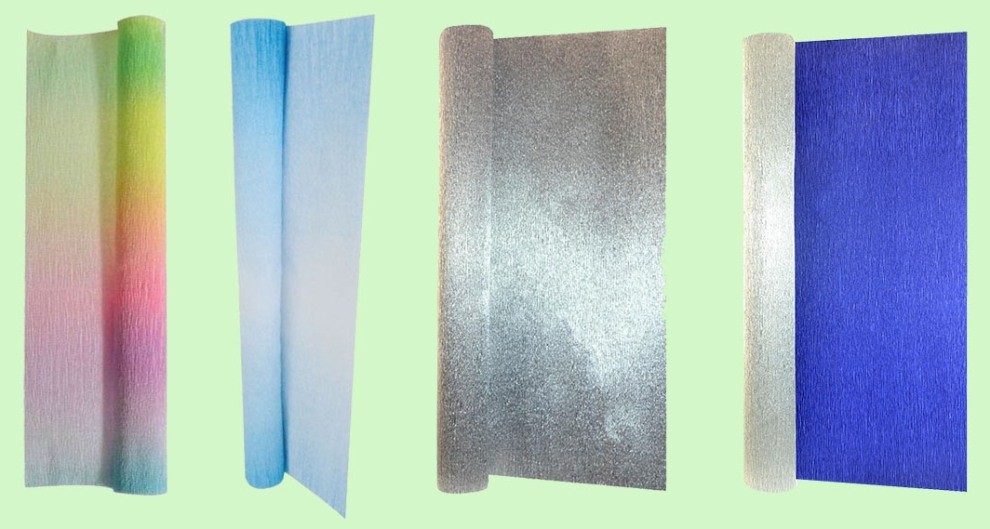
Corrugated paper is also known as crepe or crepe paper. The only difference is that gaufrer is a French name, while crepe is an English name. There is also an analogue in Russian - a reaper, pressed paper. There are several options for corrugated paper on sale, but the main classification is divided by sheet density:
Paper for creativity and gift wrapping: density 30–50 g, small folds, the height of which is not regulated. It is not very suitable for floristry, because it does not stretch well, it breaks and gets wet from the glue.

Floral paper is used for flower wrapping and sweet designs. Its density is in the range of 120–180 gr. Deep folds provide just the right amount of stretch to create true-to-life colours.

Corrugated cardboard has high density and only suitable for making gift boxes.

Please note that "fine crepe" is listed on the packaging of the craft paper. Floral paper marking contains the inscription "crepe extra", and on the sheets themselves there are transverse textured stripes.

Folds on floral paper are called flutes, which are divided into three types:
- E-flute up to 1.6 mm high - for making small flowers;
- V-flute up to 3.2 mm high - for growth paper flowers;
- A-flute up to 4.8 mm high - for packaging.
The color palette includes not only plain paper, but also metallized double-sided, with gradient and rainbow colors.
Also, for creativity, we need auxiliary materials:
- Type tape, which is used as colored tape to decorate the base of the flower and stem;
- Scissors and stationery knife;
- PVA glue (thick), thermal gun;
- Threads for attaching petals, sheets;
- Floral and regular wire;
- Wooden sticks for stems;
- Styrofoam balls or candy for the center of the flower.
And also: ribbons, frames, baskets, vases and even cups and saucers - the decor is limited only by the master's imagination.
Basic techniques and secrets of creating flowers from corrugated paper
Master florists have come up with hundreds of ways to make do-it-yourself corrugated paper flowers. However, there are basic techniques, combining and transforming which you can achieve an almost perfect resemblance to the original.
Stem
Please note that the stem for any type of flower is created according to a single principle:
- The base is a floristic wire, a wooden stick or a paper tube.
- You need to attach the stem to the flower head on initial stage(it is threaded through the layers of paper that forms the petals) or the flower is collected directly on the stem.
- The stem can be decorated with either a thin strip of corrugated paper on glue or green type tape.
- For a greater resemblance to a real branch, it is necessary to cut the leaves and attach them to the stem, masking the junction with tape.
How to easily twist thin paper tube explained in this video:
stamens

A ready-made strip of corrugated paper of two or more colors is used, or you can cut it yourself from a sheet. On layers grind off.
Gathering should be done immediately - then it will not be possible to pull the thread without damaging the paper.
Then the workpiece is spirally wound on a rod or attached to the surface, and the collected waves create volume.
Also twisting are made for this ball.

But in this case, a strip of corrugated paper is folded in half, and then rolled into a roll. To prevent the flower from falling apart during the assembly process, it must be glued as the roll increases. In conclusion, fingers should gently straighten the curls, forming an open rose. The base is a foam ball on which roses are glued.
Corrugated paper flowers made in a similar technique are shown in a master class on creating a rose with an original twisted edge:
This technique is popular for making chrysanthemums, daisies, daisies, carnations, and other flowers with many small petals. The base is a long strip with cut fringe or carved rounded petals. For example, this charming rose.

Flowers from individual petals
These delicate flowers are made without a base, by joining individual petals cut according to a template.

For cherry blossoms you will need:
- three long rectangular strips with rounded edges for the petals,
- one long rectangular strip with pointed edges for leaves,
- for the core, a short strip with transverse cuts.
The blanks of petals and leaves should be folded in half, mark the center and straighten the edges, forming a bend. Assembly is carried out with the help of glue by simply connecting the blanks one on top of the other, a twisted core is attached to the center of the resulting flower.
Blanks for pansies are cut out of multi-colored paper; if desired, the middle can be tinted and veins can be drawn. The assembly of the flower is carried out by connecting the petals to each other also with glue or thread. As a stem, floristic wire would be appropriate here.
This chamomile is assembled using a similar technology, but for the possibility of making a bouquet, a stick is used as the basis.
To make this tulip as similar as possible to a real one, it was necessary to create a core using a special technology.

Flowers on a fixed basis
There are many options for flowers that are made using this technique: chamomile, but the most common is the English rose.
The peculiarity is that the petals are wound onto a base - a foam or paper ball, which can be replaced with a small round candy.
MASTER CLASS ON THE TOPIC
Just according to this principle, this
1. Cut strips of corrugated paper approximately 6 cm wide and 10 cm long. Colors can be combined as you like: a delicate milky core and rich yellow, orange or red outer petals.
2. Fold the blanks with an accordion along the width of the petal, round the edges.

3. Spread the corrugations a little with your fingers, forming a wavy edge, then wrap the petals with toothpicks, giving a natural shape.

4. The blank of petals should be stretched, giving a semicircular shape - this will facilitate the formation of a flower.
5. We wrap the base of the flower with a rectangular strip without cuts, pulling the corrugations so that the paper tightly wraps the ball or candy. We fix with a drop of glue, and pull the bottom with a thread.
6. We overlap all subsequent petals in a circle, tightening with a thread. At the end of the work, we decorate the assembly place with a sepal of green or any other color in accordance with the intended composition.

Advice. If you want to make a bouquet on stems, then the sticks should be glued with hot glue to the base of the flower - a ball or candy before the flower begins to form.
Here is a slightly simplified, but no less spectacular version of this flower.

Master Svetlana Bormotova suggested a simple technique that turns an ordinary rose into an exquisite flower:

This decorative artichoke is also created on a fixed basis. Incredibly beautiful decorative element!

It’s not immediately possible to guess that a candy is hidden in a graceful narcissus - you will definitely be sorry to violate such grace:

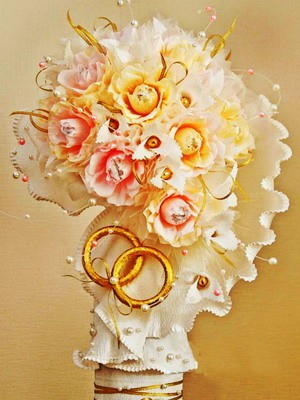
Original compositions and examples of decor creation
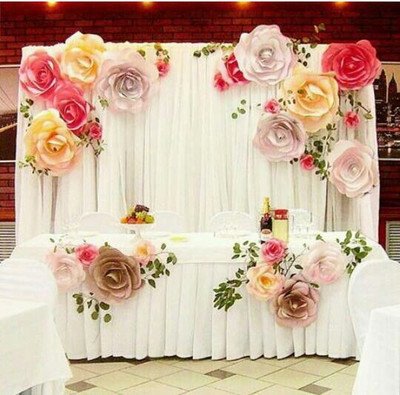
Traditional decoration - bouquets in a vase. You can collect a bouquet of daisies, roses, tulips, and for experienced florists it will not be difficult to create a gladiolus branch:
If you love indoor flowers, but don't have time to grow them, then a crepe paper orchid flower is just what you need. This is a difficult job that requires certain skills, but the result is worth it.
You can decorate a room not only with bouquets of paper flowers. For example, for wedding ceremonies passing indoors, you can create a photo zone of paper flowers. They are attached to a perforated wall with a wire bent in the form of a hook.

Using the described techniques, you can create a topiary. A foam ball is taken as the basis, which is pasted over with corrugated paper petals.

This "classy magazine" harmoniously combines the warmth of the created bouquet and the sweet filling of the box. Such a gift will definitely be remembered for a long time!

Your guests will immediately pay attention to decorating the interior, but they will not immediately understand how this cup does not fall ...

With a little patience and diligence, you will create elegant decorations for your room, make a celebration unforgettable, or simply and loved ones with a custom-decorated simple gift.
Master classes from the unique master Lia Griffith
Lia Griffith does incredible beautiful flowers corrugated paper! Her step-by-step master classes are accessible and understandable, despite being presented in English.


inspiration and the most beautiful flowers!
CategoriesLush colored dahlias will be appropriate on a laid table, garlands are formed from them, stringing a strong thread or soft wire. Small bouquets will complement the overall decoration, tables, shift the accents of the interior, create a festive mood. It doesn't take long to make dahlias.
You will need multilayer large-format napkins, ordinary threads of any color, scissors, stationery PVA, or another adhesive that becomes transparent when dried.

The manufacturing technique is simple:
- napkins need to be unfolded;
- fold in a pile, for one flower you need 4-6 pieces;
- crumple each napkin with an accordion, the already the bend is, the more magnificent the flower will turn out;
- the accordion is folded in half, the kink is pulled together with a thread;
- the edges of the accordions are rounded from above, makes a semicircle, the result is a blank;
- all blanks are put together, a lush bud is formed from them, the edges of the blanks are linked together with a drop of glue so that the flower does not fall apart;
- each of the napkins is straightened to create volume.

The flower is obtained in the form of a ball, it is fixed on sushi sticks and inserted into vases. These dahlias look good on shelves and racks. If you make small buds, string them in a checkerboard pattern on long threads, you get a festive curtain on a closed door. When there are no napkins you need colors, use corrugated paper.

creative ideas
The technique for creating flowers differs insignificantly; in addition to napkins and corrugated paper, they use:
- colored thick paper;
- egg cartons;
- toilet paper;
- old postcards.

Small mimosas are made like balambos: long narrow strips are cut, they are wound on a magazine twisted into a tube in a tight bundle. It is carefully pulled together, then the edges of the beam are folded in the middle, tightly fixed.

The resulting loops are cut, the resulting petals are fluffed. Another idea is a lot of small bags glued on the sides. In this technique, dahlias are made that resemble fresh flowers. Asters will be obtained from wide strips, on one side cut into 2/3 "noodles". They are rolled up. Roses are made the same way.

Rose from an egg carton
A small master class will wake up your imagination, for work you need to prepare:
- part of the tray with convex pyramids between the cells;
- scissors or stationery knife;
- paper for making leaves;
- paints;
- glue.

Let's get to work:
- Pyramids are cut out, this is the future part of the bud;
- Petals are formed: each pyramid is cut along the edges, the upper platform remains intact. The edges of the 4 parts are rounded, unbent.
- Bud blanks are painted and dried.
- A rose is formed: a bud is made inside: the edges of the petals of one blank are glued on top. Then rows are added along the surface.

When a large rose is made, additional individual petals are glued on the outside.

fluffy hyacinth
It is made from colored paper. It is cut into strips 5 cm wide, the length is arbitrary. We cut the strips with a fringe by 1/3 of the thickness, these are the future petals. The strip is wrapped around the top of the sushi stick so that no wood is visible after the fringe is folded back.

After that, each petal is wrapped in a pencil. For simplicity, the strip is laid on toilet paper, the entire fringe is immediately twisted, and only after that is attached. The bottom of the stick is decorated with colored corrugated paper, the leaves of the hyacinth are long, narrow, pointed, they are made of thick double-sided paper. The original flower is fixed on a stand or placed in a vase.

Planters with flowers
An original gift on the occasion of March 8 or Mother's Day will be a small decorative pot full of flowers. If you show imagination, it is easy to make a bright craft out of an unnecessary planter.

Cropped are used as a stand:
- tubes from under chips;
- plastic bottles;
- cans.
- I decorate them in various ways:
- covered with acrylic paint;
- wrapped in corrugated paper, it is fixed with colored rubber bands for money;
- ready-made round flower packaging and ribbon.

Then proceed to the manufacture of flowers. A sheet of thick double-sided colored paper is lined with strips 1 cm wide, 8–10 cm long, this will be grass. The ends of the strips are connected, glued, attached inside the pot so that numerous paper loops protrude from it.

They fix the grass with any adhesive, it is more convenient to do this using double-sided tape. Making flowers comes down to cutting them out on a stencil, you need a circle of petals and a heart, it is glued to the center of the first blank. The finished flower is attached to the grass with a stapler or glue.

They make bouquets of the same type of flowers: buttercups, daisies. Various look too clumsy. If you use thin paper for the petals, the blade of grass will withstand a multi-layered flower.

good mood effect
Flowers of different textures, colors and shades will be a unique addition to festive table, interior decor for a nursery, hall. They can be made to distract from everyday worries, to raise the bar of mood. It is better to engage in creativity together with the kids, they will be happy to spend time with their mother, learn something new.

When choosing colors, stop at warm colors, they have an amazing property: they create a positive effect, add joy to our lives. There will always be improvised means for work, and crafts will delight for a long time.
Greetings, dear readers and visitors! I have repeatedly written that I love decorating gifts in the most unexpected ways. And today I suggest you make paper flowers with your own hands. Already twenty-odd methods, by the way.
Now, unfortunately, I rarely get to mass gift wrapping. Moreover, every year there are more and more acquaintances and friends who should be congratulated along with relatives. It's very joyful! I love giving presents. But if I choose them very carefully, then lately I pack them in organza bags, since I decide on detailed packaging only for single holidays (like a birthday).
However, my passion for all sorts of packaging beauty is difficult to overcome, so today I will train with you to make beautiful flowers according to step-by-step schemes.
DIY paper flowers: simple and with a twist
There will be a lot of master classes, get ready. Good news for all rose lovers: there will be 4 of them.
Aster
Guys, honestly, I'm not very strong in the names of colors. So if you see a clear discrepancy for you - write in the comments.
So, the first in line is the aster. For her, cut out five circles: two large, two medium and one very small. Fold each circle in half three times, then draw the edge as in the 4th photo. After unfolding the design, squeeze each petal to add volume. Fold all the circles into each other and decorate the middle.
Almost calendula
This flower is much more like a packing bow. Prepare for it a square of paper of the desired length and cut the edges according to step 2. You will need several such blanks. Lay them one on top of the other and squeeze in the center, tightening with wire or thread.
Now the most important thing is to straighten the petals so that you get a beautiful likeness of a flower. Accordingly, the more layers, the more petals and the more magnificent the flower in the end.
Tip: make several of these flowers of different sizes and glue them on the packaging next to each other, then you get a beautiful semblance of a bouquet.

Calla
To create calla lilies, you can use both ordinary double-sided paper and foamed rubber (here I wrote what it is - in the section about the minion).
For calla, take a stamen (you can crumple it out of paper, go make it out of polymer clay) and a heart-shaped petal. Insert the stamen into the petal, fold the edges of the petal over the stamen, gluing them together. It remains only to unscrew the edges to get the maximum resemblance to calla lilies.
Such flowers are well suited for postcards, packaging, and as an independent gift in the form of a bouquet.

Bell
The master class for the bell is quite simple and understandable. Cut out the blank according to the first photo. Glue the edges of it, and gently straighten the ends. To make everything look natural, make the middle of several oblong stamens that will need to be glued inside the flower.
Of these bells, by the way, it will be great to decorate the packaging for March 8 or just a spring birthday.

lilies of the valley
Well, or something similar. For one flower, take a long rectangle and bend the edge of it, as in the photo. Cut the wide part so that you get a lot of small strips. Using scissors, twist the strips (to do this, you just need to run the sharp side of the scissors along these strips, slightly pressing the blade against them).
To prevent the flower from falling apart, take a rod on which you wind a green strip. Then, from above, begin to gently twist the “flower” part, previously smeared with glue. Apply layers tightly so that greenery does not show through from under them.
But it’s not at all difficult to make green leaves - for them, just fold a rectangle of green paper with an accordion and cut the edges with a “triangle”. When unfolded, you will get a lot of green leaves ready to be glued to the base.

Poppy
Now let's use corrugated paper. Cut out about ten teardrop-shaped petals from it. Stretch the wide part so that the blanks resemble mushrooms.
Take a thin wire and wind some paper around it - this will be the core. Wind the petals onto this core so that each slightly overlaps the previous one. When everything is ready, the structure can be pulled down below so that it does not fall apart.
The master class shows how this flower can be attached to a festive cap, but believe me, a poppy will look great on a gift box.

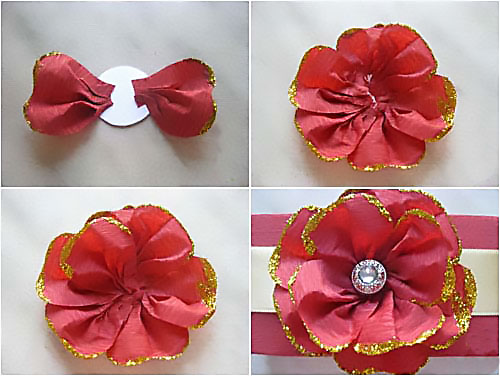
Red flower
What kind of species does he have? No associations came to mind. But this is not the point - to create it, you will need about ten petals (corrugated paper is used, by the way). Their shape is almost drop-shaped. but with a cut end.
Cut out a base circle from thick cardboard. Glue all the petals in layers to this circle, slightly crumpling (doubting? God, how right: _D) the bases, thus forming folds - then the flower will be more voluminous and “fluffy”. Decorate the center with some button or bead.
Such a flower, by the way, will look great from soft felt - so it will gain durability. And if you attach the base for the brooch at the back, you get two in one - a gift decoration and a gift itself.
Extravaganza of color
There are only two flowers, but due to the bright combinations, a very unusual effect is obtained. Take the crepe paper again, cut out a circle and fold it into a chrysalis shape. Cut a “skirt” to it, which you wrap around the chrysalis. Attach the petals on top, gluing them in a circle. Glue two wide leaves at the base.
The second flower is quite simple - cut the fringe and twist it into several layers. Flowers are very simple, they can make a very interesting gift arrangement.
Unseen flower
To prepare the basis for this flower, I advise you to look here - here the basis for the second Christmas tree is created in the same way. But then the differences begin - each of the corners must be wrapped with a thick wire or knitting needle so that a spiral is obtained.
You can leave this design alone, but I suggest you connect several (say, three) pieces using the existing spirals - the wow effect is provided. Then you can also experiment - combine elements with spirals into unprecedented designs.
Tip: going to a party in Japanese style? Then make such a flower of a very large size and take it with you - it will serve as an excellent decoration for the chandelier.

Peony
“Pio-, pio-, peonies are given by a new acquaintance ...” - the words from the song of the underground group “My Michelle” (I often listen to it lately, inspired). We will make crafts from corrugated paper. You will need five sizes of petals, approximately five copies of each ( appearance as in the photo).
Stretch the petals so that you get a semblance of a wave (for both large and small ones). Then form a stamen from the same corrugated paper by folding the paper with further compaction. You can do this on a wire skewer, or you can do it without it.
Glue the petals onto the finished stamen, overlapping each subsequent previous one. Do not tighten the petal too much. At the end, it remains only to cut the green leaves and stick them around the peony.

4 in 1: dandelion, carnation, aster, chamomile
All these wonderful creations of nature are made according to the same principle - cutting the edge of the strip from which the flower will be made. The final shape of the flower also depends on the shape of the cut. Keep in mind that some require a core, while others do not.
Please note that despite simple design the flowers are very realistic. If there is very little time for production, then this is an ideal option.
Experiment and discover your unprecedented plants - be sure to tell us what happened.

paper roses
Magic roses are one of my favorite flowers.
Rose with twisted edge
The main difficulty here is to carefully twist the edge of the corrugated paper, straightening the folds. Then make sure that the folds are even. Now twist the strip so that the layers fit snugly together. At the end, fasten with a thread, cut off the excess.

simple rosette
Need to make a plant in five minutes? Then this rose is for you! Just cut out a circle in which draw a spiral. Cut out a spiral like in the photo and twist the rose starting from the longest link of the spiral (the central part will serve as the base).

big rose
Even gigantic, if you follow just such dimensions. Heart petals are stretched and superimposed on each other in a circle with fixing with glue. Green petals are attached at the end. Of course, the flower does not have to be as big as in the photo - start from your preferences.
Twisted paper rose
Once I already described this way of creating a rose (here is the second one). The principle is exactly the same, but the dimensions of the triangles resulting from twisting must be the same along the entire length of the tape, otherwise there will be a not very neat flower.
Once she even made a Rosemary doll, which took part in the city exhibition. Her whole body was covered with roses, made just in this way (the roses were from ribbons, really).

Clover
I will only show you how to make the base for a four leaf clover. To do this, take a square of paper and fold it in half lengthwise and in half again. Bend the ends to the center. Cut out a heart from the resulting design. The result will be exactly what we wanted - a happy flower.

Nameless
As much as I puffed up, I could not give an intelligible name. As a result, Tovariz remained just a beautiful flower, reminiscent of kanzashi motifs (Japanese art of making jewelry from satin ribbons).
The beginning here is the same as in clover. But after bending the edges, it will be necessary to bend the ends so that the length of the bent part is equal to the length of the visible side in the middle. Then these parts are straightened and their edges are already bent so that the sides are even. They are again bent and glued so that three stamens are obtained. There should be three such petals.
Most of all, such a flower is suitable for decorating a gift in the Japanese style.

And again aster
This time, you already need to glue the petals around the edge until you reach the desired volume. Decorate the center as you wish, or simply fill it with as many petals as possible.

On this large flower review, I declare it closed. I hope you have found exactly the option that will help you decorate the best gift. See you soon, subscribe and share with your friends!
Sincerely, Anastasia Skoreva
The flowering time for most flowers, alas, is short. But this is no reason to be upset. You can capture the natural beauty of daisies, roses, peonies, and other flowers by creating their artificial counterparts. This article "Cross" will teach you how to create flowers with your own hands from improvised materials.
Flowers from cotton pads
Many do not even suspect that cotton pads can be used not only as a means of hygiene, but also as a universal material for creating all kinds of inflorescences.
The surface of cotton pads can be smooth, or maybe with a printed pattern. Depending on the type of flower, choose the one that suits you best.
Even a child can make a spring card with a primrose using cotton pads, scissors, glue, colored paper, paint or simple felt-tip pens.

If the cotton pads are a little “fluffy” around the edges, then you will get such airy roses. Looks very gentle and original!

From cotton pads, a cotton swab and a straw for drinks, you can create an elegant calla.

Cotton pads and a stationery stapler will help to make an original chamomile) If desired, instead of clerical brackets, you can use glue, and paint the chamomile with gouache or acrylic paint.

Cotton pads are very often used in the manufacture of a very popular flower - roses. Pearls will decorate roses, which will give nobility to the resulting flower arrangement.

The secrets of creating flowers from cotton pads with your own hands will be revealed by SunduchOK113 in a video master class:
From a large number of roses, you can create such a festive Christmas. To do this, you need a round blank, glue, cotton pads and various elements for decoration (ribbons, beads, rhinestones, sequins, etc.)


Flowers from cotton buds
Cotton buds are also an affordable and wonderful material for creating beautiful flowers.
Using cotton swabs, plasticine and colored paper, you can create cute daisies.

Willow twigs from the tips of cotton buds look very natural on an Easter card)

Using the tips of cotton swabs, paints and colored paper, you can make bright and fluffy dandelions.

You can make creative ones from colored cotton swabs and a round foam blank. For example, such a mischievous chamomile.


When making flowers from cotton buds with your own hands, you can choose any paint (gouache, watercolor, acrylic):

From the colored tips of cotton swabs, you can make mini flower beds with carnations.

Flowers from egg trays
Egg trays are one of waste materials for needlework. Usually egg containers are thrown into the trash, not knowing what beauty can be created from them! DIY flowers from egg trays will decorate the interior of the house, photo frames, wreaths, mirrors, etc.
To make these flowers you will need:
- egg trays (cardboard and plastic can be used);
- brush and paint (gouache, acrylic);
- scissors;
- glue;
- wire.
We cut the egg tray into separate sections, after which we form each section with scissors. The height of such blanks may be different. The resulting petals are painted with paint, preferably in two layers. Further, depending on the type of flower you are making, one blank can be inserted into another, forming a bud. We fix the elements of the resulting flower with glue.

The materials and the process of creating flowers from egg trays are discussed in detail in the MK Masterpieces of Needlework:
We bring to your attention the most common types of flowers from egg trays. But remember that you can come up with the shape of a flower yourself!


The frame of the summer wreath is also made of egg trays. This can be decorated with chamomile, cornflowers or pansies.

From plastic egg trays, you can even make a small masterpiece of floristry!

For example, snow-white roses from plastic containers in combination with pearls and decorative gypsophila, they form such a delicate bouquet.

Decorative moss or ferns, as well as red ribbons and beads, will add brightness and festivity to a Christmas wreath of plastic roses.

A personalized flower on the table will please a colleague or your loved ones:

Let's see how you can make an exclusive photo frame out of a simple one:

A simple mirror decorated with flowers from the trays will look more interesting and sophisticated.


Gorgeous mirror decorated with lush peonies

Flowers from disposable spoons
Disposable plastic spoons can also be used to create flowers.
From simple white spoons you can make this

Spoons can be used not only white, but also bright colors, this is especially true when creating.

When creating flowers from, you can use spoons different sizes and colors:

To create these decorative water lilies, part of the spoons were painted with gold spray paint. White and gold water lilies side by side look very stylish!

In addition to all kinds of paints, you can decorate spoons with decorative sparkles and glue:

DIY Gifts and Crafts Ideas offers MK for creating a bright spring from disposable spoons:
From white spoons, drinking tubes, plasticine and colored paper, you can create a spring flower bed. Petals (white spoons) and stems (tubes for drinks) of snowdrops are interconnected using ordinary green plasticine. Cut out snowdrop leaves from colored paper. We make yellow ones from plasticine.

With the help of thermal treatment (lighter flame, candles), spoons can be melted and deformed into a petal of the desired shape. After that, paint the petals in a suitable color and assemble. It is convenient to use spray paint. Such flowers can be used even in the manufacture.

Using the same principle, you can make this. You can learn all the secrets of its manufacture in the master class.

wire flowers
There are different technologies for creating flowers from wire with your own hands.
Flowers made of wire and nylon
For example, nylon flowers can be made from unnecessary nylon tights and wire.

The technique for making nylon flowers is quite simple, but you can create real floral masterpieces. For example, -phalaenopsis, which is not immediately possible to distinguish from the real one!) A wonderful element of decor for both home and office!


Wire flowers and nail polish
Another handy tool for creating wire flowers is regular nail polish.

It is better to use a fresh varnish of a more liquid consistency so that it flows from the brush.
The varnish is applied to the edges of the petals formed from the wire. After the first drying of the varnish, additional layers of the same color can be applied or, for example, topped with glitter varnish.
To prevent the varnish from dripping onto one side of the flower, secure the stem vertically in a dishwashing sponge.
Olga Lazarchuk reveals in her master class the features of making flowers in this way:
AND ladybug sure to bring good luck!

If you do not have time to take care of ordinary flowers, then your window sill can decorate this one.

A comb with delicate flowers will be a worthy decoration for your hair:


Flowers made of wire and floss
Ganutel - a technique for making flowers from wire and.

To create such a flower you will need:
- wire
- floss in different colors
- scissors (nippers)
- pliers.
We make a spring out of wire: we wind a thin wire around a long rounded object, for example, a pen rod or a simple knitting needle.
From the resulting spring we form the petals and leaves of the flower. Next, on the resulting flower frame, we begin to wind floss threads in a certain order. We connect the resulting flower details!
More clearly, this process of creating flowers can be seen in the DIANA Bilohorka master class:
From hard wire and soft threads, you can even create such airy beauty!

Burlap flowers
Everyone can create flowers from an unusual material - burlap. This is a very popular pastime that is born for!

Beginners can start with the simplest, make a rose from burlap.

To do this, you will need the material itself - burlap, matching threads and a needle.
If you can use it carefully, then the needle and thread can be replaced with hot glue.
We cut off the burlap 4-5 cm wide, about 1 m long. We fold the resulting strip in half along the entire length and begin to twist the rosette.
YOU WILL USE
See the step-by-step process of folding a rose in this way in the master classes "Cross":
Burlap roses look very stylish! They can decorate various things in your home, for example, make such designer lamps ...

... or make such a wreath-decoration for the door:


There is a universal technique for creating flowers from burlap. In this case, the burlap is glued onto the finished frame of wire petals.

First, the burlap is coated with PVA glue.
After drying, the fabric will become firmer and more comfortable to take on any shape.
From the wire we prepare the frame of the petals for the flowers, we wrap the wire with colored adhesive tape.

The resulting petals are superimposed on the glued pieces of fabric and are again treated with glue from above.

The workpiece must be allowed to dry in this form for 1 day. Next, cut out the resulting petals along the contour of the wire so that the edges are perfectly even. We bend the cut elements of the flower in the right direction and form a flower.
Thread flowers
Flowers from pom-poms
Thread pom-poms are a great element for creating flowers! With their help, you can create a spring mimosa:

Or a bouquet of summer dandelions.

MASTER CLASS ON THE TOPIC

Anyone can make flowers from threads with their own hands - and even without a crochet hook and knitting needles!

It is clearly shown how and from what materials such flowers can be made in the master class by Natalya Melnik:
Master class on creating a solar dandelion
To make a dandelion, you will need threads of two colors.

We wind yellow threads on any hollow frame. Next, we sew the middle of the wound threads with the same threads and coat with PVA glue. We remove the frame, and tightly wind the threads on the middle of the workpiece, stitched and smeared with glue.


After the glue dries, cut the workpiece in half. We cut the yellow threads and straighten the resulting dandelion.


We make sepals from green threads.


We make the stem from wire wrapped in green threads.
A dandelion leaf can be crocheted.

Thread flowers can be made using the Tenerife loom (flower loom). Flowers are created by winding threads in a certain order on circle skewers. This process is very addictive and captivates not only adults, but also children. The resulting flowers can decorate clothes, hats, scarves and bags.


In work, you can use twine or jute of natural color, dyed or bleached.

Twine flowers…

...and jute
The process of weaving flowers can be seen in detail in the Povyazuli master class:
You can buy a Tenerife machine at a needlework store.

Or do the same with your own hands. The easiest option is to cut it out of cardboard

There is another option homemade machine. To create it, you will need cardboard, needles, compasses, glue and a large needle.

Cut out two circles from cardboard and glue them together.

The resulting circle is divided into equal parts. According to the lines we stick needles or pins:


We form the core of the flower according to:


After the "birth" of the flower, remove the cardboard base:


