DIY bird feeder from a jar. Bird feeders: instructions, photos and original ideas. What should a bird feeder be like?
For birds, you need to have a few simple items and tools.
You can make a feeding trough with your children, but keep in mind that you need to watch every step, since during the construction process sharp things are used - scissors, knives, screwdrivers and even, sometimes, a saw.
There are many options for feeders - made from plywood, plastic bottles, tin cans or cardboard.
Here are the most interesting, popular and original ideas for creating a feeder:
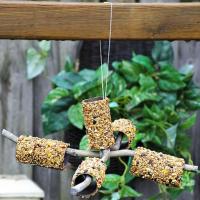
Feeder made from scrap materials: toilet paper rolls

You will need:
1 toilet paper roll
Peanut butter
Small bowl
Plate
A couple of branches
Strong thread or fishing line
Knife (dull or plastic).
1. Connect two branches or sticks together using hot glue or string. You can skip this point if you make 4 holes in the sleeve (see below).
2. Make holes in the toilet paper roll so that you can thread two branches or sticks through them. It is better to make 2 holes: a little higher and 2 slightly lower (see image). This item is not required, because The sleeve can be put on differently.

3. Place the peanut butter in a small bowl and use a plastic knife to spread the butter onto the surface of the cardboard toilet paper roll.

4. Sprinkle the food over the peanut butter sleeve.

5. Repeat steps 3 and 4 for 4 more bushings.
6. Tie a strong thread to the connected branches so that the structure can be hung.
7. Hang all the cardboard tubes on the branch structure, and then hang everything on the tree.
Feeder made from a plastic bottle. Option 1.

You will need:
Any plastic bottle
Ribbon, thread or fishing line
Awl or drill (for making holes in the bottle and plastic cap)
Bolt and nut
Stationery or simple knife (if necessary)
Deep plastic plate.

1. Prepare a plastic bottle. Remove the label from it, wash it well and dry it.
2. Make a hole in the middle of the lid and plastic plate.
3. Attach the lid to the plate using a bolt and nut.

4. Make a hole in the bottom of the bottle (bottom).
5. Make several holes on the side (4-5), near the neck of the bottle, so that the food can spill out when you turn the bottle over. Holes can be made with a stationery knife if the bottle is not too thick.

6. Take the ribbon, fold it in half, and tie the ends in a knot. Thread the ribbon through the hole at the bottom of the bottle.
Now you can pour food into the bottle, screw on the cap and turn it over. The ribbon will allow you to hang the feeder on a branch.

Bird feeder made from a plastic bottle. Option 2.

You will need:
Plastic bottle
Plastic container
Strong thread or fishing line
Screwdriver or nail
Knife (simple or stationery).
1. Remove the cap from the bottle and the cap from the container.
2. Place the bottle cap on the container cap (in the center) and trace with a pen, felt-tip pen or pencil.
3. Using a utility knife, cut a hole in the lid of the container. The hole can be made slightly smaller than the diameter of the bottle cap.

4. Make one hole along the edges of the container lid.
5. Make a hole in the center of the bottle cap. The hole should be large enough to allow bird food to spill out.
6. Place the cap on the bottle and then insert the bottle into the hole in the container cap.

7. Tie a strong thread to the bottle and put the cap on the container.
Now you can pour food into the bottle or pour water and hang the feeder on a tree.

How to make a feeder from a box (photo instructions)


Original polymer clay feeder

You will need:
Polymer clay
Rope
Thick wire or piece of aluminum
Baking bowl or any other utensil that can be placed in the oven
A small piece of fabric.
1. First roll out the clay on a flat surface until it is about 6mm thick.
2. Carefully place the rolled out clay inside the baking bowl. Trim off any excess pieces so that the clay lies flat. Make 3 large holes in the clay for the rope.

3. Place the bowl of clay in the oven. Read the clay instructions carefully to know how long it takes for the clay to harden in the oven.
4. When the clay has hardened, carefully remove it from the bowl, tie three pieces of rope to it - tie a knot at one end of each rope, and insert the other end into the hole of the clay plate.
5. Tie all ends of the rope and secure them with wire.

6. It is advisable to place a small piece of fabric inside the plate so that the birds do not accidentally peck the clay along with the food.
Original do-it-yourself pumpkin feeder

You will need:
Small pumpkin
Wooden crossbars (even branches can be used)
Thin wire.
1. You need to cut off the top of the pumpkin.

2. Using a knife or screwdriver, make 4 holes in the pumpkin to insert branches or wooden slats into. Make 2 opposite holes at the same height and two other opposite ones slightly lower - this way you will have one branch slightly higher than the other.

3. Take a thin wire and wrap it around each end of the branches so that the feeder can be hung on the tree. Connect all the ends of the wire so that the feeder can hang evenly. Twist them into a hook.

Original DIY bird feeder idea
This feeder is suitable for sub-zero temperatures.

You will need:
Large plastic bottle
Small plastic bottle or small plastic container
Scissors
Coniferous branches
Berries (optional)
Seeds

1. Cut off the bottom of a large and small plastic bottle. First you can make a hole with a knife and then cut with scissors. You will have the base of the feeder.

2. Place spruce branches, berries and seeds in a circle in the cut-out bottom of a large bottle.
3. Place the bottom of a small bottle or small plastic container in the center of the base.

4. Pour earth, sand or pebbles into a small container.

5. Tie strong threads or fishing line to the feeder so it can be hung.
6. If you put the feeder in the freezer overnight, and then take out and remove the plastic parts, you will get an ice feeder.

How to make a feeder with your own hands using a bottle

You will need:
Small glass or plastic bottle (preferably with a cap)
Small saucer or bottom of a plastic bottle
Wire
Saw (if necessary)
Screw half ring (hook).

1. Using screws, connect two small pieces of plywood. In this example, the dimensions of the plywood are 11 x 15 cm and 31 x 15 cm.
2. Using the bottle that you will later attach to the stand, mark the places where you will need to attach two pieces of wire - one at the neck, the other at the bottom of the bottle.
3. The neck of the bottle should be approximately 3-4 cm above the base.
4. Drill holes for the wire, insert your wire through the bottom, wrap it around the bottle and secure it to the back of the plywood (you can twist the wire or secure it with a stapler).
5. Fill the bottle with seeds, screw the lid on so as not to spill the seeds, turn it over and insert the bottle between the wires, place a saucer under it and remove the lid.
6. Screw a half-ring screw into the top of the plywood to hang the feeder.
Original DIY bird feeder

You will need:
Tin can (preferably with a lid)
Sisal rope (sisal rope) or thick rope
A piece of thin plywood, a branch, or any small metal piece
Hot glue.

1. If you have a jar with a lid, then the lid needs to be bent in half.
2. Take a small branch, piece of plywood, or other small piece that birds can perch on and glue it to the jar.
3. Insert the bent lid as shown in the image (slightly inside the jar and over the metal part) and secure it with glue.
4. Take a thick rope or rope about 80 cm long and start wrapping the can so that the long ends of this rope (30 cm) remain at the beginning and at the end. Use glue to secure the rope to the can.
5. Cut the rope, tie the ends in a knot and secure with glue.

You will need:
3/4 cup birdseed
1/4 cup water
1 packet of gelatin
Twine or strong thread
Cookie pans
Baking paper.
1. Mix gelatin with water (1/4 cup) and bring to a boil, stirring. Make sure the gelatin is completely dissolved.
2. Remove from heat and let cool.
3. Add 3/4 cup birdseed. You can add more if it fits.
4. Place the cookie cutters on baking paper and fill them with the resulting food mixture.

5. Cut a piece of thread and tie its ends in a knot. Partially insert the thread into the mixture.
6. Leave the mixture to dry overnight, making sure to turn it occasionally when you have time.
7. Remove the molds and hang the food on the tree.

How to make your own bird feeder using tin cans

You will need:
3 cans of paint or cans
A piece of branch or wooden stick
Hot glue
Paints (if desired).

You can paint the jars, or you can leave them as is.

1. Glue a piece of branch to a jar for the birds to land and eat.
2. Wrap strong thread or ribbon around the jar and tie the ends in a knot. You can secure the tape with glue so that it sticks better to the jar.
3. Fill the jars with food and you're done!
How to make a bird feeder from a plastic bottle

A tin of biscuits can also serve a good purpose if you turn it into a bird feeder that can be hung in the garden, park or country house. Our master class will tell you how to make a simple feeder.
Materials for making a feeder:
- biscuit tin (d-19 cm, h-8 cm)
- chain (130 cm)
- detachable ring (d-1.5 cm)
- cotter pin (1.5 cm) 8 pcs.
- sheet of paper (A4).
Tools for making a feeder:
- ruler
- compass
- pencil
- alcohol marker
- metal scissors
- pliers.

How to make a bird feeder
Using a compass, draw a circle (d-19 cm) on paper and divide it with lines into 4 equal sectors. We attach the container and lid to the template, and mark the locations for the holes with a marker.

Using an awl, we pierce holes in the marked places 0.4 cm from the edge of the container and lid. Don't forget to place a piece of wood or plastic underneath so you don't damage the table with the awl.

We cut the chain into four pieces of 12 cm and two pieces of 38 cm.

We insert a cotter pin into the holes of the container, first putting a chain (12 cm) on it. We fix the cotter pins in the holes by bending the tails in different directions with pliers. We fix the chains to the lid in a similar way, but do not forget to hook the chain (38 cm) and the chains coming from the container onto the cotter pin.

We find the middle on the chains (38 cm) and insert a split ring into the link. The finished feeder can be secured to a branch using a plastic clamp.
With the arrival of cold weather, snow and frost, conscious nature lovers hang bird feeders near the tree house (or near the apartment window). These simple devices will not only delight children and the elderly, they will help many birds survive the winter. We will tell you how to make feeders and from what available materials in this article.
Variety of feeders
Human imagination is limitless. And having looked at what kind of bird feeders people come up with and from what, this fact is beyond doubt. Having analyzed the basic materials, we can divide devices for feeding birds into the following groups:
- from glass containers;
- from meshes;
- from iron cans;
- from old dishes;
- from plastic containers;
- wooden;
- from fruits;
- all kinds of garlands.
Having examined each group in detail, you can definitely find exactly the one that meets all the parameters. And most importantly, you will want to make it and hang it near your home.
Glass feeders
Jars with a volume of 1 liter to 2 liters are suitable for this. Place a plastic cap on the neck and cut a hole in it. Place food inside. Hang in a horizontal position. The advantages of such a feeder:
- snow does not fall;
- the wind does not blow;
- large birds (crows, magpies) will not be able to take food from small birds.
- Long service life.

There are also more original feeders made from cans. You can see them in the photo.


But there are also feeders made of glass bottles. They need to be secured with the neck down, placing a saucer underneath into which the food will be poured.


Alternatively, you can drill or cut a hole in the bottle into which the bird will fly for food. In this case, you must not forget about the bird's footrest.

Mesh devices
You can feed the birds in a more primitive way, the main thing is that the birds are well-fed. Nets made of polymer material with small holes need to be fastened together to form a bag into which food is poured and hung on a string near a window or on a tree. The advantage is the simplicity and speed of production.

For those who find this method too simple, there are more original and beautiful mesh feeders, but their production will take longer:
- You need to take a garden plastic mesh with small holes.
- Twist a cylinder out of it and secure it in this position.
- Take two pallets from flower pots and secure them at the top and bottom of the cylinder.
- After attaching the lower saucer, pour the food inside.
- Make fastenings in the upper saucer (or along the edges of the mesh) to hang the feeder on a branch.

Feeders made from iron cans
In this case, there are two product options:
- Vertical feeder: small cuts are made in the walls of the jar so that the birds can peck the food. Be sure to make footrests at the bottom base. The top should be closed.

- Horizontal feeder. You need to attach a footrest to the hole into which the birds will fly for food. Decorating the jar itself is at your own discretion.

The advantage of such feeders: relative speed of production, long service life, and is not afraid of impacts.
Old dishes as a bird feeder
Old ceramic dishes are suitable for creating an original feeder that will not only feed the birds, but also decorate a gloomy, cold landscape. This is the main advantage of these feeders. After all, the process of their manufacture will require some skill: making holes for fastenings without destroying the product.


Plastic feeders
Suitable for feeders:
- eggplants from 3 l to 6 l;
- bottles from 1l to 2l;
- canisters from 1 to 35 l;
- containers with lids;
- not big buckets.
How to adapt them to feeders is a matter of imagination. The main models of such bird canteens are presented in the photo.


The advantages of feeders made of plastic products are:
- ease of manufacture;
- long service life;
- not afraid of shocks and temperature changes;
- low cost of raw materials.
The main thing you need to take into account is that thin plastic from bottles and eggplants becomes sharp when cut. And it can damage the delicate legs of birds. Therefore, the part of the cut where the birds will land must either be melted over a fire, or rubber tubes must be put on.
Wooden feeders
- whole cut of the trunk (chock);
- from boards;
- from branches or sticks;
- from plywood or other wood sheet.


It is recommended to make feeders with a roof to provide protection from direct snow and rain getting into the feed. Wood products always attract the eye, as they show the skill and dexterity of the craftsman. Therefore, the advantage of this type of feeder is not only the environmental friendliness of the raw materials, but also its attractive appearance.
Feeders made from plant fruits
Original feeders are made from:
- pumpkins;
- coconut shells;
- orange peel.
Having cut the fruit and pulled out the pulp, you can safely add food, attach it to a rope or wire, and hang it on a branch. Original, beautiful and simple.


Birds living in the wild need protection and care. It is especially difficult for them during winter: when it is frosty outside, it is so difficult to find shelter and food.
That is why caring people try to feed our younger “brothers” as much as possible. One of the ways that will not only help birds, but also decorate your garden is a feeder made from scrap materials.

In this article we have collected several of the most affordable options - based on descriptions and photographs, using already unnecessary items (plastic bottles or old dishes), you can easily arrange a place where flocks of birds will gather.
Material selection
After assessing the resources you have to create a feeder, you can choose an idea you like. However, it is worth remembering that not only its appearance, but also practical characteristics such as stability depend on the configuration.

That is why a good feeder must meet the following requirements:

Wear resistance and durability. Preference should be given to wood or plastic, which can withstand weather conditions without getting wet from rain and snow, or collapsing under gusts of wind.

In addition, the birds themselves often cause damage to the feeder - in search of crumbs, their beaks and claws scratch and tear fragile materials.

Proper size. Remember that if you cut out a small feeder, for example, from tetrapack, then large birds will not be able to eat from it, and small ones will start fights for space and shake out the food on the ground.

No sharp edges, protruding nails, etc. Birds are very delicate creatures, their feather protection and the skin on their legs cannot prevent cuts from sharp objects, so make sure that your feeder is not dangerous for them, especially if it is made of glass, plastic or planks!

Location and installation
Choosing the right location is extremely important!

Having chosen the most suitable position from the point of view of landscape design, evaluate:

Accessibility for birds. Perhaps the feeder will be closed from them by thick branches, or, conversely, it will be too open, and then, in a strong wind, the birds simply will not be able to get close to it.

Difficulty for cats. These animals are excellent hunters, especially those who live in villages and holiday villages. They are stronger, faster and more dexterous than their domestic counterparts, and therefore, sneaking up to the feeder, they can cause great damage to the bird community.

Ideas for making your own feeder
There are a huge number of different types of feeders - it all depends on your imagination and available materials.

We will try to consider both the simplest and the most original ideas.

House made of wood or plywood
Despite the apparent complexity, such a structure can be assembled with unnecessary boards, pieces of wood, glazing beads, plywood and, of course, special glue or nails.
Note!

The base should be a heavy, flat board. To make the walls and roof, you may need a drawing, however, you can get by with an eye.

A wooden bird feeder, depending on how much attention you pay to it, can become not only a place for birds to feed, but also an elegant decoration for your garden.

Feeder made from plastic bottles
This type of feeder is very easy to make and is perfect if you decide to involve children in the creation process. You need to cut one or two holes in the bottle so that you can not only pour in the food, but also access it without difficulty.

Of course, you should try to ensure that the cut edges come out neat and not too sharp (in addition, it is advisable to cover them with tape).
If you are using a small bottle (1.5-2 liters), then you can do it in two ways: cut a square or rectangular hole in the bottle, or prefer a U-shape so that you can bend a piece of plastic and make a visor.

If you decide to use a large bottle (5-6 liters, in which drinking water is usually sold), you can make a large side cutout. This will not only provide more food, but also give the birds room to maneuver.
Note!


To prevent the wind from ruffling a light bottle, it is worth placing a stone or a piece of brick at the bottom. This also applies to the next type of feeder.

Bird feeder made of tetra pack
You can also use juice or wine boxes to make a bird feeder.

To do this, you should follow the same technology as in the previous case: mark the location of the cut, cut it in shape, glue tape (or adhesive tape) along the bottom side of the opening, then make holes for a strong rope in the upper part of the tetra pack. All that remains is to hang the feeder in the place you choose.
Shoe box feeder
The cardboard from which the shoebox is made cannot be considered a durable material, but it is quite resistant to moisture, and if it is frosty outside, such a feeder can hang until spring.

The technology for making the feeder, as in previous cases, is also very simple: make four to six holes for the rope, slits on the sides and put a weight on the bottom for stability.

Note!

Other options
The above options are extremely popular - such feeders can be found at any dacha. If you want to make a unique feeder with your own hands, you should take unusual materials, for example, old tableware: a cup and saucer.
In the autumn, you can cut out a product from a pumpkin or zucchini; in the winter, halves of an orange, peeled from the pulp, are suitable for this. These feeders will surprise your neighbors and will undoubtedly decorate your garden!

Photo of a DIY bird feeder


Preface
When winter comes, especially frosty and snowy ones, many wintering (non-migratory) birds move closer to human habitation in search of food. Feeding them is not only noble, but also exciting, because the bright plumage and sonorous chirping of winged guests will delight both adults and children. We’ll tell you in this article how to make a feeder from a wide variety of available materials.
Features of bird feeders
When creating a mini-dining room for flying guests, regardless of the chosen design, you should take into account important nuances:
- Birds hear poorly and smell poorly, but they see well. Based on this, in order for them to realize that there is a food source in front of them, the food must be clearly visible.
- The feeder should also have sides and/or be stable enough to prevent the food from being blown away by the wind. By scattering seeds on the ground, we risk feeding not birds, but cats or other predators, and, unfortunately, birds. To prevent such an outcome on firmly fixed structures, special protective devices are needed.
- You need to make several small holes in the bottom. They are needed to drain water that gets caught in the rain, so that rot or mold does not develop.
- The sides must be secured. Sharp or metal edges are not allowed - birds can damage their legs.
Important! The feeder should not be constantly full - pour food 1-2 times a day. By overfeeding birds, you risk discouraging them from getting food on their own.
Simple options for making bird feeders
There are a lot of options for making poultry canteen. Depending on the availability of materials and skills, you can assemble something simple or a real tower. Below are examples of various designs.
Almost the simplest option, even a child can do it on his own. You need to prepare:
- a clean dry box or juice/milk carton (take at least a liter volume, preferably Tetra Pak - it does not get wet);
- scissors or knife;
- rope;
- tape (optional);
- plastic tube/straw;
- weighting material
Feeder-garland
Very simple and New Year's style. You only need a thin, strong rope (or twine, or wire, but always braided). We string or wrap food on it: pieces of unsalted lard, bunches of berries, dried fruits (apples, pears). This type of feeder needs to be hung tightly so that the birds can sit comfortably.
Did you know?It is worth putting the most unexpected, at first glance, things into the bird feeder. Carefully crushed eggshells are rich in essential calcium, and fine river sand will aid digestion.
Tin can feeder
It is made quickly and easily, and looks compact. You will need:
- tin or metal can (for example, from canned goods);
- small stick;
- rope/tape.
Manufacturing:
- place the jar horizontally;
- Wrap the tape approximately to the middle (if necessary, add additional fixation with glue), leave a long end;
- Attach a stick to the bottom edge of the hole (the bird will land there);
- Wrap the free end of the tape to a branch (the can should hang parallel to the ground).
Pumpkin feeder
A bright and original solution that does not require special skills. You will need:
- whole large pumpkin;
- sharp knife and spoon;
- two long, strong, not too thick straight sticks or plastic tubes;
- a couple of meters of strong twine/rope/wire.
There are 2 ways. First (if the fruit is not very large and/or it does not have a tail):
- cut off the top third horizontally;
- scrape out the false pulp and seeds;
- taking a gap from the edge, pierce the pumpkin with sticks crosswise, right through the walls - so that the ends of the sticks stick out of the pumpkin;
- Attach ropes to the outer ends of the sticks;
- tie them to a horizontal tree branch or other suitable support;
- fill with food.
Second (if the pumpkin has a strong and long tail):
- make two large holes approximately in the middle on different sides of the fruit;
- remove pulp and seeds;
- tie the rope tightly to the ponytail;
- attach to height.
Video: pumpkin feeder
Feeder "string bag"
Freezing feeding method:
- pour seeds, cereals, berries with rendered lard (or interior fat, or peanut butter);
- form a large lump;
- freeze it until hard (put it in a bag and in the freezer);
- remove the bag and put the resulting product in a string bag (a small mesh bag).
Metal mesh feeder
It is done in almost the same way as the “string bag”, but there are some differences. So, the food does not need to be sealed with fat; you can take it in bulk. Here is an example of an interesting mesh feeder.
Required:
- well-bending mesh (plastic or stainless steel);
Important! Select the size of the cells so that the food does not spill out, but the birds can easily get it.
- 2 plastic saucers (pallets from under flower pots are suitable) - this is the bottom and the lid;
- rope;
- construction screeds.
Manufacturing:
- roll a cylinder from the mesh and fasten it with ties;
- make 4 holes in the saucers along the edges;
- attach the bottom to the cylinder with ties;
- pour in food;
- make a hole in the middle in the roof;
- secure a rope there (you will use it to hang the feeder);
- We attach the roof with ties.
Plywood feeder
The most durable and durable option, but also the most complex.
You will need:
- sheets of plywood (with water-repellent impregnation);
- 4 durable slats (optional);
- saw;
- nails/screws;
- hammer/screwdriver.
There are many schemes for construction, so we will give only general principles. The feeding house consists of:
- bottom/floor where bird food will be poured;
- roofs that protect from precipitation (horizontal or sloping);
- 4 supports connecting the bottom and roof (or two opposite walls, then supports are not needed);
- low sides so that the food does not spill out.
The final appearance of the finished structure depends only on your imagination and skills. We recommend that you make a drawing with dimensions before starting and cut the material based on it.
Such a feeder can be placed on a post, railing of the house, or hung on thick branches.
Video: bird feeder made of plywood
Wooden feeder
A bird canteen made of wood differs from a similar one made of plywood only in its greater weight, which should be taken into account when placing it. Also, if the boards are not impregnated, they should be varnished for durability. However, there is another option - a log feeder. It should be 25-30 centimeters in diameter and about half a meter in length. To make a feeder out of it, you need:
- the log itself;
- rope;
- axe;
- strength, skill and patience.
The process itself is simple, but lengthy - an oval depression is hollowed out with an ax. Depending on its size, the feeder is placed with the recess to the side (if it is large), then a roof is formed, or upward (then the roof can be built from boards and slats). Due to its large weight, such a structure can only be placed on strong supports (pillars, ceilings).
Did you know?If you live in a private house with a garden plot, you can get practical benefits from the feeder - birds that are accustomed to flying to you for food may well begin to nest nearby, and as the weather warms up, they will rid your garden and vegetable garden of pests.
Video: how to make a bird feeder
You need to fill the feeder with food suitable for the birds so as not to harm them. Under no circumstances should you put:
- Bread and any baked goods (cookies, bagels, muffins). They are difficult to digest, but do not give strength.
- Salty, peppery, spicy. Chips, snacks, and any human food are not a suitable option.
- Rancid, moldy, spoiled cereals.
Optimal composition of fertilizing:
- Sunflower seeds (raw, no salt). They contain a lot of healthy vegetable fats and are suitable for almost all wintering birds.
- Cereals: wheat, oats, millet. They like to eat granivores (for example, sparrows).
- Lard and/or meat (unsalted). Tits and woodpeckers peck him with pleasure.
- Dried berries (hawthorn, rowan, viburnum). They prefer bullfinches.
- If you prepare in advance, you can diversify the bird's menu with maple and ash seeds, cones, nuts and acorns.
Important! The feeder needs to be cleaned from time to time. Since birds shit in the same places they eat, this will quickly lead to unsanitary conditions that can become a source of infections.
As you can see, by spending a little extra materials and your time, you will help the birds survive the winter. Get closer to nature.